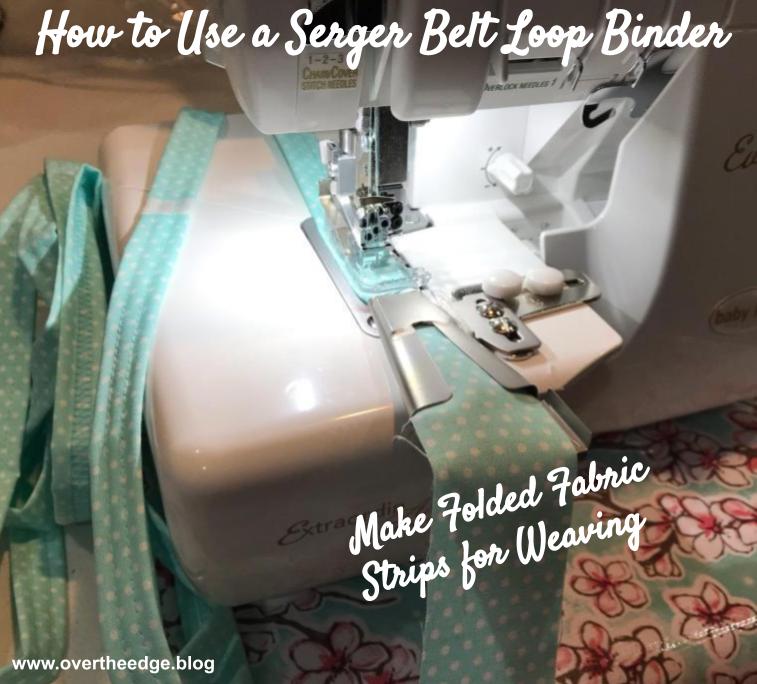
Learn how to use a serger belt loop binder to make folded fabric strips for weaving. The instructions are written for a Baby Lock serger and belt loop binder attachment. In addition to this tutorial, I have also created a video to show you how to use a serger belt loop binder, which you can find near the end of the tutorial.


Set up Serger for Coverstitch
Using the instructions for your serger, set up for a coverstitch wide, triple coverstitch or narrow coverstitch. I prefer the wide or triple coverstitch for the 1.5” belt loop binder. The 1.5” belt loop binder will create folded fabric strips that are about ¾” wide. If you would like narrower fabric strips for weaving, use the ¾” belt loop binder instead. The ¾” belt loop binder will yield folded fabric strips that are about ⅜” wide. I used a stitch length of 3 for my samples. The standard presser foot will work, but a clear foot is better. With a clear foot it is easy to see that the stitching is centered on your folded fabric strip. Other presser feet can also be used with the belt loop binder.
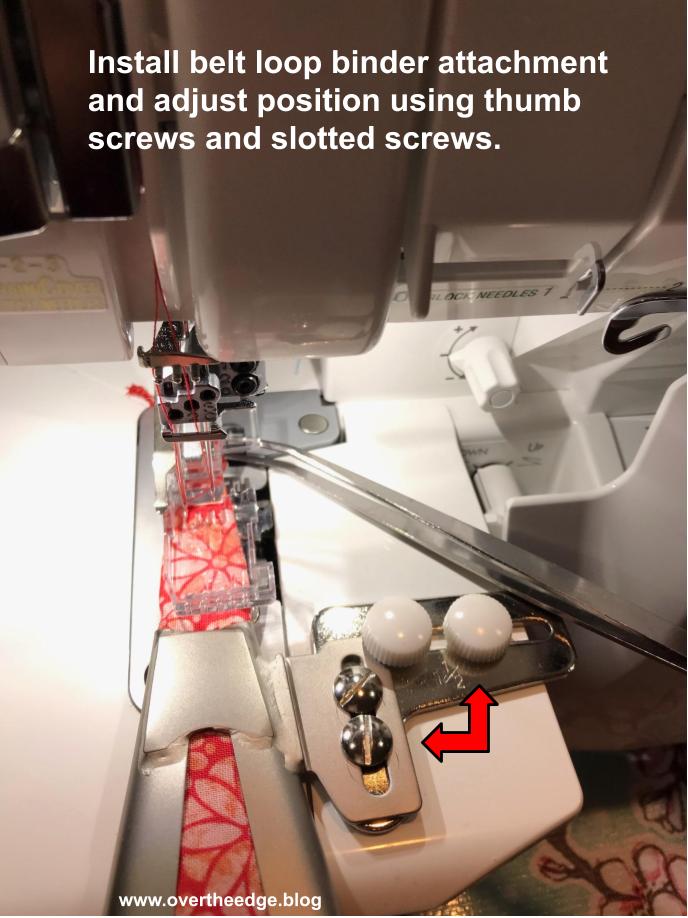
How to Install and Align the Baby Lock Belt Loop Binder
The belt loop binder attaches to the cover stitch sewing table of the serger using two white thumb screws. Use both screws to hold the attachment firmly in position. You will need to adjust the position of the binder so that the needles are centered on your fabric strip. This adjustment is made by moving the binder side to side then tightening the two white thumb screws. You can use the markings on the toe of foot to help you determine the locations of the needles.
Tip: Take a permanent marker and highlight the needle markings on the toe of your presser foot to make them easier to see. Also, measure across the tip of your belt loop binder and make a dot at the center using a permanent marker. It’s much easier to center the belt loop binder by aligning the markings than trying to eyeball where the center is!
Depending on what presser foot you use, you may need to move the binder forward or backward using the slotted screws. The attachment should be close to the foot, but not touching it.
Run a test strip and make adjustments as needed. Refer to sections on cutting and inserting fabric strips into binder.

Cut Fabric Strips
Follow the instructions for your belt loop binder for cutting the width of your fabric strips. My instructions for the 1.5” serger belt loop binder say to cut the fabric strips at 1⅝” wide. However, since weaving is done in straight lines, you can cut your fabric strips on the cross grain (selvage to selvage) instead of on the bias. I find it much easier to cut cross grain strips of fabric than bias strips.

How to Insert Fabric into the Serger Belt Loop Binder
Cut your fabric strip into a point (kind of like an arrow). Insert it into the attachment right side up. Use your tweezers to push it through the attachment using the slot on top. When the fabric comes out the end of the binder, use your tweezers to grab the fabric and pull the strip under the foot behind the needles. I find it easiest to position the strip under the presser foot with tweezers from the left side. Lower your presser foot and take the first few stitches by hand. Begin serging, guiding your cut fabric strip through the attachment. Keep the strip centered as it feeds into the binder so that the edges of the fabric get folded under evenly.


Joining Strips for Continuous Serging
When you get near the end of a strip, stop serging. Place the next strip under the previous strip in the attachment and continue serging. The new strip will get pulled into the attachment by the previous strip. You may need to use your tweezers to gently push the new strip into the attachment until it advances on its own. This method of serging the strips is like “chain piecing” in quilting. It is much faster chain piecing than serging each strip indiviually. Once you get the attachment set up, serging the strips goes really quickly. This attachment does almost all the work for you! With a little practice you will be able to crank out a ton of strips in no time!
You will end up with an obvious “raw edge join” between the strips when you chain piece. This isn’t a problem for weaving, since you cut your strips into many different lengths. If you need a long continuous strip of fabric without exposed raw edges you will need to join the pieces as if you were making quilt binding, before inserting into the belt loop binder.


Fabric Width Adjustments
My instructions say to cut 1⅝” wide strips for the 1.5” binder and ⅞” wide strips for the ¾” binder. You may need to adjust this based on your fabric. Take a look at your sample. If your fabric is not meeting in the middle on the back side, or not getting caught in the loop stitches on the back, you may need to cut it a little wider. Only make changes by ⅛” at a time and test.

Video – How to Use a Serger Belt Loop Binder to Make Folded Fabric Strips for Weaving
If you’d like to see the serger belt loop binder in action, please check out my YouTube video, How to Use a Serger Belt Loop Binder.
Inspiration for Fabric Strip Weaving
Check out my blog post on Triaxial Weaving with a Serger Belt Loop Binder for photos of projects and links to helpful websites and videos about fabric strip weaving.


Hope you enjoyed learning how to use a serger belt loop binder to create folded fabric strips for weaving!

Resources
Baby Lock YouTube videos on serger belt loop binders
The 1.5″ Belt Loop Binder https://youtu.be/i78xzvOVjSo
The 3/4″ Belt Loop Binder https://youtu.be/8L9wpwOgZbY