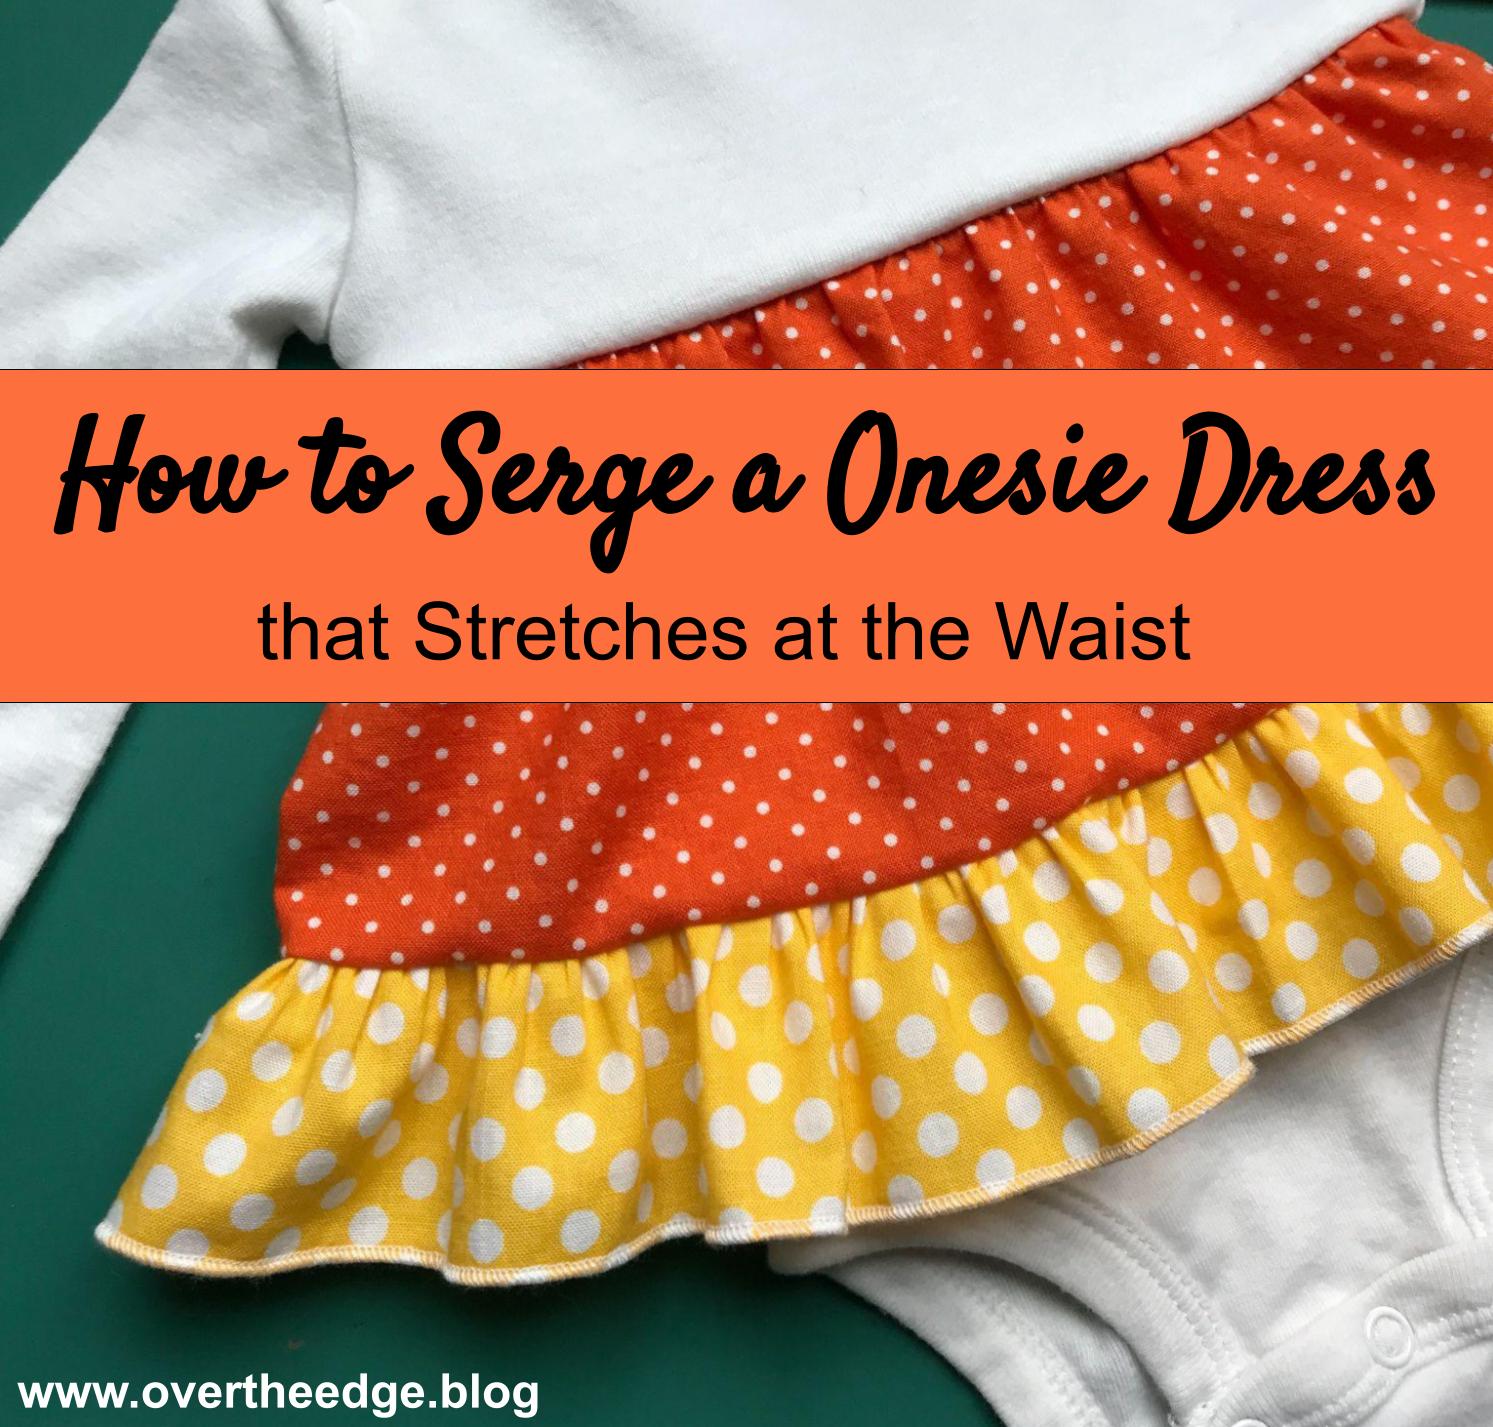

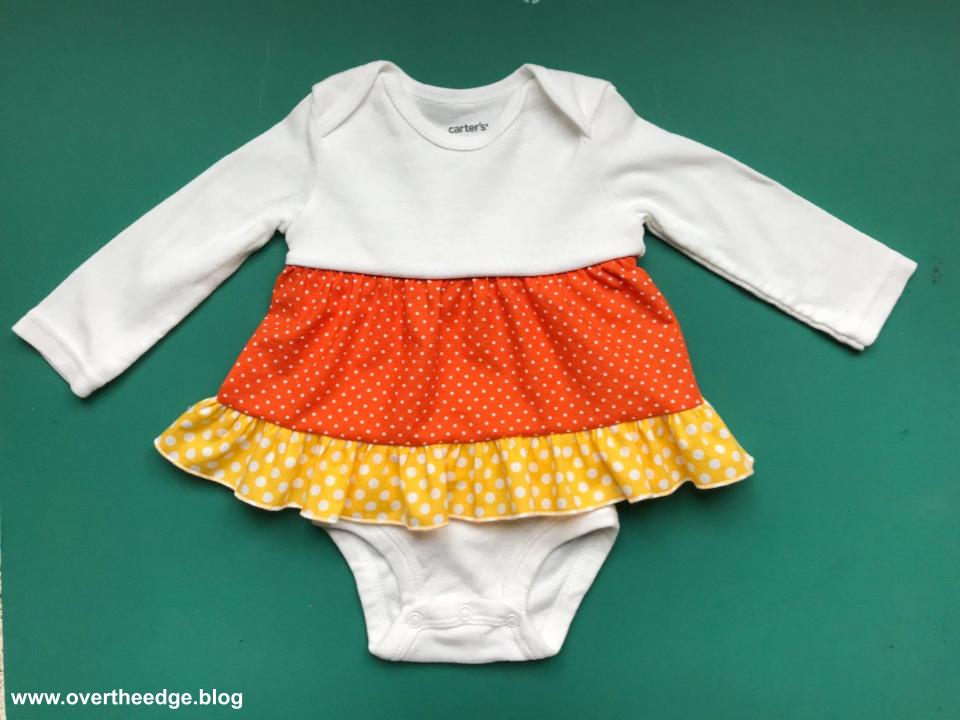
Surfing the internet one day, I stumbled across a photo of a cute little girl’s dress that reminded me of candy corn. Right then I knew my baby granddaughter needed her own version of that dress. Instead of a regular dress though, it needed to be a onesie dress. Onesies are the perfect base for a baby dress or shirt because they stay tucked in and don’t ride up and expose little belly buttons! And of course, I had to use my serger to make it. After a little experimentation I figured out how to serge a onesie dress that stretches at the waist. This blog post is a summary of my process. In the future I plan to create more detailed instructions for this style onesie dress using several different serger techniques. So stay tuned!
The Typical T-Shirt or Onesie Dress
There are many great tutorials on the internet for making cute onesie and t-shirt dresses. The typical method for creating a onesie or t-shirt dress is based on gathering a piece of cotton fabric with long basting stitches and then stitching the gathered fabric to the t-shirt or onesie. I’ve made t-shirt dresses like this before, but I’ve found that the woven fabric skirt limits the stretch of the waist seam. In the previous dresses I’ve made, the waist seam stretches very little or not at all. If the t-shirt is loose and baggy there is usually enough wiggle room to get the dress on a child without popping seams, even if the seam doesn’t stretch. But with a close fitting onesie, it’s really difficult to get it on a baby if the fabric at the waist doesn’t stretch.
How to Serge a Onesie Dress that Stretches at the Waist
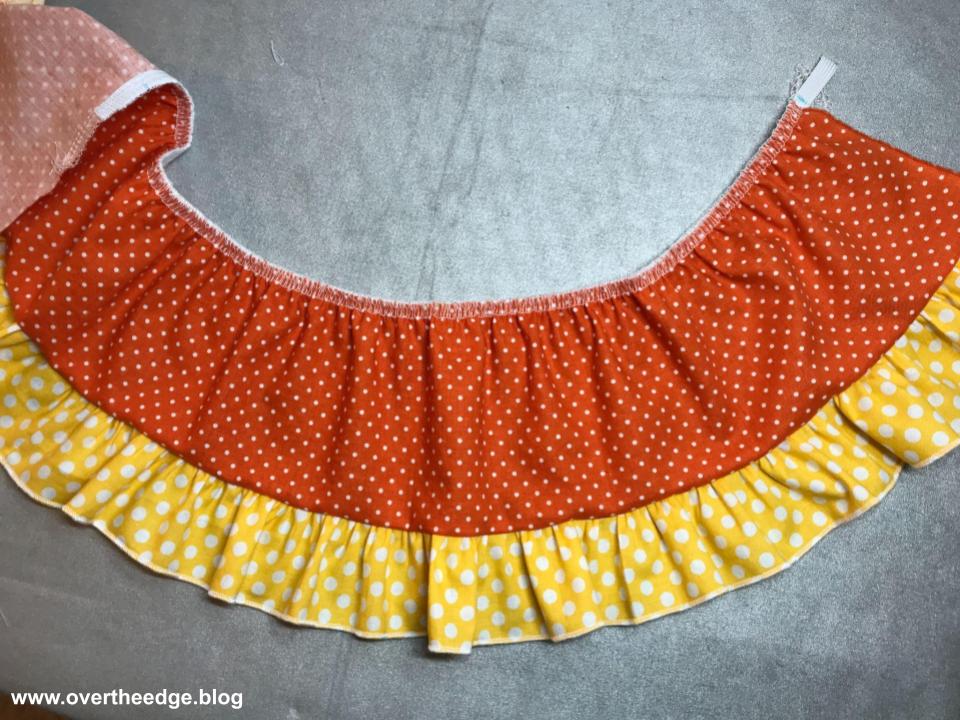
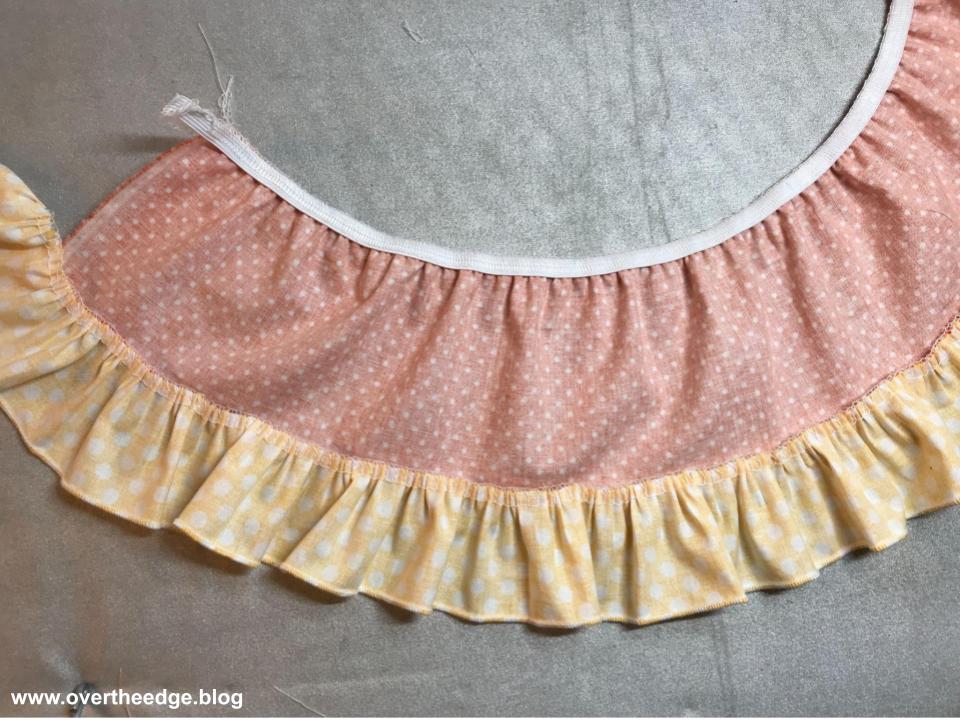
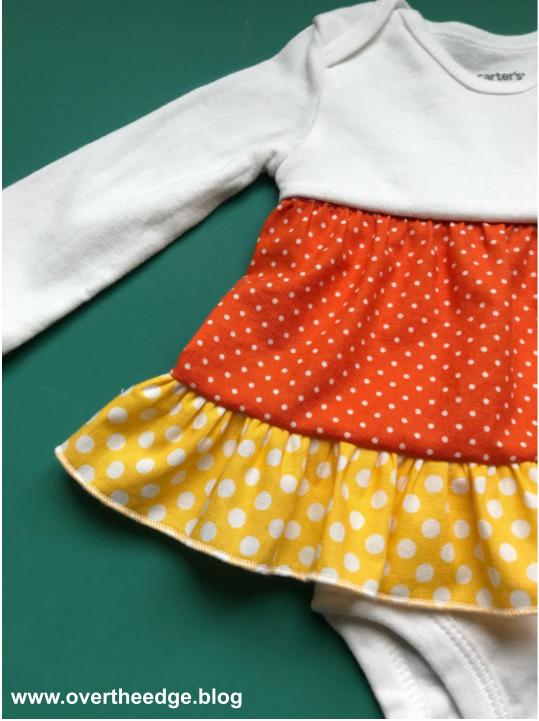
To create my candy corn skirted onesie I wanted to use a couple of cute woven cotton polka dot prints. So I had to figure out a way to add a skirt to my onesie without losing the stretch around the waist. I decided the best way for me to do this was to use my serger, along with an elastic foot to gather the top edge of the skirt using elastic.

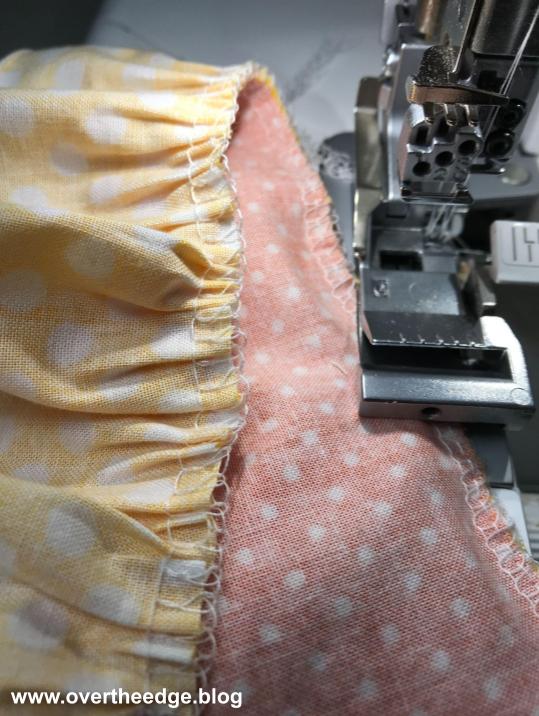
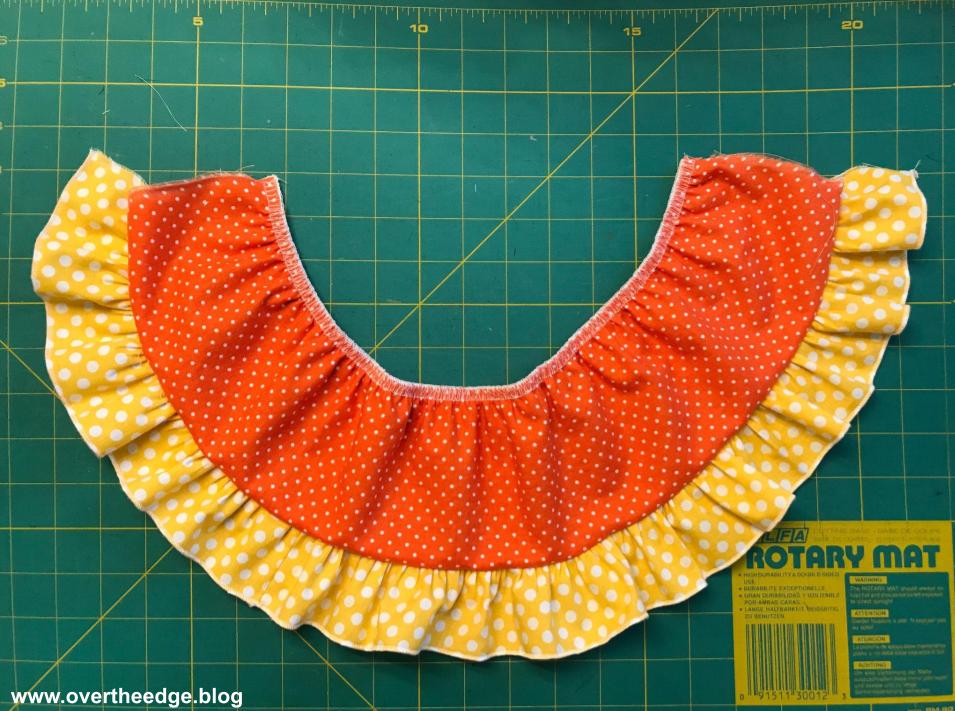
I also used a ruffling foot to simultaneously gather and attach the bottom ruffle to the skirt.
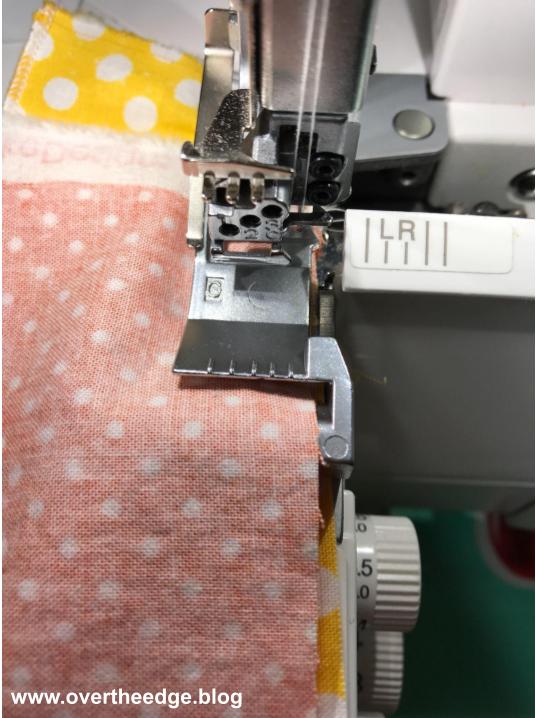
The ruffling foot and elastic foot are presser feet that help you gather fabric or attach elastic to fabric. You can gather fabric or attach elastic to fabric using a serger without these specialty feet. The feet just make the process quicker and more professional looking.
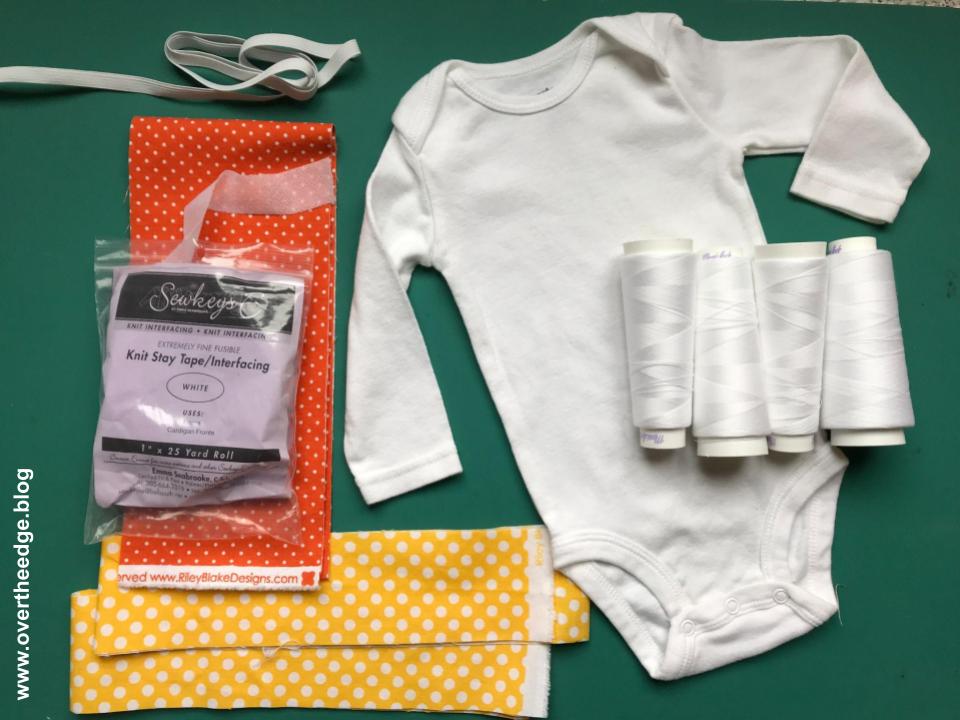
Supplies
- Baby onesie – I used size 6 month long sleeved by Carters
- 4½” x 45” wide cotton print fabric for main skirt
- Two – 2½” x 45” wide strips of cotton print fabric for bottom ruffle
- ⅜” wide elastic – 2X the width of the onesie (where you will attach the skirt) plus 6”
- Serger thread for overlock and rolled hem stitches
- Optional – 1” thin fusible knit knit stay tape – 2 x the width of the onesie (it helps to stabilize the onesie where you cut it so the edges don’t stretch out as you handle/serge)
Supply Notes
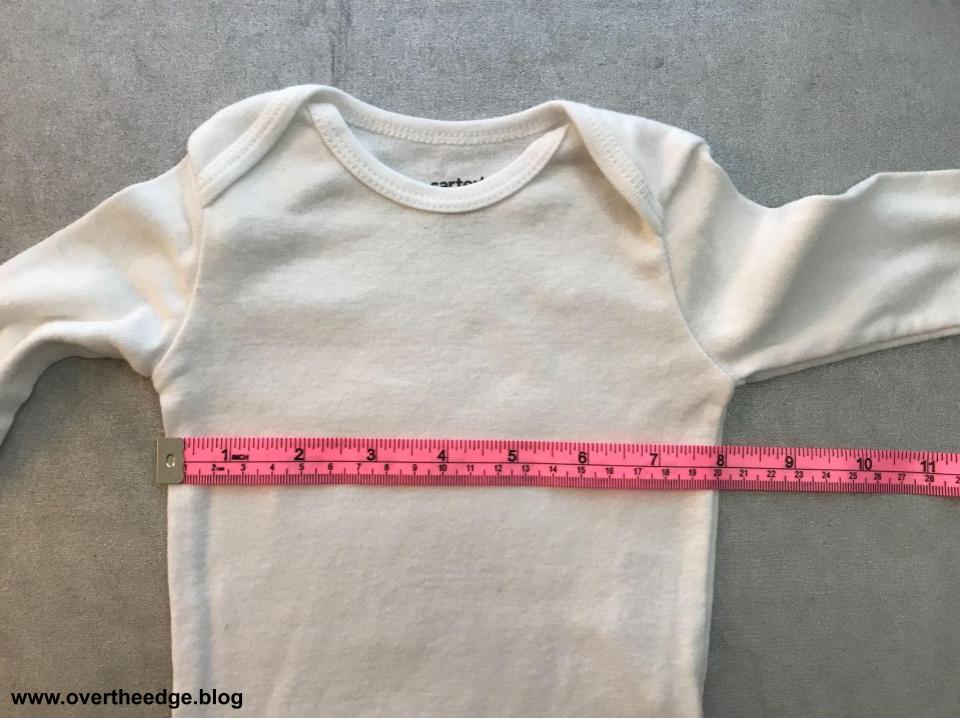
Since I added a seam at the waist, the onesie did get a little shorter (about ½-¾” shorter). Keep this in mind when selecting your onesie. You may need to select a onesie that is a little bit longer than the length you actually need.
I made the skirt on the onesie shorter so the onesie looked more like a skirted shirt than a dress. I wanted more of a shirt that she could wear with pants. Feel free to make your skirts any length you desire.
Tools
- Serger capable of 4 thread overlock and 3 thread rolled hem
- Elastic foot for serger – helpful, but not required
- Ruffling/gathering foot for serger – helpful, but not required
- Serger accessories and manual
- General sewing supplies
- Sewing machine for basting (optional)
Summary of Steps
The steps below are a summary of the steps I took to make my “Candy Corn Skirted Onesie” for the blog post “How to Serge a Onesie Dress that Stretches at the Waist.” This style onesie consists of cutting apart the onesie and inserting a gathered skirt.
Step 1: Seam the Bottom Ruffle
I used a narrow three thread overlock stitch to seam my two bottom ruffle pieces together into one long strip.
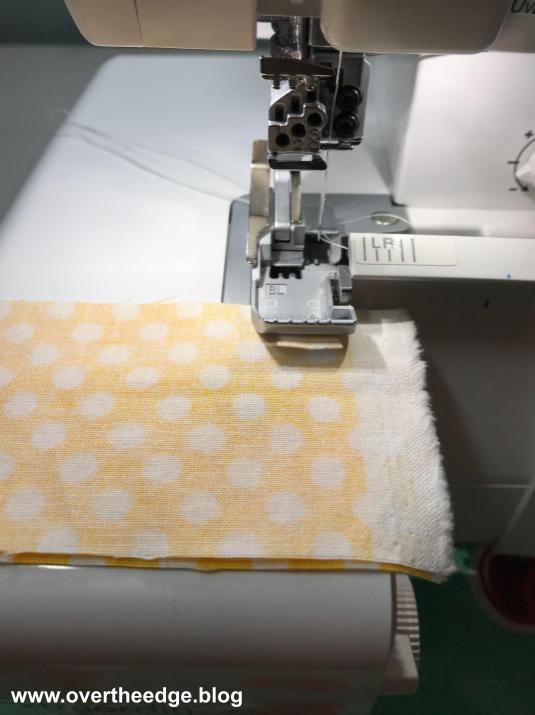
Step 2: Finish Bottom Edge of Ruffle
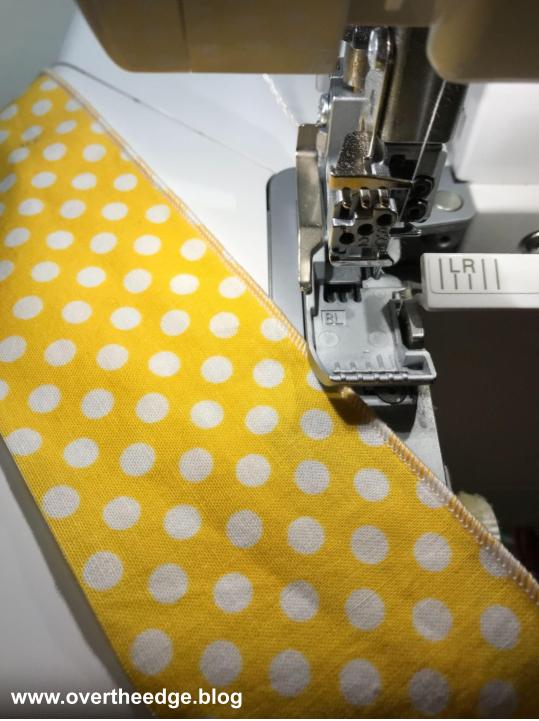
Next I used a three thread rolled hem stitch on my serger to finish the bottom edge of my long ruffle strip.
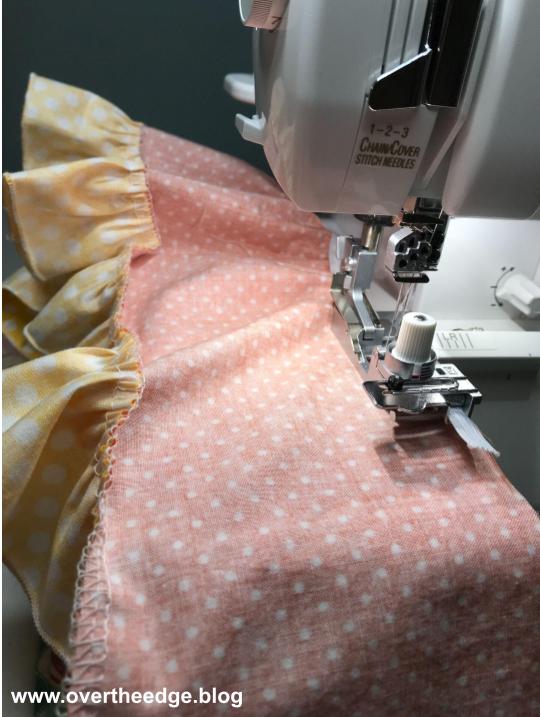
Step 3: Gather Bottom Ruffle and Attach to Main Skirt
I simultaneously gathered my bottom ruffle and attached it to the main skirt piece using the ruffling foot for my serger.

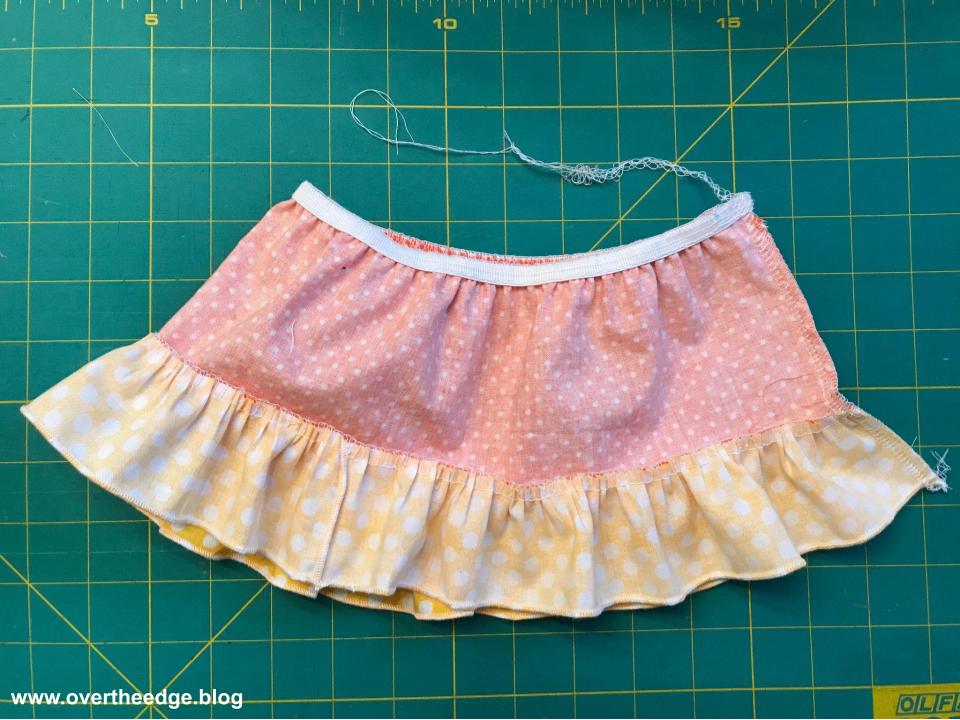
Step 4: Gather Top Edge of Skirt Using Elastic
I used my elastic foot and elastic to gather the top edge of the skirt fabric. There are many variables that determine how much fabric will be gathered to the elastic using an elastic foot – things such as the type of fabric, the type of elastic, how the fabric is guided into the foot, etc. Because of these variables I factored in a some wiggle room and used a little more fabric than I actually needed for the skirt. Because I could easily cut it to size in a future step (step 6). It’s much harder to add fabric than to take it away!


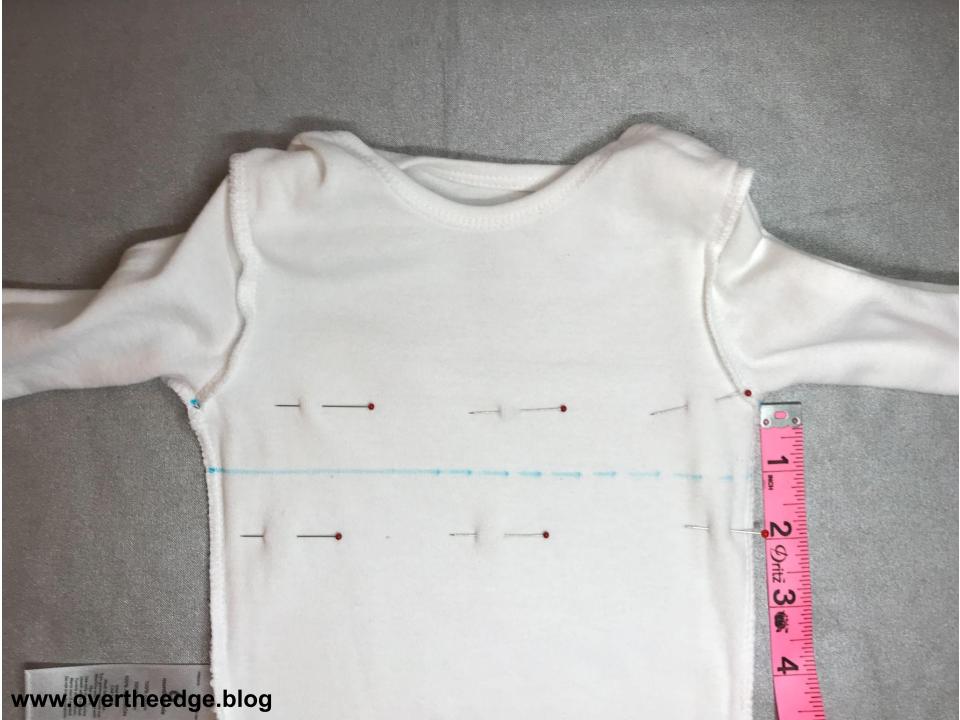
Step 5: Prepare Onesie
I measured down 1” from the armpits and marked a line across the front and back of the onesie. I also added a fusible knit stay tape over the cutting line to add stability to the future cut edges at the waist. Then I cut the onesie apart at the line.

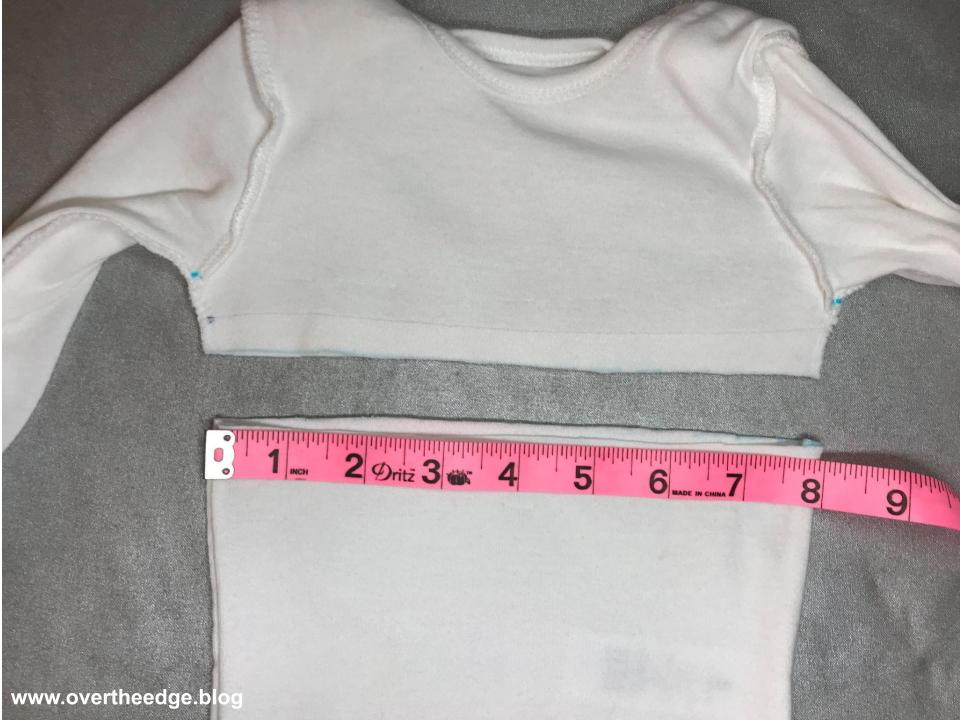
Step 6: Prepare Skirt for Attaching
I measured the cut edge of my onesie and cut my elastic gathered skirt piece to match (2X this measurement plus 3/4” for seam allowances.)
I serged the short edges of the skirt seam together using a standard four thread overlock stitch.


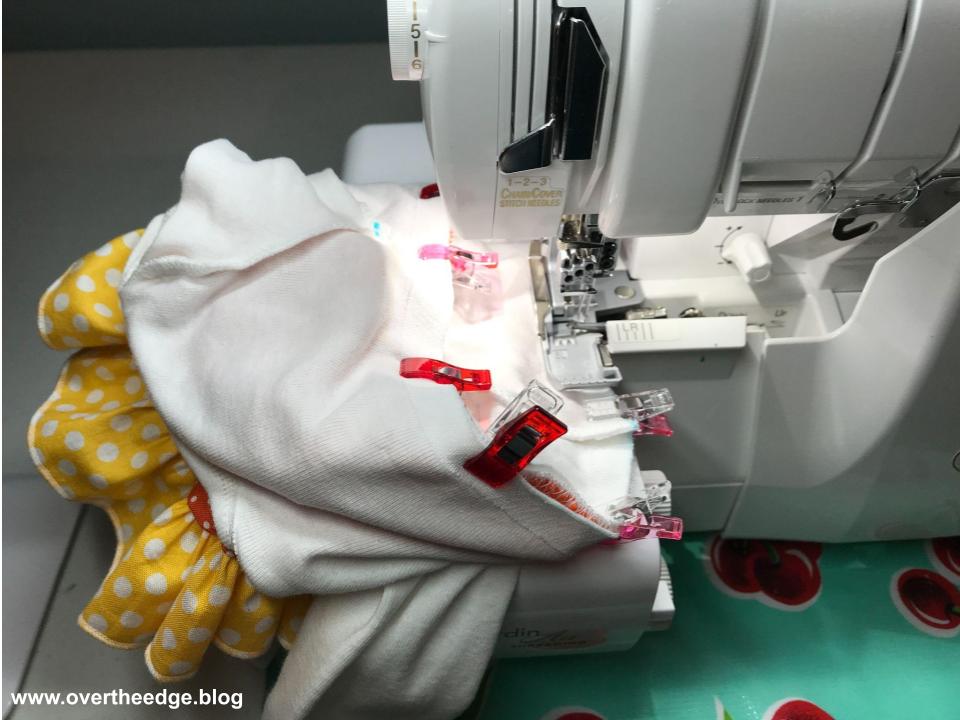
Step 7: Insert Skirt and Serge Waist Seam
I placed the wrong side of the skirt against the right side of the bottom half of the onesie, lining up the raw edges. Using my sewing machine, I basted the skirt to the onesie bottom.

Then I placed the right side of the top half of the onesie against the right side of the skirt, lining up the raw edges of all three pieces (the top half of the onesie, the skirt, the bottom half of the onesie.)
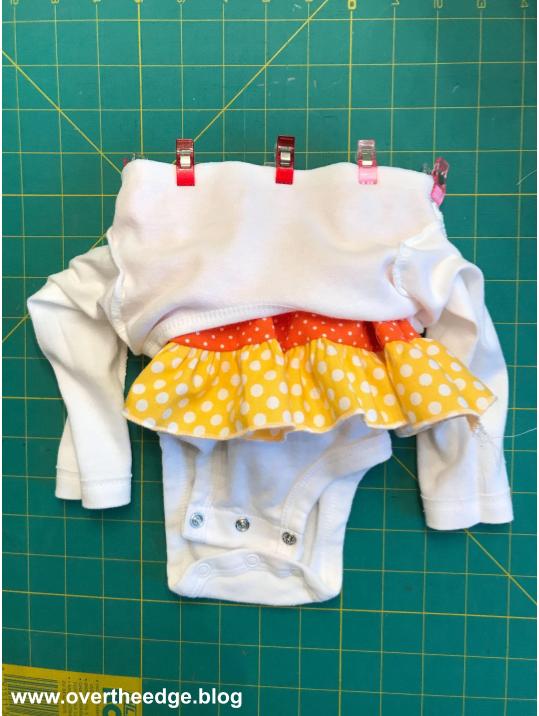
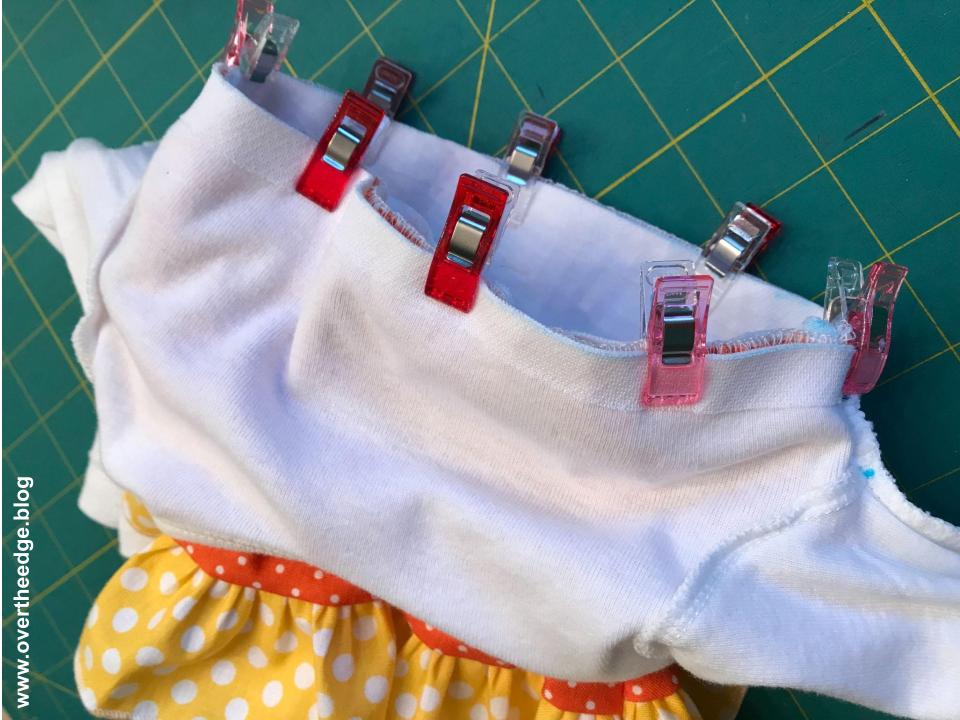
Next, using a standard four thread overlock stitch, I serged all the way around the waist seam.
And that is how I created a fun and functional serger onesie dress that stretches at the waist. But I wasn’t quite done yet. There were a few more things I needed to do.
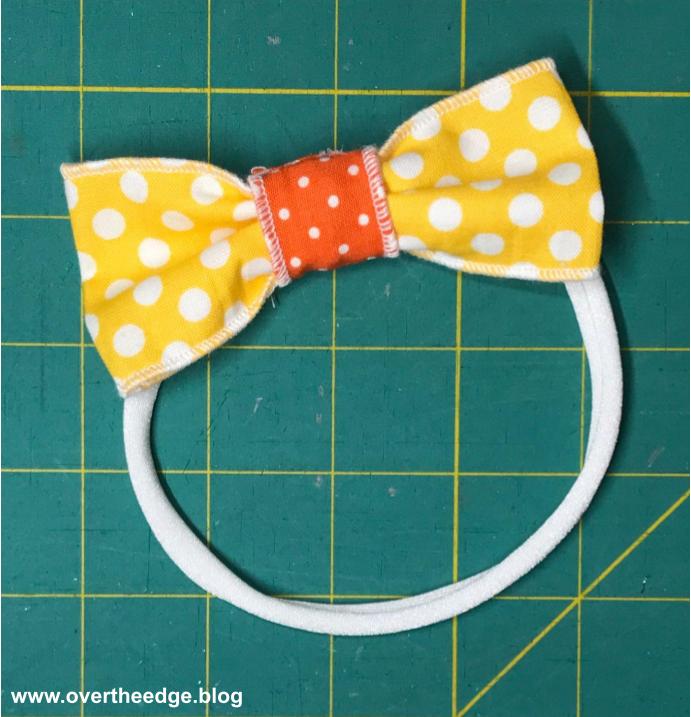
Step 8 – Make a Matching Hair Bow
I took the scraps of fabric leftover from the skirt and made a matching hair bow.
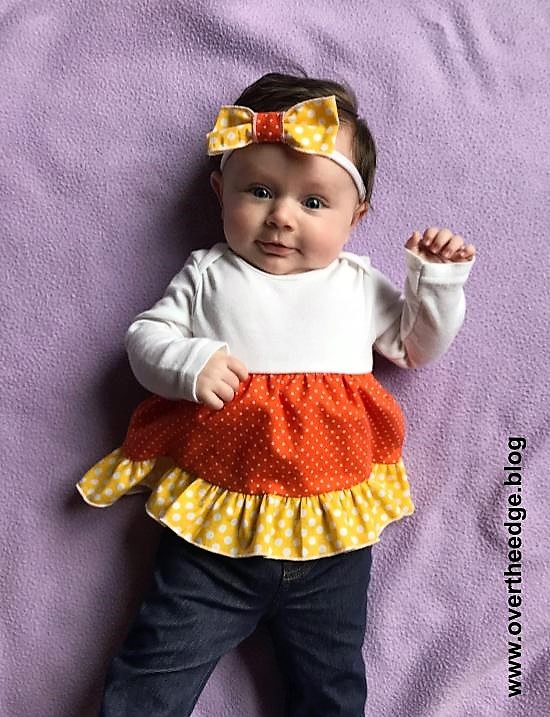
Step 9 – Find a Model and Take Photographs
Isn’t my model cute?!!! I call her my Candy Corn Cutie. The candy corn skirted onesie is the perfect outfit for my granddaughter to wear this October!

How to Serge a Onesie Dress that Stretches at the Waist
I hope you enjoyed my post about How to Serge a Onesie Dress that Stretches at the Waist.

Resources
https://youtu.be/tph4RpcBnvU – Baby Lock Accessory Spotlight: Serger Elastic Foot Video
https://youtu.be/2o2yzjJxuo8 – Baby Lock Accessory Spotlight: Serger Ruffling Foot Video
https://overtheedge.blog/how-to-serge-a-lettuce-hem/ – Another onesie refashion project
First of all…the outfit is adorable especially with the sweet model wearing it! Thank you for the clear directions and tutorial. I can see that there are many ways that the techniques can be used in other projects. This is a great addition to your blog. Thank you for sharing your skills.
You are very welcome! And you are right about the techniques being able to be used in other projects. I have several more projects using these techniques that I will share on my blog in the near future. :)