Month: February 2020

HIS & HERS Serger Pillowcases

A serger pillowcase is a great beginner project for those new to serging. In the classes I teach, I always encourage my beginning sergists to start with a simple project that they already know how to sew.  An easy project allows them to focus on learning the serger without also having to figure out the project. Sewing doesn’t get much easier than a few straight seams and a couple of pieces.  If you sew, you have most likely made a pillowcase using a sewing machine. So why not try to make one with your serger?  

I developed these instructions for HIS & HERS Serger Pillowcases to be used in my beginning serger classes.  Although there are many different ways to construct a pillowcase, I feel that this is the easiest way to make them on a serger.  Both pillowcases fit standard size bed pillows and are made completely with a serger – no sewing machine required. 

The HIS Pillowcase

The HIS Pillowcase

The HIS Pillowcase is very simple and should be done before the HERS Pillowcase if you are new to serging. Only two pieces of fabric are used for this pillowcase – the main body and the cuff.  After setting your serger up for a 4 thread overlock stitch, all you need to do is serge straight seams, wrap a corner, and secure your seams at the beginning and end. These skills are the first ones we practice in my Serger SOS class after getting our sergers threaded.  (SOS stands for Serge On Successfully.) There is always a little more to learn when you switch from practicing on a small scrap of fabric to incorporating the skills into an actual project.

The HERS Pillowcase

The HERS Pillowcase

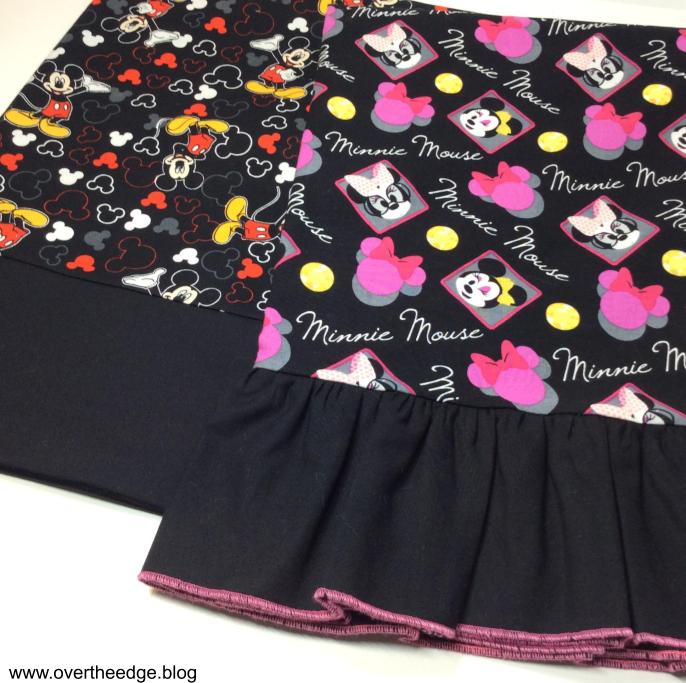
The HERS Pillowcase is a slightly dressed up version of the HIS Pillowcase but still simple enough for a beginner. In addition to the techniques used to construct the HIS Pillowcase, you also add a 3 thread rolled hem to the edge of the cuff and gather the cuff with your serger. Only three pieces of fabric are used in this pillowcase – the main body of the pillowcase and two pieces for the ruffled cuff. 

Link to My Tutorial

Below you will find the link to my full tutorial on the HIS & HERS Serger Pillowcases.  Included are tips on how to wrap corner seams for perfect corners and how to adjust serger gathers.

Serger Roses

I love making fabric flowers, especially when I can use my serger! Serger roses are just gorgeous when you begin with a beautiful satin fabric and some fun decorative thread. A typical way to finish the raw edges of the satin with a serger would be to use the 3 thread rolled hem or the 3 or 4 thread overlock stitch, which would work well. However, for these roses I chose to use the 8 thread stitch on my Babylock Evolution to really emphasize the edges of my rose petals.

How to Make a Serger Rose

Here is what you need to make a serger rose like mine:

  • 3″ wide by 58″ long strip of satin fabric
  • 8 spools of machine embroidery thread (or as needed for your desired stitch)
  • 3″ square of felt for the backing
  • heavy duty hand sewing thread for finishing the rose
  • hand sewing needle
  • 2″x44″ long strip of poster board to use a folding template
  • iron and ironing board
  • serger, set up for an 8 thread stitch (or your desired stitch)
  • a few wonder clips
  • hot glue gun and glue sticks

Step 1: Serge

Begin by serging both raw edges of the fabric strip from the right side. Trim off just a little of the raw edge with your blade so you have a nice neat edge to your rose.

Step 2: Fold Strip Around Template

Draw a 45 degree line near both ends of your poster board strip, and one near the center. These lines serve as guidelines to help you fold your strip at the proper angle to create your rose “petals”. With right side showing, begin at one end and wrap your fabric strip around the template until you have wrapped it all. You can use a wonder clip to hold the ends and keep the strip from slipping off the template. See photo below.

Step 3: Press Folded Strip and Remove from Template

Press one or both long sides of your folded strip while still on your poster board template. If you would like a crisp edged rose, press both sides. If you would like a softer edged rose, press only one long side. After strip has cooled, carefully slide out the poster board template, and orient the folds of the strip just like they looked with the template inside. See photo below.

Step 4: Gather Strip and Form Rose

Thread a hand sewing needle with heavy duty thread. Sew a running stitch along one long edge and up one short edge at the end of the strip. Gather up your rose as desired. I gathered my fabric strips to about 12” long and then formed the rose by wrapping the gathered strip around itself. After each turn I took a stitch to tack the layers together. I made a base for my rose from a piece of felt and I used hot glue to secure it. Cut the base large enough to cover your tacking stitches, but small enough not to be seen from the front of the rose.

Step 5: Add to a Project and Enjoy!

A serger rose would look equally beautiful on a garment, bag or home decor item.  I choose to create a gorgeous pillow from this textured silk fabric to showcase my roses. And yes, in case you are wondering, I used my serger to make the both the pillow cover and the tassel.

Resources

I was inspired to make serger roses by the book, Fun-to-Wear Fabric Flowers, by Elizabeth Helene Searle. My method is very similar to the one used in her book on page 57 to create the “grey folded rose”. Instead of using a piece of fabric with the raw edges folded in, I used my serger to embellish the edges with thread. And instead of free-hand folding the strip into 45 degree folds, I created my own folding template to make this task much easier.

What do you get when you combine serging with embroidery? Serge-Broidery!

Did you know that February is National Embroidery Month? I thought this would be the perfect time to share with you the sewing tote project I made using both my serger and my embroidery machine. I used the pattern “Serge-Broidery Sewing Tote” by Sue Overy Designs. https://sueoverydesigns.com/product/sewing-tote-serge-broidery/

About the Tote:

When I teach serger classes, I use this tote to carry my supplies.  It has an interior pocket that I use for patterns or fabric, and an outside clear vinyl pocket with a zipper that I use for accessories such as feet and tweezers. I really like being able to see my accessories through the clear vinyl pocket! The only part of the pattern I wasn’t crazy about was the bamboo handle. So I made a fabric handle instead. 

Machine Embroidered Details:

All of the embroidery designs I used on this tote were included with the pattern. I began by stitching the serger design near the center front of the tote. Then after finishing the flatlock piecing of the front panel, I embroidered the dress form applique on the front lower right corner. Finally, the needle was embroidered on the flap after chain stitching the “thread”.

Serger Details:

The tote features decorative thread and four serger stitches – flatlock, cover stitch, chain stitch and four thread overlock.

For my decorative thread, I chose metallic Madeira 12 wt. Glamour to give my serger stitches a little sparkle. Using a flatlock stitch, I pieced together the fabric for the front of the tote.  I installed the zipper on the clear vinyl pocket on the back using the cover stitch, along with a cording foot.  I also used the cover stitch in combination with the belt loop binder attachment to make the handle. The “thread” that goes through the needle on the flap is a clever use of the chain stitch.  The four thread overlock stitch was used to finish constructing the tote.

If you are interested in utilizing different stitches and techniques on your serger, this would be a good project for you.

Isn’t this project tote-ally cute!


Cozy Sweater Shirt – 100% Serger Made

I introduce to you, the cozy sweater shirt – 100% serger made – no sewing machine required. 

Because I love my serger, I am always looking for more ways to use it.  I wanted to make a top that could be completely constructed on my serger without the use of a sewing machine. When I saw Simplicity 8988, I knew that this pattern would be a great starting point for my cozy sweater shirt. The exposed seams down the center front and back were perfect for showcasing serger stitching with decorative thread.

How I Changed the Pattern to Serge my Cozy Sweater Shirt:

Simplicity 8988 was written for a sewing machine, but I easily adapted it for serger construction and embellishment utilizing both overlock and cover stitches. If your serger is not capable of chain stitch or cover stitch you could still make this cozy sweater shirt. You would just need to substitute your sewing machine for the steps that include chain stitch or cover stitch.

To adapt a pattern for serging, all you need to do is to group similar stitch types as much as possible. Most sewing patterns are not optimized for serger construction. If you follow the pattern as written, you will find yourself converting back and forth between serger stitches. For some sergers, this conversion can be a time consuming process. I feel very fortunate to own a Babylock Evolution serger because converting between stitch types is easy!

Four Thread Overlock:

I began by grouping all of the 4 thread overlock operations together. I serge finished the raw edges of the exposed seams and neck edges with decorative Madeira Lana thread.  The shoulder seams and the raw edges of the interior seams were serged with Maxilock Stretch thread. 

Chain Stitch:

Next I converted my serger to the chain stitch to sew the center front and back seams and the upper sleeve seams.

Wide Cover Stitch:

Then I switched to a wide cover stitch and stitched down the center of the exposed front and back seams and the upper sleeve seams.  The cover stitch helps to keep the seams partially open during wearing so the cool serger stitching always shows.

The wide cover stitch was also used for the bottom hem and the sleeve hems. I turned the hems to the inside and serged so that the looper thread showed on the right side of the top. These hems were finished before closing the side seams. It is much easier to cover stitch flat than in the round.

The belt loop binder attachment along with the wide cover stitch was used to make the ties.

Chain Stitch:

The last serger conversion was back to the chain stitch to sew up the side seams, finish the neck hem, and make the channels for the ties.  After inserting the ties, my cozy sweater shirt was ready to wear!

I hope this post inspired you to serge!

Theme: Overlay by Kaira Extra Text
Cape Town, South Africa