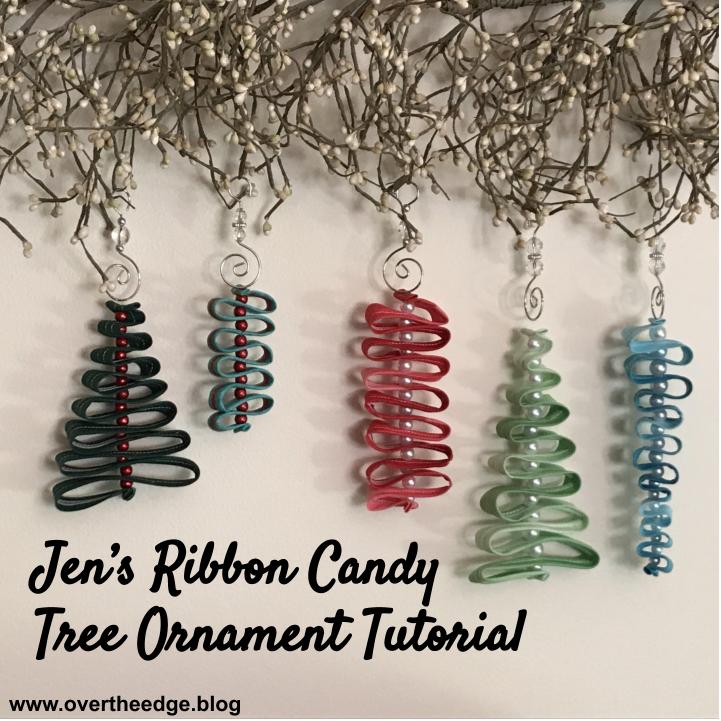
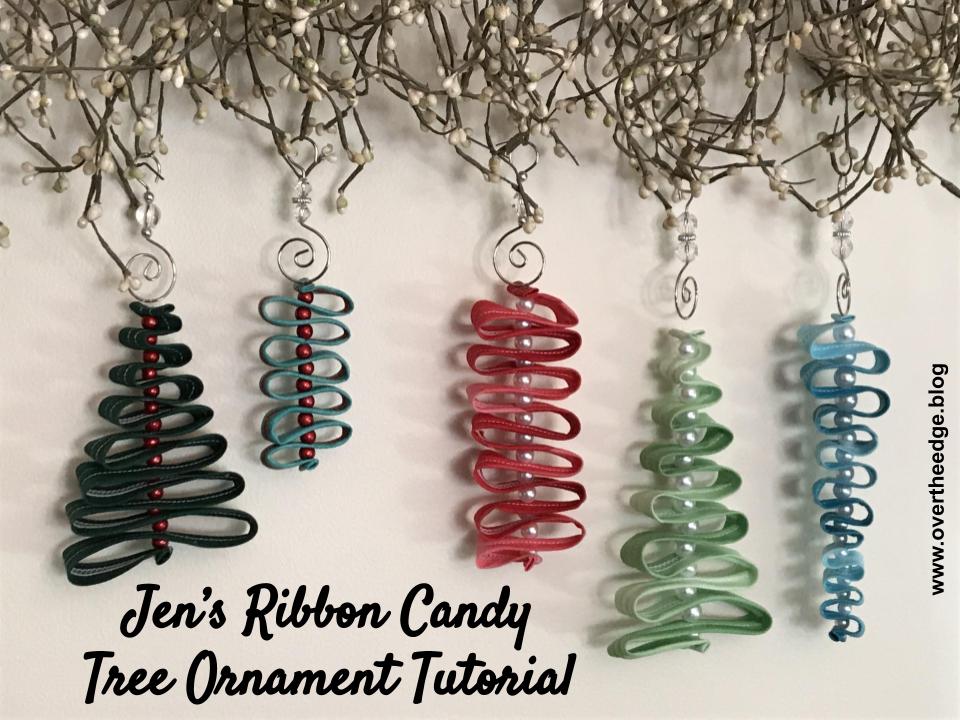
Jen’s Ribbon Candy Tree Ornament Tutorial for Sergers
I created this project tutorial to inspire others to do more with their sergers. In this Ribbon Candy Tree Ornament Tutorial I provide instructions for creating three different ornaments from serger made fabric ribbons. Fabric ribbon is a nickname I give to finished strips of fabric created with a serger belt loop binder or serger double fold bias binder. Of course, if you don’t have a serger, or if your serger doesn’t do coverstitch, or if you don’t have the attachments, you could always substitute fabric ribbons made with a sewing machine or actual purchased ribbon.
Please see my blog post on How to Make Tree Ornaments Using a Serger for tips and information that will help you create your own ribbon candy ornaments. Here is the link: https://overtheedge.blog/how-to-make-tree-ornaments-using-a-serger/
Step 1: Decide Which Serger Attachment to Use


No matter which serger attachment you choose to make your fabric ribbon, I have a tutorial to help you get set up. You will find the links to those tutorials in the Resources section at the bottom of this tutorial.
Note: The ornament instructions in this tutorial are based on using a ¾” wide finished belt loop fabric ribbon made with a 1.5″ serger belt loop binder.
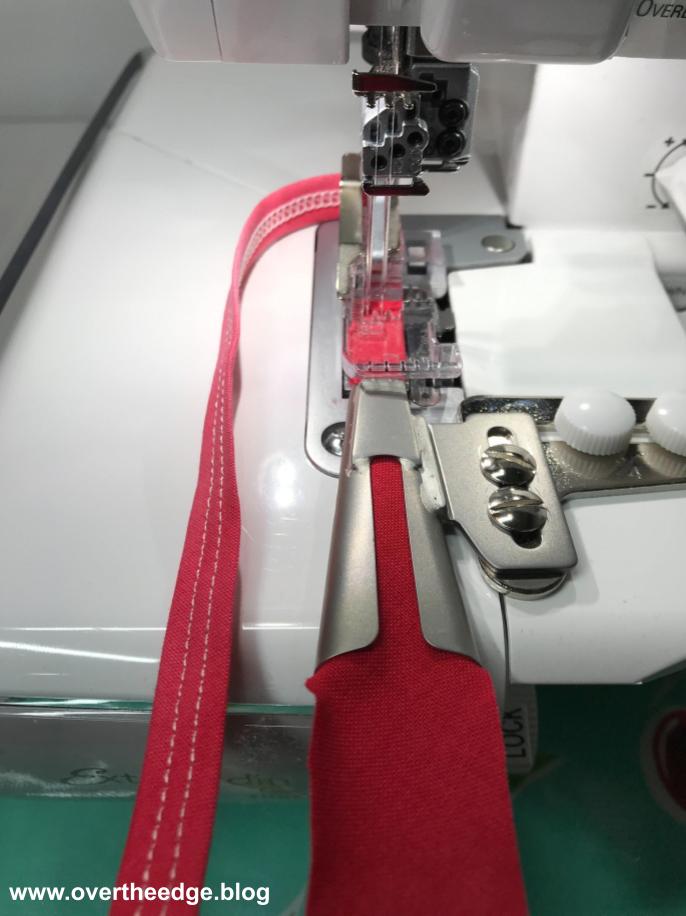
Step 2: Cut Out Your Fabric Strips

Make your bias or cross grain fabric strips according to the attachment you will be using. Be sure to test your choices until you are happy with the results. I recommend making more fabric strips than you think you will need. The Resource section at bottom of this tutorial has a link for making bias fabric strips. Cross grain strips are easy to cut – simply cut your fabric in a straight line from selvage to selvage.
Step 3: Make Your Finished Fabric Ribbons

Use your serger and selected attachment to turn your cut fabric strips into fabric ribbon.
My ornament instructions are based on using ¾” wide belt loop fabric made with the 1½” belt loop binder attachment. Each ornament uses between 27” – 37” of belt loop fabric ribbon.
Step 4: Make an Ornament
Make an ornament from the fabric ribbons you created with your serger. See the instructions below for creating three different designs – a tree, an icicle and a ribbon candy ornament. Be sure to read through all of the instructions before beginning to create. Feel free to modify the instructions to suit your needs. Get creative with different beads and fabric. Change the number or size of beads or spacing between loops to create an endless variety of ornaments.
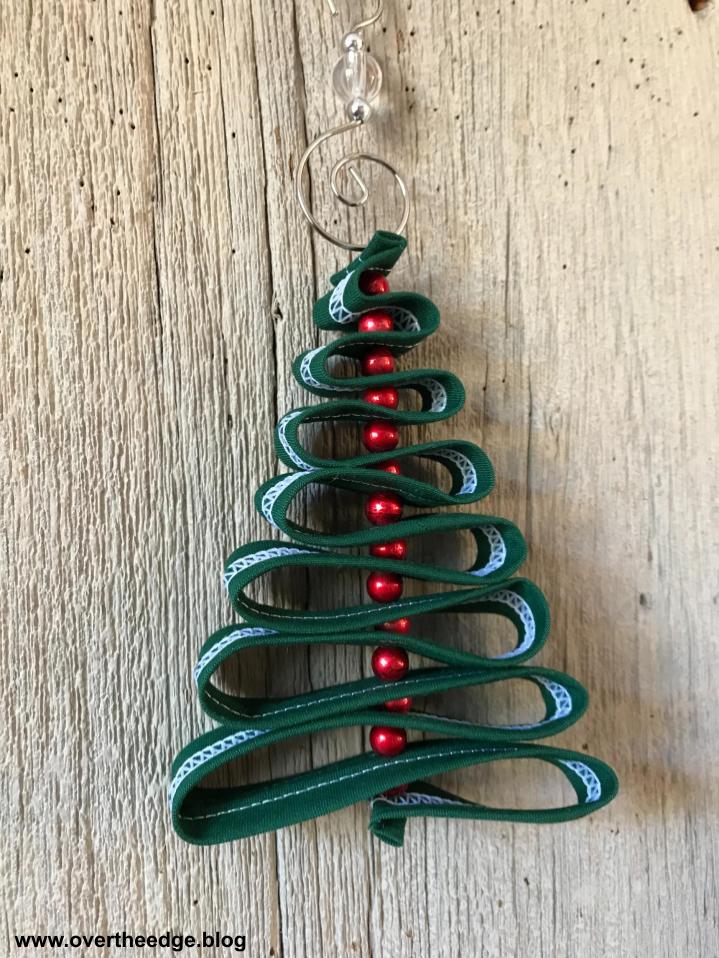
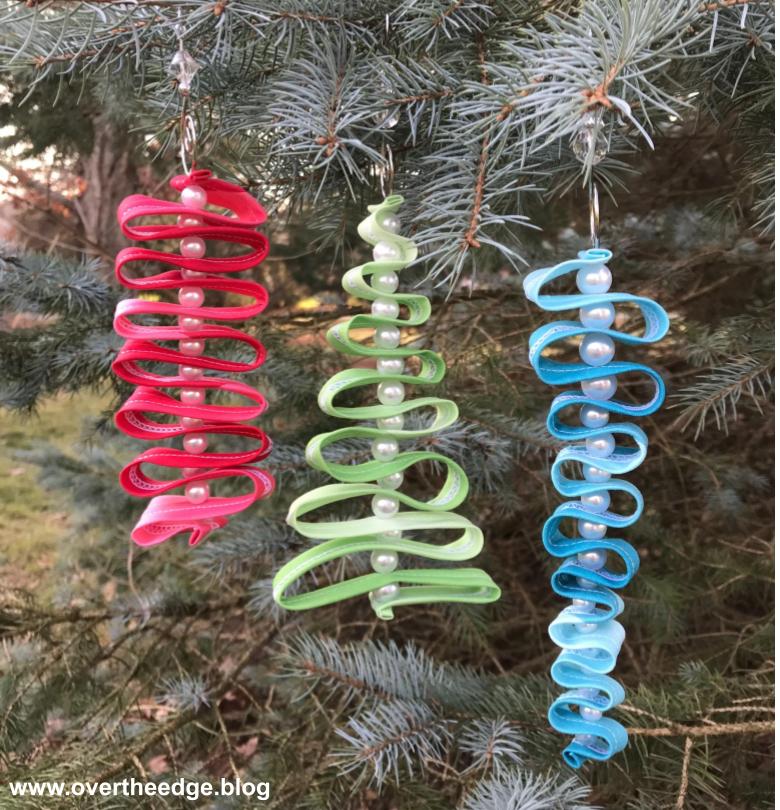
Jen’s Serger Belt Loop Tree Ornament

Tree ornament is approximately 6¾” tall, 3¾” wide and ¾” thick.
Supplies for One Tree:
- Fourteen 12 mm beads
- ¾” wide finished belt loop fabric ribbon at least 37” long
- Hand sewing needle
- 18” of fishing line or other strong thread (I used 8# test because that’s what I had)
- Fabric marking pen
- Ruler
- Ornament hanger if desired
Instructions
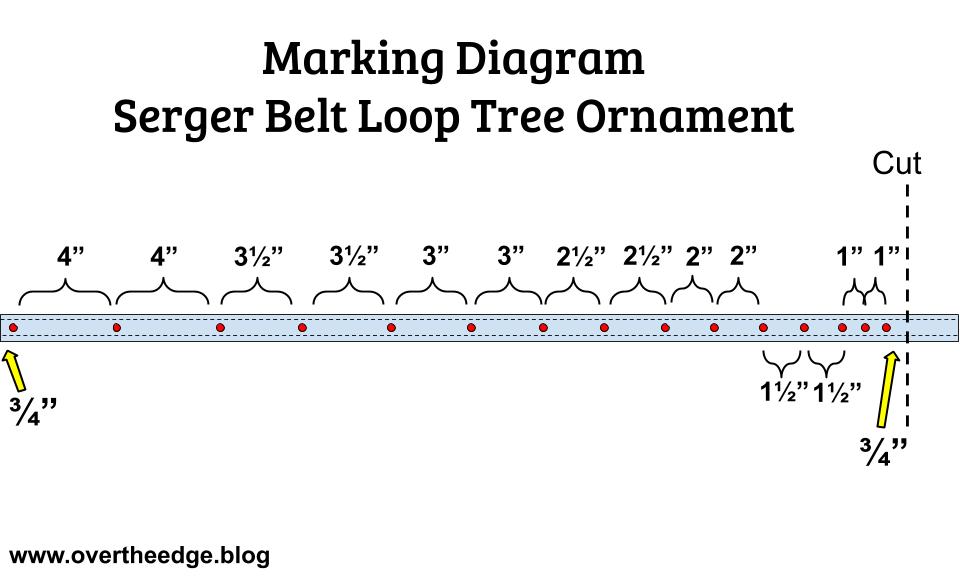
Mark Loop Placement
Layout your belt loop fabric ribbon with the needle stitching facing up. Use the fabric marking pen to make dots at all the locations shown in the Marking Diagram below. These marks will help you make nice even loops for all of your tree “branches”. Make your first mark ¾” from the left end in the center of the fabric ribbon. Then mark 4” from the first dot. Then continue making marks, at 4″, 3.5”, 3.5”, 3”, 3”, 2.5”, 2.5”, 2”, 2”, 1.5”, 1.5”, 1”, 1” and finally at ¾”. This last mark is where you need to trim the fabric strip. The dot marks will line up with the center of the trunk (beads) of the tree ornament.

String Beads and Belt Loop Fabric
Starting from the end with the marks spaced 4″ apart, make a 1/4” double fold at the raw edge. Fold it toward the side of the belt loop with the needle stitches. The first dot at ¾” from the end is where you insert the needle to get started. This is the bottom of the ornament. Take your needle and fishing line (thread) and tie a knot near the end of the fishing line. Insert the needle into the folded fabric and take a few stitches into these folds to secure. You will be working from the bottom of the ornament to the top. Add a bead to your fishing line. See photos below.


Then find the next mark on the belt loop strip. Insert your needle at that mark from the same side of the fabric ribbon that the needle just came out of at the last mark. Be sure not to twist the strip. You are basically folding the ribbon back and forth. Pull the needle through to create the first loop.

Then add another bead and insert your needle into the next mark on the belt loop strip just like you did before. Be sure not to twist the strip.

Continue adding beads and creating loops.
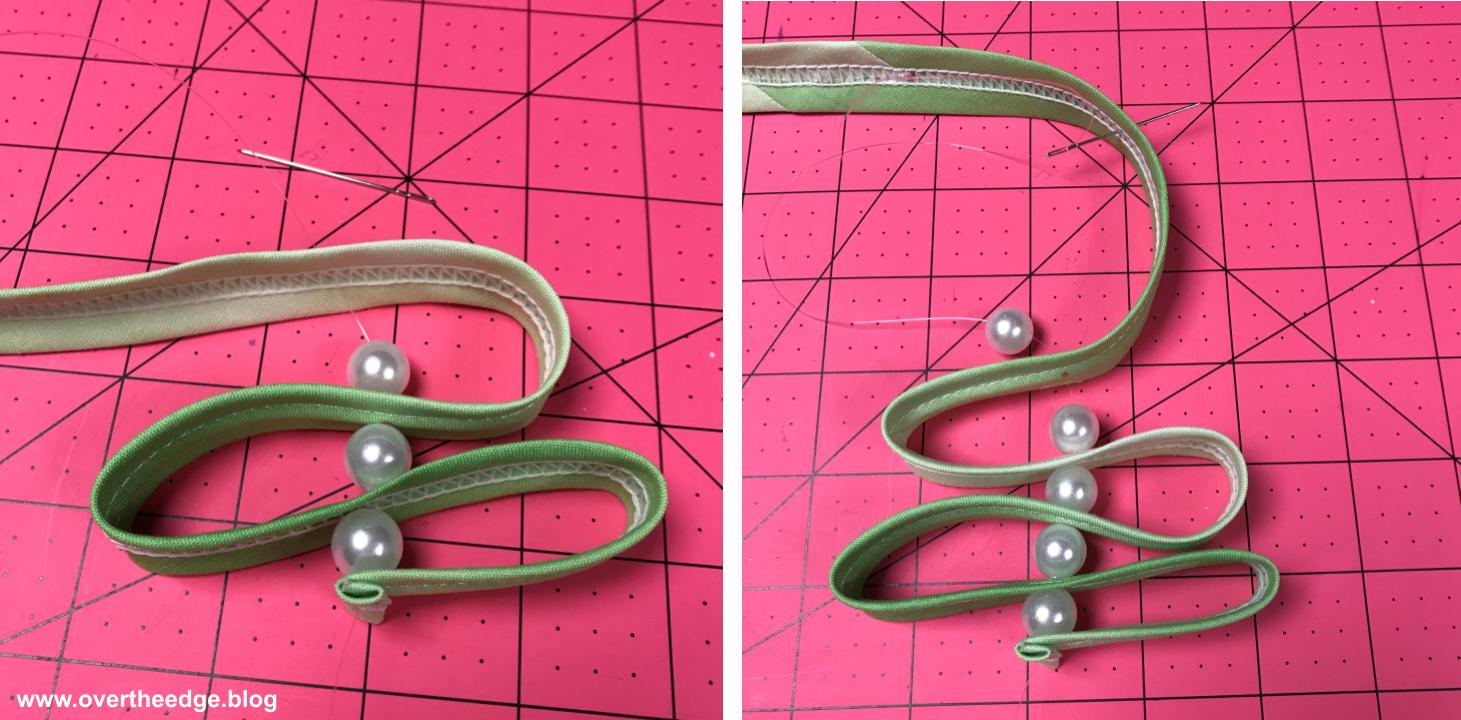
Continue these steps until you have added the last bead.

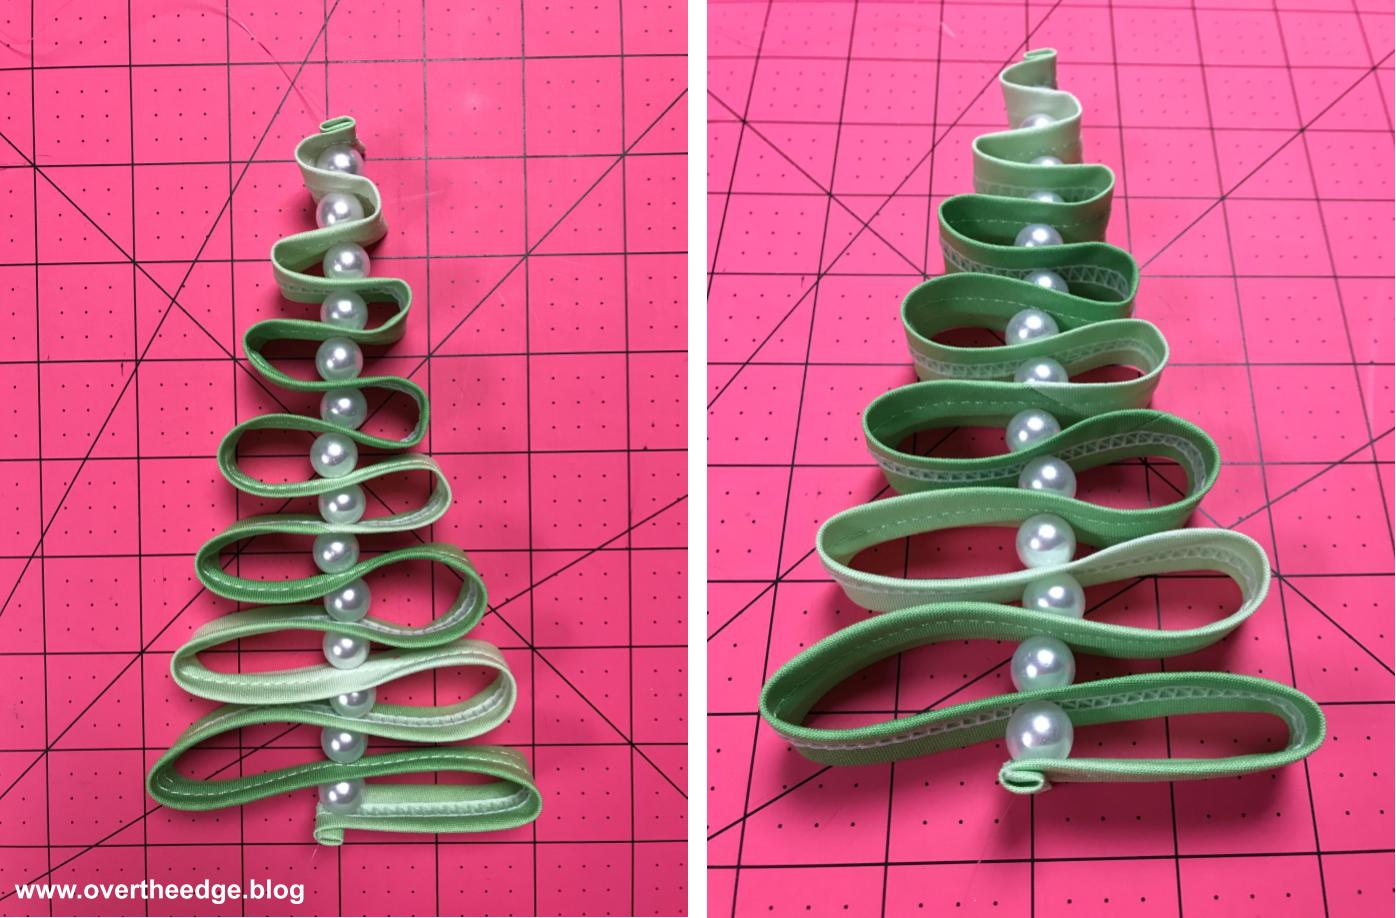
Tie Knots to Secure and Finish
There should be one final dot mark. Fold the end in a ¼” double fold toward the chain looper side of the belt loop. Insert your needle through the fold at the mark. Take a few securing stitches, being sure to pull the line snug to remove any slack in the line. Tie a knot to secure.

Add a hanging loop/hanger as desired.
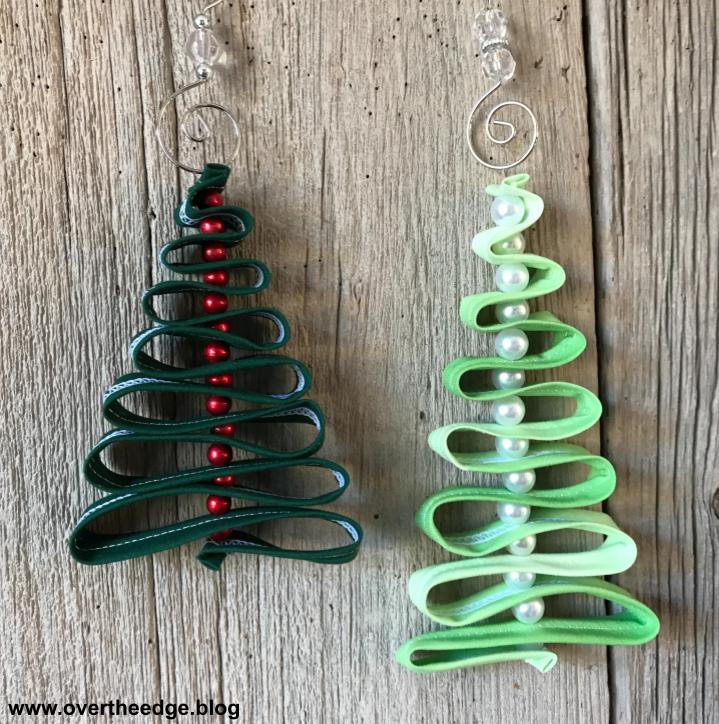
Another Version of the Tree
I also tried making this ornament using the same instructions but with smaller beads. I used a dark green ¾” wide belt loop fabric and 8 mm red beads. The finished size of the ornament was 5” tall, 3 ¾” wide and ¾” thick.
The photo below shows the original ornament next to the new one. It’s amazing how such small changes can completely change the look.
Jen’s Serger Belt Loop Ribbon Candy Ornament
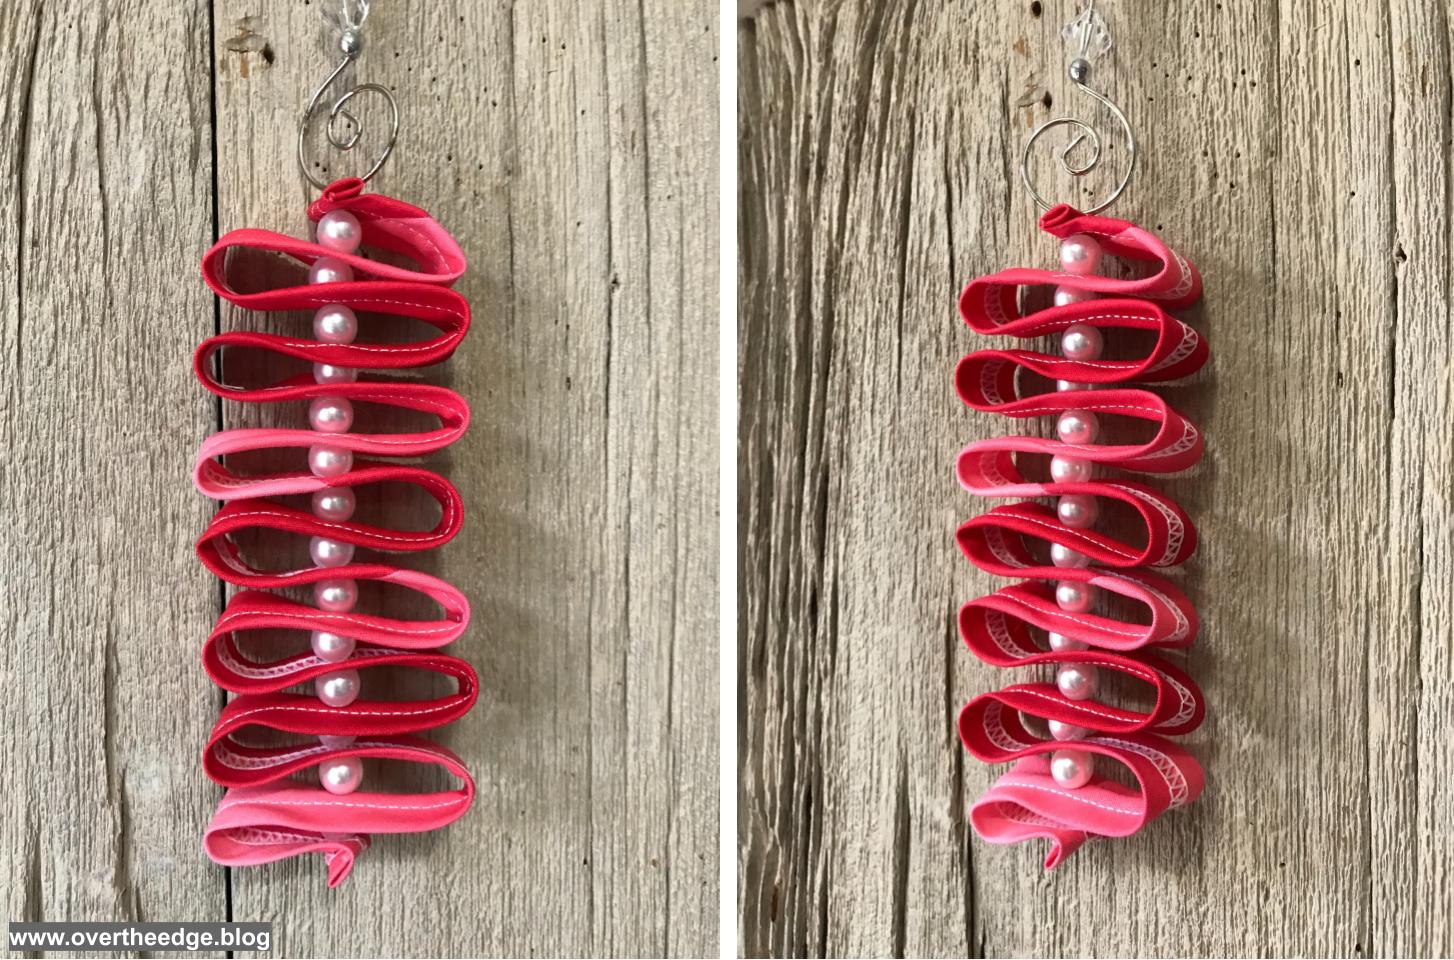
Ribbon Candy Ornament – approx 5¾” tall, 2¾” wide and ¾” thick.
Supplies for One Ribbon Candy Ornament:
- Fourteen 10 mm beads
- ¾” wide belt loop fabric ribbon at least 37” long
- Hand sewing needle
- 18” of fishing line or strong thread
- Fabric marking pen
- Ruler
- Ornament hanger if desired
Instructions
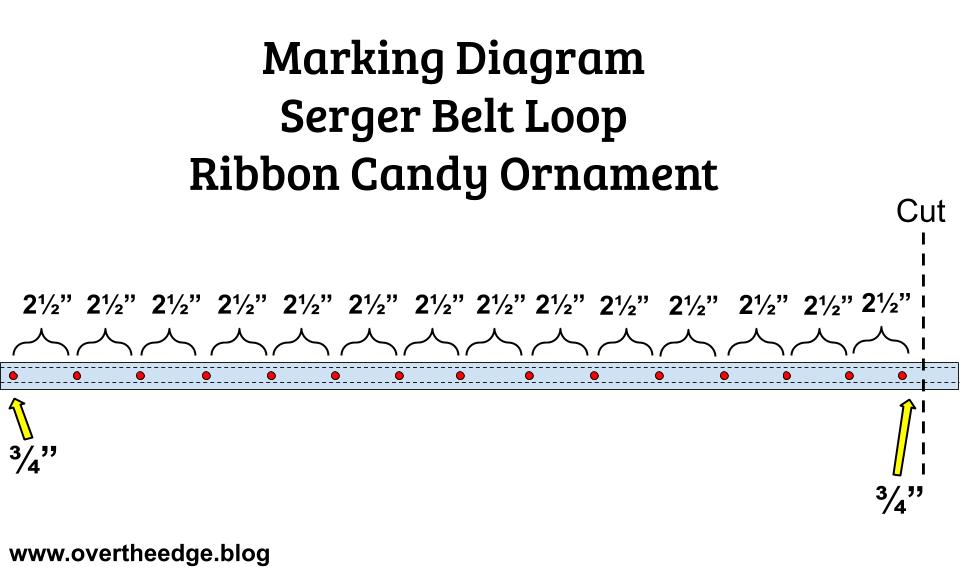
Mark Loop Placement
Layout your belt loop fabric ribbon with the needle stitching facing up. Use the fabric marking pen to make dots at all the locations shown in the Marking Diagram below. Make your first mark ¾” from the left end in the center of the needle stitch side of the belt loop strip. Then make a mark 2.5” from the first dot. Continue marking until you have fourteen, 2.5” spaces. Then make the last mark at ¾”. This last mark is where you need to trim the fabric strip. The dot marks will line up with the center of the ribbon candy where the beads are attached.
String Beads and Belt Loop Fabric, Tie Knots to Secure and Finish
Follow the instructions for the tree ornament. The process is the same, but the size of the beads and size of the loops will be different.

Jen’s Serger Belt Loop Icicle Ornament
Icicle ornament – approx 7” tall, 1¾” wide and ¾” thick.
Supplies for One Icicle Ornament:
- Four 12 mm beads, six 10 mm beads, eight 8 mm beads
- ¾” wide belt loop fabric ribbon at least 27” long
- Hand sewing needle
- Fishing line or other strong thread
- Fabric marking pen
- Ruler
- Ornament hanger if desired
Instructions
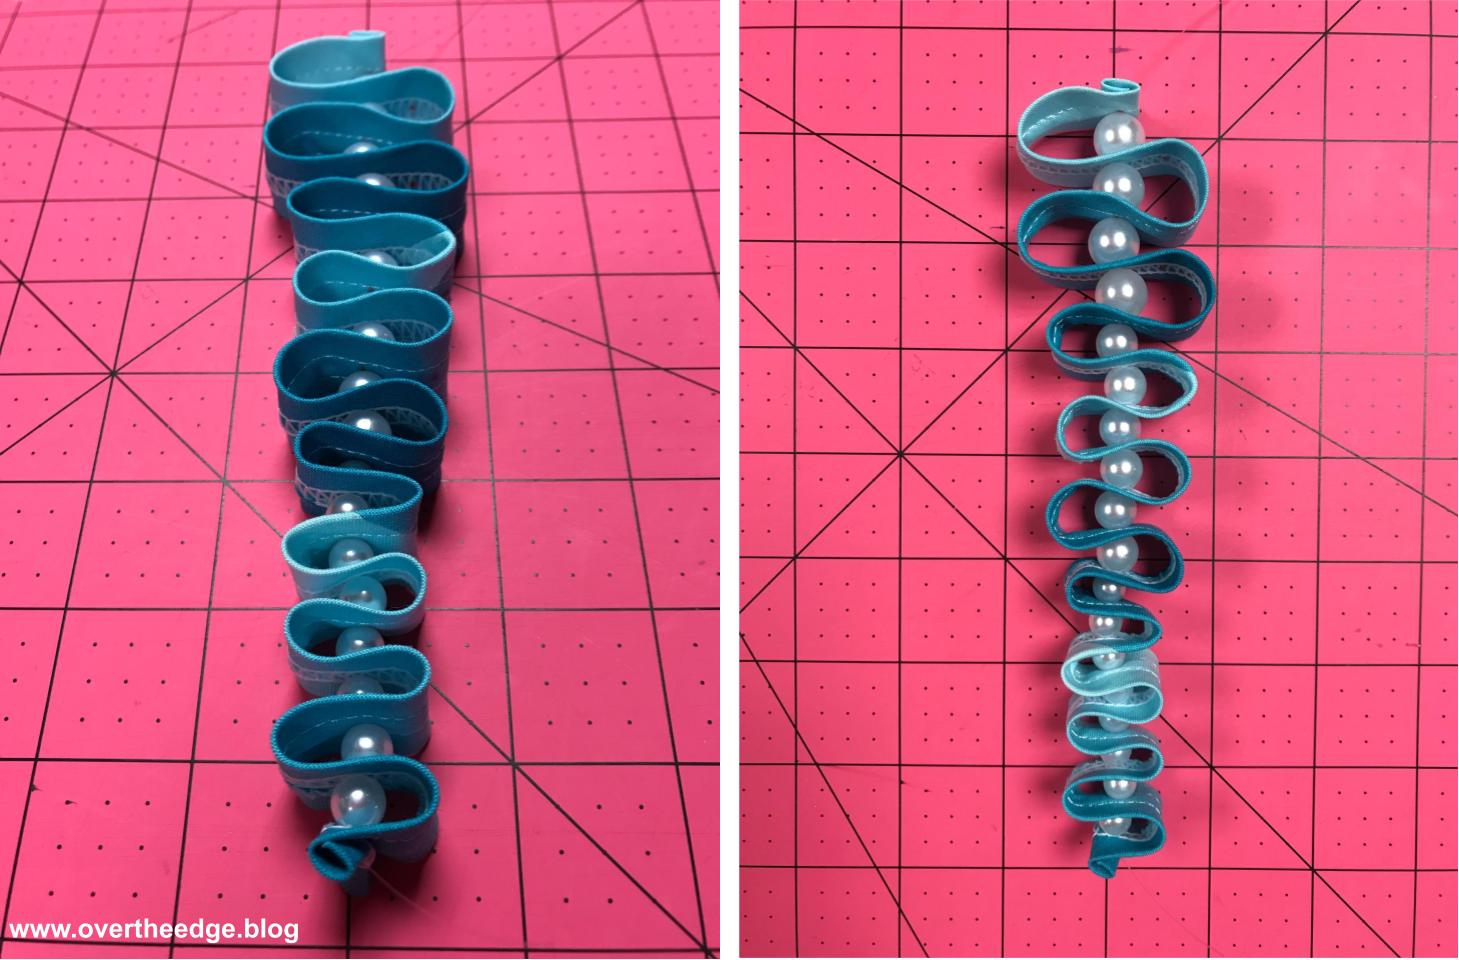
Mark Loop Placement
Layout your 27” or longer belt loop strip with the needle stitching facing up. Use the fabric marking pen to make dots at all the locations shown in the Marking Diagram below. Make your first mark ¾” from the left end in the center of the needle stitch side of the belt loop strip. Then mark 2” from the first. Then mark 2”, 2”, 2”, 1.5”, 1.5”, 1.5”, 1.5”, 1.5”, 1.5”, 1”, 1”, 1”, 1”, 1”, 1”, 1”, 1” and ¾”. This last mark is where you need to trim the fabric strip. The dot marks will line up with the center of the icicle where the beads are attached.

String Beads and Belt Loop Fabric, Tie Knots to Secure and Finish
Follow the instruction for the tree ornament. The process is the same, but the size of the beads and size of the loops will be different. Use 8mm beads for the 1″ loop sections at the bottom of the icicle. In the middle 1.5″ loop sections, use 10mm beads. And for the top 2″ loop sections, use 12mm beads.
Bonus Ornament – Ribbon Candy Using Double Fold Bias Binding
I made up one ornament using fabric ribbons made from my double fold bias binder attachment for my serger (instead of the belt loop binder). The width of the ribbons are approximately ⅜”. Since the ribbon is smaller I downsized my Ribbon Candy instructions to better fit the narrower ribbon. I used smaller distances between the loops and smaller beads. I wanted you to see how easy it is to change up the instructions to make your own custom ribbon candy tree ornaments.

This ribbon candy ornament is 3¾” tall, 1⅞” wide and ⅜” thick.
Supplies for One Small Ribbon Candy Ornament:
- Ten 8 mm beads
- 3/8” wide double folded bias binding fabric ribbon, at least 22″ long
- Hand sewing needle
- Fishing line or other strong thread
- Fabric marking pen
- Ruler
- Ornament hanger if desired
Instructions
Mark Loop Placement
Layout your double fold bias binding fabric ribbon with the needle stitching facing up. Use the fabric marking pen to make dots at all the locations shown in the Marking Diagram below. Make your first mark ¾” from the left end in the center of the needle stitch side of the belt loop strip. Then make a mark 2” from the first dot. Continue marking until you have ten, 2” spaces. Then make the last mark at ¾”. This last mark is where you need to trim the fabric strip. The dot marks will line up with the center of the ribbon candy where the beads are attached.

String Beads and Belt Loop Fabric, Tie Knots to Secure and Finish
Follow the same basic instructions for the tree ornament. The process is the same, but the size of the beads and size of the loops will be different.
Jen’s Serger Ribbon Candy Tree Ornament Tutorial
Have fun experimenting with serger belt loop binders and serger double fold bias binders and make a bunch of ornaments for your tree! I hope you enjoyed my ribbon candy tree ornament tutorial for sergers. I’d love to see your ornaments if you’d like to share a photo!

Resources
My tutorial on using a serger belt loop binder – https://overtheedge.blog/tutorials/how-to-use-a-serger-belt-loop-binder-to-make-folded-fabric-strips-for-weaving/
My tutorial on using a serger double fold bias binder – https://overtheedge.blog/tutorials/serger-double-fold-bias-binder-tutorial/
Link to How to Make your own Continuous Bias Binding – https://sew4home.com/how-to-make-your-own-continuous-bias-binding/