Learn How to Make Fabric Gift Wrap with a Serger
These six different fabric gift wrap projects are great for sergists of all levels, whether you are a beginner or experienced. They are quick to make and very forgiving (meaning they don’t have to be perfect but still can make a gift look good.) These gift wrap projects are great for practicing serging seams, finishing edges, turning corners, securing ends, using standard and decorative thread and more. Feel free to customize the sizes and create your own unique gift wrap! Try different fabrics, threads, ribbons and accessories. Experiment with different serger stitches – 4 thread overlock, 3 thread overlock, rolled hem, narrow hem, etc.
- I’ve created instructions as well as a simple diagram to help you create each gift wrap project. The dashed lines in the diagrams indicate serger stitches.
- All of these wraps are made with only a serger, with the exception of the petal pouch.
- All of the fabric for the gift wrap projects are cut to size in advance, so when you serge, you are just skimming or trimming the edge very slightly, just to neaten it up.
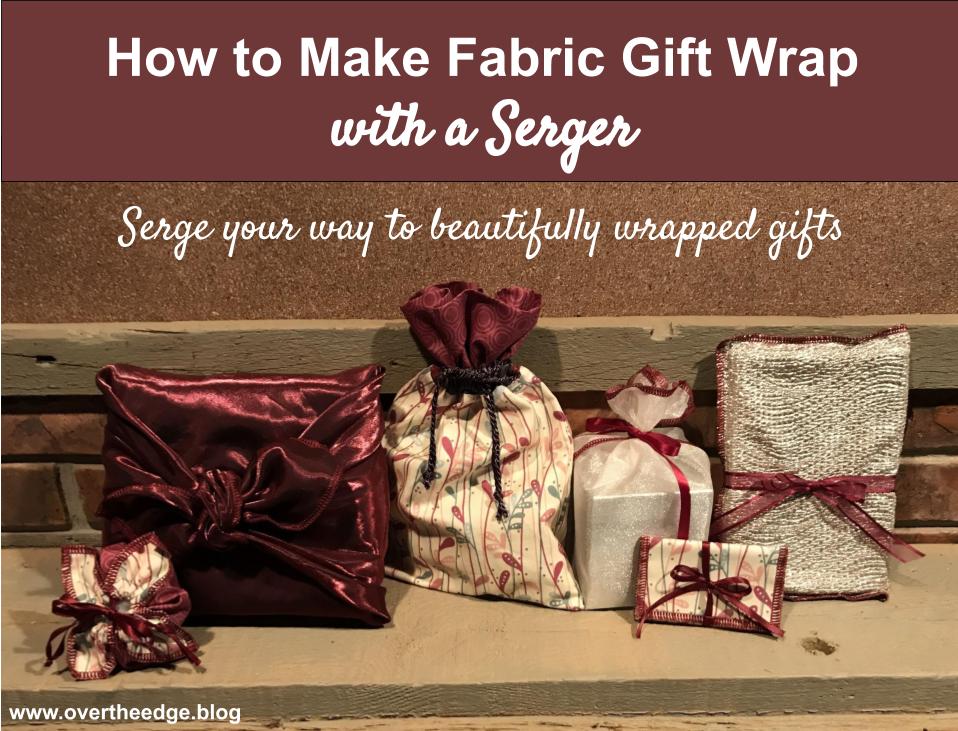
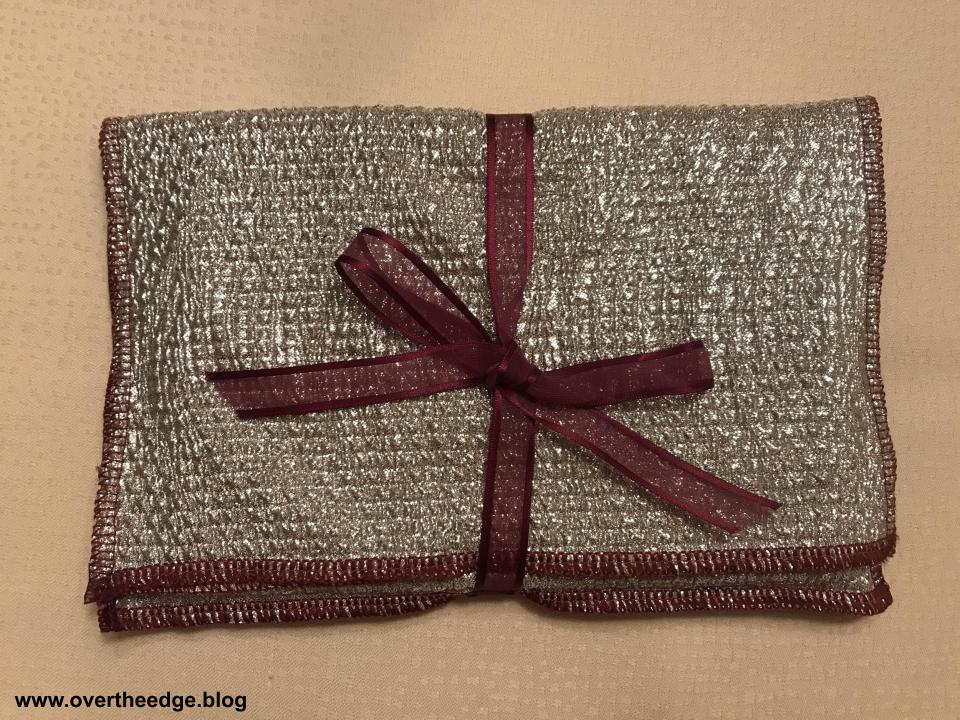
1. Wrapping Scarf
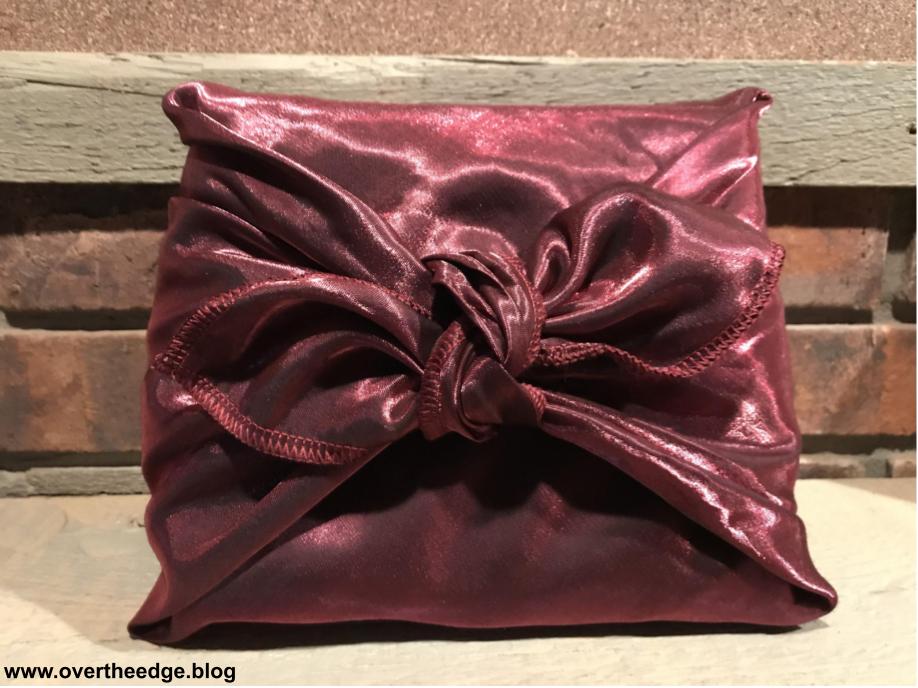

For a single layer wrapping scarf you need one square of fabric. A single layer of fabric is the easiest and most cost effective gift wrap to make. It’s just like making a fabric napkin – simply finish the edges of all four sides of the square using your favorite serger stitch (A). A four thread overlock, three thread narrow overlock, and three thread rolled hem are the stitches I usually use for my wraps. If you want the edges to stand out, use fun contrasting thread. Or if you want a more subtle edge, use a standard serger thread that blends with the fabric.

What Size Scarf to Use
As a guideline, the diagonal of the square fabric wrap should be about three times the length of the longest side of the object to be wrapped (B). But that is only a guideline. You can vary the size of the wrap based on the effect you want to achieve. I’ve made them in all different sizes, from about 18” square (for very small gifts) up to 60” square (for large gifts).
How to Use a Wrapping Scarf
To wrap a gift, place it in the center of the fabric square with the longest edge along the diagonal (B). Then bring the opposite corners together and tie in pretty square knots, or secure with some other creative closure. If you search the internet and you will find an infinite number of wrapping ideas with a simple search on the internet. I have included links to some wrapping scarves sites in the resource section at bottom of this post.
Wrapping Scarf Fabrics
Although you can use just about any type of fabric for wrapping a gift, I prefer to use satins/charmeuses (or other synthetics) for my wrapping scarves. Cottons get kind of wrinkly for this style wrap, and I prefer not to iron my gift wrap if I can help it.
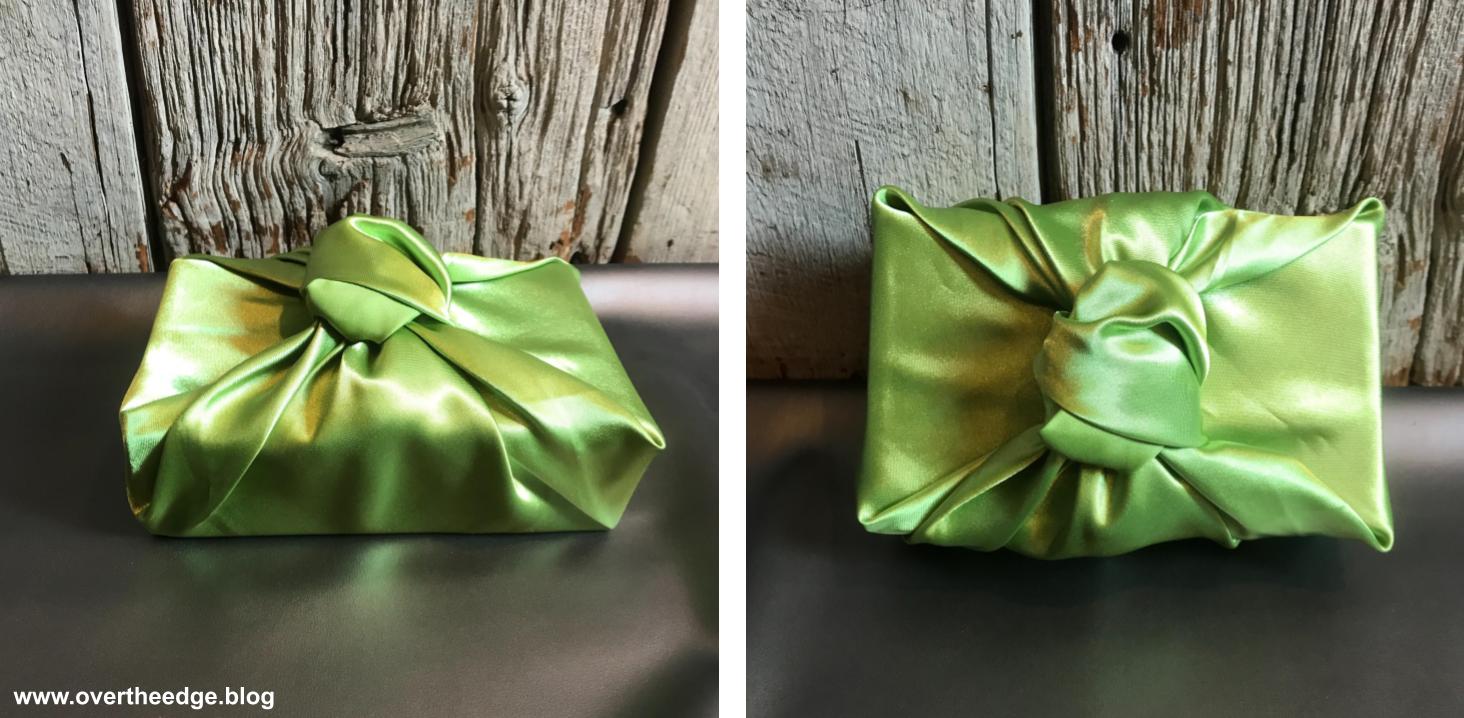
Two Layer Wrapping Scarves
You can also make an elegant wrap with two layers of fabric. Make sure the fabric can be easily tied in a loose knot. Pin the fabrics together and serge the edges as if it were one piece of fabric. The wrap in the photo below has a satin on one side and a sheer crinkle organza on the other.
Wrapping Scarf Closures
For a different effect (or if you don’t like tying knots) you can secure the fabric wrap with things like ribbons or other creative closures.
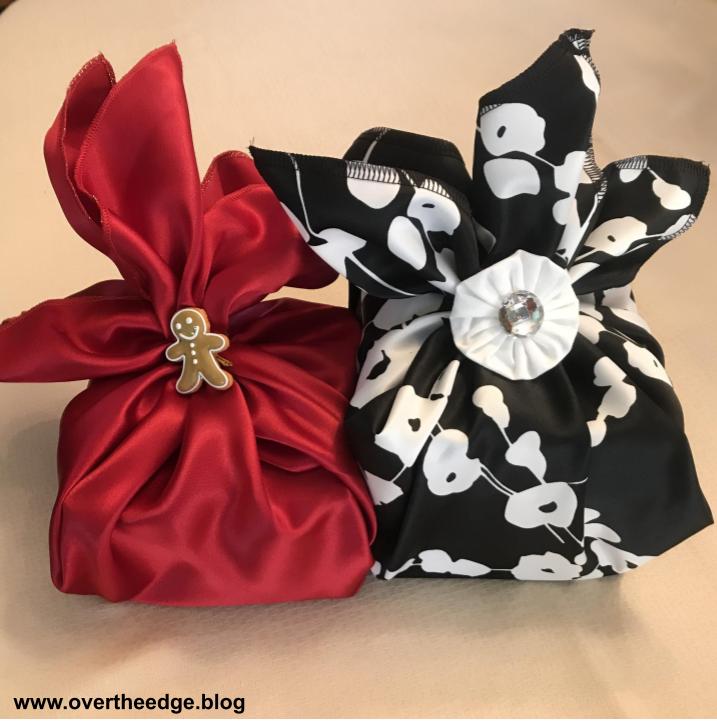
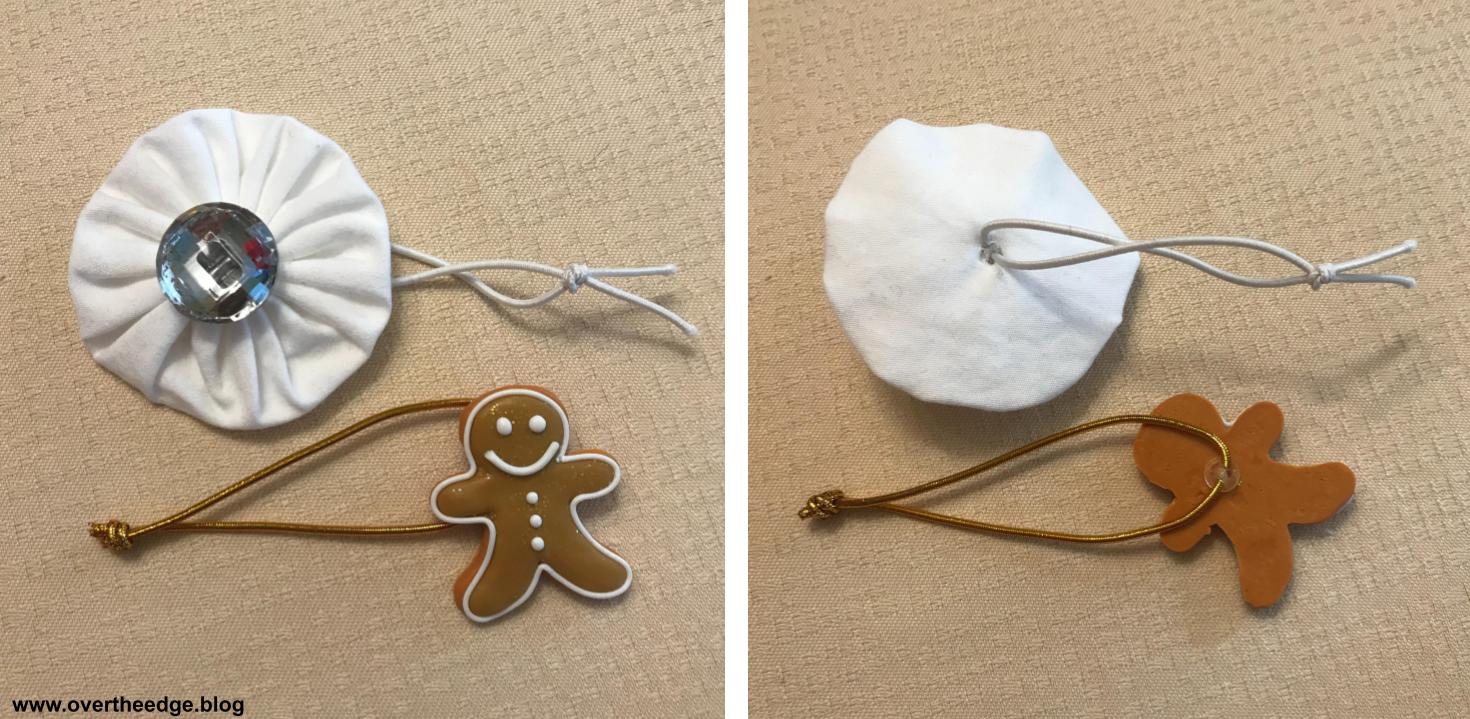
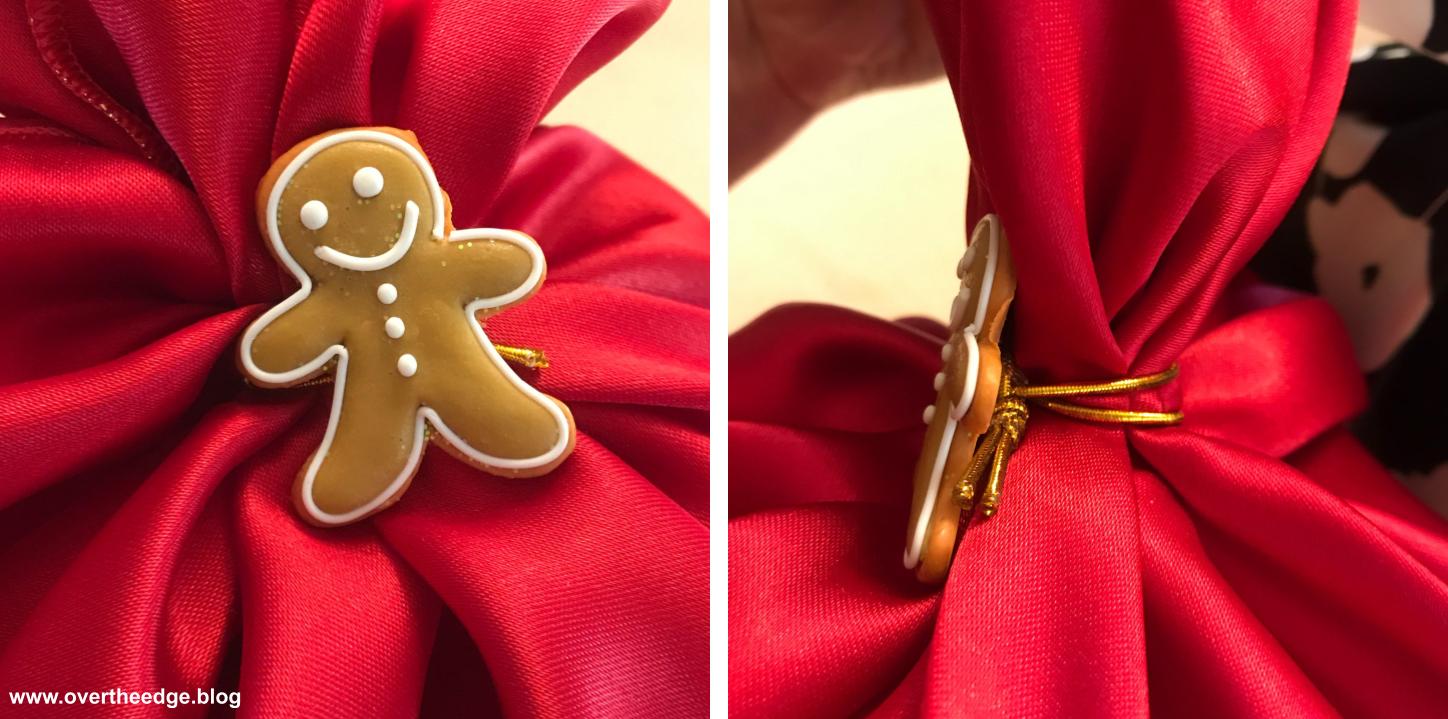
I made a bunch of closures with elastic cord and pretty buttons and fabric yo yos – see photos below. My elastic closures are simple. All you need is to insert a 7-8” piece of elastic cord through a shank type button and/or fabric yo yo. Tie the two ends of the cord in a knot. Then wrap the cord around the fabric and slide the end over the button to secure.
The wrapping scarf is my favorite way to make fabric gift wrap with a serger!
2. Simple Serged Gift Bag
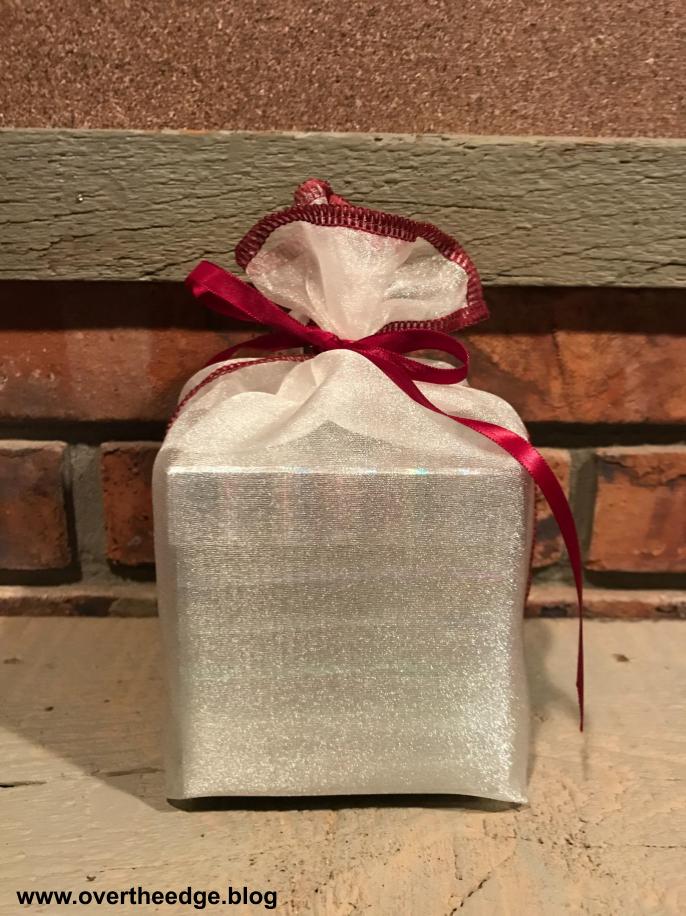

This gift bag is very simple to serge and can be made with a wide variety of fabrics. I made the one in the photo from sparkle organza. I used a four thread overlock stitch, but other stitches would work as well.
Supplies
Cut a rectangle the desired width and twice as long as the desired height of the gift bag. I cut the organza for this gift bag to 9” x 24”. Cut a piece of ribbon for a closure. I cut mine 25″ long for this size bag.
Instructions
Finish the two short ends with your serger (A). These short sides will be the top opening of your bag.
Fold the rectangle in half wrong sides together with the short sides lined up. The fold will be the bottom of the bag.
If desired, you can add a folded piece of ribbon right into the side seam of the bag (B). That way your closure is already attached to the bag and you don’t have to worry about finding a ribbon to secure it. I used a 25” length of ribbon, folded it in half, and placed it about 1½” down from the top. Be sure to place the fold of the ribbon along the raw edge of the side of the bag.
Serge the two side edges. Bury your serger thread tails or knot and Fray Check.
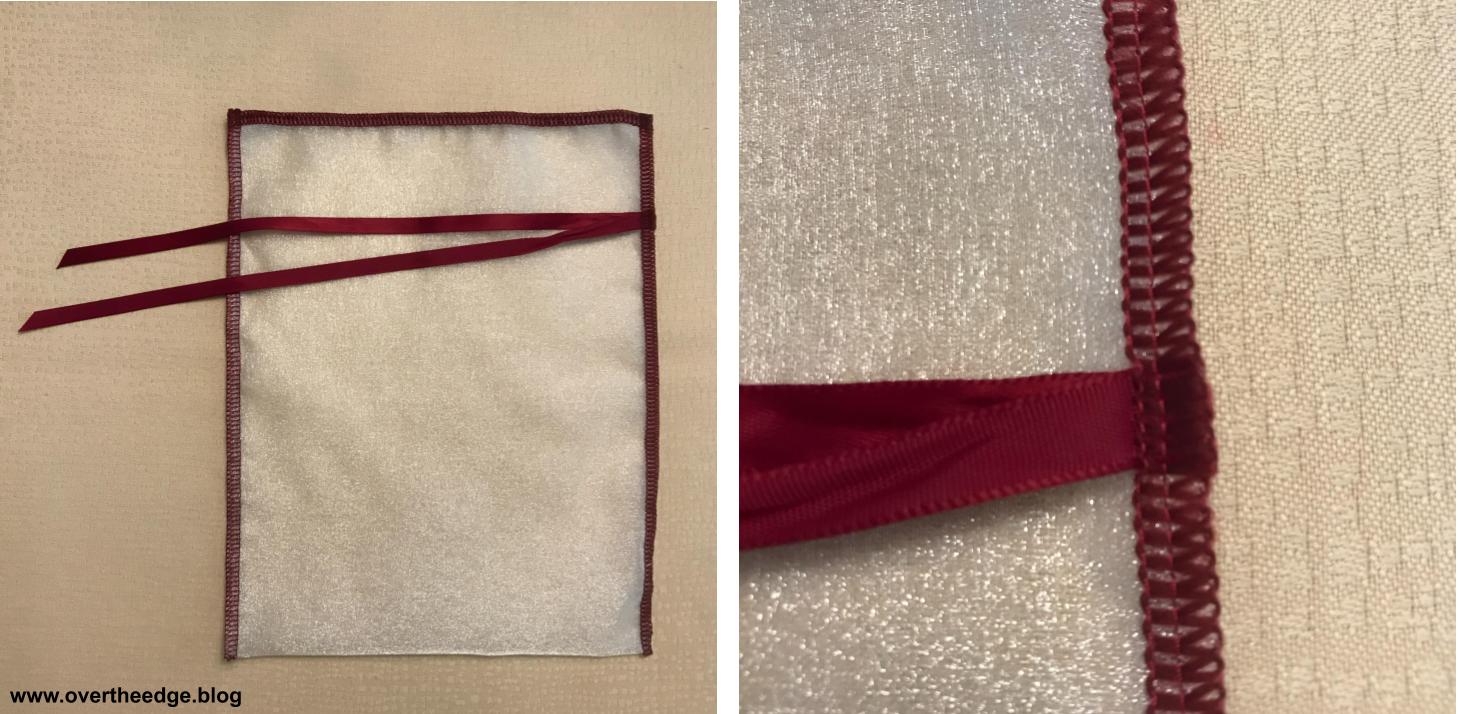
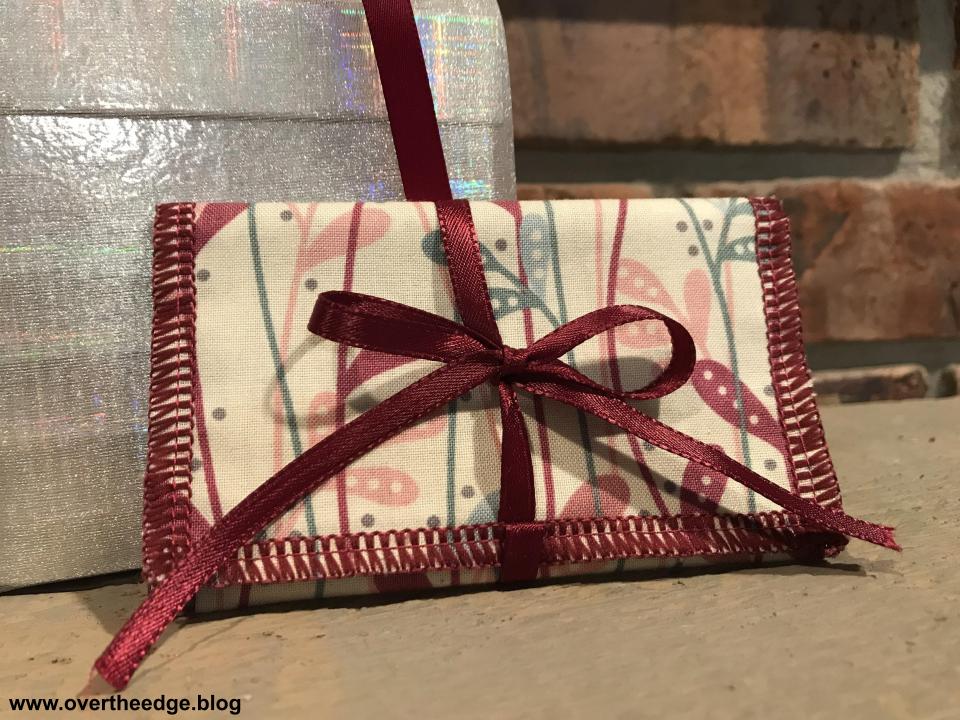
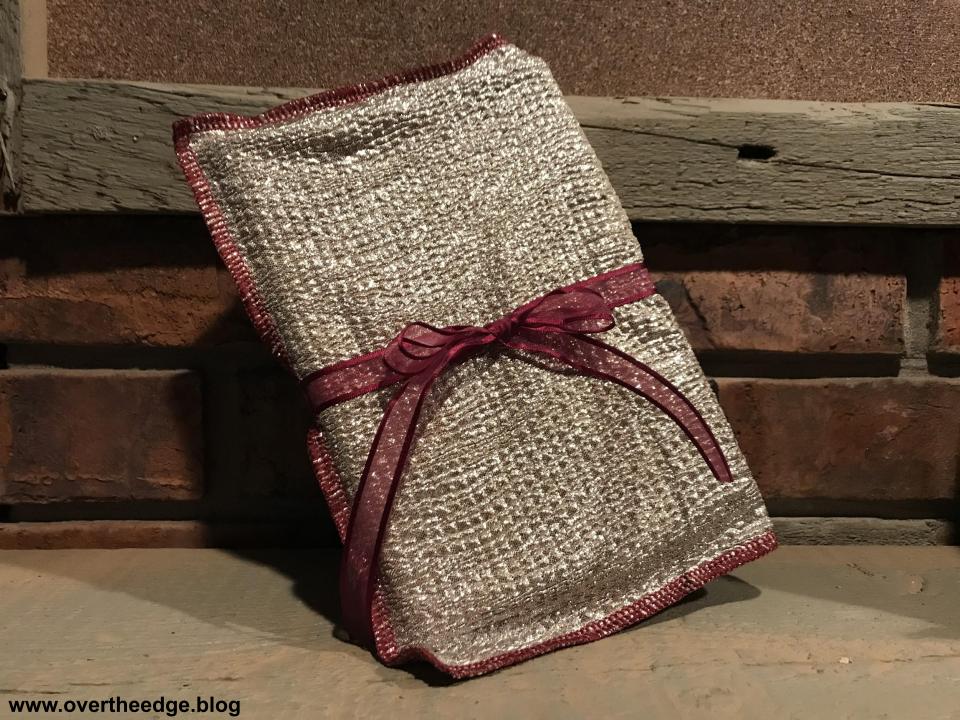
3. Gift Card Envelope

Supplies
Cut two pieces of fabric 4.5”x 8” (A). Cut a 20” length of ribbon.
Instructions
Place the fabrics wrong sides together with the main fabric on top, and serge finish one short edge (B). I used a four thread overlock stitch for this gift card envelope.
Fold the ribbon in half unevenly, with one side at 8” and one side at 12”. Center the fold of the ribbon (with the longer side on top), along the raw edge of the unserged short edge of the fabrics (C). Pin or clip to secure.
Turn the fabric over so the lining side is up. Then fold in the short serged edge by 2.5” toward the lining side to form the pocket (D).
With the main fabric side up, serge around both sides and the top edge with the ribbon (E). As you serge you can turn corners or serge on and off at each corner. Secure your thread tails as desired (weave them in, or knot and fray check.)

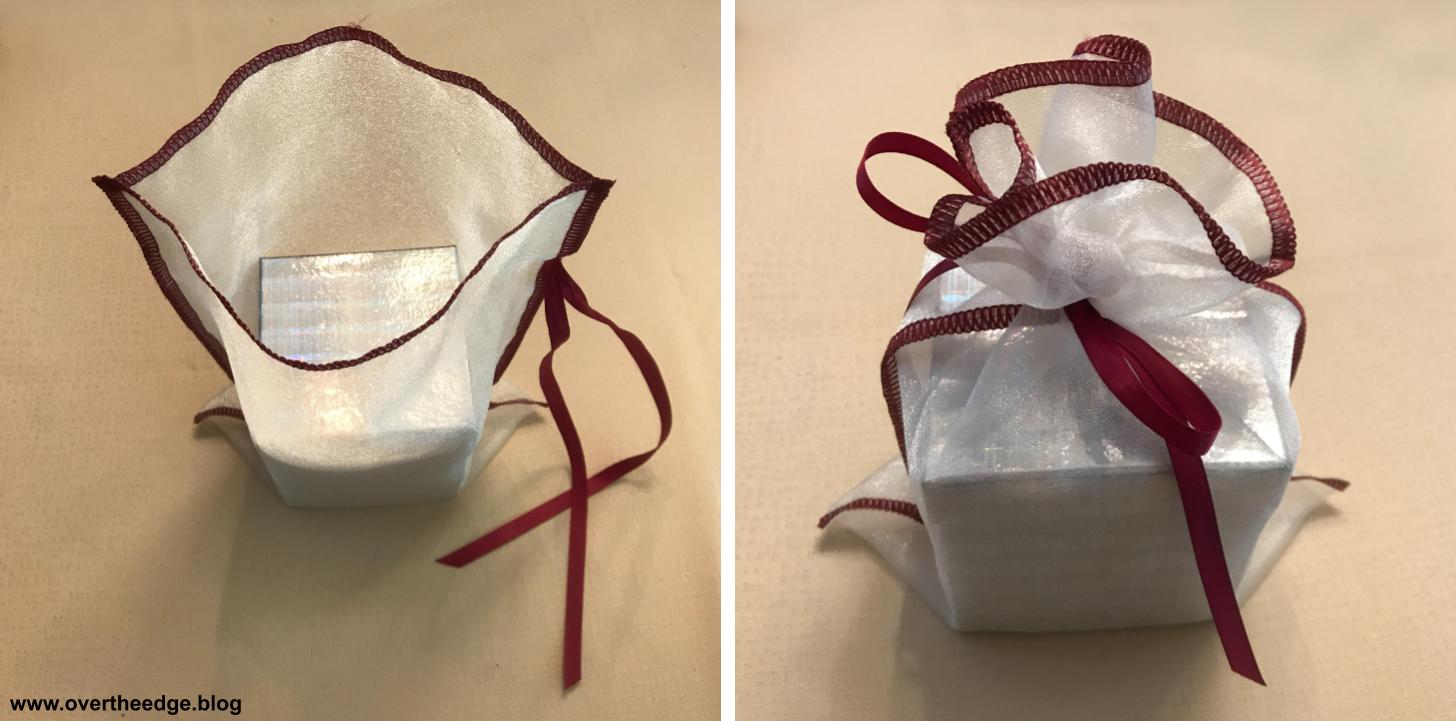
Insert gift card, close the flap, wrap the longer ribbon around the envelope and tie the ends of the ribbon into a bow.

4. DVD/Book Gift Bag

Supplies
Cut two pieces of fabric 9½” by 12”. Cut a ribbon 32” long
Instructions
Serge finish one short edge of both pieces of fabric (A). These edges will be the opening of your gift bag.
Place the pieces wrong sides together, lining up both serged edges at the top.
Fold the ribbon in half unevenly so that one side is about 12” long and one side is about 20” long. Place the ribbon at the center of the bottom edge, with the longer side on top (B).
Serge both side edges and the bottom edge. You can turn corners, or serge on and off. Secure thread tails using your favorite method.
To use, insert your gift into the bag, fold the opening edges over the gift, wrap the ribbon around it, and tie the ribbon into a bow.


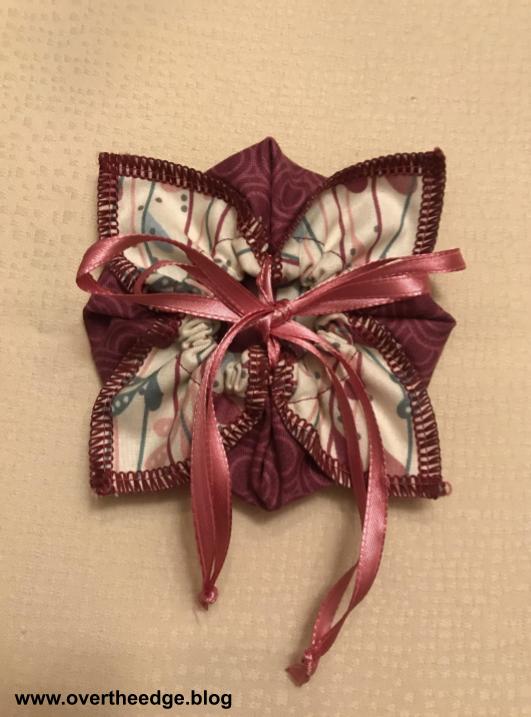
5. Petal Pouch
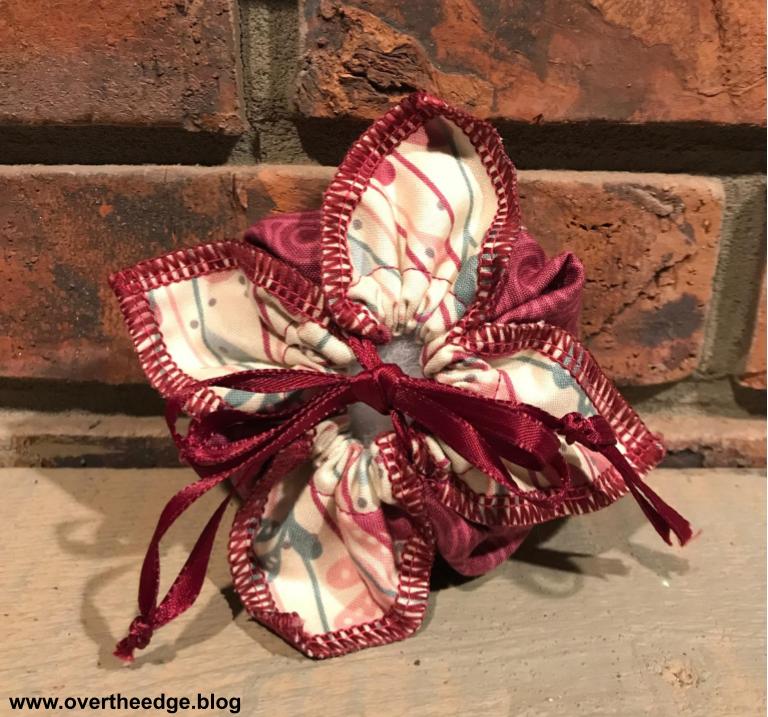

For this gift bag you will use both a serger for the decorative edges and a sewing machine for the casing.
Supplies
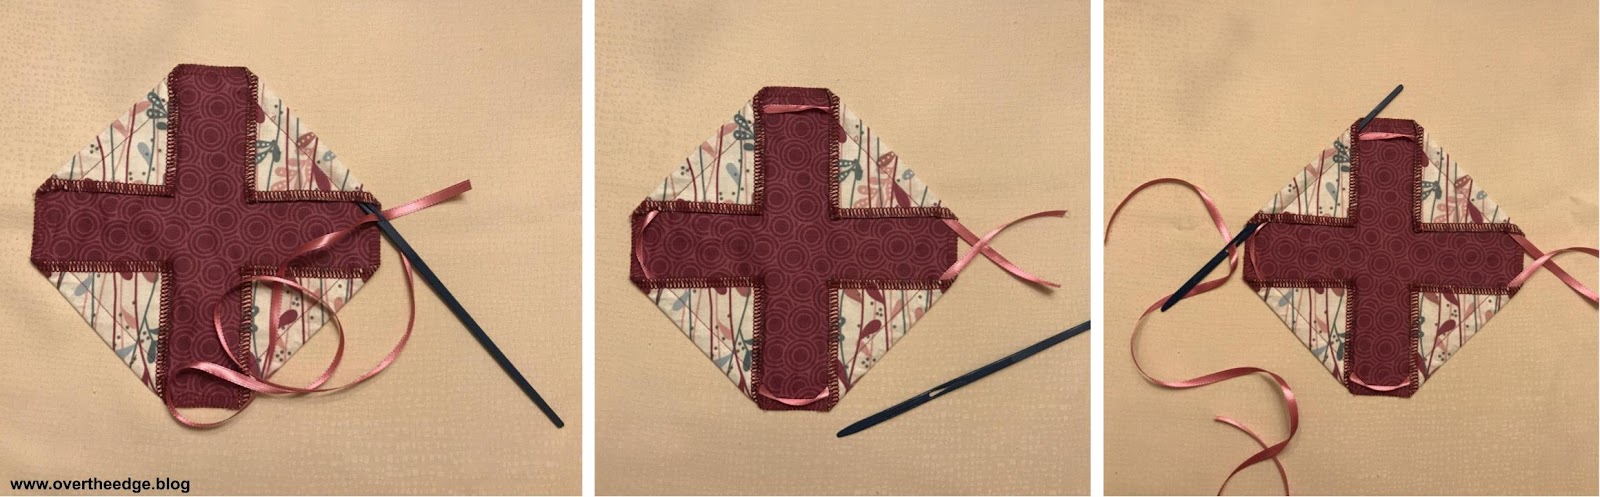
Cut two 8.5” squares of fabric, one for main and one for lining/petals (A). Cut two pieces of ribbon or cord each 28” long.
Instructions
Place the fabric squares wrong sides together. Secure with pins or clips. Serge around the edges of the square (B). I serged with the lining/petal side facing up. Turn corners or serge off and on. Secure your thread tails as desired.
Next, place the fabric petal/lining side down. Fold each corner over, so that the two equal sides of the triangle are both 3¼” long (C). Pin or clip and sew a seam with your sewing machine that is ½” away from the folds. This creates the petals and the casings.

Insert the ribbon into the casings from opposite sides (D). Begin and end the first ribbon on the right. Begin and end the second ribbon on the left. You can use ribbons as short as 22” long if you would like shorter ribbon tails, but the pouch will not lie flat when it is opened. It will lie flat when opened using 28” long ribbons.
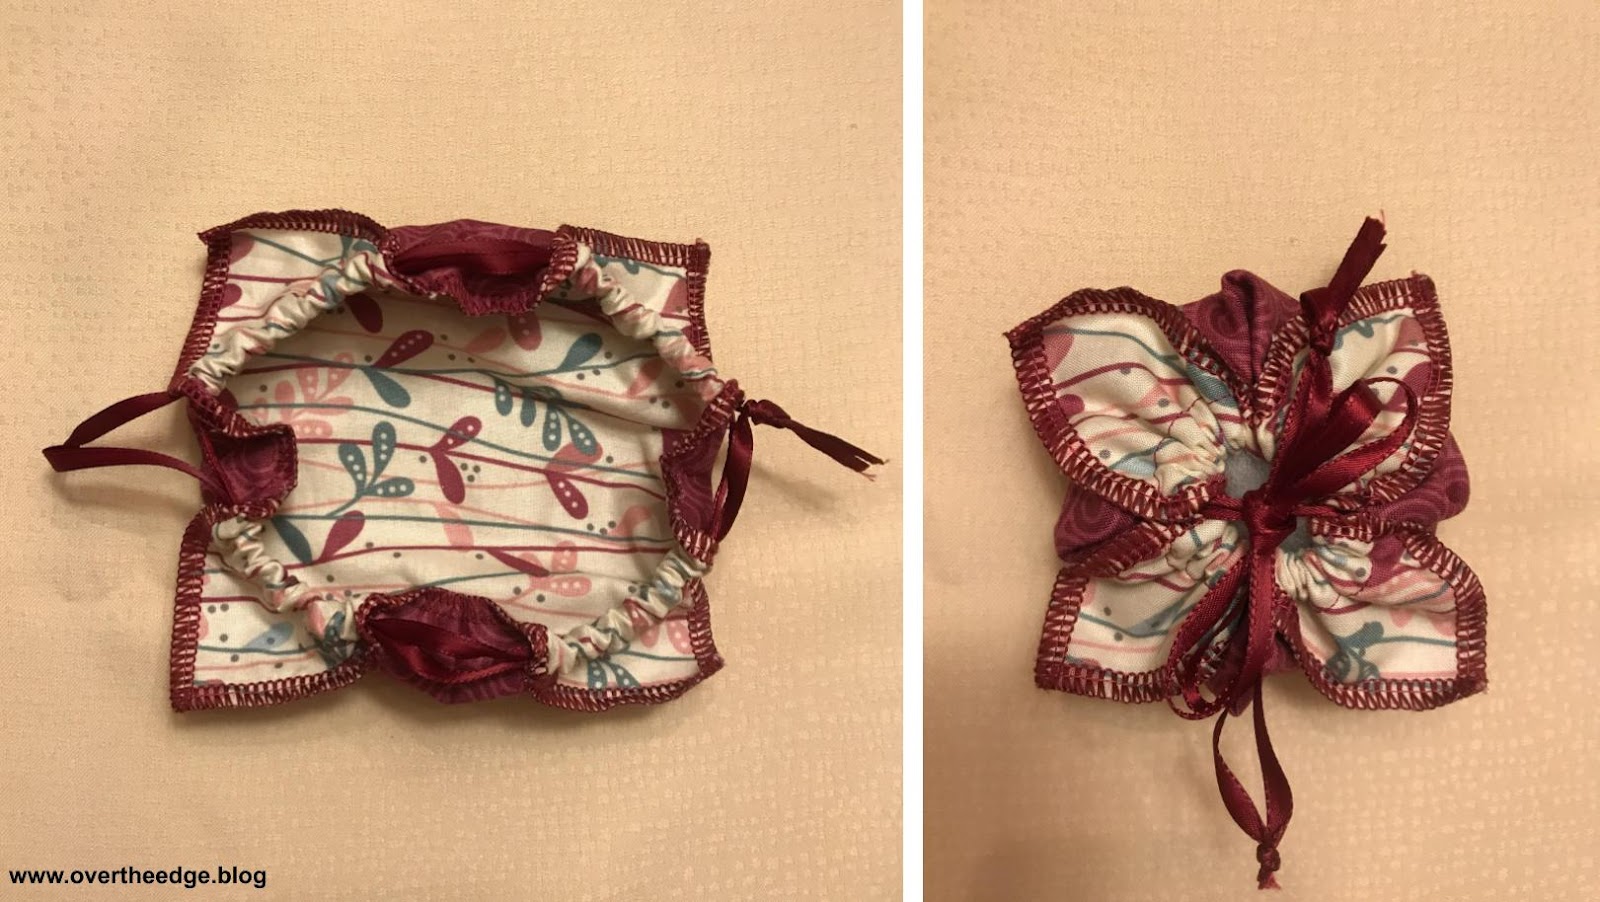
Tie the ribbon ends into a knot on each side.

To close the pouch, pull the ribbons from both sides and tuck the folds into the pouch between the petals. Tie the ribbon ends into a pretty bow.
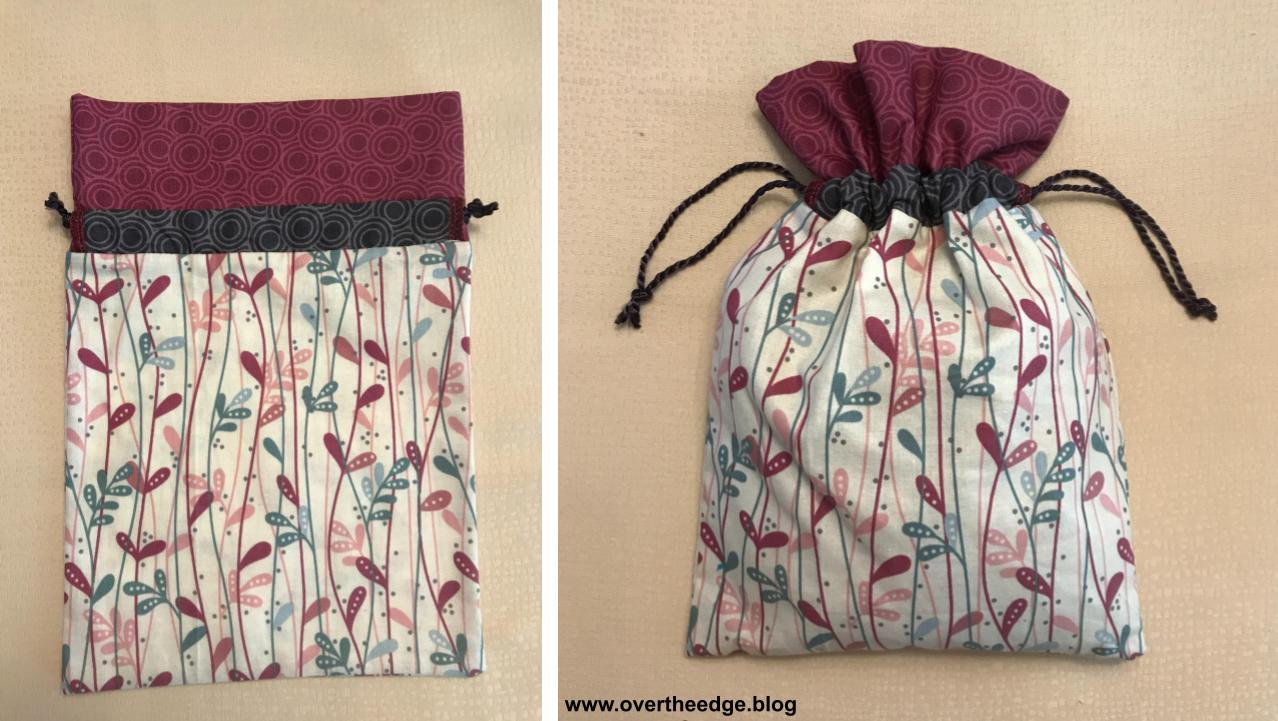
6. Drawstring Bag with Ruffle
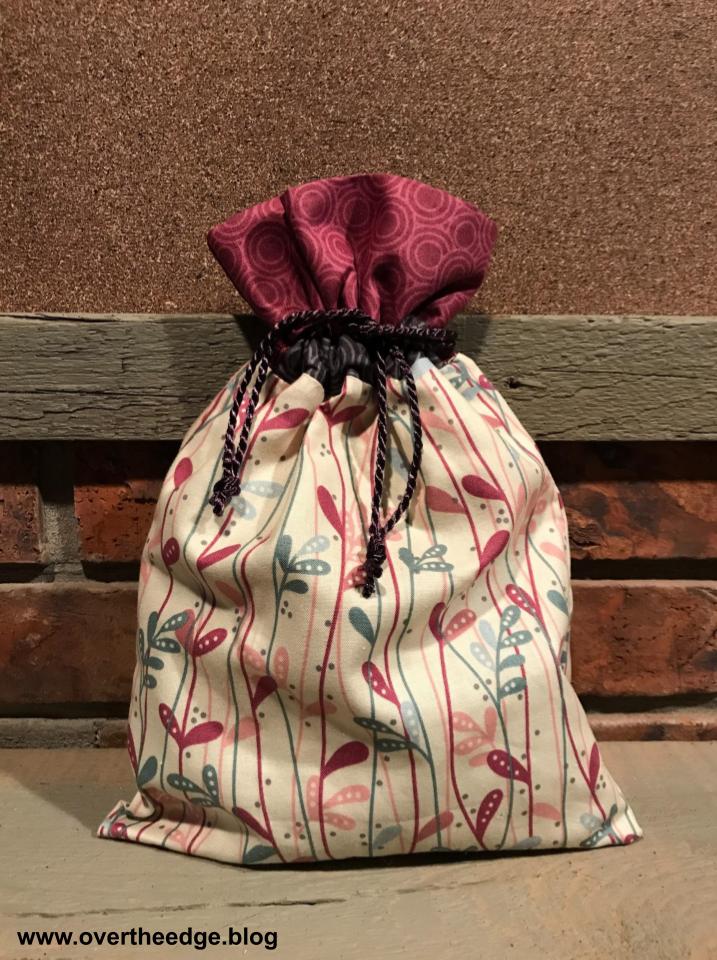

This gift bag is a dressed up version of the Simple Serged Gift Bag. I used a standard 4 thread overlock stitch to construct this bag. All seams of this bag are on the inside of the finished bag.
Supplies
Cut two 9”x9” squares from your main fabric (A). Cut two 7”x9” squares form your ruffle fabric (A) and cut two 2.5”x8” squares from your casing fabric (A). You will also need a minimum of 1⅛ yards of cording or ribbon to close your bag. Cut ribbon in half so you have two pieces approximately 20-21” long.
Instructions
Place the two main fabric pieces right sides together and serge both side seams and bottom seam using a four thread overlock stitch (B). Turn right side out and press. Use the wrapped corner technique, so you don’t have to trim your corners to reduce bulk.
The wrapping corners technique is explained in more detail in my His & Hers Pillowcases Tutorial, https://overtheedge.blog/tutorials/his-hers-serger-pillowcases-tutorial/
Place the two ruffle pieces right sides together and serge both short side seams (B). Turn right side out. Fold the ruffle piece in half wrong sides together, aligning raw edges and press (C).
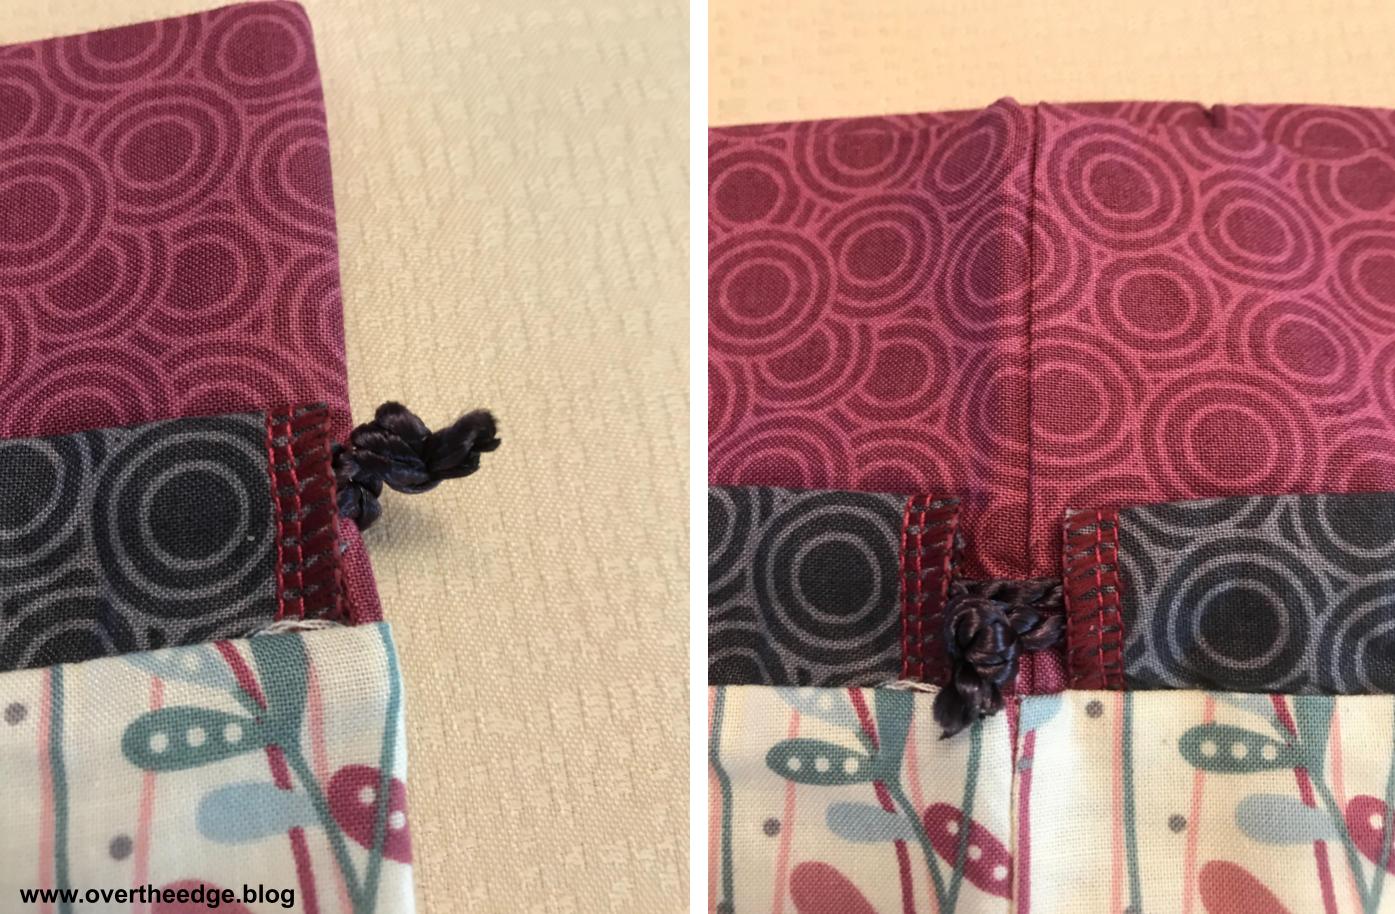
Serge finish both short edges of both casing pieces (B). Fold each casing piece in half lengthwise wrong sides together and press (C).
Place a folded casing piece right sides together on both sides of the main bag piece, centering along the top edge, having raw edges aligned. The casing will not extend all the way to the side seams. Pin or clip to hold. Place the ruffle piece right sides together over the casing pieces on the main bag, matching seam allowances and raw edges. Pin or clip to hold. Serge all the way around this edge, just skimming the raw edges to neaten them up (D).
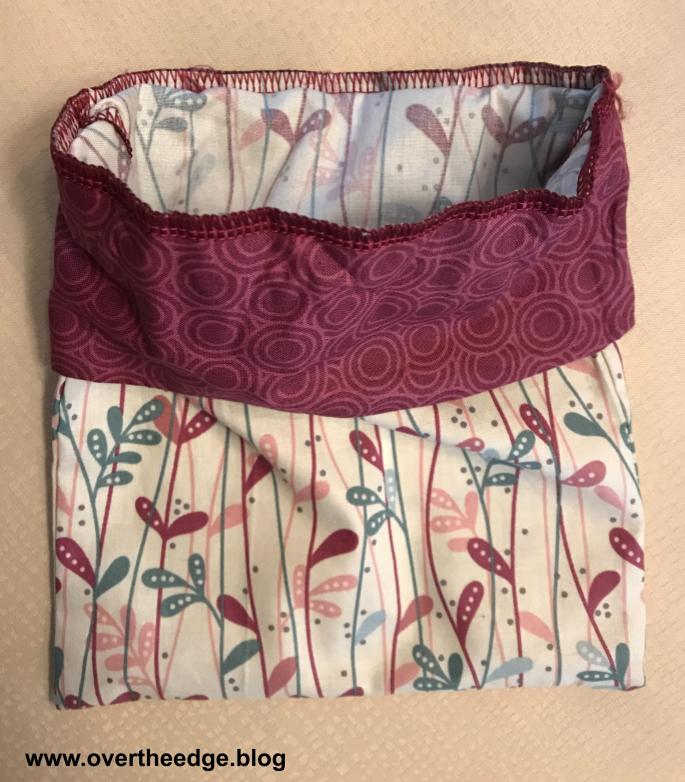
Flip up the ruffle and casings and press. Insert one ribbon from the right through one casing and then around through the casing on the other side. Tie ends in a knot. Do the same from the left side with the other ribbon (E).
Place the gift in bag through opening at the top and pull cording to close up bag.
How to Make Fabric Gift Wrap with your Serger
I hope you enjoyed learning six different ways how to make fabric gift wrap with a serger. I’d love to see photos of your serger created fabric gift wrap! What’s your favorite way to wrap a gift with fabric?

Resources
Jen’s fabric napkin tutorial – https://overtheedge.blog/tutorials/quick-easy-serger-napkins/
Jen’s post, Beautifully Wrapped Gifts Made Simple with a Serger – https://overtheedge.blog/beautifully-wrapped-gifts-made-simple-with-a-serger/
Wrapping scarves book – The Wrapping Scarf Revolution by Patricia Lee. https://www.amazon.com/Wrapping-Scarf-Revolution-Earth-Friendly-Change/dp/1574861069 This is one site where you can buy the book. It was published in 2009, so if you can’t find a new one, you should be able to find a used copy on the internet.
https://www.bobowrap.com/howtos.html – Patricia Lee’s website where she shows you different ways to tie and use the wrapping scarf. She also sells her wrapping scarves if you’d rather not make it yourself.
http://www.env.go.jp/en/focus/attach/060403-5.html How to use Furoshiki (Japanese style fabric wrapping scarves). This website shows you different ways to wrap gifts using fabric wrapping scarves.