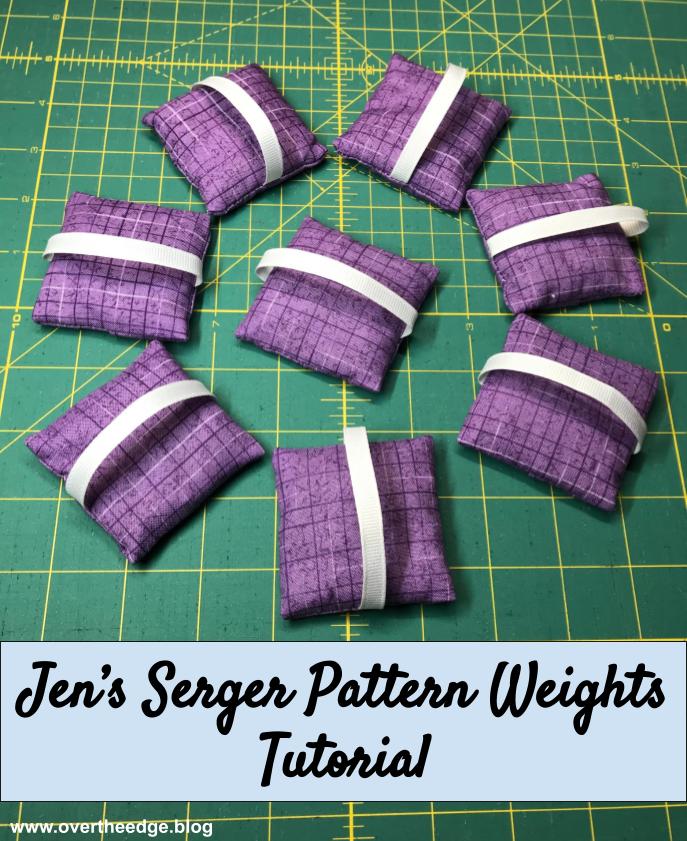
Jen’s Serger Pattern Weights Tutorial will guide you through making a set of pattern weights using your serger. These pattern weights are the perfect serger project for a beginner, but even the most experienced sergist will enjoy making a set!

My Ideal Pattern Weights
Since I designed these myself, I wasn’t limited to features currently available in a pattern weight. I considered what features I would like in a pattern weight and the best way to construct it using a serger. Below is the list of criteria I used to design my ideal pattern weights:
- made using only only my serger
- no hand sewing
- not too large
- fairly heavy for its size
- a handle to make it easy to pick up and move
I’m very pleased with my pattern weights. So pleased that I thought you may enjoy making them too. And so I created Jen’s Serger Pattern Weights Tutorial to share with you.
Serger Techniques Used
- 4 thread overlock stitch
- securing ends at the beginning and end of a seam
- wrapped corners technique for perfect corners (Why clip corners to reduce bulk when you can wrap your corners instead!)
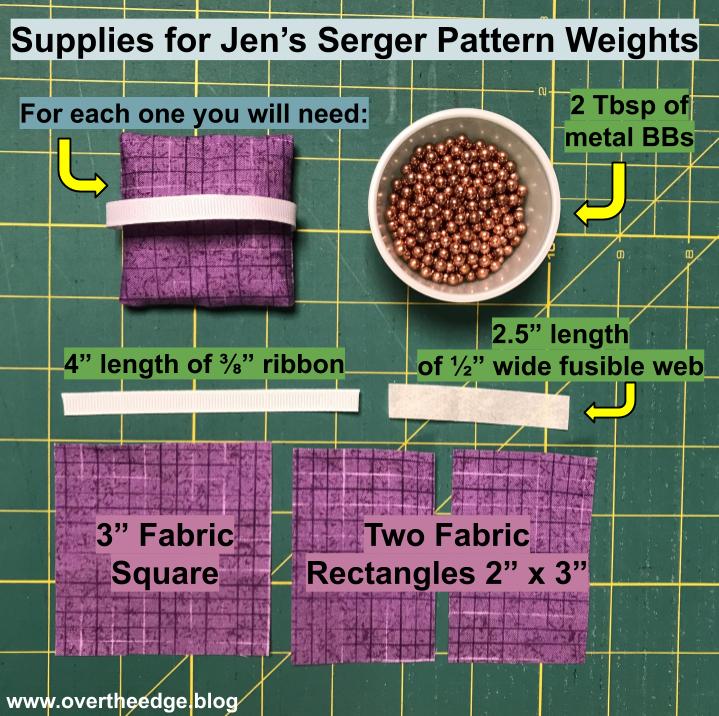
Supplies for Jen’s Serger Pattern Weights
Here’s what you need to make one pattern weight:
- 3” x 7” piece of fabric cut into one 3”x3” square and two 2”x3” rectangles
- 4” piece of ⅜” ribbon
- 2.5” of ½” wide fusible web like Steam a Seam 2
- 2 Tablespoons of metal BBs (like the kind you use in a bb gun)
To make 10 -12 pattern weights you will need:
- ¼ yard of 45” wide fabric (this gives a little wiggle room for mis-cuts)
- 1 ⅓ yards of ribbon, ⅜” wide or as desired
- ⅞ yard of ½” wide fusible web
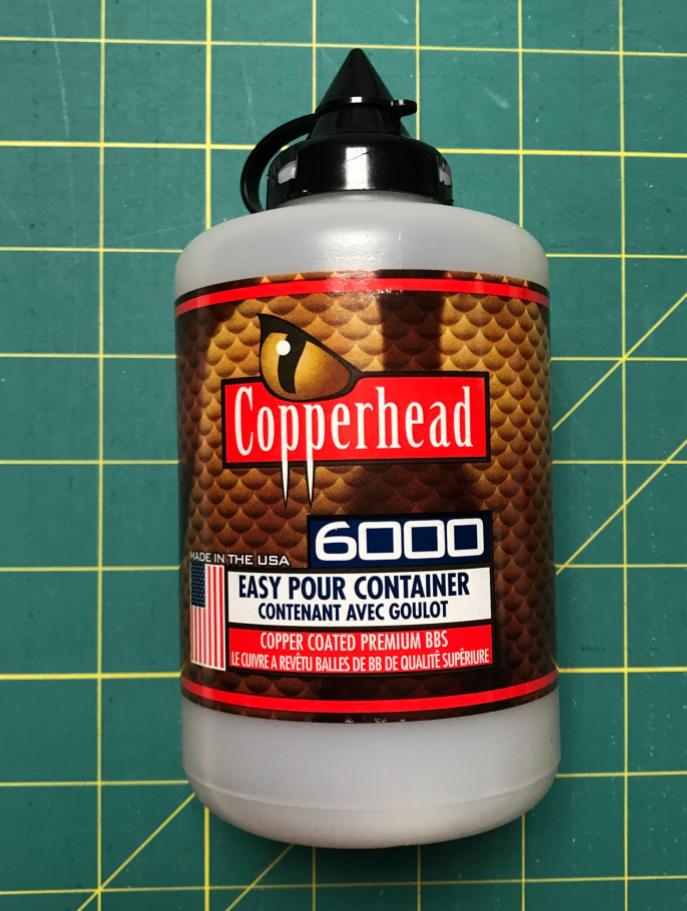
- Container of 6000 BBs
These are the BBs I used. This size container will make about 10-12 pattern weights. If you can’t find them at your local sporting goods store, I have included an Amazon link in my Resources section at the bottom of this tutorial.
Equipment
- basic serger, capable of 4 thread overlock stitch
- 4 cones coordinating thread
- tool for poking out corners
- Wonder clips (or pins)
Instructions for Making Jen’s Serger Pattern Weights
After cutting out your pieces as listed in the Supplies section, follow these steps to serge a pattern weight.
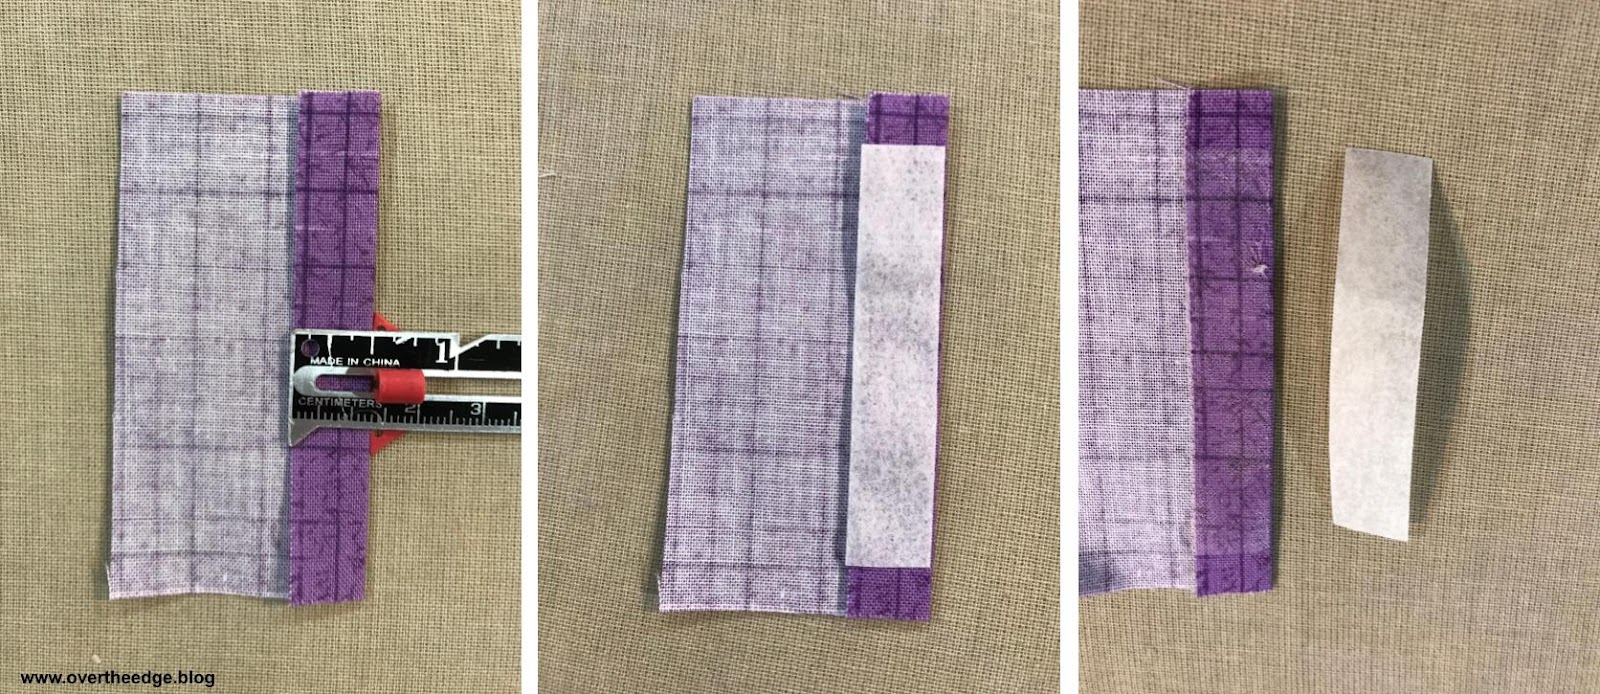
Prepare Back Pieces
Press under a long side of one 2″ x 3” back piece by ½”. This piece should now measure 1.5” x 3”.
Center the fusible web on top of the turned under part and fuse in place. You can peel the paper off now, or you can remove it in a later step.
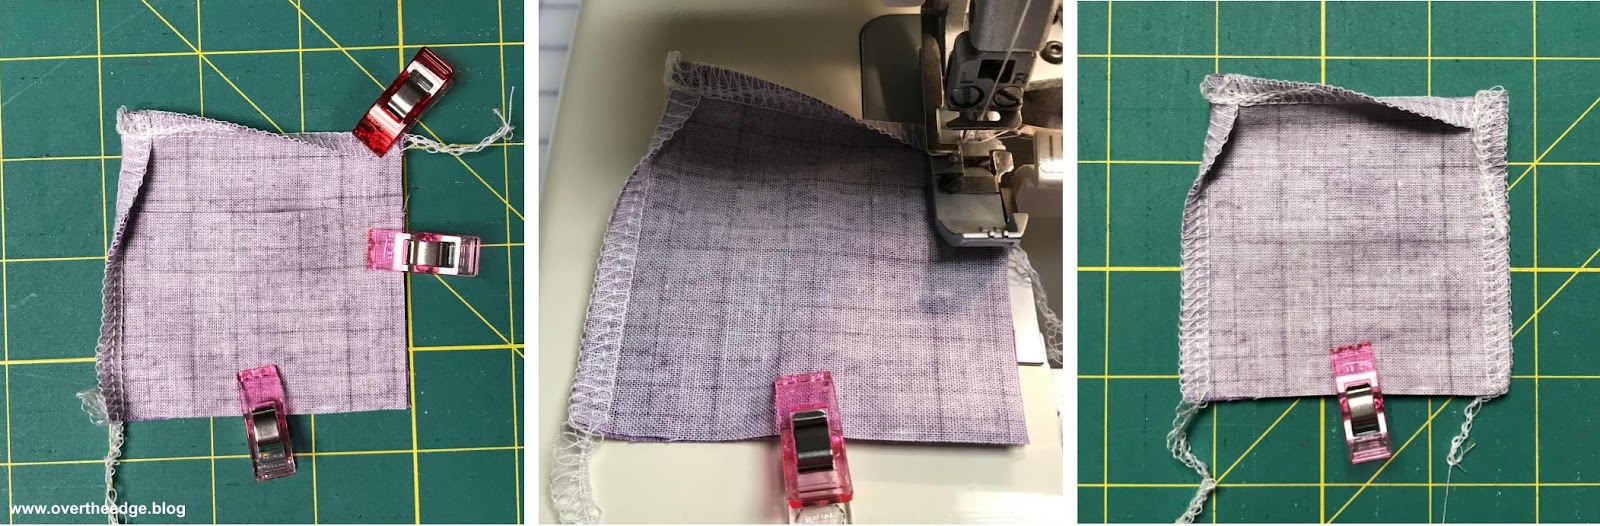
Assemble Pieces for Serging
Lay the 3” square right side up. Center one end of the ribbon on the left side.
Place the back piece with the fusible web right side down on the left side, on top of the ribbon. Clip in place, securing the fabric and the ribbon.
Make a little fold in the center of the ribbon, so the other end of the ribbon is flush with the right edge of the square.
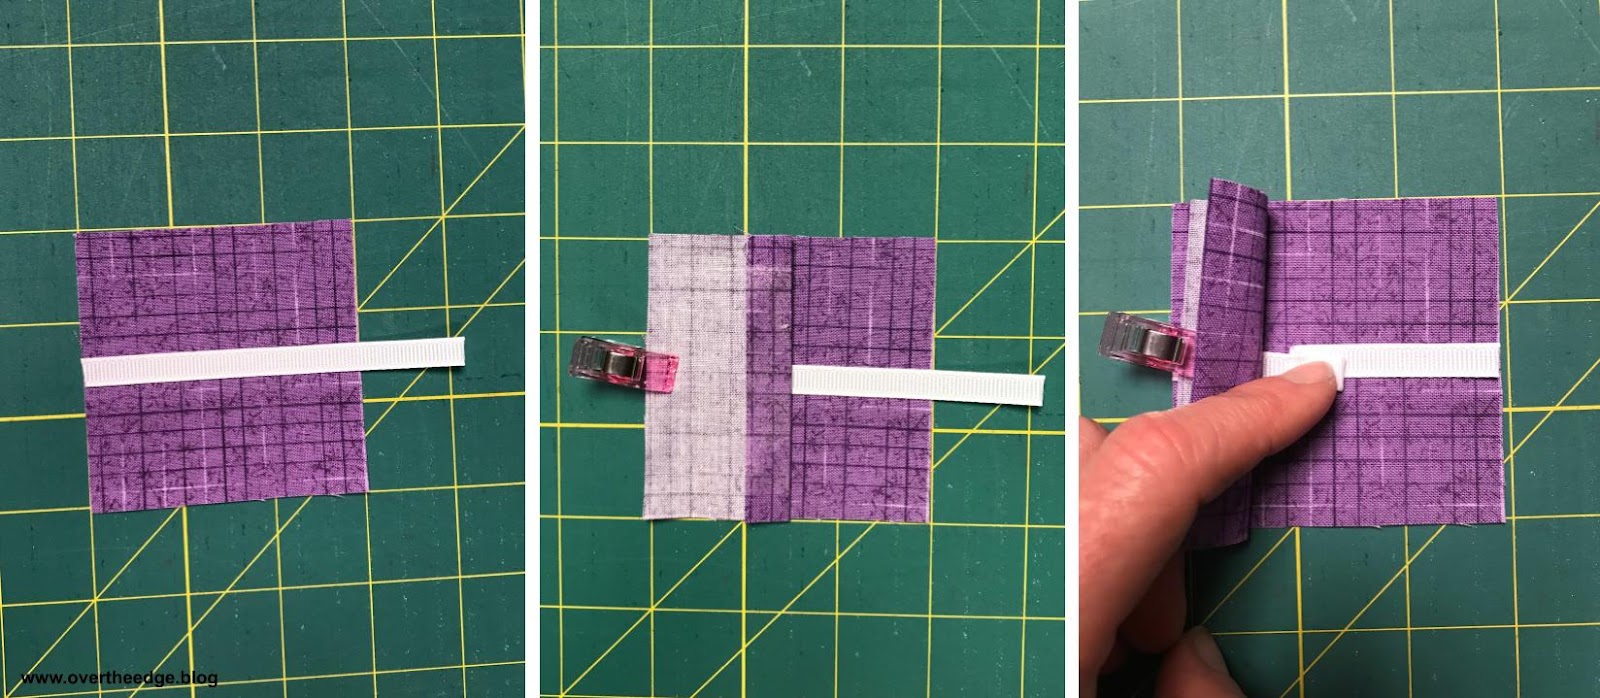
Temporarily clip the the right edge of the ribbon in place.
Lay the other back piece right side down on the right side of the square, aligning raw edges. This back piece should cover the fusible web on the other back piece. Clip in place, securing both the fabric and the ribbon.
Now clip the fabric together on the top and bottom sides, so all 4 sides are secure.
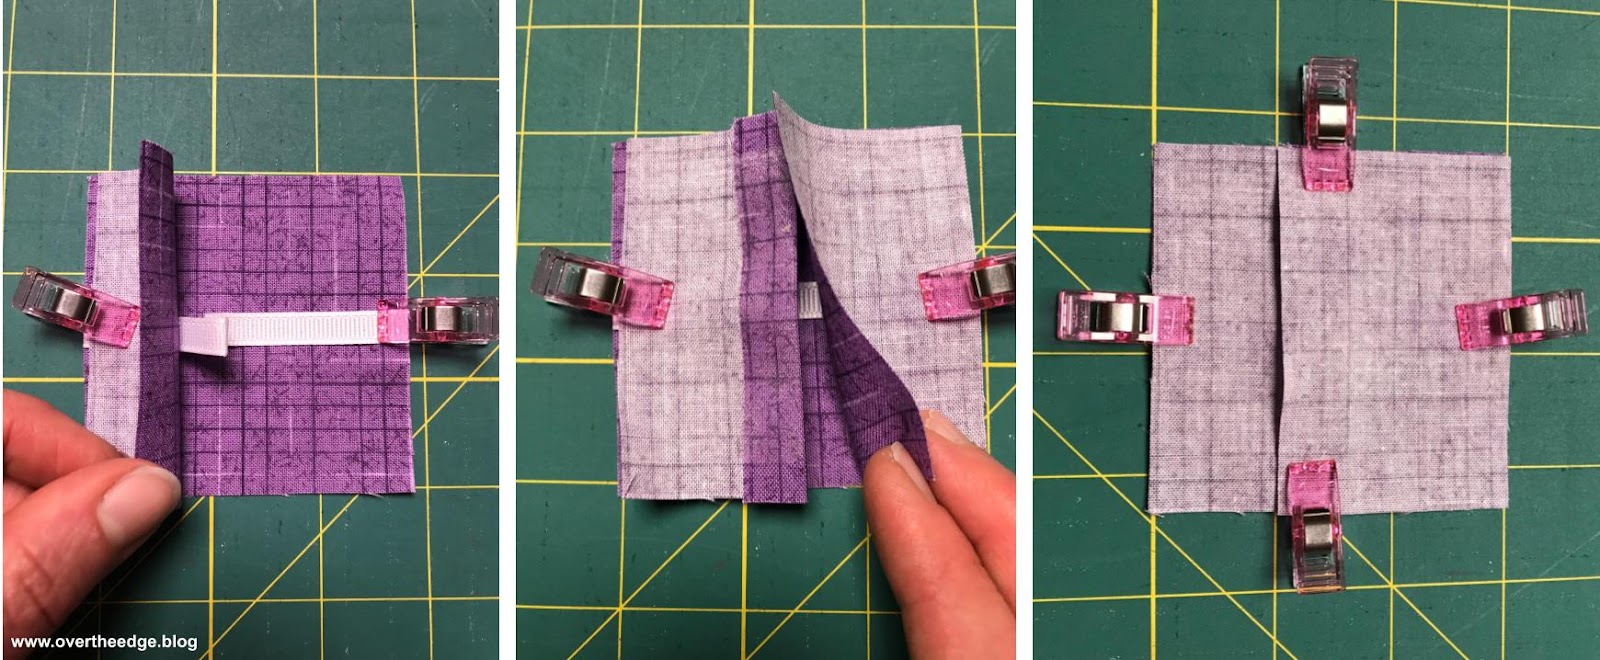
Set up Serger
Set up your serger for a 4 thread overlock stitch, with a standard cutting width and a stitch length of 2.5.
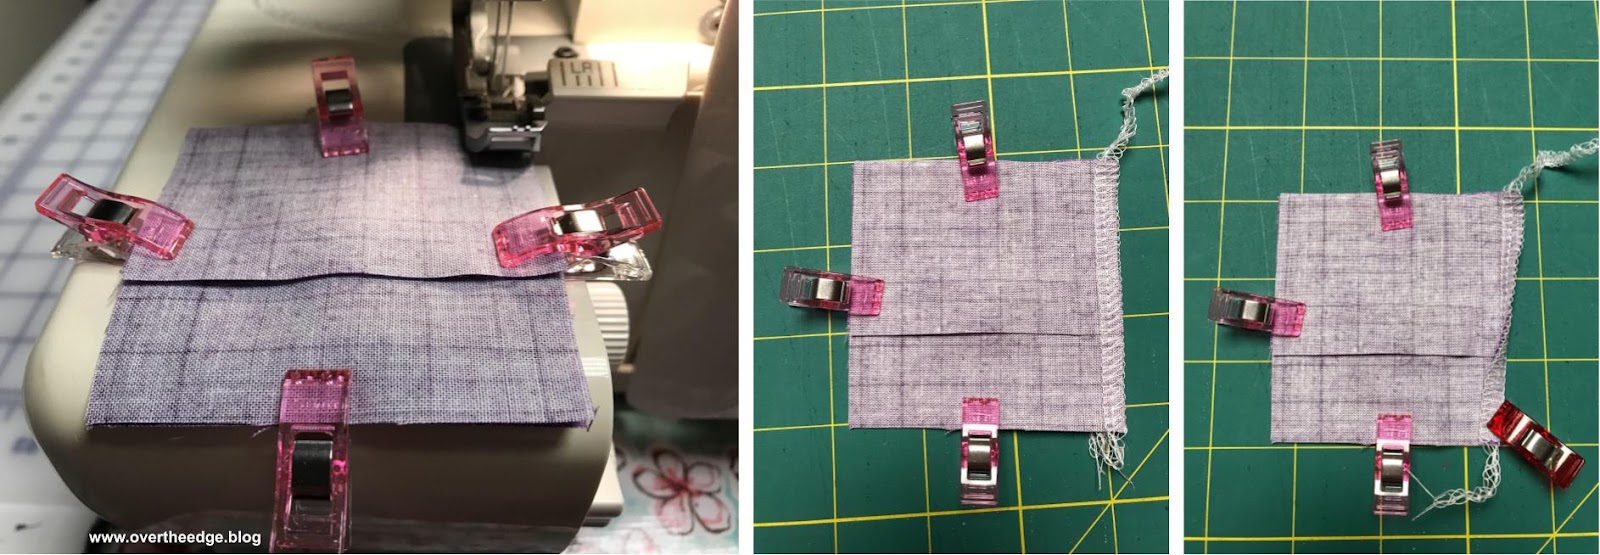
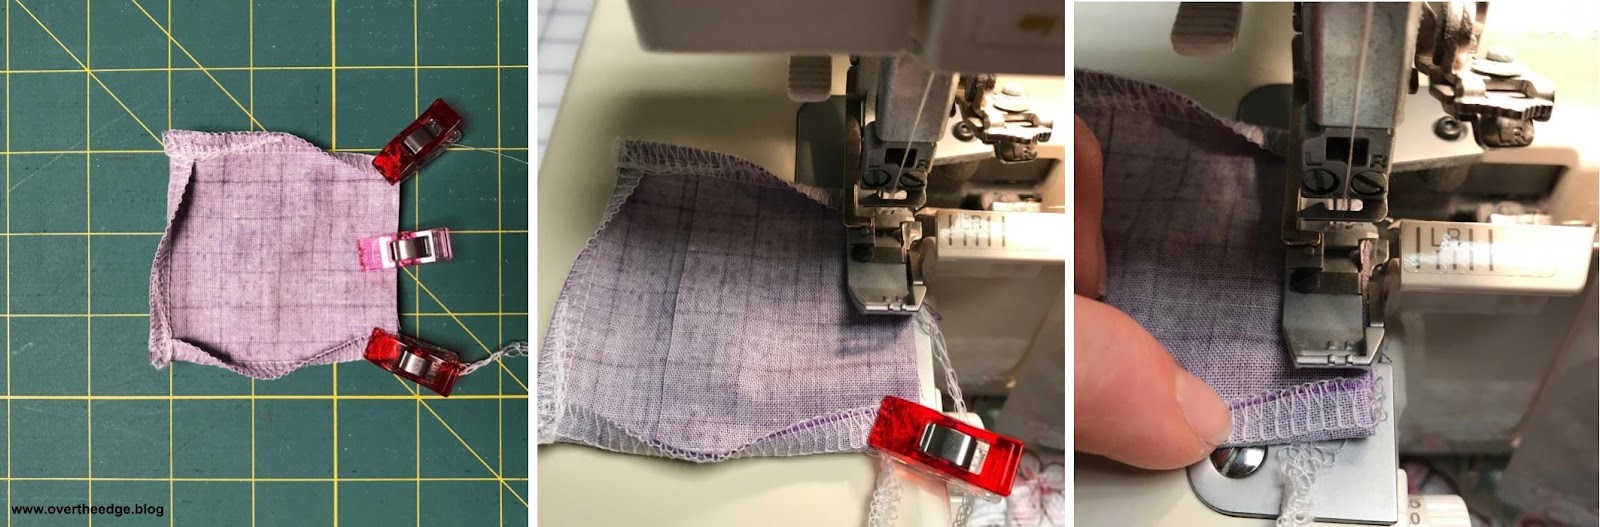
Serge First Seam
Place your clipped pattern weight on the bed of your serger, aligning the raw edge of the one side with the blade. Don’t cut any fabric off. Keep your raw edges next to the blade, just skimming stray threads as you serge.
Serge your first side of the square, chaining off at the end. (For this project there is no need to lock your stitches at the beginning or end of the first seam – these ends will be secured in future steps).
At the end of your first seam, take the seam allowance and fold it over, clipping in place. This is the first step of creating a “wrapped” corner. A wrapped corner eliminates the need to trim your corners to reduce bulk, as you would with traditional sewing machine corners. For more information about wrapping corners with a serger visit my pillowcase tutorial:
https://overtheedge.blog/tutorials/his-hers-serger-pillowcases-tutorial/
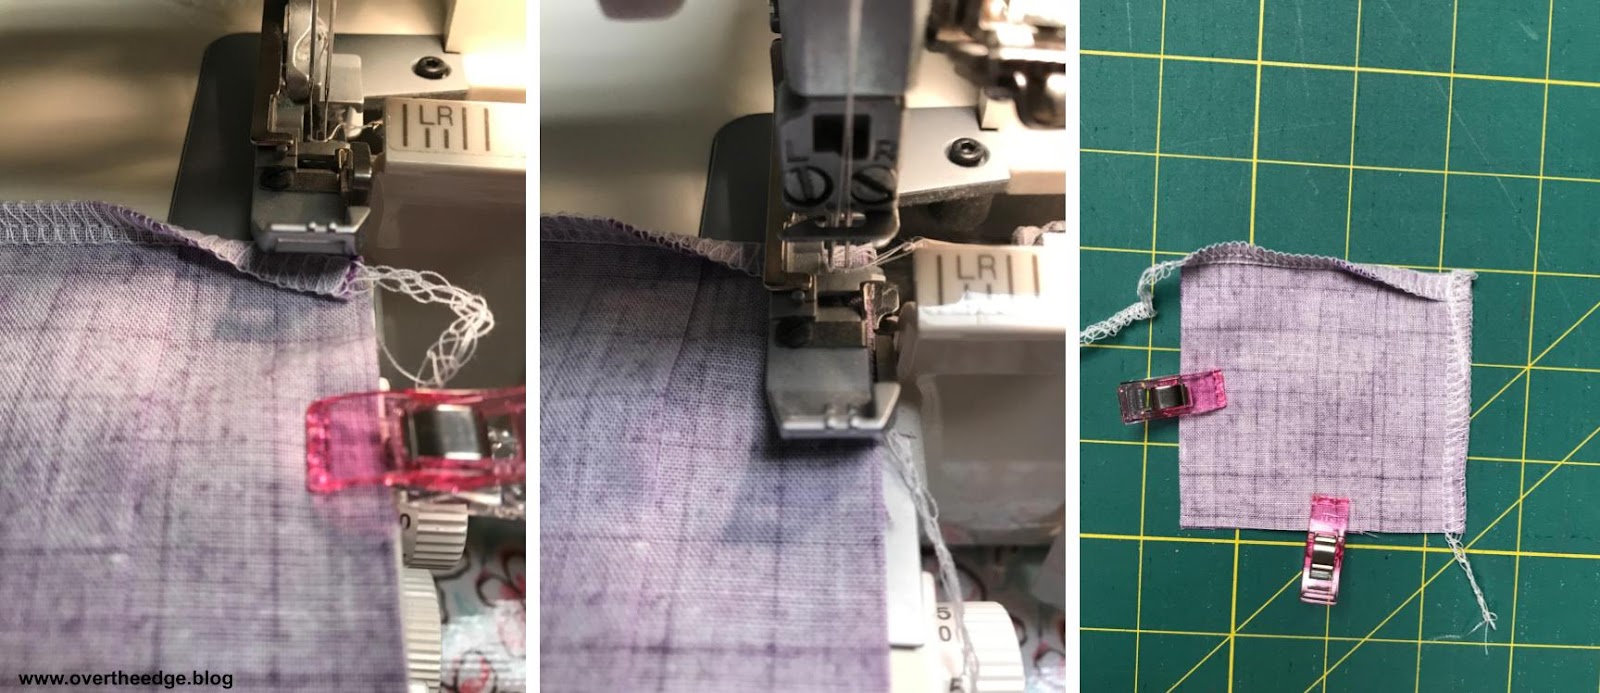
Serge Second Seam
Now serge the second side of your pattern weight, beginning with the corner that you just folded or “wrapped”. The raw edge should be aligned with your blade. Again, you are not cutting off any fabric, but just skimming stray threads.
You will need to lock your stitches at the beginning of this seam. I did this with my serger, by taking 2-3 stitches into the seam, lifting my presser foot, smoothing out the thread tail and swinging it under my foot and in front of the blade. Then I continued to serge, and the thread tail was trimmed and locked in the seam.
You could also secure the ends after you are done serging, by tying the ends in a knot, or taking a needle and thread and weaving them under some stitches.
I have included a few links in my Resources section on how to secure the ends of a serger seam.
You do not need to lock the stitches at the end of this seam, as they will be secured when you serge the next seam.
Serge Third Seam
At the end of the second seam you just serged, fold over the seam allowance to create a wrapped corner and clip in place.
Serge over the folded seam allowance, lock your stitches at the beginning of the seam, and continue to serge the third side. There is no need to lock your stitches at the end of this seam.
Serge Fourth Seam
For the fourth and final side, you will need to fold over the seam allowances to wrap your corners at both the beginning and the end of the seam and clip in place.
Serge over the folds as you complete the last seam, securing your stitches at both the beginning and the end of this final seam. I have included a few links in my Resources section on how to secure the ends of a serger seam.
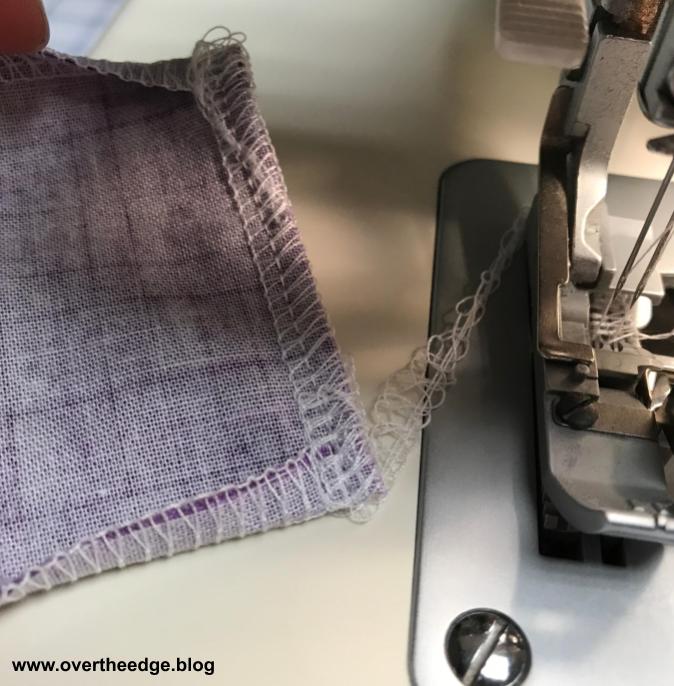
Here is what the seams should look like after you have finished serging all four sides. They will be twisted on the wrong side, but when you turn it right side out the corners will be flat and look really nice! And the corners will stay strong and won’t pop open under stress, because they are not clipped close to the stitches.

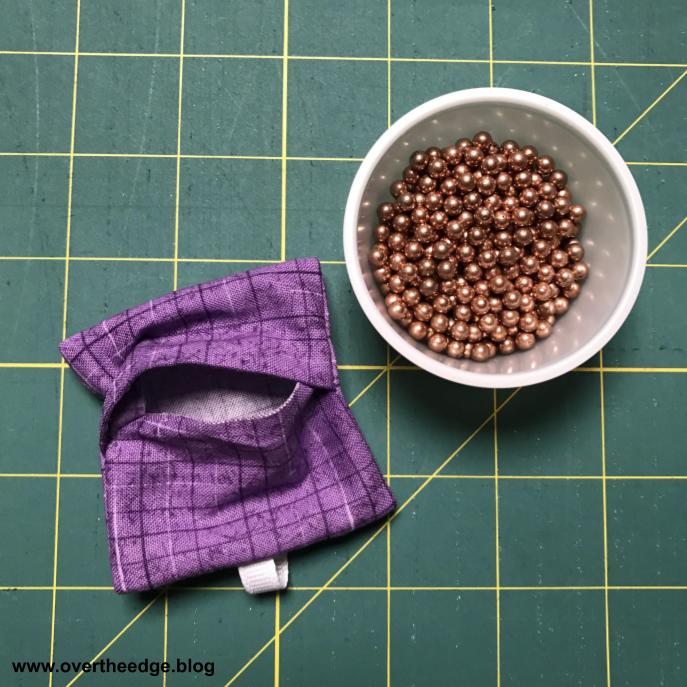
Turn Right Sides Out and Fill
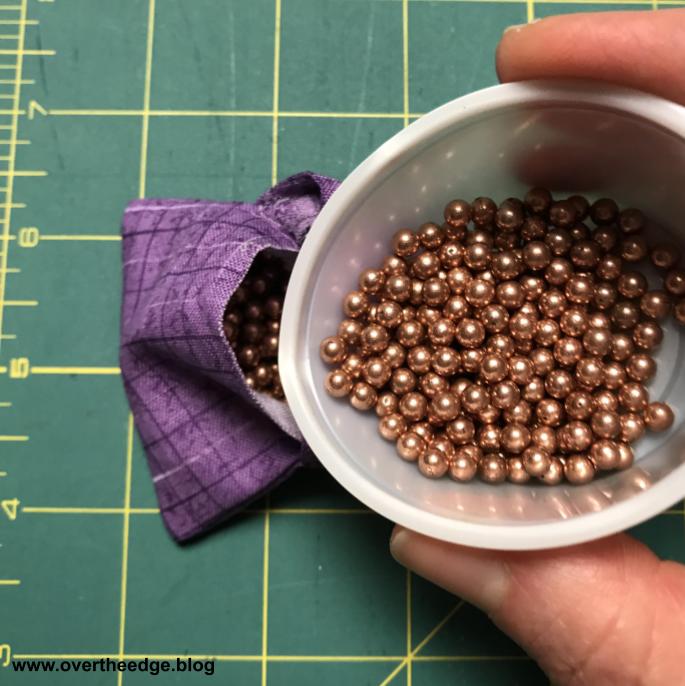
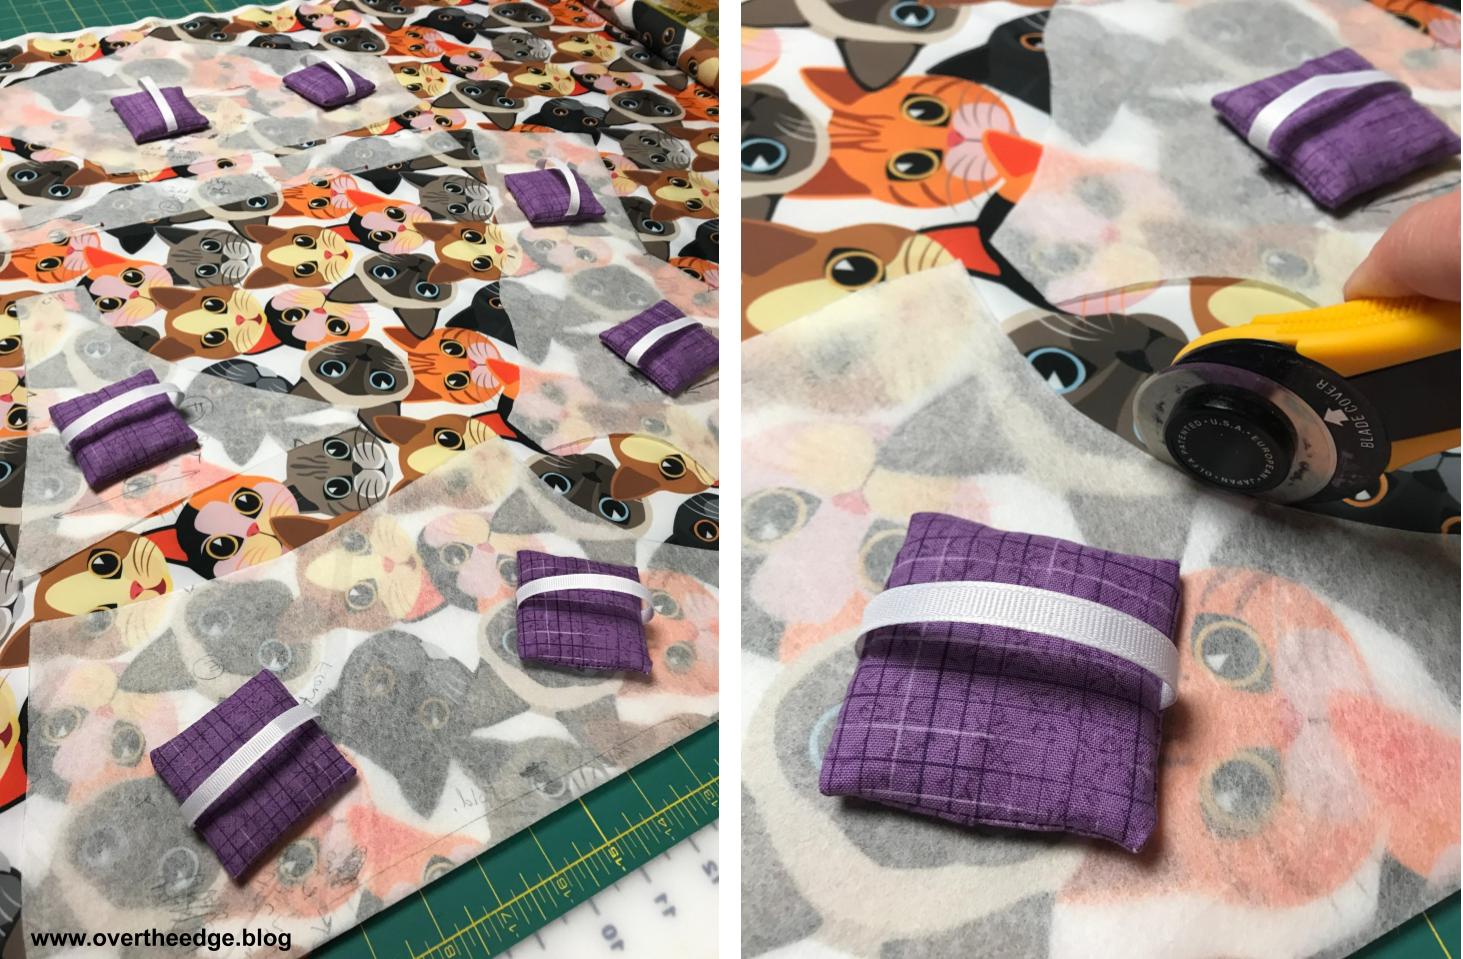
Reach in through the opening in the back, and turn your pattern weight right side out. Poke out your corners as necessary.

Carefully fill your pattern weight with the BBs through the opening in the center back.
Fuse Opening Closed
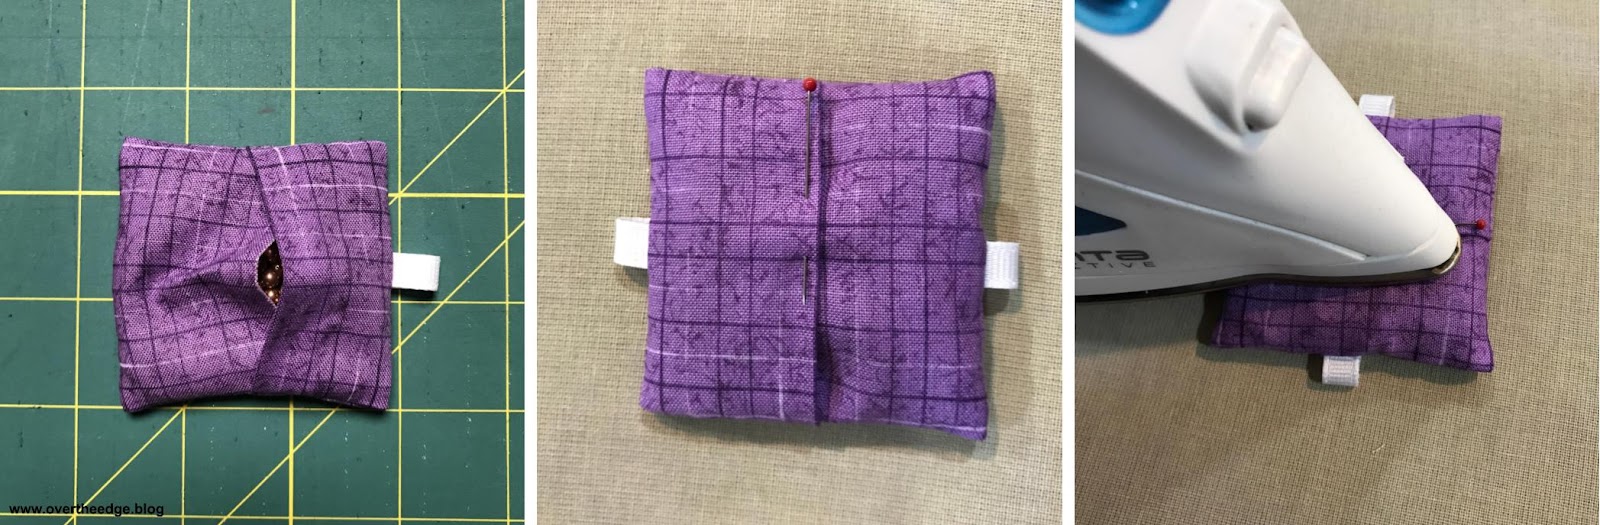
After filling, adjust the center back by overlapping the top back piece with the fusible web on the other back piece, so that the “seam” is centered on the back. (Remove the paper from the fusible web if you haven’t yet done so.) Pin the “seam” in place to hold (using a pin that won’t melt with the heat of the iron.).
Fuse the web in place using an iron per the directions for your web. Yes, you are fusing on top of a bunch of BBs, but that’s OK. Make sure you get a good strong fuse – you don’t want your BBs to spill out while you are using your pattern weights! You can hand sew this opening if you prefer.
Completed Pattern Weights
Here is a top and bottom view of a finished pattern weight.
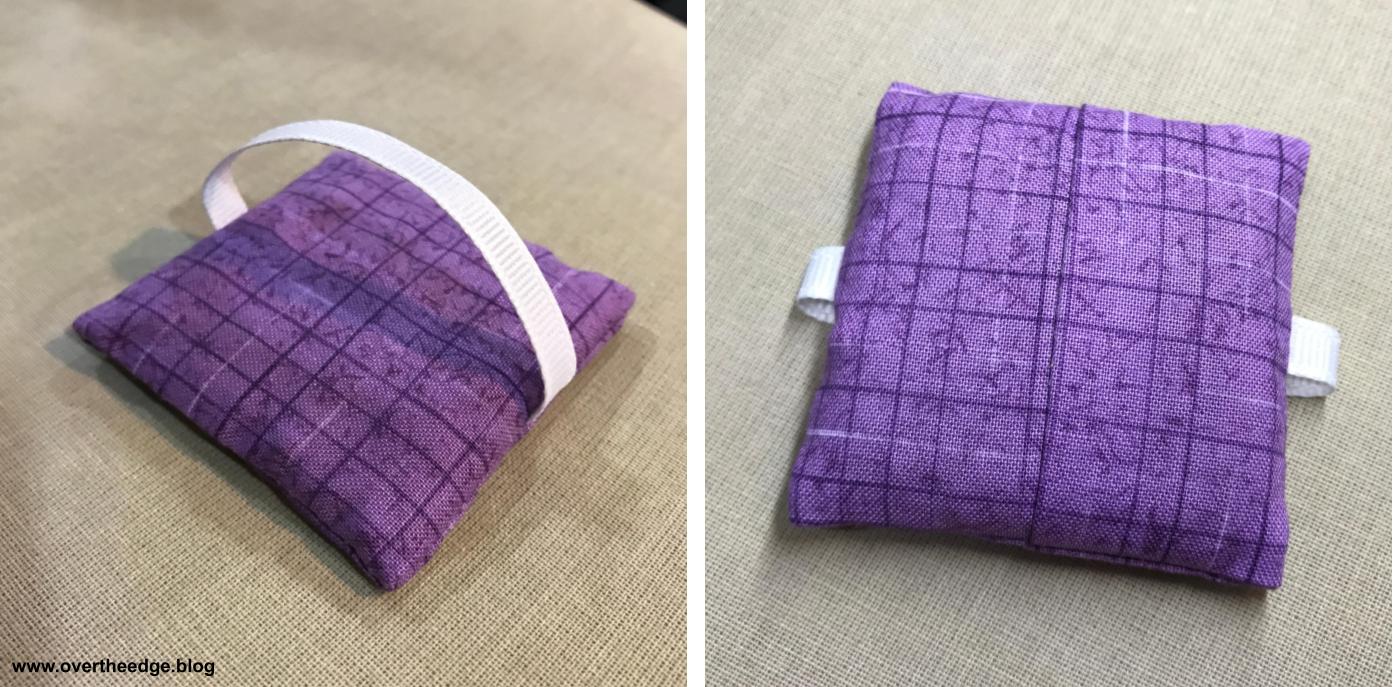
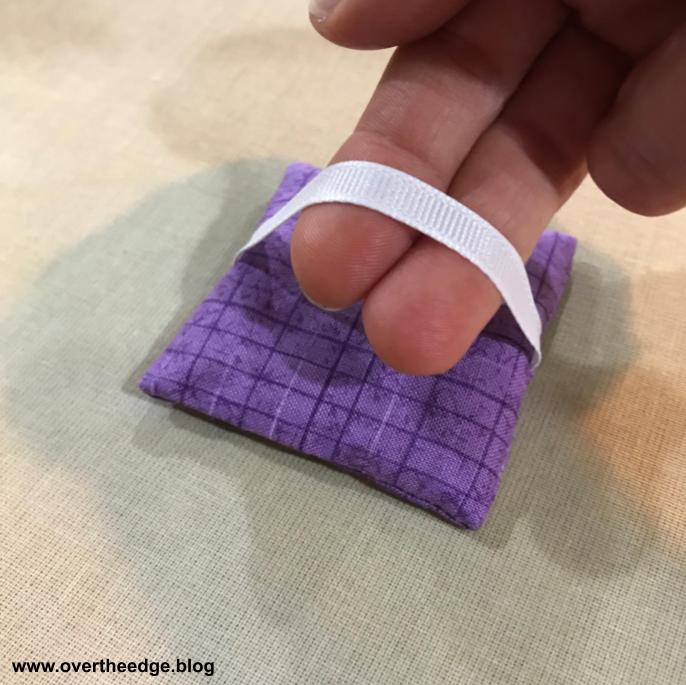
I love the nice little finger loop which makes it easy to pick up the pattern weight and move it around.

Here’s a view of my pattern weights in action on my daughter’s purr-fect swimsuit!
Jen’s Serger Pattern Weights Tutorial
I’d love to see the pattern weights you make using my tutorial. Post your photos on my Facebook page at https://www.facebook.com/overtheedge.sergingwithjen/. Add your photo in a comment within the post – Serge a Set of Pattern Weights.
I hope you enjoyed this tutorial and are inspired to serge!

Resources
https://reallyhandmade.com/five-ways-to-finish-a-serger-thread-chain/