Learn to quilt as you go using a serger and make a pair of colorful placemats for your table. You can use this technique for a variety of other projects too.

“Quilt as you go is a fun technique that allows you to get the whole project finished at one time–the piecing and quilting are done together so that when you’ve completed the top, all you have left to do is bind the project.” Quote from www.allpeoplequilt.com.
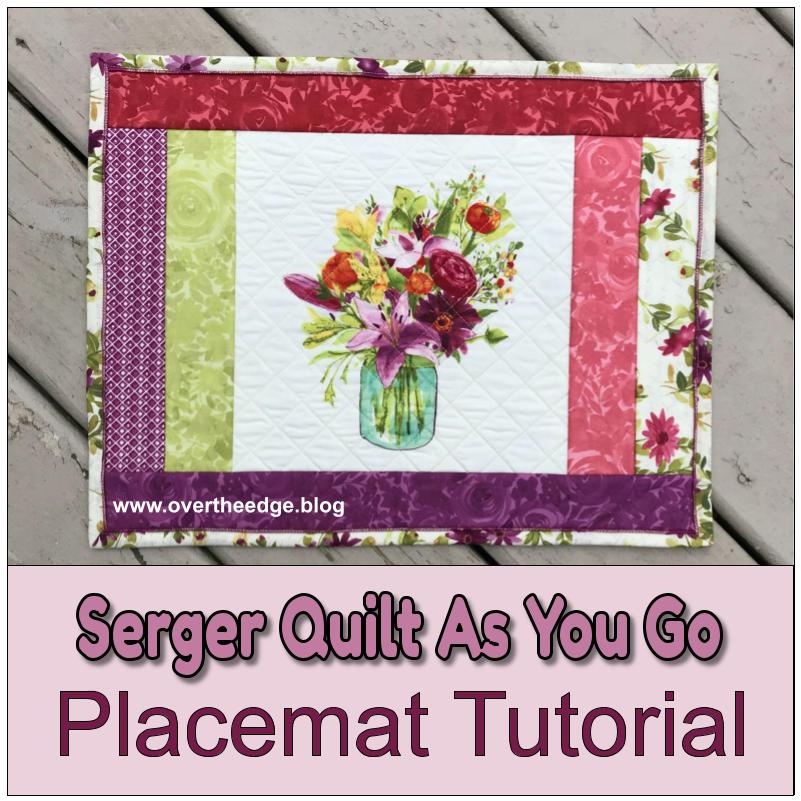
Serger Quilt As You Go
You may be familiar with the process of quilting as you go using a sewing machine. But this technique is a little different using a serger. When you use a serger, the top, batting and backing are all cut into pieces and layered together before serging. After you serge each set of layers, you flip out the layers and press them. Then you repeat the process until you reach the desired size. The serger stitches compress the seam, making the batting within the seam a little less bulky.
The final results yield a quilt that looks like it has been “stitched in the ditch” because all the layers are connected at the seam lines. The size of your strips or pieces are only limited by the maximum distance between quilting stitches for your batting.
Use this technique to make bags, table runners, quilts and more. See the Resources section at the bottom of this tutorial for a link to my blog post about other ideas for quilt as you go on your serger.
Supply List – Serger Quilt As You Go Placemat Tutorial
Finished dimensions approximately 14” x 18”
Tools
- Serger capable of four thread overlock
- Serger accessories and manual
- Sewing machine for quilting center panel and applying binding
- General sewing supplies – scissors, pins, needles, marking pen, etc.
- 24” ruler, rotary cutter, mat
- optional – Wonder Clips – work well for holding layers together
Fabric and Notions – Makes Two Placemats
- Themed fabric for placemat centers – 2 fussy cut fabric squares 10.5” x 10.5”
- Fabric strips for top side of placemat – You will need a minimum of 6 – 2.5”x WOF cotton strips (but you can use additional strips for more for variety)
- Backing fabric*
- ½ yard of 45” wide fabric
- Binding – 1/3 yard of 45” wide fabric
- 1/3 yard of 60” wide thin batting (I used a thin synthetic)
- 4 cones of serger thread for construction and optional thread for rolled hem on binding
*Note on Backing Fabric: If you would like to make your placemats reversible with “tops” on both sides here’s what you need instead of the 1/2 yard of fabric for the back. Fussy cut 2 fabric squares 10.5” x 10.5″ and a minimum of 6 – 2.75” x WOF strips.
Instructions
Please read all the instructions before you begin.
Cutting Instructions
Cut backing fabric into:
- 2 – 10.5” x 10.5” pieces
- 8 – 2.75” x 11” pieces
- 4 – 2.75” x 19” pieces
Cut 2.5” wide fabric strips for front: ·
You may want to determine the layout of your pieces before you cut them to size.
- Using 4 strips, Cut one 19” length and one 11” length from each strip
- Using 2 strips, Cut two 11” pieces from each of strip
(you will have a total of 4 – 2.5” x 19” and 8 – 2.5” x 11” front pieces)
Cut batting into:
- 2 – 10.5” x 10.5” pieces
- 8 – 2.5” x 11” pieces
- 4 – 2.5” x 19” pieces
Cut binding into:
- 4 – 2.5” x WOF strips, and sew together into one continuous binding strip
Cutting Notes: The fabric strips for the front of the placemat are cut 2.5” wide and the fabric strips for the backing are cut 2.75” wide. The extra width on the backing strips helps to account for “turn of cloth” with the bulkier batting seams.
Sewing and Serging Instructions
Quilt Center Panels
Make a quilt sandwich from your 10.5” squares of backing, batting and fussy cut center panel. Pin and quilt as desired with a sewing machine, by hand or with a serger chain stitch. I quilted the panels of my placemats with a 1” grid “on-point” layout using a sewing machine.


Strip Layout
Layout your strips in a pleasing arrangement around your pre-quilted center panel. The 11” strips are for the sides of the placemat and the 19” strips on for the top and bottom.

Add Strips to Sides of the Center Panel
Once you’ve decided on your layout, begin the quilt as you go technique with the right and left sides of the placemat. You will need a pre quilted center panel, four 11” strips of fabric for the front, four 11” strips of batting, and four 11” strips of backing fabric.

Serger Quilt As You Go Technique
- Layer the pieces
- Serge the seam
- Flip the strips
- Press
- Trim and square up as needed
- Repeat
See instructions and diagrams below.
Layer the Pieces
Step 1 – Lay one 2.75” x11” backing strip right side up on the table.
Step 2 – Lay your pre-quilted center panel right side up on top of the backing strip, lining up the right edges and having raw edges even. (The wrong side of the center panel will be against the right side of the backing strip.) The strip will be slightly longer than the center panel.
Step 3 – Lay one front 2.5” x 11” strip right side down on top of the center panel, lining up the right edge and having raw edges even. (The right side of the front strip will be against the right side of the center panel.) This strip should align with the backing strip on the bottom.
Step 4 – Layer a 2.5”x11” batting strip on top of the front strip, lining up the pieces as before.
Make certain everything is aligned and even for every seam that you serge.


Serger Seams with Batting
I have seen tutorials where the layers are stacked together a bit differently. I chose to layer it the way I showed you to help hide the bulky seam allowances from the front side of your placemat. In these placemats the layer of batting ends up just under the fabric on the front and adds a little bit of extra padding to hide the seam allowances underneath.
In the photo below you will notice that the seam allowance “lump” is more noticeable on the back side than the front side. It is also more noticeable because you can see my red thread through the white fabric. I decided to use the same thread throughout the entire project. In retrospect I should have taken the time to switch to white thread for the outer white fabric border. The layer of batting helps to hide the red thread on the front side of this QAYG project.

Serge the Seam
I use wonder clips instead of pins to secure the layers for serging. They work well with the layers. I find that bulky layers tend to bend my pins. And I don’t want to accidentally cut off the tips of my pins with my serger.
Using a 4 thread overlock stitch set at standard settings, serge the right edge, just skimming the fabric and trimming stray threads with your blades. (You don’t want to trim much.)
Flip the Strips
Flip the strip layers from the top and bottom away from the center panel, enclosing the seam allowance you just serged.
The photo below shows the process of flipping the strips away from the center panel so that the right sides of the fabrics show on the front and back side of the placemat.

Press
Press the seam from both sides.

You did it! You just created your first “quilt as you go” seam. The front, back and batting pieces were all “quilted” together as you serged the seam.
Continue Adding Side Strips
Do the same procedure on the left side of the center panel. You now have a strip on either side of the center panel.

Trim Side Raw Edges
You may see a little batting or backing fabric peaking out from behind the fabric after they have been pressed. Trim the raw edges of the long sides of the 2 strips that were just added to 2.25” wide or as needed to even them up. I put my placemat on my cutting mat and use the lines on the mat to help keep the rectangular shape of my placemat.

Now add another set of 11” backing, front, and batting strips to the right and left side of the center panel. Pin or clip to hold in place. Serge the seams. Flip open and press. You now have two fabric strips on either side of the center panel.

Trim Strips Even with Top and Bottom Edge
Now “square up” the placemat by trimming the top and bottom of the placemat even with the center panel. Use the lines on your cutting mat as a guide to keep it rectangular in shape (unless you would like it to be wonky!)

Add Top and Bottom Strips
Add a set of 19” backing, front and batting strips to the top and bottom of the center panel, pin or clip, serge and press open.


Final Trim
Square up the placemat to approximately 14” x 18” or as desired. My sample placemat finished at 14.5” x 18.5”.
Optional: You can serge around the edges of the placemat with a 4 thread overlock stitch to compress and secure the layers before you add the binding.

Binding
Feel free to bind your placemats as desired – there are so many options! You could use pre-folded bias tape, or a continuous quilt binding technique, or even use a decorative thread with a serger stitch such as a three thread wide overlock or a wave stitch. I finished the folded edge of binding with a 3 thread rolled hem stitch on my serger to create mock piping on my binding.

I began by folding my binding strip in half lengthwise right sides together and then pressed it. Then I set my serger up for a 3 thread rolled hem with the blade disengaged the blade so I wouldn’t accidentally cut my fold. I aligned the fold along the line where my serger would normally cut and serged the folded edge of the binding strip.
On the back side of the placemat, I placed the right side of the binding facing the backing and lined up the raw edges. I used a few wonder clips to hold the binding in place to make it easier to begin serging. Using the 4 thread overlock stitch I serged each side, serging off each corner at a diagonal and then folding the binding at the corner and serge down the next side.

Once I attached the binding, I turned it to the right side and top stitched it down with a sewing machine. In my post about quilting with a chain stitch I discussed ways to apply binding with a serger. For more information check it out at: https://overtheedge.blog/how-to-serge-a-quilt-with-a-chain-stitch


Serger Quilt As You Go Placemat Tutorial
I hope you enjoyed my serger quilt as you go placemat tutorial. I’d love to see your finished placemats!

Resources
Link to Jen’s blog post about Quilt As You Go with a Serger: https://overtheedge.blog/quilt-as-you-go-with-a-serger/
Quilt as you go with a sewing machine –
https://www.allpeoplequilt.com/how-to-quilt/machine-quilting/machine-minute-quilt-you-go