
There are many ways to use a serger flatlock stitch. This tutorial will help you master the three thread flatlock stitch for quilt piecing.
Typical Serger Flatlock Stitch
Most home sergers are capable of creating a two and/or three thread flatlock stitch. You create seams by flatlocking on the raw edges. Or you can create decorative stitching anywhere on a piece of fabric by flatlocking on a fold. A serger blind hem is a combination of both raw edge and folded flatlock stitching. Seams flatlocked with the two thread version typically open a little flatter than those flatlocked with the three thread version.
Usually with these methods you guide the fabric so that that the loops hang off of the edge. And you don’t trim any fabric with the knives. When you open the seam the fabrics within the seam lie flat and do not overlap. It takes some practice to gauge where to guide the fabric to get a nice looking flatlock stitch. It also helps to have a steady hand or a special presser foot with a guide. The amount of loop you need to leave hanging off the fabric can vary with the thickness of your fabric and the width of the stitch.
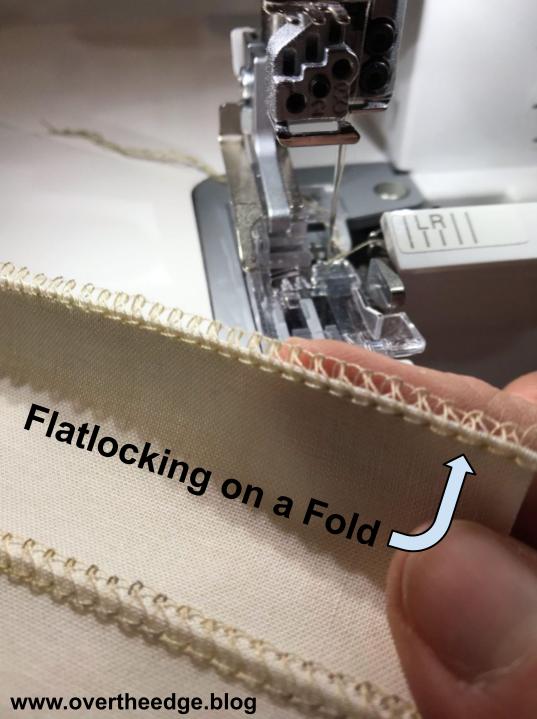
This type of flatlocking is not the focus of this tutorial. But you can learn more about it by visiting my blog post, Simply Leafy 2, at https://overtheedge.blog/simply-leafy-2/.
Three Thread Flatlock Stitch for Quilt Piecing
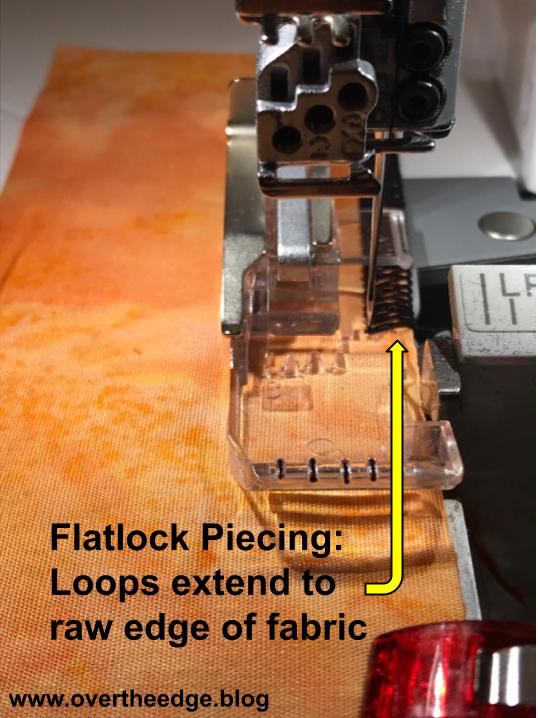
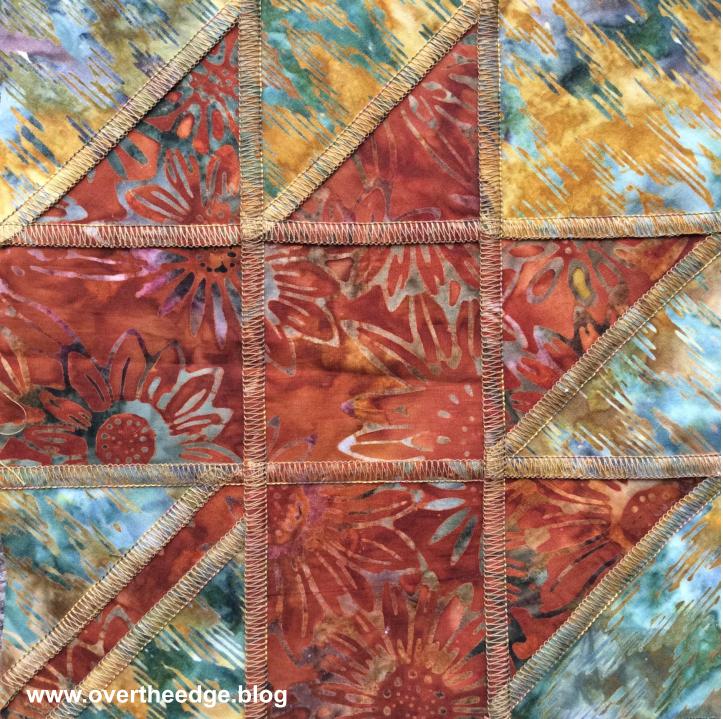
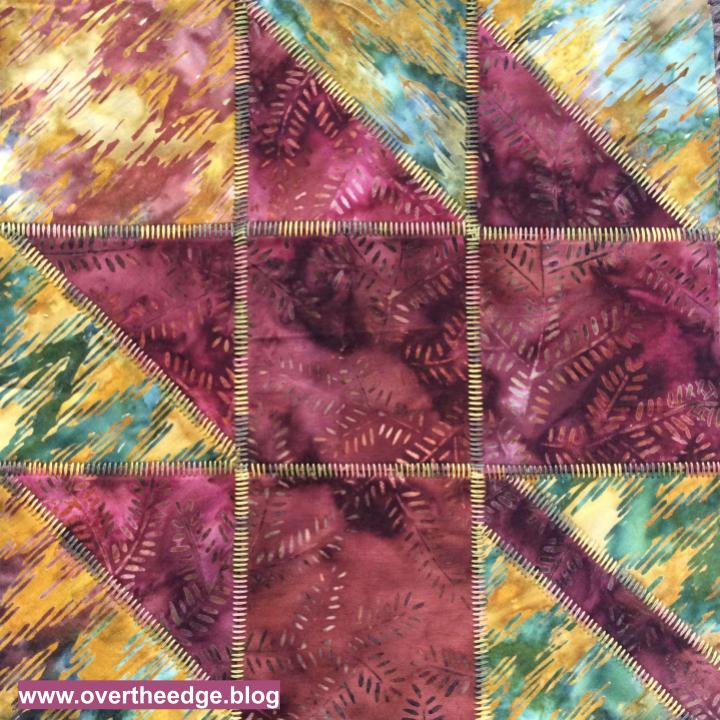
Piecing is a quilting term for joining two pieces of fabric used in a quilt block. So flatlock piecing is a term used to describe joining two pieces of fabric together in a quilt block using a serger flatlock stitch. Flatlock piecing is a good introduction to flatlock stitching with your serger. You don’t need a special foot. You can flatlock piece using your standard serger presser foot. I typically use the three thread flatlock stitch instead of the two thread version for piecing a quilt. The extra thread helps to encase the raw edges of the fabrics and keeps them from unravelling.
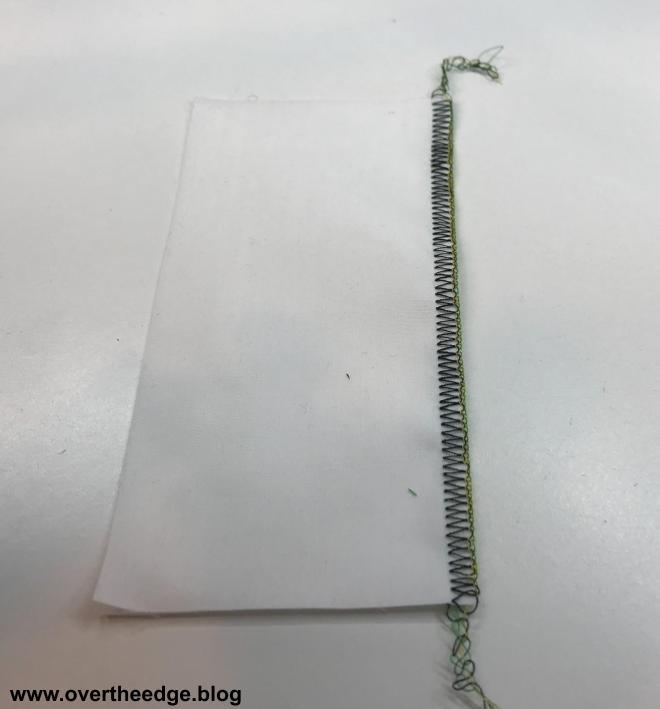
In flatlock piecing, you seam two pieces of fabric together with the knife engaged. You very slightly skim/trim the stray threads as needed at the raw edges of the fabric as you serge. The entire stitch lays on the fabric without any loops hanging off the edge. I think it’s much easier to get great results with flatlock piecing. You use your knives as a seam guide for your fabric, no matter the thickness of the fabric or the width of the stitch.
When the flatlock seam is pulled open, the raw edge of the bottom fabric folds under. So the seam is not perfectly flat. But with thinner fabrics like quilting cotton, you barely notice the fold.
Quilt blocks pieced together with ¼” flatlocked seams may be slightly larger than those pieced together with ¼” seams on a sewing machine. The slight difference in size is caused by how the fabric is folded as the seam is opened.
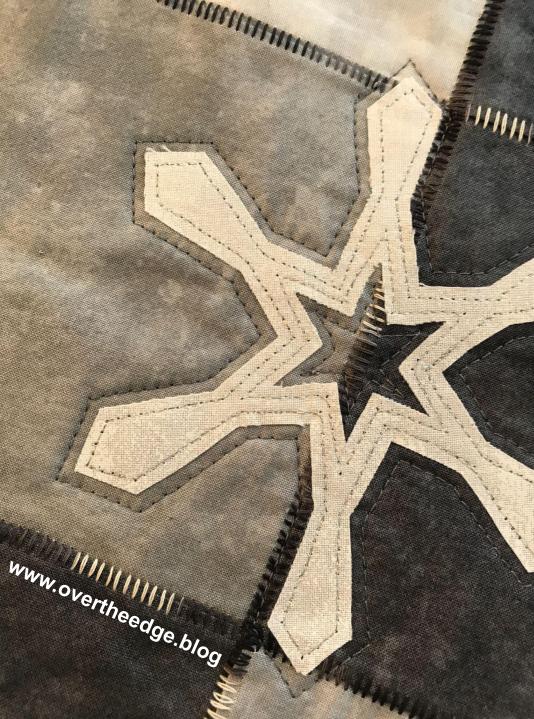
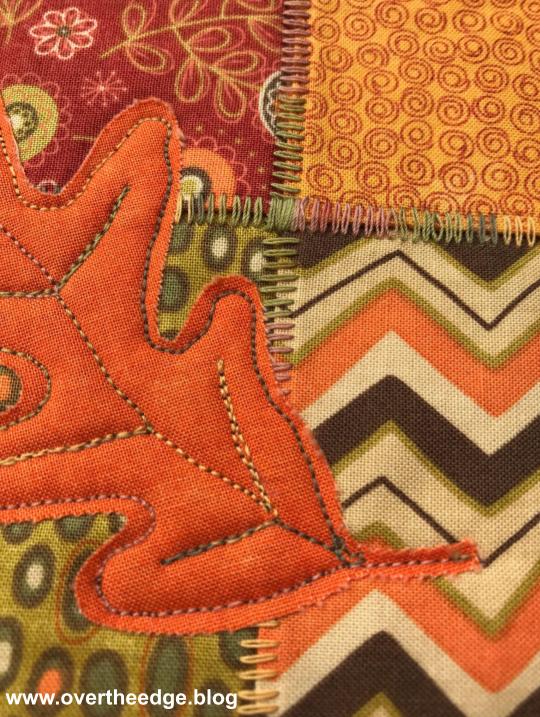
Flatlock piecing is a great way to showcase decorative threads. It is one of my favorite ways to quilt. But in my opinion flatlock piecing is best for quilts that will be gently used. Think of flatlocked quilts as beautiful sweaters. The exposed thread in all of those loops and ladders can get damaged by rough handling, just like sweaters can get snagged.

Setting up Your Serger for a Three Thread Flatlock Stitch
Refer to your manual for setting up this stitch. This stitch uses one needle (either the right or left) and both loopers.
The typical thread tensions are as follows:
- Needle thread tension is very loose
- Upper looper tension is “normal”.
- Lower looper tension is tight.
The tight lower looper tension causes the lower looper thread to form a straight line, which causes the loose needle thread to form loops that look like “V’s”.
In some sergers you set up the three thread flatlock stitch just like a three thread overlock stitch. You simply adjust the tensions of your needle thread and your loopers to convert it to a flatlock stitch. In other sergers that have “auto tensions” you usually need to follow different thread paths to create the flatlock stitch.
The Anatomy of a Three Thread Flatlock Stitch
In order to master the three thread flatlock stitch for quilt piecing, you must understand how the stitch is formed.
As you serge:
- The upper looper forms “loops” on the top side of the fabric.
- The needle thread forms “Vs” on the bottom side of the fabric.
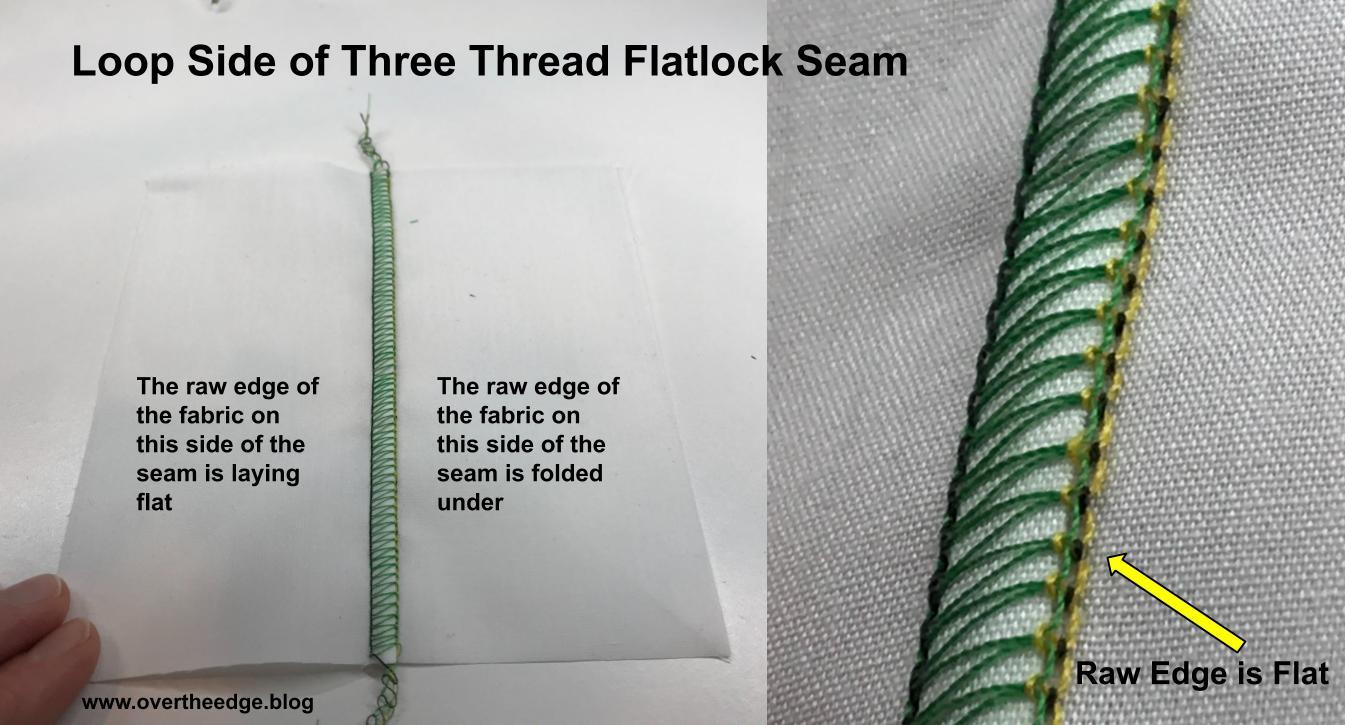
- The lower looper forms a straight line right along the raw edges of the fabric.
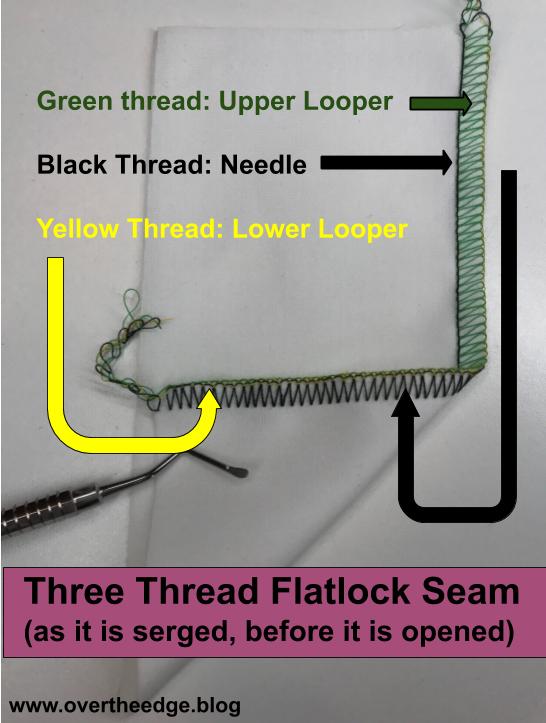
When pulled open, one side of the seam will form “loops” and one side of the seam will form “ladders”. You will also notice that one of the fabric raw edges will remain flat, and the other will fold under. The raw edge of the fabric that is on top as you serge remains flat, which you will see on the loop side of the stitch. The raw edge of the fabric that is on the bottom when you serge will fold under, which you will see on the ladder side of the stitch.

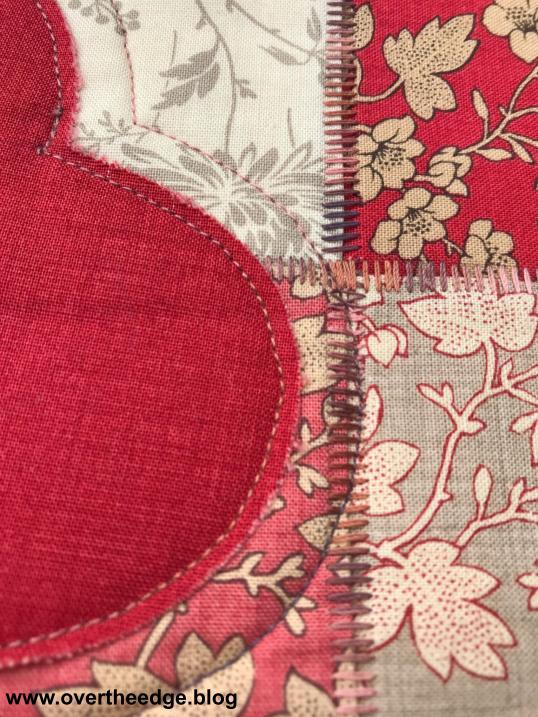
Which Side of the Flatlock Stitch is the Right Side?
You can use either the loop or the ladder side of the three thread flatlock stitch for the right side of your quilt blocks. It is a matter of preference.
Highlight Loops – If you would like the loops to show on the right side of your quilt block you need to serge with the wrong side of your fabric pieces together. You would put your decorative thread in the upper looper position.
Highlight Ladders – If you would like the ladders to show on the right side of your quilt block, you need to serge with the right side of your fabric pieces together. You would put your decorative thread in the needle position. I personally love the look of variegated thread for quilt piecing with the ladder side of the flatlock stitch.
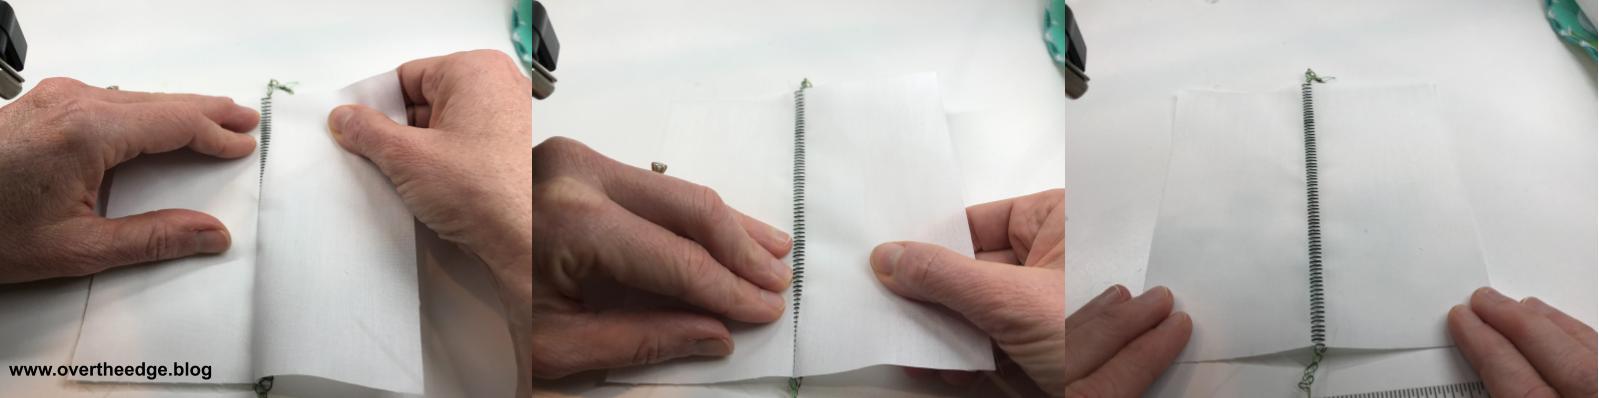
How to Open a Flatlocked Pieced Seam
The way you open the seam can help the raw edge fold under well. Of course you can just grab it and yank it open. But you may find the raw edges don’t always fold over consistently. If you work with the fabric and it’s natural tendency to fold, you will get better results. Here’s what you can do to get a better fold of the raw edge within your flatlocked pieced seam.
Place the seam with the bottom fabric side (the V side of the stitch) facing up. Insert your fingers between the two layers of fabric, placing them next to the seam.
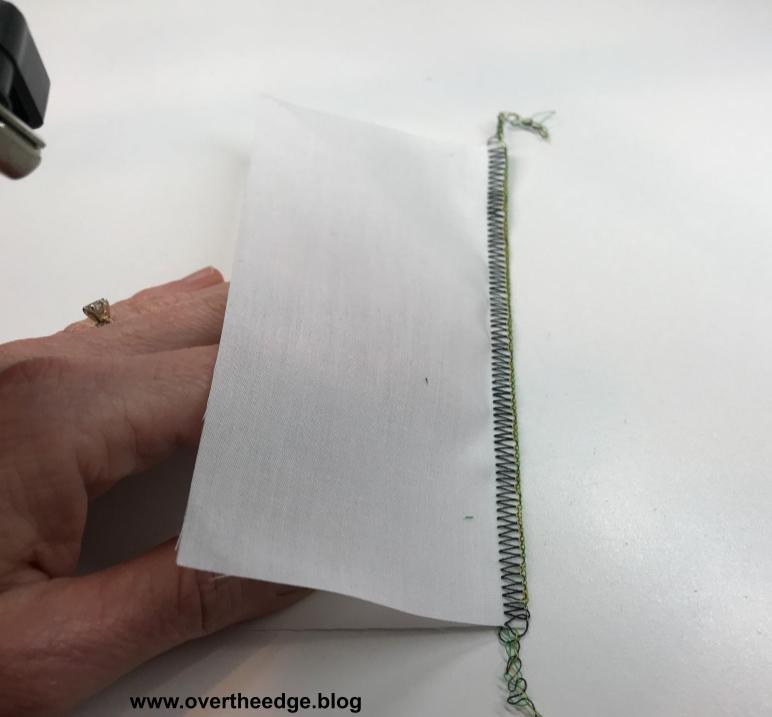
Use those fingers to hold the fabric down, while you use your other hand to pull the other piece of fabric to open the seam. Continue holding the fabric down and pulling the fabric open until you have opened the entire seam.
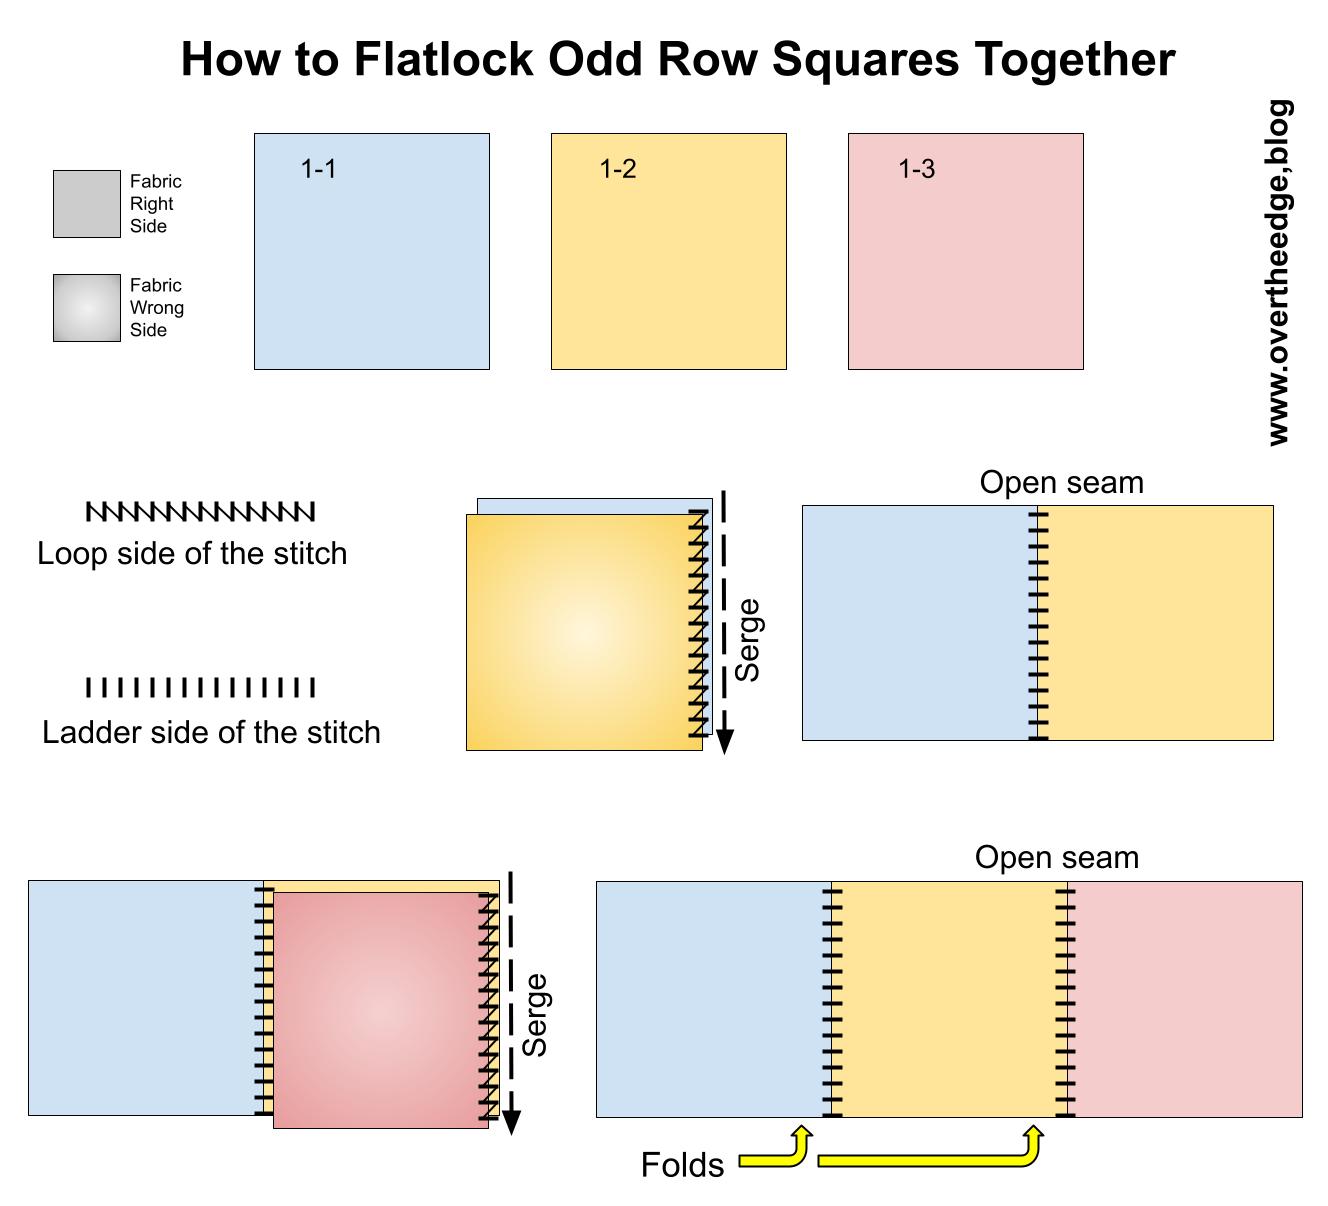
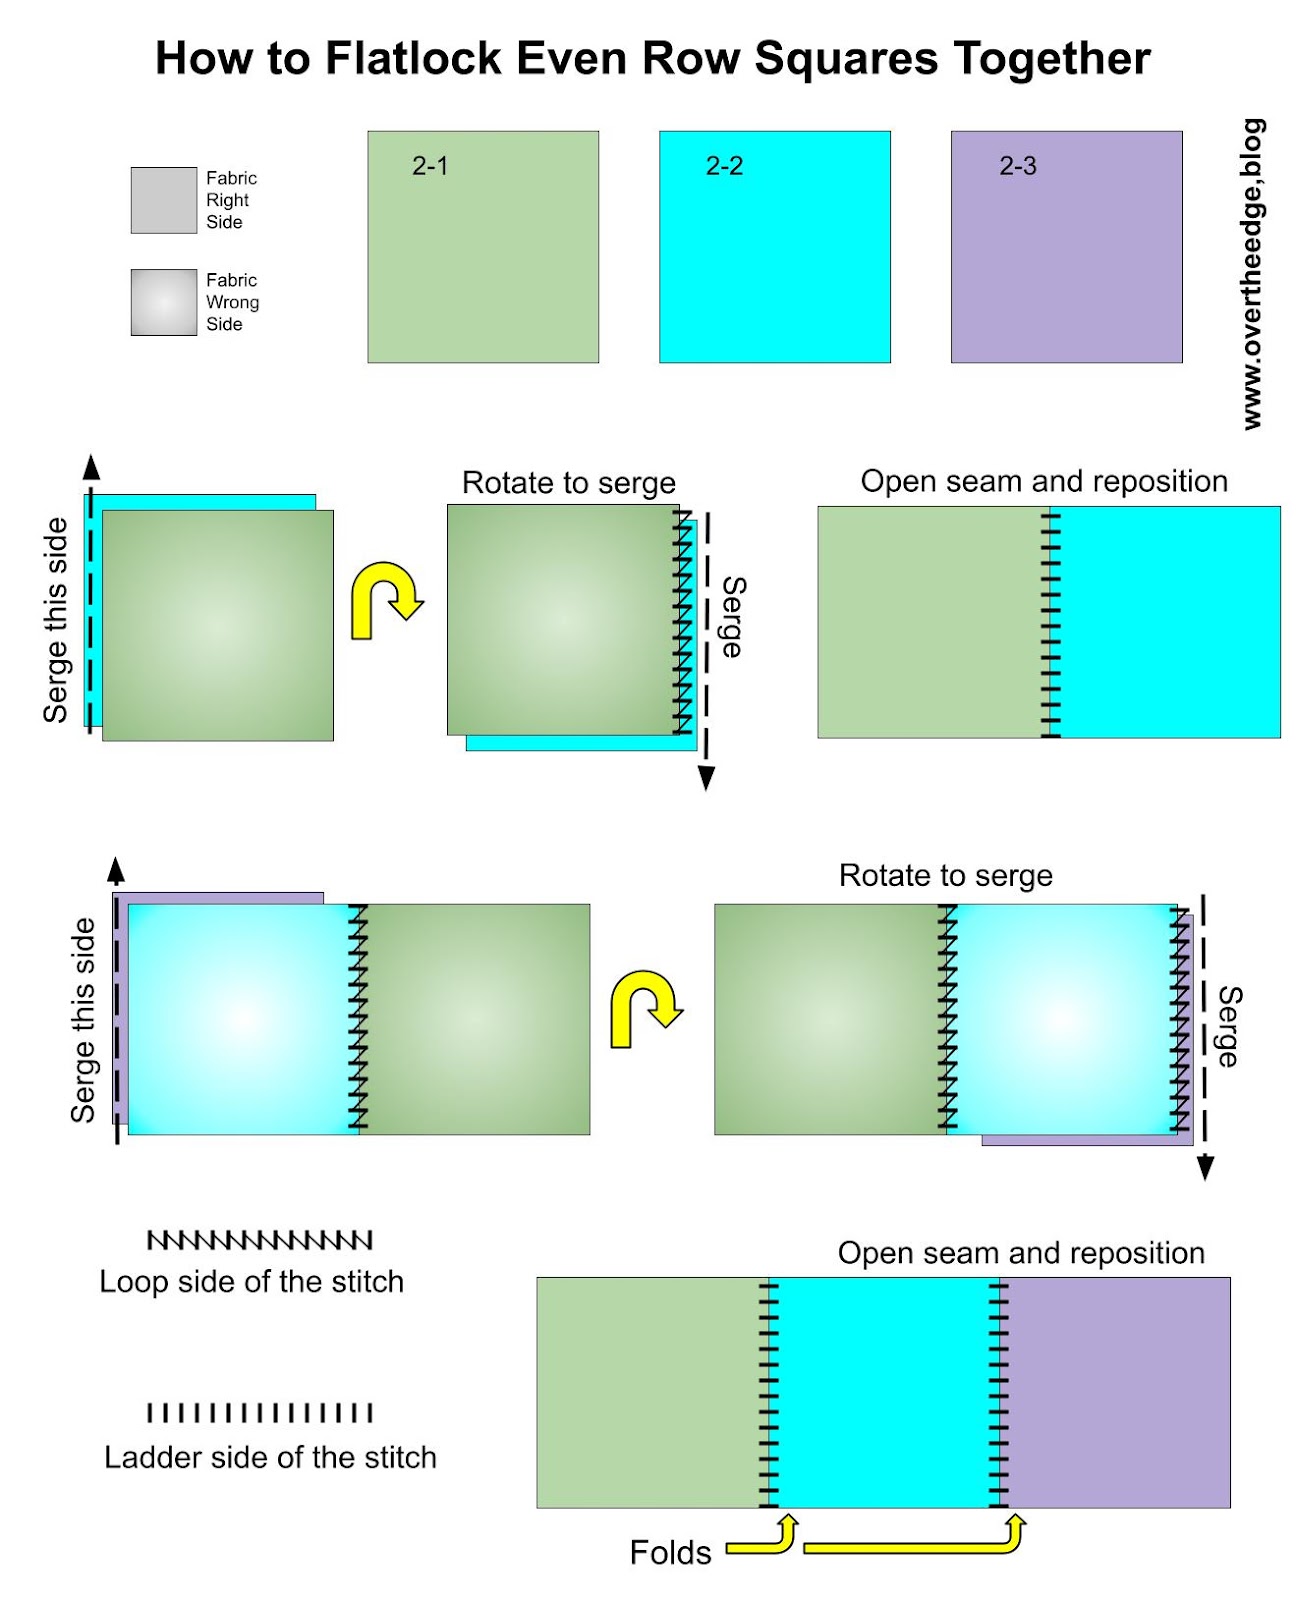
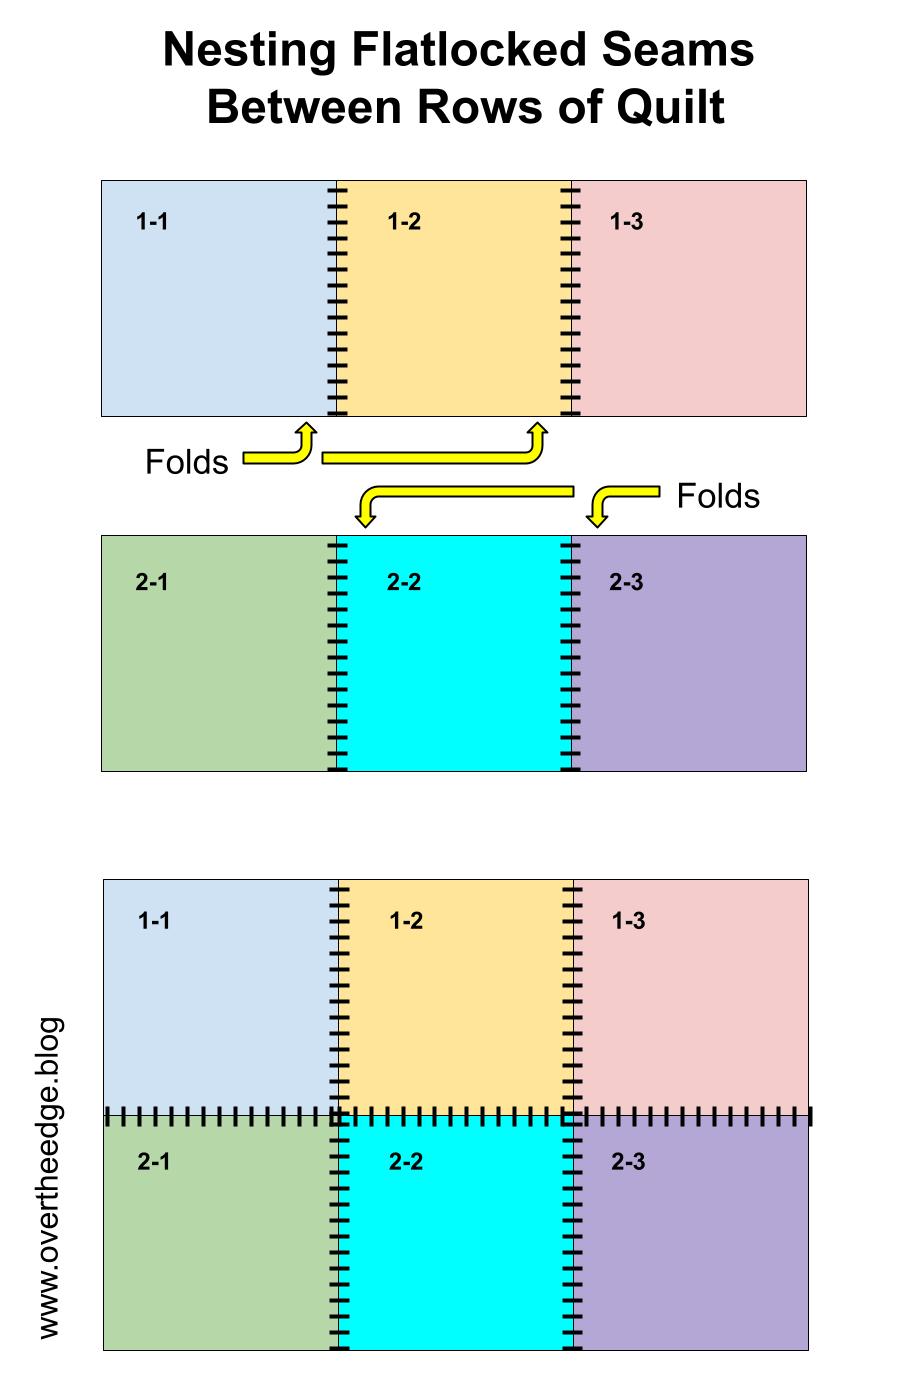
Tips for Creating Nested Flatlocked Pieced Seams
To create flatlocked pieced seams in your quilt that nest really well with each other, pay attention to the way you layer your fabrics as you serge them together. The fabric that is on bottom when you serge will be the one that folds within the seam as you open it.
Here is what I do to nest flatlock seams in my quilt blocks:
- Serge odd numbered rows with the next piece of fabric to be added on top.
- Serge even numbered rows with the next piece of fabric to be added on bottom.
When I line up my flatlocked seams as I combine rows, one seam has the fold to the left and the other seam has the fold to the right. This is similar to standard nested seams in quilting, where the seams are pressed in opposite directions. It helps if you label each fabric piece with its row and position within the row. 1-1, 1-2, 1-3, 2-1, 2-2, 2-3, etc. The diagrams below show how to orient your fabric pieces to get perfectly nesting flatlock ladder stitches in your quilt blocks.
If this seems too complicated don’t worry about it. Just flatlock your fabric pieces together by placing the next piece of fabric to be added on top. You will still be able to line up the seams within each row. And your quilt will still be beautiful.
Master the Three Thread Flatlock Stitch for Quilt Piecing
If you’ve read this tutorial you are well on your way to mastering the three thread flatlock stitch for quilt piecing. Of course the only way to become a master is to practice! So get out your serger and practice piecing quilt blocks with a three thread flatlock stitch. I’d love to see what you create!

Resources
YouTube Videos
Flatlock Piecing with a Serger, https://youtu.be/iN_D06Htzwg
How to Easily Remove a Three Thread Flatlock Seam, https://youtu.be/QIW0PZQDW64
Tutorials
Serger Flatlocked Heart Flag, https://overtheedge.blog/tutorials/serger-flatlocked-heart-flag/
Blog Posts
Charmed by a Serger – Coming Soon
Flatlock Piecing with a Serger https://overtheedge.blog/flatlock-piecing-with-a-serger/
Serge a Flag with a Flatlock Stitch https://overtheedge.blog/serge-a-flag-with-a-flatlock-stitch/
Which Fabric Makes a Better Flag? https://overtheedge.blog/which-fabric-makes-a-better-flag/
Simply Leafy 2 https://overtheedge.blog/simply-leafy-2/
Patterns for Sale
Serger Charm Table Runner https://overtheedge.blog/shop/
Pumpkin Garden Flag https://overtheedge.blog/shop/