Month: April 2020

Triaxial Weaving with a Serger Belt Loop Binder

If you have a serger with a cover stitch and a belt loop binder attachment you are going to love this post, Triaxial Weaving with a Serger Belt Loop Binder. A new way to create quick and easy fabric strips for weaving into your own custom fabric! No more making fabric strips on the bias and no more burning your fingers while ironing the folded strips!

Serger Belt Loop Binder Attachment

Baby Lock has a specialty serger attachment called a Belt Loop Binder, which comes in two sizes (1.5” and ¾”). Other manufacturers may have something similar. The belt loop binder is designed to be used with a cover stitch.

I’ve seen it used to make belt loops, handles, straps, and bracelets. Belt loops and straps are very useful. But making your own woven fabric from these strips is way more exciting and is another perfect application for this attachment. And you don’t have to make bias strips for this weaving to work. You can cut strips by the width of the fabric (selvage to selvage), feed them into bias binder attachment on your serger, and quickly make fabric strips ready to weave into cool designs! This method is so much faster than cutting traditional bias fabric strips and standing at the ironing board pressing the edges under. And since it works on the cross grain, you don’t have to spend time creating the bias strips of fabric. I love my serger!!! 

Modern Fabric Strip Weaving

Fabric strip weaving is becoming a popular activity. I first saw a bias fabric strip triaxial weaving project in a Sew News magazine (Feb/Mar 2017)

The article/project was titled “Take It or Weave It” was written by Tara Curtis, of Wefty. She invented a tool called the Wefty Needle to help make fabric strip weaving much easier. Bias fabric strips are made and then folded and pressed into bias tape. Then the bias tape is woven into fabric. Of course when I saw the project my first thought was “how can I use my serger to make this easier!”  

Tools for Weaving

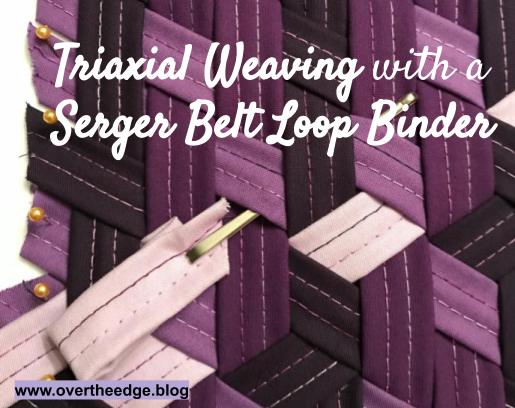
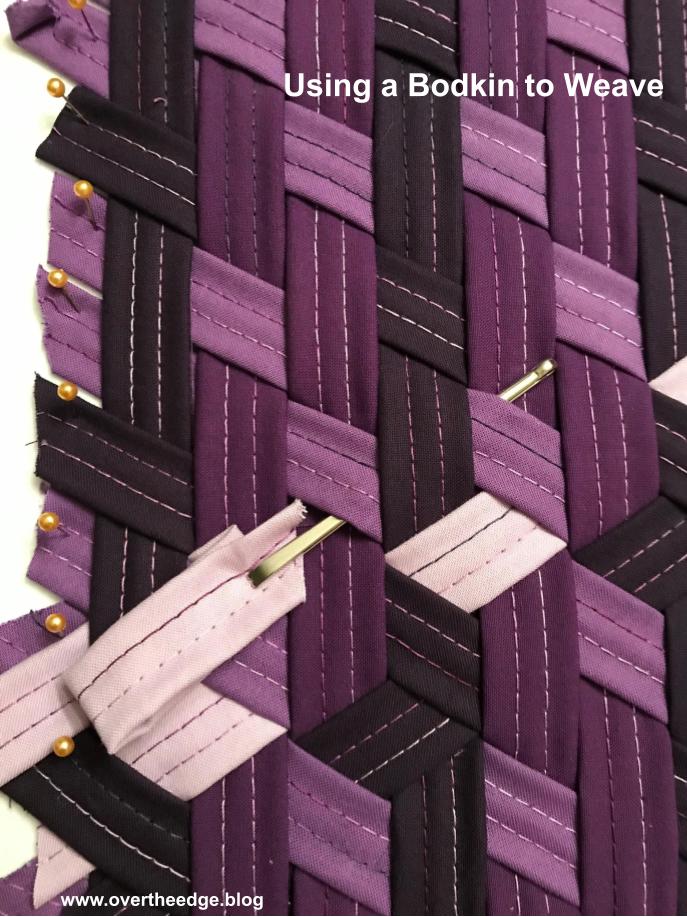
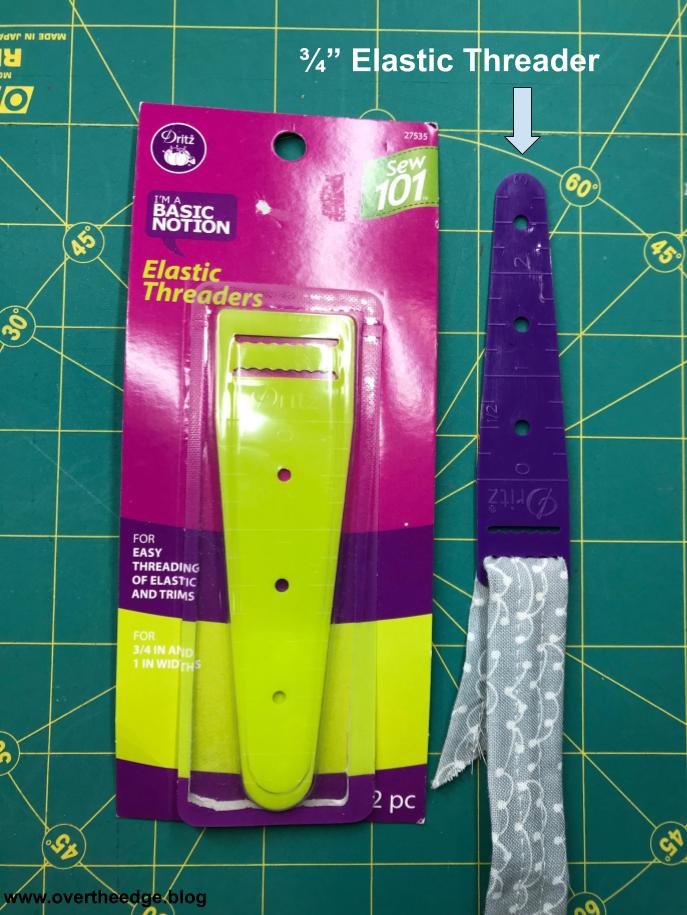
I purchased a set of Wefty needles from Tara. They work well for weaving ½” folded fabric strips and 1” folded fabric strips made with bias strips the traditional way. However, the Wefty Needles don’t work as well for serger belt loop binder strips. The tool was just a little too wide for the ¾” strips made from the 1.5” belt loop binder. It was hard for me to get through the tight weave of the third row of the triaxial weave. If the Wefty Needle was available in a ¾” or ⅜” it would be perfect for using with fabrics strips made with babylock belt loop binders! 

I ended up using a bodkin (for inserting elastic or cord into a casing) to help me weave that 3rd row. The Wefty needle would have worked better than the bodkin if it were the right size for the ¾” strips. Recently, I found a ¾” elastic threader by Dritz that I am going to try on my next project.  For other tools needed for fabric strip weaving see the Resources section at the bottom of the post.

Weaving Types

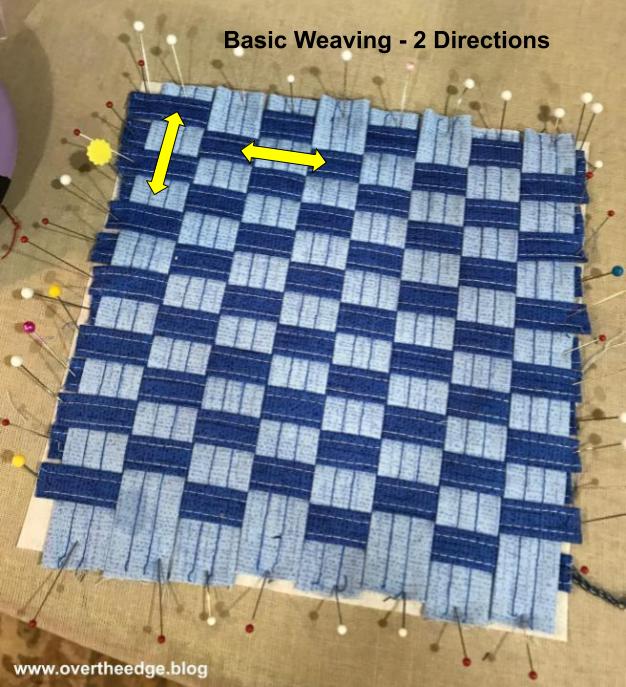
Basic or simple weaving occurs in 2 directions (biaxial at 90 degree angles to each other). Some forms of basic weaving you may be familiar with include plain weave, satin weave, twill weave, basket weave. Triaxial weaving occurs in 3 directions (triaxial 60 degree angles to each other). You can make some really nice weaving projects with basic weaving, but I think there is something special about triaxial weaves. I have included some links to resources about weaving at the end of this post.

Jen’s Triaxial Weaving with a Serger Belt Loop Binder

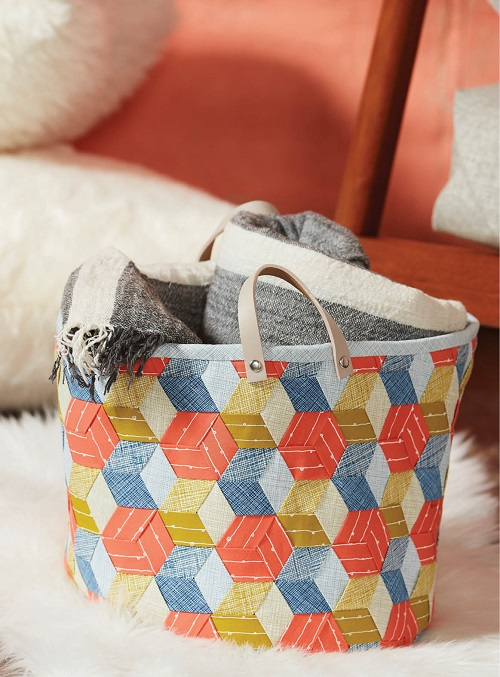
The Sew News article did inspire me to try fabric strip weaving, even though I didn’t make the basket that was in the article. Following the basic instructions in the article, I created my triaxial weave using fabric strips made on my serger with the 1.5” belt loop binder attachment. I then used the new “fabric” to construct this bucket from Simplicity pattern 8859 (I did make a few minor modifications to the pattern for this fabric basket/bucket). I really enjoyed triaxial weaving so I had to do more of it. After one project I was hooked!

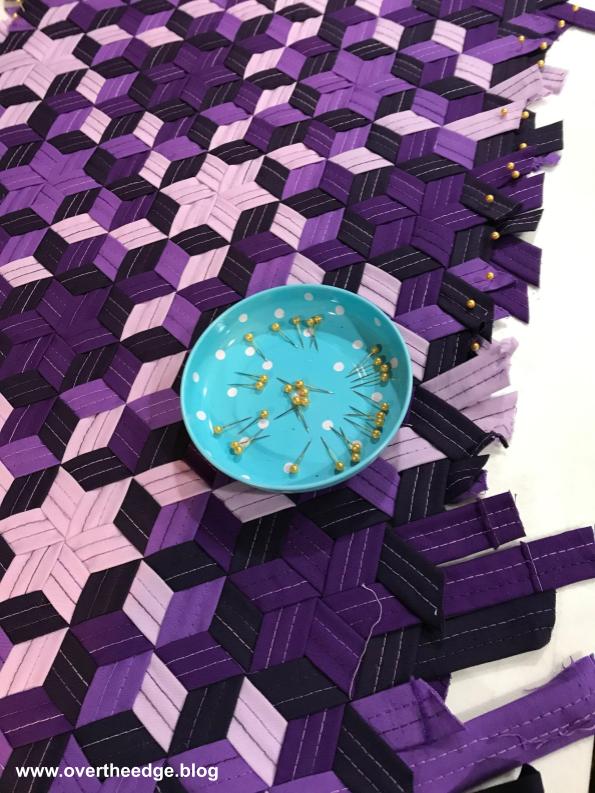
I really like the look of “stars” in triaxial weaving, so I decided that would be my next project. I figured out how to weave the stars after some trial and error and a little research on the internet. It probably would have been faster to purchase a pattern from Wefty to show me how to do it, but I wouldn’t have learned so much about weaving!  Like with the fabric bucket project, I used the 1.5” belt loop binder attachment to make my strips. Then I made a pillow from the triaxial weave “stars” fabric that I created. This pillow was constructed on the serger, including using a cording foot to install the zipper. The pillow pattern I created may be included in my blog in the future.

Tutorial – Setting Up and Using a Serger Belt Loop Binder 

I created a tutorial and a video to help you be successful using the belt loop binder attachment with your serger. You will find the links below.

Hope you enjoyed learning about triaxial weaving with a serger belt loop binder!

Resources for Fabric Strip Weaving

Here are a few internet sites and youtube videos for you to check out if you would like to learn more about the process of weaving with fabric strips. 

Tara Curtis of Wefty

Website: www.weftyneedle.com 

https://weftyneedle.com/blog/2016/8/26/tools-for-weaving-updated

Tumbling Blocks Mad Weave Tutorial Video by Wefty – https://youtu.be/6xlUirFs0Kg

https://youtu.be/6xlUirFs0Kg

Mathew Boudreaux of Mister Domestic

Website: www.misterdomestic.net

https://misterdomestic.net/2017/12/29/fundamentals-of-fabric-weaving/

Fundamentals of Fabric Weaving Video by Mister Domestic  – https://youtu.be/vlGt5Mxs2M0

If you want to get Tara’s fabric bucket pattern from the Sew News magazine, click on the link below to get more information.

https://www.interweave.com/product/sew-news-february-march-2017-digital-edition/

Serger Trim Catcher & Mat

What happens to the fabric and thread you trim off as you serge? Does it end up on your lap, your table, your floor or stuck to your project? Spend less time cleaning up and more time serging with Jen’s Serger Trim Catcher & Mat!

Use a serger trim catcher to keep fabric and thread trimmings out of your lap

The first serger I ever owned had a plastic catch bin that attached to the front cover. It worked well for catching small bits of thread. But if you were cutting off much fabric there was a problem. The catch tray would cause the trimmed fabric to flip up into the loopers and get caught in my stitching. After a few mishaps, I removed the bin and let the trimmings fall to the table or my lap. Eventually I grew tired of all the “hitch hikers” that seemed to travel all over my house as they fell from my clothes. I needed a solution. 

My solution was to use my serger to make a simple trim catcher mat that was easy to clean and non-slip, so that my serger didn’t vibrate around on my table. After experimenting with a few ideas, I came up with a working prototype that met all my requirements. And to celebrate National Serger Month, I thought I would share my design with you.

The Design of Jen’s Serger Trim Catcher & Mat 

  • I chose oil cloth for its smooth wipeable surface and its substantial “weight”. The serger trimmings wipe easily into the pocket on the front and are easy to scoop out and throw away. 
  • Grip shelf liner (or rug grip) seemed like a good material to keep my serger from vibrating around the table as I worked.
  • The design should be simple and easy to construct.
  • I didn’t want any extra pockets to hold tools on the front of my catcher. Having tools right in front of me is like asking them to get caught in my project while I serge. I prefer to have a tray on the table next to my machine to hold my accessories.
  • The Evolution was my first serger with Babylock’s exclusive wave stitch and the trim catcher was my first project on that serger. I just had to use the wave stitch to embellish the outer edges of the trim catcher and mat!
  • This mat works well for 4 thread overlock machines and smaller 8 thread overlock machines like the Babylock Evolution.
  • Finished size of Jen’s Serger Trim Catcher & Mat – 15” x 18”.
trim catcher serger project

Serging with Oil Cloth and Grip Liner

The only reason I didn’t put “easy” in the title of this project is because of the challenge of working with my chosen fabric. Both the grip liner and the oil cloth are “grippy” and can stick to the bed of your machine or table. I wasn’t sure that I could successfully serge the grip shelf liner and the oil cloth together, but the Babylock Evolution handled it beautifully! As I serged, I made sure the grip layer on the bottom was well supported and not catching on my machine or table. Be certain to test the combination of grip shelf liner and oil cloth layers with your serger. If your serger doesn’t like feeding the grip shelf liner you could always glue it to the underside of the oil cloth after you have completed the serging steps. 

Pocket Support

The first catcher I made did not include a dowel or boning for support of the pocket edge. It worked fine, but the pocket edge became a little droopy over time. So in my other versions, I tried a ¼” thick wooden dowel, and a piece of plastic boning (used in clothing for support).  Both work well to support the upper edge of the trim catcher pocket. As you can see in the photo below, the pocket with the dowel is more rigid and the pocket with the boning is more flexible. 

how a serger trim catcher works

The Wave Stitch

The wave stitch looks best with thick decorative thread and serged onto the edge of a stable material that will not pucker under the weight and width of the stitching. It’s a stitch with oscillating tensions that creates a “wave” with the upper and lower looper threads. The wave stitch is exclusive to Babylock. If you don’t have the ability to do the wave stitch, you could embellish the edges of your serger trim catcher & mat with a three thread overlock.

close up of babylock wave stitch on serger trim catcher & mat
Wave Stitch

Jen’s Serger Trim Catcher & Mat Tutorial

Are you ready to make a serger trim catcher for yourself? Go for it! Click on the link below for the full tutorial. 

Other Resources 

Check out the YouTube video below to learn all about the Babylock Wave Stitch.

Serge a Flag with a Flatlock Stitch

It’s April now, and in a typical year I would be celebrating National Serger Month. In the last few weeks I have been sewing face masks almost non-stop, and I miss using my serger creatively. So I took a short break from mask production to create a serger project to share with you. I’ve seen on the news that in some places people are clapping and cheering for healthcare workers from their balconies. Others are making signs to show support. Well, I’m going to show you how to serge a flag with a flatlock stitch. Hang it outside or hang it in your window to show your support!

The flag is garden size, about 12” x 18”. I thought about making it larger but I didn’t have any pieces of batik large enough to make a bigger flag. Normally, I would just run out to the store to buy what I needed, but that is a little difficult right now. 

The flag is reversible and since both sides of the fabric show in this flag, batiks work well. Solids would work too, but batiks are so much richer. Using black thread gives the effect of stained glass. Who knew you could make stained glass with your serger!

Supplies Used for this Flag

  • Red batik remnant at least 6” x 13”
  • Light colored batik remnant at least 7” x 16”
  • Blue batik remnant at least 10” x 26”
  • Black thread – 1 spool of sulky solids 12 wt (or other thick thread) and 2 cones of Maxilock serger thread
  • Serger, capable of 3 thread flatlock stitch
  • Rotary cutter, mat and ruler
  • Hanging rod
  • Tool for securing thread tails (large eyed needle or other tool)

Serger Set Up and Testing

I set my serger up for a 3 thread narrow flatlock stitch with the widest width. I used a spool of black Sulky Solids 12 weight cotton in my upper looper and black cones of Maxilock serger thread in my needle and lower looper. The Sulky Solid would have been good to try in the needle too. It would have made the ladder side of my flatlock stitches stand out more. But since I only had one spool, I went with the Maxilock thread instead. 

Using scraps of fabric, I tested my stitch settings. After trying a few different stitch lengths, I decided on a stitch length of 1.5 to create my stained glass effect. I serged my samples with the wrong sides together, so the more dense loop side would be on the right side.

Flatlock Piecing on your Serger Video

Watch my short video on flatlock piecing if you would like to see the technique in action.

Serger Flatlocked Heart Flag – Link to Tutorial

Click on this link to view my full tutorial for serging this stained glass heart flag using the flatlock stitch. https://overtheedge.blog/tutorials/serger-flatlocked-heart-flag/

Flag Front Side and Back Side

This photo shows the front side and the back side of the reversible flag. The stained glass look is more pronounced on the front side with the loops and the heavier thread. 

Close Up View of Stitching

Serge a Flag with a Flatlock Stitch

I hope you enjoyed this post and are inspired to serge a flag with a flatlock stitch. Hang it proudly and show your support of all the workers on the front line of this pandemic! 

How to Make Spandex Cord for Your Face Mask

In response to our current pandemic, like many sewists out there, I have been making face masks to distribute to family, friends, nursing homes, and other places. However, thin elastic has become difficult to find.  When I ran out of elastic, I thought what do I do now? After experimenting with scraps of spandex with great success, I decided I needed to share my solution with you. If you have access to any spandex type fabrics, you can use them to learn How to Make Spandex Cord for Your Face Mask.

I have a huge stash of spandex scraps from various figure skating and colorguard costume projects that I have worked on over the years. I was so happy to finally put those scraps to good use! After a little bit of trial and error I came up with this ¼” elastic substitution for my face masks. I call it “spandex cord”. My daughter has been wearing these face masks a lot, and she says the spandex cord is much more comfortable on the ears than regular elastic.

Cut Spandex into Strips

It’s pretty simple to make. Cut ⅜” wide crosswise strips from your spandex fabric (selvage to selvage.) You can cut pieces about 8-9” long or cut across the entire width and subdivide into individual pieces later.

Grab Both Ends and Pull

Grab both ends of the strip and give it a firm pull. Watch, like magic, as the edges of the spandex strip curl and the strip turns into a stretchy piece of spandex cord. If your strip doesn’t curl, try cutting your strips parallel to the selvage instead of crosswise. Let the spandex cord “relax” for a few minutes before you cut it to size. It may shrink up a small amount after all the stretching and curling.

Cut to Size and Apply to Face Mask

You will need to experiment with your mask pattern to determine how much cord you need to be comfortable wearing your face mask.  On my face mask pattern I use 7.5” of spandex cord for each ear (and 9.75” of ¼” elastic). So I actually use a shorter piece of spandex than I would for elastic.

Jen’s Face Mask Pattern

If you are interested in trying the face mask pattern that is shown in this blog post, go to https://overtheedge.blog/tutorials/jens-face-mask-tutorial/

It’s pretty easy to make, but don’t be scared off because of the length. It’s a long tutorial because I included a ton of photos to make it easier to understand.  I use a serger for finishing the edges in a couple of steps (or you could use a zig zag stitch on a sewing machine.) The mask is mostly made on a sewing machine.

I tried several different face mask patterns, and I find this one to be the most comfortable for my face. I also included information on how I wash my face masks in the tutorial.

Video – How to Make Spandex Cord for Your Face Mask

Follow along with me as I will show you how to make spandex cord for your face mask in my YouTube video below.

Disclaimer

Make and wear fabric masks at your own discretion. I’m trying to help where I can, just like everyone else. I am definitely not an expert in anyway in face mask protection. Face masks made from this pattern are not considered personal protective equipment (PPE) and may not protect you from pathogens. I have included links to the CDC and other sources about face masks in my full tutorial. 

Keeping the world healthy, one face mask at a time.

Happy Sewing and Serging!

Jen

Theme: Overlay by Kaira Extra Text
Cape Town, South Africa