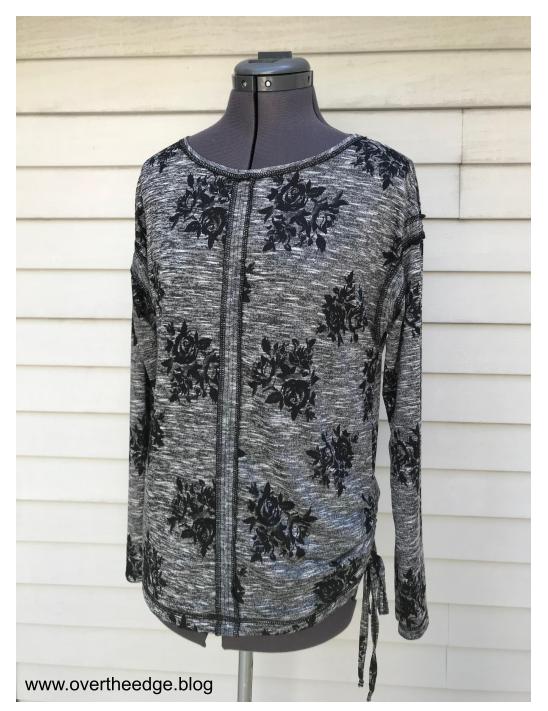


I introduce to you, the cozy sweater shirt – 100% serger made – no sewing machine required.
Because I love my serger, I am always looking for more ways to use it. I wanted to make a top that could be completely constructed on my serger without the use of a sewing machine. When I saw Simplicity 8988, I knew that this pattern would be a great starting point for my cozy sweater shirt. The exposed seams down the center front and back were perfect for showcasing serger stitching with decorative thread.

How I Changed the Pattern to Serge my Cozy Sweater Shirt:
Simplicity 8988 was written for a sewing machine, but I easily adapted it for serger construction and embellishment utilizing both overlock and cover stitches. If your serger is not capable of chain stitch or cover stitch you could still make this cozy sweater shirt. You would just need to substitute your sewing machine for the steps that include chain stitch or cover stitch.
To adapt a pattern for serging, all you need to do is to group similar stitch types as much as possible. Most sewing patterns are not optimized for serger construction. If you follow the pattern as written, you will find yourself converting back and forth between serger stitches. For some sergers, this conversion can be a time consuming process. I feel very fortunate to own a Babylock Evolution serger because converting between stitch types is easy!

Four Thread Overlock:
I began by grouping all of the 4 thread overlock operations together. I serge finished the raw edges of the exposed seams and neck edges with decorative Madeira Lana thread. The shoulder seams and the raw edges of the interior seams were serged with Maxilock Stretch thread.

Chain Stitch:
Next I converted my serger to the chain stitch to sew the center front and back seams and the upper sleeve seams.
Wide Cover Stitch:
Then I switched to a wide cover stitch and stitched down the center of the exposed front and back seams and the upper sleeve seams. The cover stitch helps to keep the seams partially open during wearing so the cool serger stitching always shows.
The wide cover stitch was also used for the bottom hem and the sleeve hems. I turned the hems to the inside and serged so that the looper thread showed on the right side of the top. These hems were finished before closing the side seams. It is much easier to cover stitch flat than in the round.
The belt loop binder attachment along with the wide cover stitch was used to make the ties.

Chain Stitch:
The last serger conversion was back to the chain stitch to sew up the side seams, finish the neck hem, and make the channels for the ties. After inserting the ties, my cozy sweater shirt was ready to wear!
I hope this post inspired you to serge!
