Since March is National Quilting Month, I thought it fitting to share the latest serger quilting technique that I have been experimenting with – one seam flying geese with a serger.
While I was surfing the internet I came across an interesting YouTube video of Jenny Doan from Missouri Star Quilt Company. She was showing how to create a one seam flying geese block using a sewing machine. I immediately decided that the serger would be a great tool to use for this technique. I couldn’t find any internet resources about using a serger to make a one seam flying geese block. So maybe I am the first person to try it with a serger? Probably not, but it appears I am the first person to blog about it…..
One Seam Flying Geese with a Serger
The one seam flying geese block is a three dimensional block. The block is made from a rectangle and two squares and has just one seam. Each geese block/unit is twice as wide as it is tall. The angled sides (or wings) of the geese are folds in the fabric. This method has no lines to mark, no subcutting, and makes perfect points. How easy is that?!
Pros and Cons of the One Seam Flying Geese Block
Pros
Accurate
Fast
No markings or paper to remove
No bias edges
3D adds texture
Very little waste
Cons
May need or want to stitch down the wings of the three dimensional geese
Some seams are a little thicker due to the folded fabric
Jen’s Experiment with Serged Flying Geese
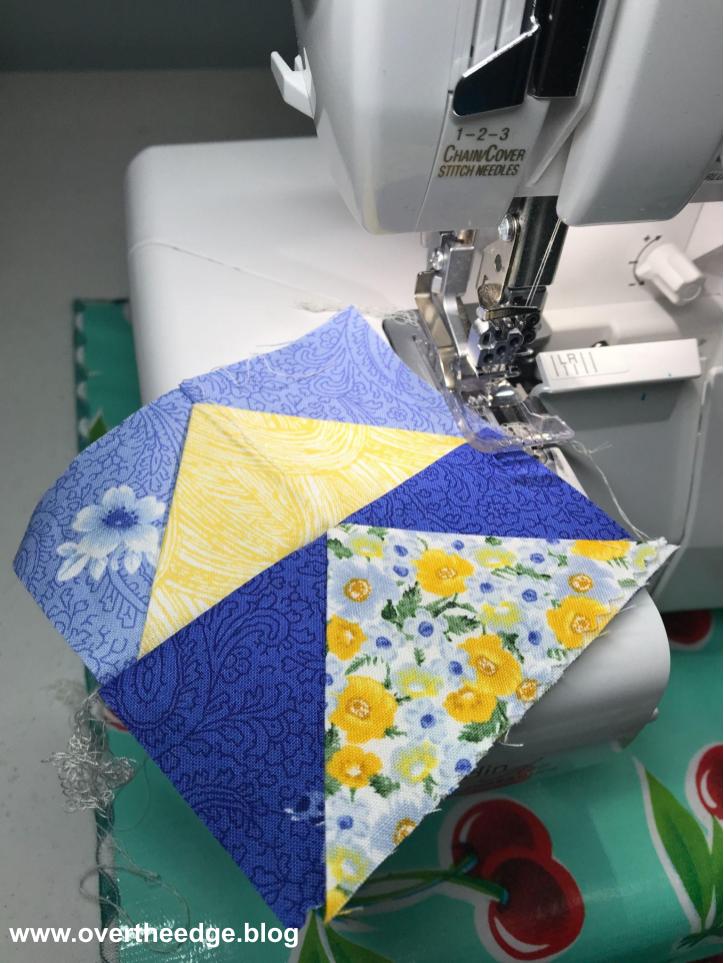
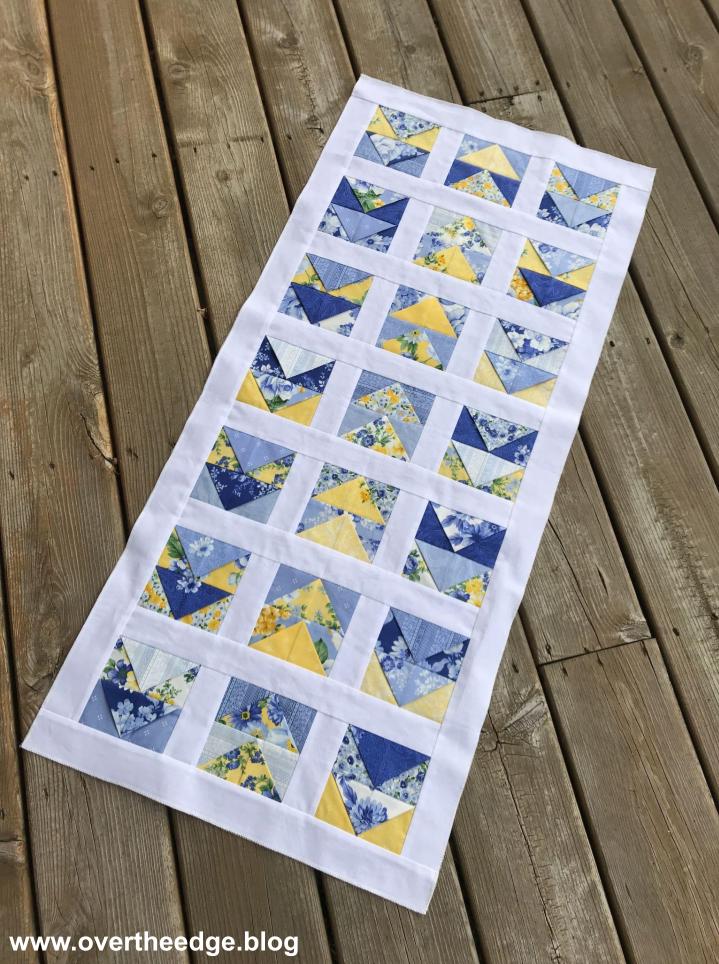
I pulled a charm pack from my stash. The charm pack was from Boundless Fabrics and called Dutch Garden III. The blues and yellows were so fresh and cheerful compared to our dreary February weather! With a few simple cuts and a little serging, I quickly transformed the 42 squares in my charm pack into 42 flying geese units. Chain piecing the blocks on my serger was quick and easy. I found making them kind of addictive – I just wanted to keep making them!
With a little fabric manipulation, pressing and trimming, I transformed all of the blocks into one seam flying geese.
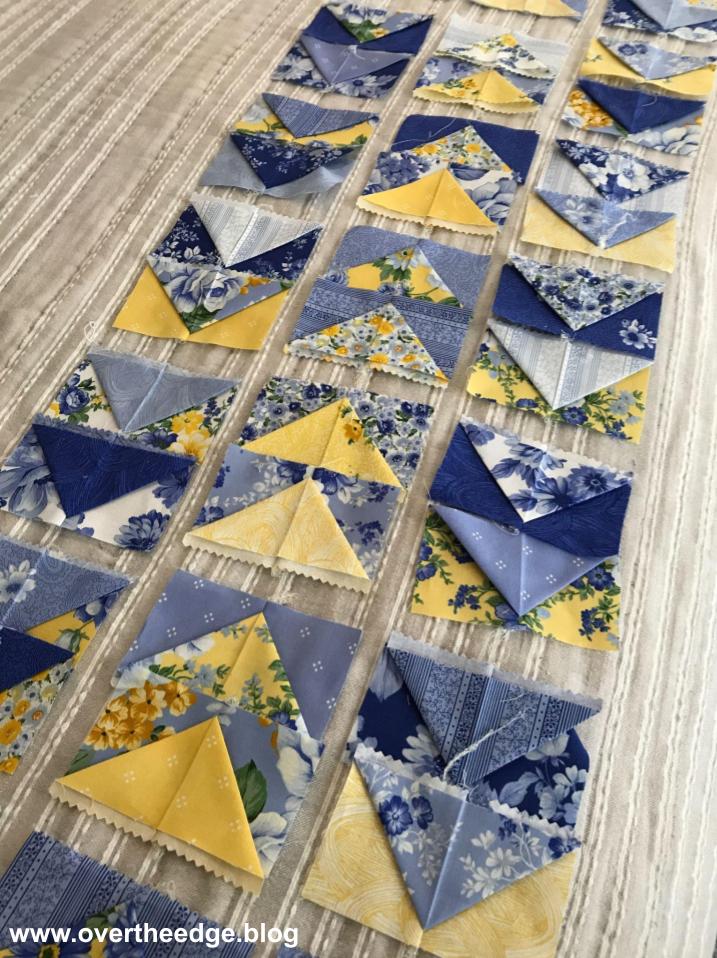
I Have a Bunch of Flying Geese – Now What?
Most people begin with a pattern when they create a quilt. Sometimes I do too. But not this time. I serged all these geese without a plan for what to do with them. I simply laid out all the blocks and moved them around until I liked the arrangement. These geese decided to become a table runner.
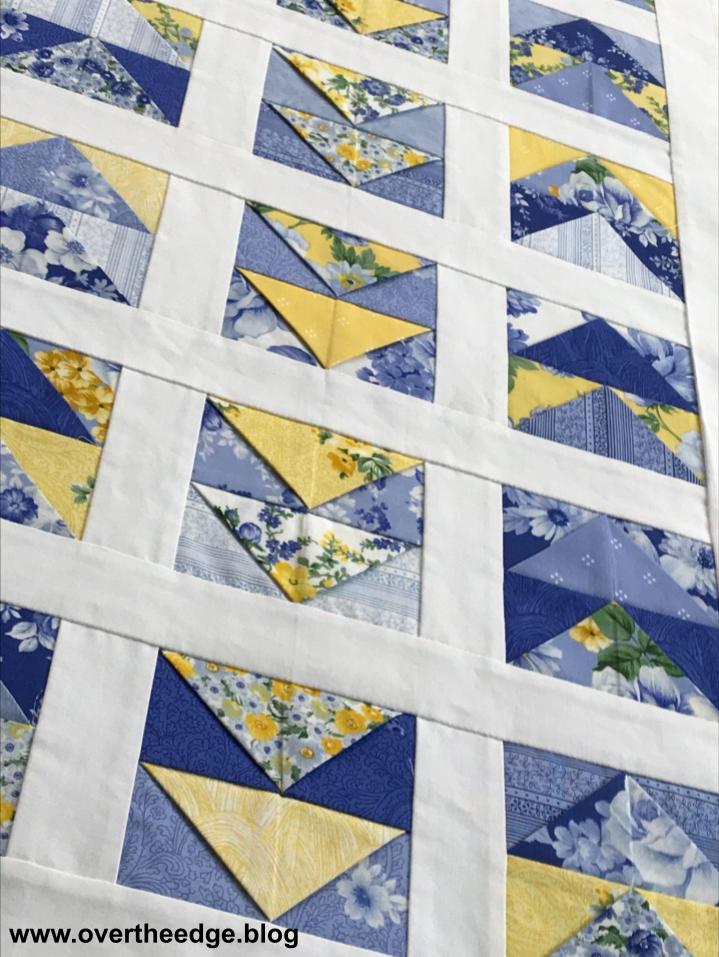
Sashing and Borders
I serged the geese blocks together in groups of two and added sashings and borders.
The Results of my Experiment
From the front side you might think the table runner was sewn with a sewing machine. But from the back side you can see all the neat and tidy serged seams.
My one seam flying geese blocks became my cheerful Spring Migration Table Runner!
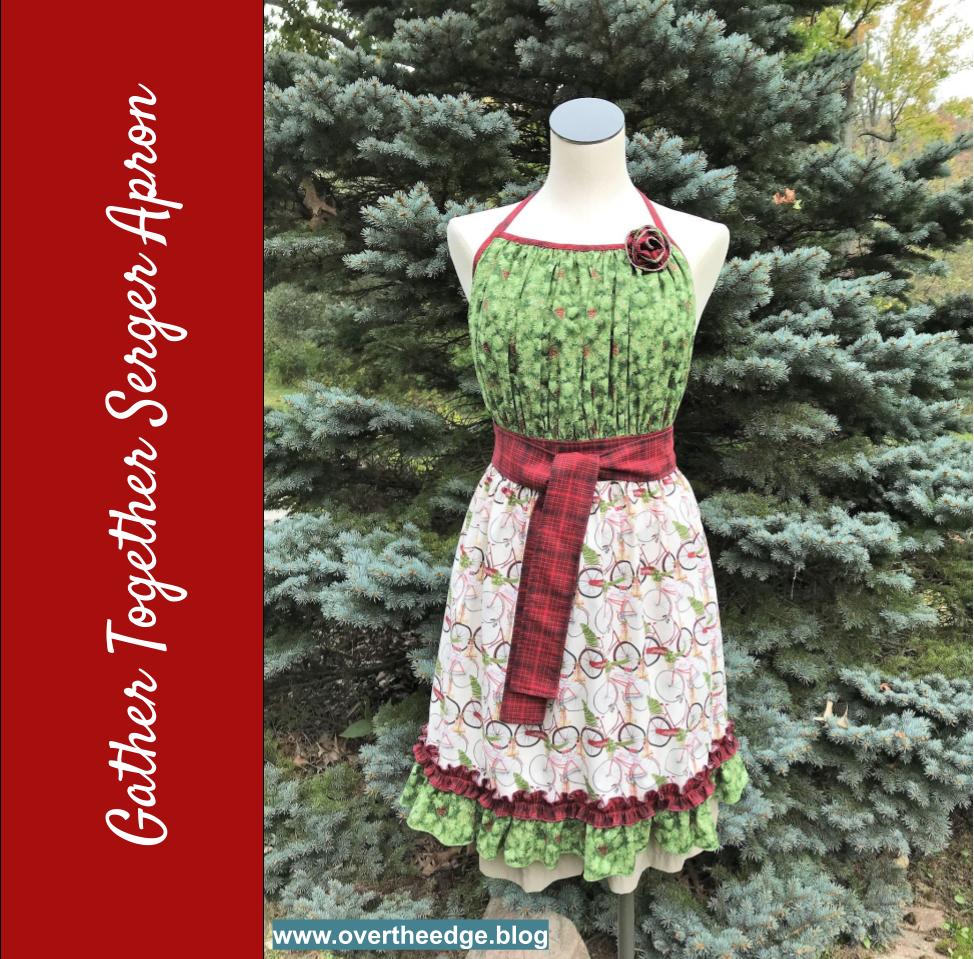
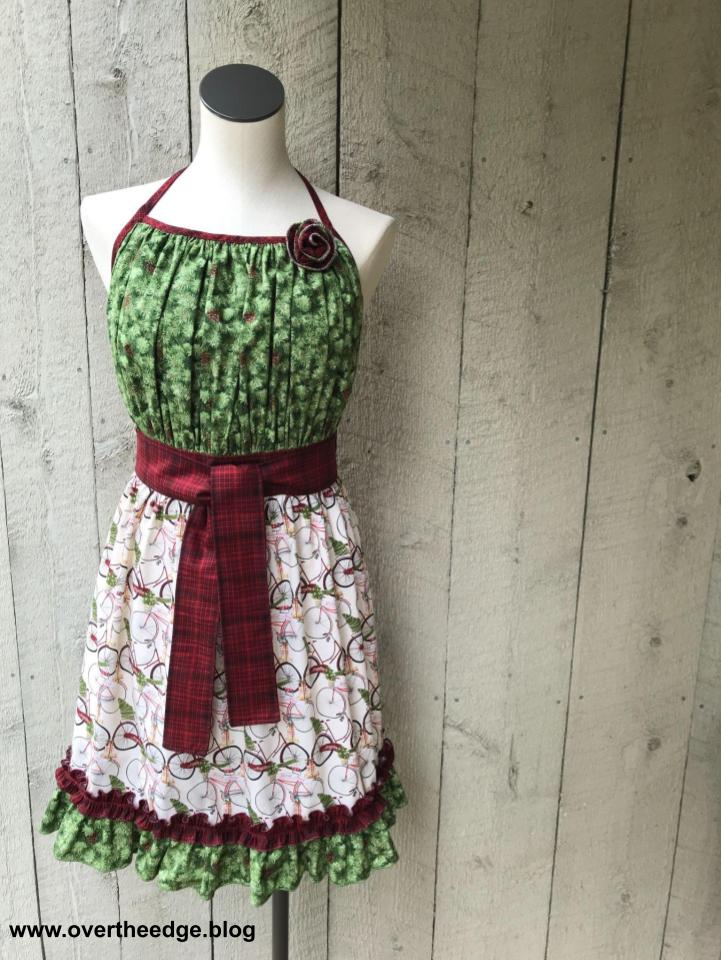
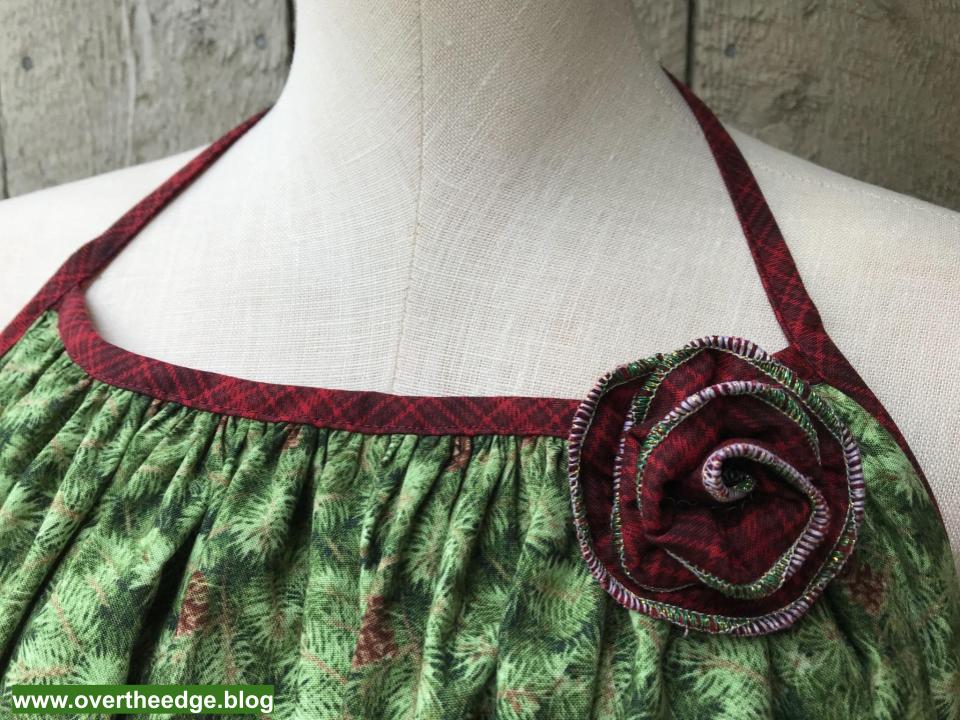
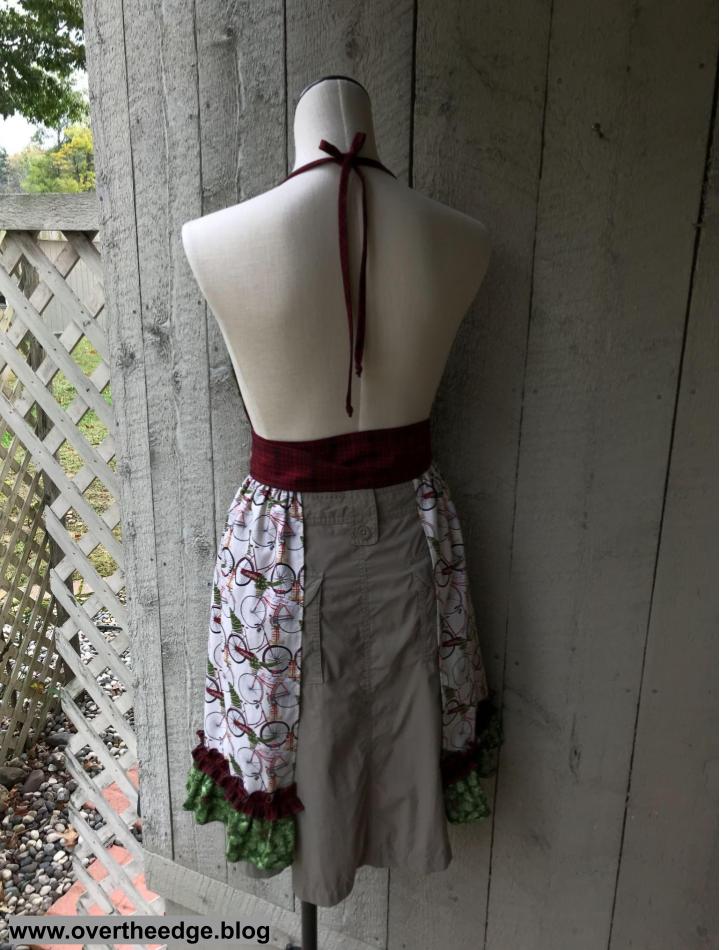
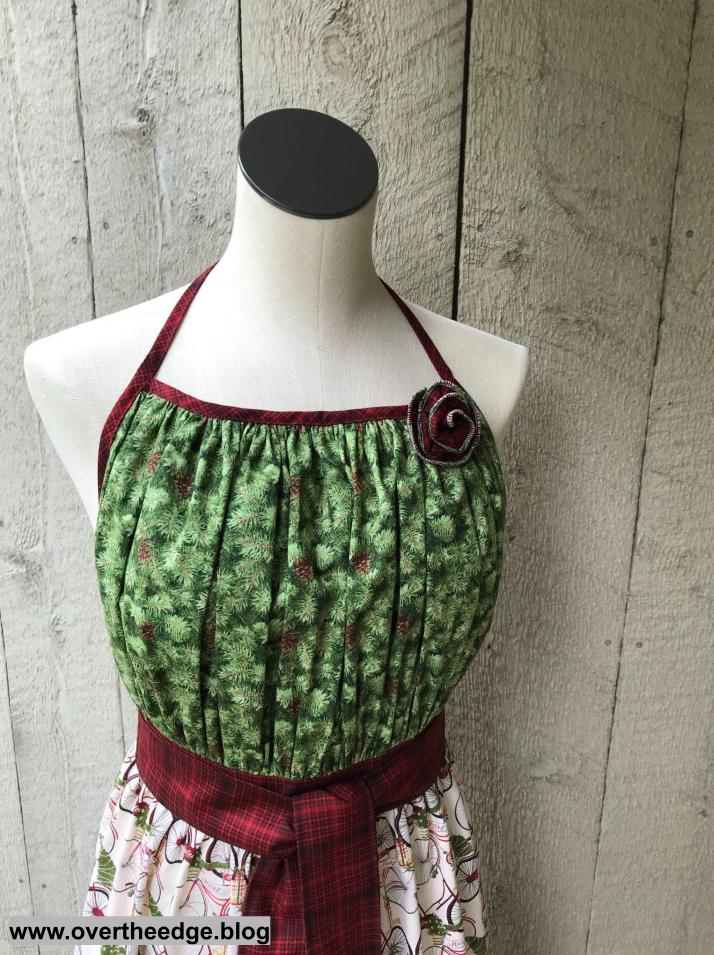
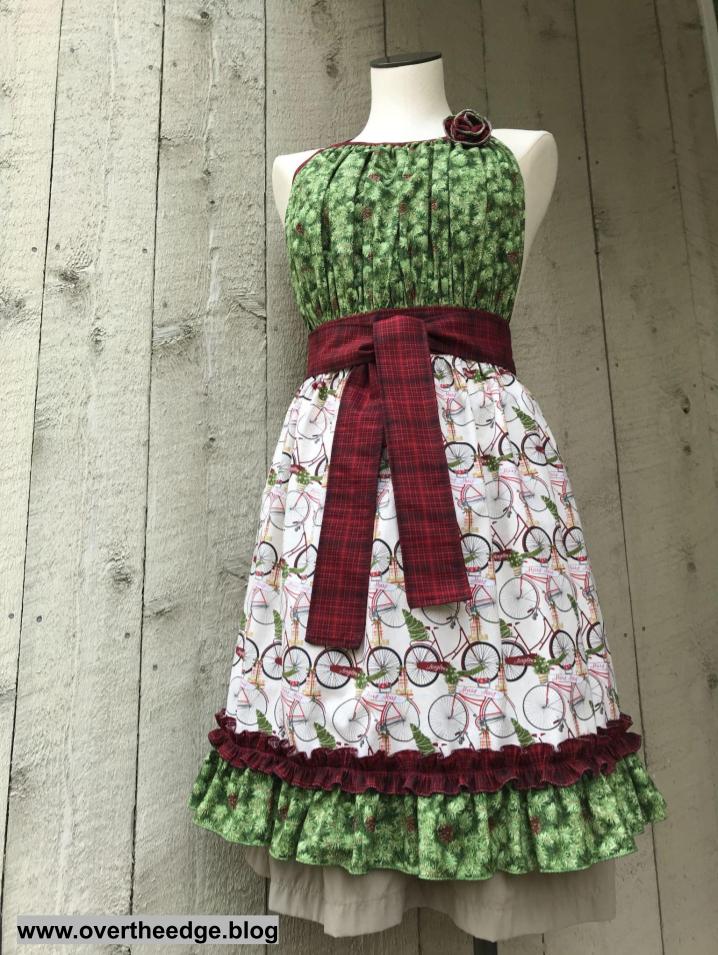
Every year my fellow employees and I sew up holiday aprons to display in the store. For my 2021 holiday apron I made the Gather Together Serger Apron by Baby Lock.
The Gather Together Serger Apron pattern was based on a sewing pattern by Pat Bravo of Art Gallery Fabrics, which was adapted for serger construction. See links to both apron patterns in the Resources section of this post.
How I Used My Serger
I serged the entire apron using only my Baby Lock Evolution serger. It’s a great apron pattern to try making with your serger. You can use your serger to make as little or as much of the apron as you like.
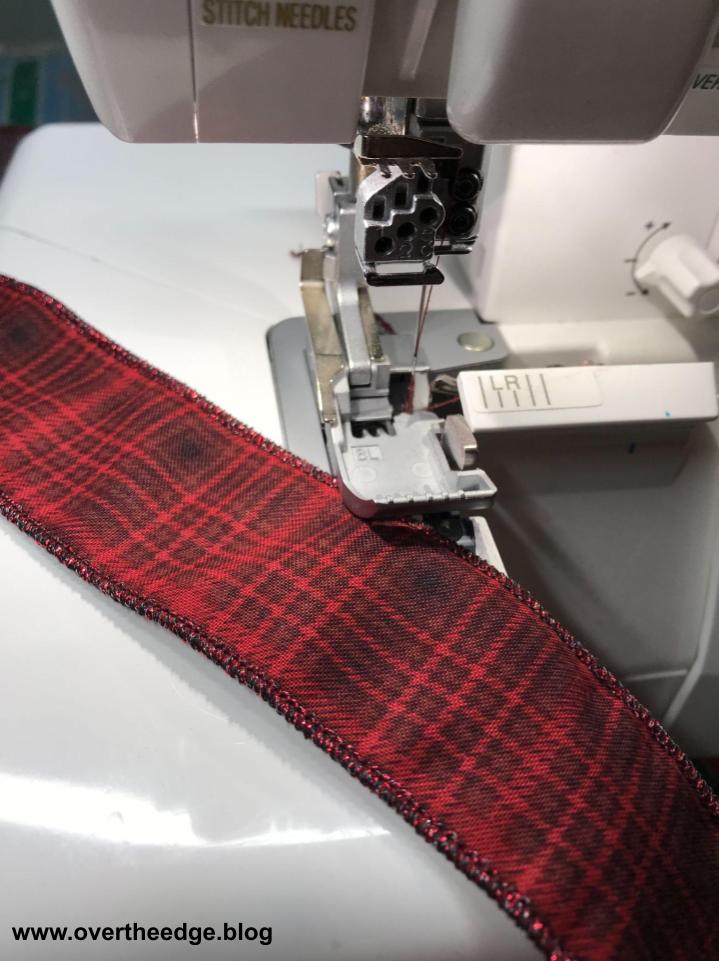
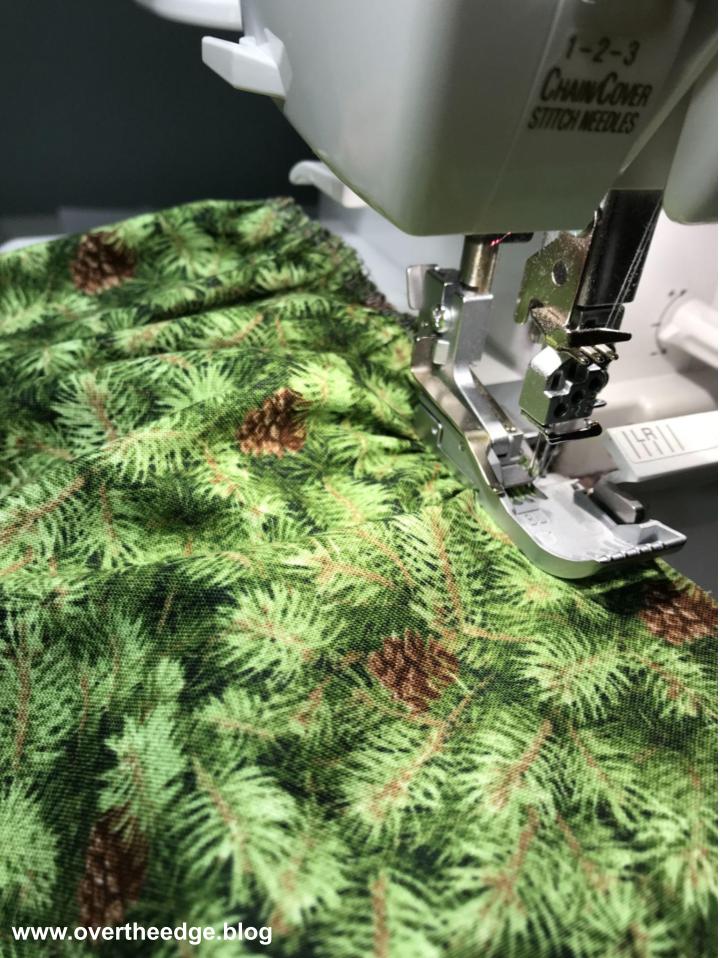
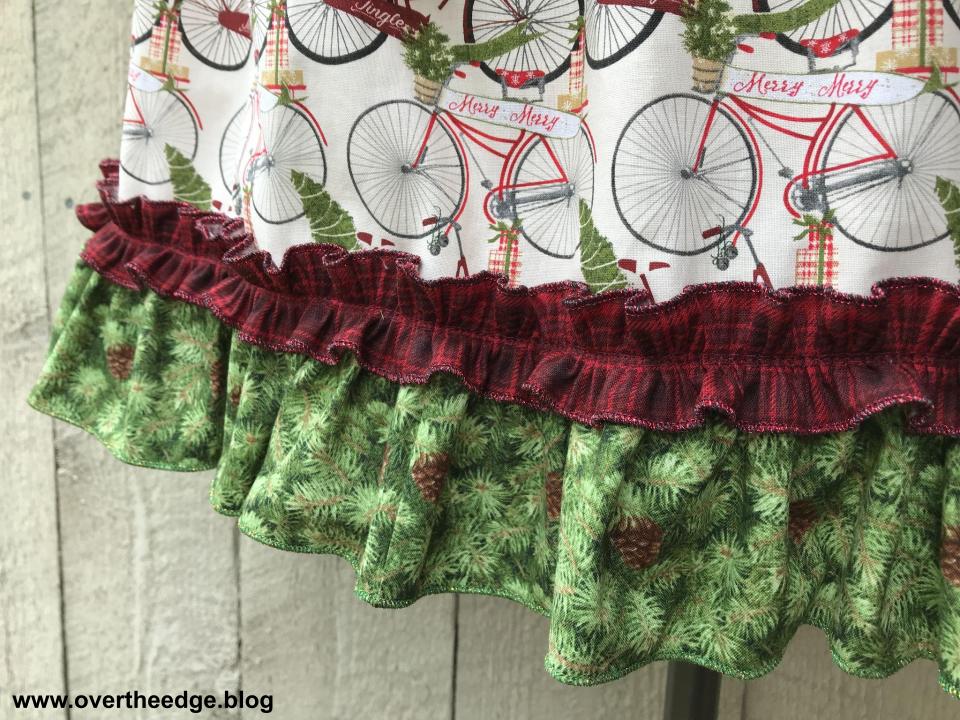
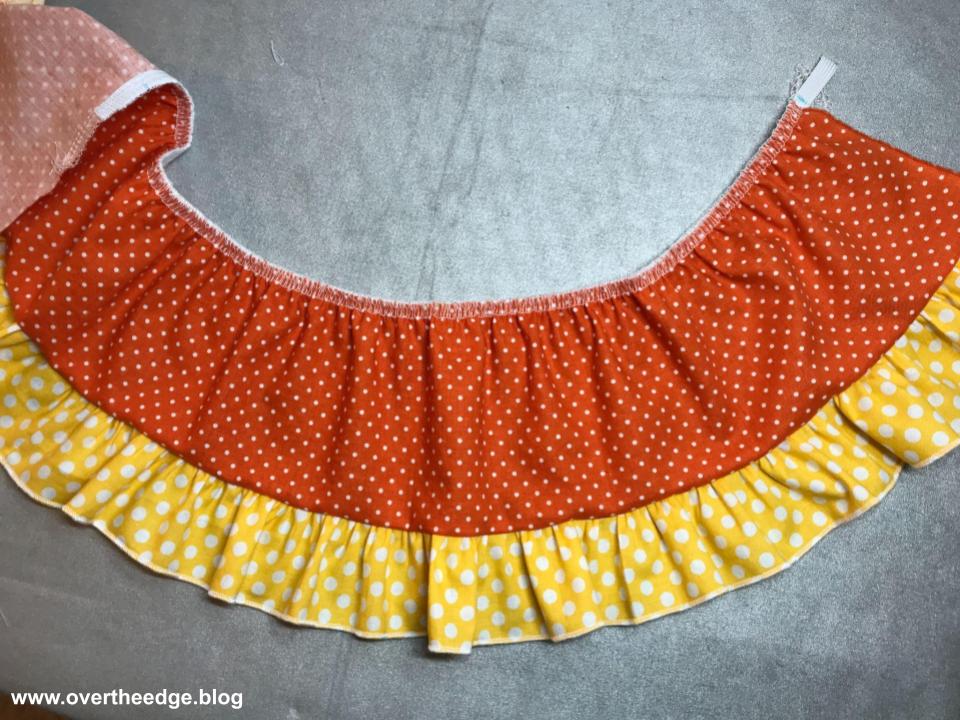
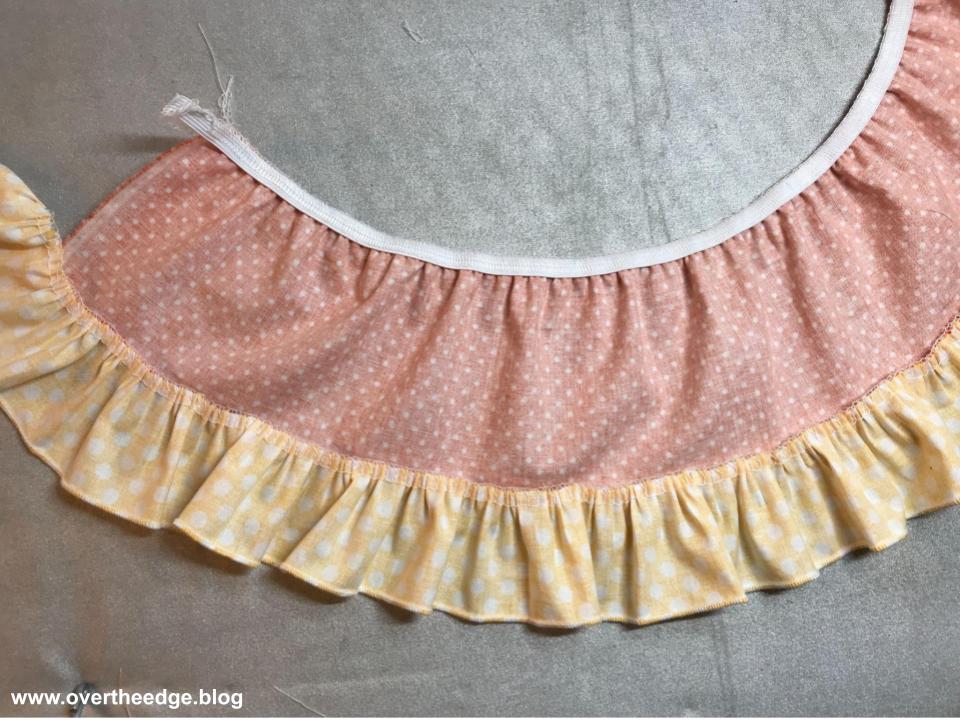
Edge Finishes
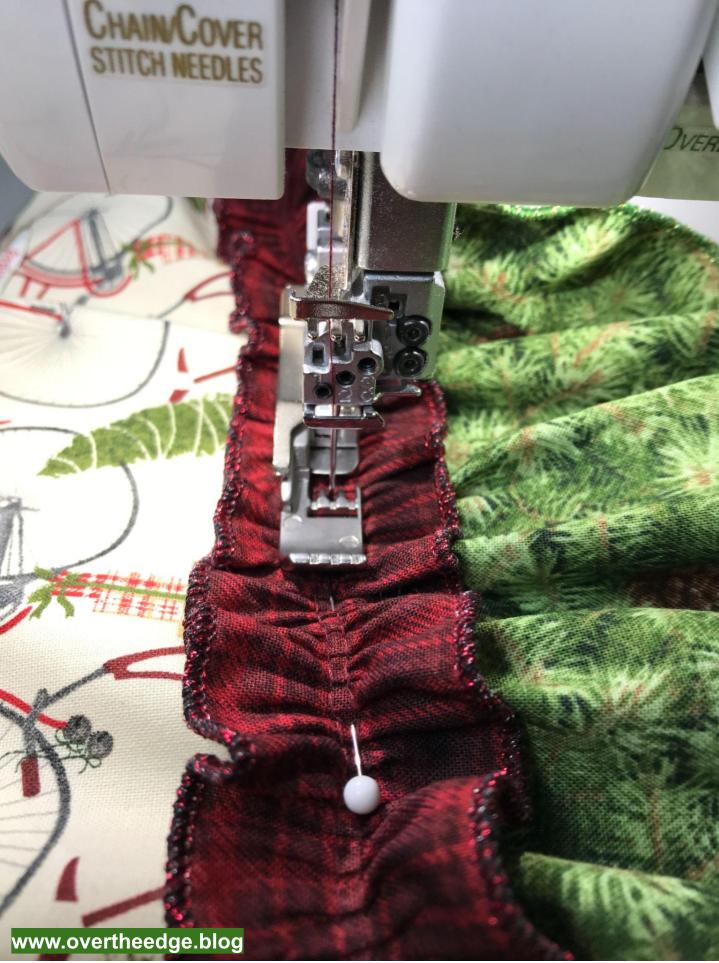
I used a variety of edge finishes to complete this apron, which utilized different stitches and/or attachments.
Overlock stitch to keep raw edges from unravelling
Rolled hem stitch for ruffles
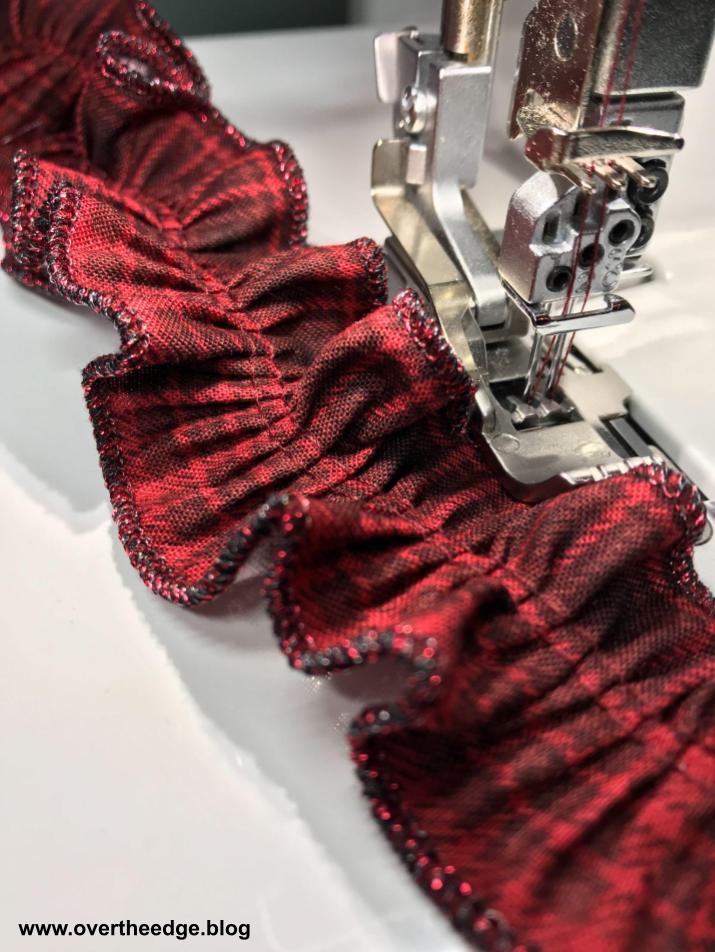
Wave stitch for fabric flower
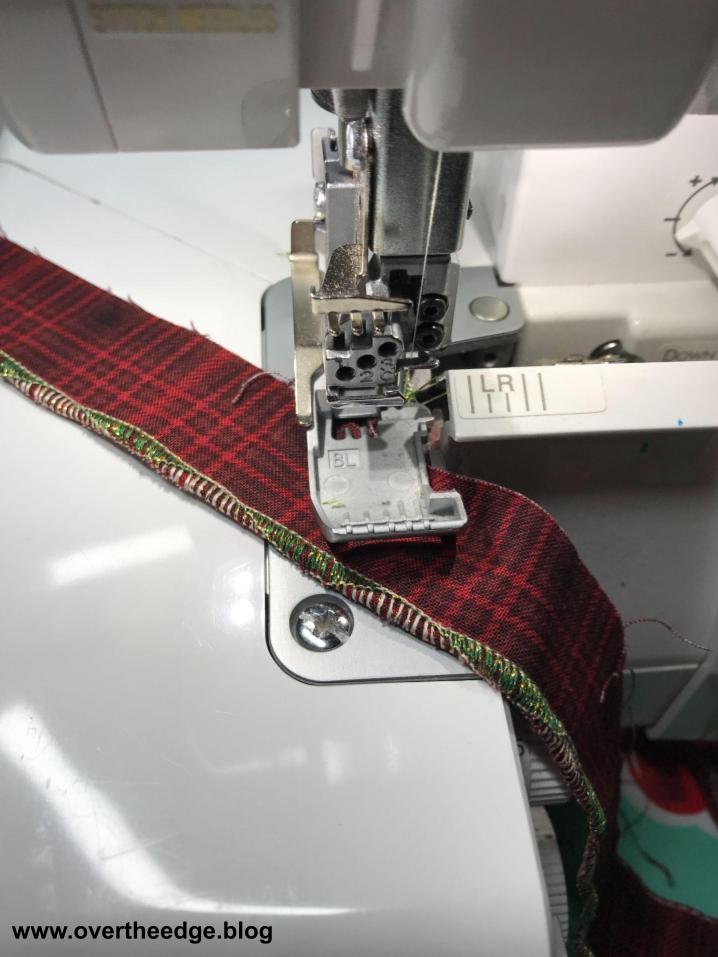
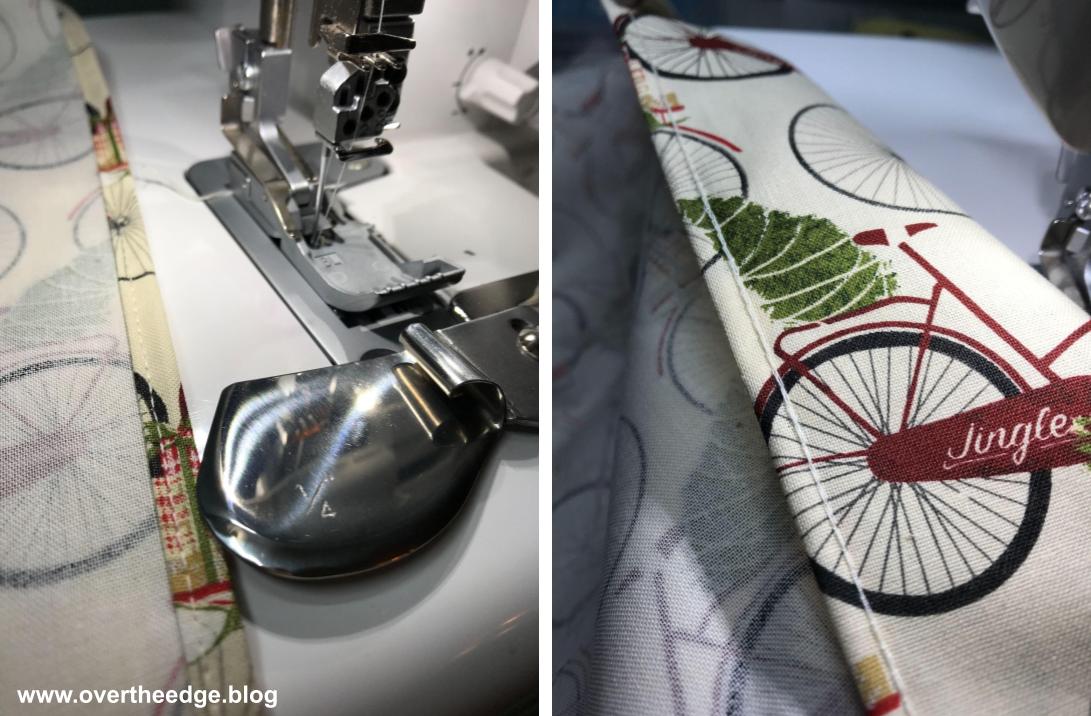
Hem sides of apron with ¼” plain hemmer attachment and chain stitch
Encase edges of bodice and make neck straps with a double fold bias binder and chain stitch
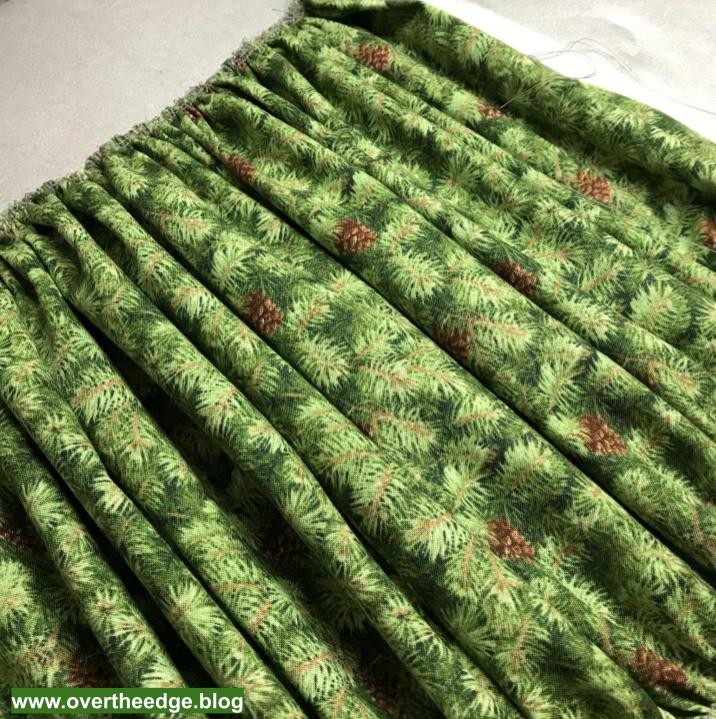
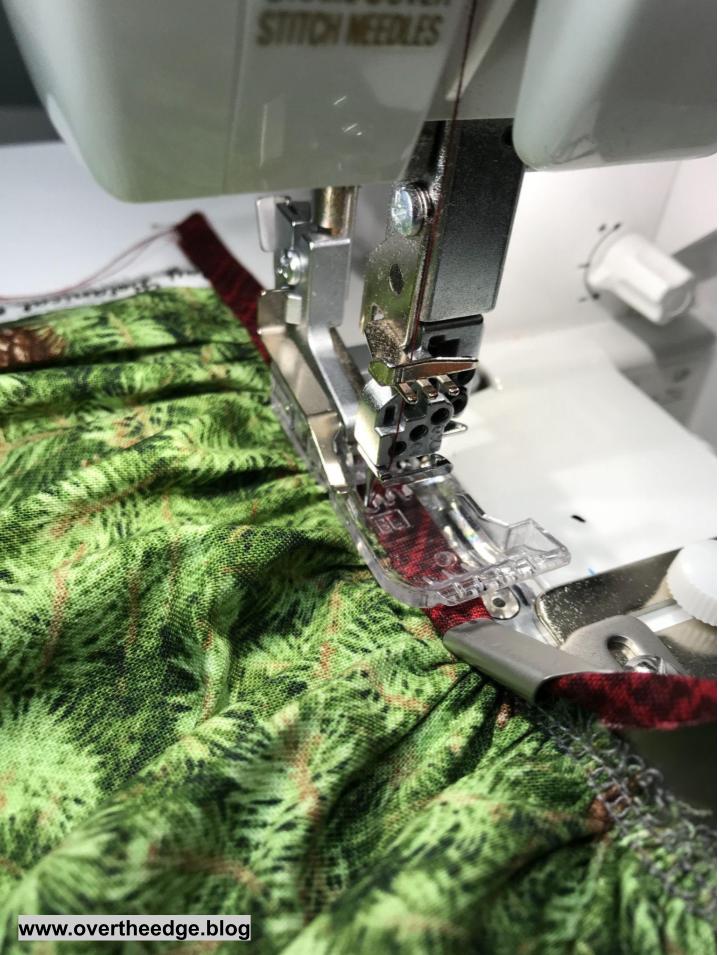
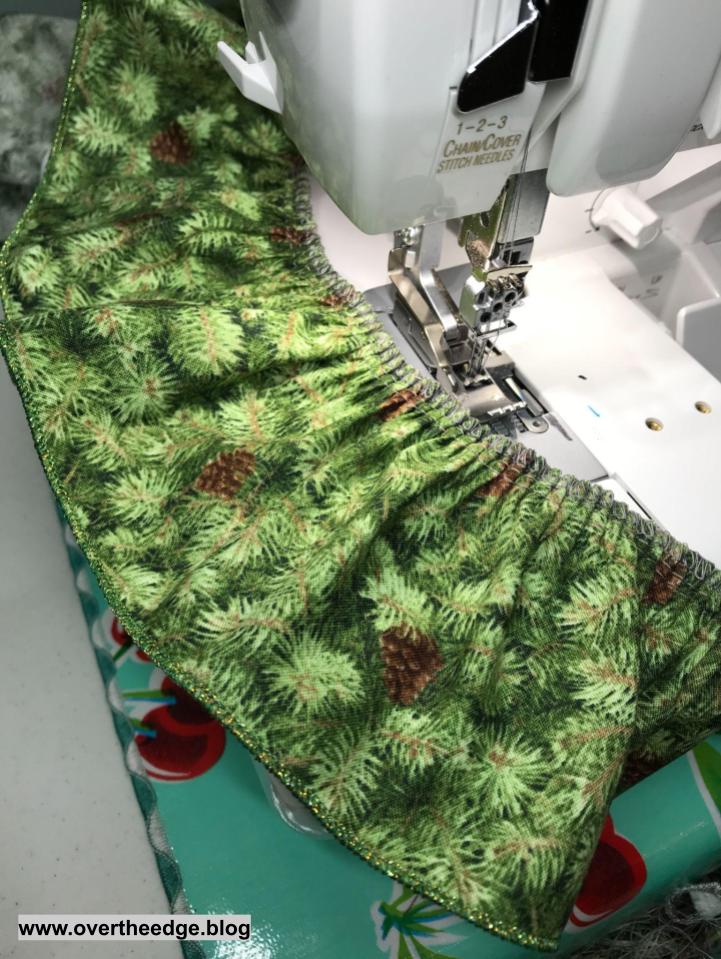
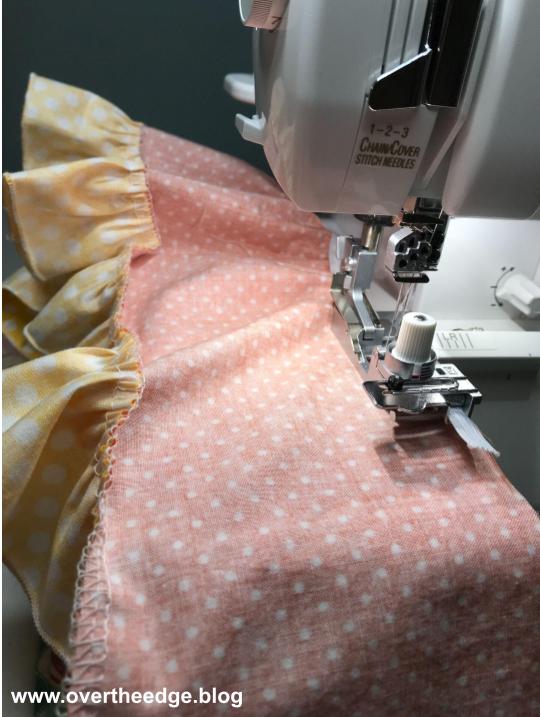
Gathering and Ruffles
I gathered the ruffles using two different techniques.
Four thread overlock technique which makes adjustable gathers, similar to a double row of basting stitches using a sewing machine. This technique is perfect for gathering fabric where you need to adjust the gathers to fit.
Narrow cover stitch technique which makes permanent gathers. The gathers created by the cover stitch are much fuller than those created by an overlock stitch. However, they can not be adjusted.
Long stitch lengths and differential feed are used in both gathering techniques.
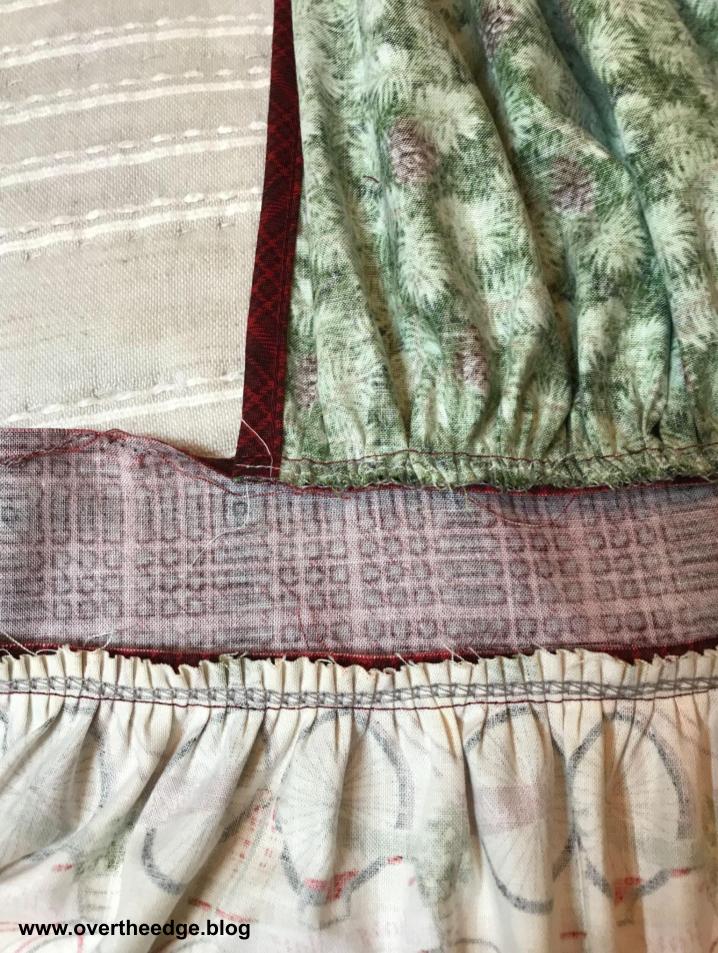
Seams and Construction
I serged all seams using a chain stitch.
Feet and Attachments
I used the following feet and attachments to construct the Gather Together Serger Apron:
Double fold bias binder 36mm
Plain hemmer ¼”
Cover/chain stitch foot
Clear foot. The pattern did not call for this foot, but I like it’s visibilty. I thought the visibility of the foot made it easier for me to attach the double fold bias binding to the apron bodice.
Standard foot
Photo Overview of my Gather Together Serger Apron
Wave Stitch
I used the wave stitch to finish the edges of the fabric flower. Metallic thread in both loopers gave the edges a bit of holiday sparkle. If your serger isn’t capable of the wave stitch you could substitute a rolled hem or three thread overlock stitch.
Three Thread Rolled Hem
I used a three thread rolled hem to finish the edges of the ruffles, with metallic thread in the upper looper.
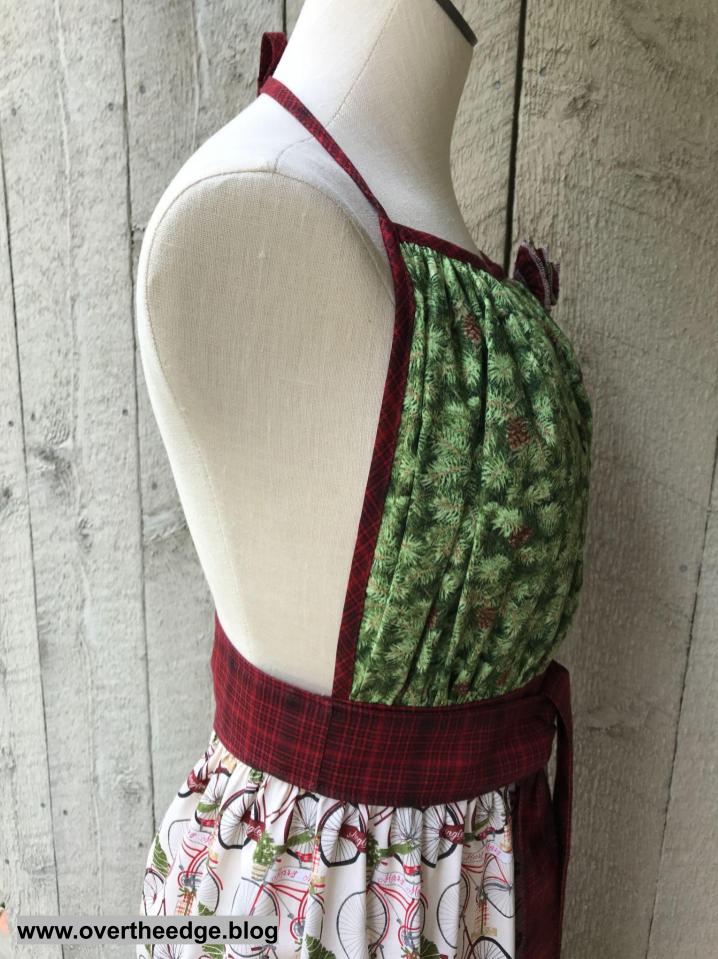
Gathering The Bodice
The bodice of the apron was gathered using a four thread overlock stitch. After gathering with my serger, the bodice still needed a bit more gathering. Gathers created with the four thread overlock are adjustable. So I slid the fabrics along the needle threads adjusting the bodice edges to the proper dimensions. See link about gathering in the Resources section of this post.
Hem Sides of Skirt with ¼” Plain Hemmer Attachment
I love to try new things with my serger. Using the serger plain hemmer was a new experience for me. I hemmed the side edges of the apron’s skirt using the ¼” plain hemmer, a chain stitch and a standard presser foot. My practice piece turned out perfectly. It must have been beginner’s luck because the first hem on the actual project took me three tries to get it right. I figured out that I needed to generously turn/roll the edge of the fabric in advance and keep it turned as I fed it into the attachment. Then the plain hemmer worked really well. The second side hem of the apron looked beautiful on the first try! See the link in the Resources section for tips for using a serger ¼” plain hemmer.
The plain hemmer rolls the hem to the top side as it is serged. So you feed your fabric into the attachment with the wrong side up. The needle thread will be seen on the back side of your finished project. The chain looper thread will be seen on the right side of your project.
Finish Edges of Bodice and Create Straps Using a Double Fold Bias Binder Attachment
I followed the video class/instructions to make the apron. However, instead of making the top edge and neck straps all one piece, I bound the top edge first. Then I bound the side edges of the bodice and continued the binding from the sides to make the neck straps.
Gathering Ruffles Using a Narrow Cover Stitch
I used a narrow cover stitch along with the cover stitch foot to gather the narrow ruffle strip, bottom ruffle skirt and flower. The narrow cover stitch gathers fabric much more tightly than gathering with an overlock stitch. But the cover stitch gathers are not adjustable like the gathers made by serger overlock stitching.
Construct Seams
I used the chain stitch to serge the seams of the bodice, skirt and waistband/ties. Serging with a chain stitch is very similar to using a sewing machine straight stitch.
I attached the narrow ruffle and bottom ruffle to the skirt of the apron using a chain stitch too.
Gather Together Serger Apron
I hope you enjoyed learning about how I serged my Gather Together Serger Apron.
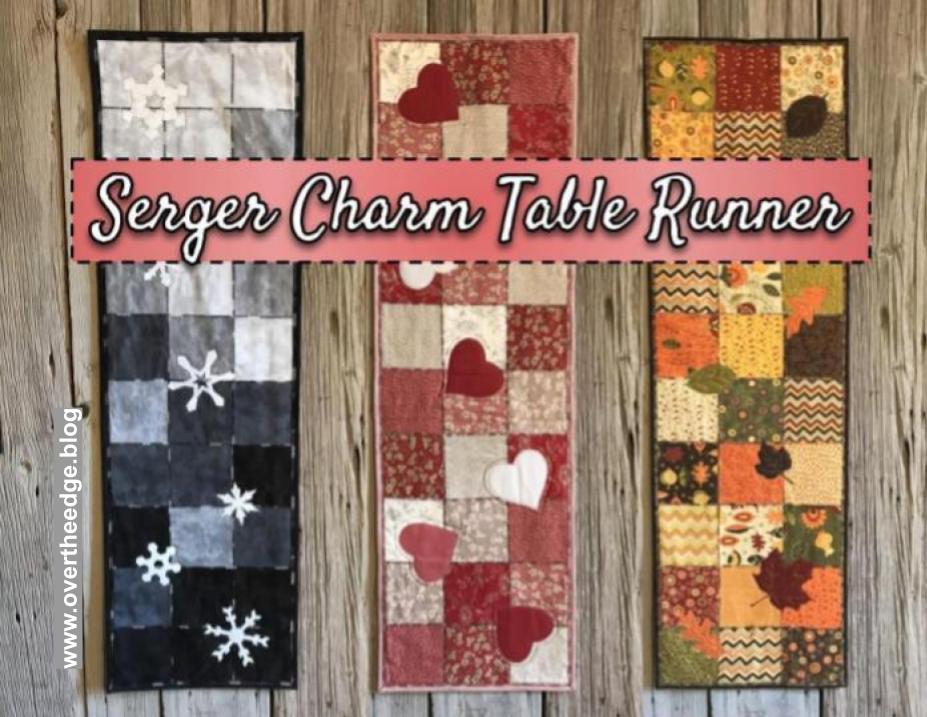
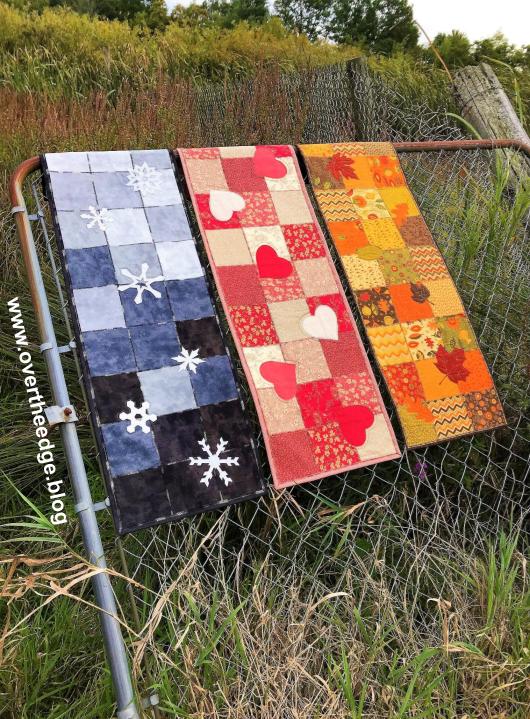
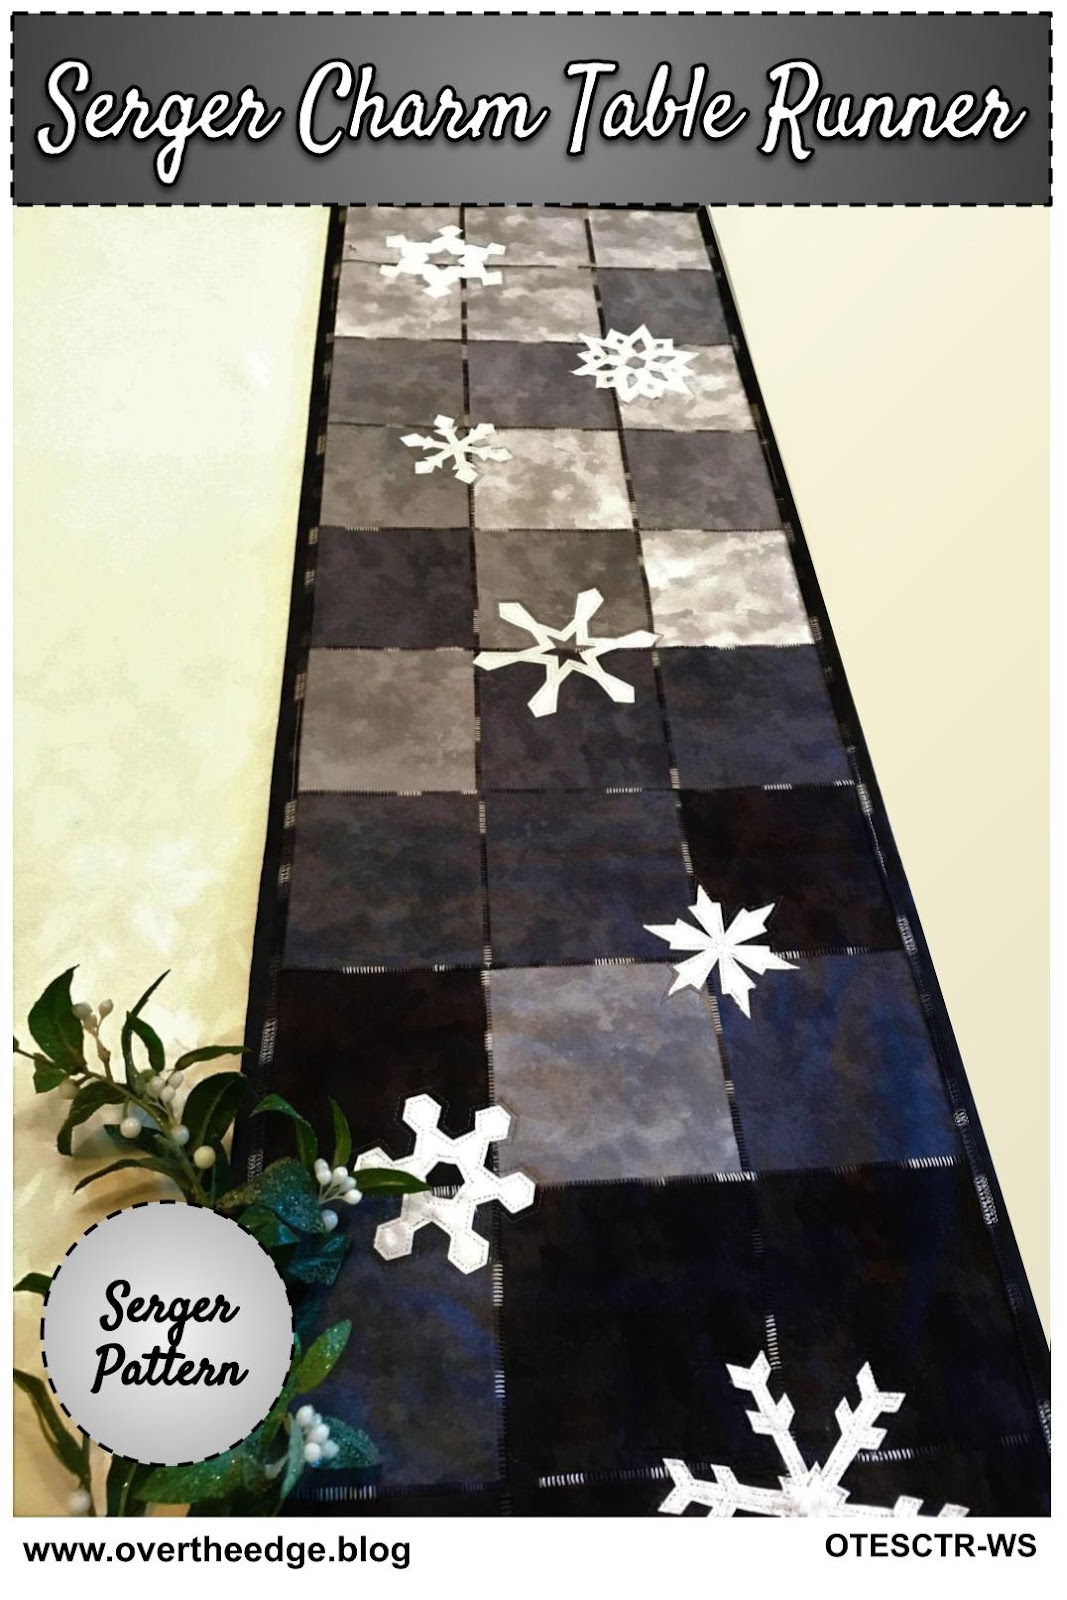
I finally completed the official pattern for my Serger Charm Table Runner design. It’s hard to believe that six years have passed since I first taught this design in a serger class. It’s time to get charmed by a serger!
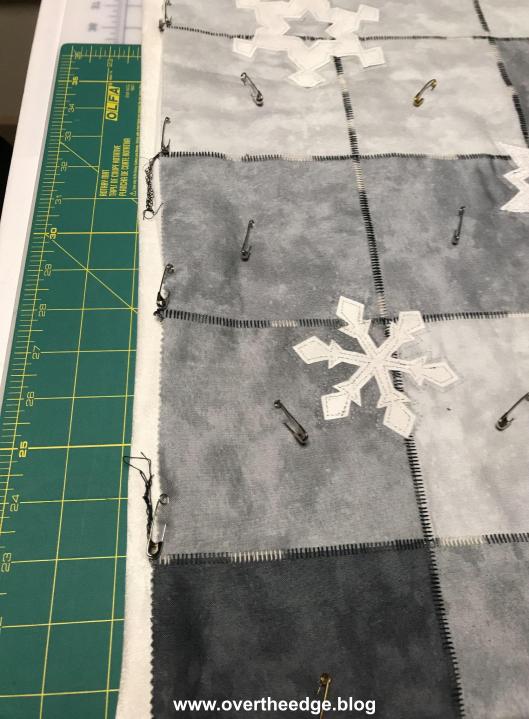
My serger charm table runner quilt is made from charm squares that are pieced together with a serger flatlock stitch. It even has overlock embellished binding. I included all three layouts and applique shapes in the pattern: Winter Skies, Hearts a Flutter and Falling Leaves. And of course, the step by step instructions have lots of diagrams and photographs. Keep reading to learn all about the table runners I made as samples for my pattern.
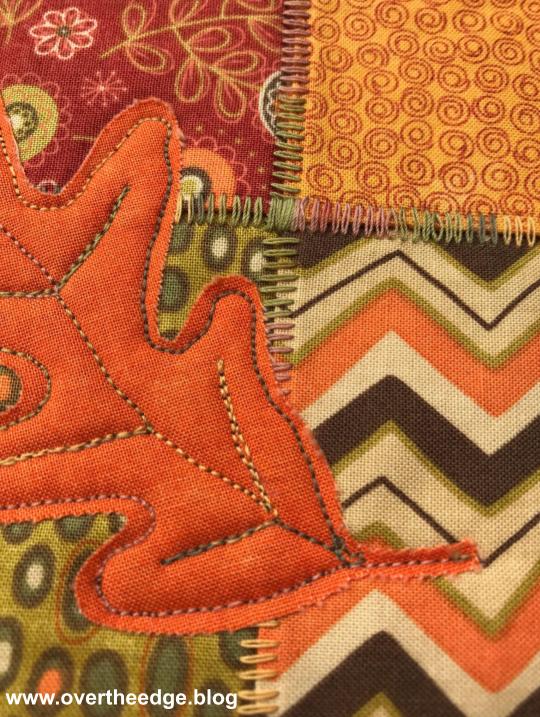
The Flatlock Stitch and Piecing a Quilt
There are many different ways to use a flatlock stitch. Most involve serging with part of the loops hanging off the edge of the fabric. You need a steady hand (or a special presser foot) and a little practice to get it just right. But with flatlock piecing you don’t need a special foot. Your standard presser foot will work just fine. You guide the raw edges of your fabric next to your blade, and just trim off the stray threads. So the entire stitch lays on the fabric with no overhanging loops.
Charm squares are 5” squares that are cut from a collection of cotton quilting fabric and sold in packages. There are typically 40-42 squares per pack, but the number can vary. I used one package of charm squares for each of my table runners.
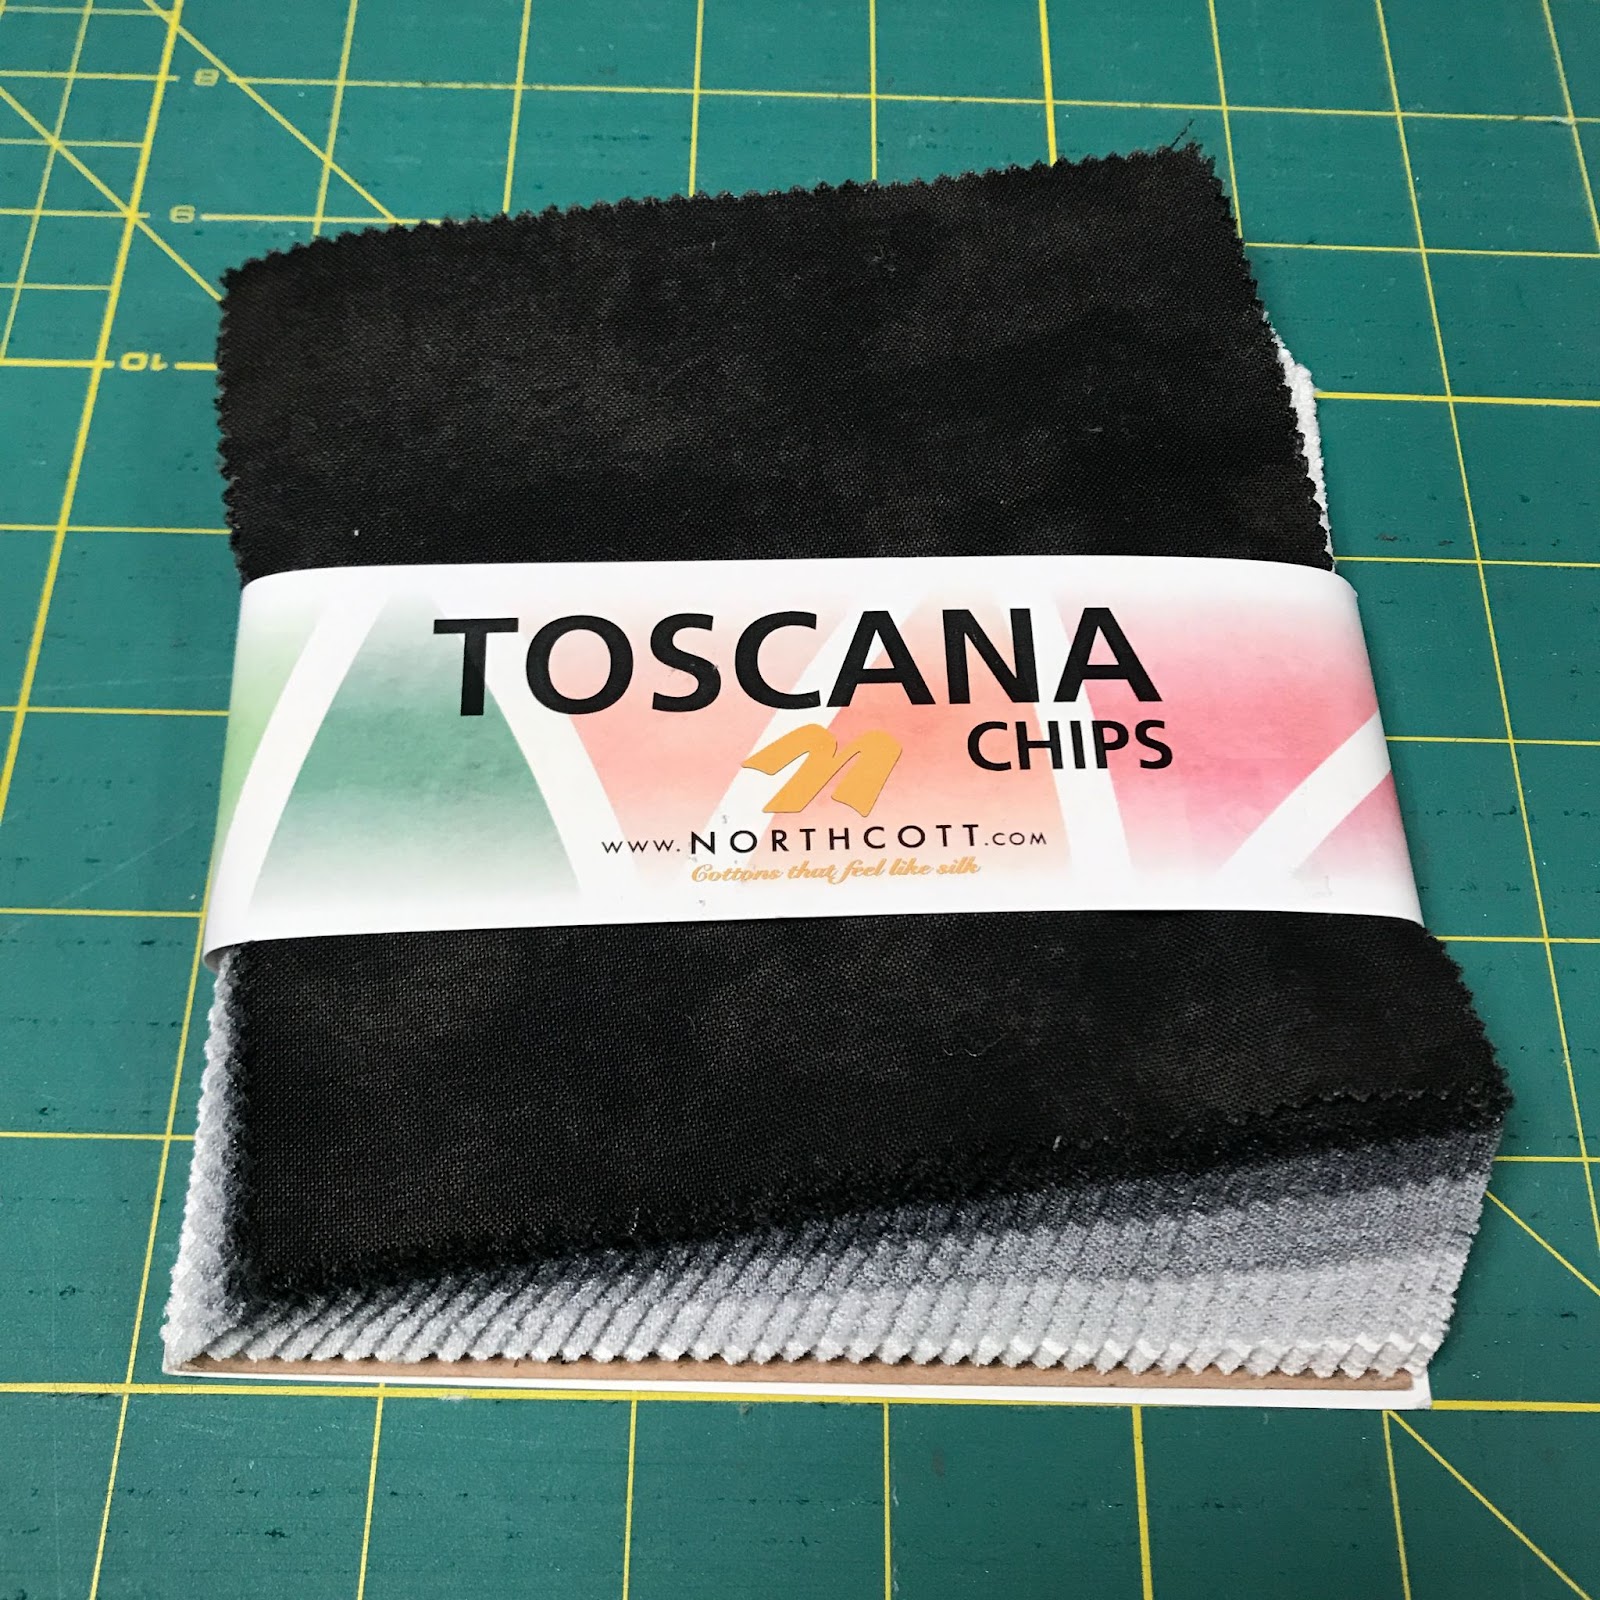
Winter Skies – I used a Northcott Toscana Evening Shadow Chip Pack
Hearts a Flutter – I used a Moda French General Favorites Charm Pack
Falling Leaves – I used a Moda Hello Fall by Sandy Gervais Charm Pack
Both the background squares and the applique squares in my table runners came from the charm packs. The Northcott Toscana charm pack had 5 colors in it with multiples of each fabric. The Moda Hello Fall charm pack had very few repeats. The Moda French General Favorites charm pack had some repeats. You can always add in some applique fabric from your stash if the charm pack doesn’t have the solids or blenders you need for the appliques. I was lucky because the charm packs I chose had just the right amount of blenders for appliques. Or you could always cut your own collection of 5” squares for this table runner.
Quilt Top
The table runners were pieced together using flatlock stitch. I love the look of the flatlock stitches in decorative quilts where the thread can be a focal point. And I love the way it looks with variegated thread. It really adds interest to a quilt. I’ve used both 30 wt and 40 wt variegated cotton threads by Sulky and YLI. The squares with the flatlocked seams look great as a background for applique.
Applique
I had fun designing the applique shapes for this pattern. Real tree leaves were the inspiration for my Falling Leaves table runner. It’s amazing what you can do with real leaves and a copy machine! I learned how to make my own six sided paper snowflakes and picked my favorites to add to my Winter Skies table runner. For the Hearts a Flutter table runner I cut out several different paper hearts from folded paper and tested them on the runner before choosing my favorite.
I used the raw edge applique technique to apply my shapes using a sewing machine. But other forms of applique would also work. If you have a serger with a large throat space you could applique with the chain stitch. You could even machine embroider some of your favorite applique designs on your table runner.
Batting
Choose your favorite. I’ve made mine with thin fusible fleece, cotton quilt batting, and flannel. I like them all, but each is a little different. Flannel is the thinnest. Fusible fleece was a little more “stiff” and cotton quilt batting was the fluffiest. I think the fusible fleece fused to the back side of the quilt top fabric helps to hold the fabric and flatlock stitches in place, but I’ve had good success with all of these battings.
Quilting
You can quilt this table runner with as little or as much quilting as you like, based on your selected batting. Some battings require quilting stitches every 3-4” or some like flannel can be quilted 8-10” apart. My table runners are decorations and are spot cleaned as needed (rarely), so quilting distances are not that important. I did minimal quilting on my table runners so that my variegated thread and flatlock stitches would stand out and be a focal point of the quilts. I quilted my table runners using both a sewing machine and a hand sewing needle.
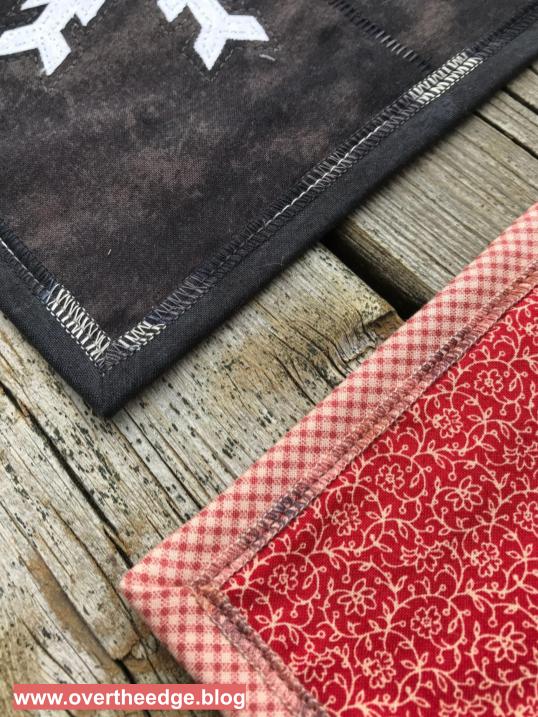
Binding
Although any method of binding would work for this table runner, I chose to embellish my binding with a three thread overlock stitch. The serger stitches on the binding really help tie together the quilt with the flatlock stitching around the squares. I attached and top stitched the binding to these table runners using a sewing machine, but a serger using a 4 thread overlock and/or a chain stitch would work as well.
Other Ways to Use a Serger for this Project
You can serge a table runner just like mine using the instructions in the pattern. A standard serger capable of a three thread flatlock stitch and a sewing machine are all you need.
Would you like to get more creative with your serger? Here are a few additional ways to use your serger that are not included in the pattern:
Use a rolled hem on the binding instead of an overlock
Attach the binding with a four thread overlock stitch or a chain stitch
If you’d like to try making the Serger Charm Table Runner be sure to visit my etsy shop and get your own copy of my pattern. Use the coupon code SERGERCHARMNOV2021, which will give you a 20% discount on this pattern through November 30, 2021. Click on this link to take you directly to the pattern section of my shop. https://www.etsy.com/shop/studiojsewing?coupon=SERGERCHARMNOV2021
I hope you enjoyed learning about the making of my serger charm table runners.
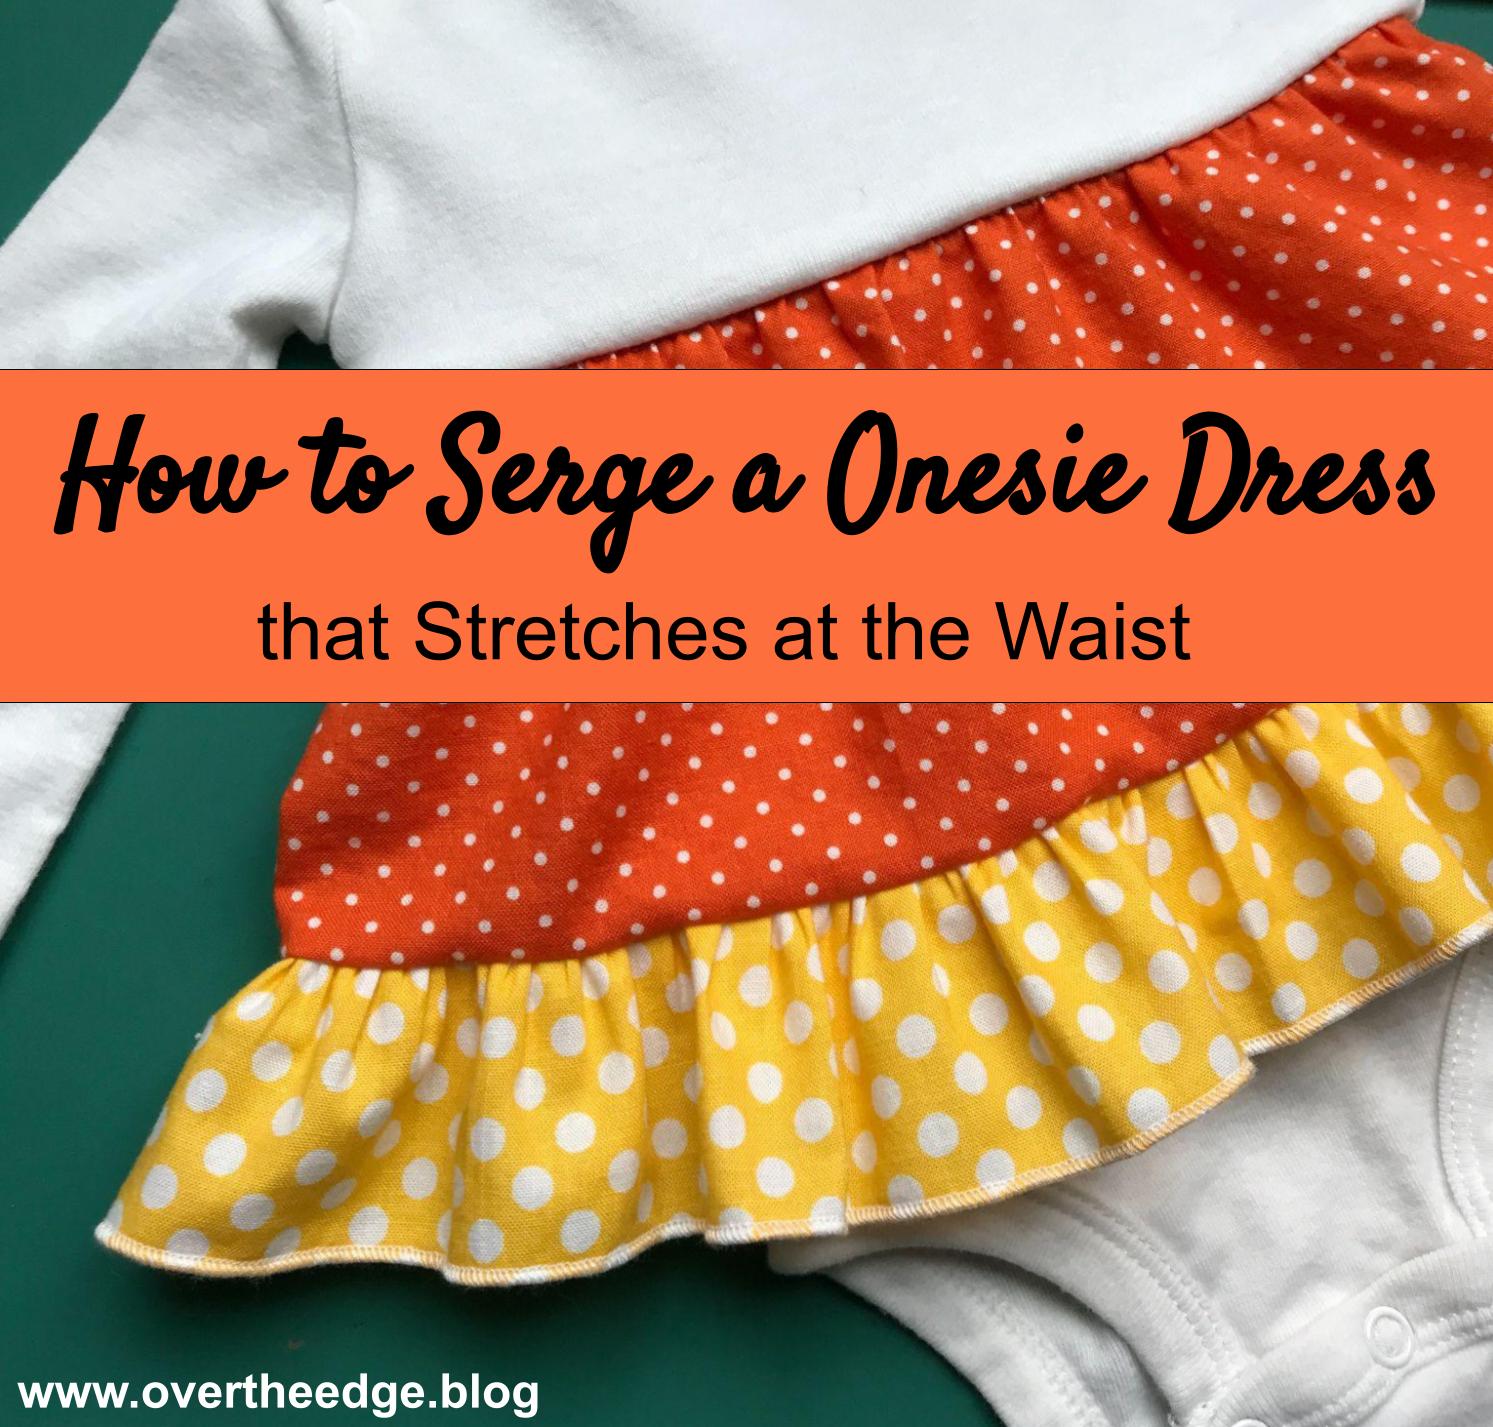
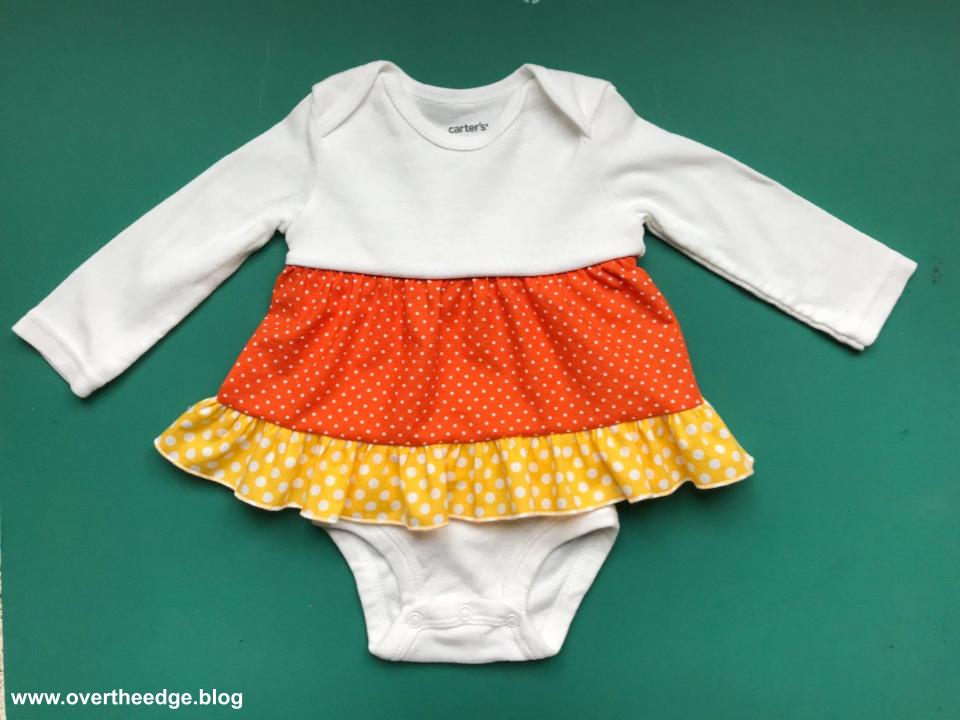
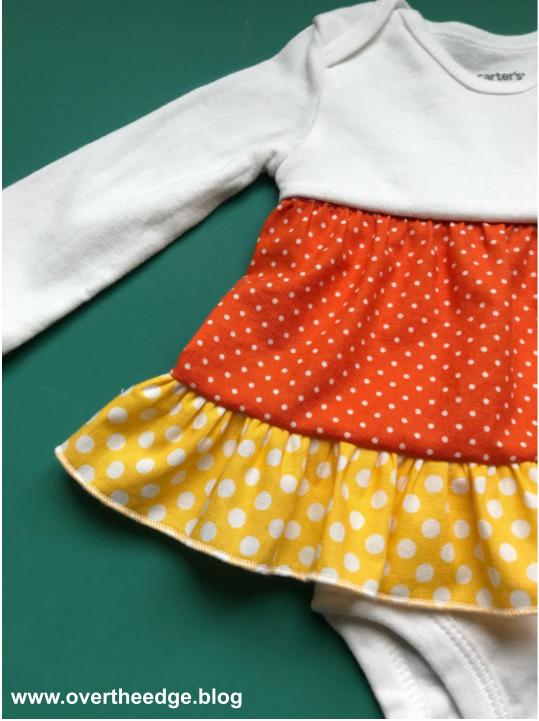
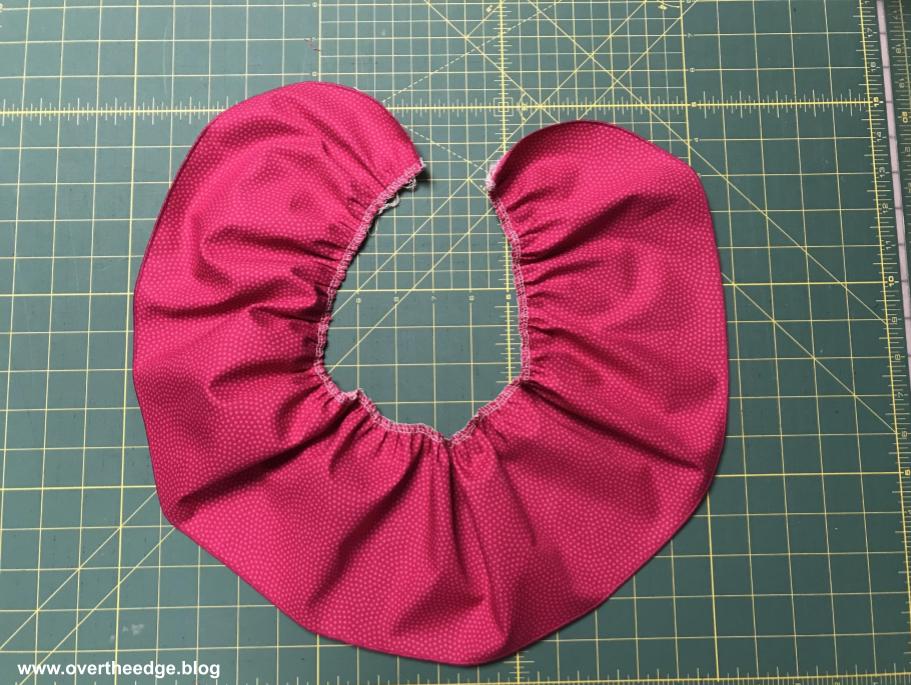
Surfing the internet one day, I stumbled across a photo of a cute little girl’s dress that reminded me of candy corn. Right then I knew my baby granddaughter needed her own version of that dress. Instead of a regular dress though, it needed to be a onesie dress. Onesies are the perfect base for a baby dress or shirt because they stay tucked in and don’t ride up and expose little belly buttons! And of course, I had to use my serger to make it. After a little experimentation I figured out how to serge a onesie dress that stretches at the waist. This blog post is a summary of my process. In the future I plan to create more detailed instructions for this style onesie dress using several different serger techniques. So stay tuned!
The Typical T-Shirt or Onesie Dress
There are many great tutorials on the internet for making cute onesie and t-shirt dresses. The typical method for creating a onesie or t-shirt dress is based on gathering a piece of cotton fabric with long basting stitches and then stitching the gathered fabric to the t-shirt or onesie. I’ve made t-shirt dresses like this before, but I’ve found that the woven fabric skirt limits the stretch of the waist seam. In the previous dresses I’ve made, the waist seam stretches very little or not at all. If the t-shirt is loose and baggy there is usually enough wiggle room to get the dress on a child without popping seams, even if the seam doesn’t stretch. But with a close fitting onesie, it’s really difficult to get it on a baby if the fabric at the waist doesn’t stretch.
How to Serge a Onesie Dress that Stretches at the Waist
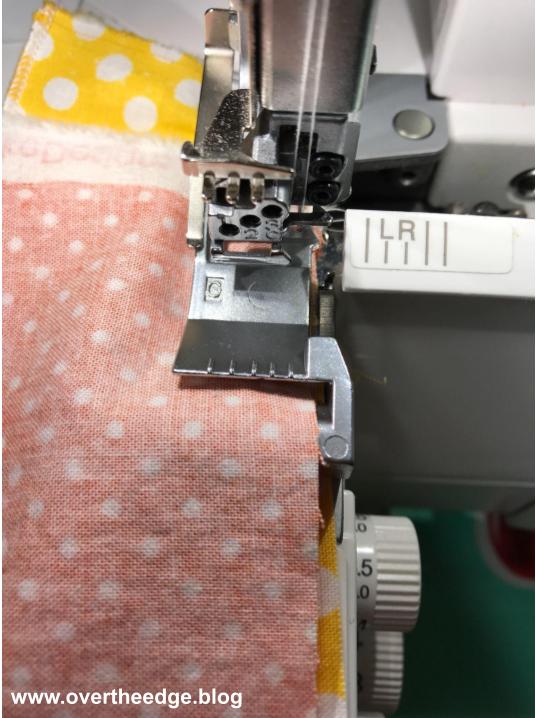
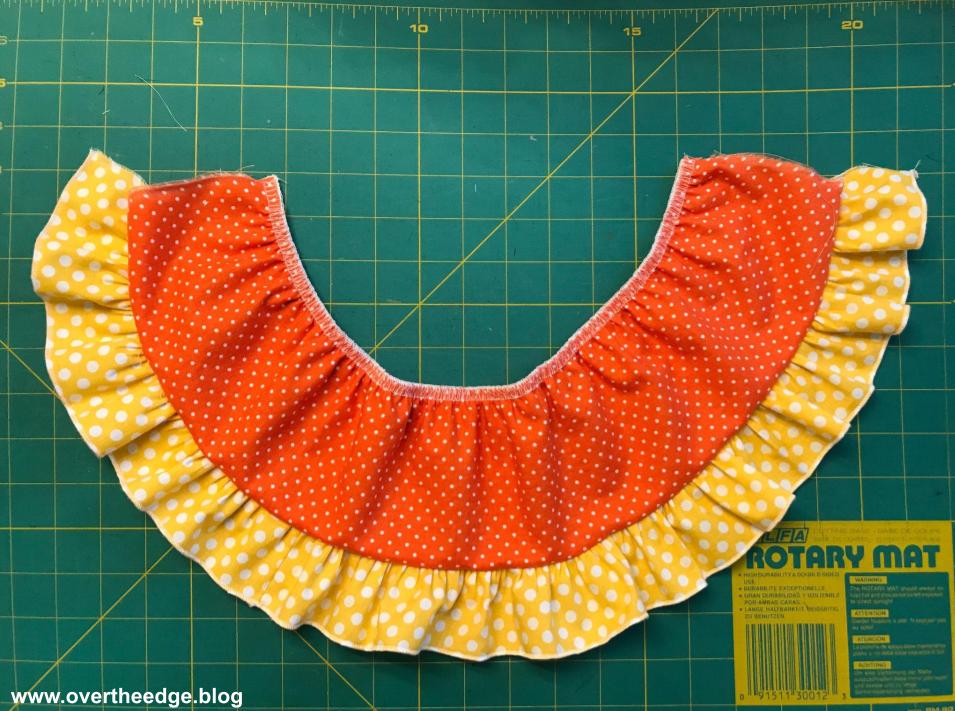
To create my candy corn skirted onesie I wanted to use a couple of cute woven cotton polka dot prints. So I had to figure out a way to add a skirt to my onesie without losing the stretch around the waist. I decided the best way for me to do this was to use my serger, along with an elastic foot to gather the top edge of the skirt using elastic.
I also used a ruffling foot to simultaneously gather and attach the bottom ruffle to the skirt.
The ruffling foot and elastic foot are presser feet that help you gather fabric or attach elastic to fabric. You can gather fabric or attach elastic to fabric using a serger without these specialty feet. The feet just make the process quicker and more professional looking.
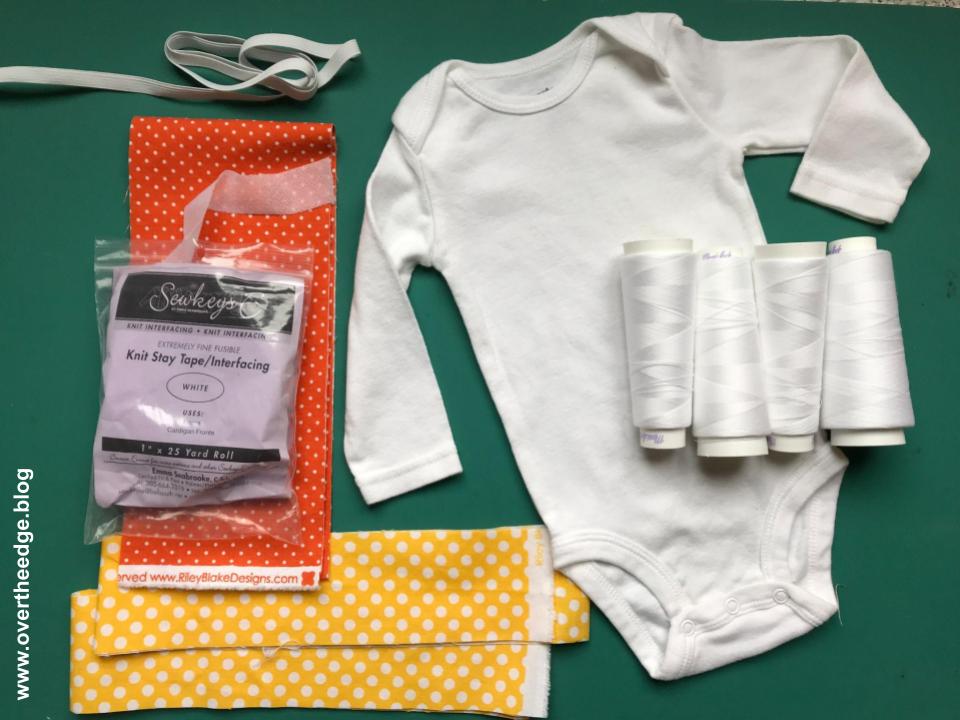
Supplies
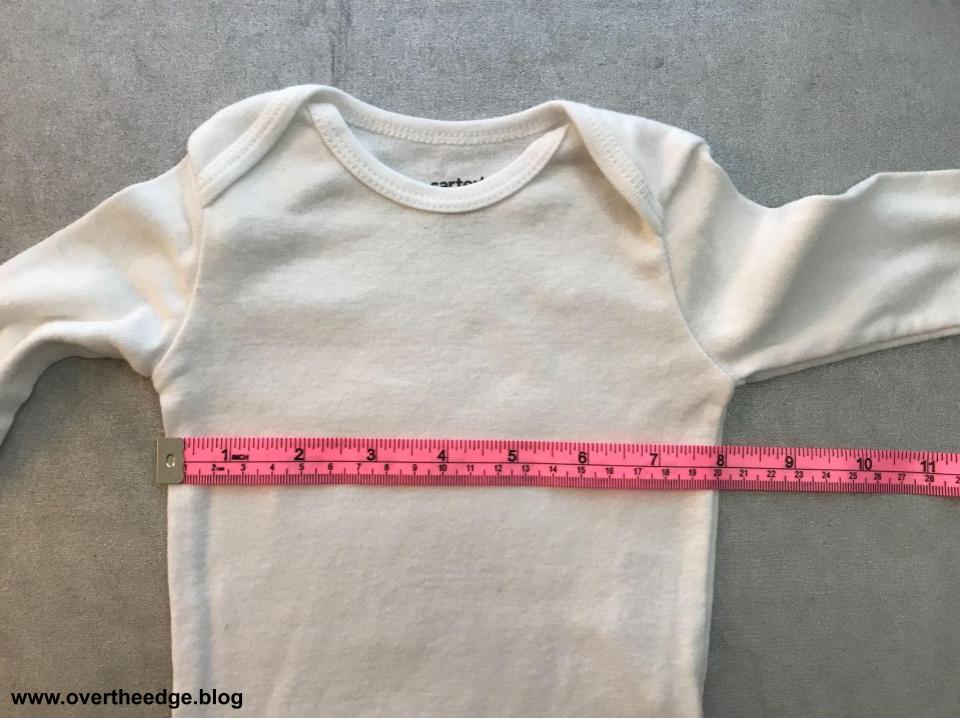
Baby onesie – I used size 6 month long sleeved by Carters
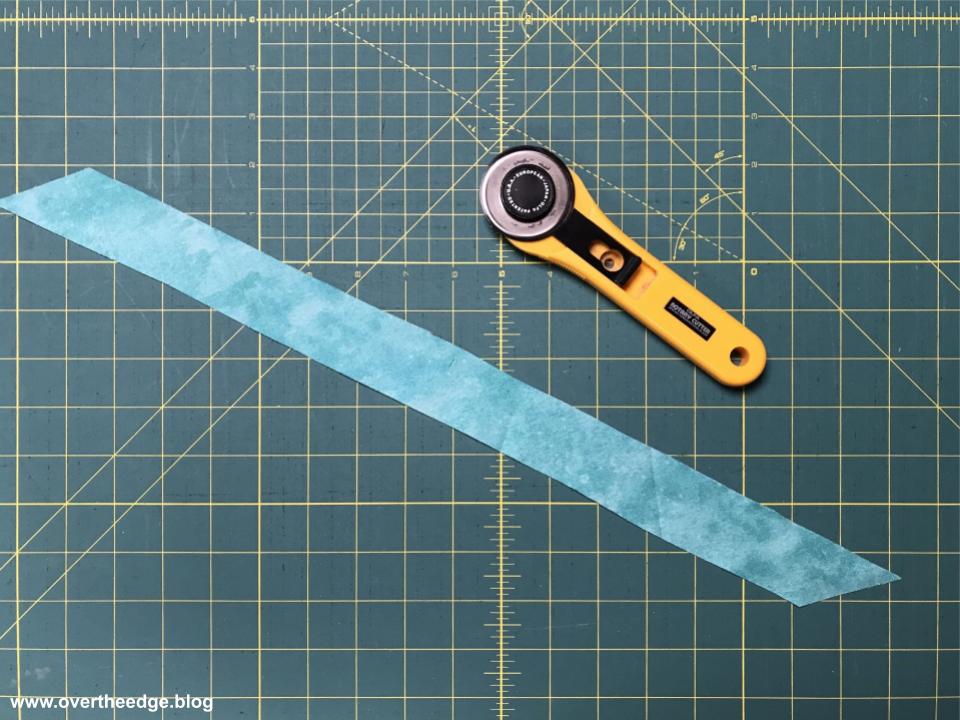
4½” x 45” wide cotton print fabric for main skirt
Two – 2½” x 45” wide strips of cotton print fabric for bottom ruffle
⅜” wide elastic – 2X the width of the onesie (where you will attach the skirt) plus 6”
Serger thread for overlock and rolled hem stitches
Optional – 1” thin fusible knit knit stay tape – 2 x the width of the onesie (it helps to stabilize the onesie where you cut it so the edges don’t stretch out as you handle/serge)
Supply Notes
Since I added a seam at the waist, the onesie did get a little shorter (about ½-¾” shorter). Keep this in mind when selecting your onesie. You may need to select a onesie that is a little bit longer than the length you actually need.
I made the skirt on the onesie shorter so the onesie looked more like a skirted shirt than a dress. I wanted more of a shirt that she could wear with pants. Feel free to make your skirts any length you desire.
Tools
Serger capable of 4 thread overlock and 3 thread rolled hem
Elastic foot for serger – helpful, but not required
Ruffling/gathering foot for serger – helpful, but not required
Serger accessories and manual
General sewing supplies
Sewing machine for basting (optional)
Summary of Steps
The steps below are a summary of the steps I took to make my “Candy Corn Skirted Onesie” for the blog post “How to Serge a Onesie Dress that Stretches at the Waist.” This style onesie consists of cutting apart the onesie and inserting a gathered skirt.
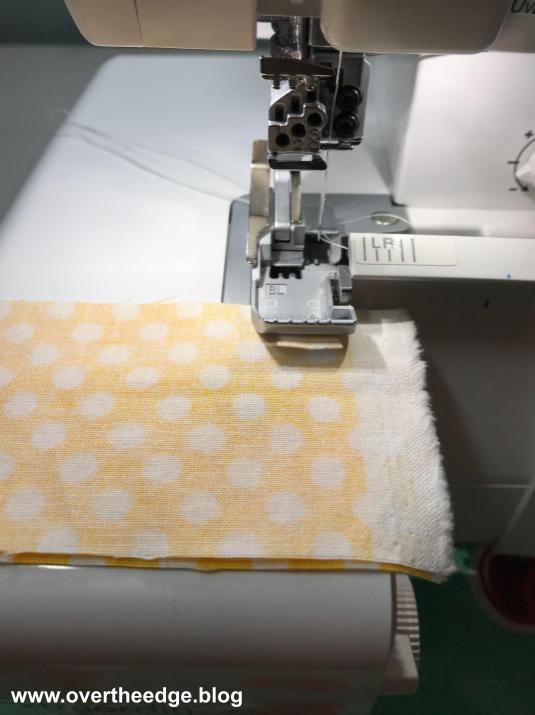
Step 1: Seam the Bottom Ruffle
I used a narrow three thread overlock stitch to seam my two bottom ruffle pieces together into one long strip.
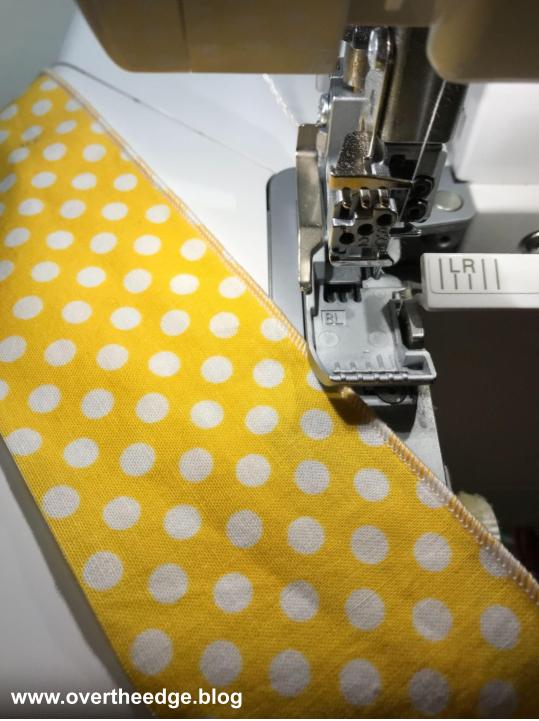
Step 2: Finish Bottom Edge of Ruffle
Next I used a three thread rolled hem stitch on my serger to finish the bottom edge of my long ruffle strip.
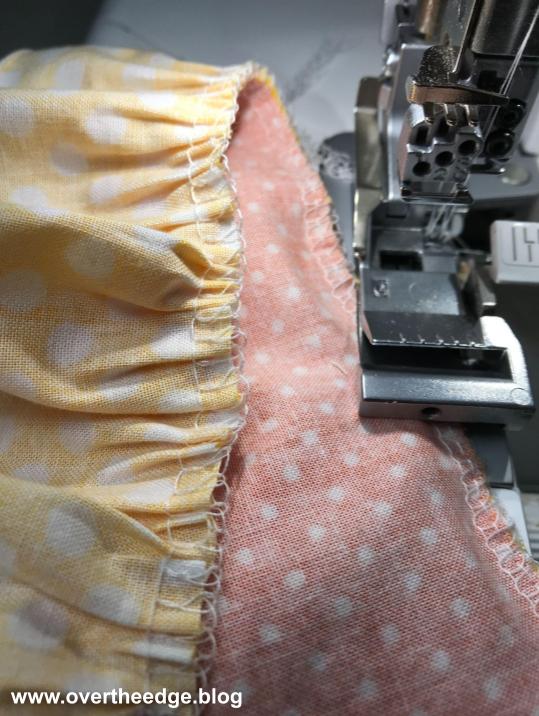
Step 3: Gather Bottom Ruffle and Attach to Main Skirt
I simultaneously gathered my bottom ruffle and attached it to the main skirt piece using the ruffling foot for my serger.
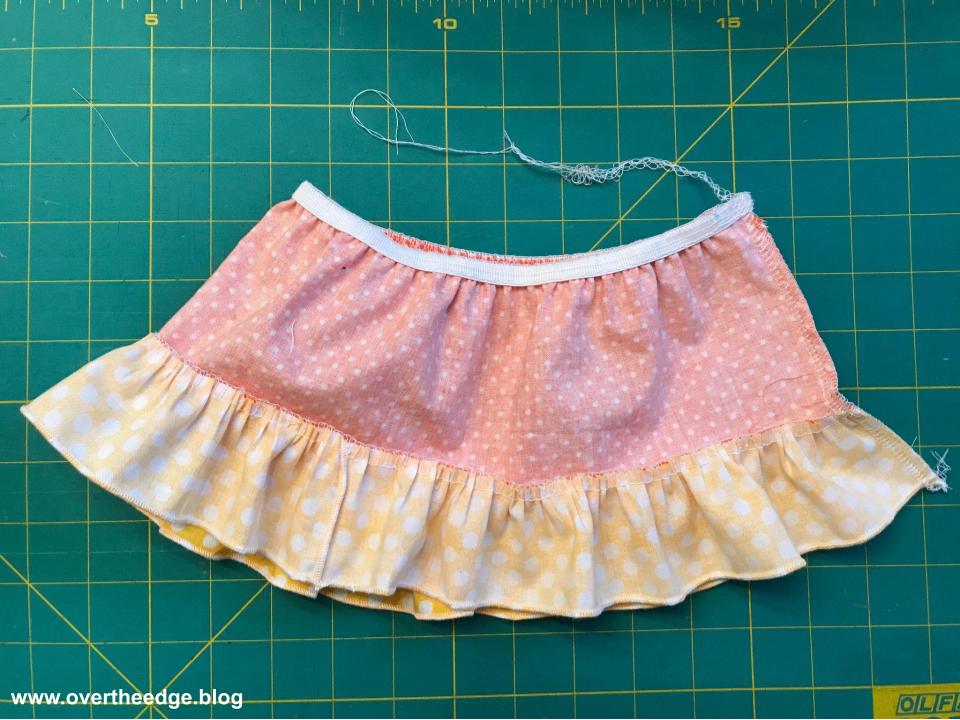
Step 4: Gather Top Edge of Skirt Using Elastic
I used my elastic foot and elastic to gather the top edge of the skirt fabric. There are many variables that determine how much fabric will be gathered to the elastic using an elastic foot – things such as the type of fabric, the type of elastic, how the fabric is guided into the foot, etc. Because of these variables I factored in a some wiggle room and used a little more fabric than I actually needed for the skirt. Because I could easily cut it to size in a future step (step 6). It’s much harder to add fabric than to take it away!
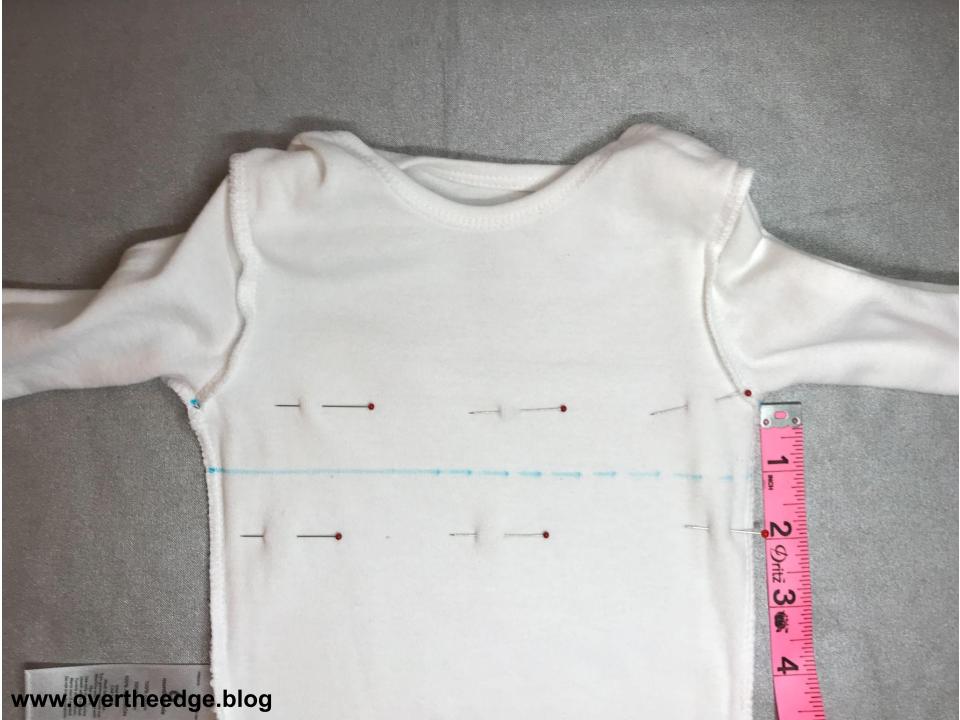
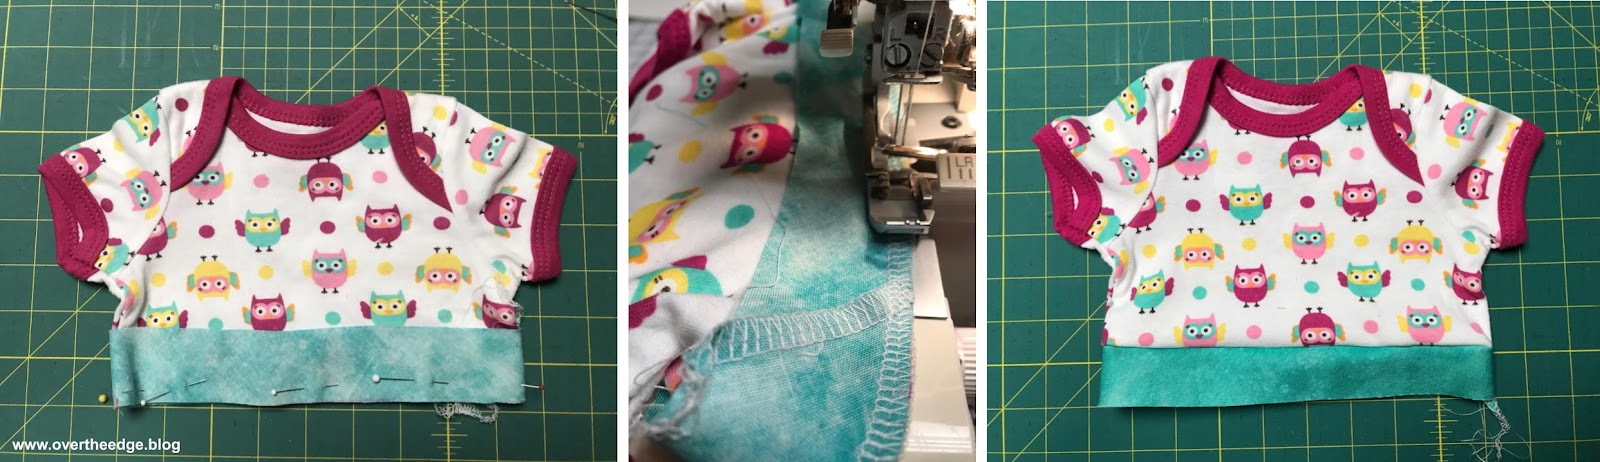
Step 5: Prepare Onesie
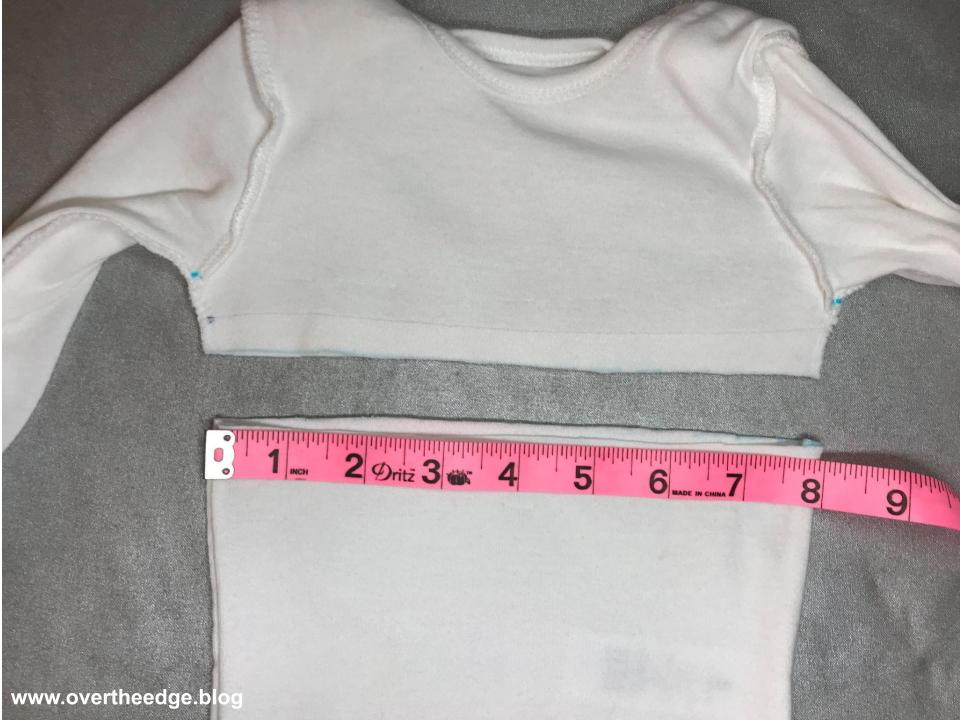
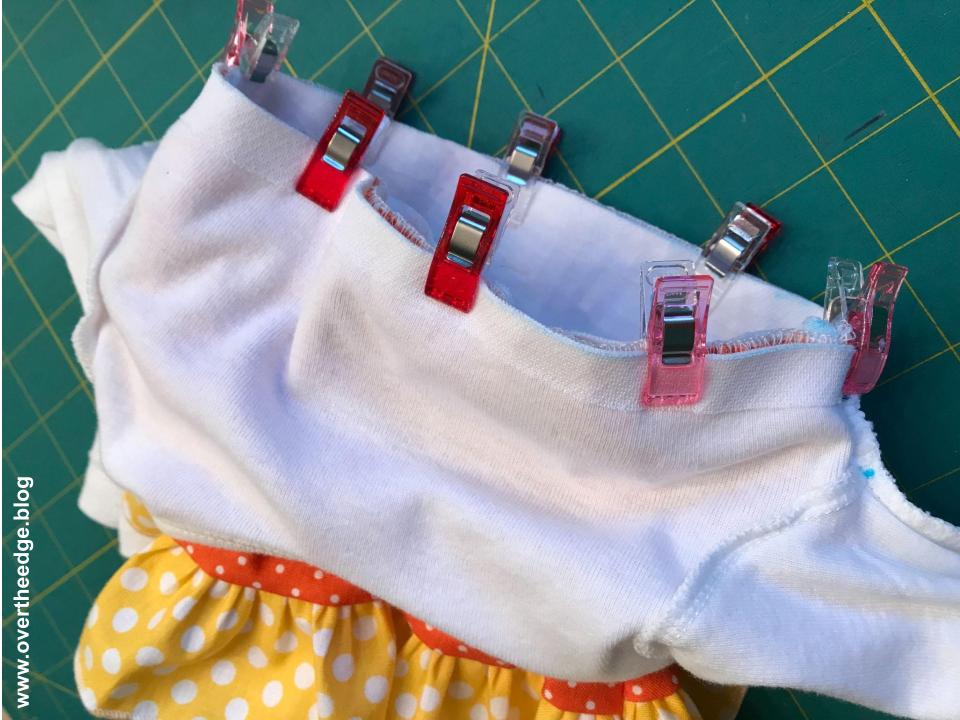
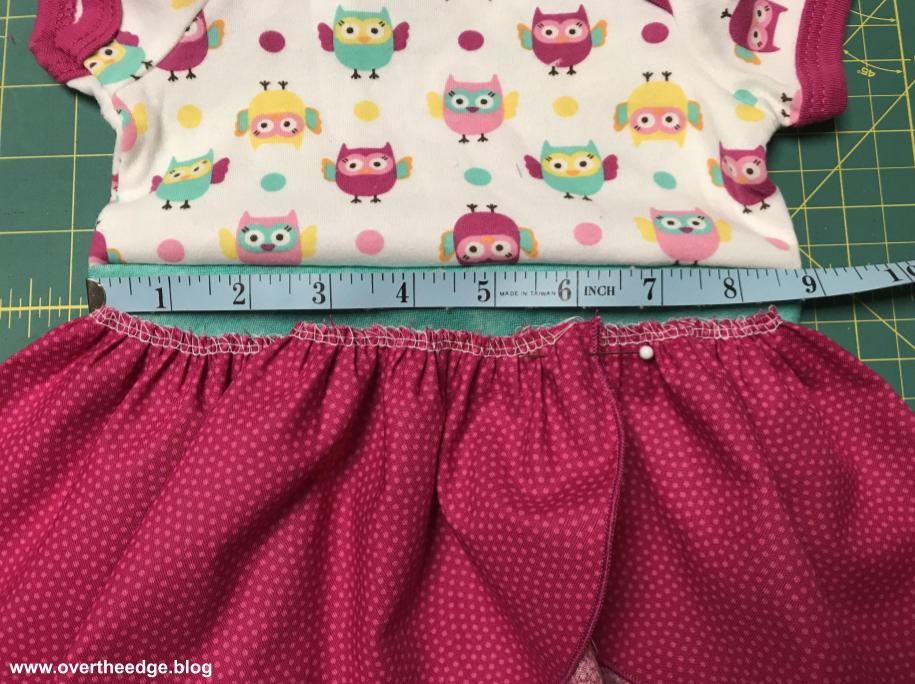
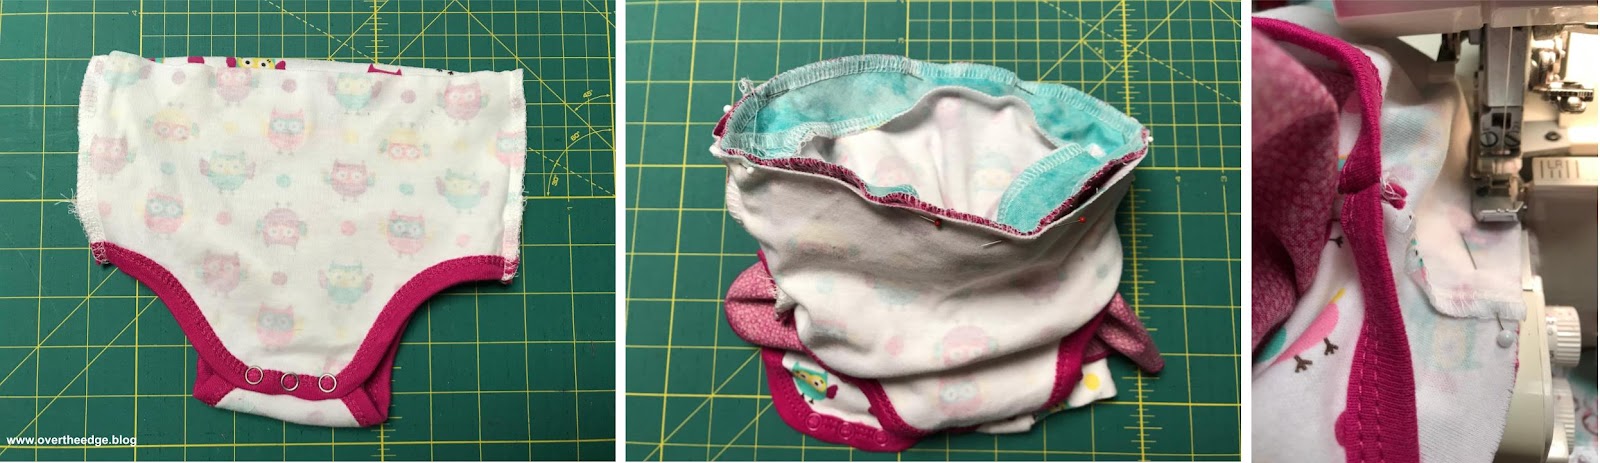
I measured down 1” from the armpits and marked a line across the front and back of the onesie. I also added a fusible knit stay tape over the cutting line to add stability to the future cut edges at the waist. Then I cut the onesie apart at the line.
Step 6: Prepare Skirt for Attaching
I measured the cut edge of my onesie and cut my elastic gathered skirt piece to match (2X this measurement plus 3/4” for seam allowances.)
I serged the short edges of the skirt seam together using a standard four thread overlock stitch.
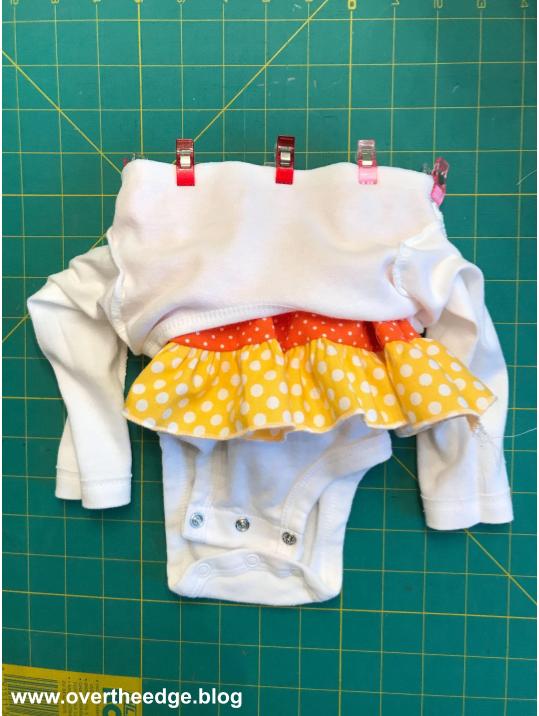
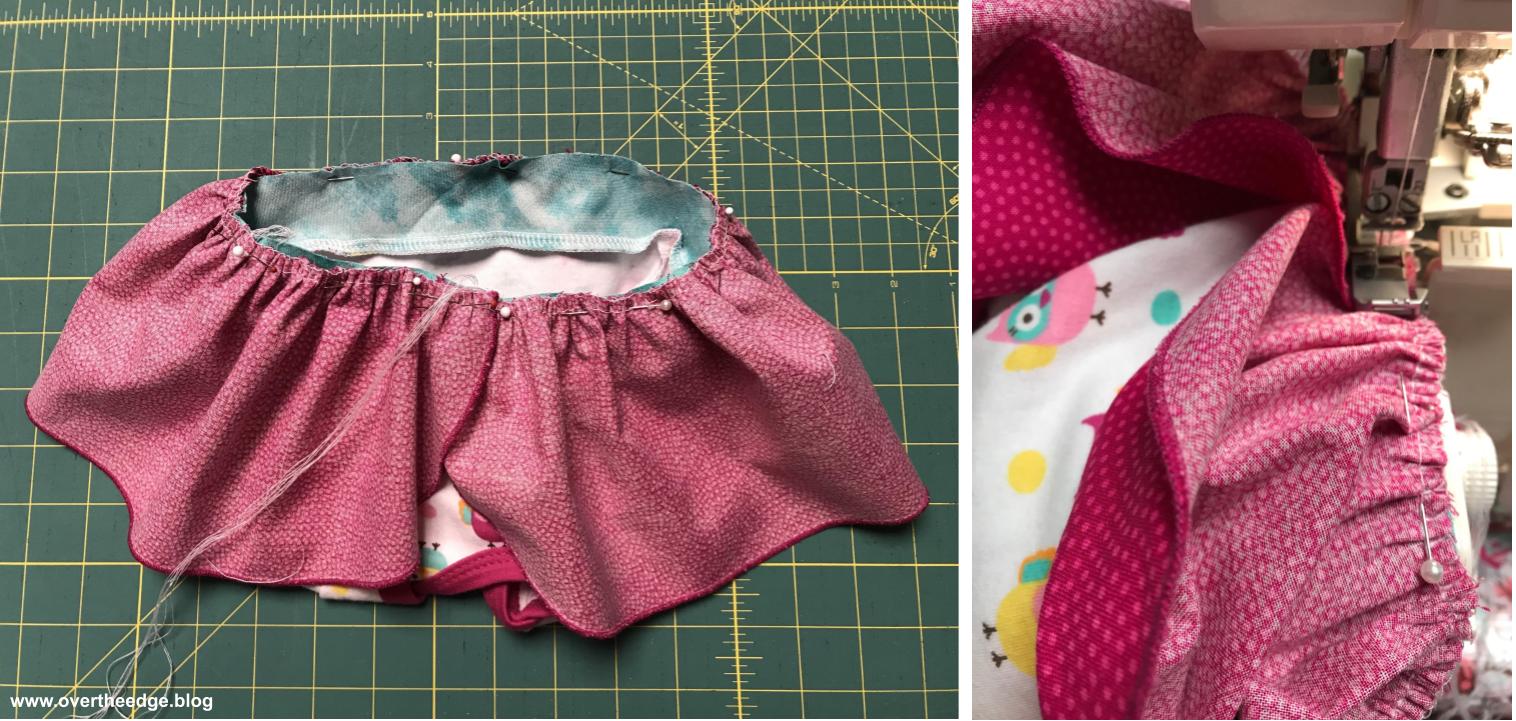
Step 7: Insert Skirt and Serge Waist Seam
I placed the wrong side of the skirt against the right side of the bottom half of the onesie, lining up the raw edges. Using my sewing machine, I basted the skirt to the onesie bottom.
Then I placed the right side of the top half of the onesie against the right side of the skirt, lining up the raw edges of all three pieces (the top half of the onesie, the skirt, the bottom half of the onesie.)
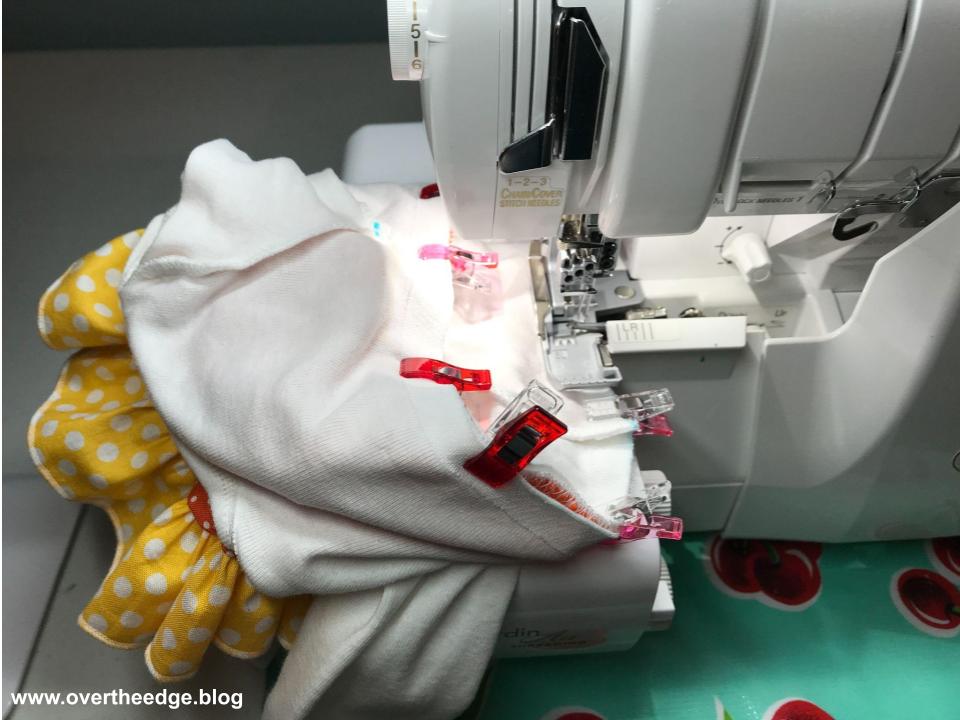
Next, using a standard four thread overlock stitch, I serged all the way around the waist seam.
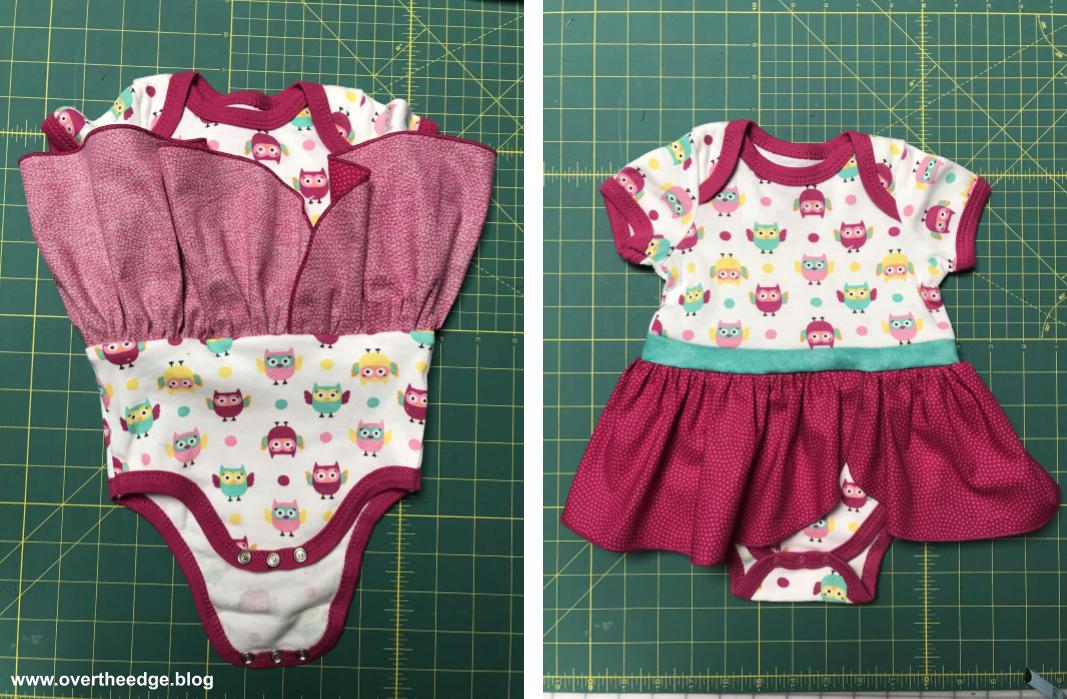
And that is how I created a fun and functional serger onesie dress that stretches at the waist. But I wasn’t quite done yet. There were a few more things I needed to do.
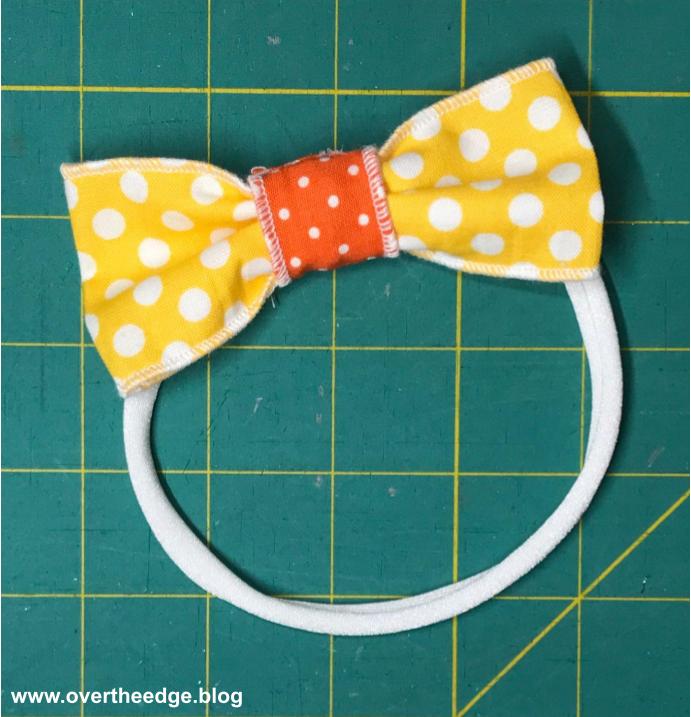
Step 8 – Make a Matching Hair Bow
I took the scraps of fabric leftover from the skirt and made a matching hair bow.
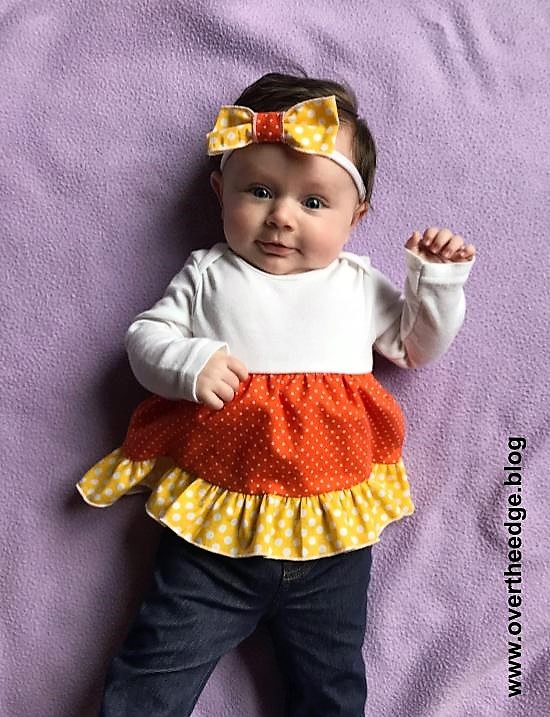
Step 9 – Find a Model and Take Photographs
Isn’t my model cute?!!! I call her my Candy Corn Cutie. The candy corn skirted onesie is the perfect outfit for my granddaughter to wear this October!
How to Serge a Onesie Dress that Stretches at the Waist
I hope you enjoyed my post about How to Serge a Onesie Dress that Stretches at the Waist.
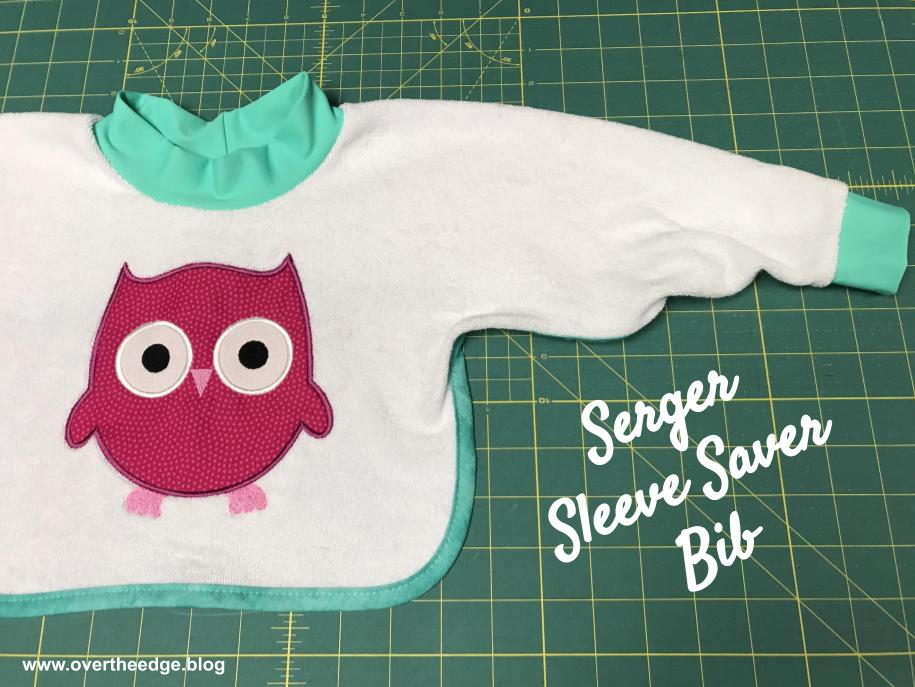
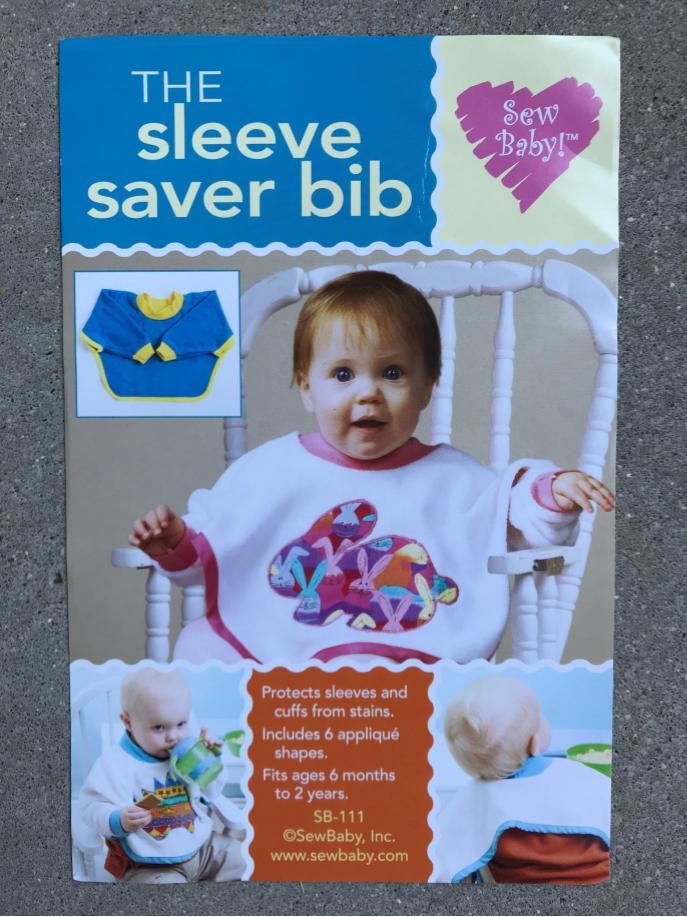
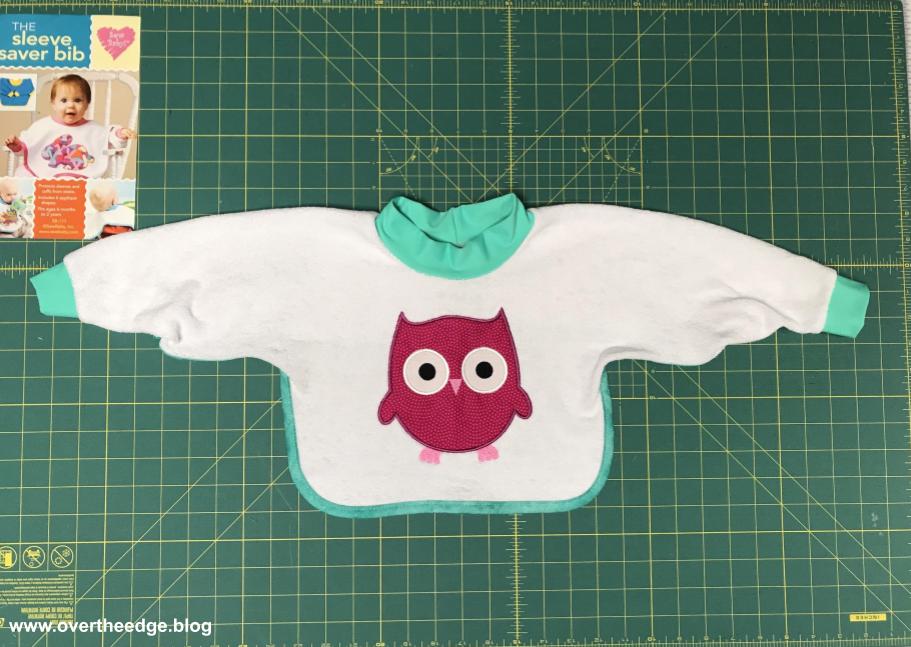
Last week I blogged about the Serger Funsie Onesie that I made for my niece’s baby. This week I made another gift for her baby – a Serger Sleeve Saver Bib. This great bib has sleeves to protect the sleeves of your child’s outfit. The bib is made from stretch terry cloth with ribbing at the cuffs and neckline and bias binding on the edges. The serger is the perfect tool for construction of this bib and to apply the bias binding.
The Pattern
The pattern instructions for applying the ribbing and constructing the seams are written for a standard four thread overlock stitch on a serger. A sewing machine can also be used. The pattern applies the binding using a sewing machine, but I applied the bias binding with a serger chain stitch using a double fold bias binder. If you don’t have a chain stitch capable serger you could apply the binding with your sewing machine following the instructions in the pattern. You will find a link to the Sleeve Saver Bib pattern in the Resources section at the bottom of this post.
Applique
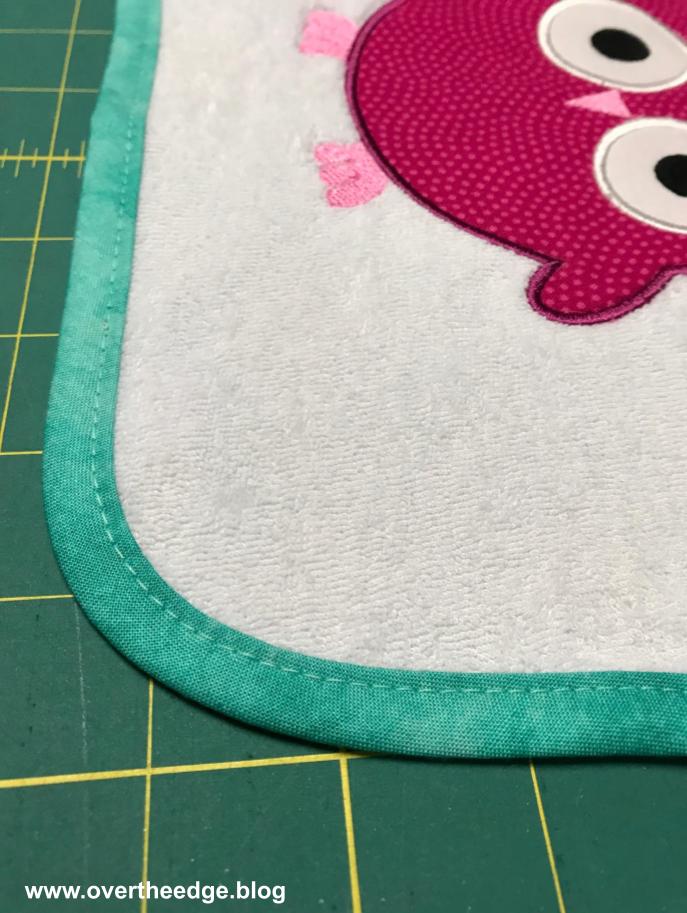
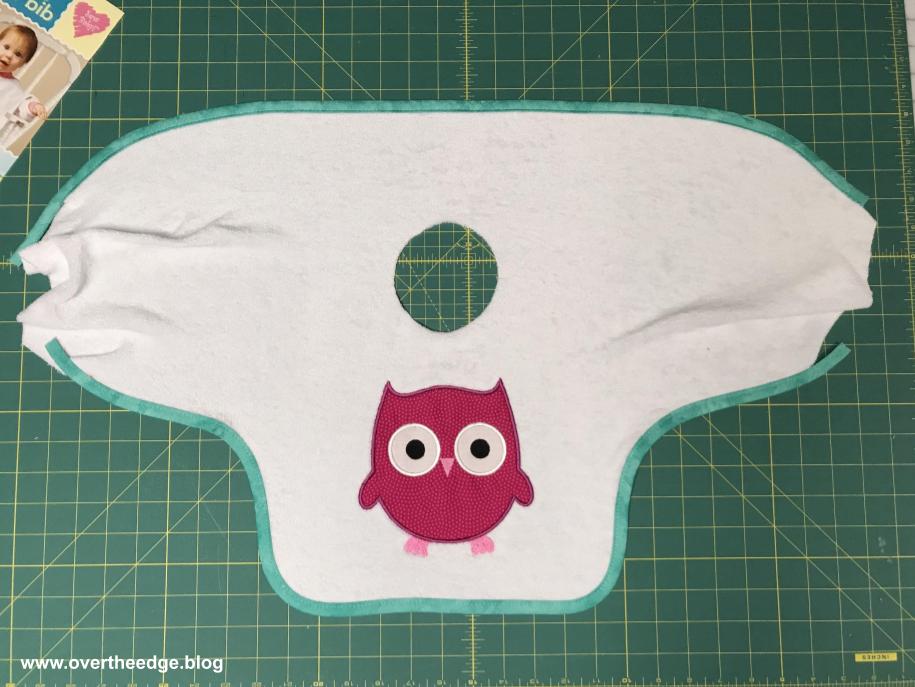
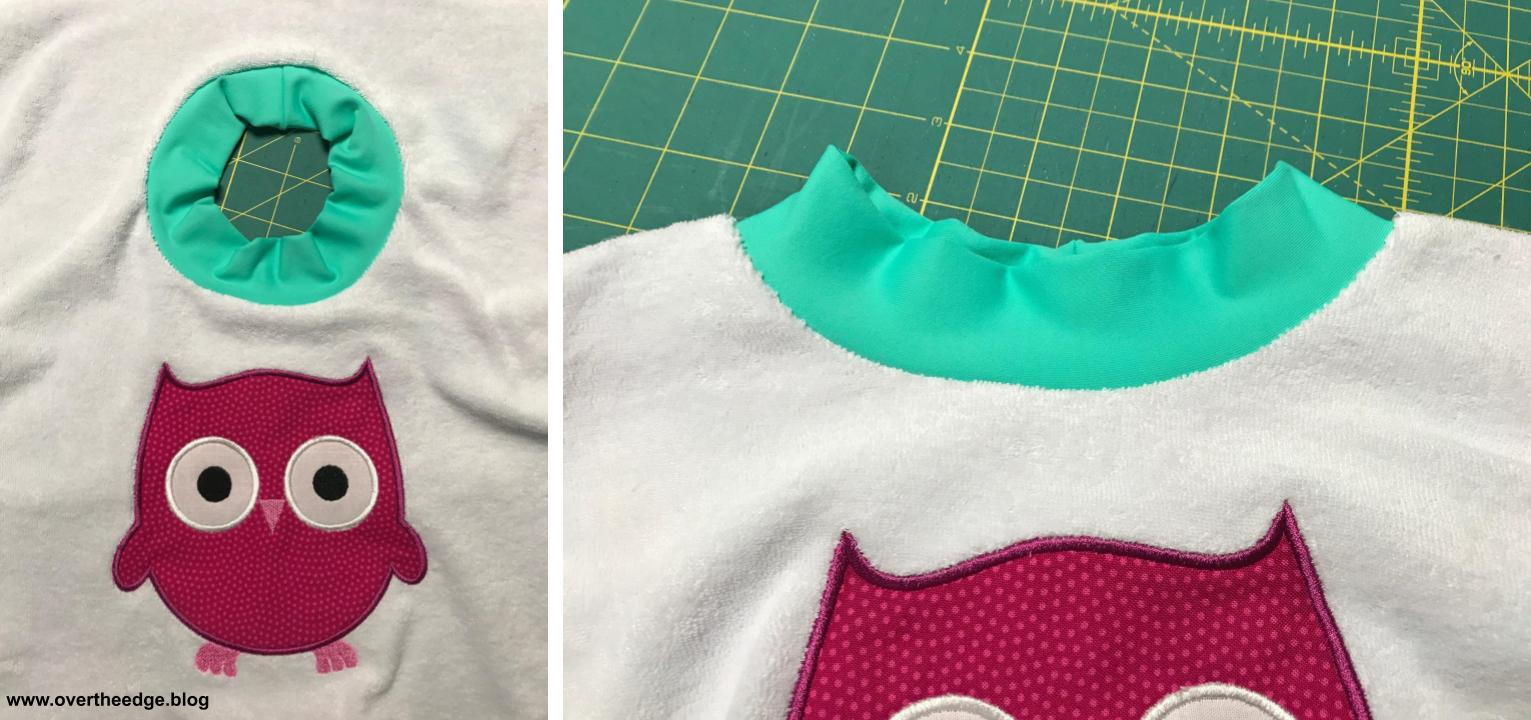
I used my embroidery machine to applique a cute owl on the front of the bib. If you don’t have an embroidery machine you can apply an applique with your sewing machine. The pattern comes with several shapes for appliques. I purchased the owl applique on Etsy. You will find a link to the design in the resources section at the bottom of this post.
Here is my terry cloth pattern piece with my owl applique already applied.
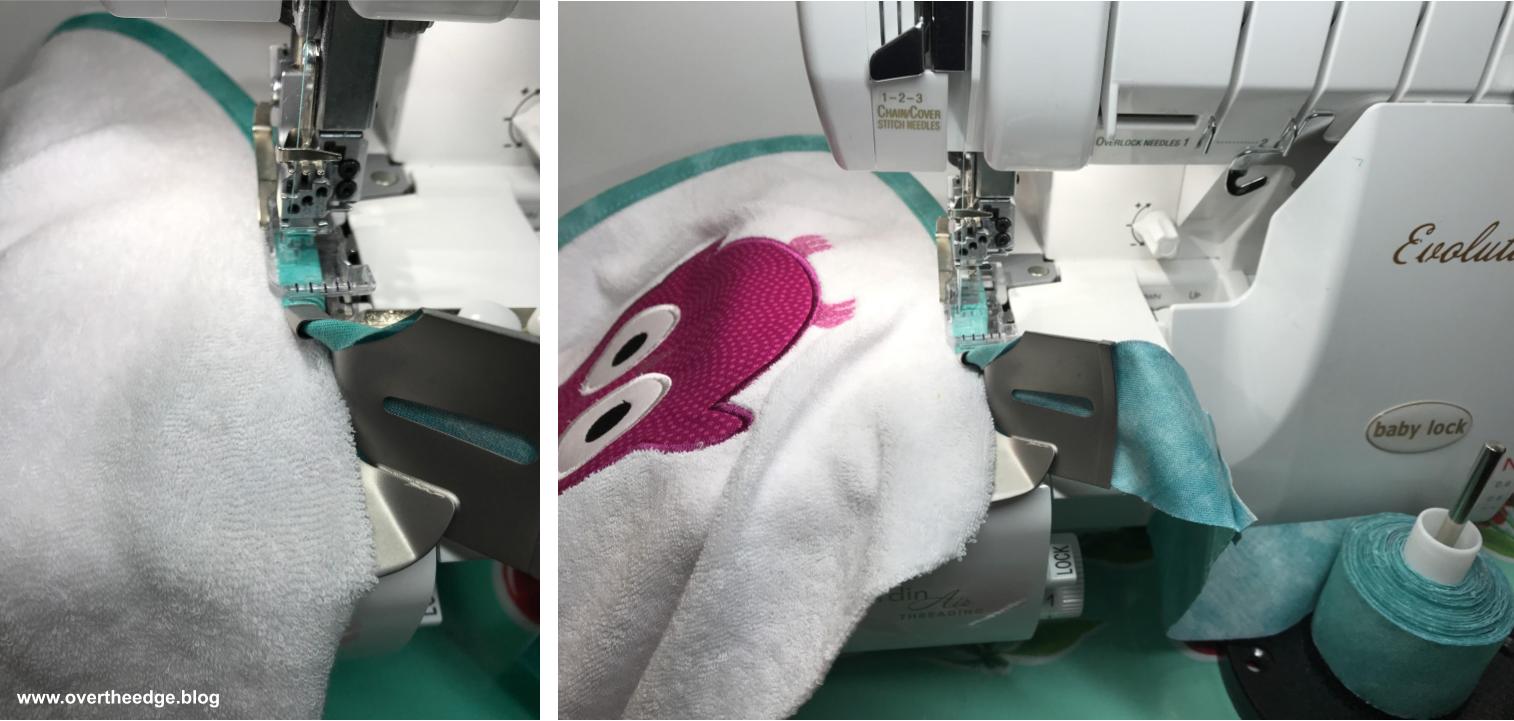
Apply Bias Tape
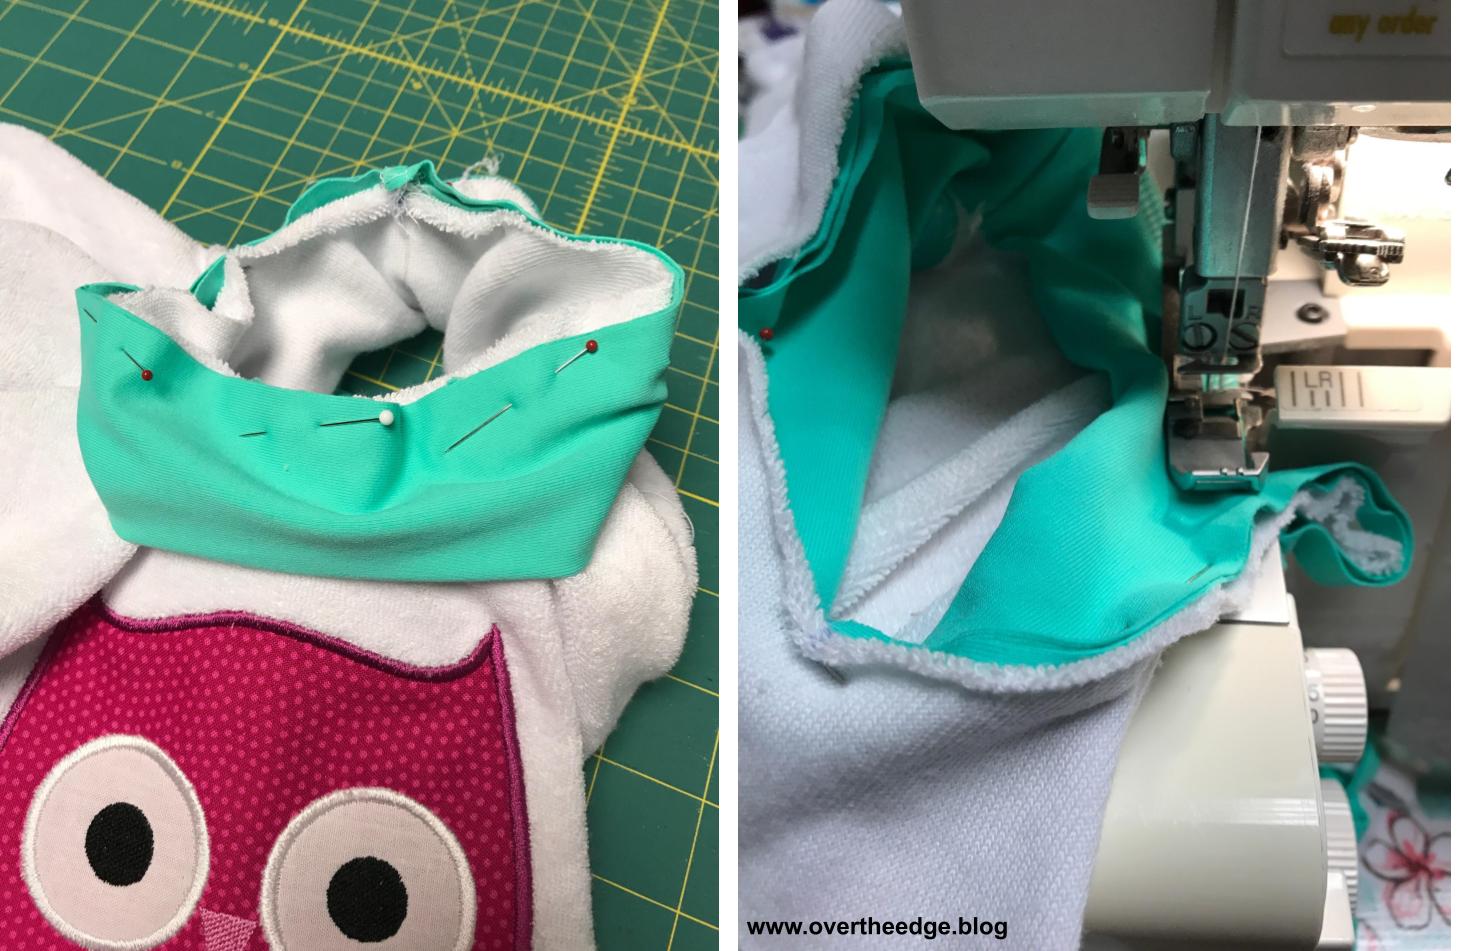
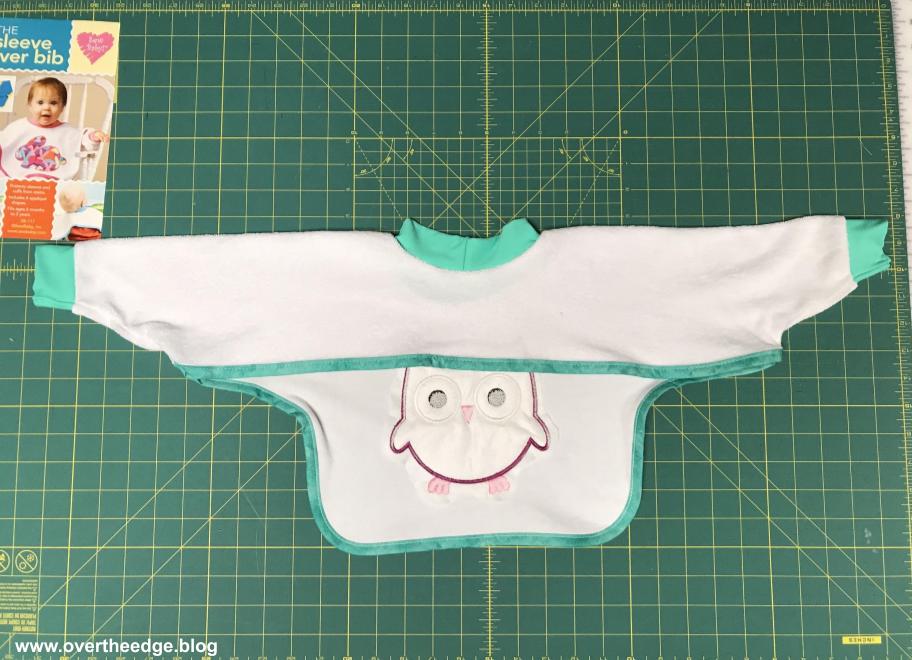
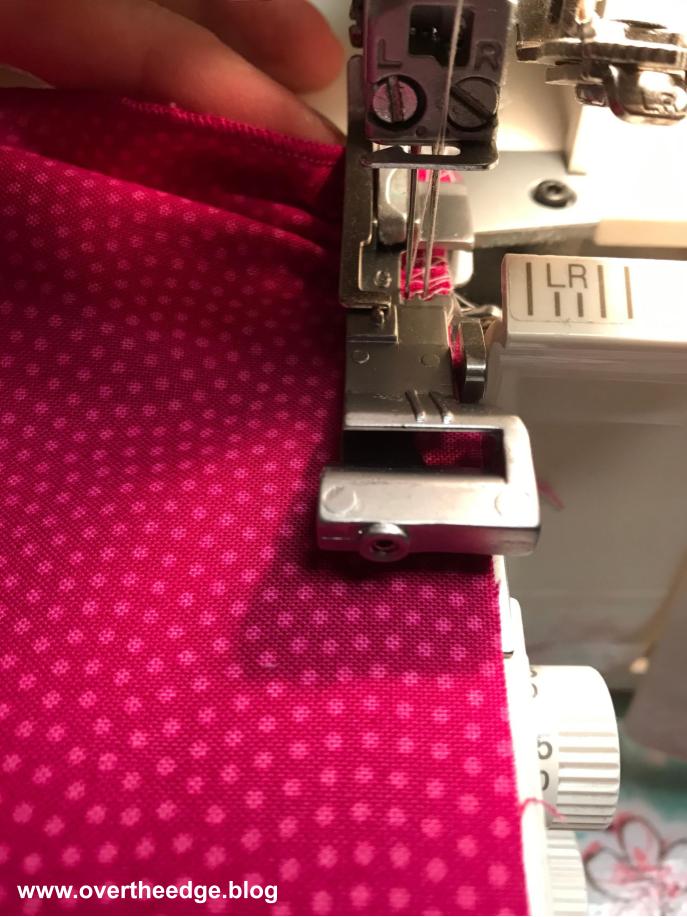
The bias binding I used for the bib, was the same bias binding I created for the funsie onesie. I set up my serger for a C1 chain stitch and attached my 36mm double fold bias binder.
I’ll be honest with you. I was trying to finish this project quickly and so I just jumped right in without practicing. Not a good idea with stretch terry. The first time I bound the back edge it was a little wavy, so I took it out and tried again with my differential feed set to 1.3. This time the back edge looked good. The straight back edge was fairly easy, but it took me three tries to get the binding right on the sharp curves on the front. Good thing that the chain stitch pulls out easily and I made lots of extra bias strips!
The trick on sharp curves on stretch terry is to go slow. Take a few stitches. Stop with the needle down. Lift the presser foot to release the pressure on the stretch terry. Continue this process until you are through the curve.
How to Use a Serger Double Fold Bias Binder Tutorial and Video
For more information on how to use double fold bias binder with a serger check out my tutorial and video:
Seam allowances on the Sleeve Saver Bib pattern are ⅝”. If you are using a sewing machine, the pattern has you trim the seams down to ¼” after they are sewn.
Since I used my serger for all the seams, I just trimmed the allowances down to ¼” as I serged. My serger has markings to the right of the blade that show you where to line up your raw edges of seams with ⅝” seam allowances. If you are unsure of how to trim down a ⅝” seam to ¼” using your serger, you could always trim off the extra seam allowance with your scissors before you serge. Then when you serge you only need to align the raw edges next to the blades. Or you could use a marking pencil to draw the seam allowance on the fabric and align the marks with your needles.
Apply Ribbing
I used a piece of spandex material in place of the ribbing called for in the pattern.
The cuff pieces were applied first. I cut the pieces 2” longer than stated in the pattern so I had a one inch “grab tab” on each end. It’s not required, but I find it easier to have the extra fabric to hold onto when stretching the ribbing to fit.
If you find it difficult to keep all three layers from shifting as you serge, you can always baste the raw edges of the folded ribbing together before pinning the ribbing to the project. That way you only have to control two layers of fabric instead of three. Basting first with my sewing machine gives me much better results on ribbing. And I spend a lot less time resewing because one layer of fabric slipped away from the seam.
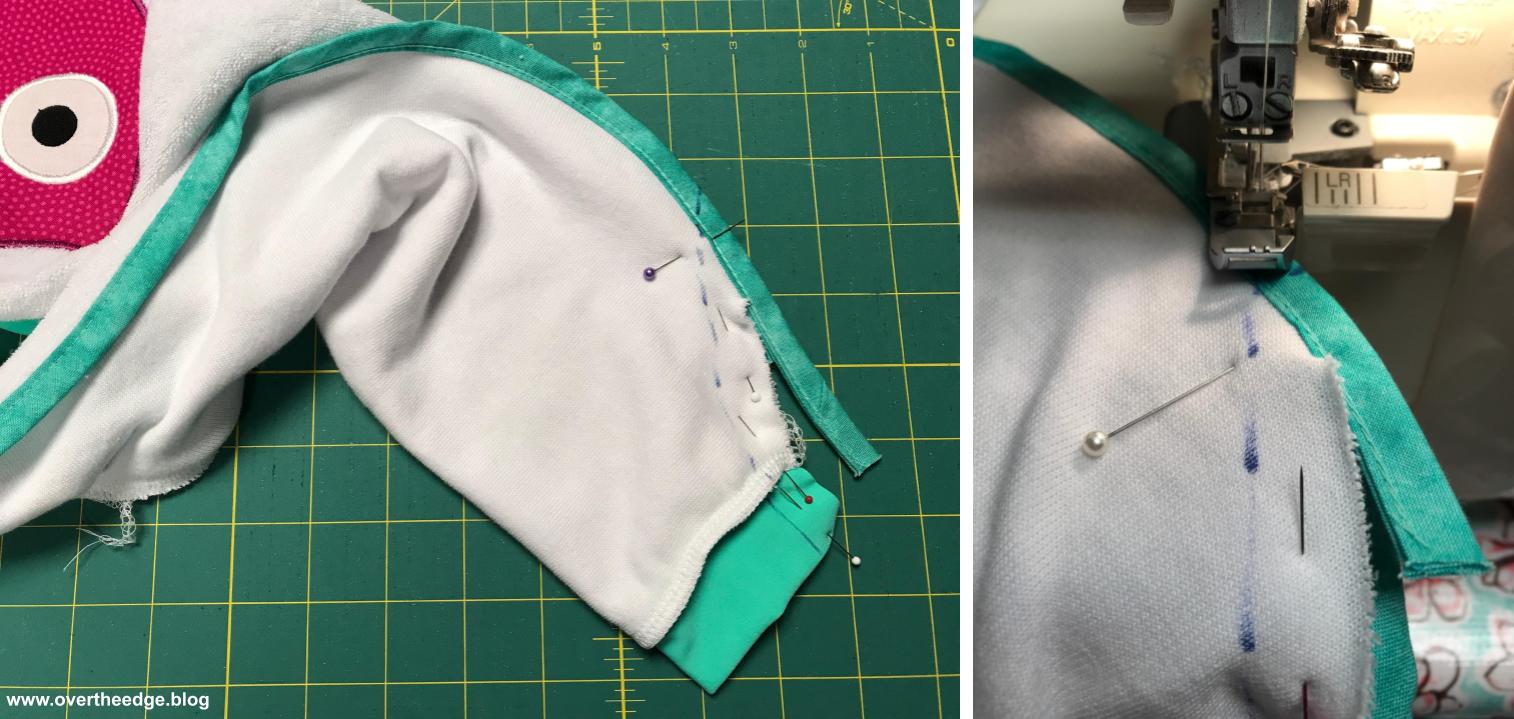
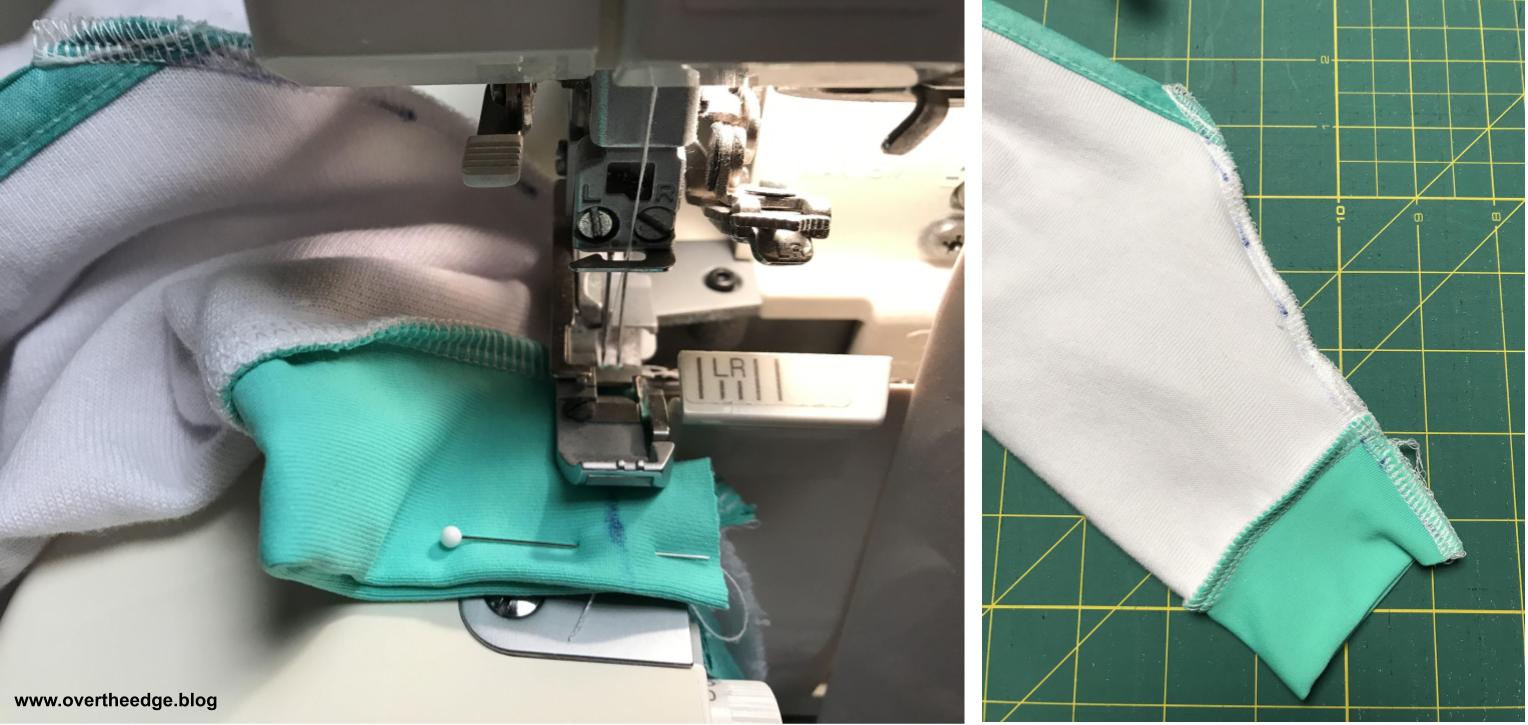
Next I applied the neck band. I serged the short ends together to make a circle. Then I folded it in half lengthwise, wrong sides together and pinned the neck band to the bib. I matched the seam of neck band to center back of neck of the bib. You will need to evenly stretch the ribbing to fit.
Sleeve Seams
The last step was to serge the sleeve seams. I finished the ends of my seams by locking the ends with my serger.
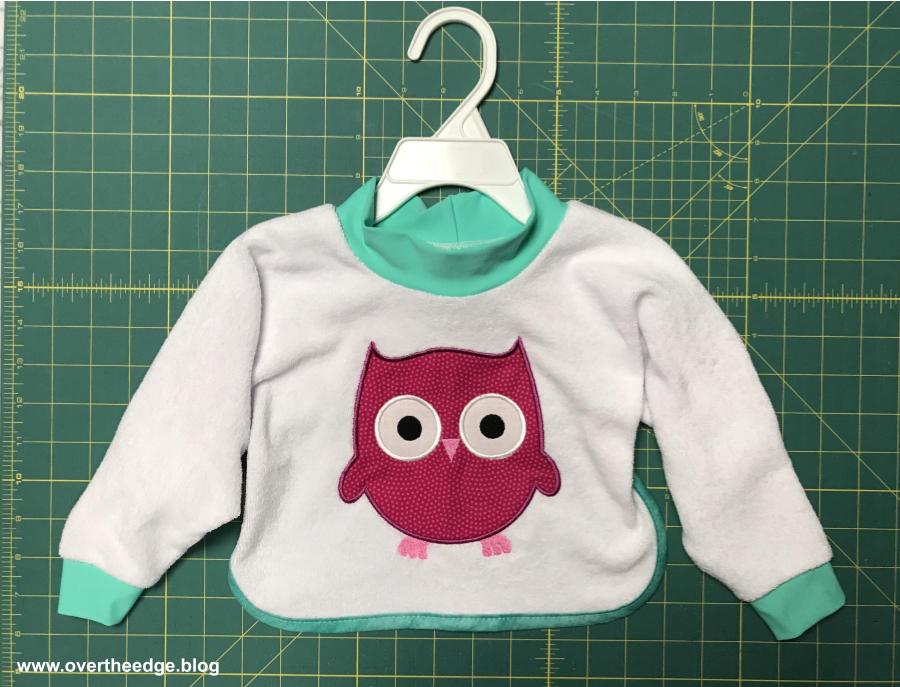
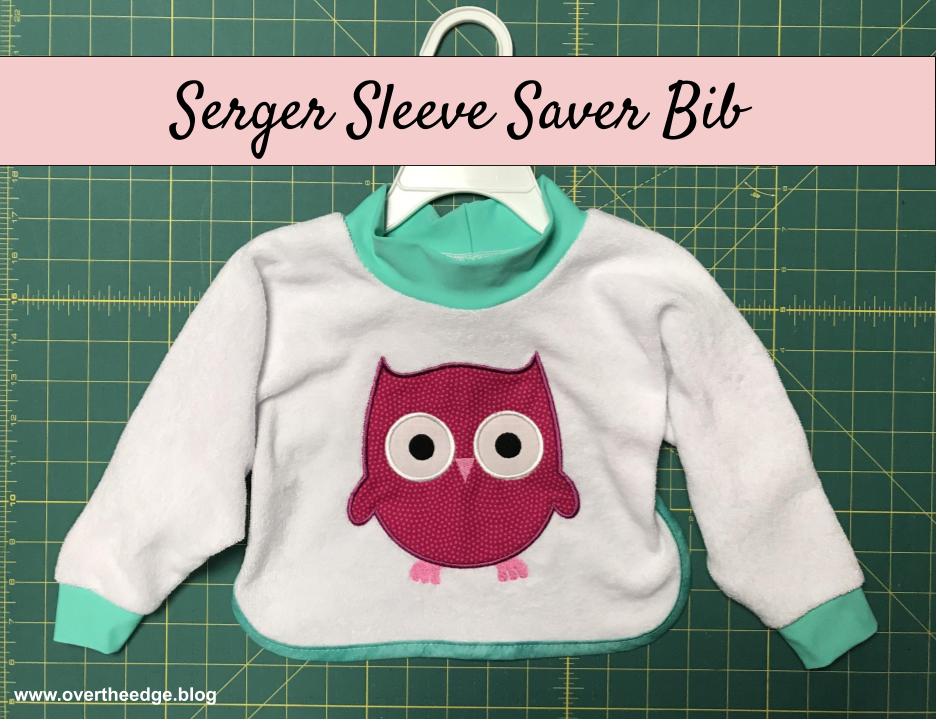
Serger Sleeve Saver Bib
Here is a front view and a back view of my finished Serger Sleeve Saver Bib.
This bib is both cute and practical and the perfect accessory for my serger funsie onesie from last week’s blog post. I can’t wait to see it on my niece’s baby girl! I hope this post inspires you to use your serger more…..
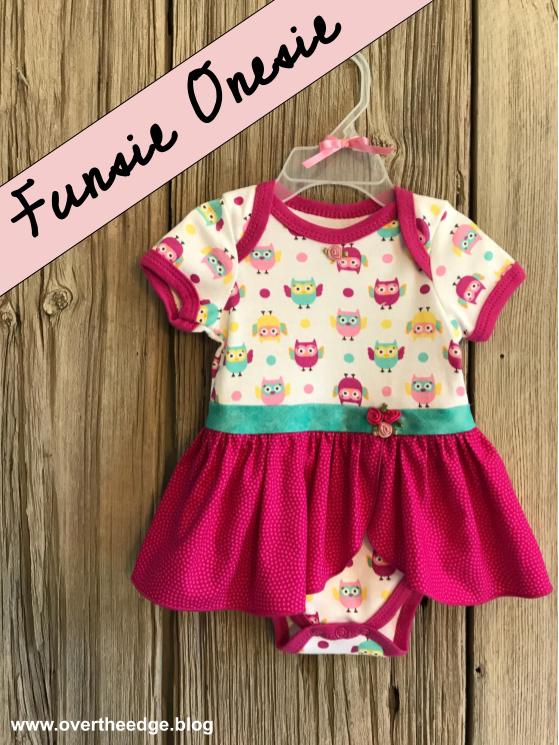
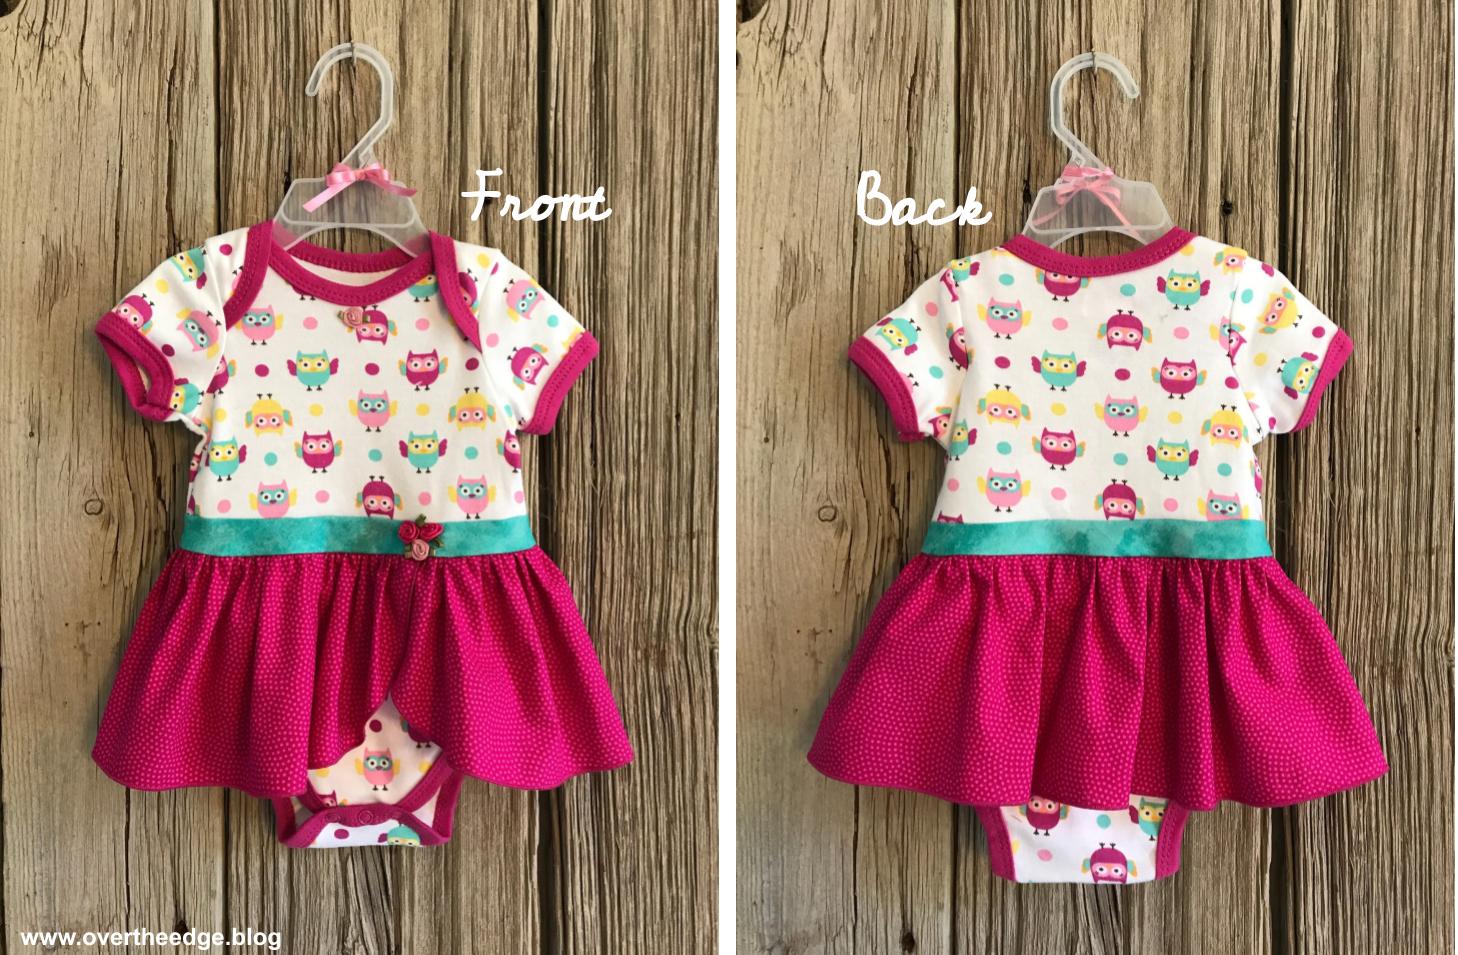
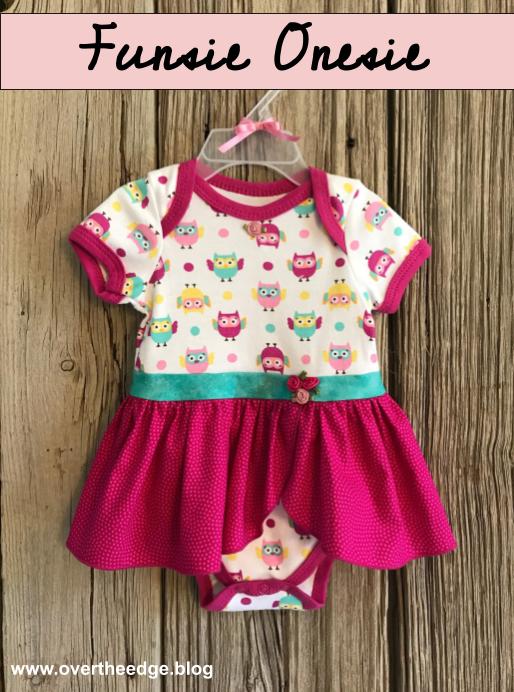
Transform an ordinary onesie into a super sweet outfit for a little baby girl! This Serger Funsie Onesie is fun to create using basic stitches on your serger. My niece is having a little baby girl and her nursery theme is owls. I found this cute little owl onesie and knew I could turn it into something special. I can’t wait until the baby is big enough to wear it!
The Funsie Onesie Pattern
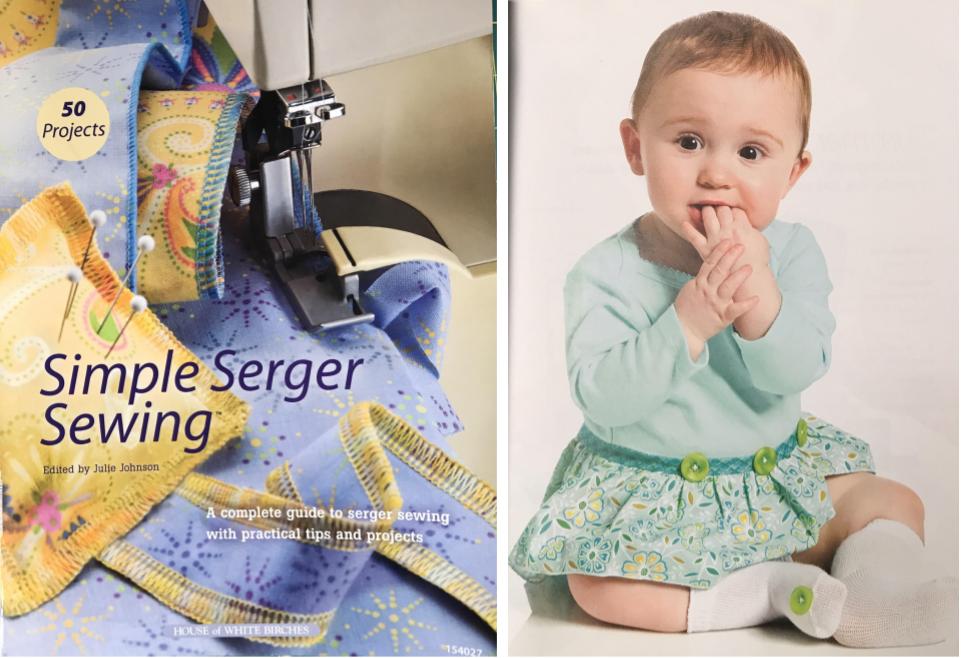
The pattern for the Funsie Onesie came from the book, Simple Serging Sewing, edited by Julie Johnson.
The Transformation from Onesie to Sweet Dress
I was amazed at how a few simple additions took this onesie from cute to amazing! Read along and observe the transformation.
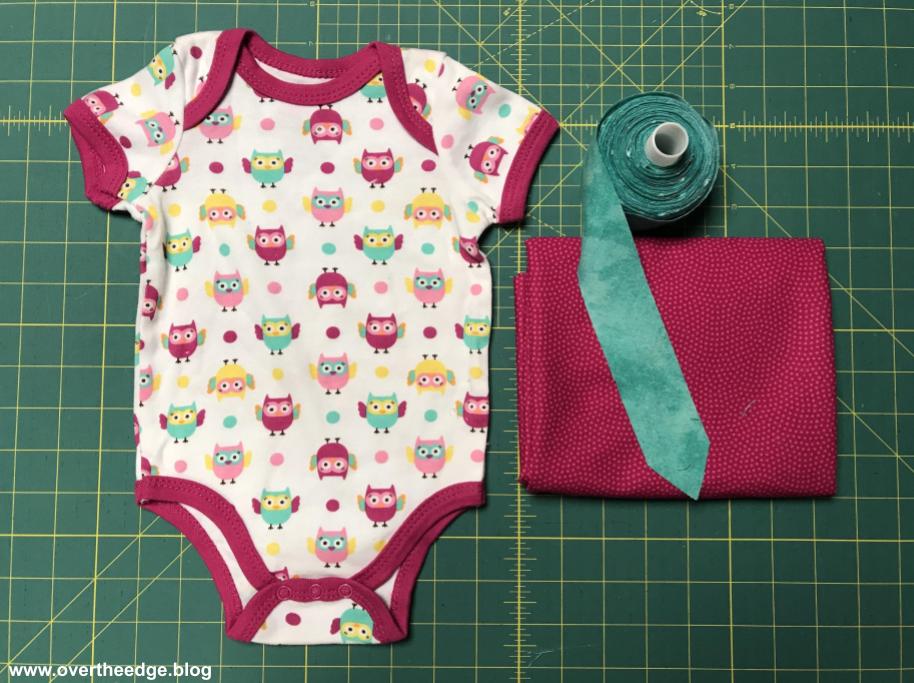
Here’s my onesie, skirt fabric and waistband bias strip.
Prepare Strip for Ruffled Skirt
Because my onesie was larger than the one in the pattern, I added 1” to the length of the ruffled skirt piece.
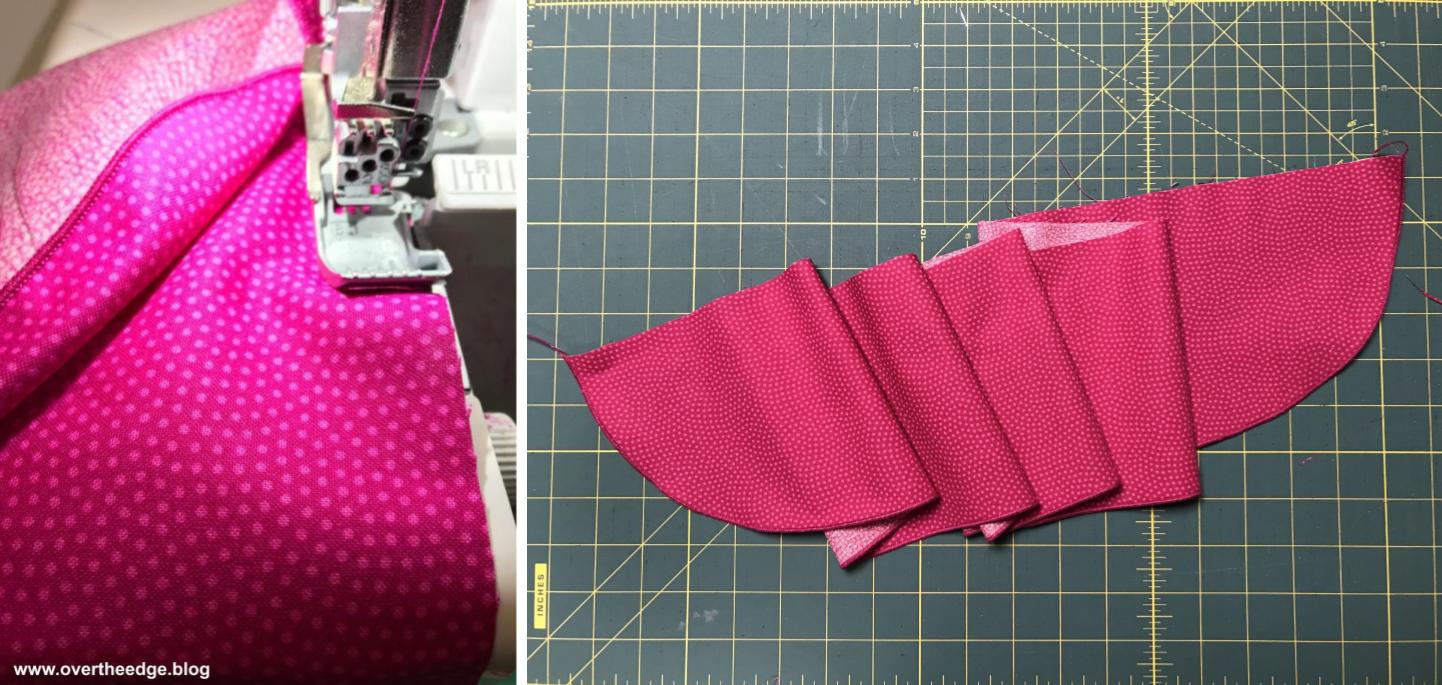
The instructions said to use a plate as a template for rounding the ends of the ruffle strip. I used the plate as a starting point, and then I drew in the rest of the curve in freehand.
For this project I used a Babylock Imagine serger. I set my serger up for a 3 thread narrow hem to finish the bottom edge of my ruffled skirt. You could also use a 3 thread rolled hem if you like. I used Maxilock thread in a color that matched my fabric.
To gather the ruffled skirt, I used my serger ruffling foot (the G foot for the Babylock Imagine) with a 4 thread overlock stitch. Even though you can use the foot to simultaneously create the ruffle and attach it, I chose to do it in two steps so I could adjust the ruffle to fit the onesie exactly. I set my differential feed to 2, my stitch length to 4 and my stitch width to M. The raw edge of the skirt was just skimmed by the blade as I serged. I also held my finger behind the foot to help it gather just a little bit more.
If you don’t have a ruffling foot for your serger, you can still use your serger to gather. Follow your instruction manual for gathering. Usually gathering on a serger involves increasing the differential feed and stitch length (and increasing your needle tensions if you have a serger with tension dials.)
Here’s what my ruffled skirt piece looked like after gathering it with my serger.
Prepare Onesie
Determine where to cut your onesie. My onesie was a 6-9 month size. I cut it apart as stated in the pattern instructions.
Create Bias Waistband
Next I created the bias waistband strip. The bias fabric strip has a some stretch which makes it a little easier to dress the baby. The waistband also adds back in length that was lost in the seams from adding the skirt to the onesie. So your onesie length will still be the same size as when you started. I used a standard 4 thread overlock stitch with a stitch length of 2.5 to serge the ends of the waistband together.
Attach Waistband
I pinned the bias waistband strip to the top half of the onesie, and serged the seam with a standard 4 thread overlock stitch.
Attach Skirt
My onesie waistband measured about 18” around, so I adjusted the gathers of my ruffle to equal 20” (18″ + 2″ for overlap.) My serger didn’t gather the fabric quite as much as I needed. So I adjusted the gathers by first separating the needle threads from the looper threads. And then I pulled on the needle threads and slid the fabric, just like I would using 2 rows of basting stitches on my sewing machine. I overlapped the ends of my ruffled skirt by 1” on each end.
After adjusting the gathers, I pinned the ruffled skirt to the bottom of waistband, aligning the overlapped section of skirt slightly off center. I serged this skirt to the waistband using a standard 4 thread overlock with a stitch length of 2.5.
Attach Bottom Half to Top Half
After attaching the skirt, the last step was to reattach the bottom half of the onesie. I pinned the onesie panties to the waistband/skirt section, making sure that the side seams of both onesie halves were aligned. To serge this seam, I increased my stitch width as wide as it would go (7.5) and used a stitch length of 2.5. I made this stitch wider than the stitching I used to gather the ruffle, so the gathering stitches on the skirt would not show on the right side of the garment.
Add Finishing Touches
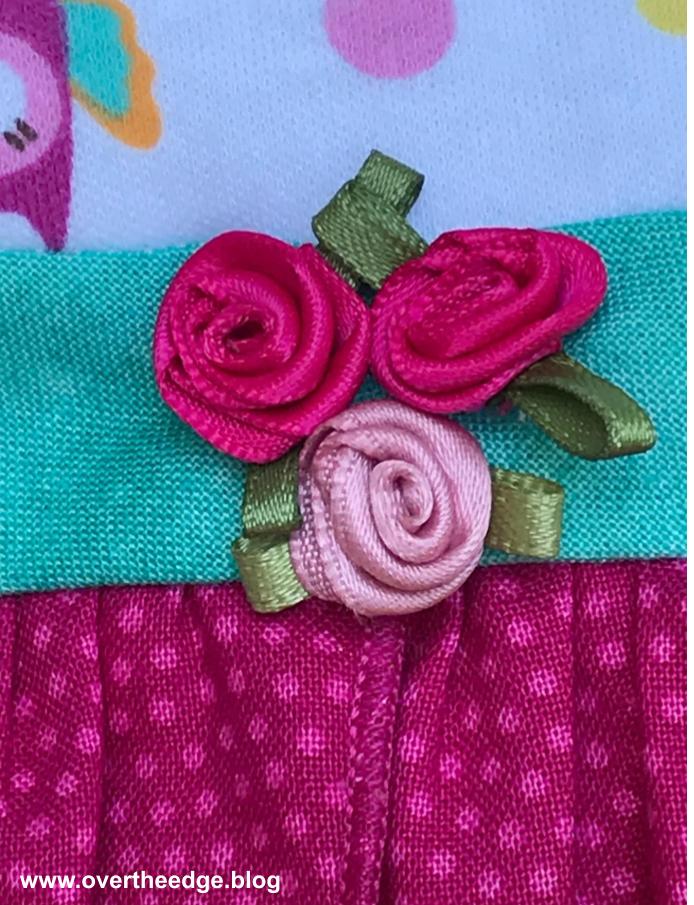
Even though the skirted onesie was adorable, I thought it needed just a little something more. So I hand stitched a few ribbon roses on the waistband and one at the center of the neckline.
My Serger Funsie Onesie
My serger funsie onesie is finished and ready for a sweet baby girl to wear! I hope you enjoyed this post and are inspired to serge.
Resources
Book – Simple Serger Sewing, published in 2009, but found online:
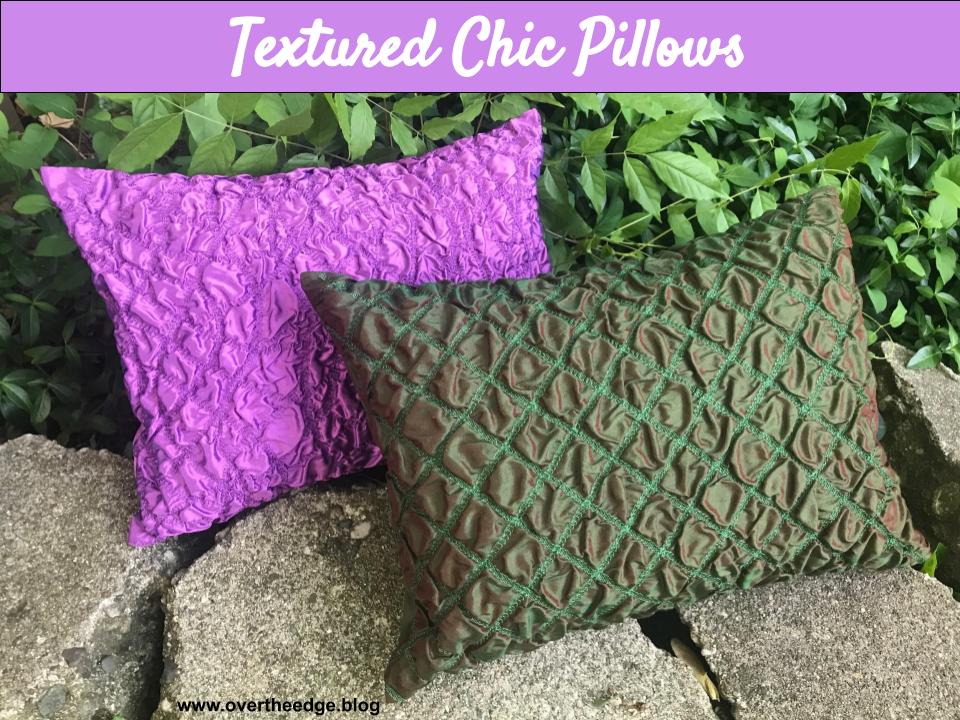
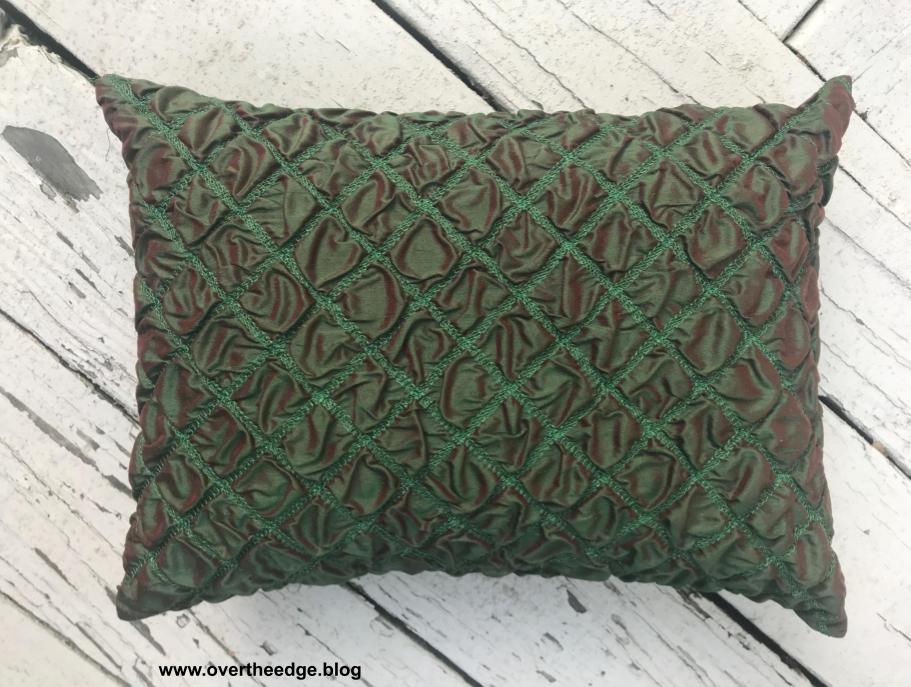
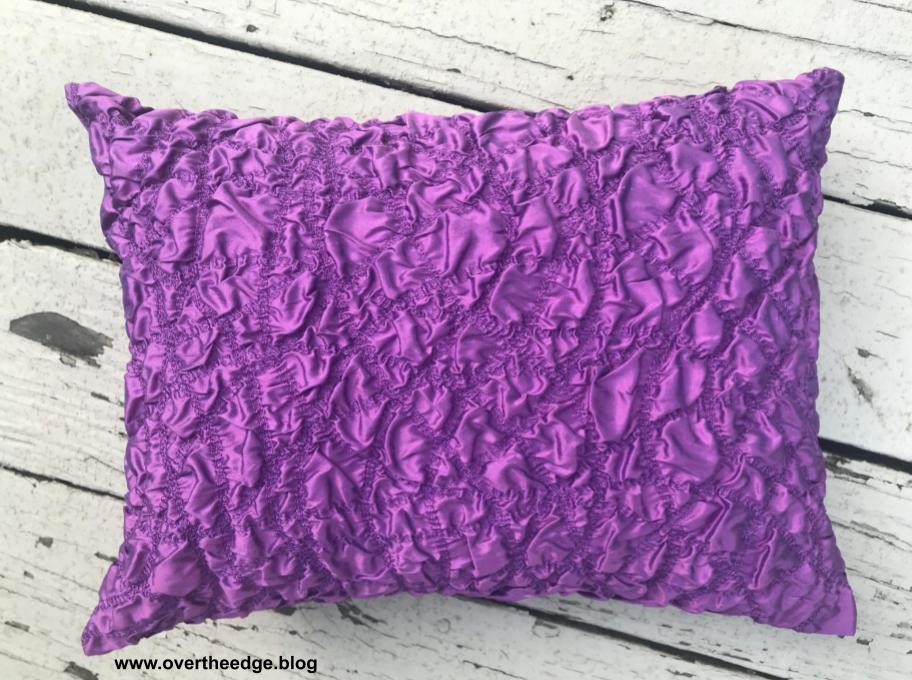
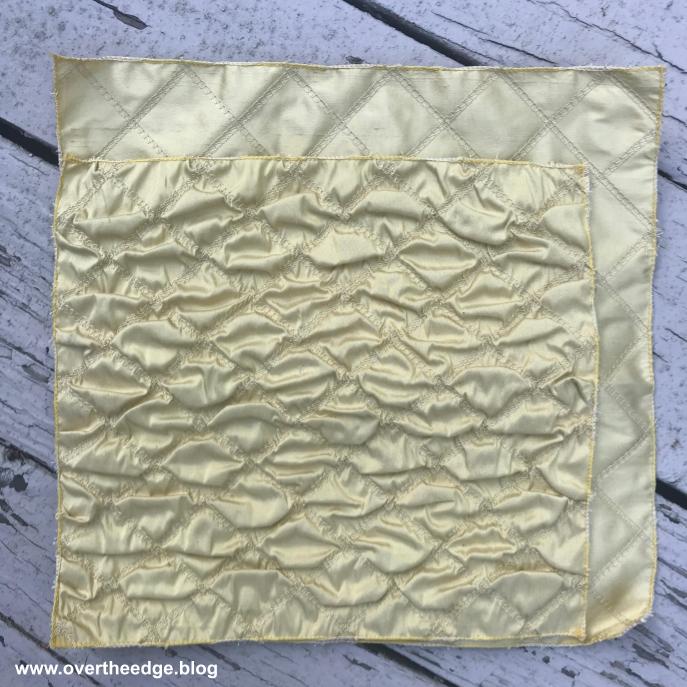
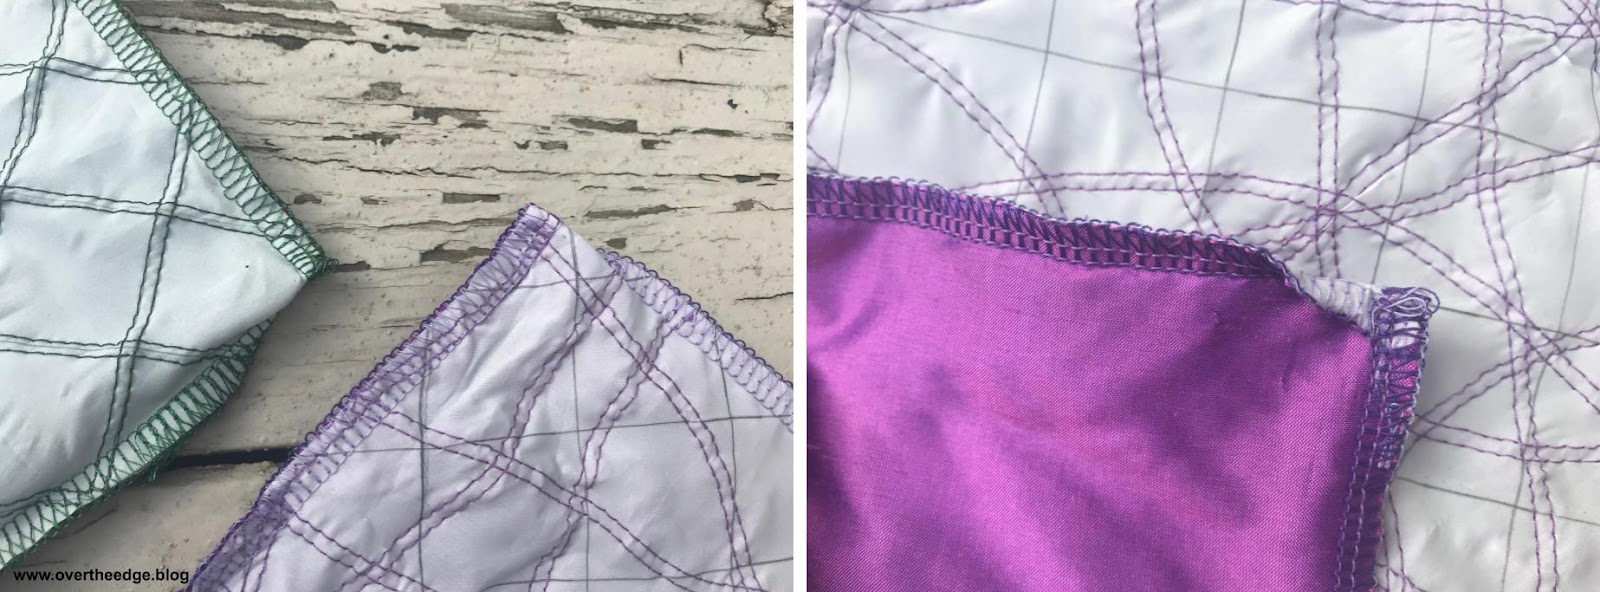
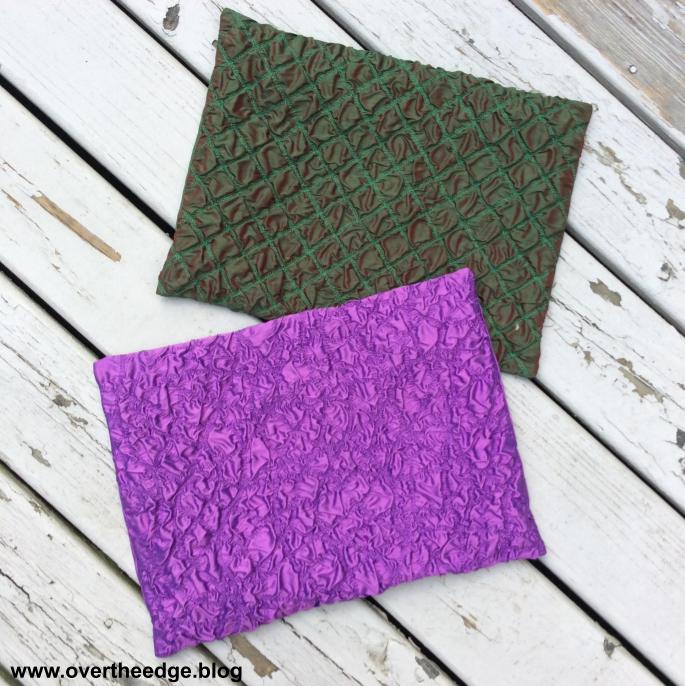
I always get excited when I get an opportunity to use the coverstitch on my serger for more than just hems on knits. Although these textured chic pillows may appear advanced, they were actually very easy to make on the serger using a narrow coverstitch and silk dupioni fabric. The secret to the texture is in the special shrinking fabric. I just love how the textured surface of the dupioni silk changes color with the light!
The Book – Serger Boutique
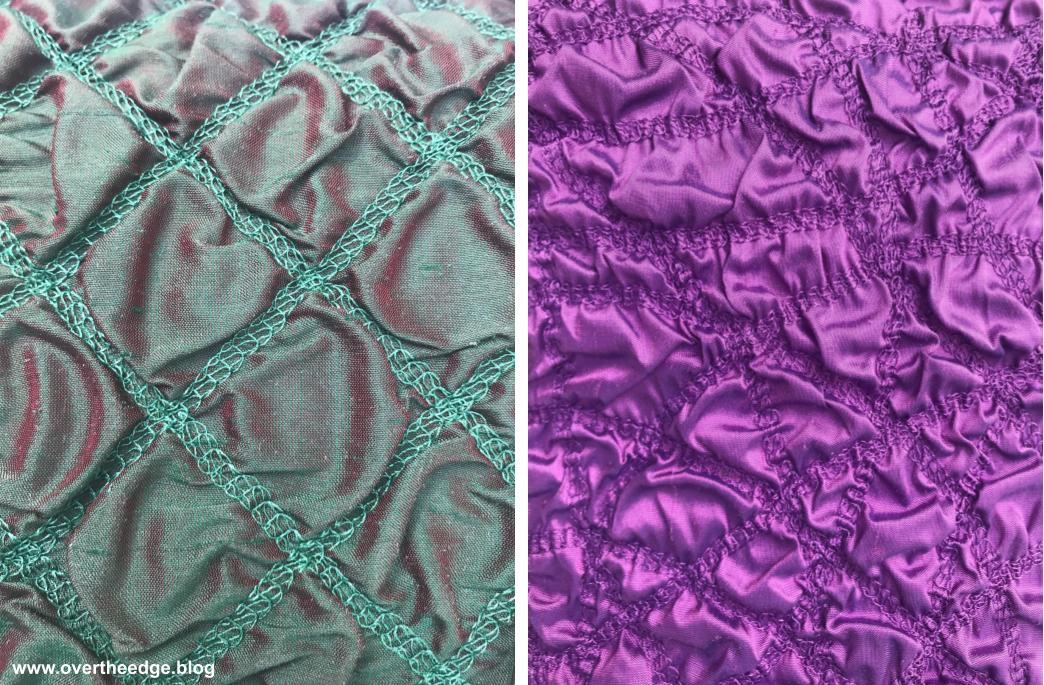
Both of these pillows were based on projects in the book, Serger Boutique by Nancy Zieman and Barbara Goldkorn. I used the instructions from the Textured Chic Pillow project to construct my green pillow. I constructed my purple pillow using the instructions from the project, Randomly Stitched Texture Pillow.
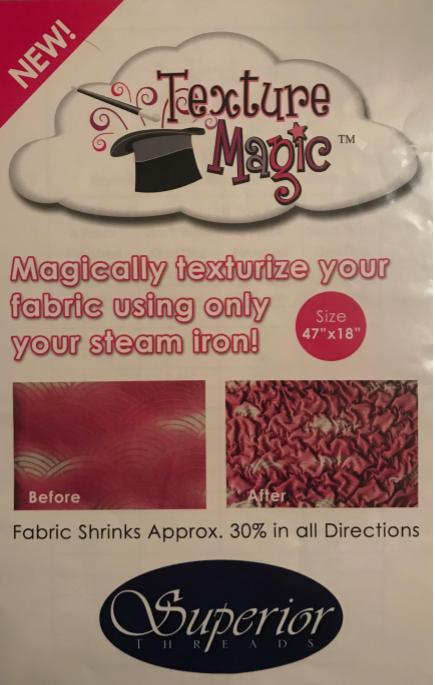
Texture Magic
The special shrinking fabric is a synthetic fabric that shrinks when it is steamed. There are two brands that I am familiar with – Texture Magic by Superior Threads and Fabric Magic by Pellon. Sew or serge it to the back of the fabric you want to texturize, apply steam and watch it magically transform. The package says it can shrink up to 30%. I think the amount of shrinkage is dependent on the fabric to which it is stitched.
Shrinkage Test
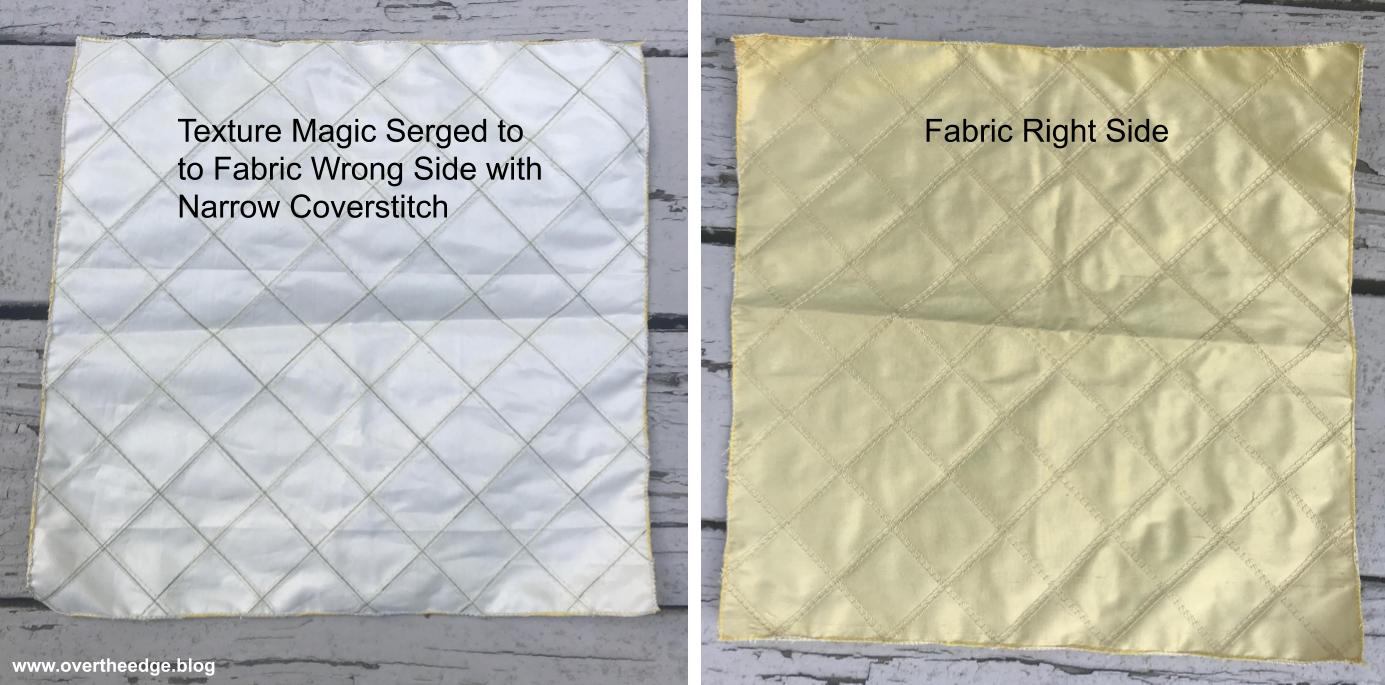
I wanted to see how much my silk dupioni would shrink, so I would know how much fabric I needed to make my pillows. For my test I started with a square of Texture Magic and of silk dupioni. I drew lines on the piece of Texture Magic and pinned it to my silk. I then stitched on the lines with a narrow coverstitch.
Then came the fun part – the steam! I hovered over the sample with my iron at full steam and watched the fabric shrink. The result of my test is shown in the photos below. My square started at 12.5” x 12.5” and it ended up at 10” x 11”. So my fabric shrank 12% in one direction and 20% in the other direction. My fabric didn’t shrink quite as much as the “up to 30%”, but the texture was still amazing.
Embellish the Pillow Fabric
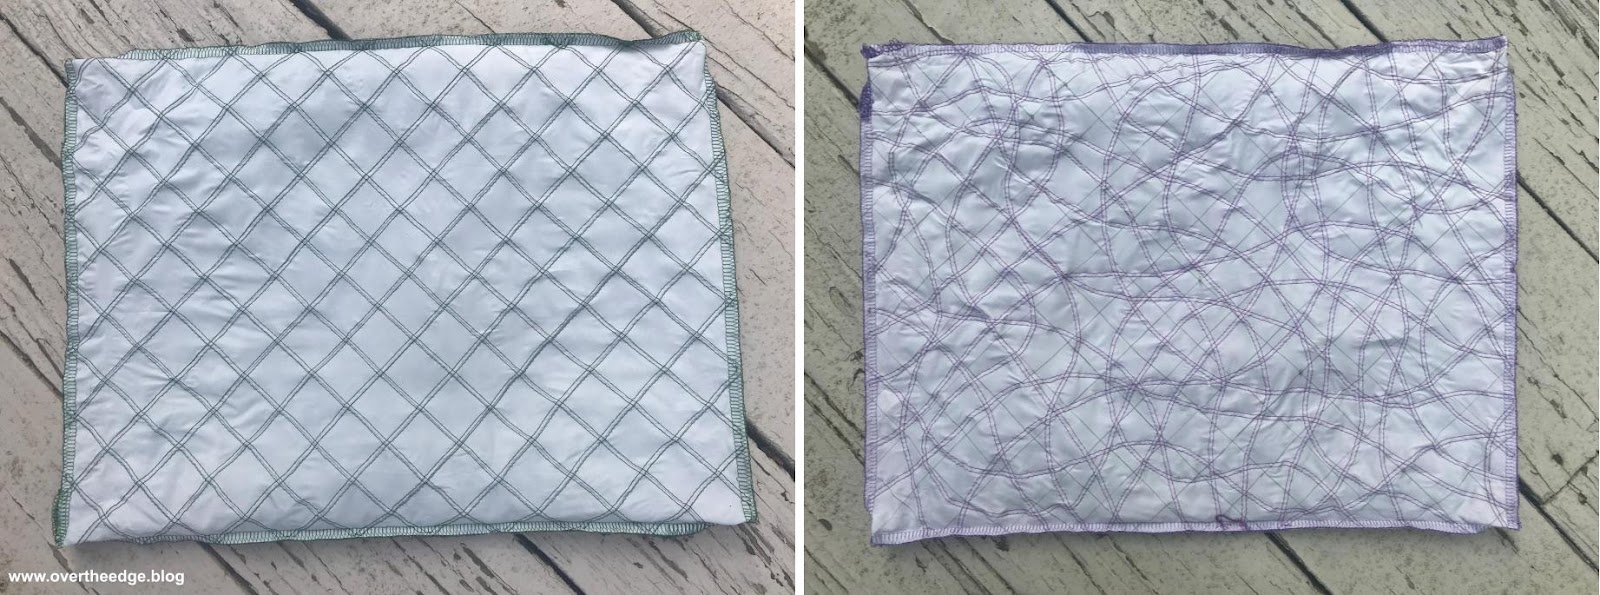
I began by drawing lines on the texture magic for where I wanted to stitch on the green pillow. For the purple pillow I didn’t need to draw the lines because I was stitching randomly. After finishing my lines, I pinned a piece of texture magic to the back side of each piece of dupioni.
I set up my serger for a narrow coverstitch with thread to coordinate with my fabric. I wanted the puffy texture to stand out and not the thread. Maxilock thread was used in the needles and Mettler embroidery thread was used in the chain looper.
So I could see the lines more easily, I used a clear foot, but a standard presser foot would also work. With the Texture Magic side up, I serged on the lines (or randomly) to stitch the Texture Magic to the silk.
I have a Babylock Evolution serger, and there is not very much room to the right of the needle. Because I was serging into the center of the fabric, I had to shift and maneuver the bulk of the fabric around the right side of the presser foot. If you have a coverstitch capable serger without a lot of “throat space” you will need to roll and fold your fabric to get it to fit through the machine. Those of you that have sergers like the Babylock Ovation or Babylock Triumph, you will have no problem serging into the center of large pieces of fabric.
Following the instructions for the texture magic, I steamed the fabric to shrink it and here are close up photos of the resulting texture.
Turn the Embellished Fabric into a Textured Chic Pillow
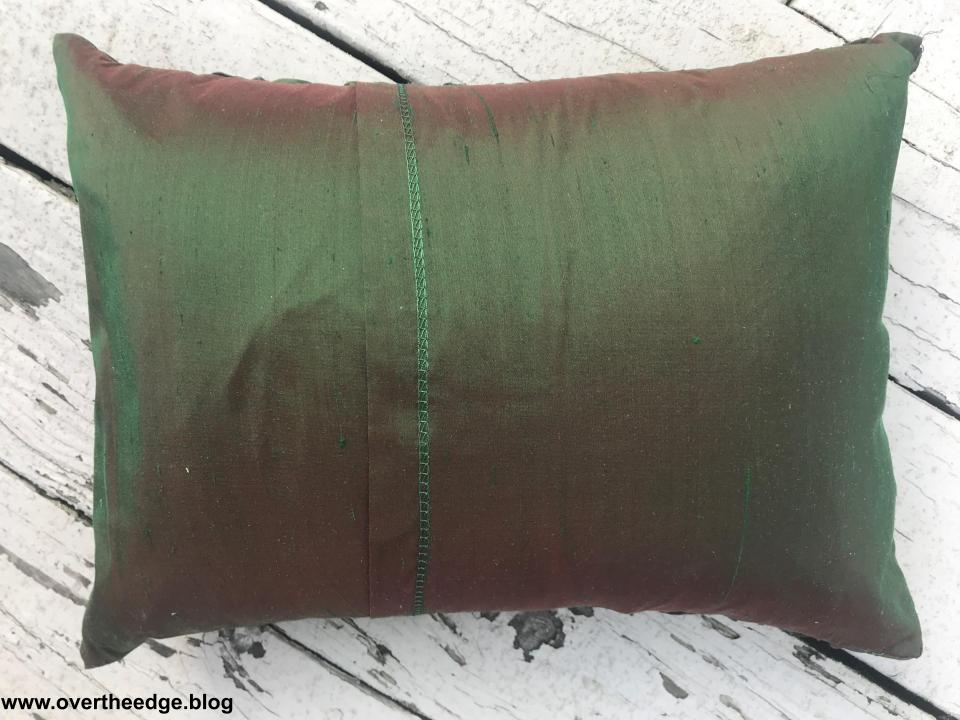
My finished pillows are 12” x 16” and completely made on the serger. I did not make the same size pillows as in the book, but I did follow the basic instructions. Because I wanted to remove my pillow forms for cleaning, I chose to make an overlap back for my pillows. I used a narrow coverstitch to make a 1” double fold hem on each side of the back opening.
After embellishing my fabric and doing the hems, I switched my serger to a 4 thread overlock to construct the pillow. While serging the pillow seams, I wrapped the corners to make perfect points on the right side of my pillow. There is no need to trim the extra fabric from the corners with this technique. For more information on how to wrap corners with a serger, check out my His & Hers Serger Pillowcases Tutorial. https://overtheedge.blog/tutorials/his-hers-serger-pillowcases-tutorial/
Textured Chic Pillows by Serger
I hope I inspired you to serge your own Textured Chic Pillows!
Resources
Serger Boutique – Book was published in 2012. Check your local sewing store, or check the internet, sites like ebay or amazon to get a copy.
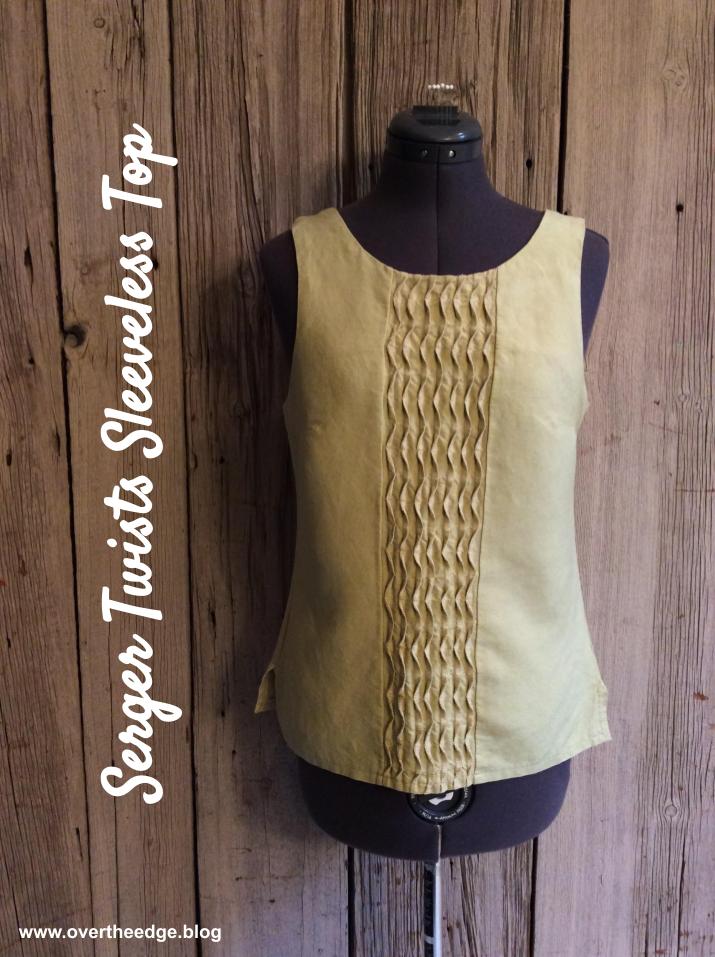
Embellishment can turn a plain garment into a WOW garment. Why not use your serger to make your garments special! I love the texture created from twists and tucks. I’ve heard them called wave tucks or twisted tucks, or as I call them serger twists. I’ve used this serger technique in bags, pillows, serger covers and garments. You can make these folded tucks/twists with a sewing machine, but it is more fun with a serger because you have the added element of decorative thread. Keep reading to learn more about how I started with a pattern for a plain top and transformed it into my serger twists sleeveless top.
The Pattern
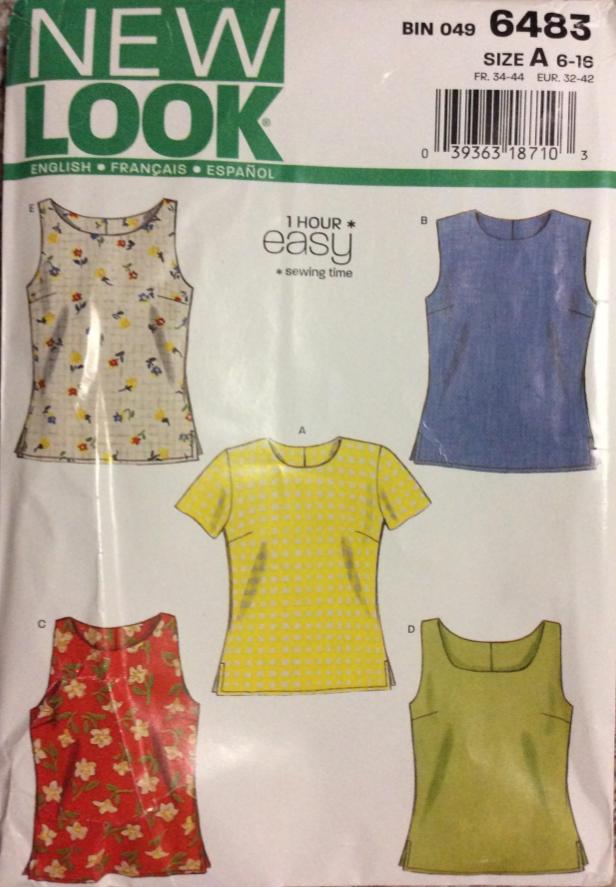
As a foundation for my serger twists sleeveless top, I chose a simple sleeveless top pattern, New Look 6483 view E, and a linen blend fabric. I basically followed the pattern to construct the top, but with a few changes. I modified the pattern to include a serger twists center panel, and I serged some of the steps instead of using my sewing machine.
Equipment
Serger capable of three thread overlock and 4 thread overlock
Sewing machine
Sewing and serging supplies
Pattern, such as New Look 6483
Marking pen/pencil
Fabric and thread
How to Create Serger Twists
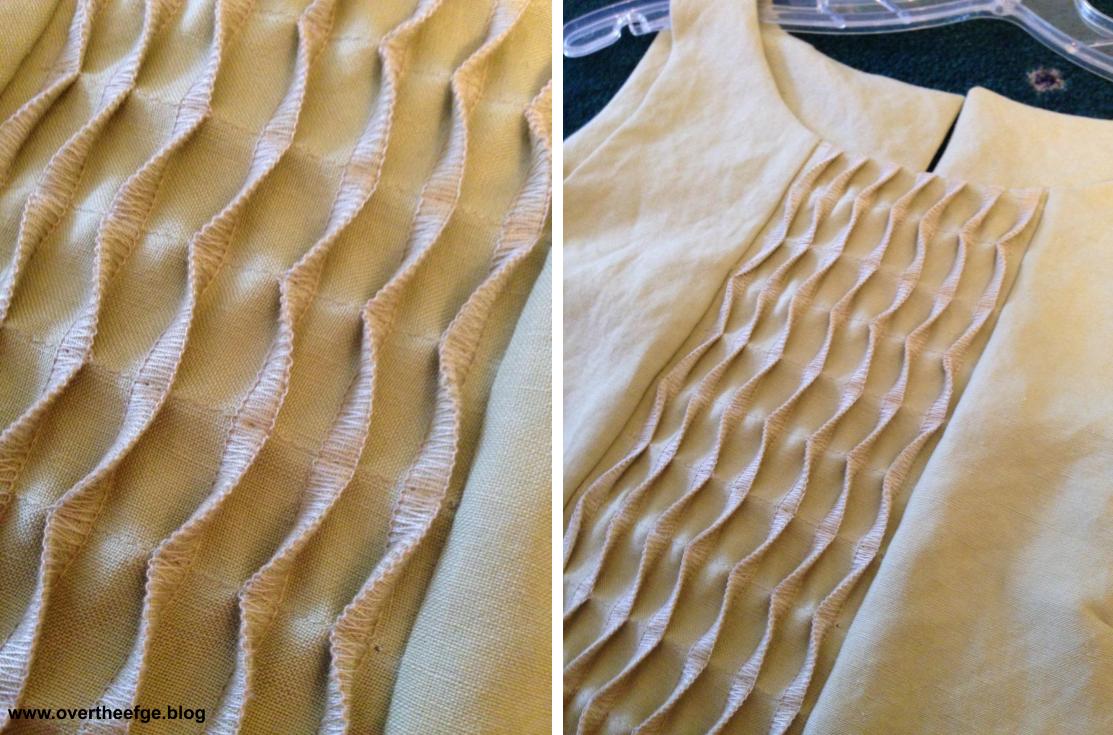
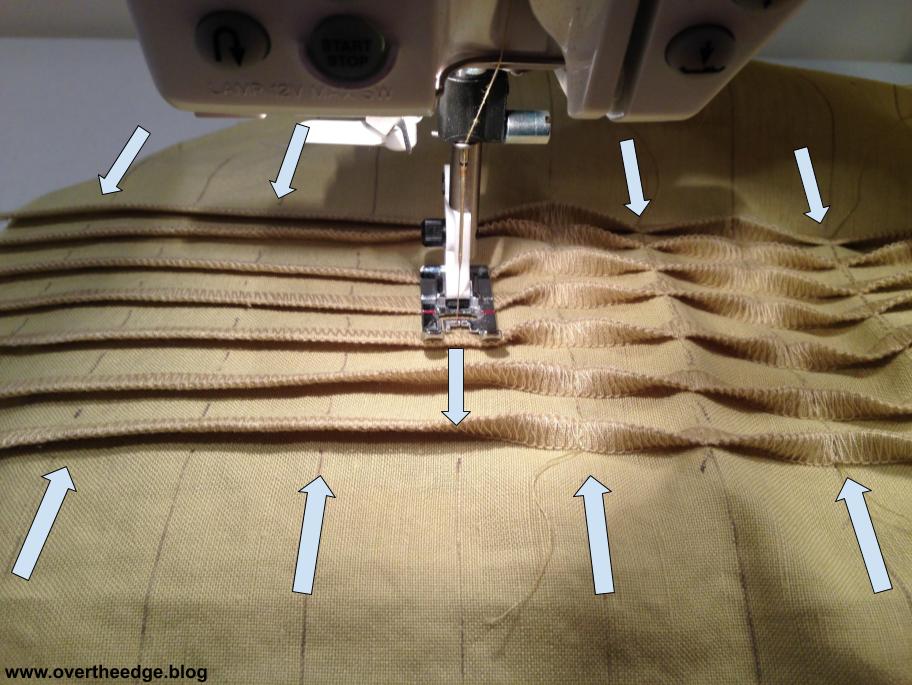
I began by preparing the center panel. I cut a rectangle piece of fabric about 4” longer than the center front pattern piece of the top and about twice as wide as my desired finished center panel plus 4” extra. You need the extra fabric because the width is drawn in as you create the twist. For my top I decided on 7 twists. I marked 7 vertical lines 1¼” apart with a Frixion pen in the center of my rectangle. I folded each line, wrong sides together and pressed to create creases. The creases make it easier to serge on the folds in the next step.
Serge
I set up my serger for 3 thread overlock wide with a stitch width of ¼” and disengaged the blade. Maxi Lock thread was used for all positions because I wanted my thread to blend in with the fabric to emphasize the texture and not the thread color. You could use a more decorative thread if you wanted. I used a stitch length 2-2.5, but it could be longer or shorter depending on the thread and look you are trying to achieve.
Serge on each fold, lining up the fold with where the blade would normally cut. I used a standard foot and guided my fabric along the disengaged blade. But you could also use a blind hem foot for your serger and set up the guide to help you position the fold in the proper place. Serge the same direction each time, so that the upper looper thread is on the same side of all the folds. Press folds well to set the stitches. You may need to use a press cloth so you don’t damage your thread.
Mark and Stitch
I drew horizontal lines 1” apart on the panel perpendicular to my serged folds using my Frixion pen. Using my sewing machine I stitched across the folds on the lines in alternating directions. You can hold the twists down with your fingers as you stitch to make sure they lay the proper direction. See photo below. Don’t press the twists after making them or you will distort them. You can hover over them and steam them if needed.
How to Modify Pattern Front for Center Panel
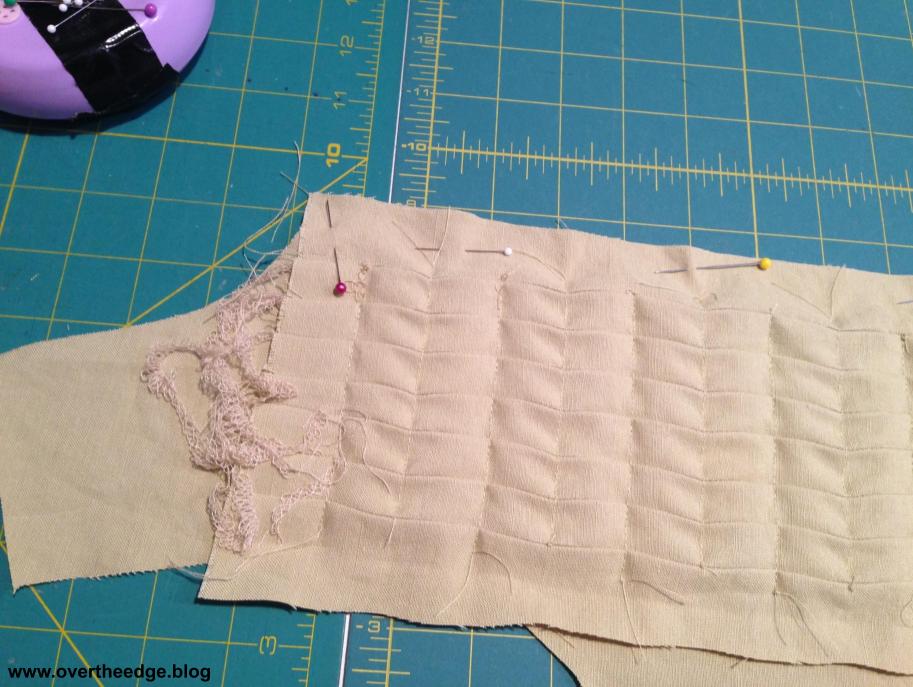
I measured my center panel as it would be finished in my top to be 4.5”. So I added my seam allowances (⅝” + ⅝” = 1¼”) before trimming the center panel to 5¾” wide. The extra fabric on the top and bottom was cut off after combining the center panel with the rest of the front pieces.
Since I added in a center panel, I needed to remove an equivalent amount from the front pattern piece, so the new top front was the same size as the original pattern piece. I determined that the amount to be removed was 3¼” (4½” for the center less seam allowances of ⅝” + ⅝” = 1¼”). The original pattern piece was a single piece cut on the fold. So I cut off 1⅝” from the center of the folded front and ended up with a right and left front piece.
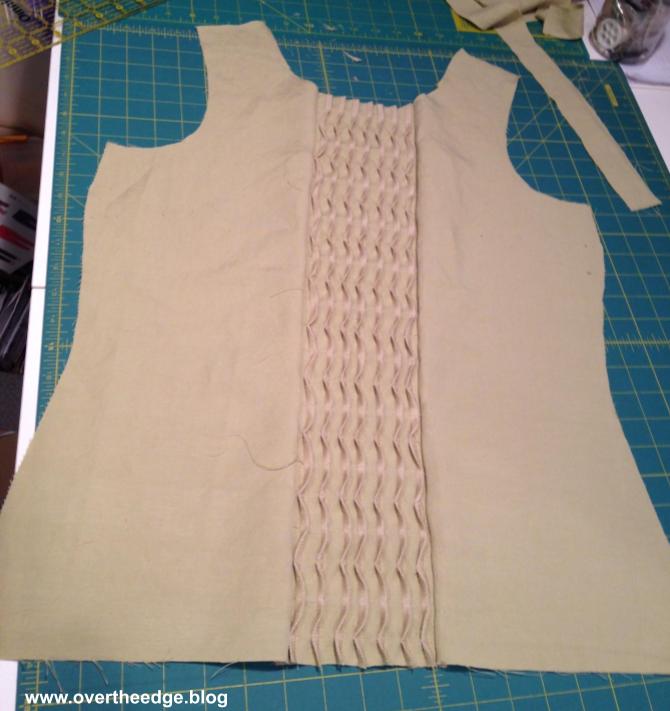
I changed my serger over to a standard 4 thread overlock stitch for serging my garment seams. To create my new top front I serged together the left, center and right front pieces. I pinned the center panel right sides together with the right front and left front. Then I double checked that my new front piece would end up the same size as my original pattern piece front. I serged the seams and trimmed center panel using the original front pattern piece as guide.
Finish Garment Construction
The rest of the garment was constructed using the pattern instructions, but I used my serger for some of the steps. The stay stitching, darts, neckline, armhole edges and hem top stitching was done with my sewing machine. I also used my sewing machine to under-stitch the neckline front facing to keep it from flipping outward. The side seams and raw edges of hems and facings were serged with a standard 4 thread overlock. I used ⅝” seam allowances to be consistent with the pattern and trimmed off the extra as I serged.
Once you cut off that extra seam allowance you cannot put it back on, so I suggest you make certain the garment fits before seaming it with a serger. Making a muslin mock-up takes more effort, but it leads to much less frustration in the long run. It’s a real bummer to spend hours making a beautiful looking garment only to have it not fit when you are all done.
Inside Look
I turned my top inside out so you could get a detailed look at the construction. If you look closely you will see darts, seams, hem and facing edges, and the wrong side of the serger twists. This top has been worn and washed so the stitching you are looking at is not as crisp and clean as when new.
My Serger Twists Sleeveless Top
Serger twists are a fun way to add embellishment to your projects and garments. As with any garments with exposed stitches, handle and launder with care. Any large loops on garments always have the potential to snag or get pulled. Think of those light, airy, lacy sweaters that we buy at the store that are so beautiful. We love to wear them, even though they snag easily. Serger stitches don’t snag as easily as those sweaters, but because of the loops, it’s best to handle them with care. I recommend hand washing garments with exposed stitching. After I spent all that time making the garment I want to be able to wear it more than once!
I hope you enjoyed this post about my serger twists sleeveless top. Try spicing up your garments with serger stitching!
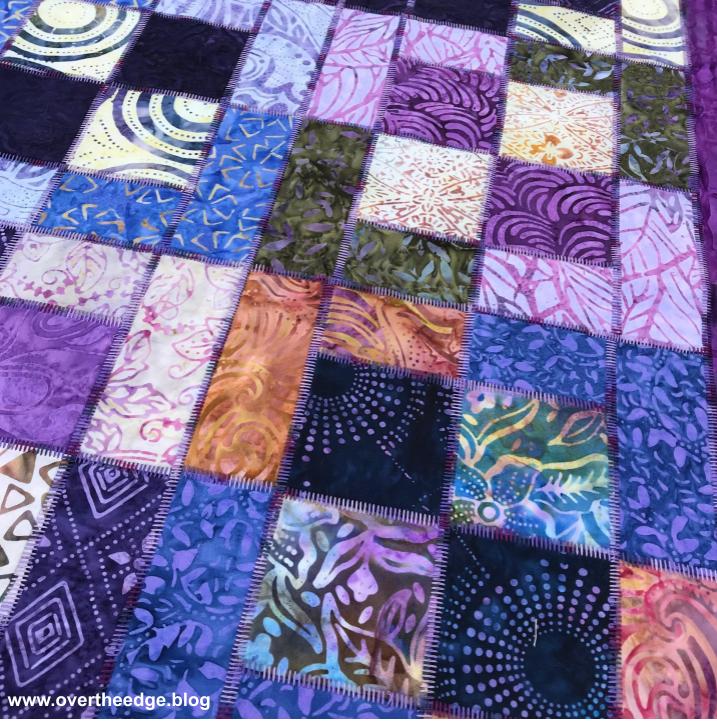
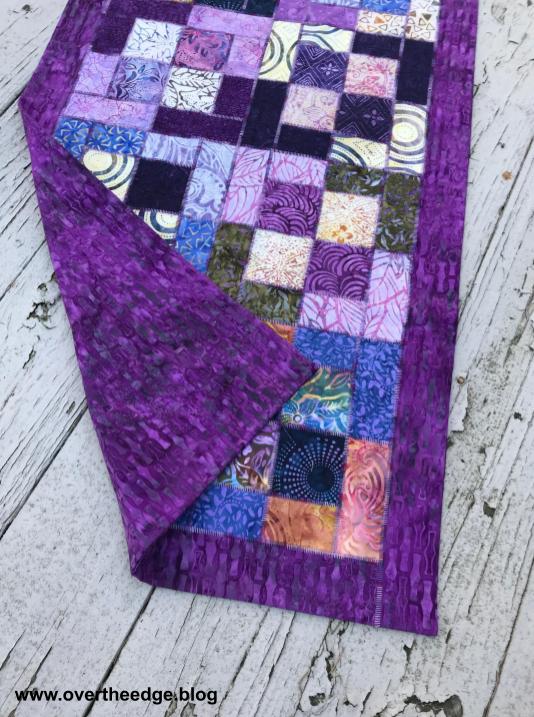
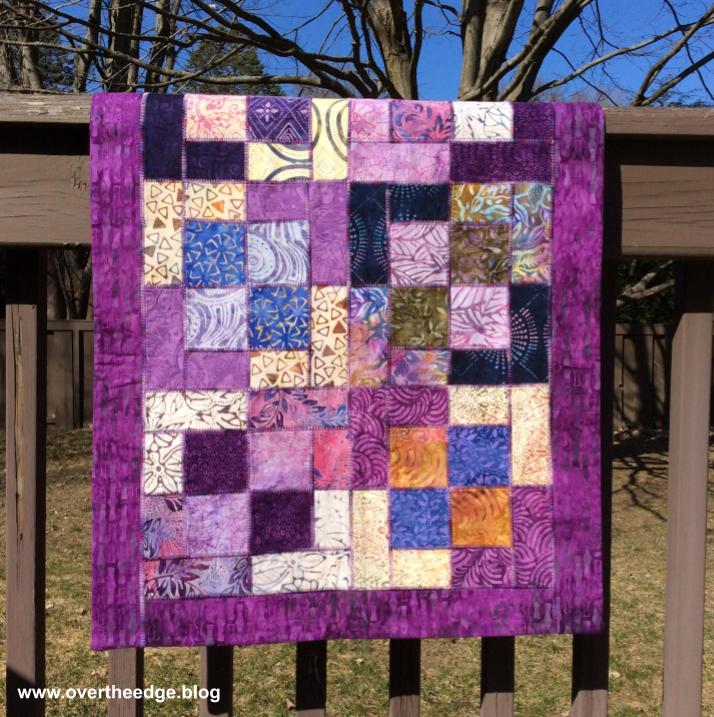
It’s still March and National Quilting Month, so here I am highlighting another way to use a serger to quilt. Flatlock piecing with a serger is a great way to add an artistic flair to your quilts. With a serger flatlock stitch, you are embellishing your quilt with decorative thread as you piece it together. The photos in this post are of my Four Square Table Runner that I made in 2014. This table runner is one of my favorite serger quilts I have made!
My Four Square Table Runner
My table runner is a great example of how easy it is to modify a traditional quilt pattern for serger construction.
Fabric, Pattern and Thread
I used a package of forty 5” squares called Tonga Treats by Timeless Treasures. The “Four Square Table Runner” pattern came free in the package. I don’t know if this fabric is still available, but you can do this technique with any fabric or quilt pattern.
I used a variegated purple YLI machine quilting thread in the needle and Maxilock serger thread in the loopers.
Serging
I followed most of the pattern instructions to make the quilt top, except for using a sewing machine. Instead, I pieced the quilt together with my serger using a three thread flatlock stitch with a length of 2. I serged the pieces right sides together, so the “ladder” side showed after pulling the flatlock stitches open.
I added a border, which I also attached with the flatlock stitch. Instead of a traditional quilt sandwich, I used a flannel fabric as batting. and attached the backing using the pillowcase or “birthing” method (without binding). I serged the layers together leaving an opening for turning right sides out. After turning and pressing, I hand stitched the opening closed and hand tacked the layers together invisibly at the corners of the blocks. I wanted the decorative thread and the flatlock stitching to be the center of attention.
What is a Serger Flatlock Stitch?
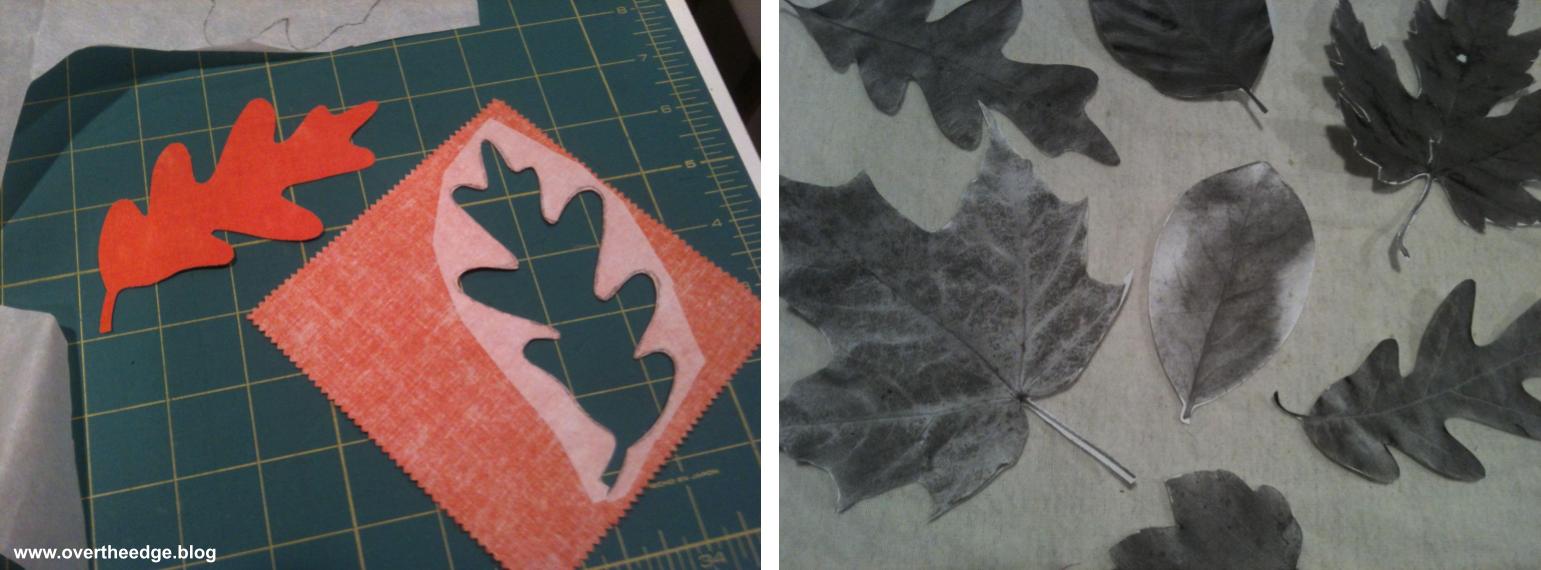
A flatlock stitch can be used to seam two fabrics together and to add detail to a seam line. It has unbalanced tensions that allow you to pull open the seam so it lays flat. Typically the needle thread tension is very loose and the lower looper tension is tight. The flatlock stitch is also reversible. It forms a “loop” stitch on one side of the fabric and a “ladder” stitch on the other side of the fabric. If you serge a seam with the fabrics right sides together, you will end up with a ladder stitch on the right side. The “ladder” you see is the needle thread. If you serge a seam with the fabric wrong sides together you will end up with a “loop” stitch on the right side. The “loop” you see is the looper thread. The example below show the ladder and the loop sides of two maple leaf quilt blocks that I made when I was practicing flatlocking.
What is Serger Flatlock Piecing?
When you sew your pieces together to form a quilt block, it is referred to as “piecing”. When you piece with a sewing machine the stitches made by a sewing machine are hidden within the seam. Flatlock piecing with a serger is piecing your quilt blocks together with a flatlock stitch. The stitch used in flatlock seams is very visible in the finished quilt. You can use the standard serger presser foot for this technique.
Follow the instructions in your manual for setting your serger up for a flatlock stitch. There are different types of flatlock stitches (2 or 3 thread, wide or narrow). I typically use a three thread flatlock for piecing quilts.
For piecing a quilt with a flatlock stitch, I keep the blade engaged and run the raw edge of my fabric along the blade. I don’t really cut anything off, I just trim stray threads.
Always test your serger set-up on a scrap of fabric and adjust as needed, before you begin serging your actual project. The actual tension settings and stitch length needed will vary with different threads and fabrics.
Leave a few inches of thread tail at the end of each seam. By leaving long tails you will prevent your seams from unraveling until you have a chance to secure them.
Press your flatlock seams flat before pulling them open. I feel it helps the fabric within the seam fold properly during the opening process. After pulling the seams open, I press them again.
Your finished blocks may be a little larger than they would be using a sewing machine. The process of opening of the seam allowance changes the size of the seam allowance slightly.
I use the three thread flatlock stitch in smaller projects like table runners and wall hangings. Flatlock stitches are more exposed and tend to snag more easily, so I don’t typically use this stitch for quilts that will get a lot of wear.
Set your iron temperature appropriately for the thread you use in your flatlock stitch, or use a press cloth. Since the thread sits on the surface of your fabric it has more exposure to the heat of the iron. It is possible to melt the thread in your serger stitches – I know from personal experience!
Are you Inspired?
I hope you enjoyed this post and are inspired to try flatlock piecing with a serger.
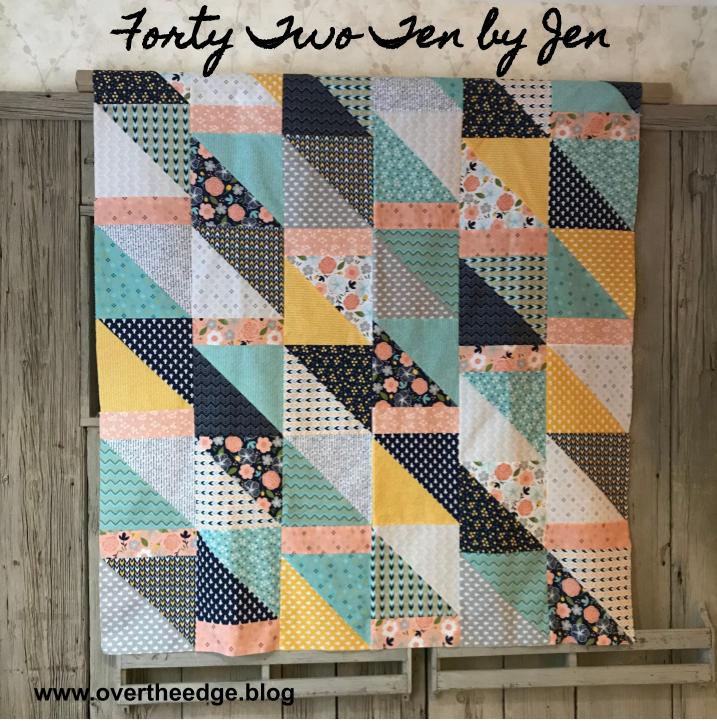
Since March is National Quilting Month and I love my serger, I thought I would show you how simple it can be to quilt with a serger. To inspire you to try it, I designed my own pattern. My challenge was to design a quilt that was quick and easy to piece using a serger and used only one layer cake of fabric. I named my design, “Forty Two Ten by Jen”. Simple and catchy don’t you think?
Layer Cakes and Other Precuts
I frequently use precuts for my quilts because I don’t have to stress over choosing coordinating fabrics. Precuts come in many different shapes and sizes such as layer cakes, charm packs and jelly rolls. I believe Moda was the first to create the “layer cake” which is basically a package of 42 ten inch squares that all coordinate. Using the word “layer cake” to describe a package of 42 ten inch squares is like calling all brands of facial tissue “Kleenex”. These packages of ten inch squares go by names such as Moda Layer Cakes, Riley Blake Ten Inch Stackers, and Bali Crackers.
A Little Information About my Quilt
For my quilt I used Riley Blake’s, Azure Skies Ten Inch Stacker, designed by Simple Simon and Company.
I am happy to say that my Forty Two Ten by Jen serger quilt is a zero waste quilt, which means it uses every single piece of fabric with no scraps. Those little scraps that are leftover from projects always create a small amount of anxiety for me. Should I throw them away or keep them for another project? If I throw them away I feel guilty. If I keep them I usually can’t find them when I need them. Does anyone else ever feel this way? No need to worry because this quilt has no leftover scraps – yay!
Equipment Required
This project does not require a fancy serger. As long as your serger can do a 4 thread overlock stitch, you can use it to make this quilt. However, not everyone is lucky enough to own a serger, so I also included instructions for how to piece this quilt on a sewing machine. I hope you enjoy quilting with your serger using my free pattern “Forty Two Ten by Jen”.