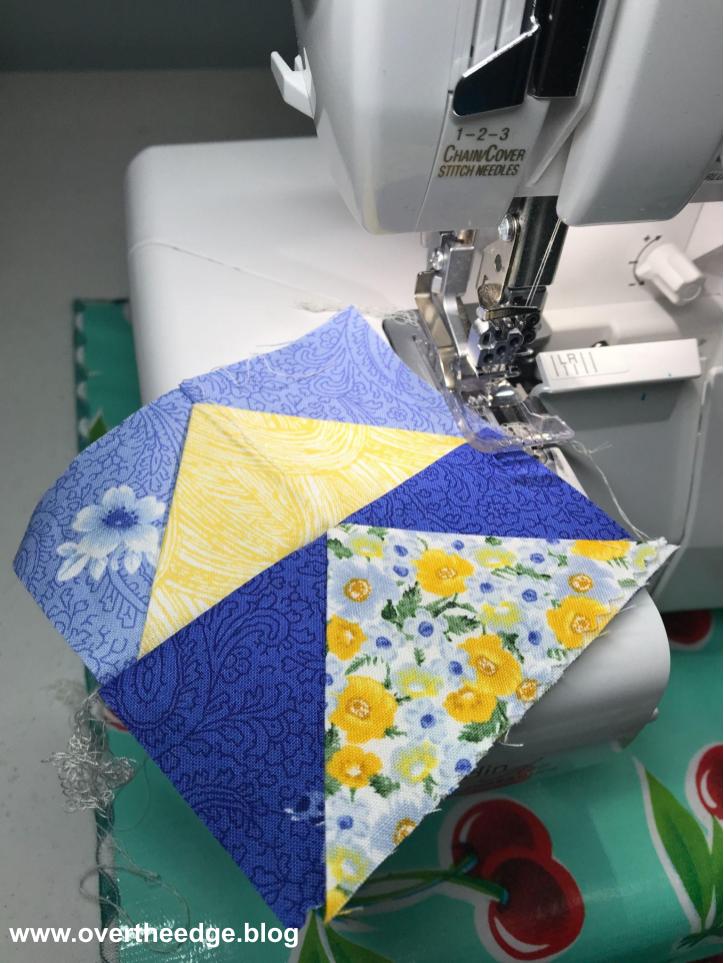
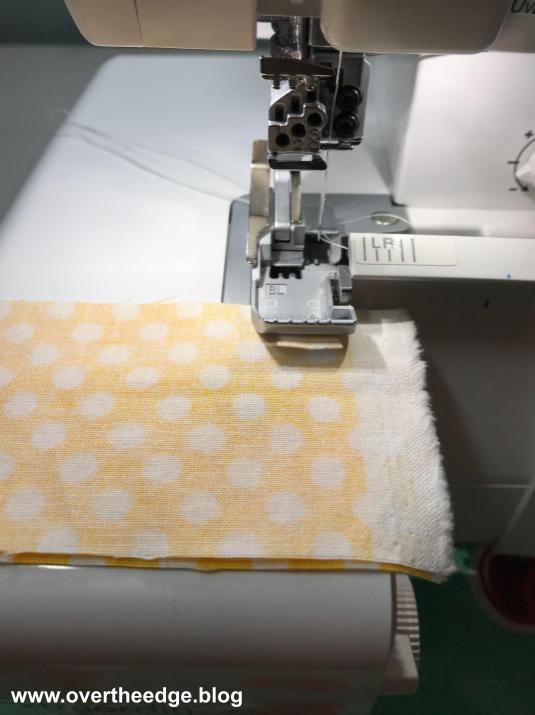
Since March is National Quilting Month, I thought it fitting to share the latest serger quilting technique that I have been experimenting with – one seam flying geese with a serger.
While I was surfing the internet I came across an interesting YouTube video of Jenny Doan from Missouri Star Quilt Company. She was showing how to create a one seam flying geese block using a sewing machine. I immediately decided that the serger would be a great tool to use for this technique. I couldn’t find any internet resources about using a serger to make a one seam flying geese block. So maybe I am the first person to try it with a serger? Probably not, but it appears I am the first person to blog about it…..
One Seam Flying Geese with a Serger
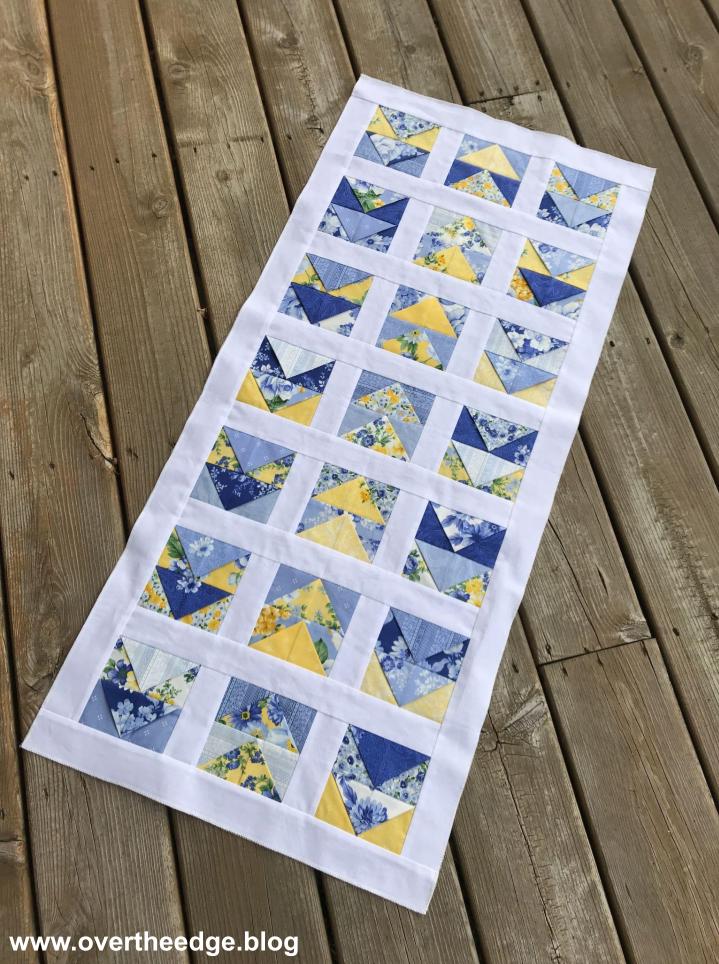
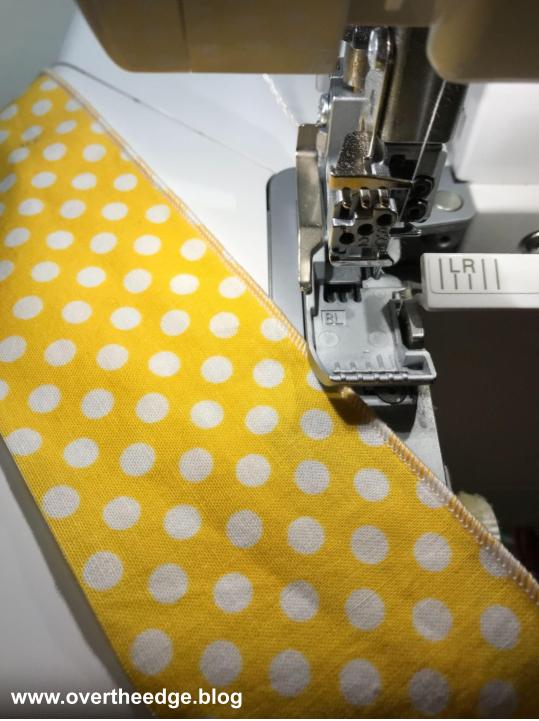
The one seam flying geese block is a three dimensional block. The block is made from a rectangle and two squares and has just one seam. Each geese block/unit is twice as wide as it is tall. The angled sides (or wings) of the geese are folds in the fabric. This method has no lines to mark, no subcutting, and makes perfect points. How easy is that?!
Pros and Cons of the One Seam Flying Geese Block
Pros
Accurate
Fast
No markings or paper to remove
No bias edges
3D adds texture
Very little waste
Cons
May need or want to stitch down the wings of the three dimensional geese
Some seams are a little thicker due to the folded fabric
Jen’s Experiment with Serged Flying Geese
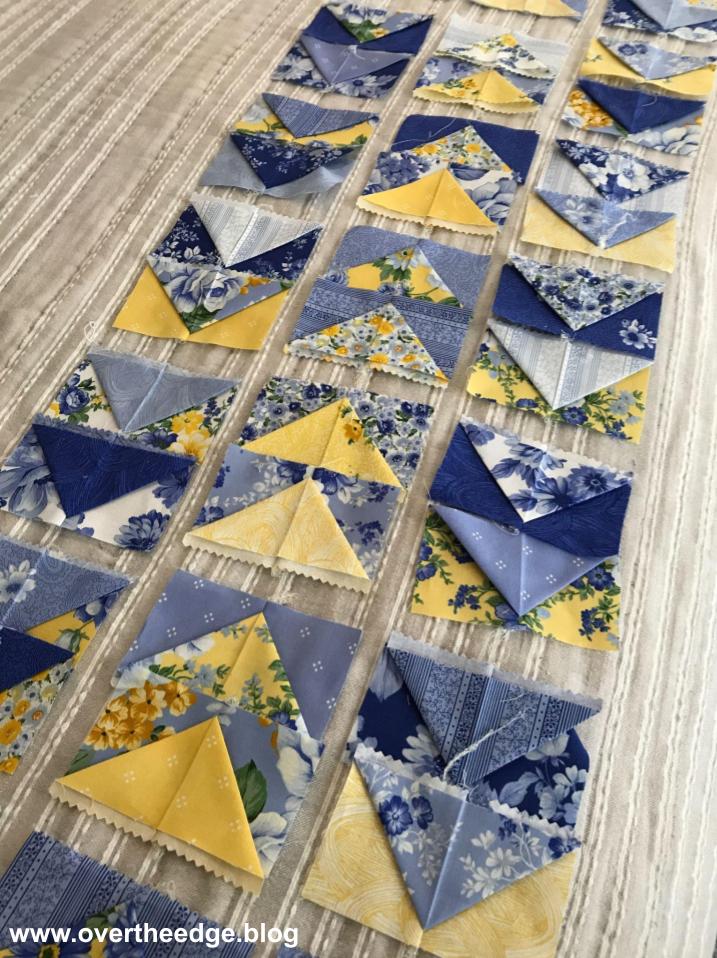
I pulled a charm pack from my stash. The charm pack was from Boundless Fabrics and called Dutch Garden III. The blues and yellows were so fresh and cheerful compared to our dreary February weather! With a few simple cuts and a little serging, I quickly transformed the 42 squares in my charm pack into 42 flying geese units. Chain piecing the blocks on my serger was quick and easy. I found making them kind of addictive – I just wanted to keep making them!
With a little fabric manipulation, pressing and trimming, I transformed all of the blocks into one seam flying geese.
I Have a Bunch of Flying Geese – Now What?
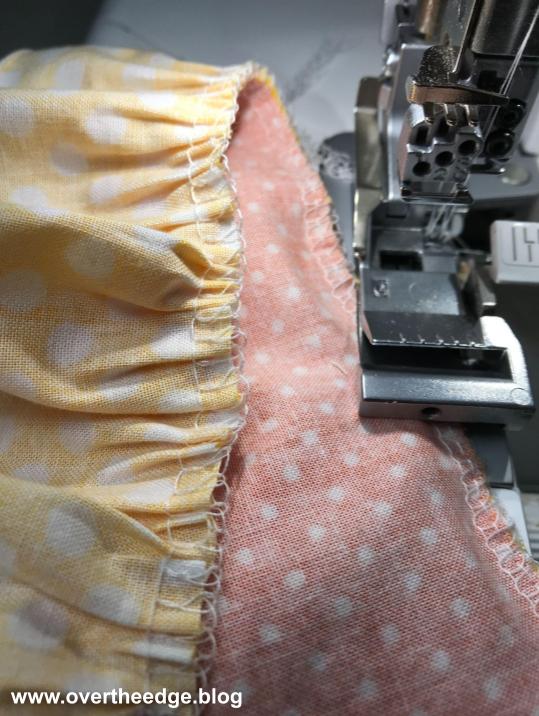
Most people begin with a pattern when they create a quilt. Sometimes I do too. But not this time. I serged all these geese without a plan for what to do with them. I simply laid out all the blocks and moved them around until I liked the arrangement. These geese decided to become a table runner.
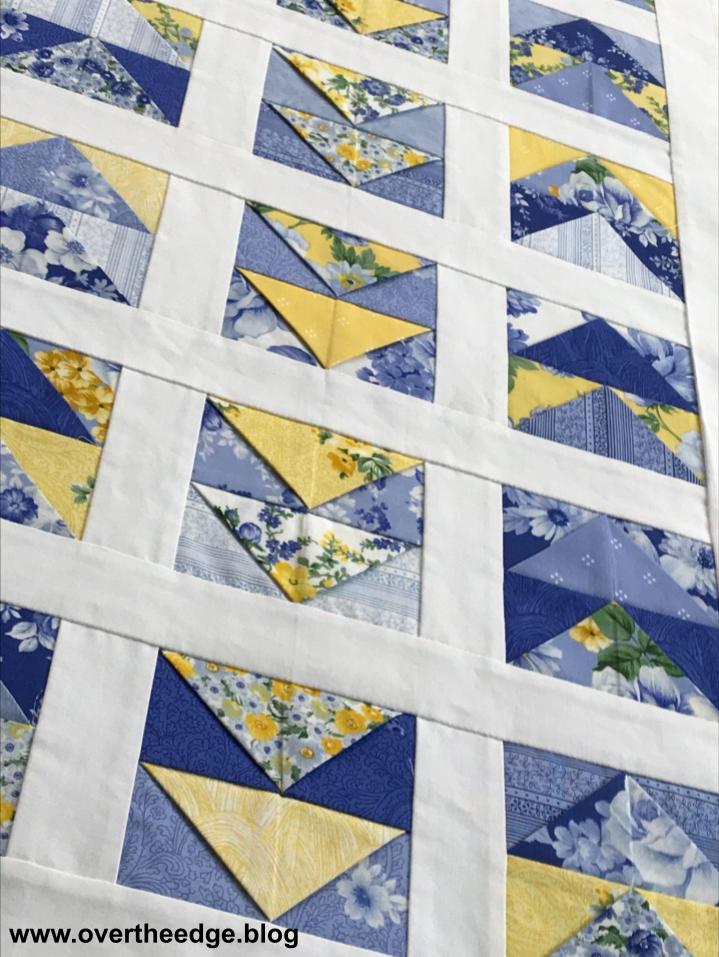
Sashing and Borders
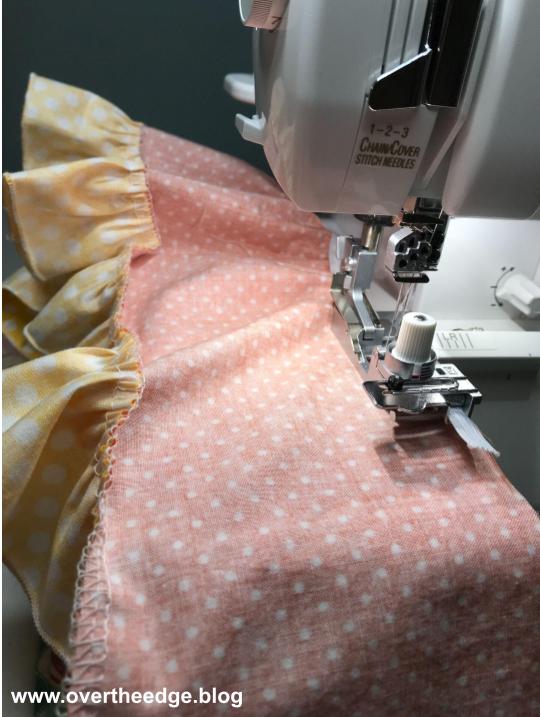
I serged the geese blocks together in groups of two and added sashings and borders.
The Results of my Experiment
From the front side you might think the table runner was sewn with a sewing machine. But from the back side you can see all the neat and tidy serged seams.
My one seam flying geese blocks became my cheerful Spring Migration Table Runner!
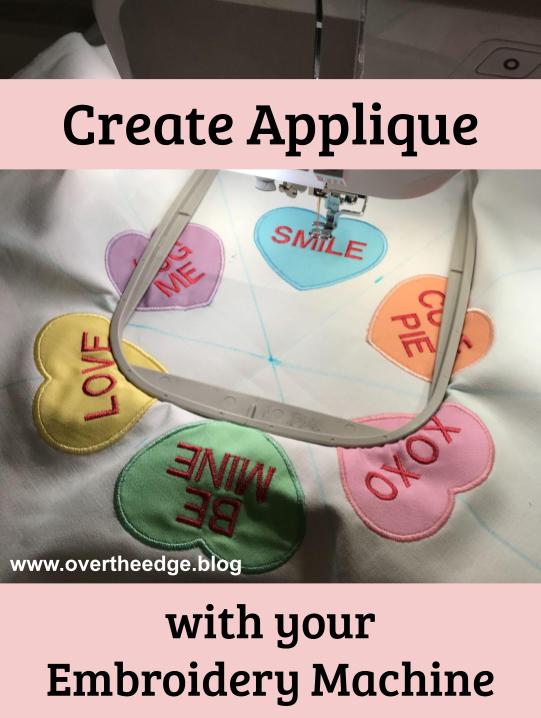
Learn how to create applique with your embroidery machine. Hmmm. What does that have to do with serging? Nothing really, but my serger is busy working on another project that is not quite ready to share. So with Valentine’s day right around the corner, I thought I could spread a little holiday cheer with my colorful and cheerful conversation heart appliques.
My Inspiration
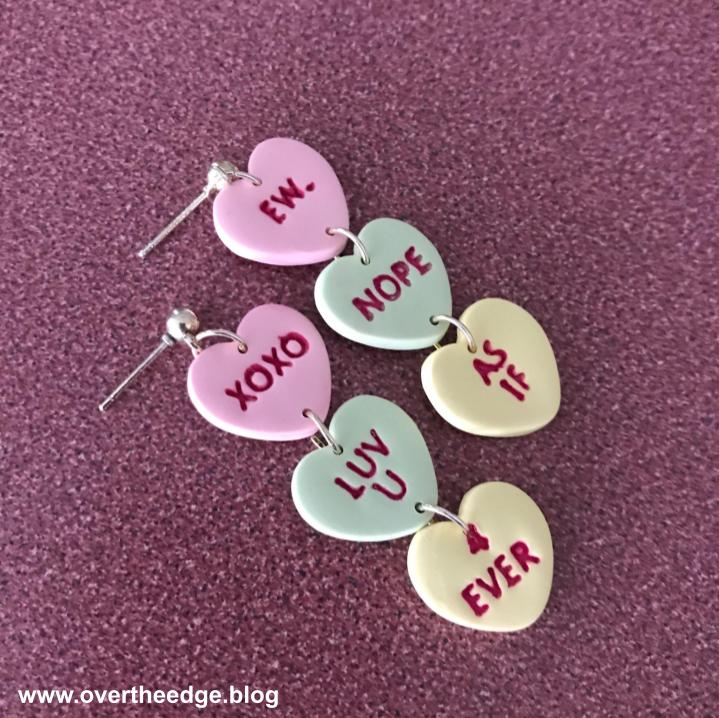
Are you familiar with those cute little heart candies with the words? Some people call them candy hearts and some call them conversation hearts. I’ve always known them as conversation hearts. Well, my daughter recently made these adorable conversation heart earrings for Valentine’s Day. Inspired by her earrings, I set out to make a conversation heart creation of my own.
February is National Embroidery Month
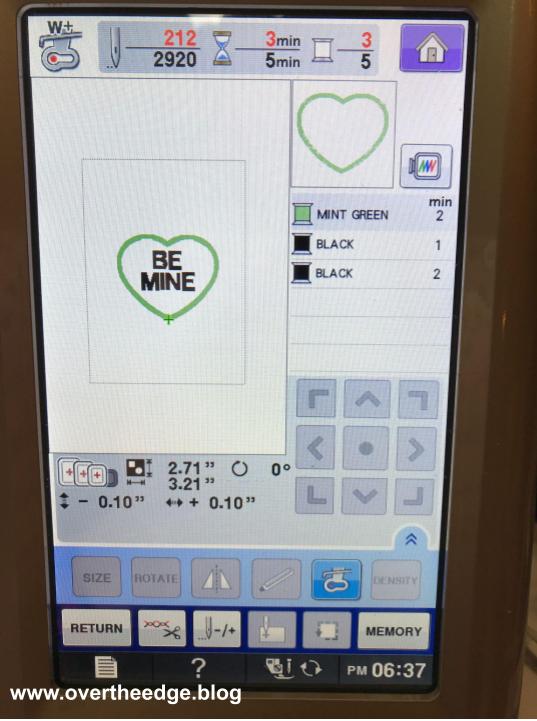
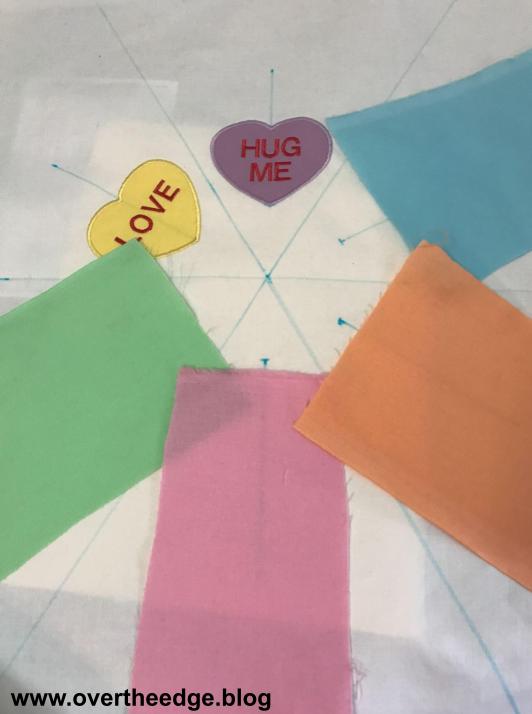
In the sewing machine world February is National Embroidery Month. Every year at the store we try to do something creative to celebrate this month. Since February also includes Valentines day, I thought a machine embroidery project that focused on hearts or love of sewing would be good. I recently learned how to “create” appliques using the built in frames in my embroidery machine. So I created my own machine embroidered applique conversation hearts.
I had so much fun making them that I put them on everything. Well maybe not everything, but a lot of things! I made several samples for inspiration and created free handouts to give out at the store. I thought that I would share them with you too.
Create Applique with your Embroidery Machine
Some embroidery machines are capable of creating new designs, but most can simply modify existing designs. I own a Baby Lock Unity sewing and embroidery machine. It’s a wonderful machine with good sized hoops, but it can not create designs, only modify them.
To “create” an applique on my machine I need to begin with a design or shape that already exists. There are many different built-in frame shapes in my machine. One of those shapes is a heart. And the heart frame is available with several different types of borders which can be used to create an applique.
There are several different steps to creating an applique on an embroidery machine. First there needs to be a placement line so you know where to place the applique fabric. Then there needs to be a tack down line that stitches the applique fabric to the background. The fabric needs to be trimmed. And then a line of satin stitches needs to be placed on top to cover up the raw edges of the fabric. And if you want you can add words or other designs on top of the applique. Even though there are several steps you need to do to create appliques this way, it’s really pretty easy once you understand the process.
This technique will work with all of the current Baby Lock embroidery machines (may not work with some of the older models). You can even do this on the entry level Baby Lock Verve. I’m not an expert on embroidery with other brand machines but if your machine has built in frame styles then you can probably do this with your machine too. The following link will take you to my instructions for creating applique with your embroidery machine using frames. https://overtheedge.blog/tutorials/conversation-heart-mug-rug/
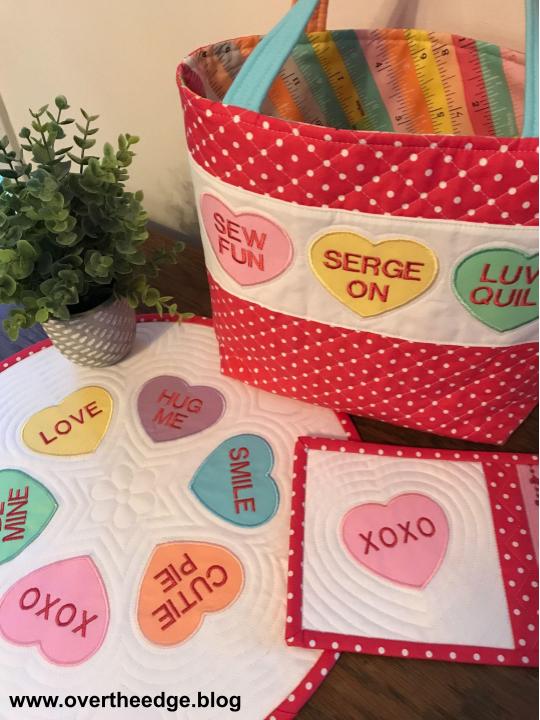
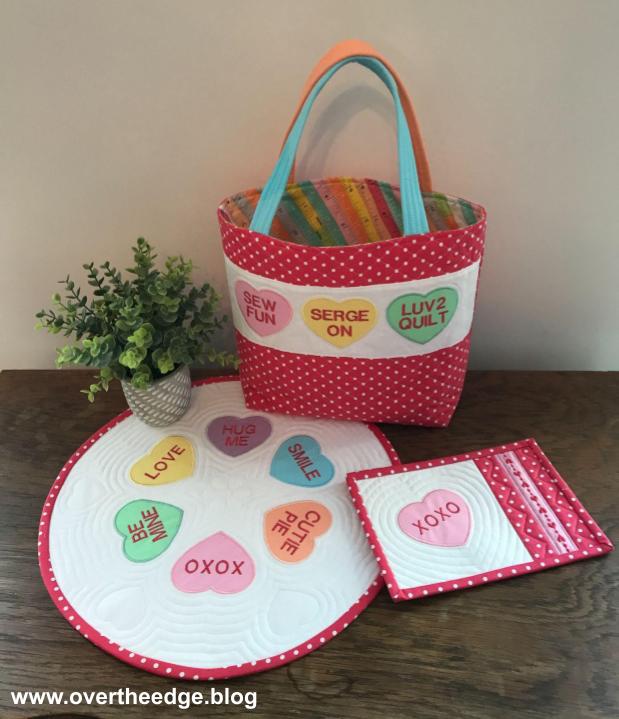
Conversation Heart Mug Rug Free Pattern
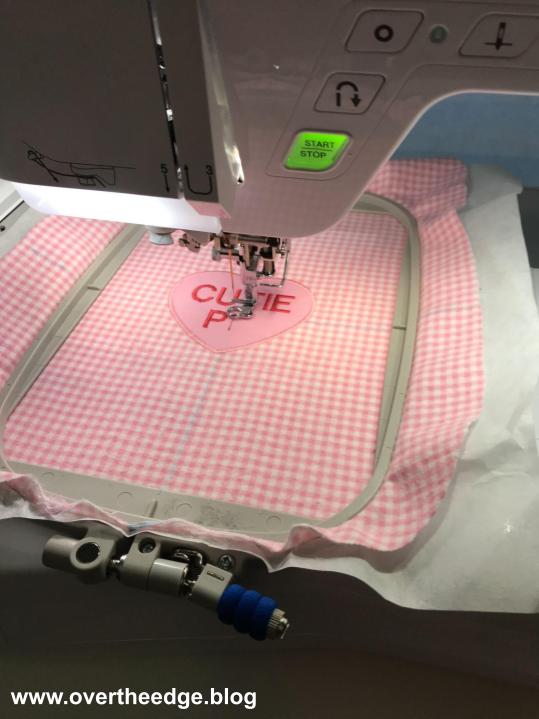
After I created my conversation heart applique design on my machine, I tested it out on a plain piece of cotton fabric. The test was a success! So I turned the fabric with the appliqued heart into a mug rug. I added some decorative stitches and quilted it with my sewing machine. WIthout an embroidery machine you can still make this project. The only difference is that you would have to create the applique by sewing it instead.
Isn’t my model a cutie pie?! Adding applique to a bib is another quick and easy project. I made my bib using flannel on the front and thin terry cloth on the back. But you could save some time by adding an applique to a purchased bib. I used a free bib pattern from MadeEveryday as the basis for my conversation heart bib. See the resources section of this blog post for the link to the free bib pattern.
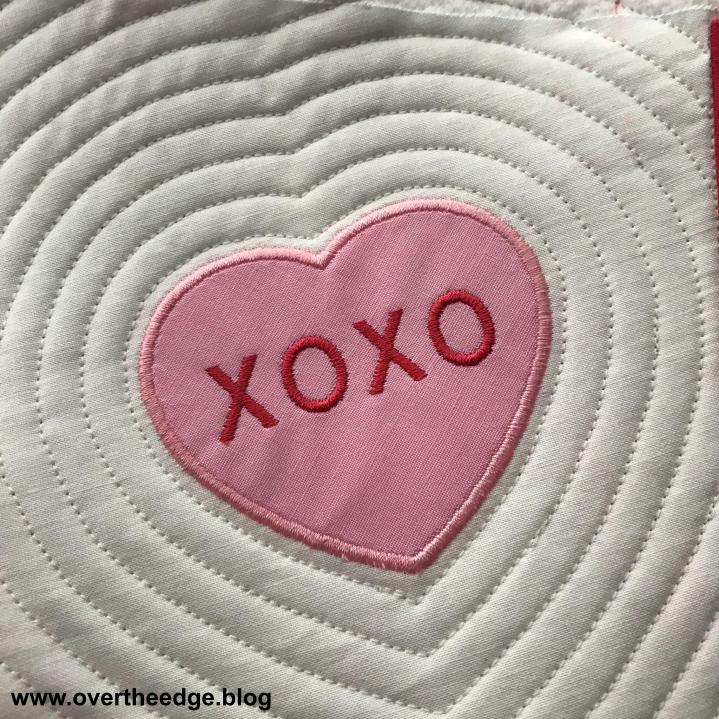
Conversation Heart Table Topper
My conversation heart table topper was created from one piece of fabric which I embellished with appliques. After creating my quilt sandwich, I quilted the topper with a combination of echo quilting and small hearts using my sewing machine. A straight stitch, a standard presser foot and a lot of pivoting were used to quilt this project. The auto pivot function on my Baby Lock Unity is awesome!
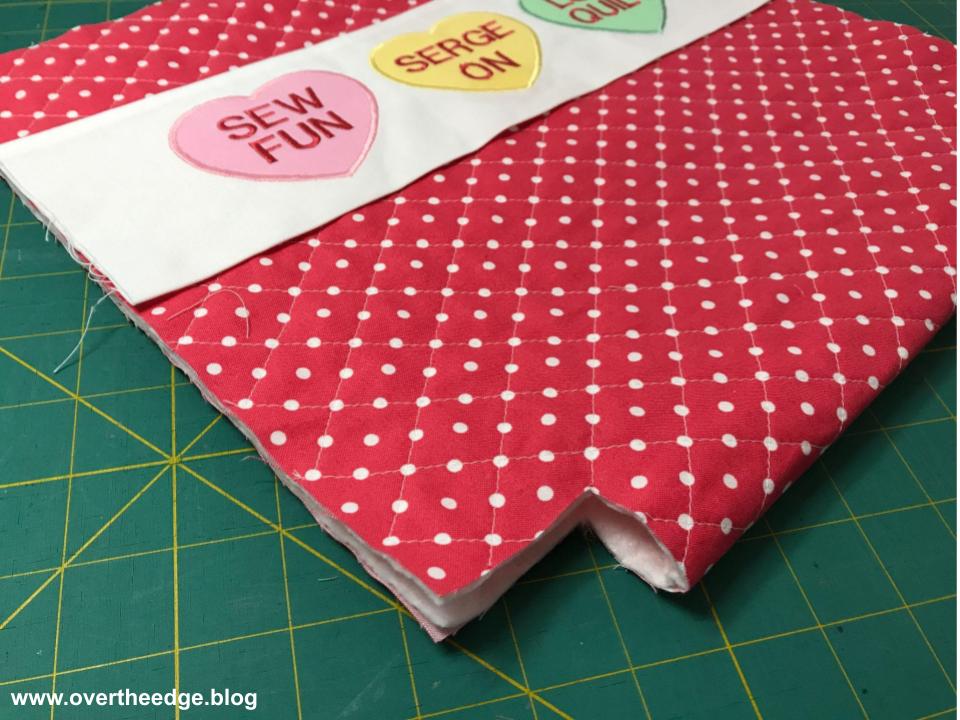
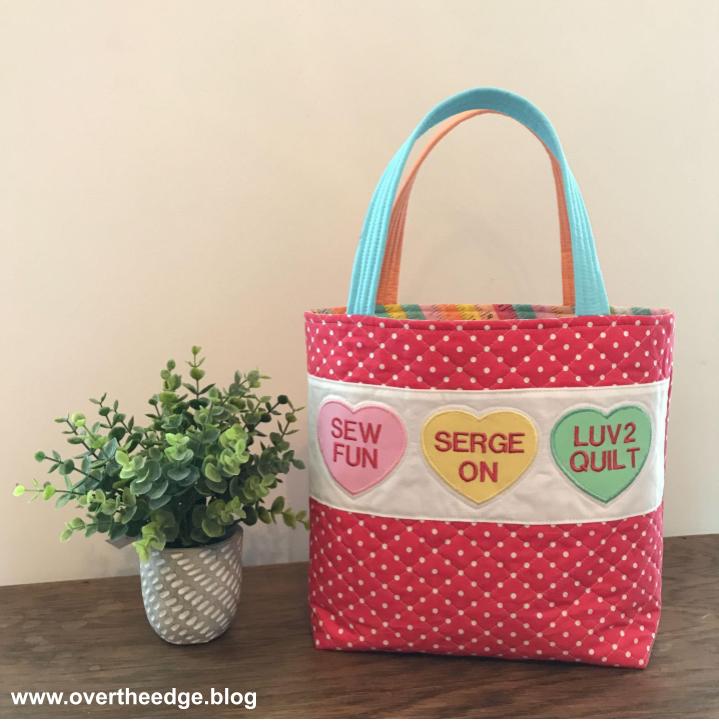
Conversation Heart Tote
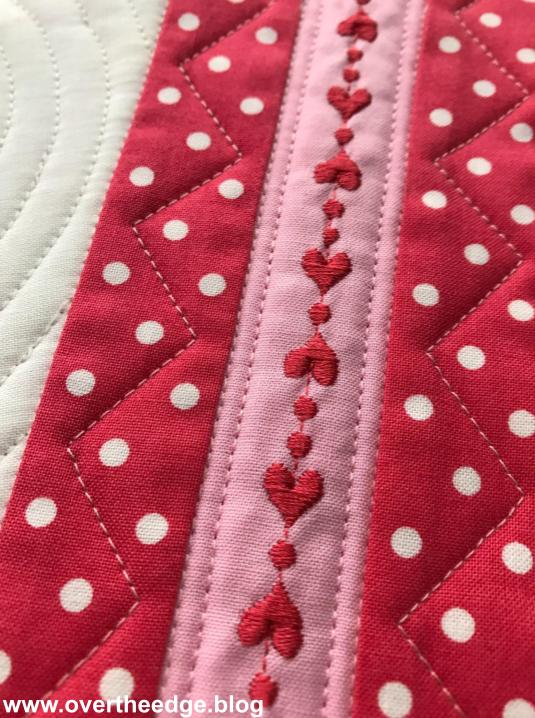
The final sample project I created was a tote bag. I used a free tutorial from SewCanShe as the basis for my bag, but added a few of my own special twists. The diamond quilted fabric was easy to make. All I had to do was to stitch lines across the polka dots! And I simply added a fabric strip with the appliqued conversation hearts on top of the quilted fabric. But instead of using traditional words on my conversation hearts, I used sewing themed words. Which means I still managed to work serging into my applique – Serge On! See the Resources section at bottom of this post for the link to the free tote tutorial.
Create Applique with your Embroidery Machine
The possibilities are endless. You can add these applique conversation hearts to just about anything! And you could have used your serger to make parts of these projects. My samples were all made with a sewing and embroidery machine because my serger was busy on another project…..
I hope you enjoyed my post about creating appliques using frames built into your embroidery machine.
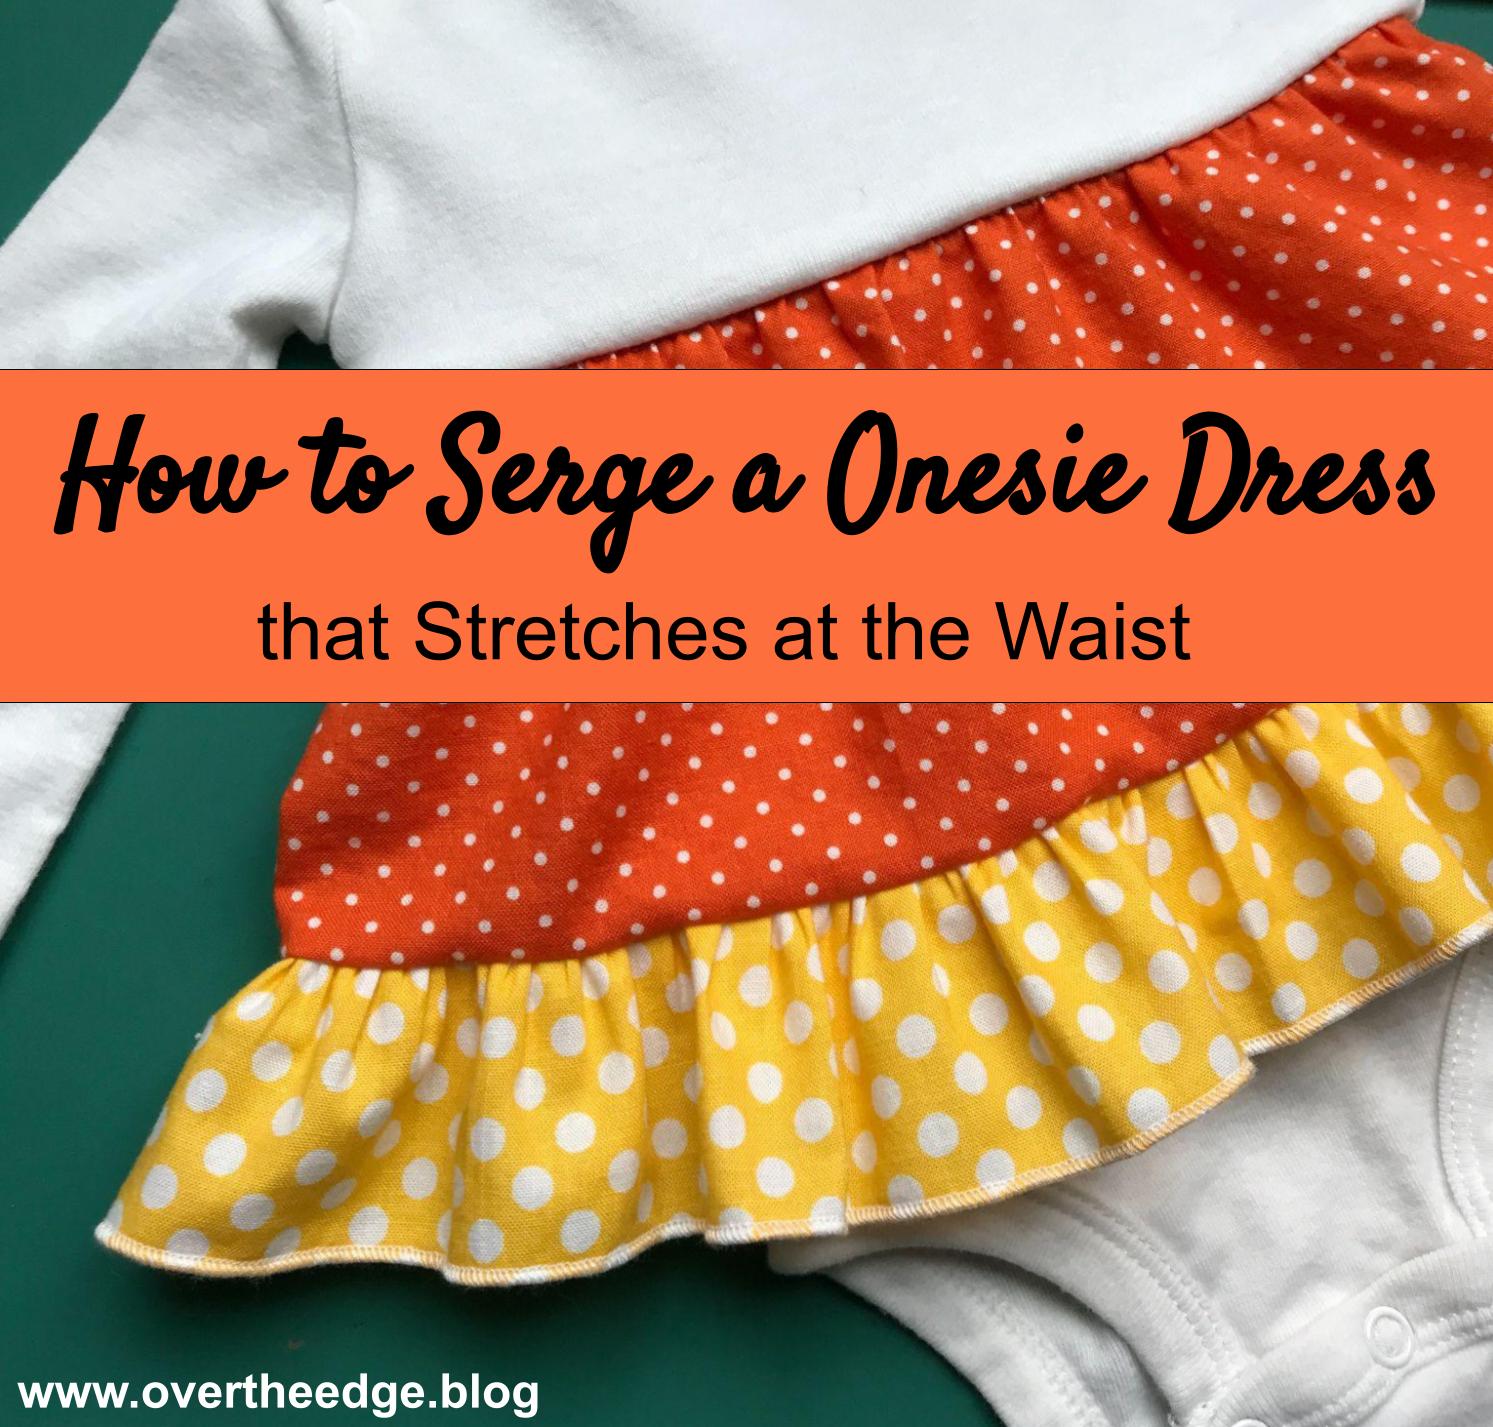
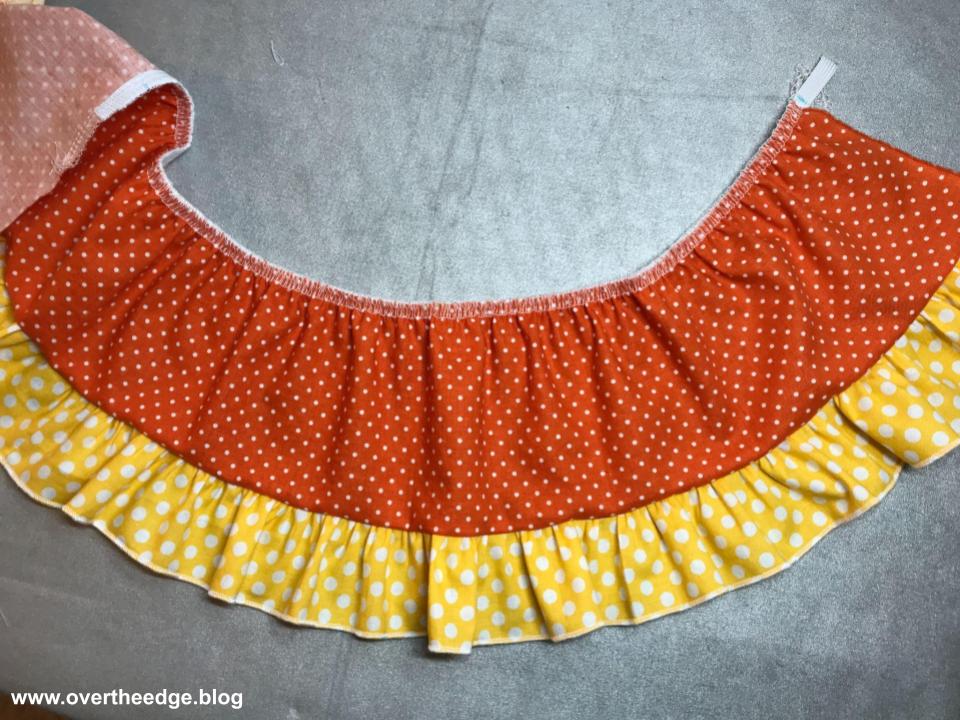
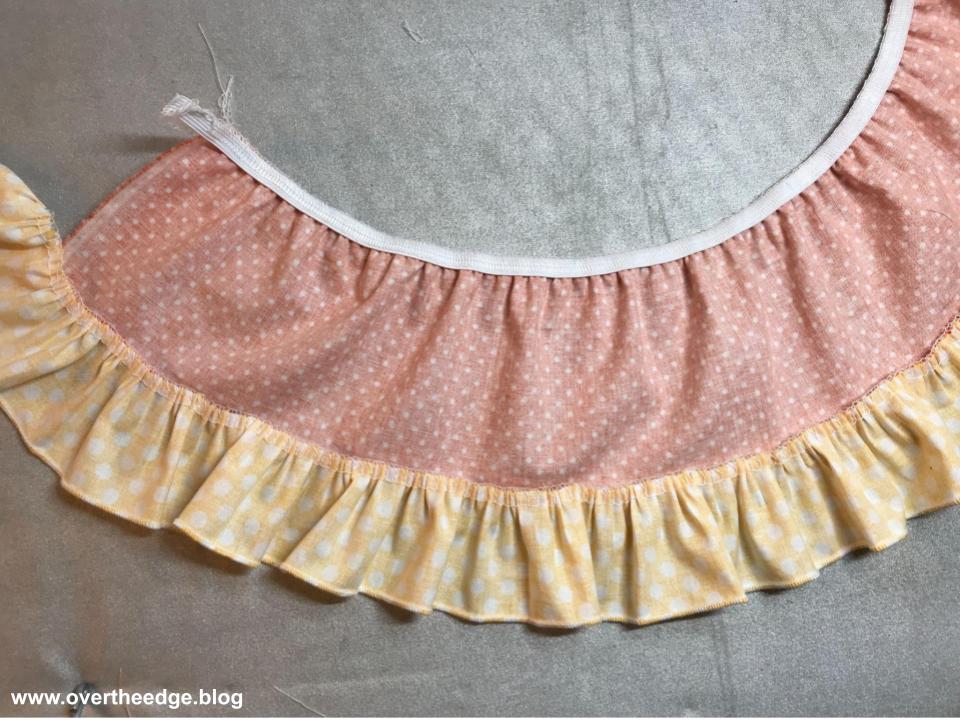
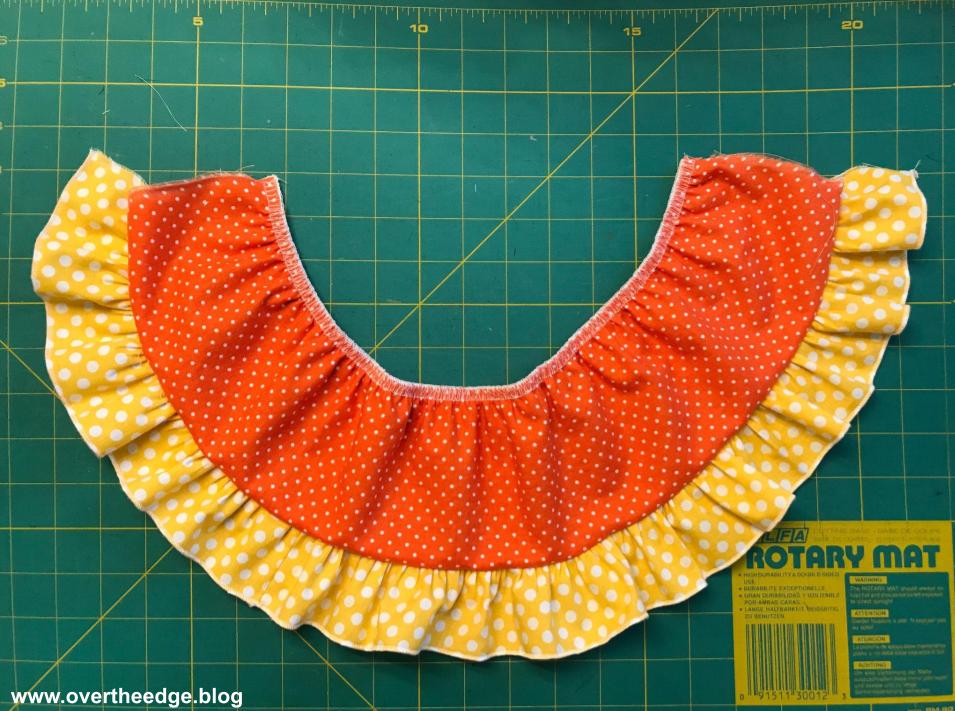
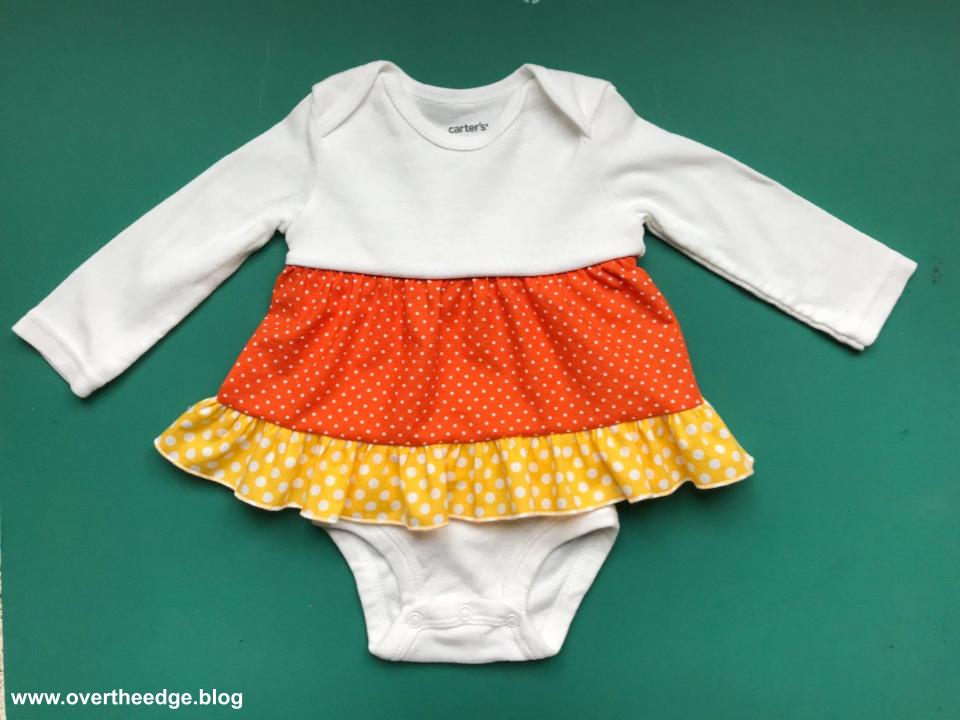
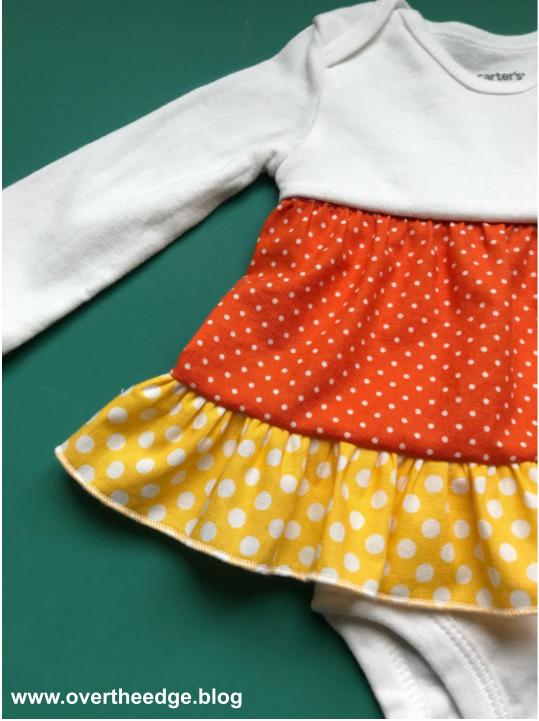
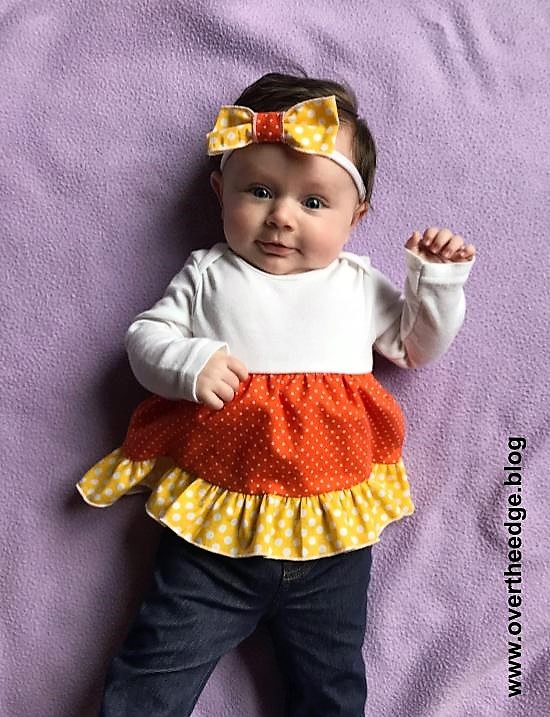
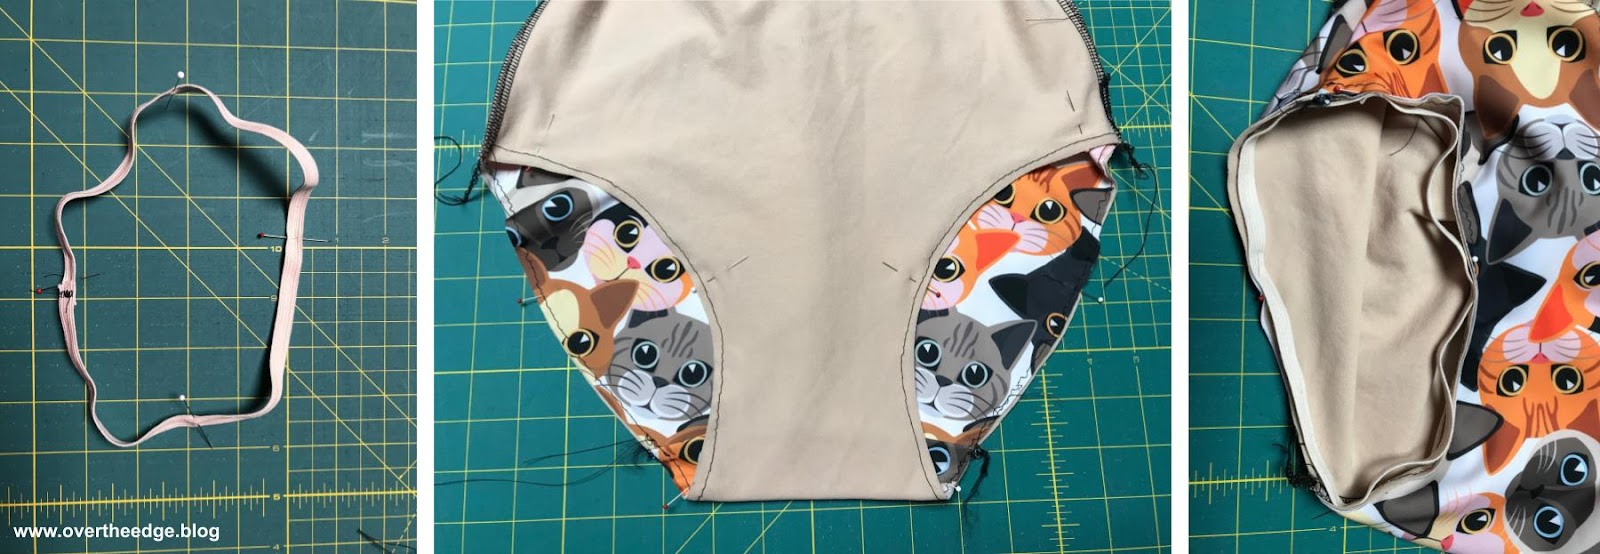
Surfing the internet one day, I stumbled across a photo of a cute little girl’s dress that reminded me of candy corn. Right then I knew my baby granddaughter needed her own version of that dress. Instead of a regular dress though, it needed to be a onesie dress. Onesies are the perfect base for a baby dress or shirt because they stay tucked in and don’t ride up and expose little belly buttons! And of course, I had to use my serger to make it. After a little experimentation I figured out how to serge a onesie dress that stretches at the waist. This blog post is a summary of my process. In the future I plan to create more detailed instructions for this style onesie dress using several different serger techniques. So stay tuned!
The Typical T-Shirt or Onesie Dress
There are many great tutorials on the internet for making cute onesie and t-shirt dresses. The typical method for creating a onesie or t-shirt dress is based on gathering a piece of cotton fabric with long basting stitches and then stitching the gathered fabric to the t-shirt or onesie. I’ve made t-shirt dresses like this before, but I’ve found that the woven fabric skirt limits the stretch of the waist seam. In the previous dresses I’ve made, the waist seam stretches very little or not at all. If the t-shirt is loose and baggy there is usually enough wiggle room to get the dress on a child without popping seams, even if the seam doesn’t stretch. But with a close fitting onesie, it’s really difficult to get it on a baby if the fabric at the waist doesn’t stretch.
How to Serge a Onesie Dress that Stretches at the Waist
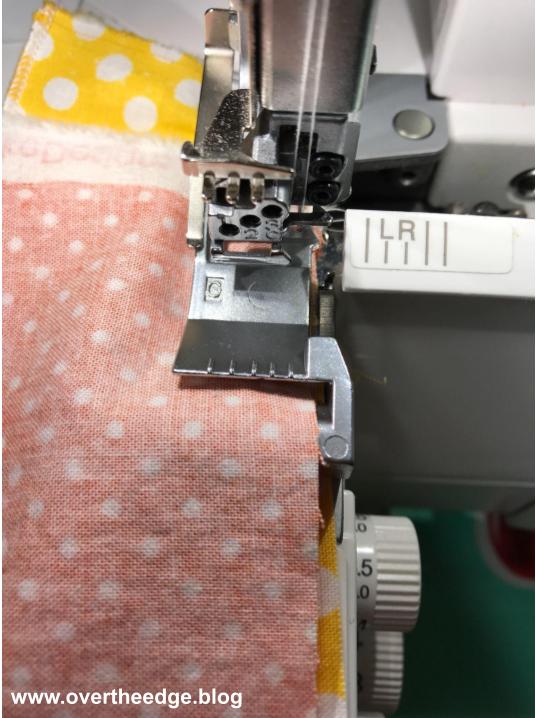
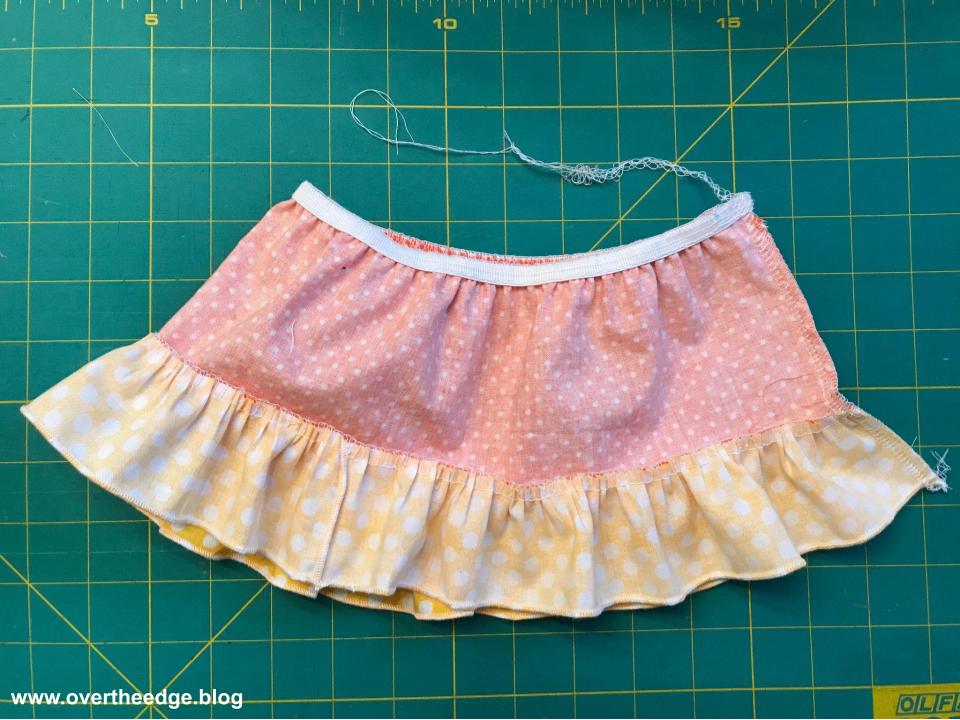
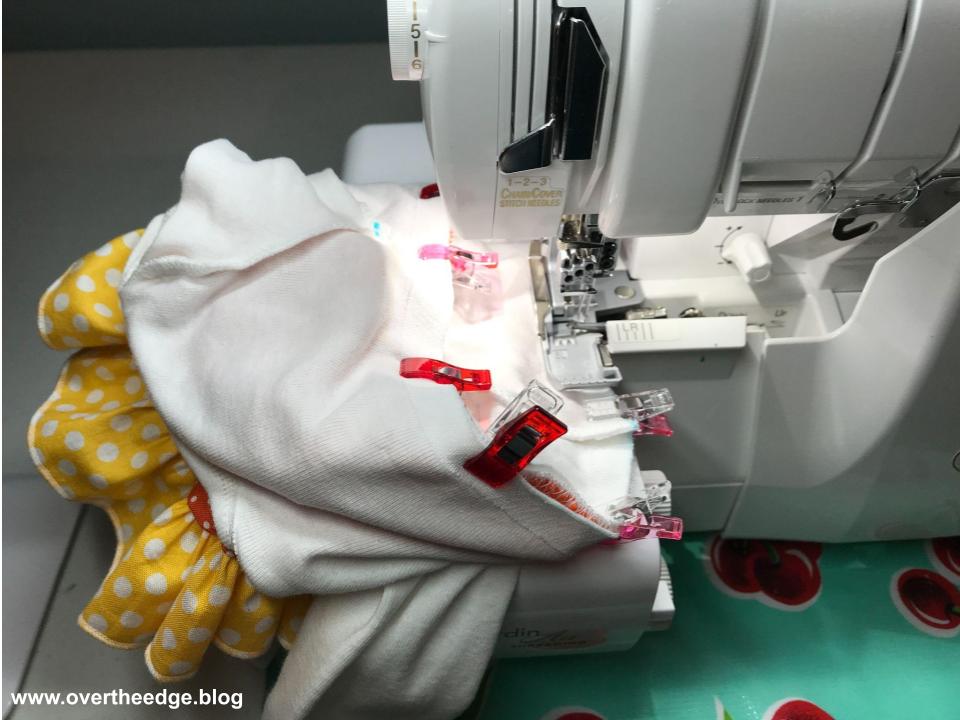
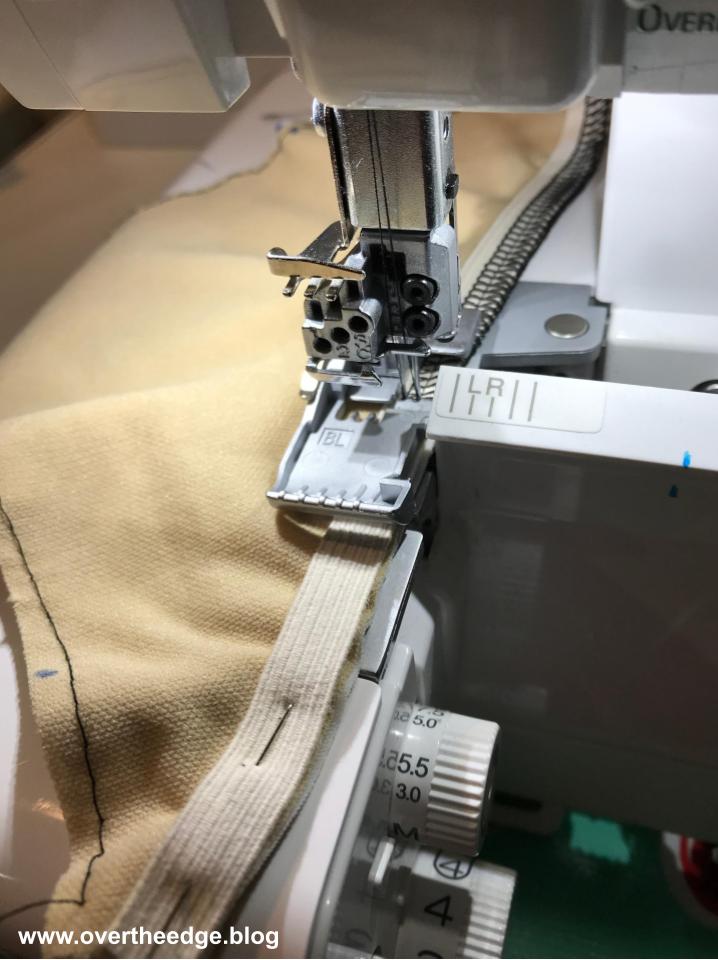
To create my candy corn skirted onesie I wanted to use a couple of cute woven cotton polka dot prints. So I had to figure out a way to add a skirt to my onesie without losing the stretch around the waist. I decided the best way for me to do this was to use my serger, along with an elastic foot to gather the top edge of the skirt using elastic.
I also used a ruffling foot to simultaneously gather and attach the bottom ruffle to the skirt.
The ruffling foot and elastic foot are presser feet that help you gather fabric or attach elastic to fabric. You can gather fabric or attach elastic to fabric using a serger without these specialty feet. The feet just make the process quicker and more professional looking.
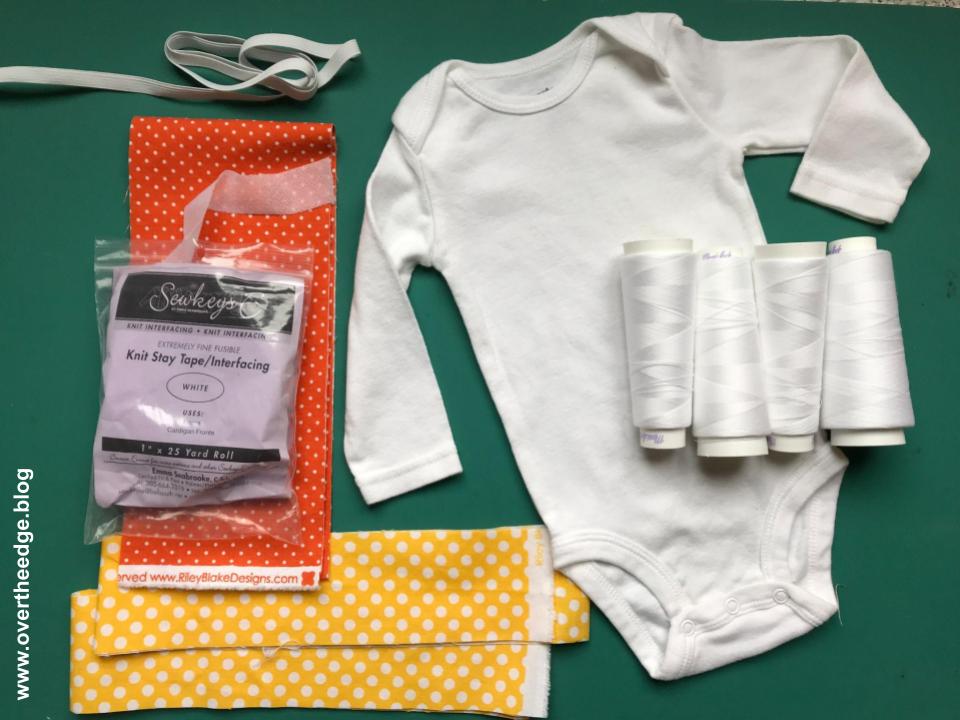
Supplies
Baby onesie – I used size 6 month long sleeved by Carters
4½” x 45” wide cotton print fabric for main skirt
Two – 2½” x 45” wide strips of cotton print fabric for bottom ruffle
⅜” wide elastic – 2X the width of the onesie (where you will attach the skirt) plus 6”
Serger thread for overlock and rolled hem stitches
Optional – 1” thin fusible knit knit stay tape – 2 x the width of the onesie (it helps to stabilize the onesie where you cut it so the edges don’t stretch out as you handle/serge)
Supply Notes
Since I added a seam at the waist, the onesie did get a little shorter (about ½-¾” shorter). Keep this in mind when selecting your onesie. You may need to select a onesie that is a little bit longer than the length you actually need.
I made the skirt on the onesie shorter so the onesie looked more like a skirted shirt than a dress. I wanted more of a shirt that she could wear with pants. Feel free to make your skirts any length you desire.
Tools
Serger capable of 4 thread overlock and 3 thread rolled hem
Elastic foot for serger – helpful, but not required
Ruffling/gathering foot for serger – helpful, but not required
Serger accessories and manual
General sewing supplies
Sewing machine for basting (optional)
Summary of Steps
The steps below are a summary of the steps I took to make my “Candy Corn Skirted Onesie” for the blog post “How to Serge a Onesie Dress that Stretches at the Waist.” This style onesie consists of cutting apart the onesie and inserting a gathered skirt.
Step 1: Seam the Bottom Ruffle
I used a narrow three thread overlock stitch to seam my two bottom ruffle pieces together into one long strip.
Step 2: Finish Bottom Edge of Ruffle
Next I used a three thread rolled hem stitch on my serger to finish the bottom edge of my long ruffle strip.
Step 3: Gather Bottom Ruffle and Attach to Main Skirt
I simultaneously gathered my bottom ruffle and attached it to the main skirt piece using the ruffling foot for my serger.
Step 4: Gather Top Edge of Skirt Using Elastic
I used my elastic foot and elastic to gather the top edge of the skirt fabric. There are many variables that determine how much fabric will be gathered to the elastic using an elastic foot – things such as the type of fabric, the type of elastic, how the fabric is guided into the foot, etc. Because of these variables I factored in a some wiggle room and used a little more fabric than I actually needed for the skirt. Because I could easily cut it to size in a future step (step 6). It’s much harder to add fabric than to take it away!
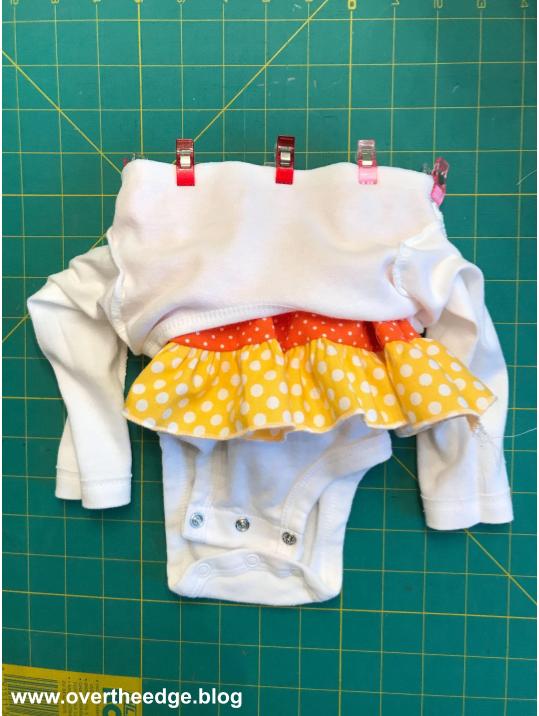
Step 5: Prepare Onesie
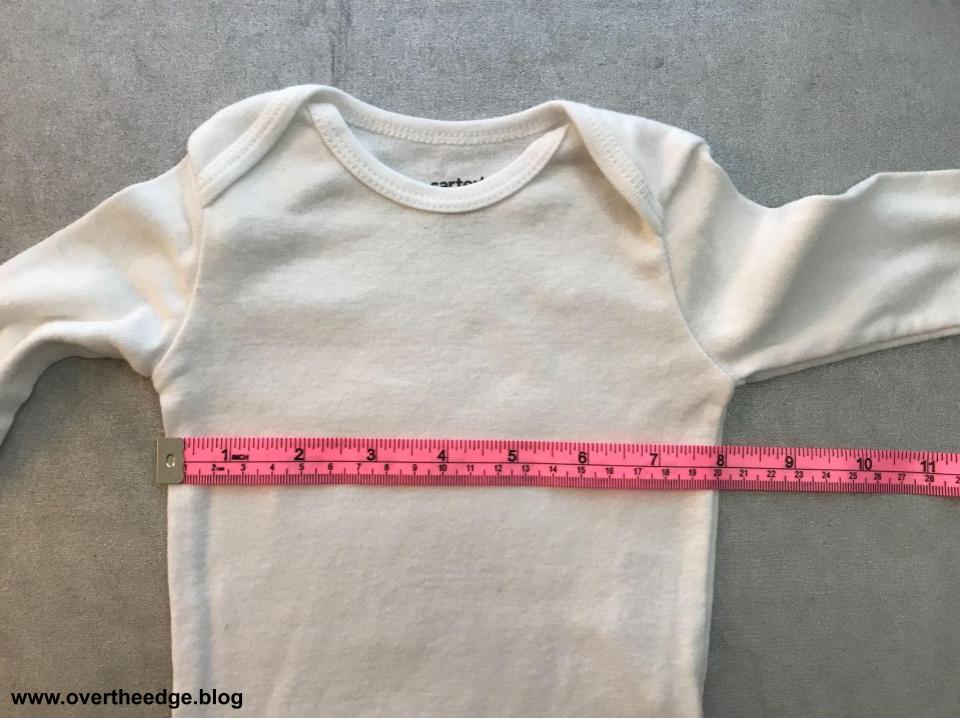
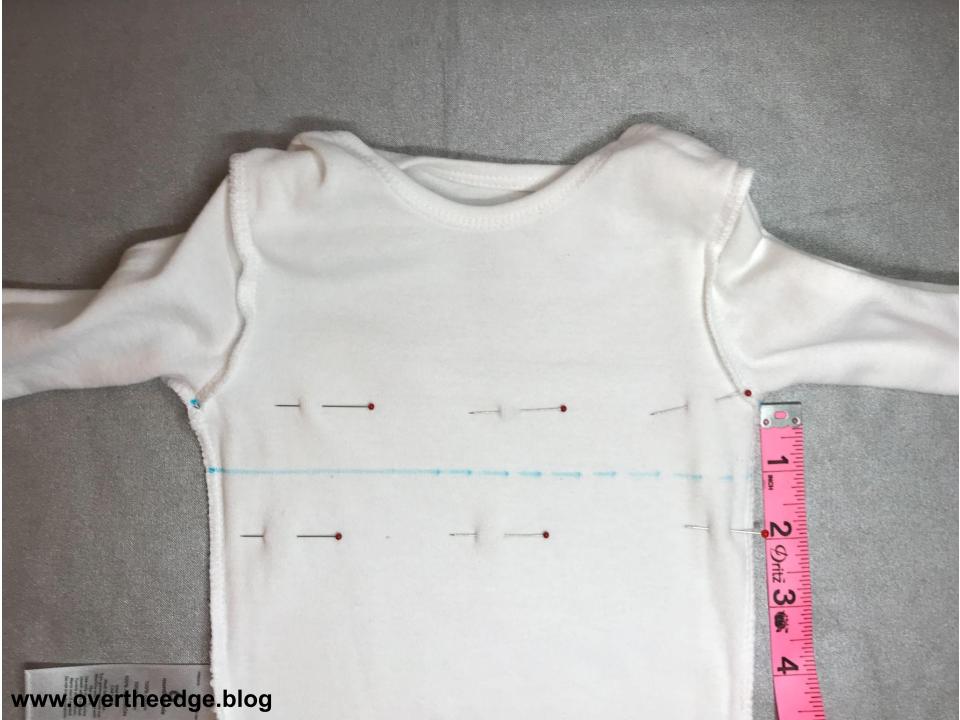
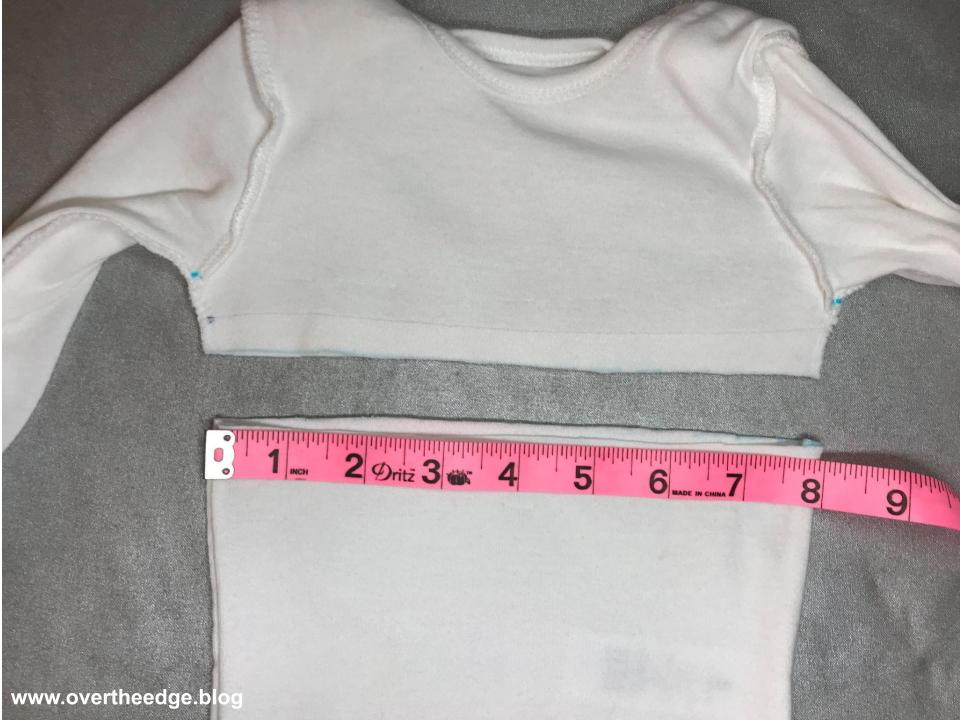
I measured down 1” from the armpits and marked a line across the front and back of the onesie. I also added a fusible knit stay tape over the cutting line to add stability to the future cut edges at the waist. Then I cut the onesie apart at the line.
Step 6: Prepare Skirt for Attaching
I measured the cut edge of my onesie and cut my elastic gathered skirt piece to match (2X this measurement plus 3/4” for seam allowances.)
I serged the short edges of the skirt seam together using a standard four thread overlock stitch.
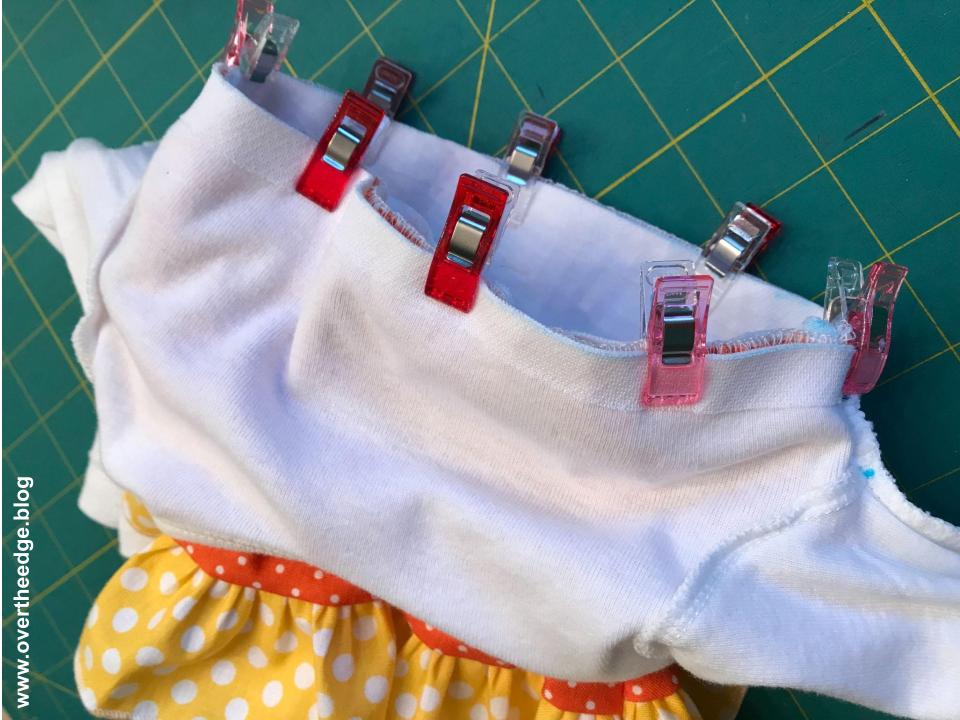
Step 7: Insert Skirt and Serge Waist Seam
I placed the wrong side of the skirt against the right side of the bottom half of the onesie, lining up the raw edges. Using my sewing machine, I basted the skirt to the onesie bottom.
Then I placed the right side of the top half of the onesie against the right side of the skirt, lining up the raw edges of all three pieces (the top half of the onesie, the skirt, the bottom half of the onesie.)
Next, using a standard four thread overlock stitch, I serged all the way around the waist seam.
And that is how I created a fun and functional serger onesie dress that stretches at the waist. But I wasn’t quite done yet. There were a few more things I needed to do.
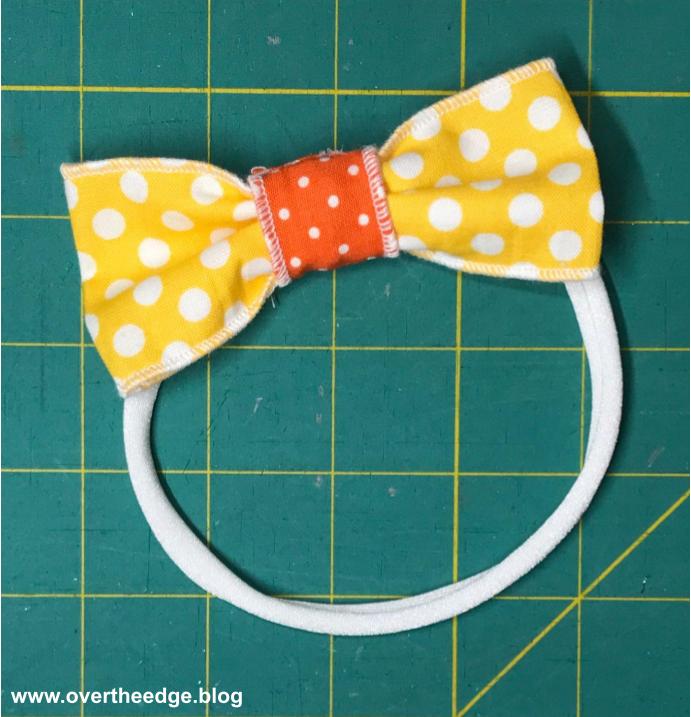
Step 8 – Make a Matching Hair Bow
I took the scraps of fabric leftover from the skirt and made a matching hair bow.
Step 9 – Find a Model and Take Photographs
Isn’t my model cute?!!! I call her my Candy Corn Cutie. The candy corn skirted onesie is the perfect outfit for my granddaughter to wear this October!
How to Serge a Onesie Dress that Stretches at the Waist
I hope you enjoyed my post about How to Serge a Onesie Dress that Stretches at the Waist.
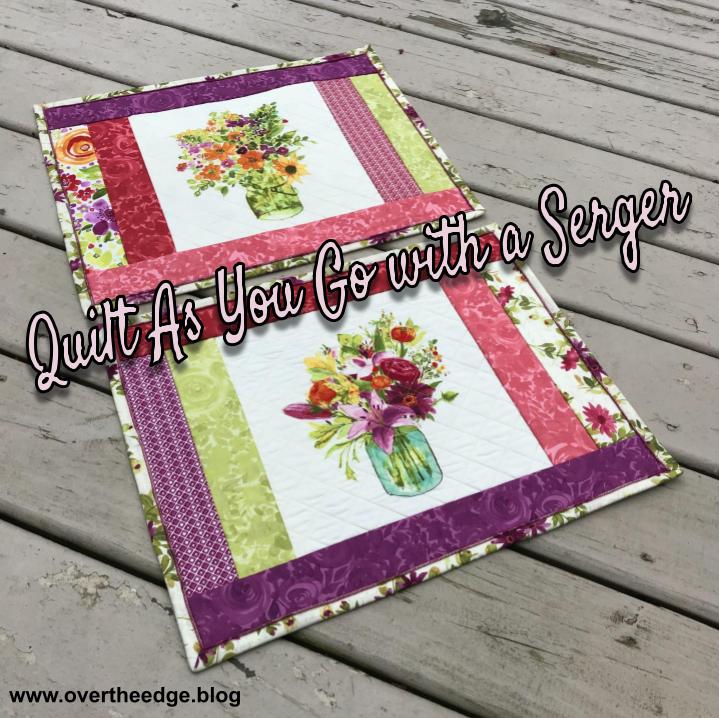
Quilt as you Go (QAYG) is a term used to describe the process of piecing and quilting each block in a quilt as you assemble it. In QAYG when the quilt top is done, so is the quilting!
QAYG with a serger is similar to QAYG with a sewing machine, but the way the pieces are layered and assembled is different. The end result is a reversible project where all the layers are connected at the seam lines. And it’s fast because you save a step. The “stitch in the ditch” machine quilting is done at the same time the layers are serged together.
Typically, you assemble your quilt in strips or log cabin style, working from the middle outwards, or side to side or top to bottom. This technique is not just limited to quilts. I’ve made placemats, lap quilts, picnic quilts, table toppers, table runners and tote bags using quilt as you go with a serger.
Why would you want to try Quilt As You Go with a Serger?
It’s fast. Some people refer to this method of quilting projects as “fun and done”.
A four thread overlock seam is approximately ¼” wide, which is a typical seam width in a quilt. The serger compresses the seam so the multiple layers aren’t too bulky. And it’s secure due to the 4 threads in the seam.
It’s great for projects with simple quilt designs without complicated seams.
Project Inspiration
I’ve done a variety of different projects with QAYG on a serger. Below I’ve included photos and information about several of my own serger QAYG projects. And you can find many tutorials and YouTube videos on the internet for inspiration.
If you would like to try a strip placemat without the center panel see the brothersews tutorial. You will find a link in the resources section at the bottom of the post.
Is it a Table Runner or are they Placemats?
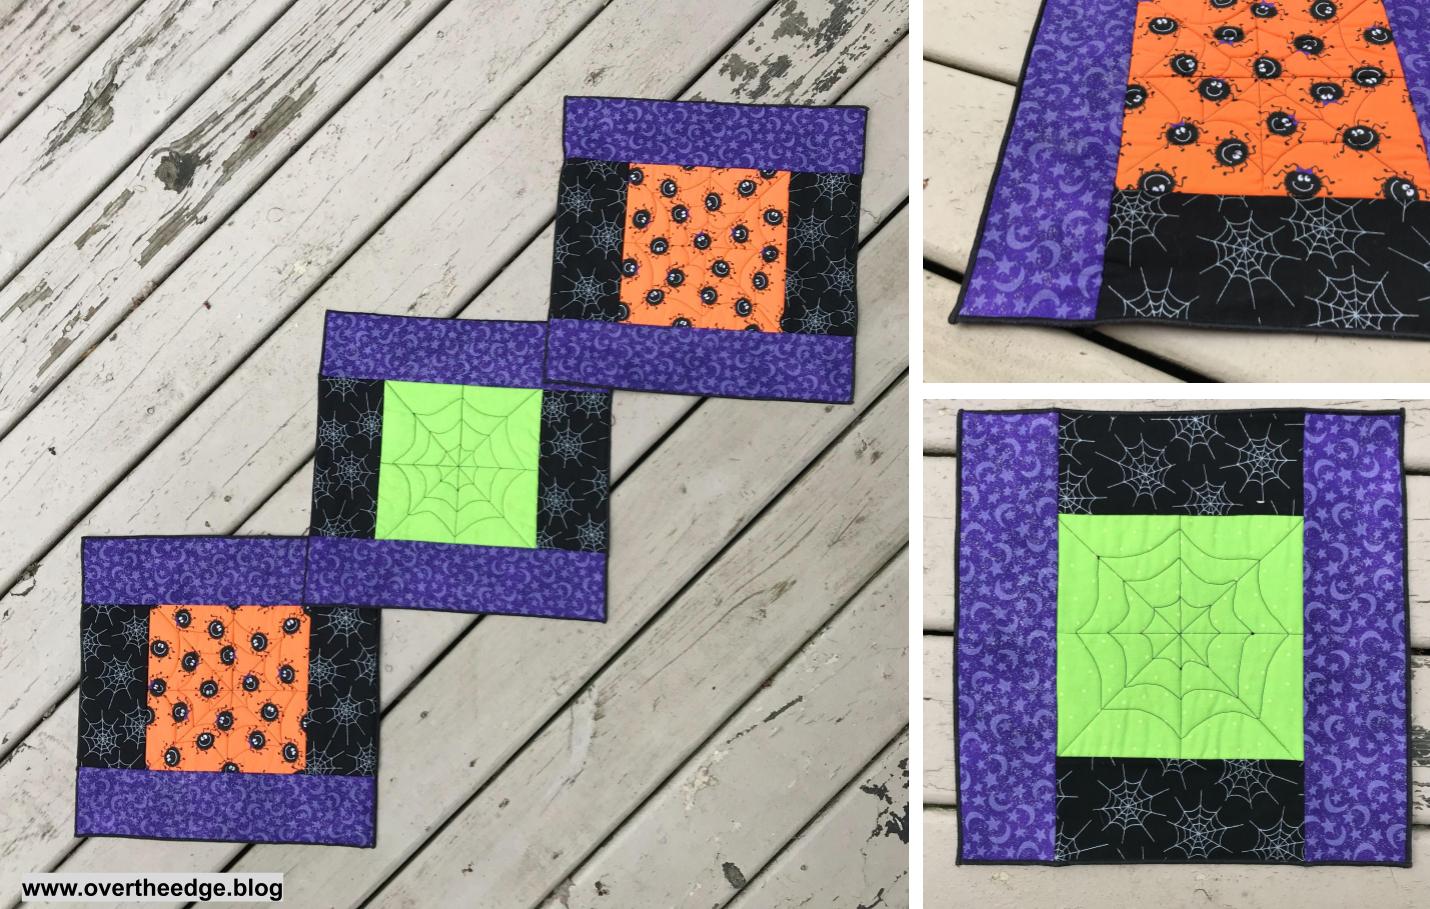
These three reversible Halloween placemats I designed can be used individually as placemats or overlapped and laid out as a table runner. One side is orange and one side is green. I quilted the center panels on my sewing machine with a spiderweb design. Then added the borders using the serger quilt as you go technique. Instead of traditional binding, I serged the edges with a decorative thread.
Lap or Baby Quilt
Serge this reversible lap or baby quilt together quickly and easily. It’s also a great quilt project to donate to charities. And you could serge the edge with a decorative thread like I chose to do, instead of binding it the traditional way. The width of the strips is only limited by the batting and it’s maximum quilting distance. I used a polyester batting that could be quilted up to 6” apart. So I cut my strips 6.5” wide x WOF. This project used 9 strips of fabric on the front, 9 strips of fabric on the back and 9 strips of batting. The finished size of my ladybug quilt is approximately 42” x 52”.
Heirloom Creations and Sara Gallegos of the Decorative Stitch have some helpful youtube videos on making lap or baby quilts with this method. For more of a log cabin style quilt check out Kay Wood’s video on youtube. See my resources section for links.
Picnic Quilt
I decided to scale up the serger quilt as you go technique to make a bigger picnic quilt. At first glance the quilt below looks like a traditional quilt. It is actually assembled in strips just like my lady bug lap quilt. This project was a bit more involved, but worthy of trying. I used cotton batiks for the top, a super thin batting, and a water resistance nylon for the back and binding. It was a gift for my daughter who uses it frequently for the beach and just hanging out in the yard. When I have some extra time, I plan on writing up a pattern for this design.
Table Topper
I made this patriotic reversible table topper using the serger QAYG method. The pattern came from the book, Simple Serger Sewing. I applied the binding to the front with a sewing machine and then turned it to the back and hand stitched it in place. This method begins in the middle with a pre-quilted center square and then works its way outward using triangles and border strips. See resources section for more information.
Tote Bag
I designed this tote bag by experimenting with an extra panel from my serger QAYG placemats and a bunch of extra jelly roll strips. It was a fun experiment! Some day when I have time I may write up a pattern for this serger QAYG tote.
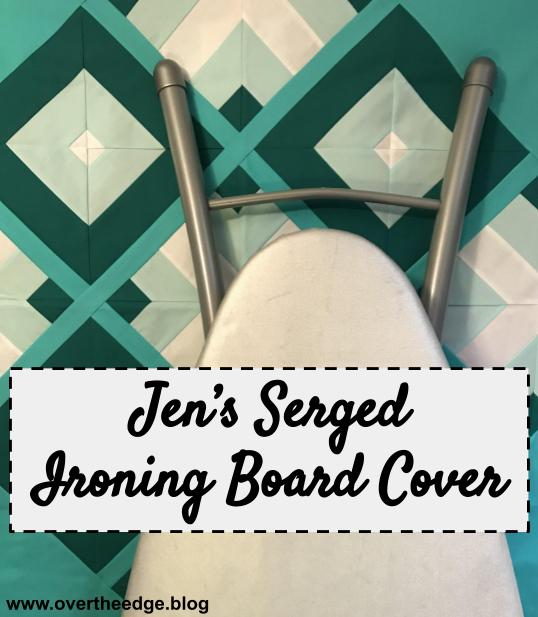
The next time you need a new ironing board cover you should make your own. But not with your sewing machine. Use your serger! Jen’s serged ironing board cover is a practical project that you can use in your sewing room. Read on below to learn how I serged my ironing board cover, quickly and easily.
Why I Needed a New Ironing Board Cover
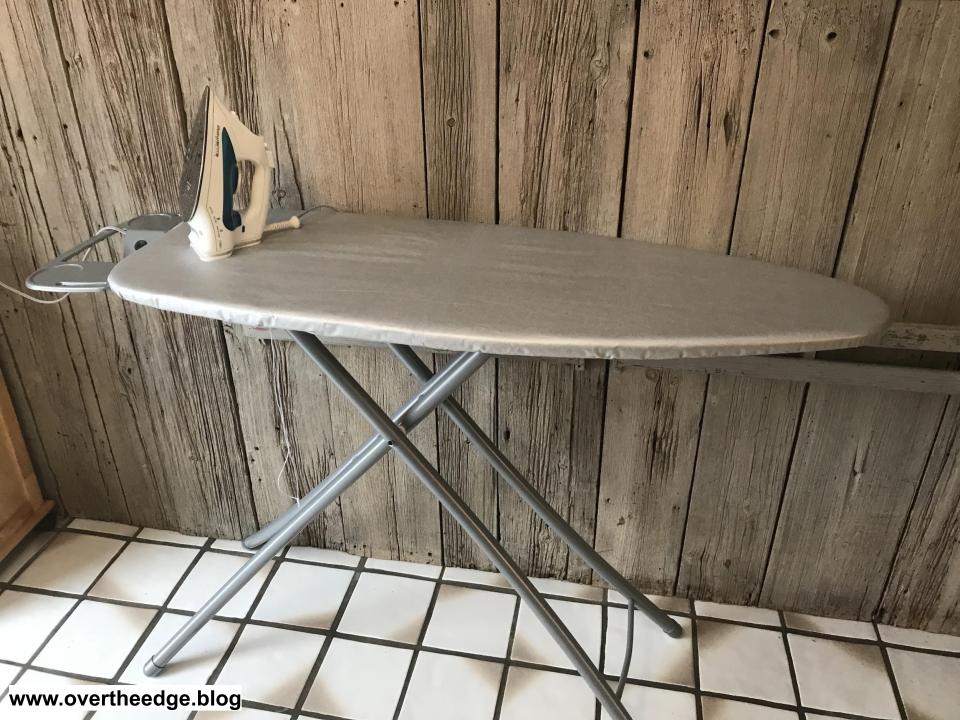
My ironing board cover had seen better days. The original cover that came with the board wasn’t high quality, but it seemed to work fine. Recently, I attempted to clean my iron with one of those iron cleaning sheets that look like dryer sheets. I set the sheet down on the ironing board and started gliding the iron back and forth across the sheet. The sheet worked well. The sole plate of the iron came clean, but my ironing board was covered in an oily, waxy residue. I was in a hurry and forgot to put a fabric scrap between my ironing board and the cleaning sheet. I thought maybe I could wash it, but the tag on the cover said do not wash. So it was time to replace it.
Why I Decided to Serge a new Cover
My ironing board is wider and sturdier than most. It is approximately 18” wide and 49” long. My local store sells the wider ironing boards but not the replacement covers. Since I couldn’t find one at the store, and I didn’t want to buy one online, I decided to make my own. I looked closely at how the existing cover was made. The cover was simply a piece of fabric that was serged around the edge with a cord inserted into the serging. When I realized this was a project for my serger, I got excited!
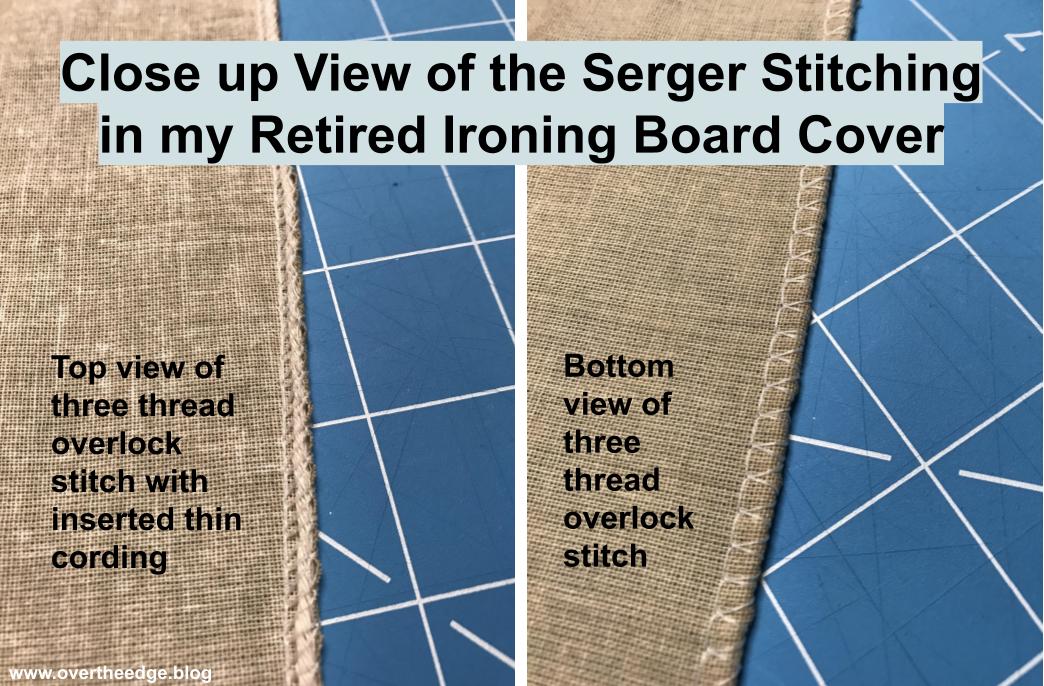
The Retired Cover Construction Details
The photos below show the stitching on the ironing board cover I replaced. The serger stitches not only covered the raw edges of the fabric. They also encased the cord which was used to gather the edges of the cover and tighten it around the metal frame of the ironing board.
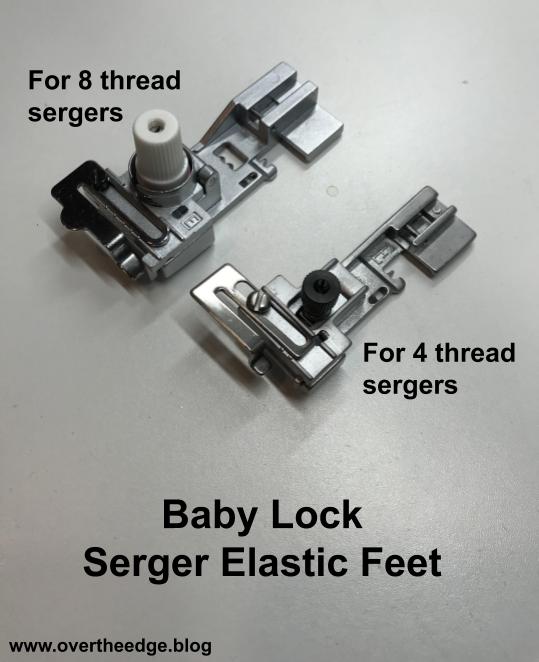
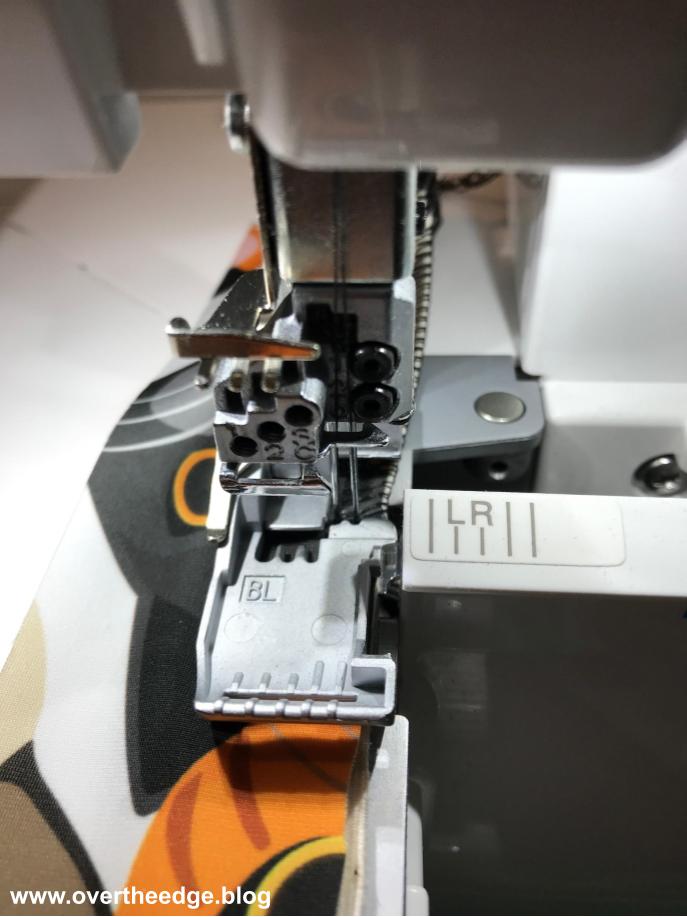
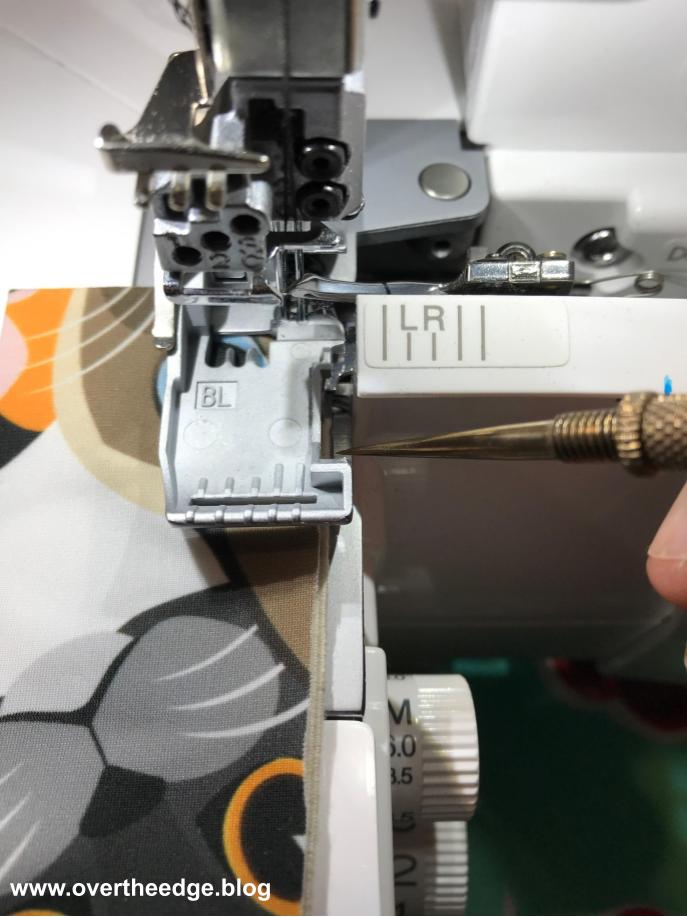
The Right Presser Foot is Key
This style of ironing board cover needs to be gathered in order for it to fit securely around the ironing board. But using a ruffling foot or gathering foot wouldn’t work well for this project. What I needed to make this a quick and easy job was my serger’s elastic foot. Even though it is called an elastic foot, I didn’t use it to serge any elastic. There is another feature of this foot that makes it perfect for serging an ironing board cover. It has two guide holes on the top of the foot and a channel on the bottom of the foot sized for thin cord. The foot positions the cord so it nestles perfectly within the upper looper thread of the three thread overlock stitch. When you use this foot you don’t have to worry about accidently stitching through the cord.
In addition to inserting elastic into a seam, some other uses for this foot include making wire edged ribbon, fishing line rolled hems and gathering heavier weight fabrics.
Different brand of sergers have different types of feet. Your elastic foot might not have the same features as mine. So check to see which foot is available for your serger that can guide thin cord, wire or fishing line into the stitches.
The photo below shows ironing board fabric that has been gathered by pulling the cord that was inserted into the stitches using a serger elastic foot.
How to Serge an Ironing Board Cover with an Elastic Foot Tutorial and Video
If you’d like to make your own ironing board cover check out my tutorial and video links:
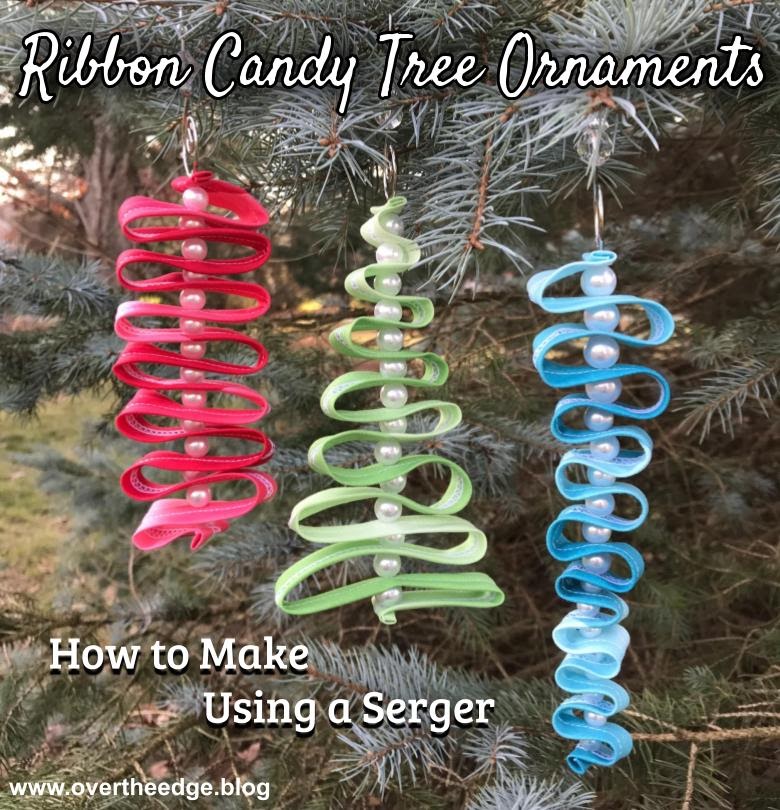
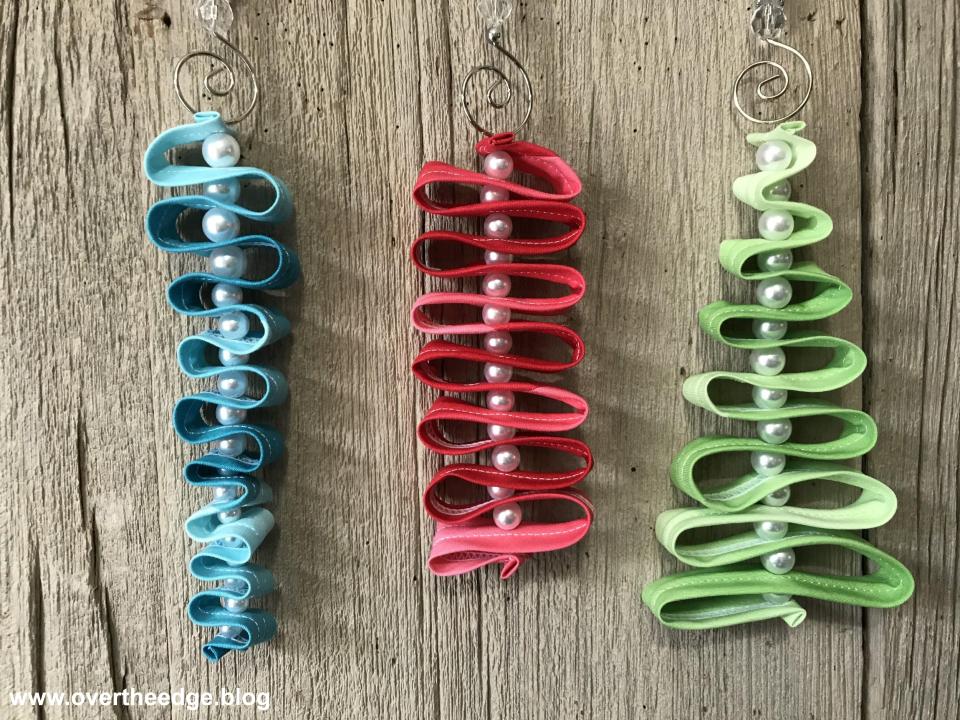
I’m always looking for new things to make with my serger and its attachments. And the holidays always bring out my creative side. As I was searching the internet for inspiration, I came across posts by Sara Gallegos of the Decorative Stitch and Mathew Boudreaux of Mister Domestic, which inspired me to create my Ribbon Candy Tree Ornaments Tutorial. (Links to their posts are in the Resources section at the bottom of the post). Sara followed Mathew’s strip tree ornament tutorial, but instead of using a sewing machine to create the fabric strips, she used her Baby Lock serger and the small belt loop binder attachment.
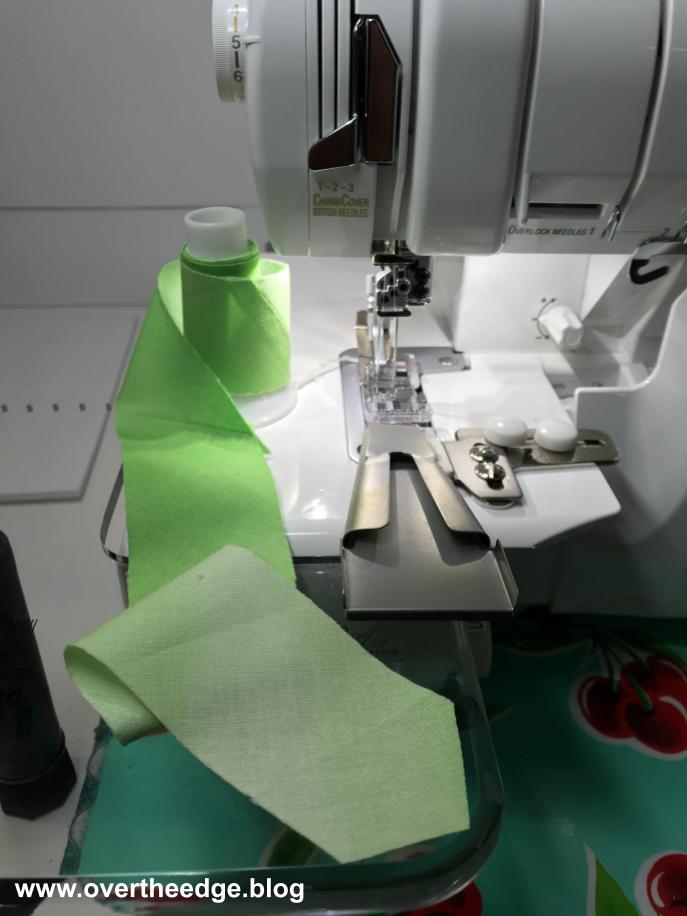
After reading about the process they used to make their tree ornaments, I decided to experiment with my serger and design my own ornaments. These ornaments all begin with a folded piece of fabric, which can be quickly and easily made with the right serger attachment. I own three different attachments for my Baby Lock serger that all fold the fabric and stitch it together in one step, so I tested all three attachments using both bias and cross grain fabric strips. I also tested the effect of adding interfacing to the fabric strips. This ornament project is a great way to practice using your attachments. Keep reading to learn how to make tree ornaments using a serger.
My Experiments with Making Fabric Ribbons Using a Serger
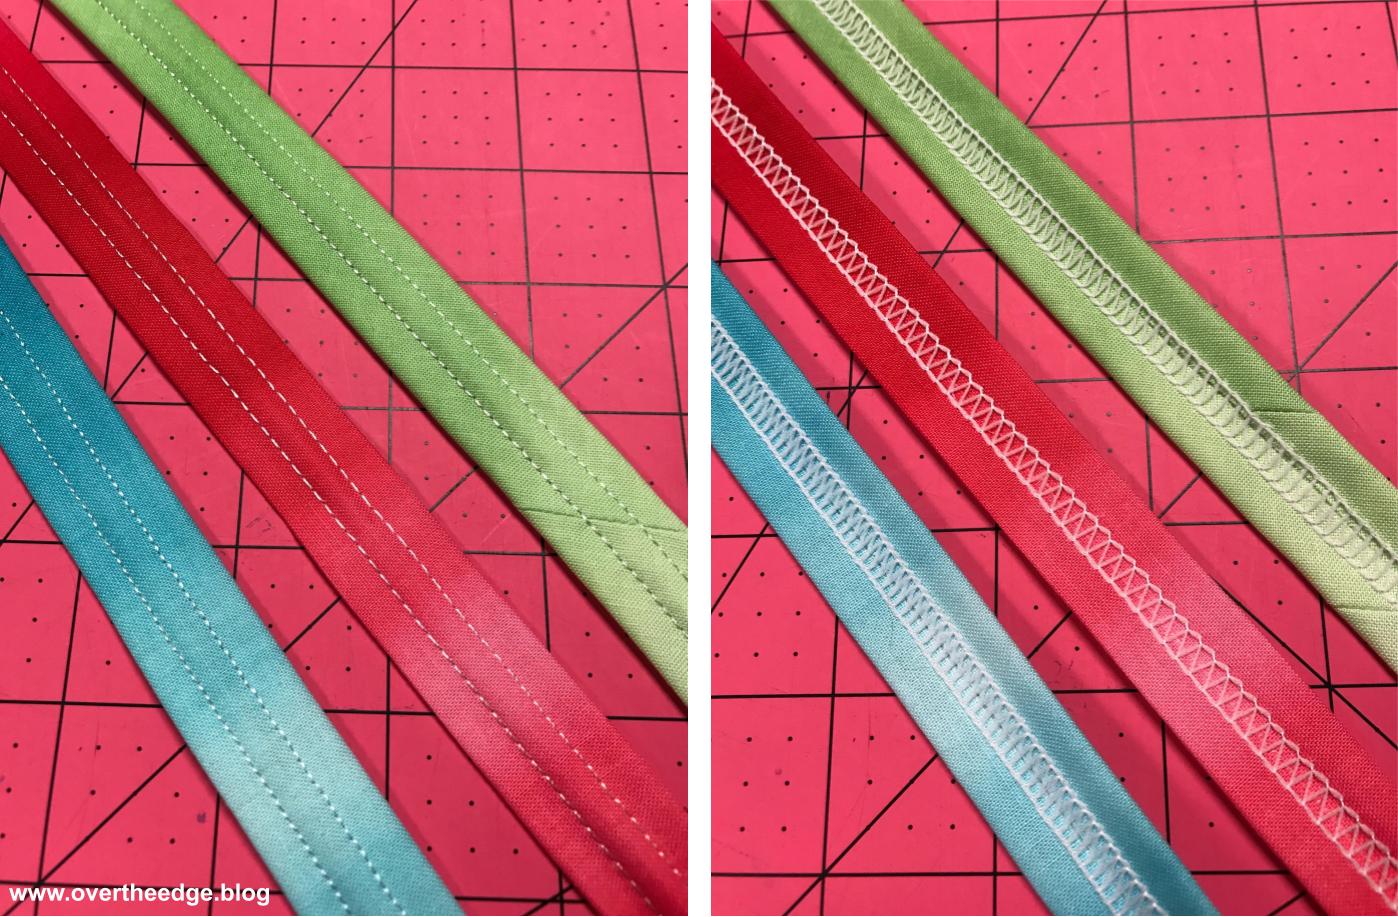
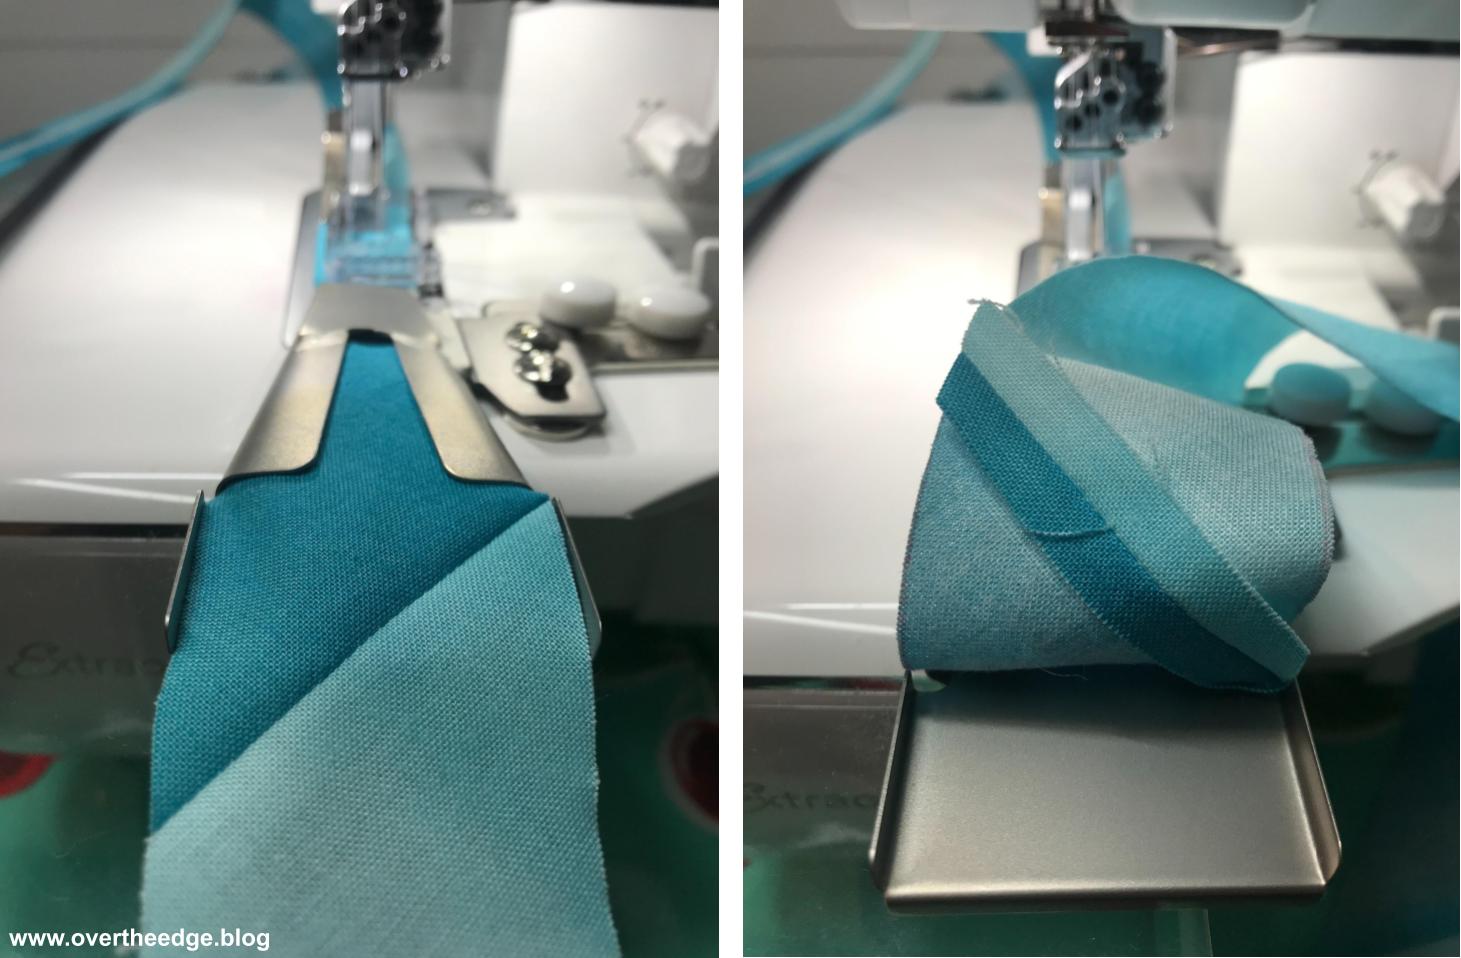
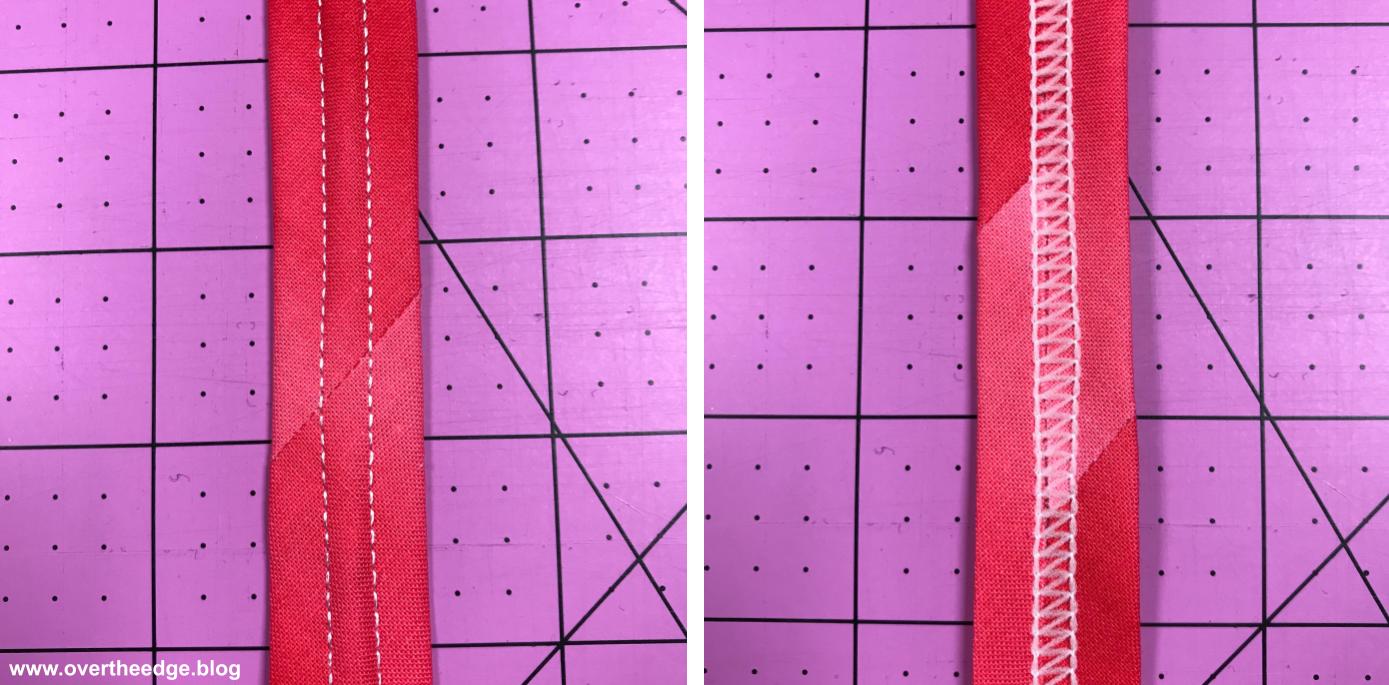
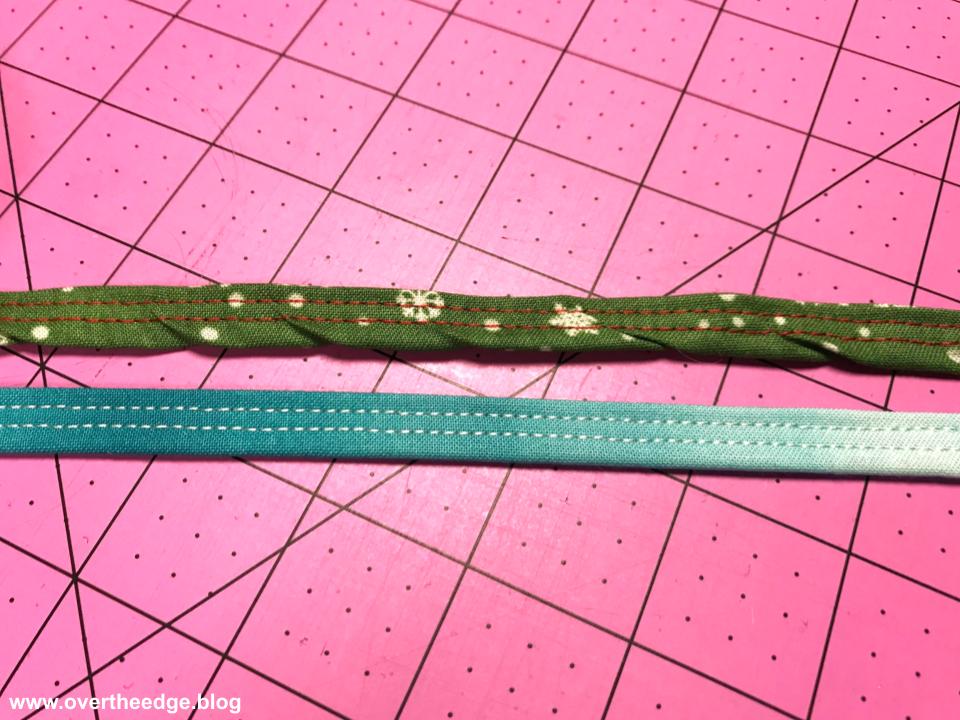
Using quilting weight cotton fabric I made fabric “ribbons” using three different attachments that I have for my serger. All three attachments are meant to be used with a cover stitch and fold under the raw edges of the strips to conceal them within the fabric and/or stitching. I used a wide cover stitch for the large belt loop attachment and a narrow cover stitch for both the smaller belt loop binder and the double fold bias binder. I tried each attachment with both crosswise grain and bias grain fabric strips. The red strips in the photo below are bias grain strips and the blue ones are cross grain.
I also experimented with different stitch lengths. The blue belt loop was serged at a stitch length of 2. the green at a stitch length of 2.5 and the red at at stitch length of 3. See photo below. At stitch lengths less than 3 on my Baby Lock serger you lose the ability to chain off with the cover stitch, but the shorter stitch lengths cover the raw edges better. I used embroidery thread in the needles and wooly nylon in the looper for better coverage of fabric raw edges.
Serger Attachments
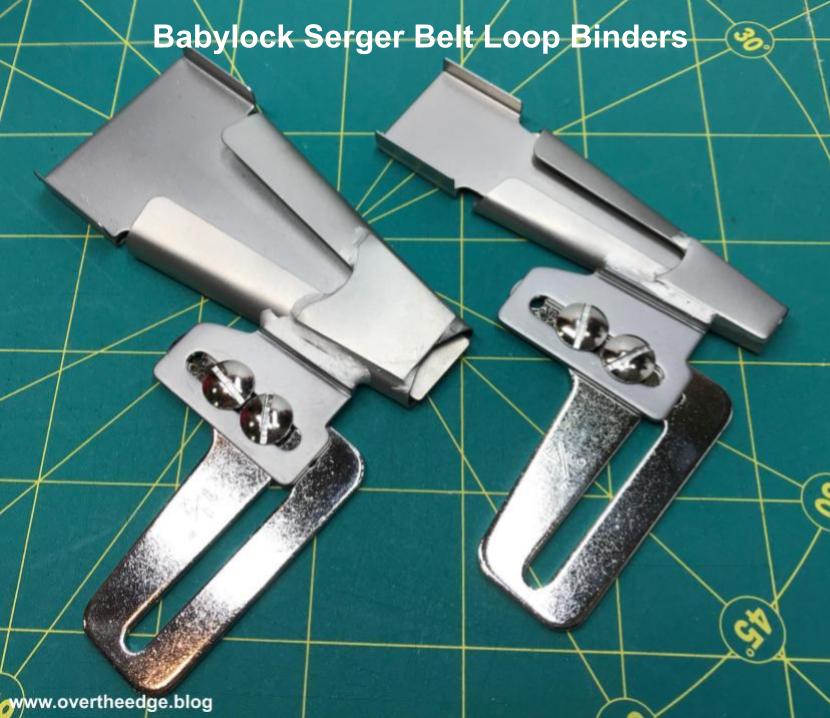
Belt Loop Folder/Binder Attachment
Baby Lock makes two different sizes of belt loop binders – 1½” and ¾”. The larger one makes finished belt loop strips that are about ¾” wide. The smaller one makes finished belt loop strips that are about ⅜” wide. The fabric is folded once and therefore the finished strips have two layers of fabric. There is a link to my belt loop binder tutorial in the Resources section at the bottom of this post if you would like more information about this attachment.
36 mm Double Fold Bias Binder Attachment
A serger double fold bias binder attachment can also be used to make finished binding strips that work well for making ornaments. This attachment makes finished binding that is about ⅜” wide. Since these strips are folded twice, there are four layers of fabric in the finished binding strip.
Normally when using this attachment to bind an edge you have to guide both the binding strip and the fabric you are binding. But for making fabric ribbons for ornaments you only have to guide one piece of fabric because you are not attaching the binding to anything.
There is a link to my double fold bias binder tutorial in the Resources section at the bottom of my post if you would like more information about this attachment.
Fabric Grain and Strip Width
Can you use Both Cross Grain and Bias Fabric Strips in the Attachments?
Both crosswise grain fabric strips and bias fabric strips will work in the belt loop binder attachment and the double fold bias binder attachment. But you may need to adjust the width of the cut fabric strips for best results depending on whether you use cross grain or bias layout. Interestingly, I found that the cut strip width recommended in the instructions worked well for the crosswise grain strips, but not so well for the bias cut strips. For me the bias cut strips folded better when I added another ⅛” to the width of the cut strip.
The chart below lists the best cut strip widths for the quilting cotton fabric I used in this comparison:
Attachment
Grain
Cut Strip Width
1½” Belt Loop Binder
Crosswise
1⅝”
1½” Belt Loop Binder
Bias
1¾”
¾” Belt Loop Binder
Crosswise
⅞”
¾” Belt Loop Binder
Bias
1”
36mm Double Fold Bias Binder
Crosswise
1⅜”
36mm Double Fold Bias Binder
Bias
1½”
Which Grain Makes the Best Ornament?
The fabric strips I use for weaving work well on the cross grain because weaving is done in a straight line. However, for the ornaments, I think the bias fabric strips work better because of the curves. The loops of the ornaments look smoother using bias fabric strips. See photo below for a comparison. The tree ornament on the left was made using a crosswise grain belt loop strip and the ornament on the right was made using a bias belt loop strip. The curves of the cross grain loops tend to slightly buckle. The curves of the bias grain loops are much smoother. So although I prefer to use the bias belt loop strips for my ornaments, the cross grain strips will work. So should you use cross grain fabric strips that are easier to cut or bias strips make a smoother curve? The decision is yours.
With or Without Interfacing?
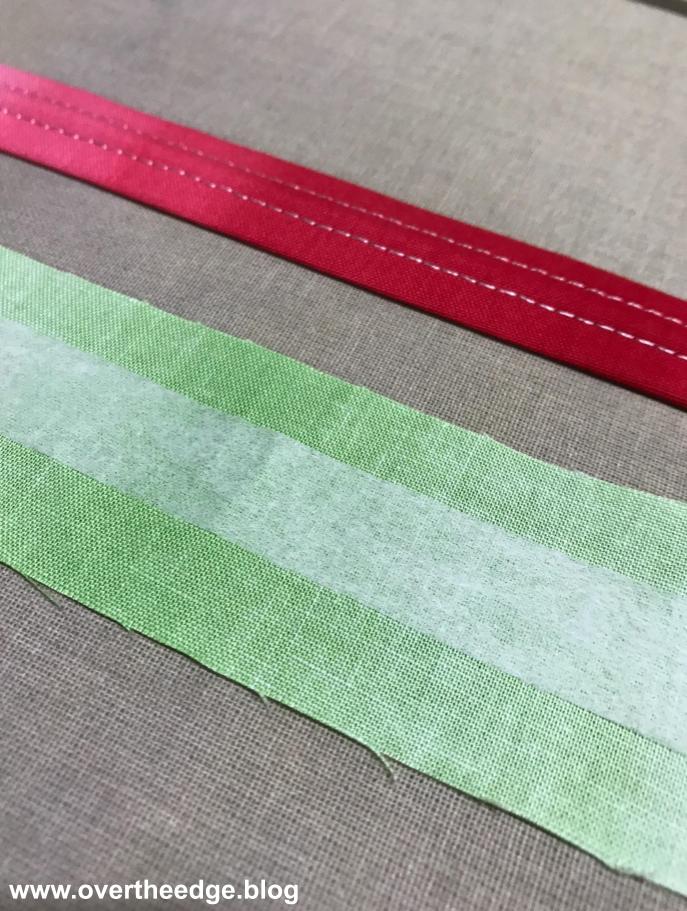
Both Sara and Mathew used interfacing in the fabric ribbons they used to make their ornaments. I experimented with using interfacing on a crossgrain strip for the 1½” belt loop binder.
The first strip I serged without interfacing (red). The second strip I added a strip of light weight fusible interfacing to the strip (green). I fused a ⅝” wide piece of interfacing to the center of the wrong side of my fabric strip. I made my interfacing ⅛” smaller than the finished width of the belt loop, so the edges were not too stiff for proper folding.
Sara used a stabilizer in her example. She did not pre fuse it to the fabric. She fed it into the attachment as she was feeding in the fabric. I tried this method a few times and couldn’t get the hang of it it. So I decided to fuse the interfacing to the fabric before I fed it into the attachment.
The bias belt loops I used in the ornaments seemed to hold their shape fine, so I didn’t feel the need to add interfacing.
I made a tree ornament from both strips to compare the results. The loops on the green tree are more stable with the interfacing added. The loops on the red tree ornament without interfacing are softer and more prone to bending. So both methods of making belt loop fabric will work. You will get a sturdier ornament with the interfacing and a softer one without it.
Tips for Success Using Fabric Strips in a Serger Attachments
Press Seams Open
Make sure that seams in the fabric strip are pressed open and stay open when feeding into the attachment. When the seam allowances flip together, those areas may be too thick for the attachment to fold the fabric properly.
Minimize Number of Seam Allowances
Make your bias fabric strips from large pieces of fabric with as few seams as possible. The more seams in your bias strips, the more chances for them to flip the wrong way and cause “blips” in your perfectly folded belt loops. This is also true of seam allowances in cross grain fabric strips.
Avoid Intersecting Seams
The attachment can easily fold one pressed open seam.
But not two intersecting seams. You will always be disappointed with the folding results of intersecting seams in your belt loop fabric. The attachment just can’t fold the extra thick areas nicely. See example below where two perpendicular seams in the bias fabric strip come together and see how the attachment can’t fold it under.
Raw Edges Not Being Caught in the Stitches
If your raw edges are not catching in the stitches there are a couple of reasons why that might be happening.
Check the Width of your Fabric Strip
It could be that your strip isn’t wide enough. Different fabrics and even different grains within the same fabric can fold differently. The initial bias strips that I cut at 1⅝” wide (per the instructions) and fed into the belt loop binder weren’t wide enough to always catch the raw edges in the stitching. So I cut my bias fabric strips a little bit wider to 1¾” (just an extra ⅛”) and the problem went away. The cross grain strips cut at 1⅝” folded well as they went through the attachment.
Check the Placement of your Attachment
Not having the needles centered within the fabric strip can lead to raw edges on the back not being caught by the stitches. You should test your attachment line up and adjust as necessary.
Pay Attention to the Fabric Strip as it Feeds into the Attachment
How the fabric is fed into the attachment can affect whether or not the raw edges get folded under properly and captured within the stitches. Make certain your fabric strips are feeding into the attachment smoothly and evenly, centered within the feeding slot on the attachment. Pay special attention to the pressed open seam allowances to make certain they don’t flip as they enter the attachment.
Fabric Buckles and Folds
If the fabric strip is too wide to fold properly, it will buckle, fold and twist as it is folded within the attachment and stitched. The direction of grain in the strips, as well as the properties of the fabric itself can make a difference in the “right” width, so you may need to experiment to get your strips looking their best. In the photo above, there are two double fold bias binding strips, both cut on the cross grain of the fabric. The green one was cut at 1½” wide and was just a little too wide for the attachment, and it buckled, folded and twisted as it went through the attachment. And those folds and twists were stitched right into the strip. The blue one was cut at 1⅜” wide, and folded well in the attachment to create a nice smooth strip.
In Conclusion
All above methods of making fabric “ribbons” on a serger yielded good results for making ribbon candy tree ornaments. If you prefer the look of an ornament made from ⅜” wide fabric ribbons then I would use the smaller belt loop binder or the double fold bias binder. If you prefer the look of an ornament made from the ¾” wide fabric ribbons then I would use the 1½” belt loop binder.
Get My Instructions for Making Ribbon Candy Tree Ornaments
For my Ribbon Candy Tree Ornament Tutorial, I chose to use the bias fabric ribbons without interfacing made with my 1½” belt loop binder attachment. I wanted to make “large” ornaments which I thought worked best with the larger ribbon produced by this attachment. I created my own version of three different ornament shapes – a tree, an icicle and a piece of ribbon candy – and have shared my instructions with you in my Ribbon Candy Tree Ornament Tutorial for Sergers. Here is the link: https://overtheedge.blog/tutorials/ribbon-candy-tree-ornament-tutorial-for-sergers/
Feel free to experiment and find your favorite combination.I hope you enjoyed learning about how to make tree ornaments with your serger. I would love to see the ornaments that you create!
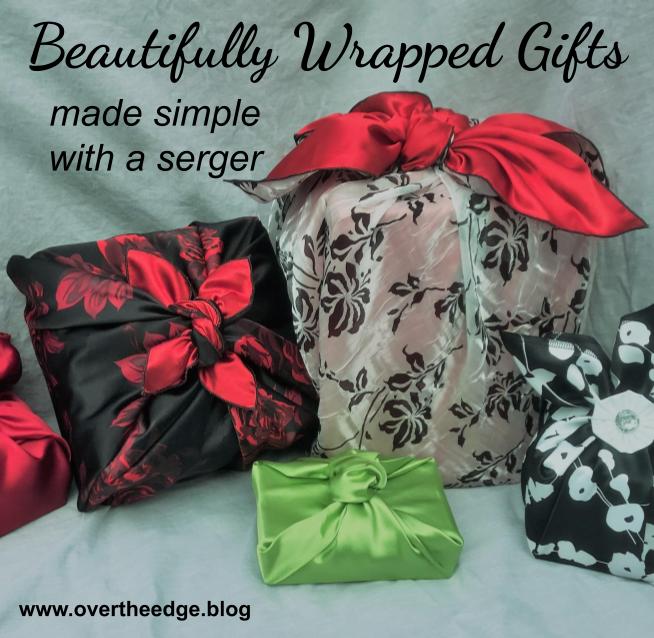
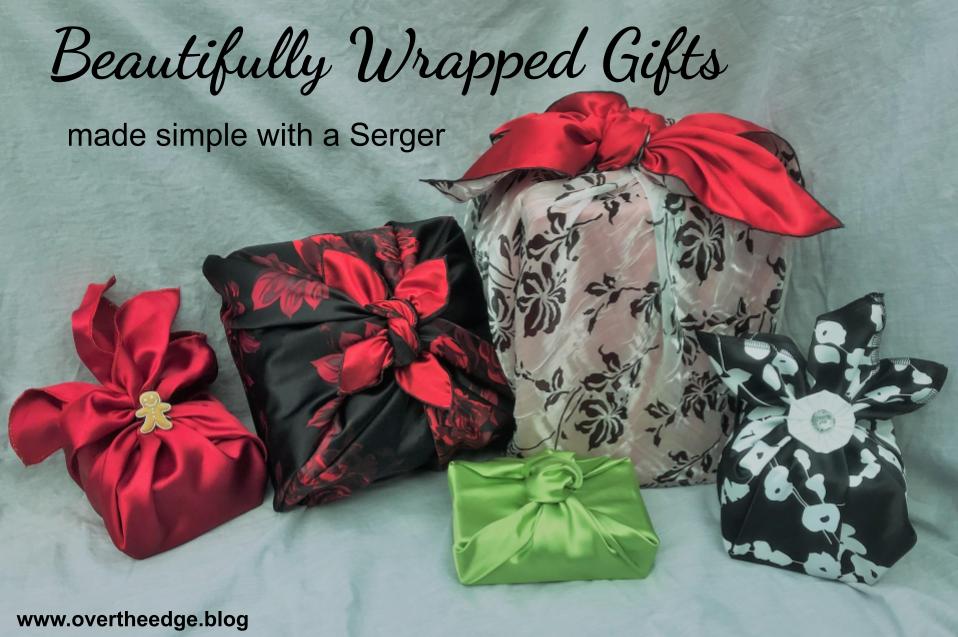
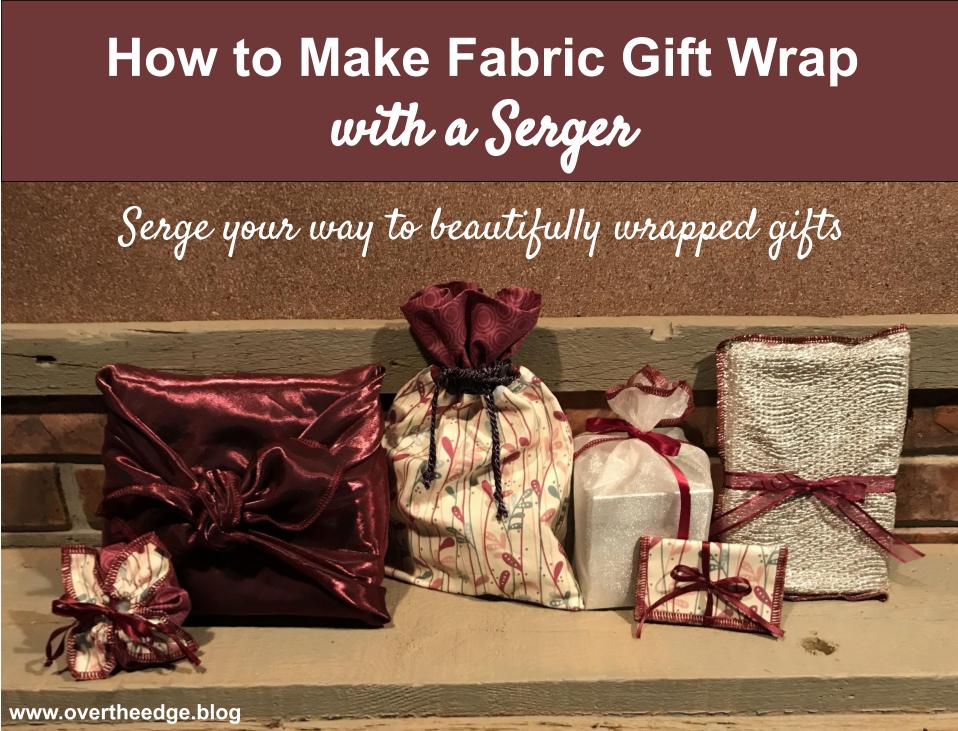
Beautifully Wrapped Gifts Made Simple with a Serger
I’ve been using fabric gift wrap for many, many years. Fabric gift wrap is beautiful, and it can be used over and over again. I use it for all occasions – birthdays, showers, holidays, etc. Fabric gift wrap is quick and easy to make using your serger. Read on below to learn all about beautifully wrapped gifts made simple with a serger.
Benefits to using Fabric to Wrap your Gifts
Benefits to using fabric to wrap your gifts:
Save some trees – fabric gift wrap is reusable
Make it from almost any fabric
Great scrap buster – think of all those leftover odd sized pieces you can turn into gift wrap
Make it in any size
Make the fabric gift wrap part of the gift
Perfect reason to use your serger!
Simple Serger Made Fabric Gift Wrap
Let me introduce you to six quick and easy fabric gift wrap projects I have created using a serger. Click on the link near the end of the post to get the instructions to serge your own fabric gift wrap.
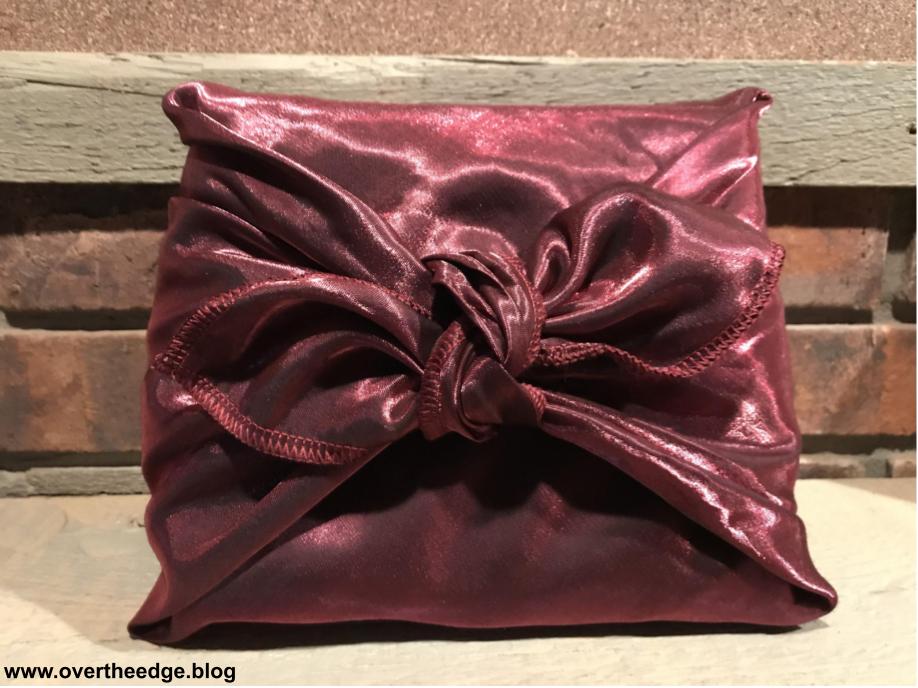
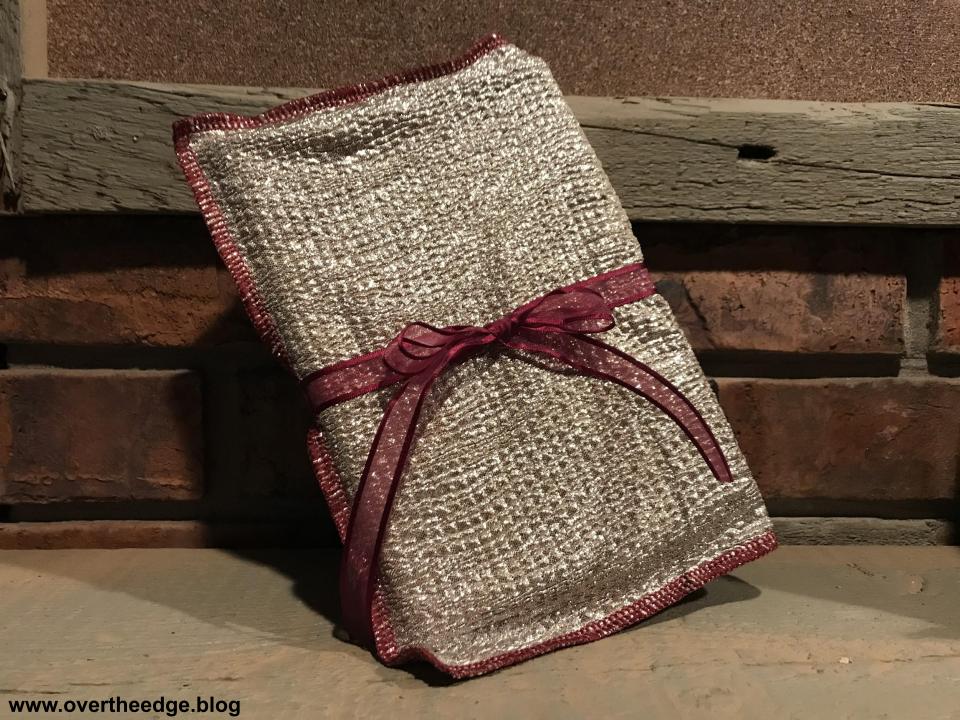
1. Wrapping Scarf
The wrapping scarf has been around for a long time. It was my first experiment with fabric gift wrap. Inspired by a book I saw at the store, I bought the book and started making fabric wrapping scarves from my leftover costume satins. Making fabric gift wrap was a double benefit for me. The first benefit was that I was able to make use of leftover fabrics from other projects taking up room in my stash. The second benefit was that the gift wrap was reusable and I no longer filled my trash with piles of paper gift wrap.
With it’s exposed serger stitching, the the wrapping scarf is the perfect project for highlighting decorative threads. You can make it from one reversible fabric which is more economical, or two fabrics, which is more colorful. My favorite wrapping scarves are made from flowy satins and shimmery organzas and chiffons. To secure a wrapping scarf around the gift, tie the ends of the fabric in loose knots, or get creative with added accessories like ribbons, buttons, and more.
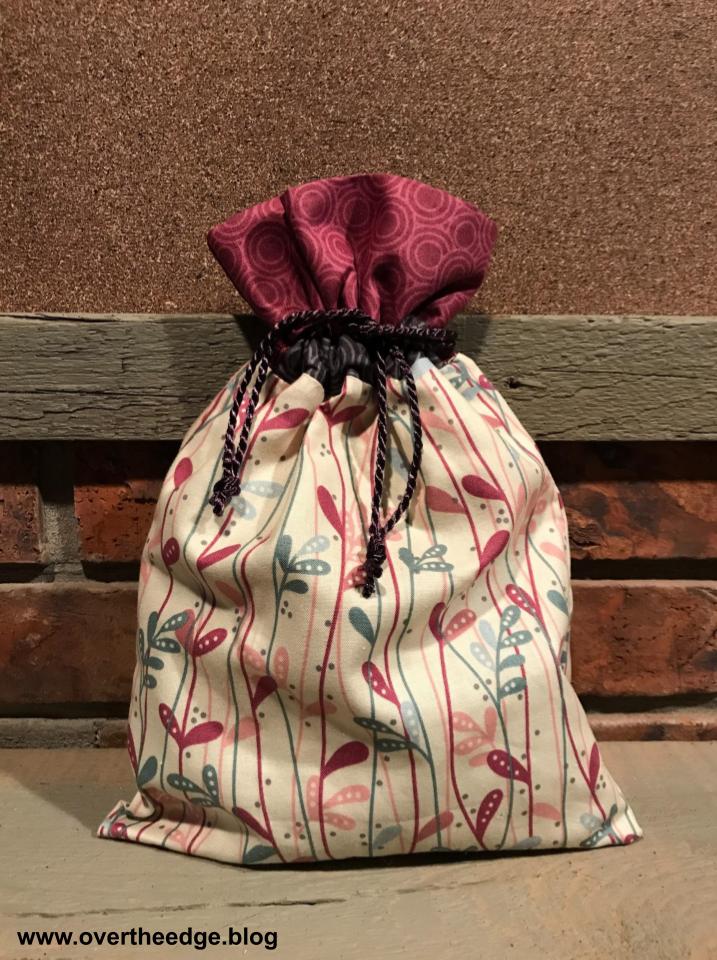
2. Simple Serged Gift Bag
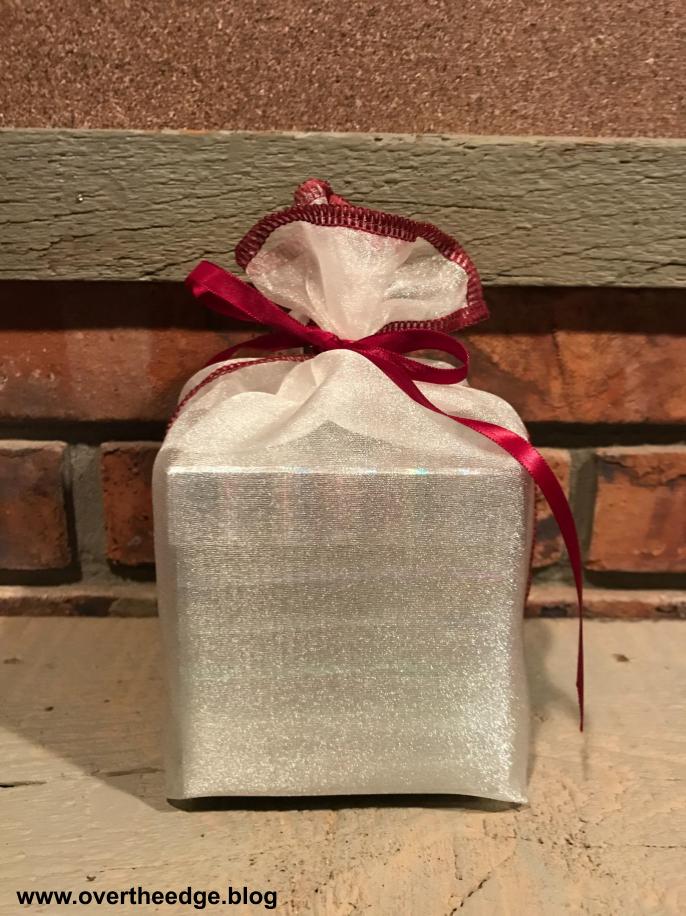
A simple gift bag serged from a beautiful fabric will make a gift more special. I made the gift bag in the photo below from sparkle organza, which I thought looked great with the metallic silver box I put inside. This gift bag features exposed serger stitches and ribbon ties that are serged right into the seams so they can’t be misplaced. Although this gift bag is flat, it would be easy to give it more shape by boxing out the corners.
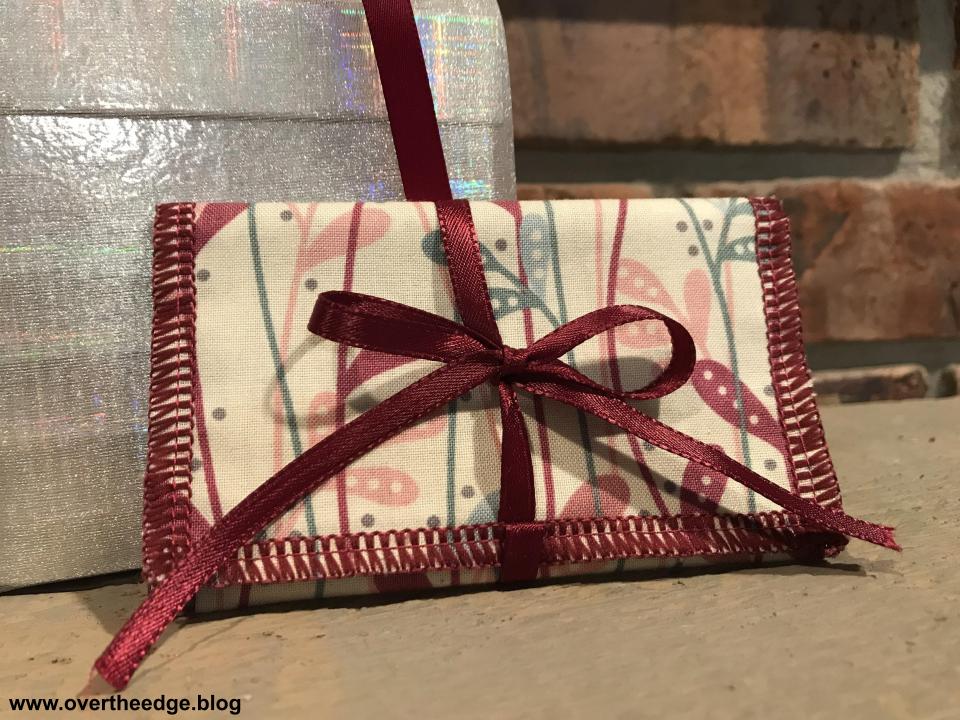
3. Gift Card Envelope
Gift cards have become pretty popular as gifts. Wrap them up in a fabric envelope to make the gift card more special. You could even decorate your tree with these cute little presents. Expose your serger seams and have fun with decorative threads with this gift wrap. And serge the ribbon tie right into the seam to make wrapping the gift card quick and easy.
4. DVD/Book Gift Bag
This flat fabric bag works great for wrapping a book or DVD. This project is quick and easy and features exposed seams and an attached ribbon tie.
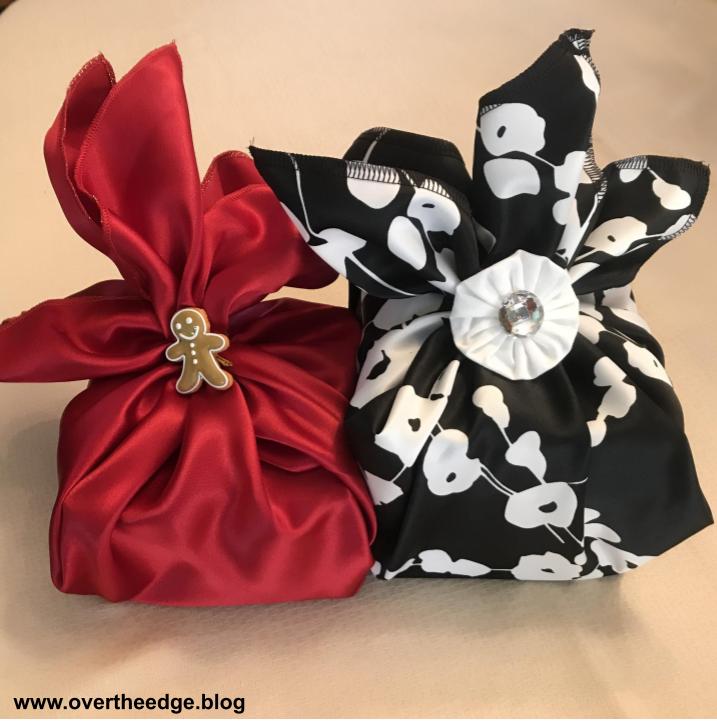
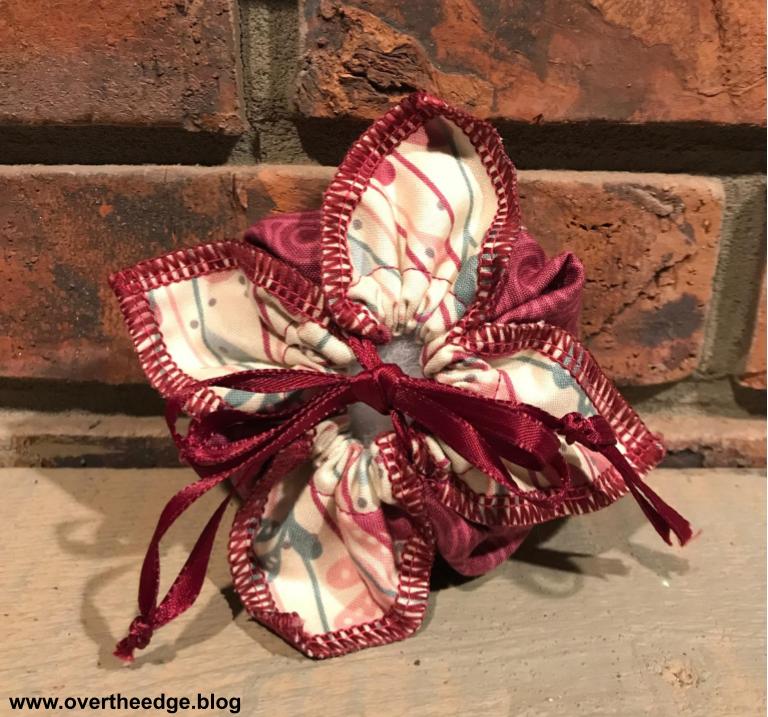
5. Petal Pouch
This cute little fabric pouch is great for wrapping small gifts or jewelry. Show off a pretty decorative thread in the exposed serger stitches on the edges of the petals. Sew the casings for the ribbon closure with a sewing machine or chain stitch on a serger.
6. Drawstring Bag with Ruffle
This is a dressed up version of the standard fabric gift bag. It showcases three different fabrics and has a drawstring closure with a ruffle. The serged seams are on the inside of the bag and not exposed.
How to Make Fabric Gift Wrap with a Serger
Are you ready to try serging your own fabric gift wrap? If the answer is yes, then be sure to click on the link below to visit my tutorial, How to Make Fabric Gift Wrap with a Serger.
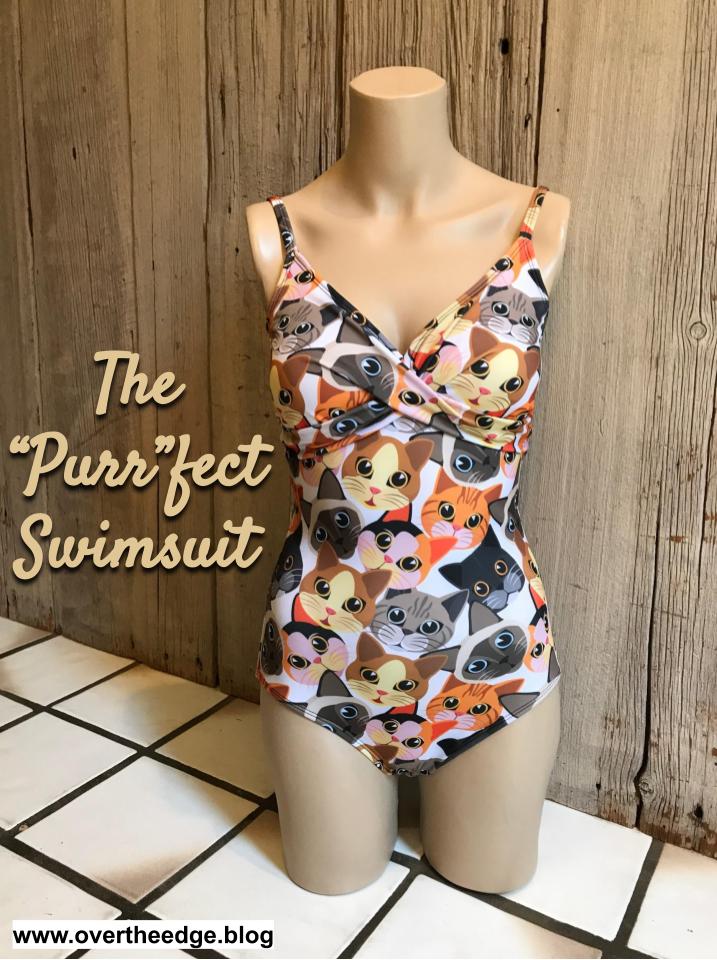
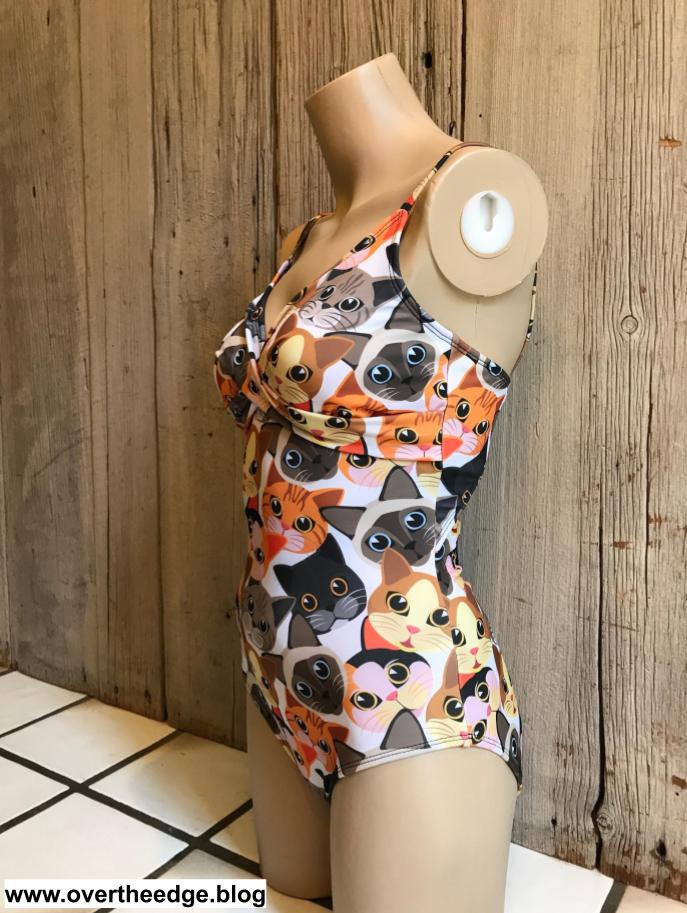
Several years ago I purchased this fun kitty spandex so I could make my daughter a swimsuit or maybe a pair of leggings. For my daughter’s birthday this year, I finally made her the “purr”fect swimsuit. Summer is here, and the perfect time to serge a swimsuit!
Swimsuits by Serger or Sewing Machine
Although you could use a sewing machine to make a swimsuit, it’s so much more professional looking if you use a serger. The four thread overlock stitch is great for serging seams and applying elastic. The narrow cover stitch is perfect for top-stitching. If you don’t have a cover stitch machine you could use a sewing machine and a zig zag stitch to top-stitch. This is the way I used to do swimsuits and figure skating costumes before I had the cover stitch.
Three Thread or Four Thread Overlock
Technically a three thread overlock is the stretchiest stitch, and is sometimes recommended for stretchy knits. The four thread overlock is almost as stretchy. I typically use the four thread overlock for serging all of my knit garments because I like the added security of the second row of straight stitches. If one row of straight stitching pops, I still have one row to hold the seam together.
Thread
I used Maxilock serger thread in the needles and Guterman Bulky Nylon in the loopers. The texturized nylon is soft next to the skin and really stretchy. Some other brands of texturized nylon thread I use are Maxilock Stretch, YLI Wooly Nylon and Madeira AeroFlock.
Pattern Used for The “Purr”fect Swimsuit – Jalie 3350
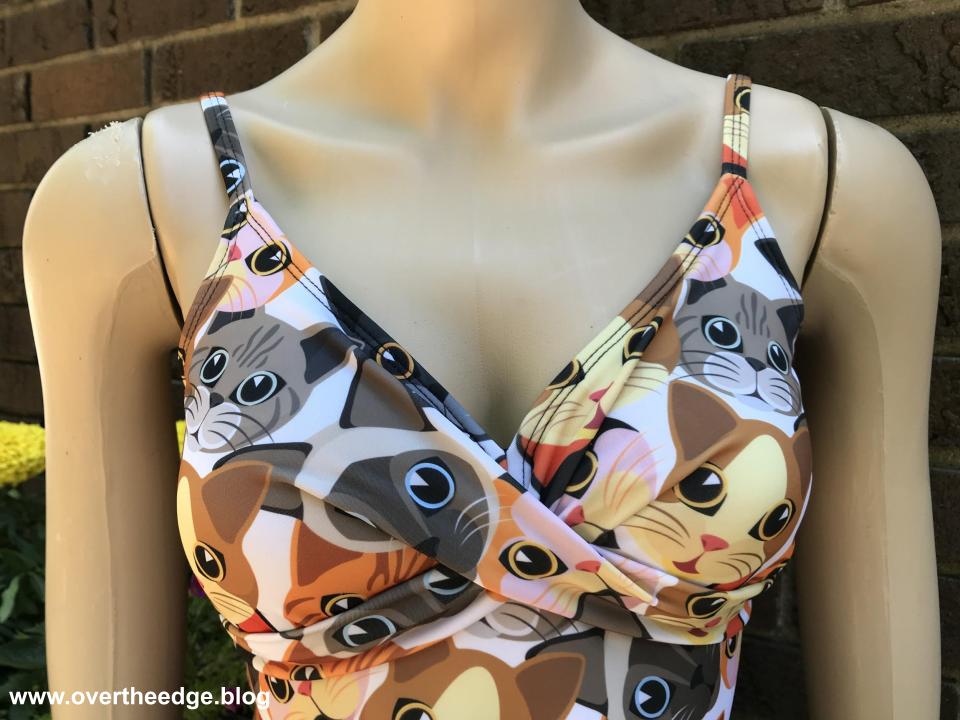
For my daughter’s “purr”fect swimsuit I used Jalie pattern 3350. I combined the twist front from view B with the open back of view A. The pattern didn’t call for lining on the back side, but I added it. The kitty spandex had a white background, and I was afraid it would be too see-through when wet. I also changed the order of construction to minimize changeovers on my serger between overlock and coverstitch.
This swimsuit pattern was a little more complicated because of the twist at the bust. But the twist was worth the time and fuss because of the extra flair it added to the suit.
The pattern also included an extra pocket in the bust lining so you could insert a swim cup for more bust coverage. I bought my swim cups from Sew Sassy. A link to their website is included in the Resources section at the bottom of this post.
I haven’t seen Jalie patterns in the stores locally, but they are easy to find online. Jalie is a Canadian company. You can also find their patterns in shops on etsy and ebay. I’ve used Jalie patterns many times for swimsuits and figure skating dresses. Their patterns include a ton of sizes, so it’s possible to get a great fit without a lot of pattern modifications. The pattern also gives tips for sewing a swimsuit with a sewing machine.
Jalie wants you to be successful using their patterns. You will find photo tutorials for different patterns and lots of tips on Jalie’s website. I have included a link to their website in the Resources section at the bottom of this post.
Applying Elastic to a Swimsuit with a Serger
For this swimsuit, I used ⅜” cotton elastic meant for swimwear. I pre-treated it by soaking in hot water and then drying it in my dryer on low heat.
Presser Foot
I use a standard presser foot to apply my elastic on my swimsuits. There is such a thing as an elastic foot for a serger, which is great for some applications. But I find it easier to use a standard presser foot for serging the elastic on swimsuits, or for a pattern that calls for applying elastic in the round.
Quarter Pinning
The most common technique I use for applying elastic by serger is called quarter pinning. I divide both the elastic and the spandex edge into fourths and mark them with pins. Then I pin the elastic to the project aligning the marks.
Usually the elastic is smaller than the spandex, so you have to stretch the elastic as you serge. Quarter pinning helps you spread out the extra spandex so everything looks nice and even. If the edges are fairly long, I will pin in eighths to be sure I am evenly stretching the elastic to fit my spandex.
Serge with Elastic on Top or on Bottom?
The most common way I see instructions written for applying elastic by serger is to serge with the elastic on top and your fabric on bottom (against the feed dogs). A tiny little bit of fabric should peek out to the right of the elastic so you are sure you are catching it in the stitches. Sometimes I do it this way.
And sometimes I serge with the elastic on bottom against the feed dogs. A little bit of elastic should peek out to the right of the fabric, so you are certain you are catching the elastic in the stitching.
Sometimes I find it easier to line up the raw edges of the spandex and the elastic as I am stretching it to fit, when the elastic is on bottom. I am less likely to have the spandex migrate away from the elastic and end up with spots not caught in the stitching.
When I made the “purr”fect swimsuit, I applied elastic using both methods.
Engage or Disengage Blades?
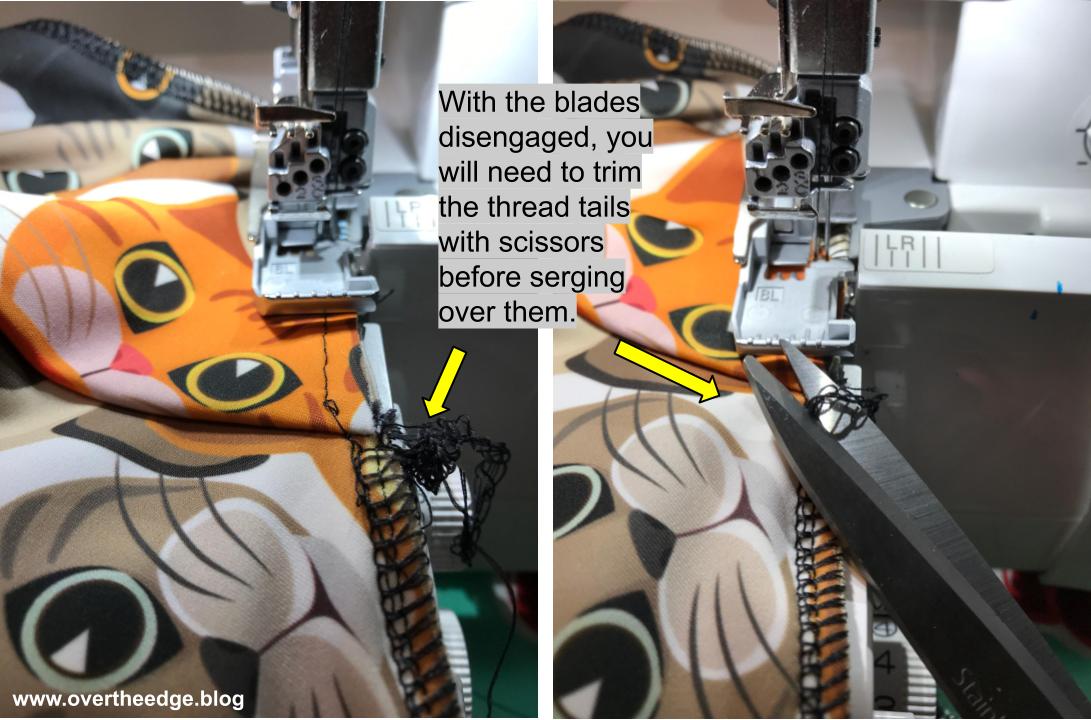
I disengage my serger blades when I am using a standard presser foot to apply my elastic, so I don’t cut through my elastic. I am very careful to align the elastic and spandex along the edge where the blade normally cuts. If the fabric and elastic move too far to the right of the blade, they could get caught in the loopers and create a mess. The photo below shows my fabric (on top) and elastic (on bottom next to the feed dogs) lined up just to the left of my cutting blade. The stiletto is pointing to the location of the blades.
With the blades disengaged, you will need to manually trim the threads from any seam allowances you cross as you serge.
I also increase my stitch length to 4 so I don’t put too much thread bulk into my seams. You could use a three thread overlock stitch to attach elastic. But I usually use a four thread overlock to attach the elastic because I don’t want to spend the extra time changing between stitches. Since I am usually stretching the elastic to fit the spandex, all the stitching seems closer together when everything relaxes back to its unstretched state.
Serging and Sewing the “Purr”fect Swimsuit
I used my sewing machine to:
baste the lining pieces to the main pieces
gather a small amount in bust area
attach the back closure hook
attach the straps at the back edge
stitch a few areas of the bust twist
attach the elastic to the short front V neckline using a zig zag (The bulk of the twist at the neckline was easier to maneuver through the sewing machine.)
I used my serger to:
attach the elastic
serge the seams
finish any exposed edges
top stitch the elastic with a narrow coverstitch
Basting is Helpful for Serging
I baste all of my lining pieces to my main pieces using the longest straight stitch my sewing machine will do (which is 6 mm I think). The basting keeps the layers from shifting when I am serging. Because the fabric stretches a little as I baste, the stitches look a little loose, but that’s ok. These stitches are not seen from the right side of the finished swimsuit.
When I am done serging the seams, I stretch each seam until I hear the basting stitches pop. After the basting stitches break the seam regains its full stretch-ability. Don’t forget to break the basting stitches or the person putting it on for the first time will pop them and think they ripped the swimsuit. If the basting stitches hang out of the seam too much after popping I will pull some of them out, but mostly I leave them in. No one but me really notices the seams anyway. Most people just notice how good they look in the garment!
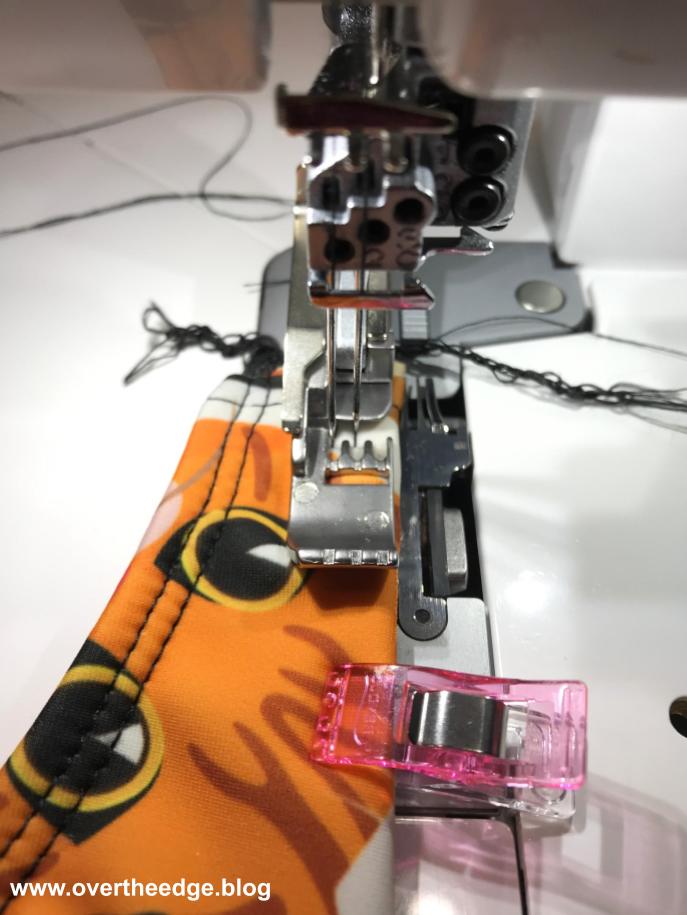
Narrow Cover Stitch
I used a narrow cover stitch to top-stitch all of the elastic in the swimsuit. The narrow cover stitch works well for top-stitching ⅜” elastic, and I like the way it looks.
I used my cover stitch foot to apply the elastic with the needles in the C1/C2 position. The cover stitch foot is narrower and makes it easier to see the right edge of your project. By aligning the right edge of the elastic just past the right edge of the cover stitch foot I get the perfect placement for my narrow cover stitch on 3/8″ elastic. You want to stitch close to the left inner edge of the elastic. If you stitch too close to the outer edge, the wrong side of your elastic will tend to curl out and not lay flat against your body when worn.
I used a stitch length of 4, which is the longest stitch length on my serger. The stitches end up looking shorter because of the thickness of the elastic and multiple layers of spandex.
A Great Technique for Finishing off a Cover Stitch
This technique has worked with every serger I have tried. It will pull your needle threads to the back at the end of the seam so they are ready to finish off with a knot. It saves time and frustration. See the Resources section at the bottom of the post for a link to my tutorial on Finishing off a Cover Stitch in the Round.
The “Purr”fect Swimsuit
I hope you enjoyed this post and are inspired to serge a little spandex!
https://jalie.com/blog/cat/photos Link to Jalie’s photo tutorials – There are six tutorials on how to make the 3350 swimsuit. I didn’t discover these until after I had made my swimsuit. It would have been helpful for everything but making the twist! Unfortunately the tutorial for the front was only for view A.
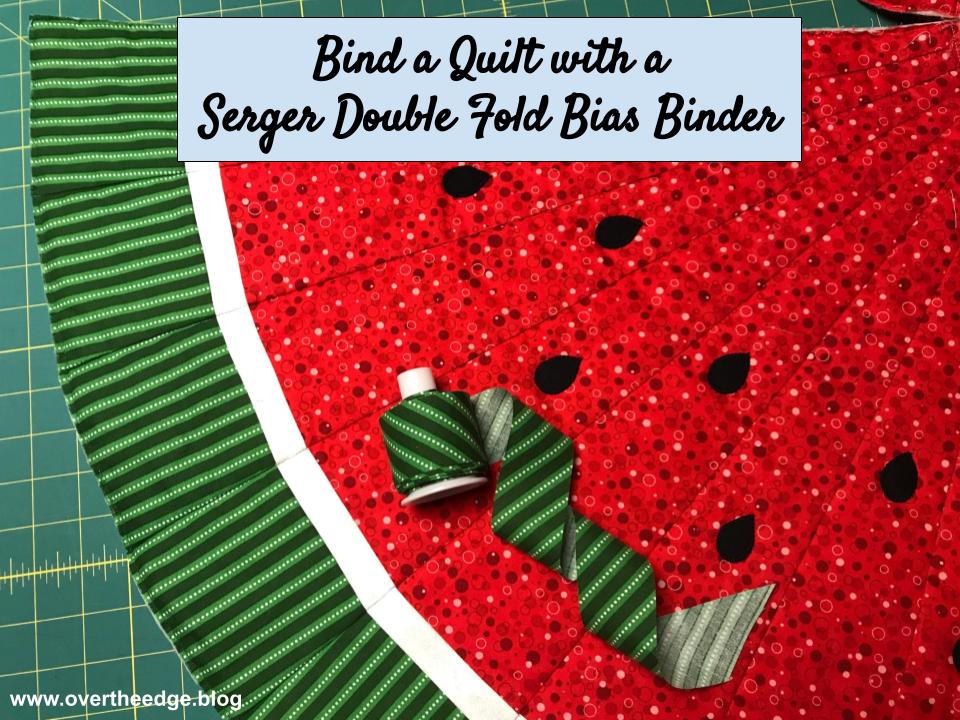
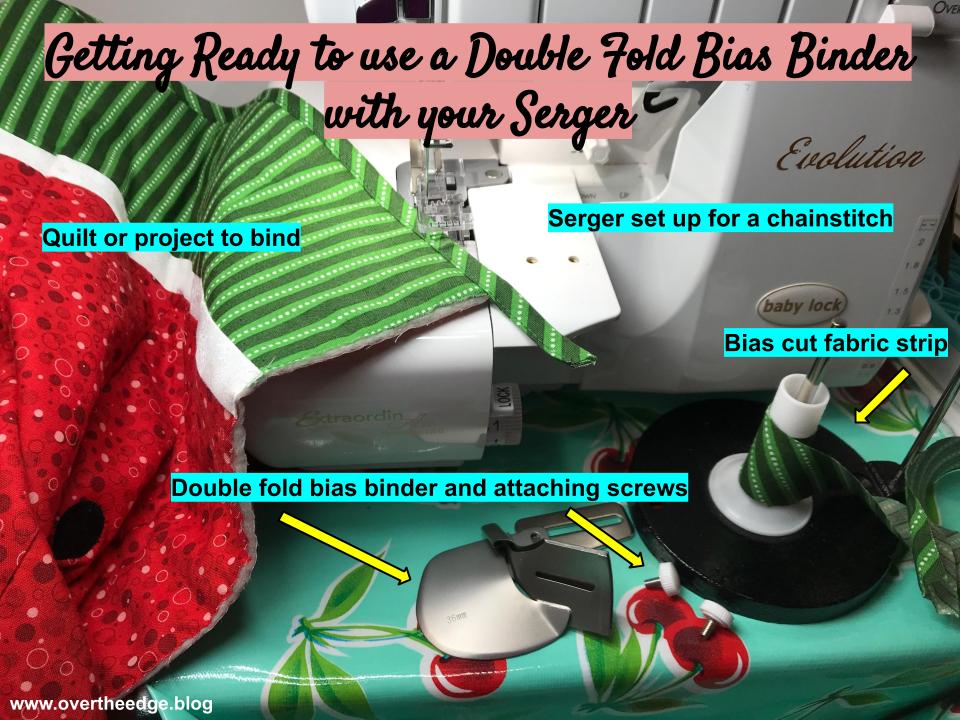
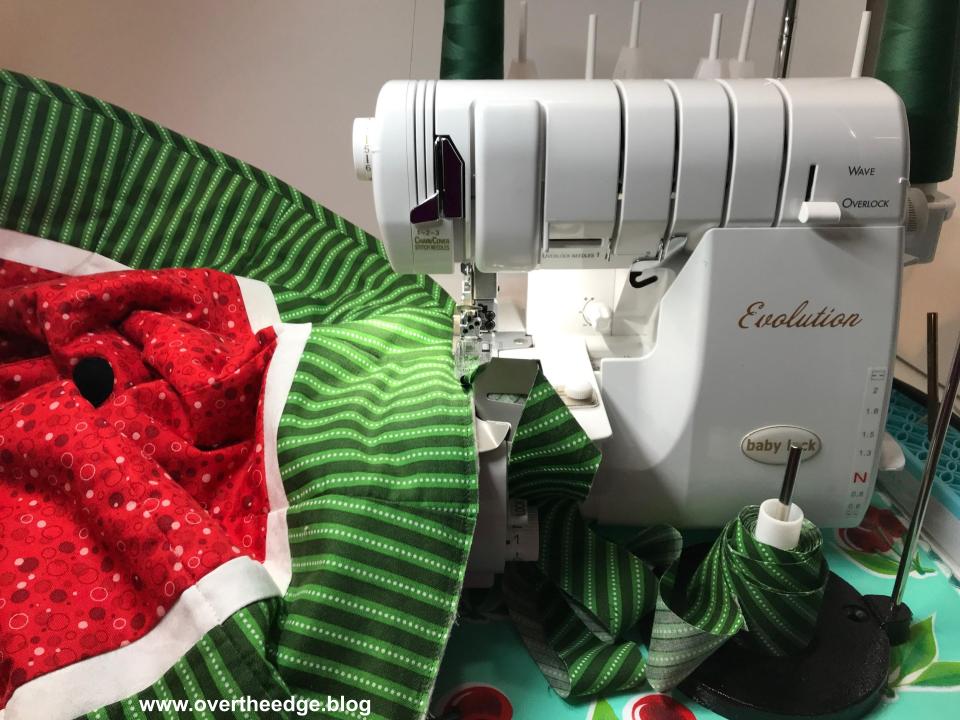
Would you like to learn how to bind a quilt using a serger double fold bias binder? If yes, then keep reading! Although I’ve found several videos and articles about the double fold bias binder and its potential as a tool, the internet seems to be lacking in resources about actual projects made using this attachment. So I thought I would try to fill the gaps by sharing my experiences using the attachment on some of my projects.
The project featured in this post is my recently designed and completed Watermelon Patio Table Topper Quilt. It’s basically a christmas tree skirt with a summer twist! The opening in the quilt fits around my patio table umbrella. The topper adds a little fun to my outdoor summer dining. In the future I hope to create an actual pattern for my design, but for now I will share with you how I used the serger double fold bias binder attachment to finish the curved edges of the quilt
Traditional Double Fold Bias Tape
I love the look of traditional bias bound edges, but I am not always excited about applying folded bias tape using traditional methods. If you use pre-folded bias tape and just slide it over the edge of your project and stitch it down, you risk not catching it on the back side. Or you do catch the back side, but your stitches waver because you didn’t catch the bias tape evenly. And pre-made folded bias tape isn’t available in many colors or prints, so often it is hard to find one that matches your project. Sometimes I do make my own double fold bias tape to coordinate with a project, but I don’t enjoy spending all that time at my ironing board pressing the folds into my bias fabric strips.
Serger Applied Double Fold Bias Binding
Now that I’ve experienced using the double fold bias binder for my serger, I’m in love! The serger double fold bias binder attachment folds your bias fabric and attaches it all in one step, saving you time and giving you professional results. To use this attachment you need to make your own bias fabric strips. This does take a little time, but opens up so many creative possibilities because you are not limited to what is available commercially.
Getting Ready to Bind a Quilt with a Serger Double Fold Bias Binder
Things you need to get started:
Serger, capable of chain stitch or cover stitch
Double fold bias binder attachment and attaching screws
Bias cut fabric strip
Quilt or project to bind
Things I’ve Learned About the Serger Double Fold Bias Binder
Practice. You will be guiding the project with your left hand and the bias fabric strip with your right. Grab some scraps and begin with straight edges. Once you’ve mastered the straight edge, experiment with some curves.
Test your binder alignment and settings before jumping into the project. It’s no fun if you have to readjust after you start applying binding to your actual project.
Make sure you keep your project raw edge positioned against the folder. If it migrates away, you may not catch it in the binding.
Don’t be afraid to modify the width of your bias fabric strips slightly to achieve better results. I found that I had better results with 1½” bias strips on my project instead of the recommended 1⅜”.
You may need to change your needle positions for better results with the chain stitch. I found that using the left needle C1 worked much better for me than the right needle C3.
Tweezers are very useful at getting the bias fabric strip into the attachment and under the presser foot.
Make more bias fabric strips than you think you will need. That way you are ready if you have to do a lot of testing or make a mistake. If you have extra left over, you can always use it on another project or for more testing.
The fewer seams in your bias fabric strip, the better. The extra bulk in the seams can sometimes cause little fluctuations in your stitching.
You can’t miter corners with this method of applying binding. You must serge on at the beginning and serge off the end of each edge.
Full Tutorial and Video on How to use the Serger Double Fold Bias Binder
If you want all the details on how to use the serger double fold bias binder to bind a quilt or other project click on the link to read my full tutorial at:
I also created a video on how to use a serger double fold bias binder in case you prefer to watch the tool in action. Click on the link below to watch my bias binder video.
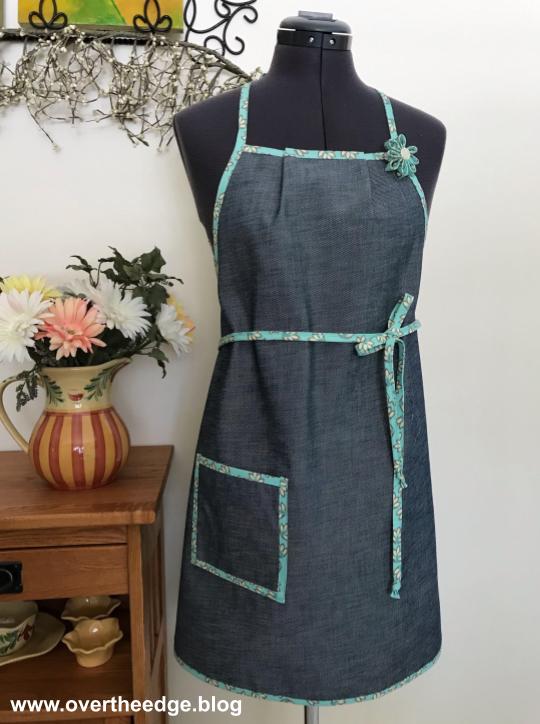
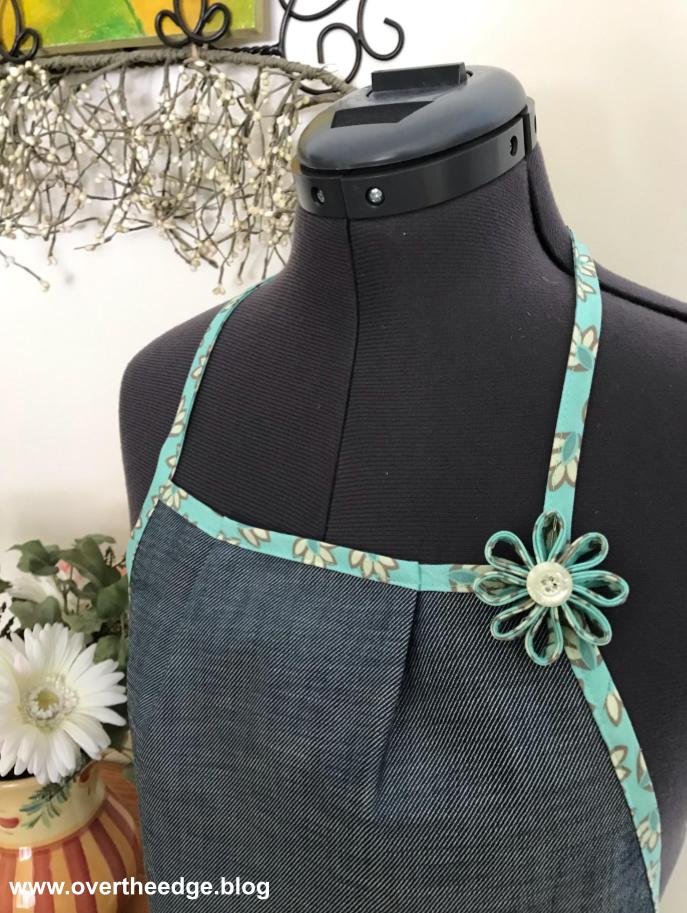
The serger double fold bias binder attachment is not just for binding quilts. I’ve used it on other projects such as aprons. The aprons below were bound using my serger and the double fold bias binder.
Jen’s Basic Serger Bound Apron – Isn’t this apron cute?! The binding, the ties and the flower on this apron were all done with this tool. Learn how to make this apron in a future project post on my blog.
Festive Holiday Apron – This apron was made from Simplicity pattern 8857. I adapted the instructions slightly so I could use my serger double fold bias binder attachment. All of the red binding on this apron was done with this tool. I was really happy with the results!
Until the Next Project…
I hope you enjoyed this post about how to bind a quilt using serger double fold bias binder. Hope to see you back at my blog soon!
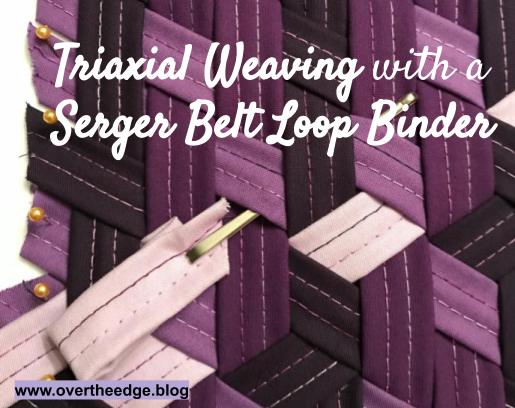
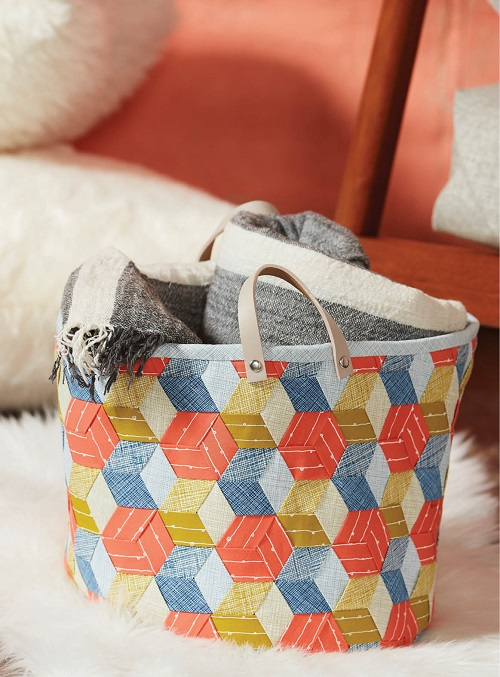
If you have a serger with a cover stitch and a belt loop binder attachment you are going to love this post, Triaxial Weaving with a Serger Belt Loop Binder. A new way to create quick and easy fabric strips for weaving into your own custom fabric! No more making fabric strips on the bias and no more burning your fingers while ironing the folded strips!
Serger Belt Loop Binder Attachment
Baby Lock has a specialty serger attachment called a Belt Loop Binder, which comes in two sizes (1.5” and ¾”). Other manufacturers may have something similar. The belt loop binder is designed to be used with a cover stitch.
I’ve seen it used to make belt loops, handles, straps, and bracelets. Belt loops and straps are very useful. But making your own woven fabric from these strips is way more exciting and is another perfect application for this attachment. And you don’t have to make bias strips for this weaving to work. You can cut strips by the width of the fabric (selvage to selvage), feed them into bias binder attachment on your serger, and quickly make fabric strips ready to weave into cool designs! This method is so much faster than cutting traditional bias fabric strips and standing at the ironing board pressing the edges under. And since it works on the cross grain, you don’t have to spend time creating the bias strips of fabric. I love my serger!!!
Modern Fabric Strip Weaving
Fabric strip weaving is becoming a popular activity. I first saw a bias fabric strip triaxial weaving project in a Sew News magazine (Feb/Mar 2017)
The article/project was titled “Take It or Weave It” was written by Tara Curtis, of Wefty. She invented a tool called the Wefty Needle to help make fabric strip weaving much easier. Bias fabric strips are made and then folded and pressed into bias tape. Then the bias tape is woven into fabric. Of course when I saw the project my first thought was “how can I use my serger to make this easier!”
Tools for Weaving
I purchased a set of Wefty needles from Tara. They work well for weaving ½” folded fabric strips and 1” folded fabric strips made with bias strips the traditional way. However, the Wefty Needles don’t work as well for serger belt loop binder strips. The tool was just a little too wide for the ¾” strips made from the 1.5” belt loop binder. It was hard for me to get through the tight weave of the third row of the triaxial weave. If the Wefty Needle was available in a ¾” or ⅜” it would be perfect for using with fabrics strips made with babylock belt loop binders!
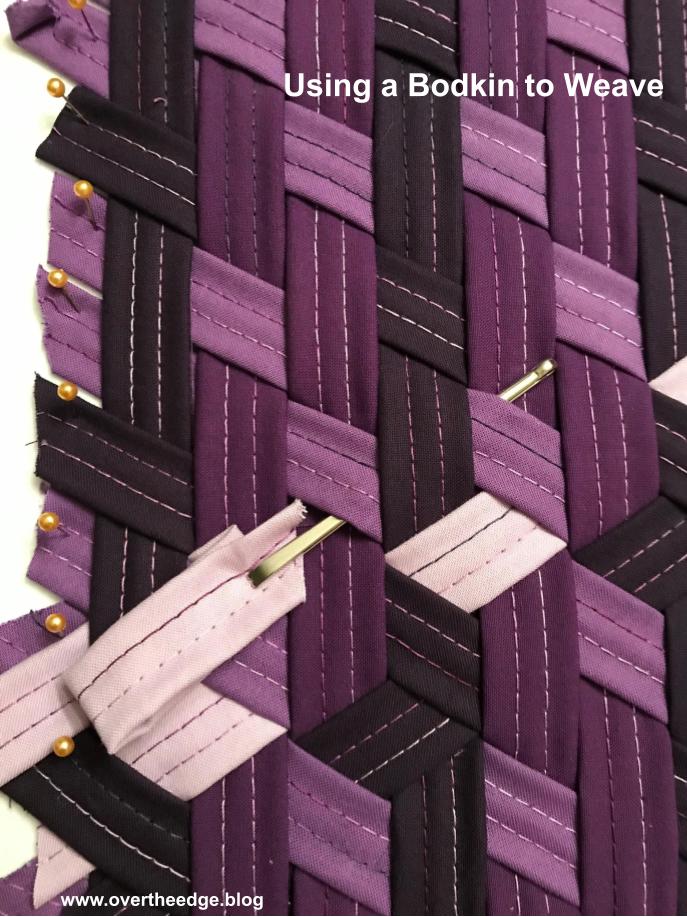
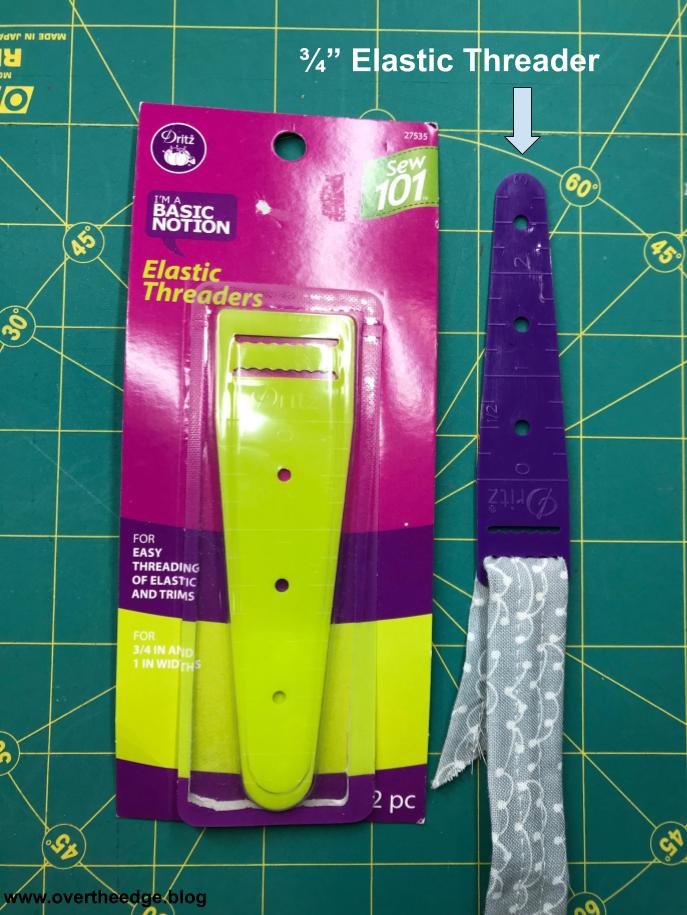
I ended up using a bodkin (for inserting elastic or cord into a casing) to help me weave that 3rd row. The Wefty needle would have worked better than the bodkin if it were the right size for the ¾” strips. Recently, I found a ¾” elastic threader by Dritz that I am going to try on my next project. For other tools needed for fabric strip weaving see the Resources section at the bottom of the post.
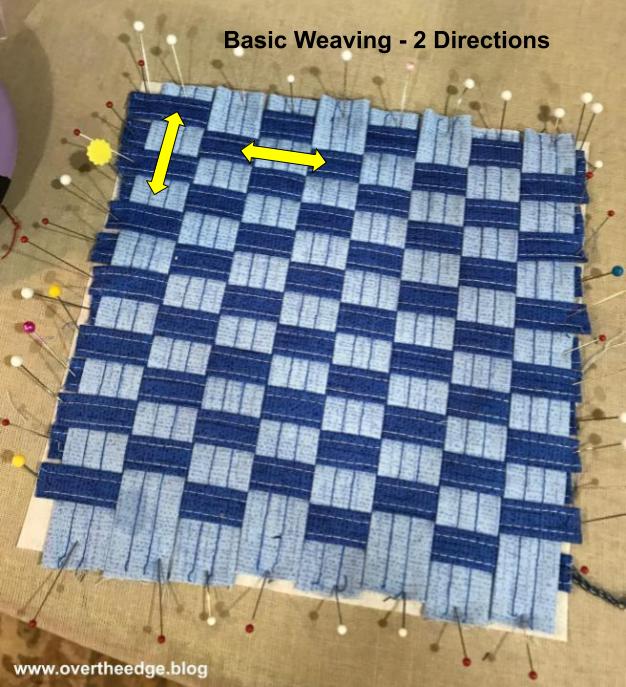
Weaving Types
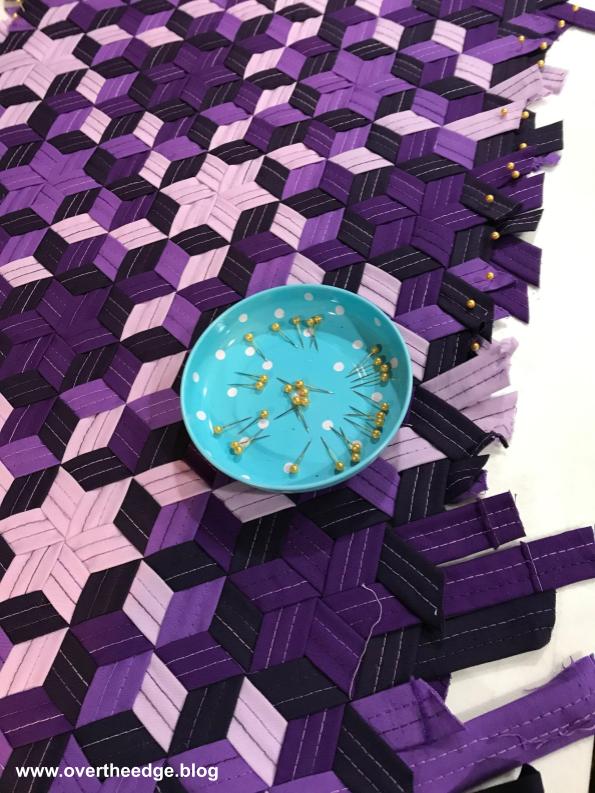
Basic or simple weaving occurs in 2 directions (biaxial at 90 degree angles to each other). Some forms of basic weaving you may be familiar with include plain weave, satin weave, twill weave, basket weave. Triaxial weaving occurs in 3 directions (triaxial 60 degree angles to each other). You can make some really nice weaving projects with basic weaving, but I think there is something special about triaxial weaves. I have included some links to resources about weaving at the end of this post.
Jen’s Triaxial Weaving with a Serger Belt Loop Binder
The Sew News article did inspire me to try fabric strip weaving, even though I didn’t make the basket that was in the article. Following the basic instructions in the article, I created my triaxial weave using fabric strips made on my serger with the 1.5” belt loop binder attachment. I then used the new “fabric” to construct this bucket from Simplicity pattern 8859 (I did make a few minor modifications to the pattern for this fabric basket/bucket). I really enjoyed triaxial weaving so I had to do more of it. After one project I was hooked!
I really like the look of “stars” in triaxial weaving, so I decided that would be my next project. I figured out how to weave the stars after some trial and error and a little research on the internet. It probably would have been faster to purchase a pattern from Wefty to show me how to do it, but I wouldn’t have learned so much about weaving! Like with the fabric bucket project, I used the 1.5” belt loop binder attachment to make my strips. Then I made a pillow from the triaxial weave “stars” fabric that I created. This pillow was constructed on the serger, including using a cording foot to install the zipper. The pillow pattern I created may be included in my blog in the future.
Tutorial – Setting Up and Using a Serger Belt Loop Binder
I created a tutorial and a video to help you be successful using the belt loop binder attachment with your serger. You will find the links below.