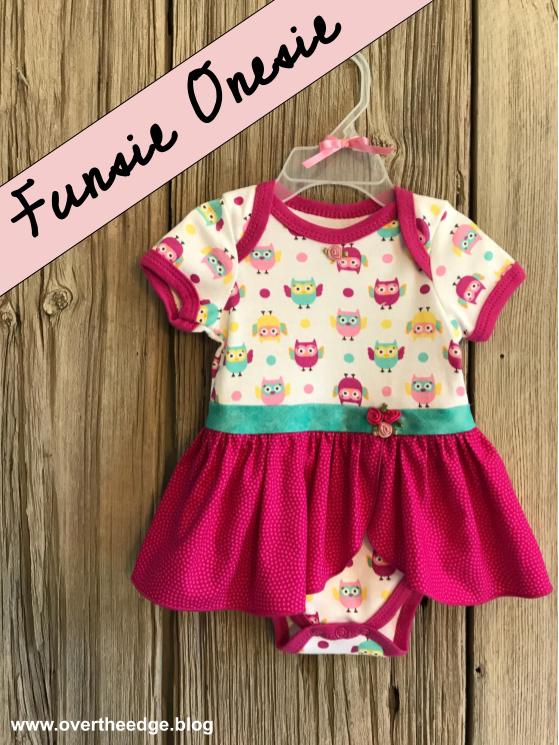
Transform an ordinary onesie into a super sweet outfit for a little baby girl! This Serger Funsie Onesie is fun to create using basic stitches on your serger. My niece is having a little baby girl and her nursery theme is owls. I found this cute little owl onesie and knew I could turn it into something special. I can’t wait until the baby is big enough to wear it!
The Funsie Onesie Pattern
The pattern for the Funsie Onesie came from the book, Simple Serging Sewing, edited by Julie Johnson.
The Transformation from Onesie to Sweet Dress
I was amazed at how a few simple additions took this onesie from cute to amazing! Read along and observe the transformation.
Here’s my onesie, skirt fabric and waistband bias strip.
Prepare Strip for Ruffled Skirt
Because my onesie was larger than the one in the pattern, I added 1” to the length of the ruffled skirt piece.
The instructions said to use a plate as a template for rounding the ends of the ruffle strip. I used the plate as a starting point, and then I drew in the rest of the curve in freehand.
For this project I used a Babylock Imagine serger. I set my serger up for a 3 thread narrow hem to finish the bottom edge of my ruffled skirt. You could also use a 3 thread rolled hem if you like. I used Maxilock thread in a color that matched my fabric.
For helpful information on serging with a rolled hem, check out my tutorial on Quick and Easy Serger Napkins. https://overtheedge.blog/tutorials/quick-easy-serger-napkins/
Gather Skirt
To gather the ruffled skirt, I used my serger ruffling foot (the G foot for the Babylock Imagine) with a 4 thread overlock stitch. Even though you can use the foot to simultaneously create the ruffle and attach it, I chose to do it in two steps so I could adjust the ruffle to fit the onesie exactly. I set my differential feed to 2, my stitch length to 4 and my stitch width to M. The raw edge of the skirt was just skimmed by the blade as I serged. I also held my finger behind the foot to help it gather just a little bit more.
If you don’t have a ruffling foot for your serger, you can still use your serger to gather. Follow your instruction manual for gathering. Usually gathering on a serger involves increasing the differential feed and stitch length (and increasing your needle tensions if you have a serger with tension dials.)
Here’s what my ruffled skirt piece looked like after gathering it with my serger.
Prepare Onesie
Determine where to cut your onesie. My onesie was a 6-9 month size. I cut it apart as stated in the pattern instructions.
Create Bias Waistband
Next I created the bias waistband strip. The bias fabric strip has a some stretch which makes it a little easier to dress the baby. The waistband also adds back in length that was lost in the seams from adding the skirt to the onesie. So your onesie length will still be the same size as when you started. I used a standard 4 thread overlock stitch with a stitch length of 2.5 to serge the ends of the waistband together.
Attach Waistband
I pinned the bias waistband strip to the top half of the onesie, and serged the seam with a standard 4 thread overlock stitch.
Attach Skirt
My onesie waistband measured about 18” around, so I adjusted the gathers of my ruffle to equal 20” (18″ + 2″ for overlap.) My serger didn’t gather the fabric quite as much as I needed. So I adjusted the gathers by first separating the needle threads from the looper threads. And then I pulled on the needle threads and slid the fabric, just like I would using 2 rows of basting stitches on my sewing machine. I overlapped the ends of my ruffled skirt by 1” on each end.
After adjusting the gathers, I pinned the ruffled skirt to the bottom of waistband, aligning the overlapped section of skirt slightly off center. I serged this skirt to the waistband using a standard 4 thread overlock with a stitch length of 2.5.
Attach Bottom Half to Top Half
After attaching the skirt, the last step was to reattach the bottom half of the onesie. I pinned the onesie panties to the waistband/skirt section, making sure that the side seams of both onesie halves were aligned. To serge this seam, I increased my stitch width as wide as it would go (7.5) and used a stitch length of 2.5. I made this stitch wider than the stitching I used to gather the ruffle, so the gathering stitches on the skirt would not show on the right side of the garment.
Add Finishing Touches
Even though the skirted onesie was adorable, I thought it needed just a little something more. So I hand stitched a few ribbon roses on the waistband and one at the center of the neckline.
My Serger Funsie Onesie
My serger funsie onesie is finished and ready for a sweet baby girl to wear! I hope you enjoyed this post and are inspired to serge.

Resources
Book – Simple Serger Sewing, published in 2009, but found online:
How to make bias strips: https://sew4home.com/how-to-make-your-own-continuous-bias-binding/
Quick video on using the ruffling foot to gather fabric:

