Tag: serger garment

Serger Funsie Onesie

Transform an ordinary onesie into a super sweet outfit for a little baby girl! This Serger Funsie Onesie is fun to create using basic stitches on your serger. My niece is having a little baby girl and her nursery theme is owls. I found this cute little owl onesie and knew I could turn it into something special. I can’t wait until the baby is big enough to wear it!

The Funsie Onesie Pattern

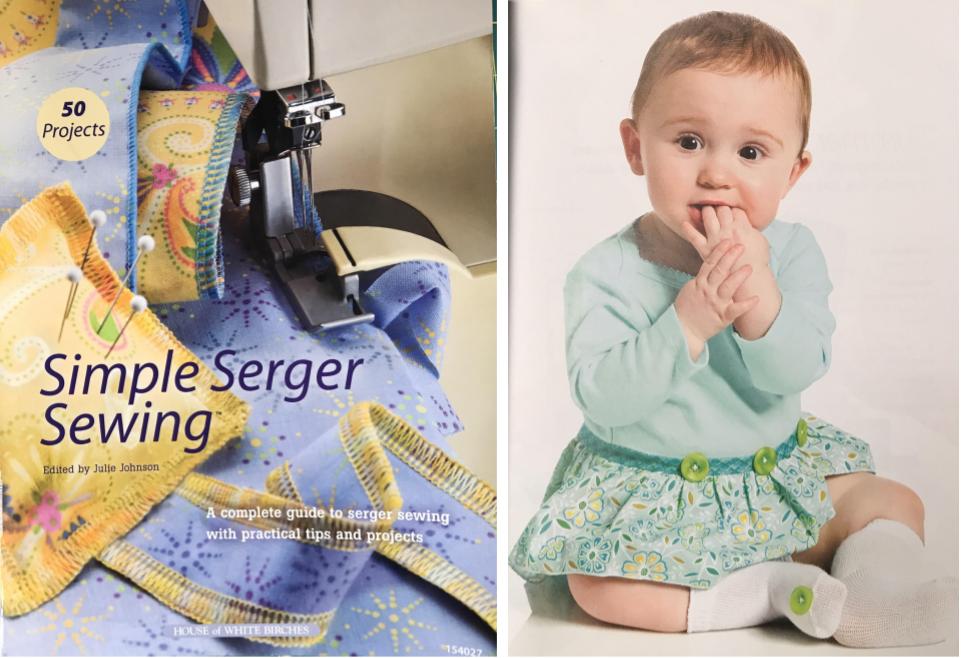
The pattern for the Funsie Onesie came from the book, Simple Serging Sewing, edited by Julie Johnson.

simple serger sewing book

The Transformation from Onesie to Sweet Dress

I was amazed at how a few simple additions took this onesie from cute to amazing! Read along and observe the transformation.

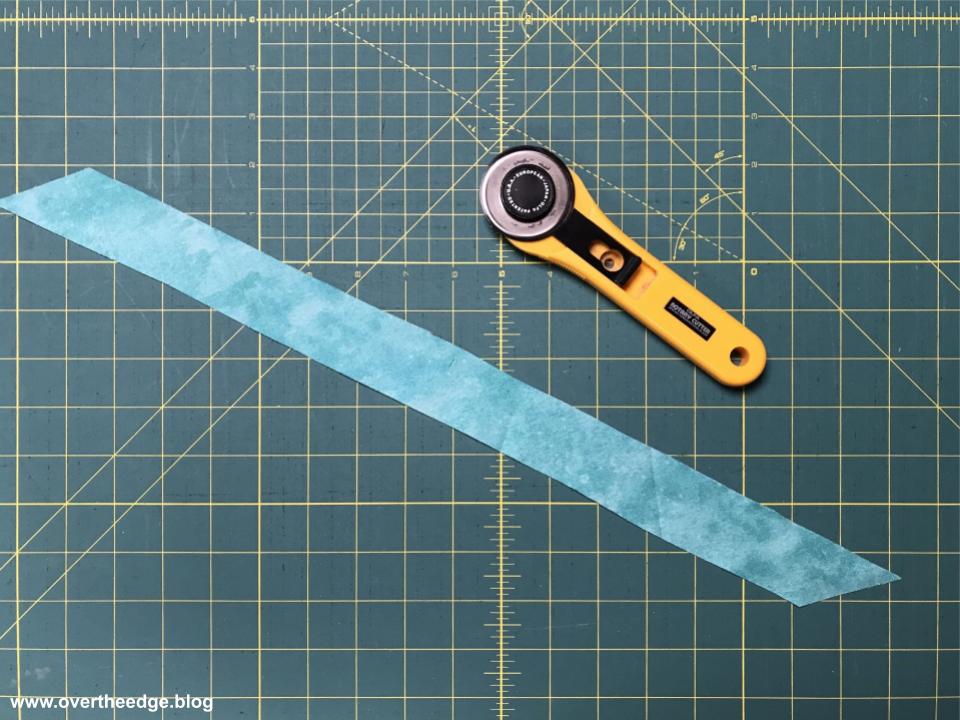
Here’s my onesie, skirt fabric and waistband bias strip.

serger funsie onesie

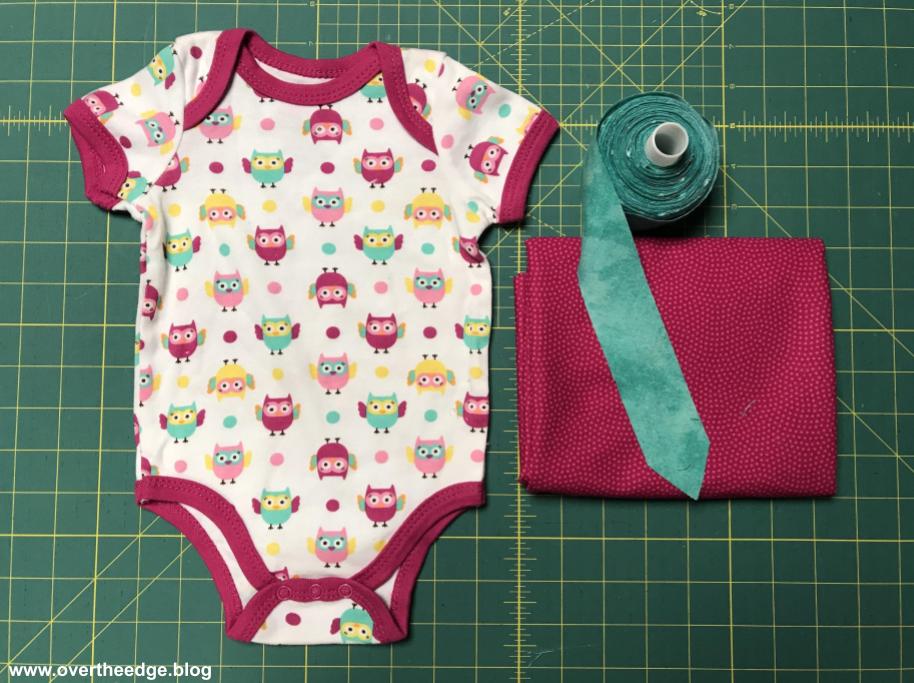
Prepare Strip for Ruffled Skirt

Because my onesie was larger than the one in the pattern, I added 1” to the length of the ruffled skirt piece.

The instructions said to use a plate as a template for rounding the ends of the ruffle strip. I used the plate as a starting point, and then I drew in the rest of the curve in freehand. 

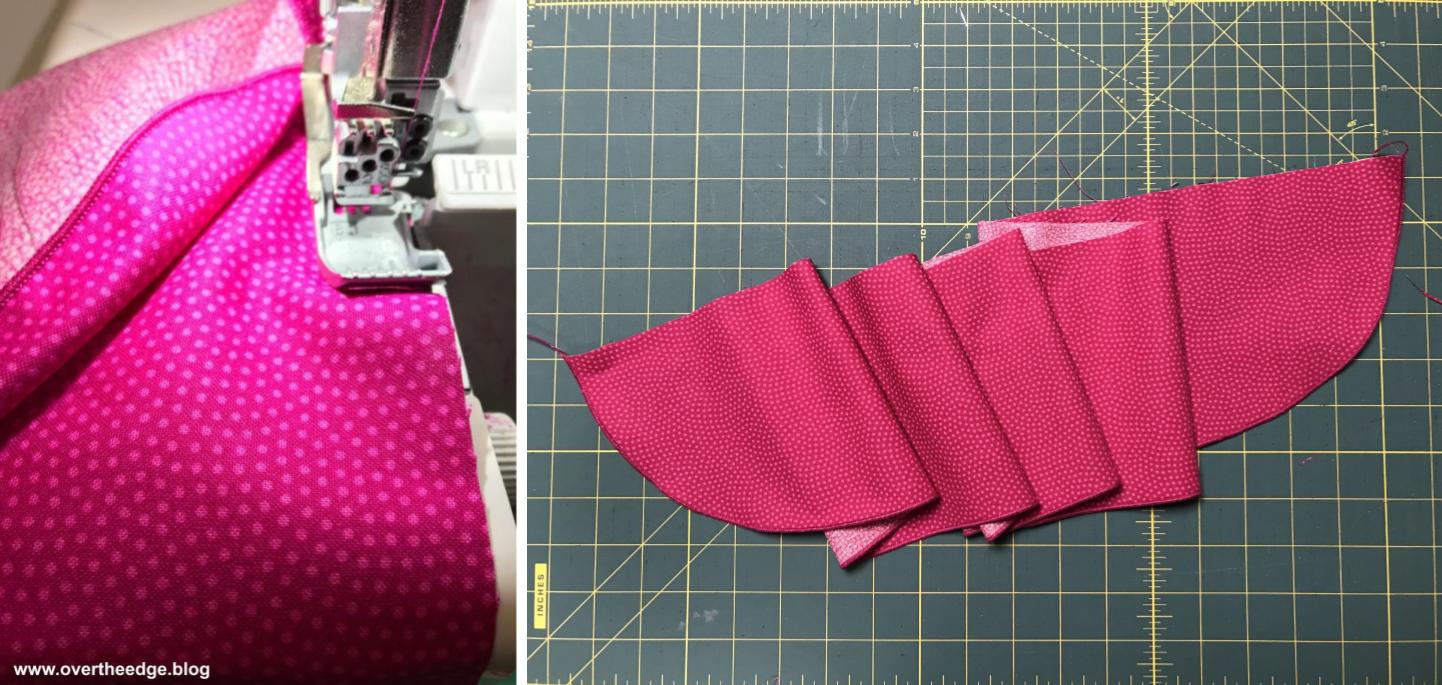
For this project I used a Babylock Imagine serger. I set my serger up for a 3 thread narrow hem to finish the bottom edge of my ruffled skirt. You could also use a 3 thread rolled hem if you like. I used Maxilock thread in a color that matched my fabric.

serger rolled hem

For helpful information on serging with a rolled hem, check out my tutorial on Quick and Easy Serger Napkins. https://overtheedge.blog/tutorials/quick-easy-serger-napkins/

Gather Skirt

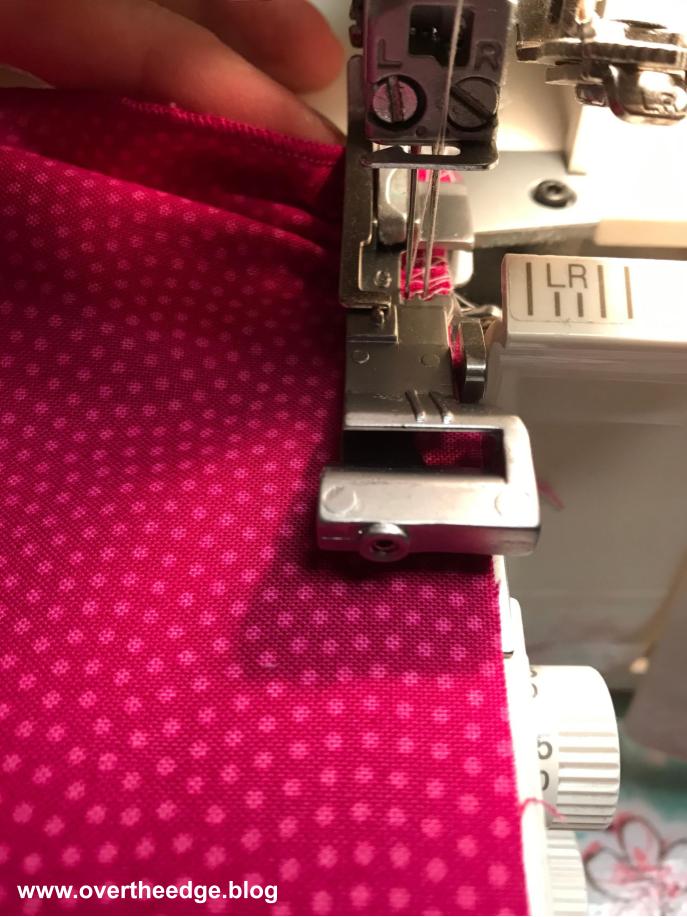
To gather the ruffled skirt, I used my serger ruffling foot (the G foot for the Babylock Imagine) with a 4 thread overlock stitch. Even though you can use the foot to simultaneously create the ruffle and attach it, I chose to do it in two steps so I could adjust the ruffle to fit the onesie exactly. I set my differential feed to 2, my stitch length to 4 and my stitch width to M. The raw edge of the skirt was just skimmed by the blade as I serged. I also held my finger behind the foot to help it gather just a little bit more. 

If you don’t have a ruffling foot for your serger, you can still use your serger to gather. Follow your instruction manual for gathering. Usually gathering on a serger involves increasing the differential feed and stitch length (and increasing your needle tensions if you have a serger with tension dials.)

gathering with a serger ruffling foot

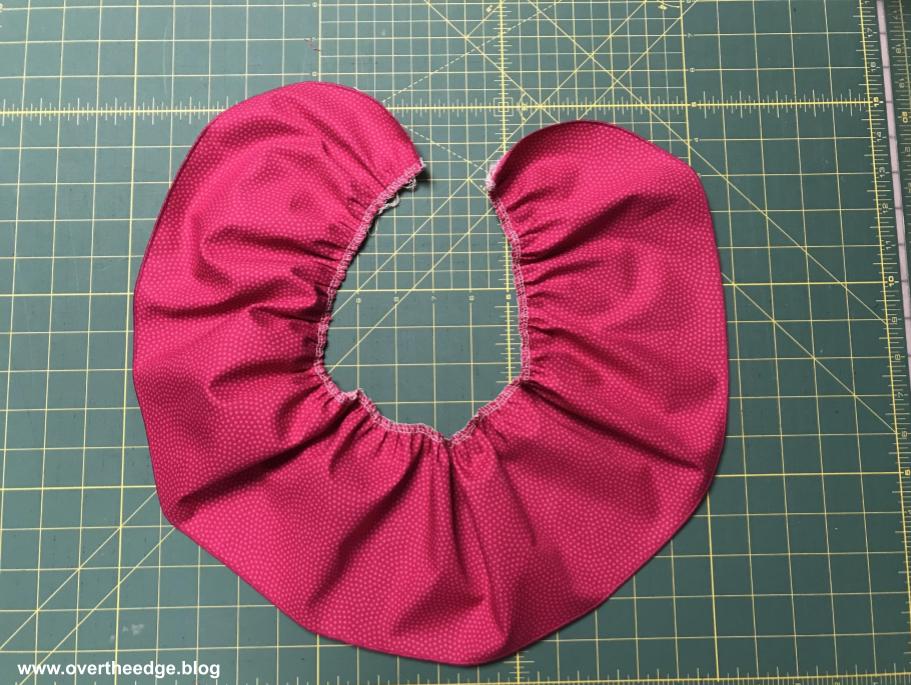
Here’s what my ruffled skirt piece looked like after gathering it with my serger.
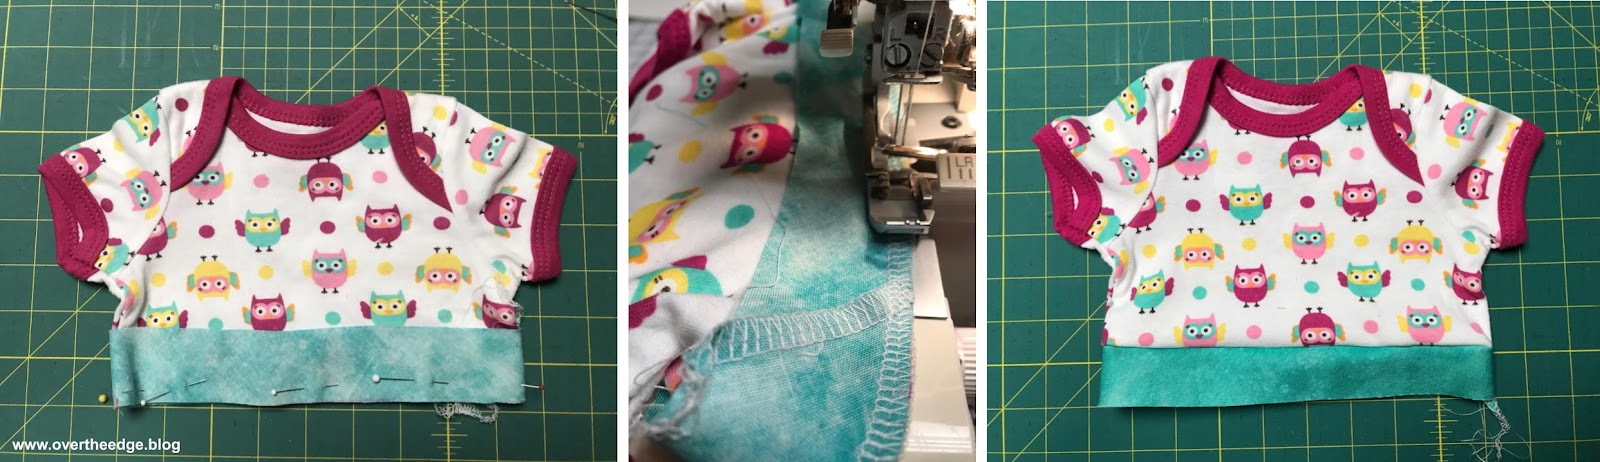
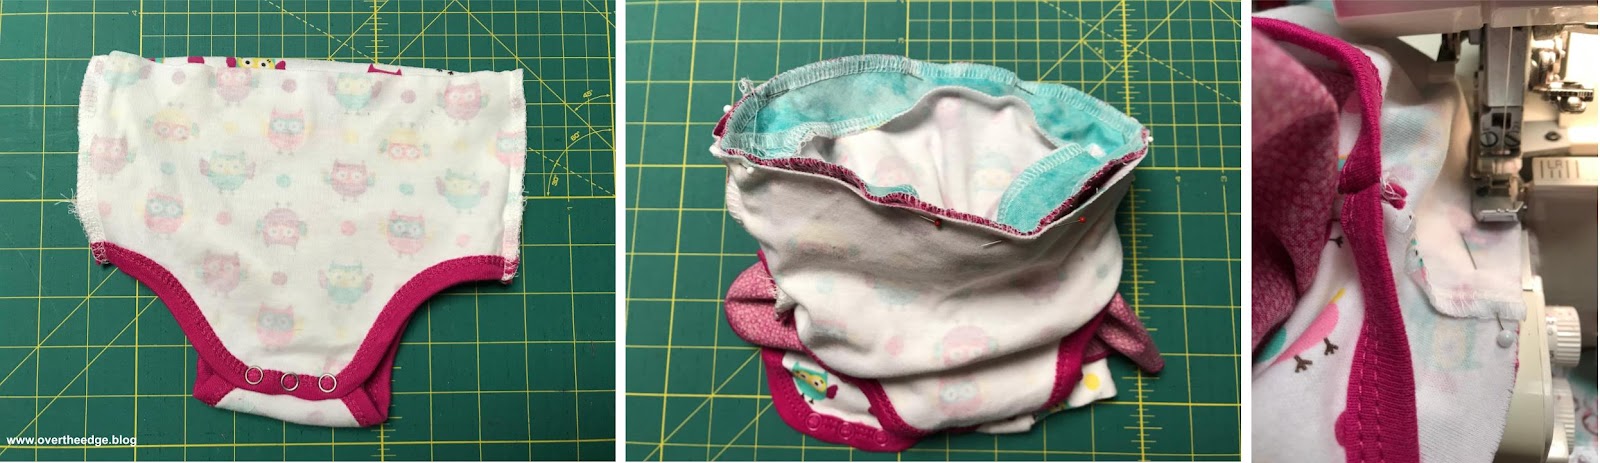
gathering with a serger ruffling foot

Prepare Onesie

Determine where to cut your onesie. My onesie was a 6-9 month size. I cut it apart as stated in the pattern instructions. 

serger funsie onesie

Create Bias Waistband

Next I created the bias waistband strip. The bias fabric strip has a some stretch which makes it a little easier to dress the baby. The waistband also adds back in length that was lost in the seams from adding the skirt to the onesie. So your onesie length will still be the same size as when you started. I used a standard 4 thread overlock stitch with a stitch length of 2.5 to serge the ends of the waistband together.

Attach Waistband

I pinned the bias waistband strip to the top half of the onesie, and serged the seam with a standard 4 thread overlock stitch.
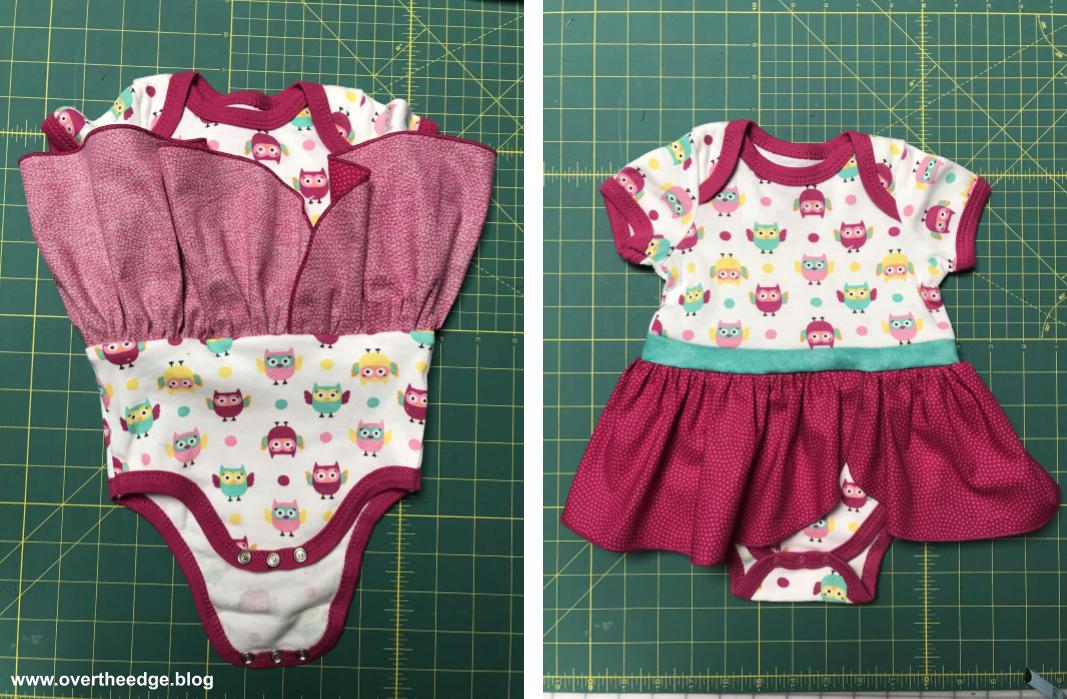
serger funsie onesie

Attach Skirt

My onesie waistband measured about 18” around, so I adjusted the gathers of my ruffle to equal 20” (18″ + 2″ for overlap.) My serger didn’t gather the fabric quite as much as I needed. So I adjusted the gathers by first separating the needle threads from the looper threads. And then I pulled on the needle threads and slid the fabric, just like I would using 2 rows of basting stitches on my sewing machine. I overlapped the ends of my ruffled skirt by 1” on each end. 

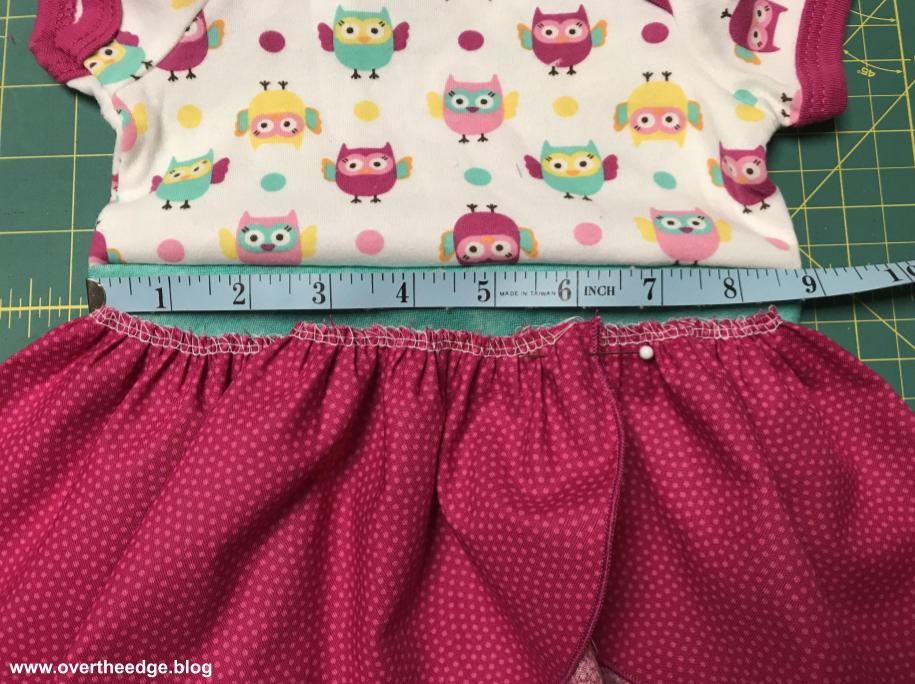
After adjusting the gathers, I pinned the ruffled skirt to the bottom of waistband, aligning the overlapped section of skirt slightly off center. I serged this skirt to the waistband using a standard 4 thread overlock with a stitch length of 2.5.

serger funsie onesie

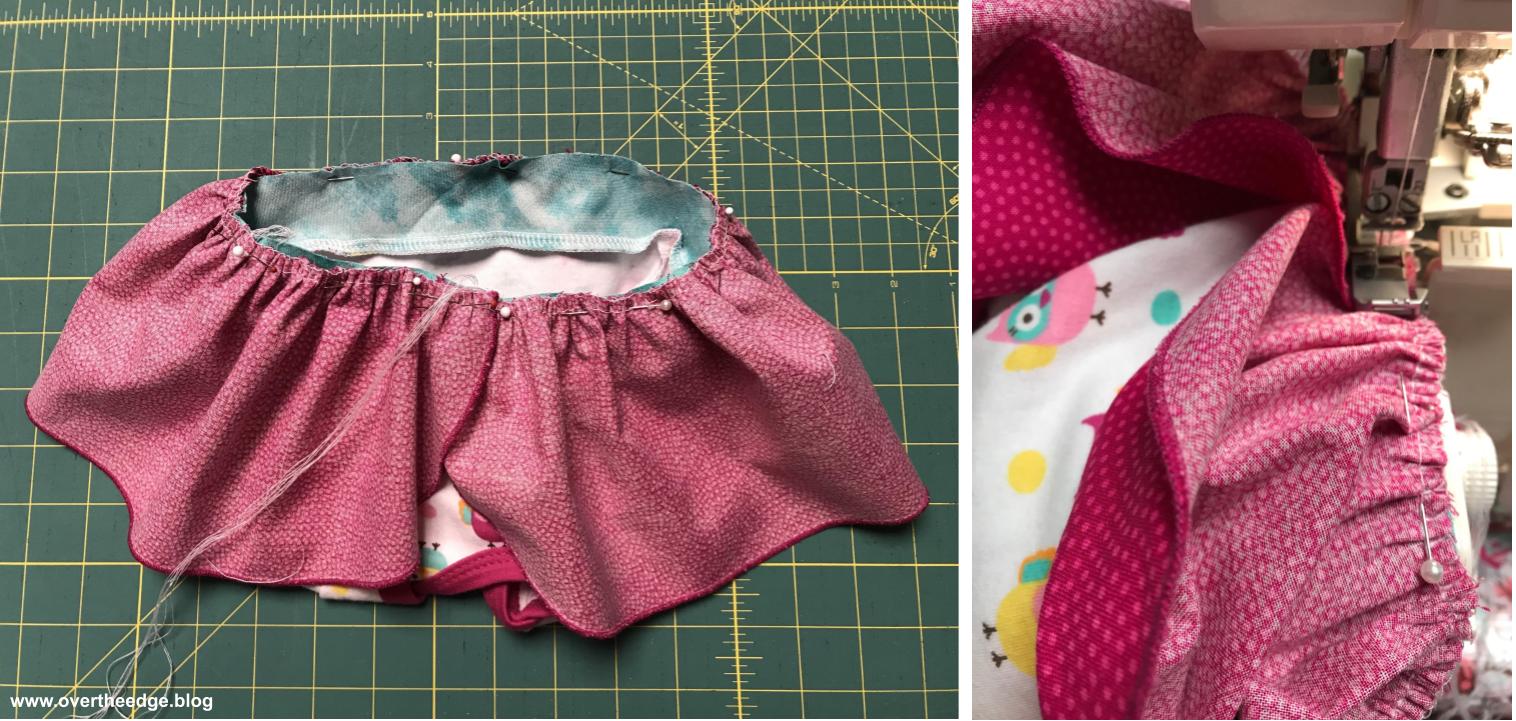
Attach Bottom Half to Top Half

After attaching the skirt, the last step was to reattach the bottom half of the onesie. I pinned the onesie panties to the waistband/skirt section, making sure that the side seams of both onesie halves were aligned. To serge this seam, I increased my stitch width as wide as it would go (7.5) and used a stitch length of 2.5. I made this stitch wider than the stitching I used to gather the ruffle, so the gathering stitches on the skirt would not show on the right side of the garment.

serger funsie onesie

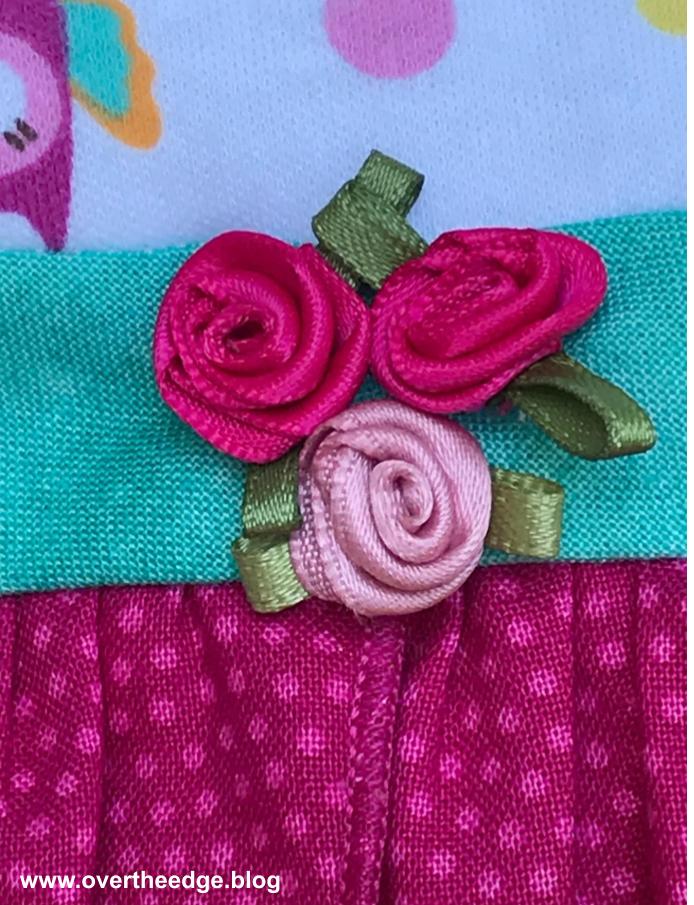
Add Finishing Touches

Even though the skirted onesie was adorable, I thought it needed just a little something more. So I hand stitched a few ribbon roses on the waistband and one at the center of the neckline.

serger funsie onesie

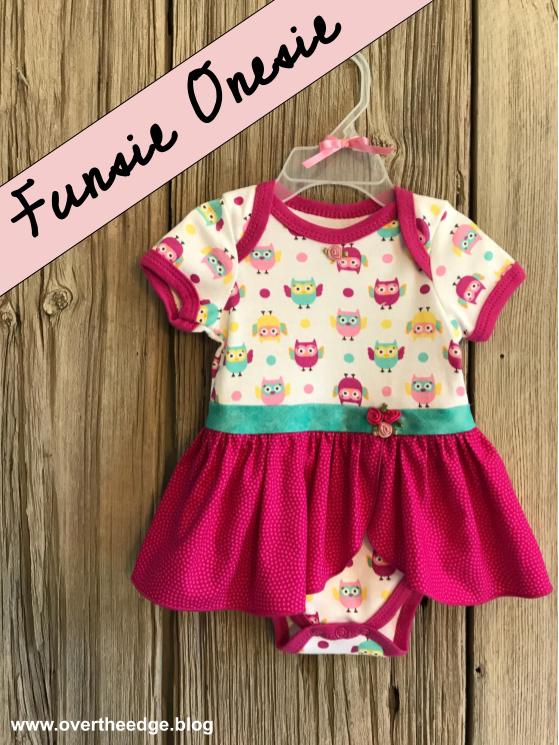
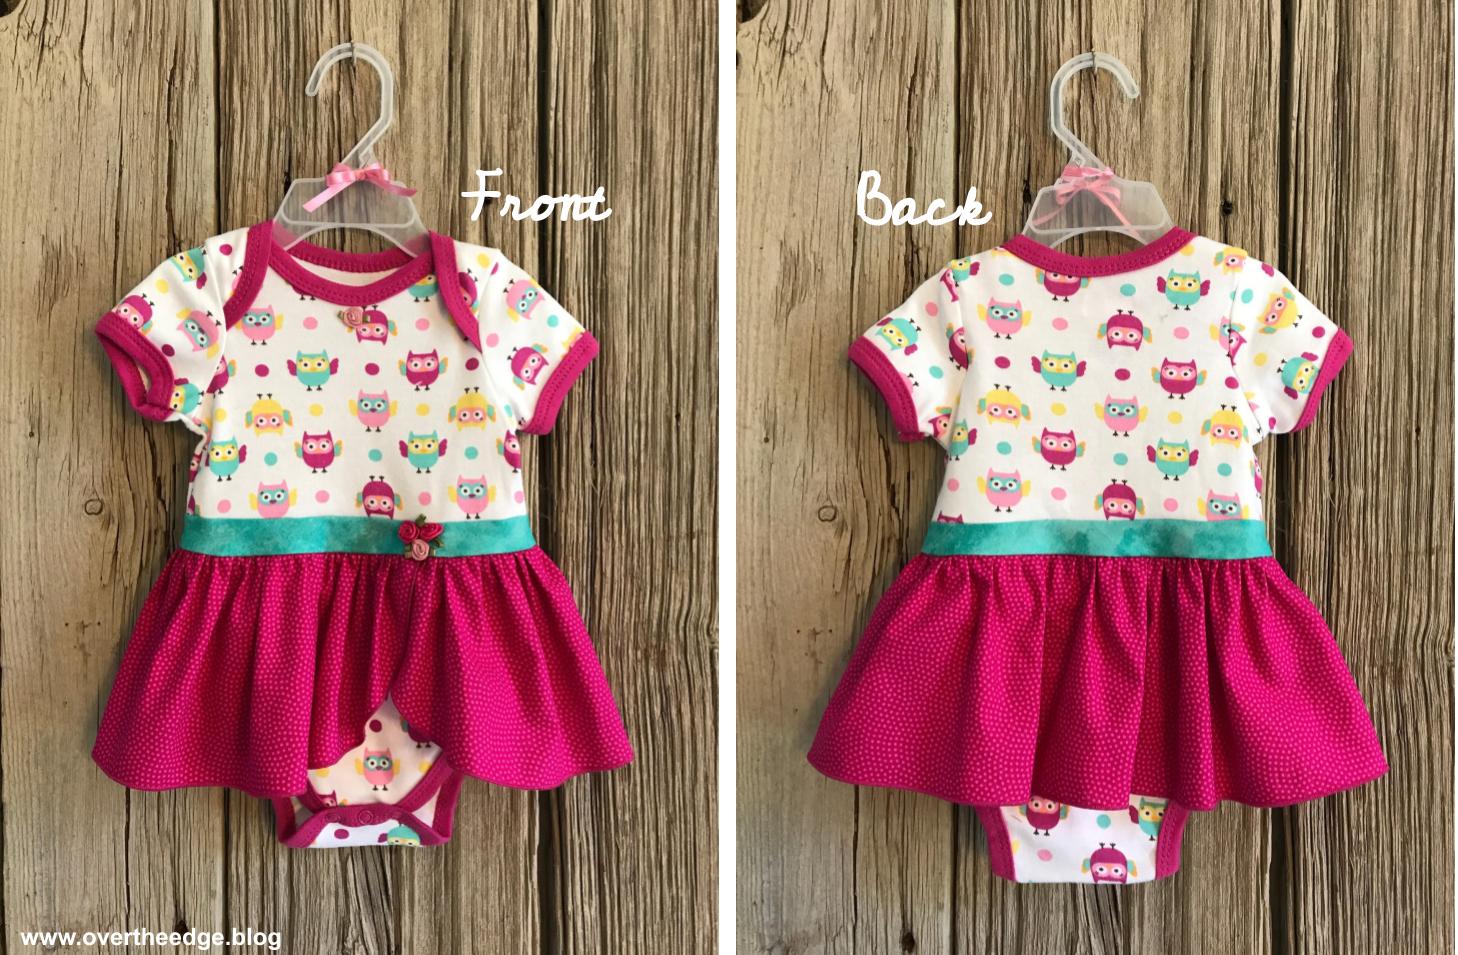
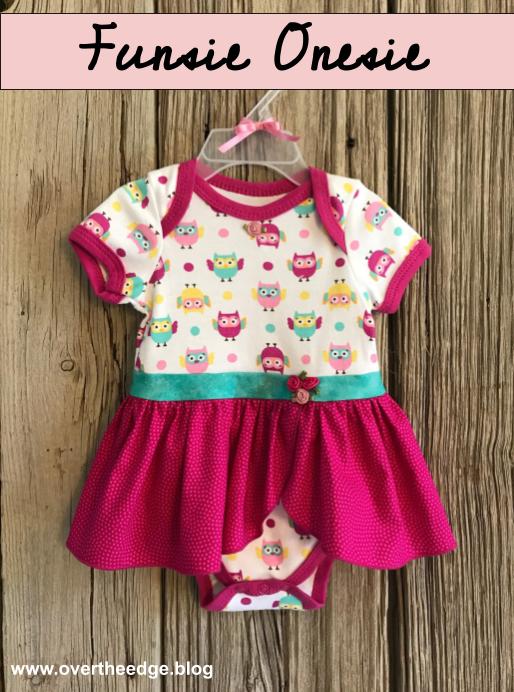
My Serger Funsie Onesie

My serger funsie onesie is finished and ready for a sweet baby girl to wear! I hope you enjoyed this post and are inspired to serge.

serger funsie onesie
serging with jen

Resources

Book – Simple Serger Sewing, published in 2009, but found online:

How to make bias strips: https://sew4home.com/how-to-make-your-own-continuous-bias-binding/

Quick video on using the ruffling foot to gather fabric:

Serger Twists Sleeveless Top

Embellishment can turn a plain garment into a WOW garment. Why not use your serger to make your garments special! I love the texture created from twists and tucks. I’ve heard them called wave tucks or twisted tucks, or as I call them serger twists. I’ve used this serger technique in bags, pillows, serger covers and garments. You can make these folded tucks/twists with a sewing machine, but it is more fun with a serger because you have the added element of decorative thread. Keep reading to learn more about how I started with a pattern for a plain top and transformed it into my serger twists sleeveless top. 

serger twists sleeveless top

The Pattern

As a foundation for my serger twists sleeveless top, I chose a simple sleeveless top pattern, New Look 6483 view E, and a linen blend fabric. I basically followed the pattern to construct the top, but with a few changes. I modified the pattern to include a serger twists center panel, and I serged some of the steps instead of using my sewing machine.

Equipment

  • Serger capable of three thread overlock and 4 thread overlock
  • Sewing machine
  • Sewing and serging supplies
  • Pattern, such as New Look 6483
  • Marking pen/pencil
  • Fabric and thread

How to Create Serger Twists

I began by preparing the center panel. I cut a rectangle piece of fabric about 4” longer than the center front pattern piece of the top and about twice as wide as my desired finished center panel plus 4” extra. You need the extra fabric because the width is drawn in as you create the twist. For my top I decided on 7 twists. I marked 7 vertical lines 1¼” apart with a Frixion pen in the center of my rectangle. I folded each line, wrong sides together and pressed to create creases. The creases make it easier to serge on the folds in the next step.

Serge

I set up my serger for 3 thread overlock wide with a stitch width of ¼” and disengaged the blade. Maxi Lock thread was used for all positions because I wanted my thread to blend in with the fabric to emphasize the texture and not the thread color. You could use a more decorative thread if you wanted. I used a stitch length 2-2.5, but it could be longer or shorter depending on the thread and look you are trying to achieve.

Serge on each fold, lining up the fold with where the blade would normally cut. I used a standard foot and guided my fabric along the disengaged blade. But you could also use a blind hem foot for your serger and set up the guide to help you position the fold in the proper place. Serge the same direction each time, so that the upper looper thread is on the same side of all the folds. Press folds well to set the stitches. You may need to use a press cloth so you don’t damage your thread.

serger twists

Mark and Stitch

I drew horizontal lines 1” apart on the panel perpendicular to my serged folds using my Frixion pen. Using my sewing machine I stitched across the folds on the lines in alternating directions. You can hold the twists down with your fingers as you stitch to make sure they lay the proper direction. See photo below. Don’t press the twists after making them or you will distort them. You can hover over them and steam them if needed.

serger twists

How to Modify Pattern Front for Center Panel

I measured my center panel as it would be finished in my top to be 4.5”. So I added my seam allowances (⅝” + ⅝” = 1¼”) before trimming the center panel to 5¾” wide.  The extra fabric on the top and bottom was cut off after combining the center panel with the rest of the front pieces. 

Since I added in a center panel, I needed to remove an equivalent amount from the front pattern piece, so the new top front was the same size as the original pattern piece. I determined that the amount to be removed was 3¼” (4½” for the center less seam allowances of ⅝” + ⅝” = 1¼”). The original pattern piece was a single piece cut on the fold. So I cut off 1⅝” from the center of the folded front and ended up with a right and left front piece. 

I changed my serger over to a standard 4 thread overlock stitch for serging my garment seams. To create my new top front I serged together the left, center and right front pieces. I pinned the center panel right sides together with the right front and left front. Then I double checked that my new front piece would end up the same size as my original pattern piece front. I serged the seams and trimmed center panel using the original front pattern piece as guide.

serger twists sleeveless top

Finish Garment Construction

The rest of the garment was constructed using the pattern instructions, but I used my serger for some of the steps. The stay stitching, darts, neckline, armhole edges and hem top stitching was done with my sewing machine. I also used my sewing machine to under-stitch the neckline front facing to keep it from flipping outward. The side seams and raw edges of hems and facings were serged with a standard 4 thread overlock. I used ⅝” seam allowances to be consistent with the pattern and trimmed off the extra as I serged.

Once you cut off that extra seam allowance you cannot put it back on, so I suggest you make certain the garment fits before seaming it with a serger. Making a muslin mock-up takes more effort, but it leads to much less frustration in the long run. It’s a real bummer to spend hours making a beautiful looking garment only to have it not fit when you are all done.

Inside Look

I turned my top inside out so you could get a detailed look at the construction. If you look closely you will see darts, seams, hem and facing edges, and the wrong side of the serger twists. This top has been worn and washed so the stitching you are looking at is not as crisp and clean as when new. 

My Serger Twists Sleeveless Top

Serger twists are a fun way to add embellishment to your projects and garments. As with any garments with exposed stitches, handle and launder with care. Any large loops on garments always have the potential to snag or get pulled. Think of those light, airy, lacy sweaters that we buy at the store that are so beautiful. We love to wear them, even though they snag easily. Serger stitches don’t snag as easily as those sweaters, but because of the loops, it’s best to handle them with care. I recommend hand washing garments with exposed stitching. After I spent all that time making the garment I want to be able to wear it more than once!

I hope you enjoyed this post about my serger twists sleeveless top. Try spicing up your garments with serger stitching!

serger twists sleeveless top

Happy Serging! – Jen

serging with jen

Resources

For another example of exposed serged stitches check out my post, Decorative Serged Seams: https://overtheedge.blog/decorative-serged-seams/

Babylock Wave Tucked Pillow Project: https://www.babylock.com/learn-and-create/projects/serger-pillows-pintuck-wave

Serger twists with Nancy Zieman in her book, Serge with Confidence: https://www.amazon.com/Serge-Confidence-Nancy-Zieman/dp/0873498550

Theme: Overlay by Kaira Extra Text
Cape Town, South Africa