Tag: beginner serger project

Beautifully Wrapped Gifts Made Simple with a Serger

beautifully wrapped gifts made simple with a serger

Beautifully Wrapped Gifts Made Simple with a Serger

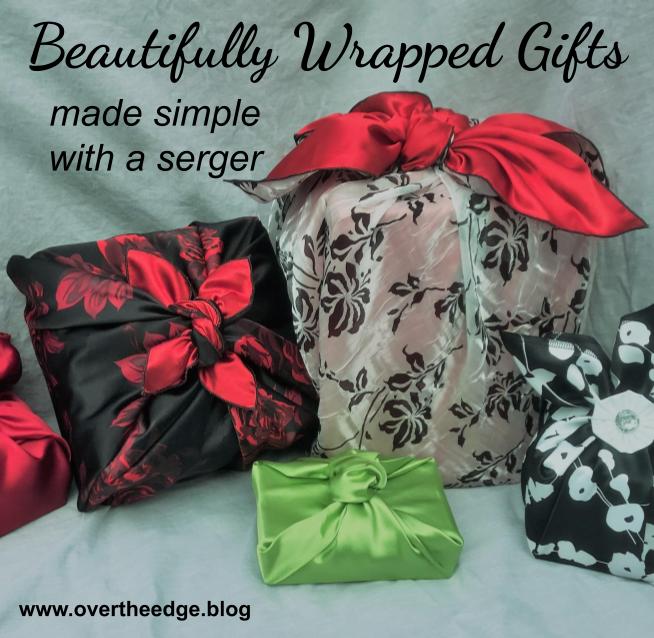
I’ve been using fabric gift wrap for many, many years. Fabric gift wrap is beautiful, and it can be used over and over again. I use it for all occasions – birthdays, showers, holidays, etc. Fabric gift wrap is quick and easy to make using your serger. Read on below to learn all about beautifully wrapped gifts made simple with a serger.

Benefits to using Fabric to Wrap your Gifts

Benefits to using fabric to wrap your gifts:

  • Save some trees – fabric gift wrap is reusable
  • Make it from almost any fabric
  • Great scrap buster – think of all those leftover odd sized pieces you can turn into gift wrap
  • Make it in any size
  • Make the fabric gift wrap part of the gift
  • Perfect reason to use your serger!

Simple Serger Made Fabric Gift Wrap

Let me introduce you to six quick and easy fabric gift wrap projects I have created using a serger. Click on the link near the end of the post to get the instructions to serge your own fabric gift wrap.

1. Wrapping Scarf

The wrapping scarf has been around for a long time. It was my first experiment with fabric gift wrap. Inspired by a book I saw at the store, I bought the book and started making fabric wrapping scarves from my leftover costume satins. Making fabric gift wrap was a double benefit for me. The first benefit was that I was able to make use of leftover fabrics from other projects taking up room in my stash. The second benefit was that the gift wrap was reusable and I no longer filled my trash with piles of paper gift wrap.

With it’s exposed serger stitching, the the wrapping scarf is the perfect project for highlighting decorative threads. You can make it from one reversible fabric which is more economical, or two fabrics, which is more colorful. My favorite wrapping scarves are made from flowy satins and shimmery organzas and chiffons. To secure a wrapping scarf around the gift, tie the ends of the fabric in loose knots, or get creative with added accessories like ribbons, buttons, and more.

beautifully wrapped gifts made simple with a serger

2. Simple Serged Gift Bag

A simple gift bag serged from a beautiful fabric will make a gift more special. I made the gift bag in the photo below from sparkle organza, which I thought looked great with the metallic silver box I put inside. This gift bag features exposed serger stitches and ribbon ties that are serged right into the seams so they can’t be misplaced. Although this gift bag is flat, it would be easy to give it more shape by boxing out the corners.

beautifully wrapped gifts made simple with a serger

3. Gift Card Envelope

Gift cards have become pretty popular as gifts. Wrap them up in a fabric envelope to make the gift card more special. You could even decorate your tree with these cute little presents. Expose your serger seams and have fun with decorative threads with this gift wrap. And serge the ribbon tie right into the seam to make wrapping the gift card quick and easy.

4. DVD/Book Gift Bag

This flat fabric bag works great for wrapping a book or DVD. This project is quick and easy and features exposed seams and an attached ribbon tie.

5. Petal Pouch

This cute little fabric pouch is great for wrapping small gifts or jewelry. Show off a pretty decorative thread in the exposed serger stitches on the edges of the petals. Sew the casings for the ribbon closure with a sewing machine or chain stitch on a serger.

beautifully wrapped gifts made simple with a serger

6. Drawstring Bag with Ruffle

This is a dressed up version of the standard fabric gift bag. It showcases three different fabrics and has a drawstring closure with a ruffle. The serged seams are on the inside of the bag and not exposed.

How to Make Fabric Gift Wrap with a Serger 

Are you ready to try serging your own fabric gift wrap? If the answer is yes, then be sure to click on the link below to visit my tutorial, How to Make Fabric Gift Wrap with a Serger.

 https://overtheedge.blog/tutorials/make-fabric-gift-wrap-with-a-serger/

how to make fabric gift wrap with a serger

I hope you were inspired by my post, Beautifully wrapped gifts made simple with a serger.

serging with jen

Resources

Wrapping Scarves book – The Wrapping Scarf Revolution by Patricia Lee. https://www.amazon.com/Wrapping-Scarf-Revolution-Earth-Friendly-Change/dp/1574861069 Here’s one site where you can buy the book. It was published in 2009, so if you can’t find a new one, you should be able to find a used copy on the internet.

Serge a Set of Pattern Weights

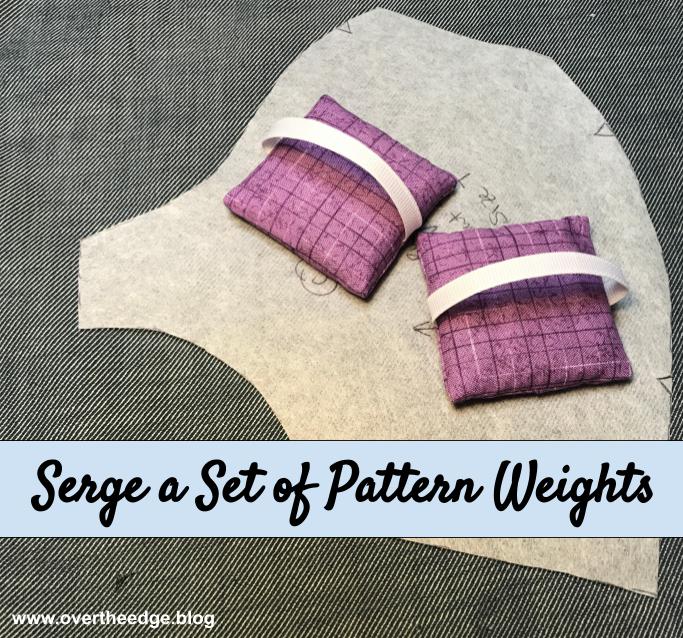
Learn how to serge a set of pattern weights that you will love! My pattern weights are a beginner friendly serger project, but even the most experienced sergist will enjoy making them.

I’ve been using oddball household items as pattern weights for years. If it could hold down a pattern piece it was fair game – old marble coasters, magnetic pin cushions, rulers, canned food, etc. I thought it was time I had some pretty pattern weights. And so an idea was born….

serge a set of pattern weights

My Ideal Pattern Weights

Since I designed these myself, I wasn’t limited to features currently available commercially. I considered what features I would like in a pattern weight and the best way to construct it using a serger. Below is the list of criteria I used to design my ideal pattern weights: 

  • made using only only my serger
  • no hand sewing
  • not too large
  • fairly heavy for its size
  • a handle to make it easy to pick up and move
serge a set of pattern weights

Serger Techniques Used

  • 4 thread overlock stitch
  • locking ends at the beginning and end of a seam
  • wrapped corners technique (Why clip corners to reduce bulk when you can wrap your corners instead!)

Supplies

Here’s what you need to make one pattern weight:

  • 3” x 7” piece of fabric cut into one 3”x3” square and two 2”x3” rectangles
  • 4” piece of ⅜” ribbon
  • 2.5” of ½” wide fusible web like Steam a Seam 2
  • 2 Tablespoons of metal BBs (like the kind you use in a BB gun)

Equipment

  • basic serger, capable of 4 thread overlock stitch
  • 4 cones coordinating thread
  • tool for poking out corners
  • Wonder clips (or pins)
serge a set of pattern weights

Serge a Set of Pattern Weights

I’m very pleased with my pattern weights. I can’t believe I spent all those years using oddball things for weights!

I thought you may enjoy making them too, so I created a tutorial to share with you. If you would like to Serge a Set of Pattern Weights please click on the link below to visit my full tutorial. https://overtheedge.blog/tutorials/jens-serger-pattern-weights-tutorial/

serging with jen

Resources

Where to get BBs – 

HIS & HERS Serger Pillowcases

A serger pillowcase is a great beginner project for those new to serging. In the classes I teach, I always encourage my beginning sergists to start with a simple project that they already know how to sew.  An easy project allows them to focus on learning the serger without also having to figure out the project. Sewing doesn’t get much easier than a few straight seams and a couple of pieces.  If you sew, you have most likely made a pillowcase using a sewing machine. So why not try to make one with your serger?  

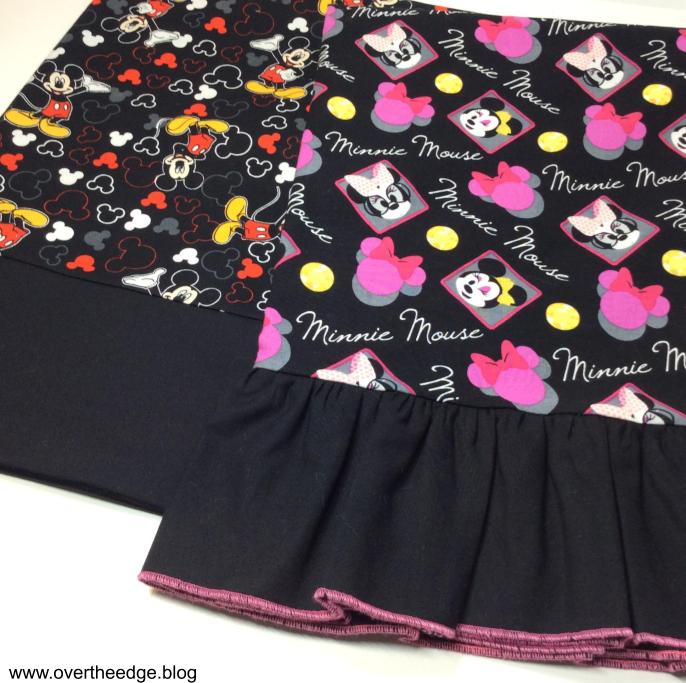
I developed these instructions for HIS & HERS Serger Pillowcases to be used in my beginning serger classes.  Although there are many different ways to construct a pillowcase, I feel that this is the easiest way to make them on a serger.  Both pillowcases fit standard size bed pillows and are made completely with a serger – no sewing machine required. 

The HIS Pillowcase

The HIS Pillowcase

The HIS Pillowcase is very simple and should be done before the HERS Pillowcase if you are new to serging. Only two pieces of fabric are used for this pillowcase – the main body and the cuff.  After setting your serger up for a 4 thread overlock stitch, all you need to do is serge straight seams, wrap a corner, and secure your seams at the beginning and end. These skills are the first ones we practice in my Serger SOS class after getting our sergers threaded.  (SOS stands for Serge On Successfully.) There is always a little more to learn when you switch from practicing on a small scrap of fabric to incorporating the skills into an actual project.

The HERS Pillowcase

The HERS Pillowcase

The HERS Pillowcase is a slightly dressed up version of the HIS Pillowcase but still simple enough for a beginner. In addition to the techniques used to construct the HIS Pillowcase, you also add a 3 thread rolled hem to the edge of the cuff and gather the cuff with your serger. Only three pieces of fabric are used in this pillowcase – the main body of the pillowcase and two pieces for the ruffled cuff. 

Link to My Tutorial

Below you will find the link to my full tutorial on the HIS & HERS Serger Pillowcases.  Included are tips on how to wrap corner seams for perfect corners and how to adjust serger gathers.

Theme: Overlay by Kaira Extra Text
Cape Town, South Africa