Serge a lettuce hem quickly and easily using a three thread rolled or narrow hem stitch. You only need a few things to create this lovely hem: a serger with a rolled hem stitch, some thread and a piece of knit fabric.
Lettuce Hems Using a Serger
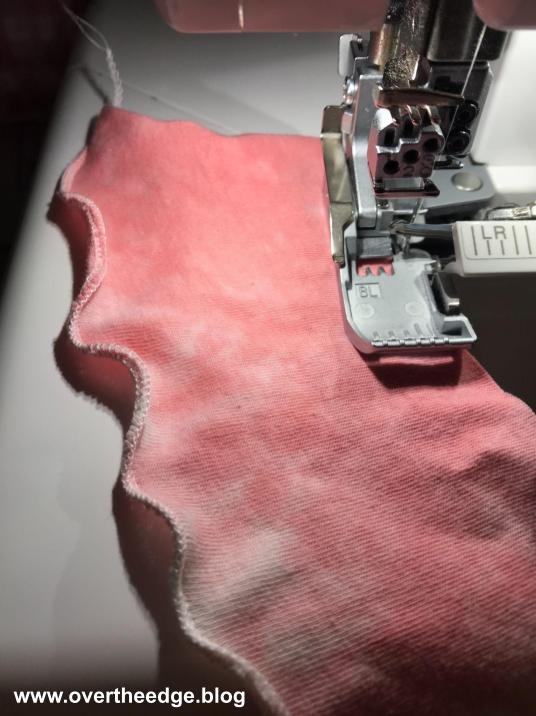
Can you guess why this ruffled hem is called a lettuce hem? Maybe because the edge of the fabric waves and curls like the edges of a lettuce leaf?!
The lettuce hem is created by stretching the fabric as you serge the edge. It can be used on the edges of light to medium weight knit fabrics. The greater the stretch of the fabric, the more the hem waves and curls. I use this technique to transform the hems on t-shirts, scarves and more.
Which Serger Stitch to Use for a Lettuce Hem?
I’ve used two similar (but different) stitches to serge a lettuce hem. Both the 3 thread rolled hem and the 3 thread narrow hem will work. Both are tiny hems. The serger is threaded the same way for both stitches, but the tension settings are different. Consult your manual for how to set up your serger for these stitches. On my serger the stitch selector is set on “D” for a rolled hem and “C” for a narrow hem. Click on the link to my napkin tutorial below for more details about the difference between the rolled hem and narrow hem. https://overtheedge.blog/tutorials/quick-easy-serger-napkins/
How to Stretch the Fabric as you Serge
Some people use the differential feed on their serger to create some extra stretch in their hems. Adjusting your differential feed to a setting less than 1 will create some stretch in your fabric as it feeds through the serger.
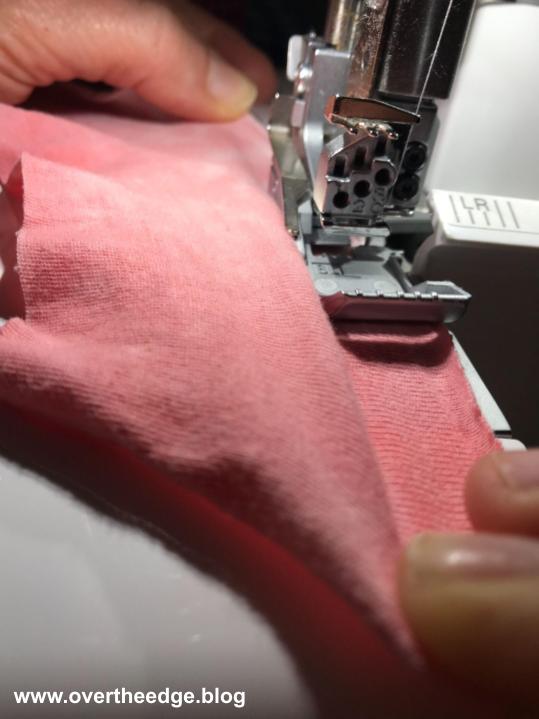
Others prefer to stretch the fabric manually. Keep your differential setting at normal (N or 1). Gently and equally stretch the fabric in front of and behind the needles as you serge, but let the feed dogs move the fabric. You will need to stop and reposition your hands as you serge around your fabric. If you try to pull the fabric through as you serge you may cause the needles to bend or break.
For my lettuce hem baby tees I had better results when I stretched the fabric manually.
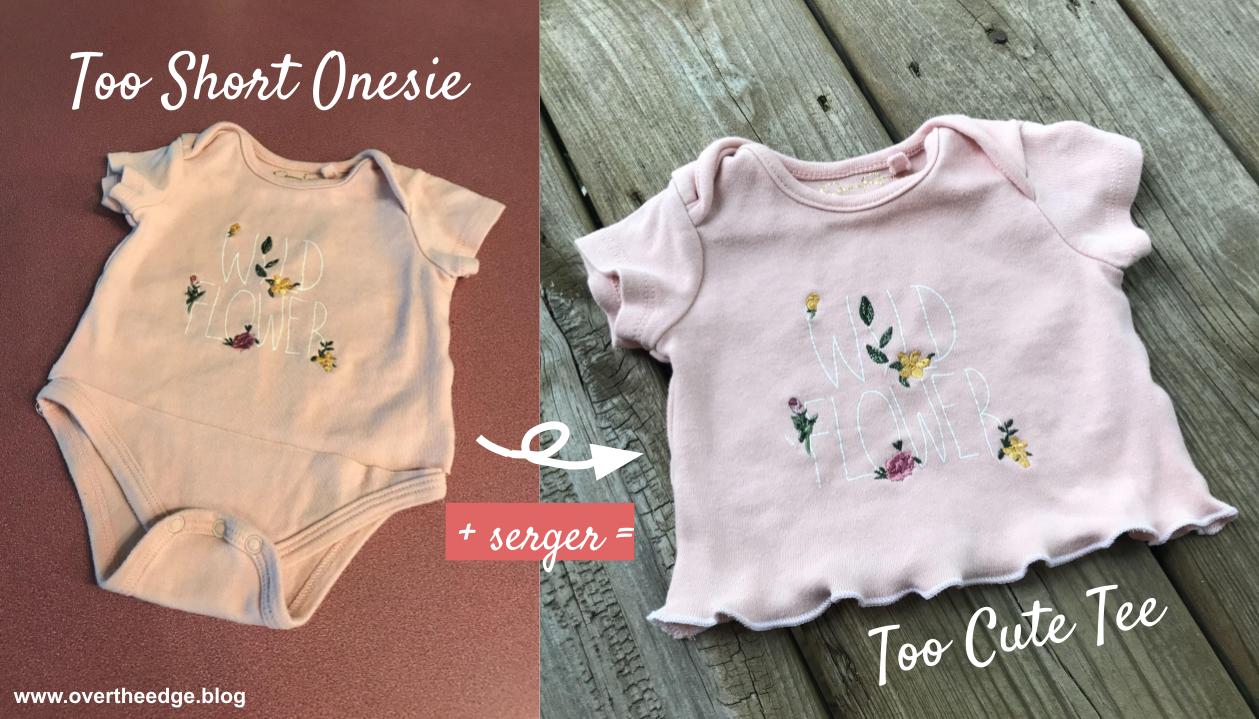
Serge a Too Cute Tee from a Too Short Onesie
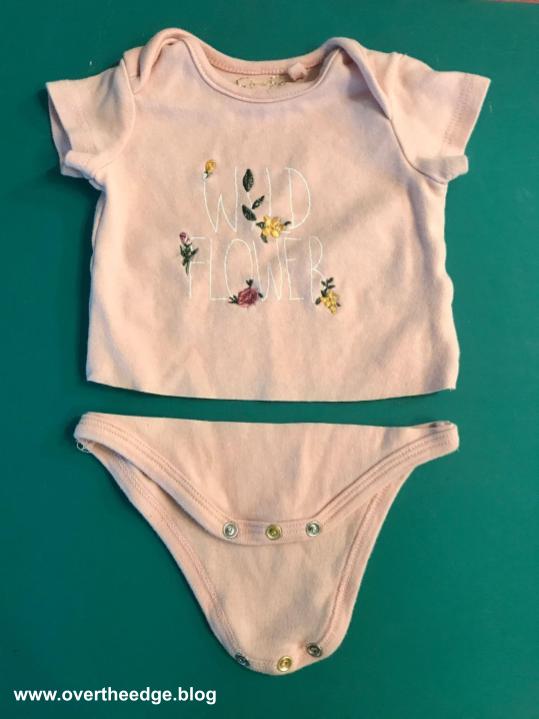
My granddaughter was gifted a bunch of really cute newborn onesies when she was born. But she grew out of them very quickly. The onesies were too cute to put away, so I turned the too short onesies into too cute tees! I guess you could call this a quick and easy “onesie refashion” project.
I started by cutting the onesie off at the leg openings.
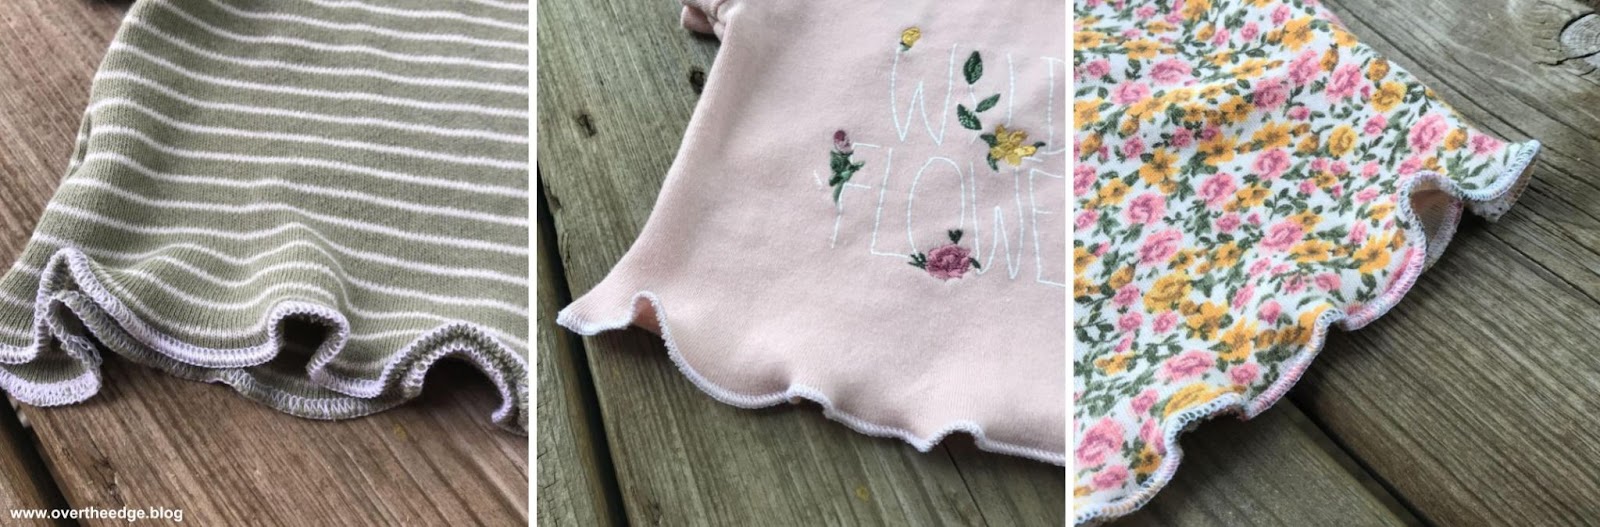
Next I set up my Baby Lock Evolution serger for a 3 thread narrow hem (stitch setting C) and a stitch length of 1.5. I used Maxi Lock thread, but you could choose more decorative thread for your loopers if you desire.
I serged the bottom hem of the t-shirt in the round, trimming off just a slight amount of fabric and stretching the fabric in front of and behind the needle.
After serging, I gave the hem a good stretch to help it “lettuce” even more. Then I buried the thread tails in the hem and trimmed off the extra thread tails.
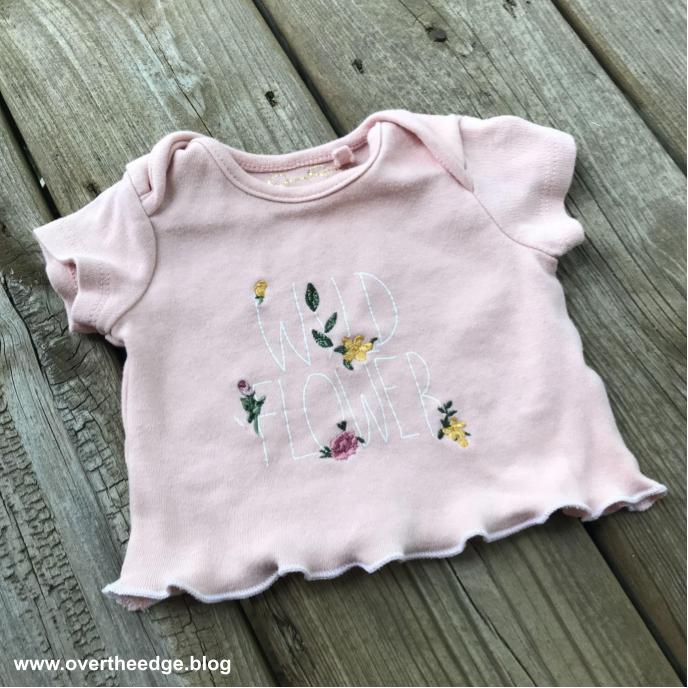
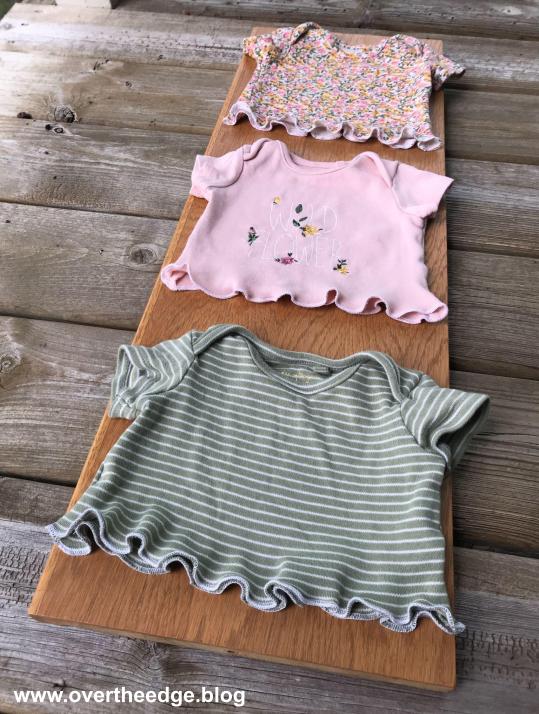
Isn’t she a cute little wildflower in her new t-shirt?!
Now my granddaughter can get a little more use out of those too short onesies as too cute tees!
As I started pulling together ideas for this blog post, I realized I did quite a few holiday serging projects this year. I thought it would be fun to share my projects with you. Hopefully, Holiday Serging with Jen, will inspire you to try some future holiday serging of your own.
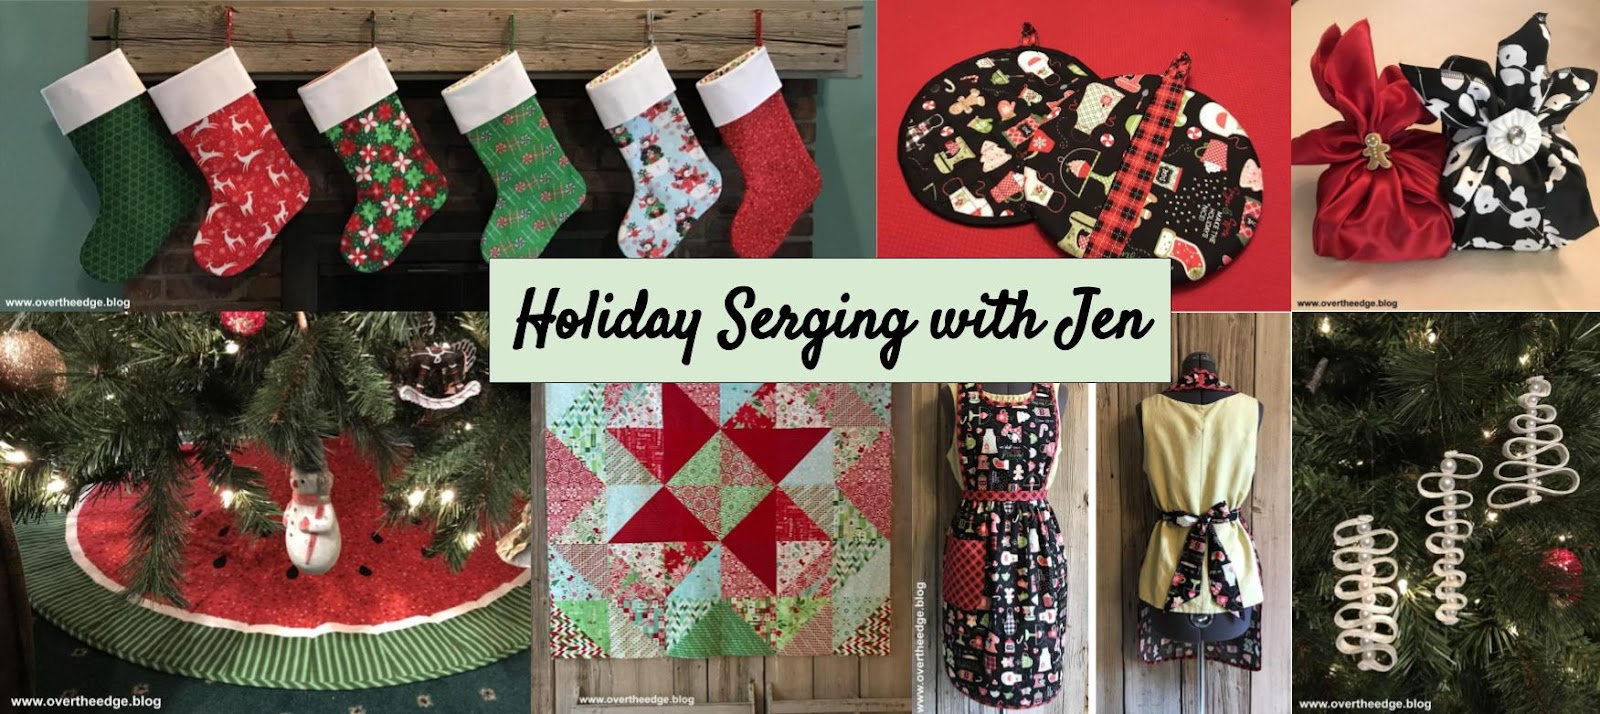
If you’ve been following my blog you’ve probably noticed that I always find ways to incorporate the use of my serger into my projects. For the holidays this year I made stockings, a tree skirt, gift wrap, an apron, some potholders, ornaments and a quilt, all using my serger. Some of these projects were made with only a serger, while others utilized a serger and maybe a sewing machine or some hand sewing.
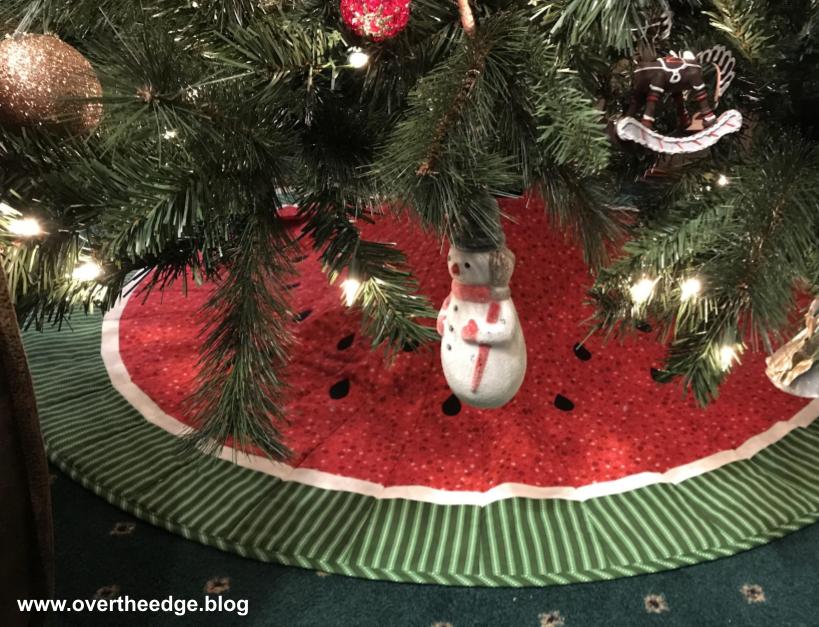
Christmas Tree Skirt
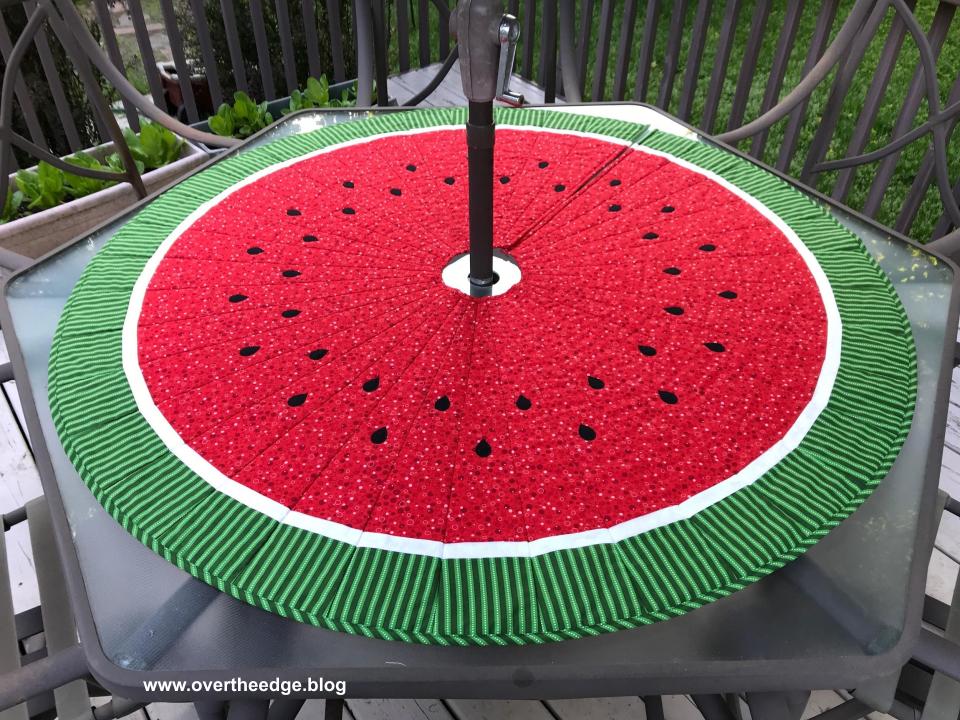
Does this tree skirt look familiar to you? In case you didn’t recognize it, it’s also my watermelon patio table topper I made with my serger that I blogged about this past summer. It fits around the umbrella post on my patio table.
We purchased an artificial Christmas tree this year, and I didn’t have a tree skirt to fit it. Since my table topper is basically a tree skirt in disguise, why not use it as my Christmas tree skirt too? It was actually my husband’s idea. It’s the perfect size for my new tree and the red and green fabrics I used in the tree skirt are from a Patrick Lose’s Christmas collection.
The watermelon design was my own, but I followed the basic tree skirt assembly instructions from the free pattern that came with my wedge ruler. I have a Ten Degree Wedge Ruler from Phillips Fiber Arts. This company has several patterns available that utilize the wedge rulers. See the resources section at bottom of this post for a link to the website.
I used a serger four thread overlock stitch to piece together the topper and I used a serger double fold bias binder to bind the circular edges. Here is a link to my tutorial if you would like more information on how to bind the edge of a quilt with a serger double fold bias binder.
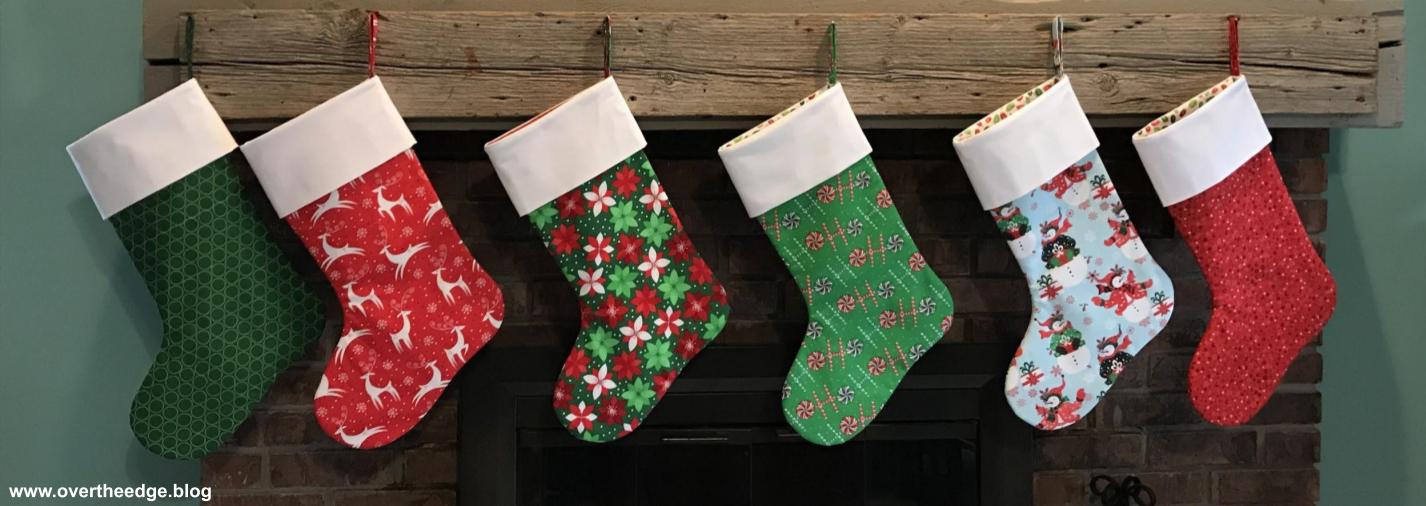
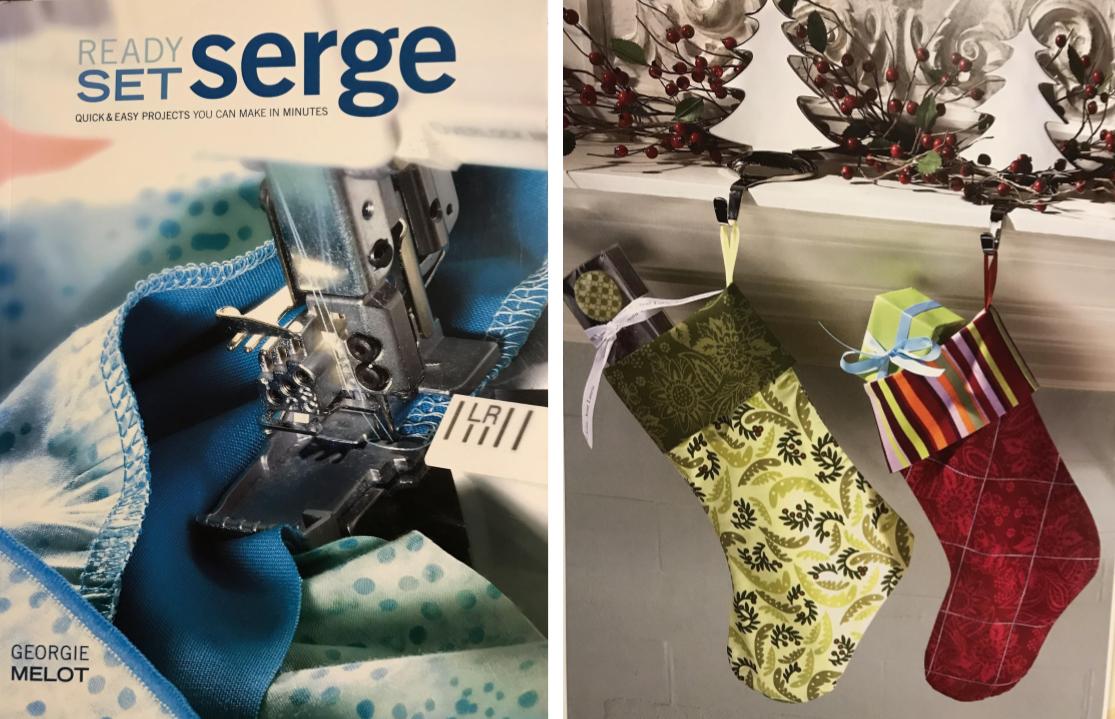
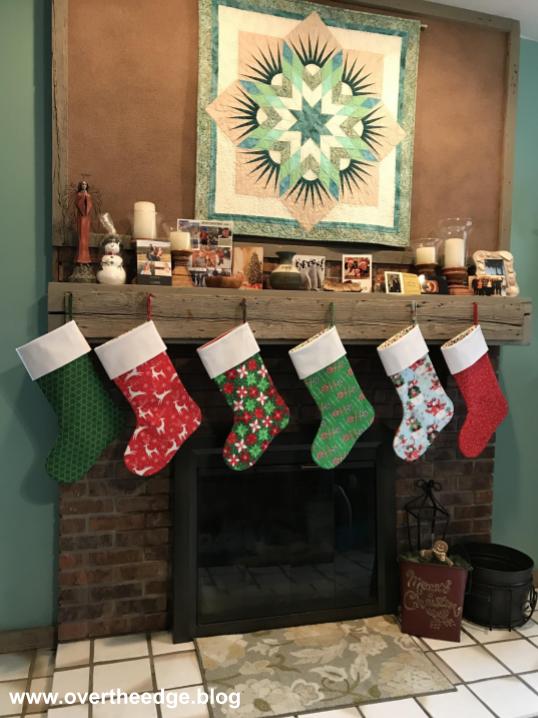
When I pulled my old stockings out of storage, I realized how tattered they looked. It was time to retire them. For the new stockings I chose mostly bright red and green fabrics that coordinate with my watermelon tree skirt. The serger technique I used to make my stockings came from the book, Ready Set Serge, by Georgie Melot. I didn’t use Georgie’s pattern for the stocking shape because I already had a favorite stocking shape. I used the stocking shape from the pattern, Stocking Sweet Stocking, by Bean Counter Quilts.
Many years ago a customer brought in some beautiful quilted stockings to the store where I work. I loved the shape of her stockings, so I asked her what pattern she used. It was the Stocking Sweet Stocking pattern. I’ve never made the quilted twister stocking, but I’ve made many serger stockings using that pattern for the shape.
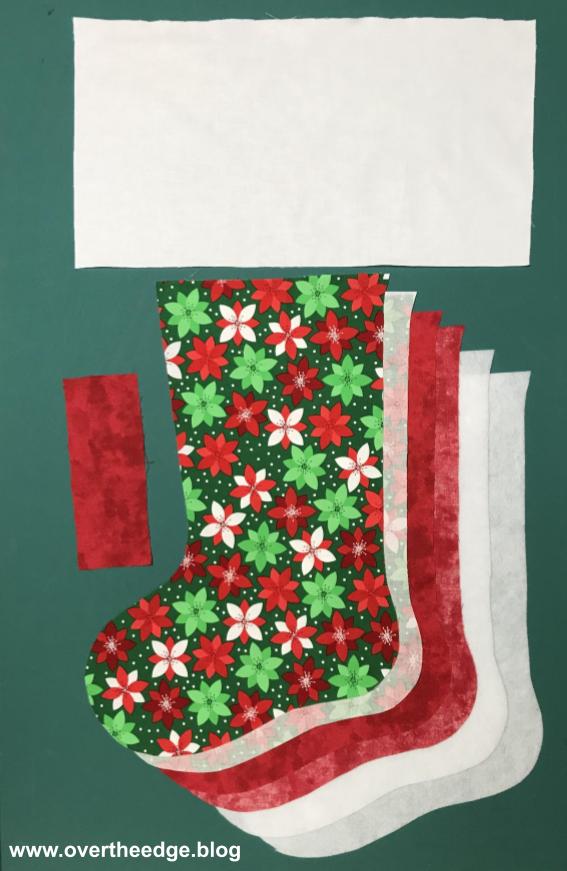
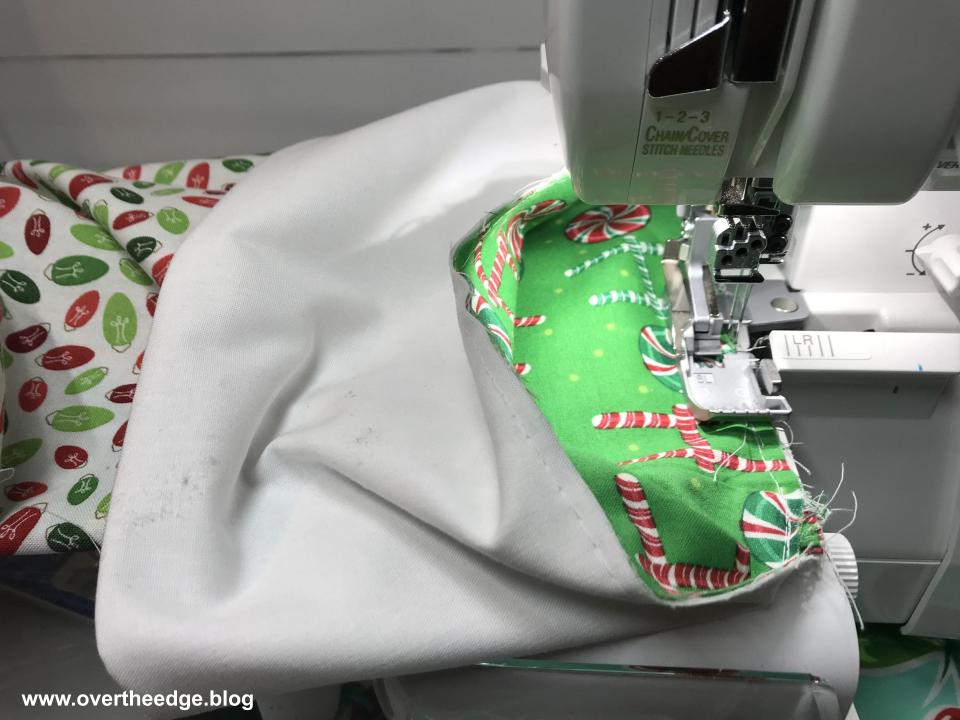
I used a four thread overlock to construct most of the stocking. Using a sewing machine, I top stitched the hanging loop and basted the layers together before serging around the stocking. Georgie Melot doesn’t use batting or tell you to baste the layers before serging, but I found the fabrics shifted less as I serged if I first basted the layers. If layers shift when you baste, no big deal. You simply take out the stitches and try again. If they shift while you are serging (and cutting) it’s much harder to fix. Plus, I like how the serging compresses the layers to make the seams flatter in the stocking.
Batting or no Batting?
I made one stocking with batting and one without batting so I could compare both methods. Both stockings turned out well. But I prefer the stability of the stockings with the batting. I used a thin sew in fleece batting by Pellon, but many other battings would work too. You can see in the photo below that the stocking without batting is a little floppy. The stocking with batting holds its shape.
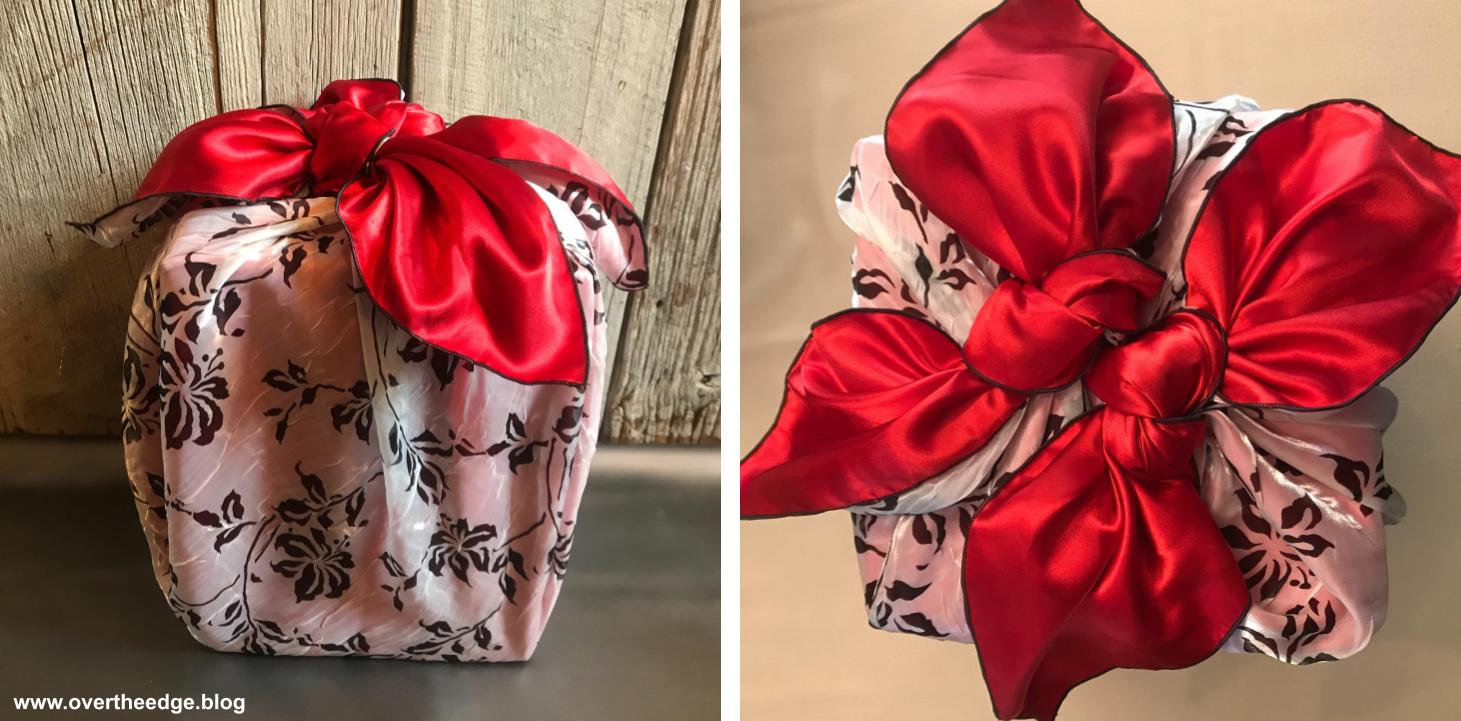
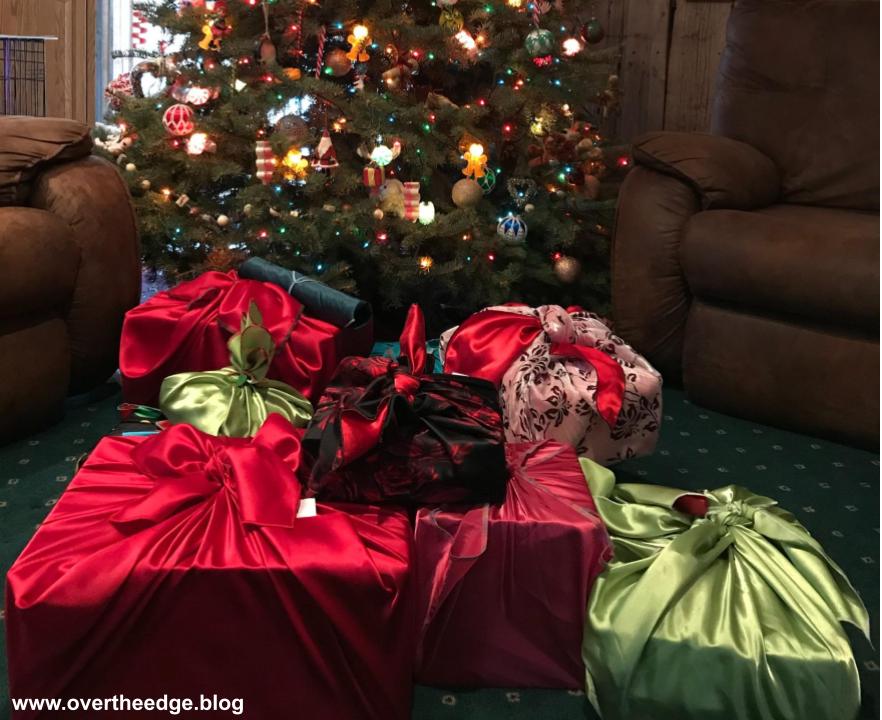
Fabric Gift Wrap
Fabric gift wrap is beautiful and can be used over and over again. I’ve been using fabric gift wrap for many years. The serger is a perfect tool for finishing the raw edges of your fabri gift wrap edges quickly and neatly. You can simply serge the edges of a piece of fabric just like you would with a cloth napkin and use it like wrapping paper. Or you can create a variety of gift bags with your serger. Check out my blog post and tutorial on serger made fabric gift wrap.
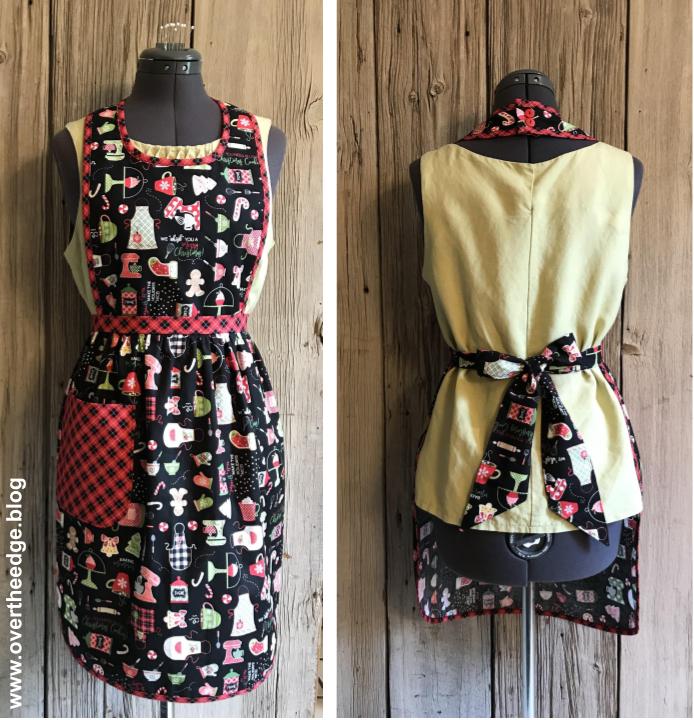
Every year at our store we make holiday aprons to display. This was my apron for 2020 and it was based on Kwik Sew pattern 4284.
I applied all of the binding on the apron using my 36mm double fold bias binder and a serger chain stitch. I used the same set up to apply the binding to my apron as I did for my watermelon tree skirt. Here are the links in case you would like to learn more.
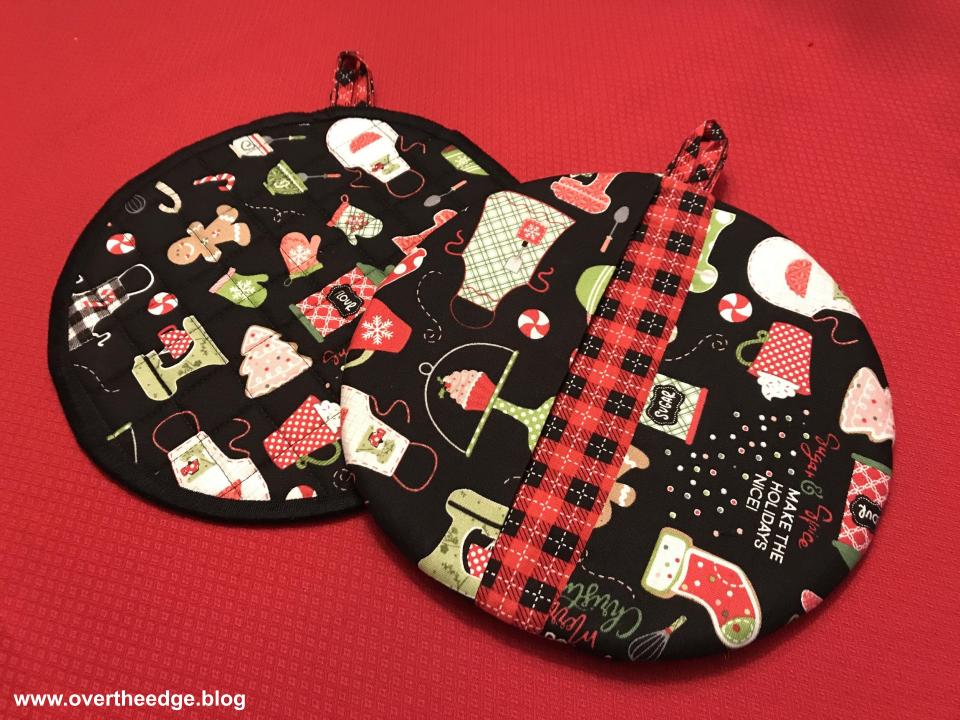
These potholders were a bonus project made with the leftover fabric from my apron. For the one on the left I made my own quilted fabric with my sewing machine. Then I used cotton thread with a three thread overlock wide and a small stitch length (can’t remember how small) and serged the edge. The one on the right was made by layering the fabrics and serging around the circle with a four thread overlock. Then I flipped the finger pockets over to conceal the serger stitches. The hanging loops were made from leftover bias fabric strips from the apron and the serger 36mm double fold bias binder.
Ornaments
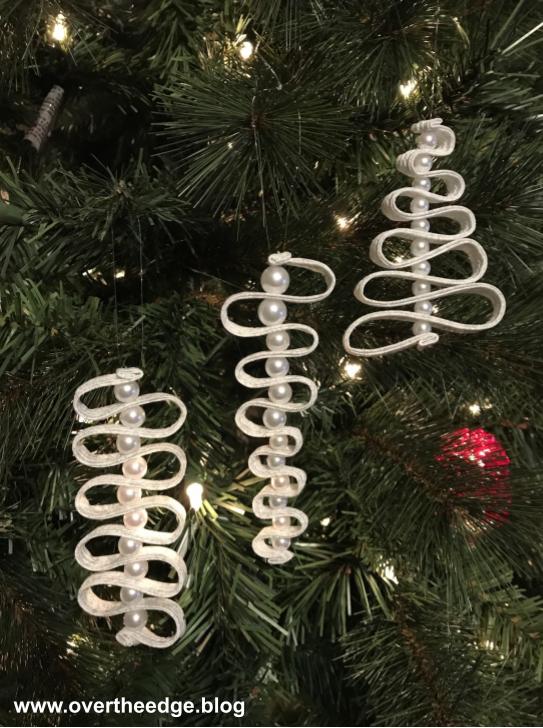
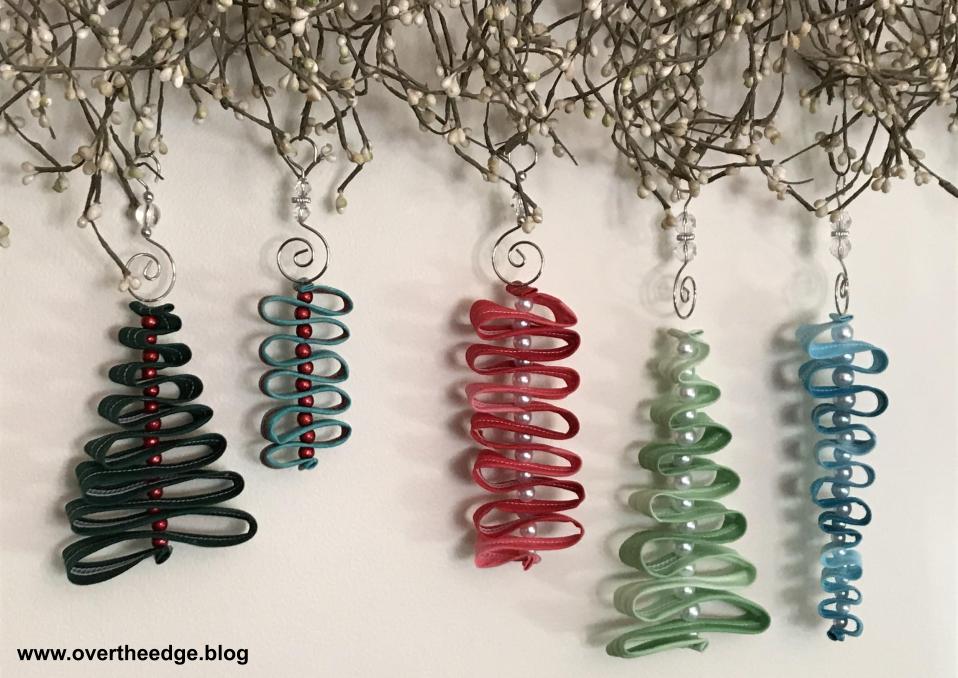
These ornaments all began with a folded piece of fabric, which I quickly and easily made with the cover stitch on my Baby Lock Evolution and the belt loop binder or double fold bias binder. Then I grabbed my hand sewing needle and combined the fabric “ribbons” with beads to make the ornaments. Your choice of fabric will determine whether your ornaments are fun and whimsical or lovely and elegant.
Check out my blog post about experimenting with your serger to make the best fabric ribbons for ornaments:
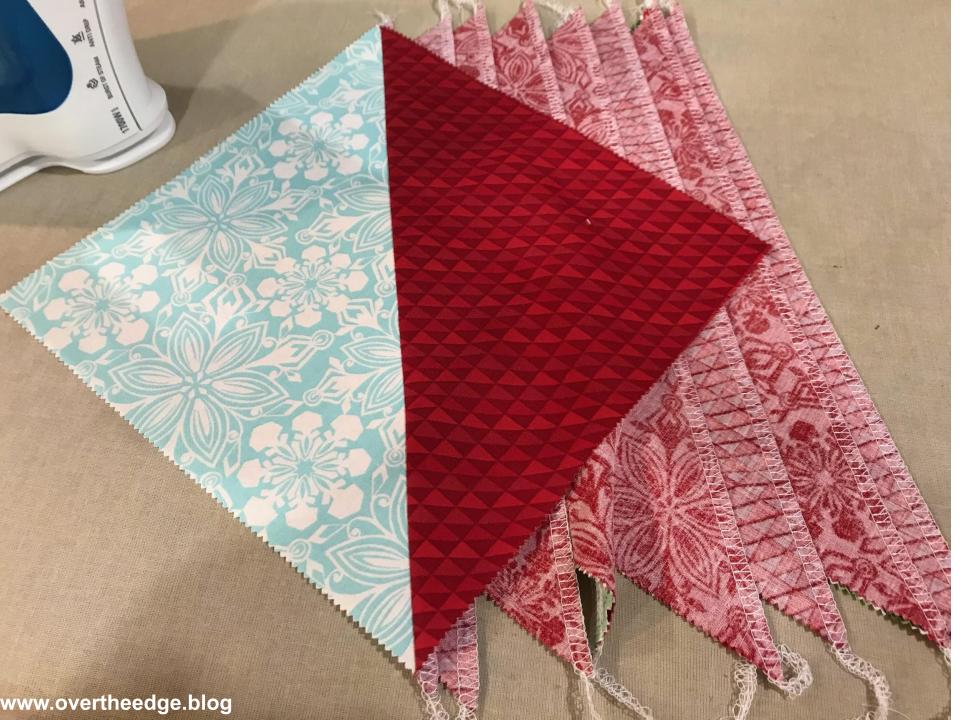
At the store this past spring most of the clerks participated in a fun activity for National Quilting Month. We created our own quilt patterns using only a layer cake for the fabric. Then we taught a class based on our designs. I called my quilt design, Forty Two Ten by Jen. Of course I had to use my serger to make my half square triangles (but you could also make it on a sewing machine.)
I also had a christmas layer cake, Jingle by Deb Strain of Moda, that I wanted to use. So I made a bunch of half square triangles with my serger and pieced them together to make this throw quilt for the holidays.
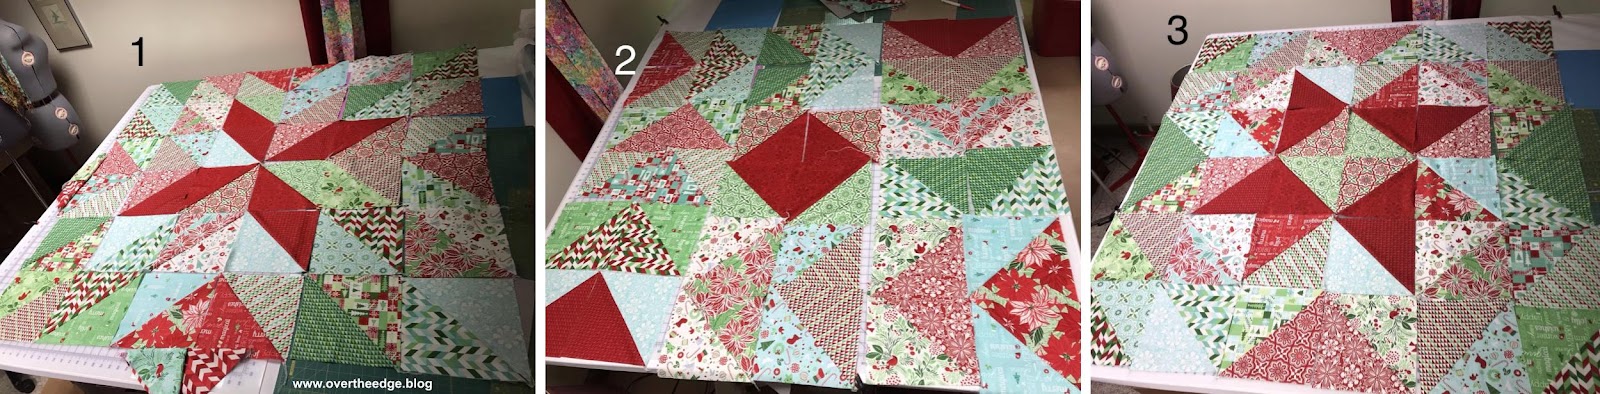
I considered three different layouts for the half square triangles in my holiday quilt. The winning layout was the friendship star in figure 3. But the giant flying geese in figure 2 was a close second. I finished piecing the quilt top earlier this year, but the layering and quilting will need to wait until next year…
Here is the link to my quilt tutorial for Forty Two Ten by Jen and my serger half square triangle video if you would like to give it a try:
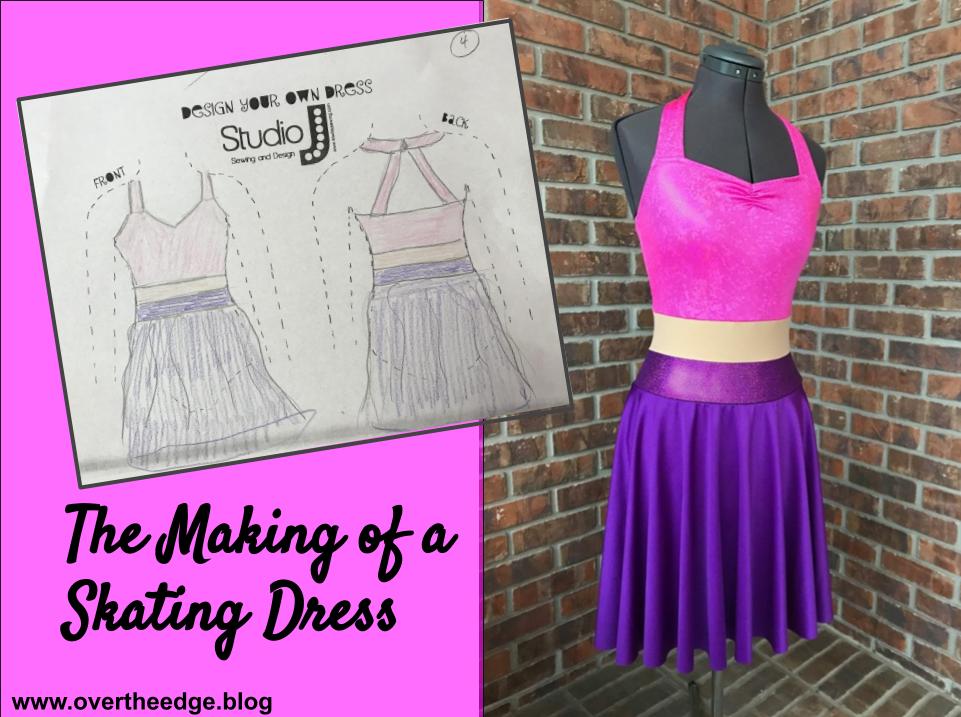
I was inspired to blog about the making of a skating dress, because this is the time of year I am typically crazy busy making costumes for color guards and figure skaters. But not this year. Because of the pandemic most of these activities were cancelled or down-sized. The good news is that I will have more time to invest in my blog. But I still am going to miss the creative process of designing costumes for these performers. I might not be sewing them this year, but I can reminisce and share some of my creations with you. So today my blog post is all about The Making of a Skating Dress.
I started designing and sewing figure skating dresses when my daughters were skating many years ago. My serger was the perfect tool to use to create these costumes. I taught myself through trial and error, like most designers of figure skating fashion. After my daughters transitioned to color guard, I started designing and sewing color guard uniforms. My girls no longer skate or guard, but I am still designing and sewing costumes for others! I enjoy working with all of the pretty fabrics and embellishments.
The Making of a Skating Dress from Start to Finish
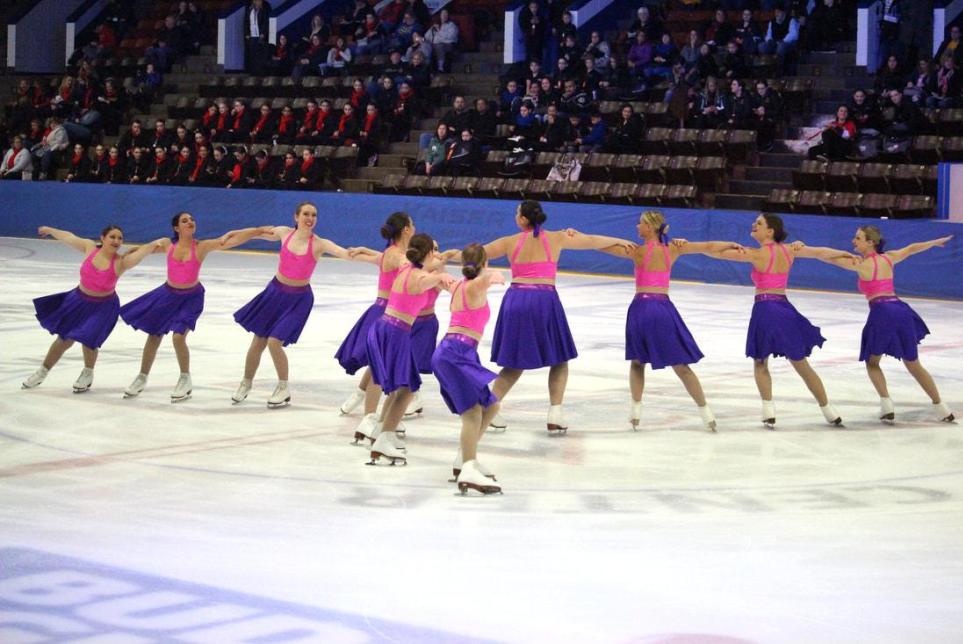
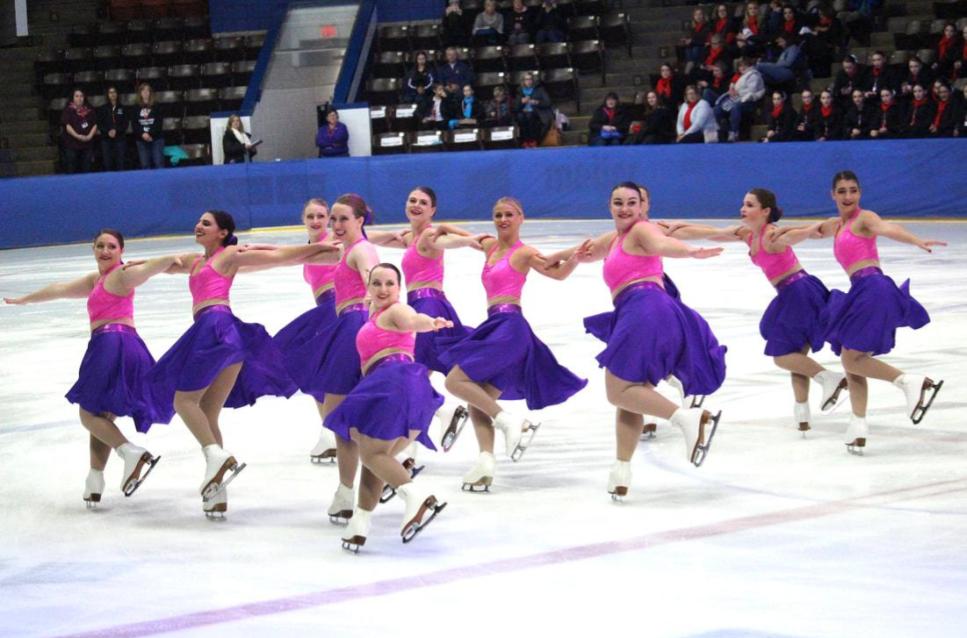
I didn’t photograph the steps of the creation process for many of my costumes, but I did happen to take enough photos of one of my dress designs to be able to feature it in this blog post. This dress was designed for a collegiate synchronized figure skating team.
Here is the process I follow to create a custom costume. Typically I need 6-8 weeks of time (minimum) from meeting with the coaches to delivering a set of costumes. It really depends on the complexity of the costume and the number of performers. I do all the designing and sewing myself. Sometimes my hubby will help me with some cutting or hand sewing.
Initial Discussion of Ideas, Budget and Timeline
The first step is to talk with the coaches/performers about the design they are envisioning and get their input about fabric and colors. We also discuss their budget and timeline. If they have made sketches or collected photos of what they are looking for, I also ask for copies of those.
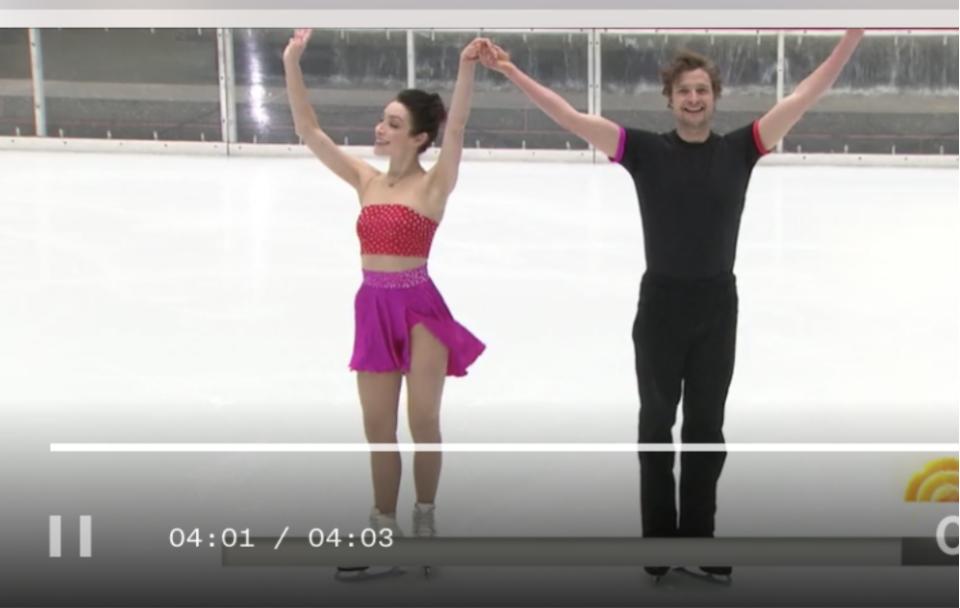
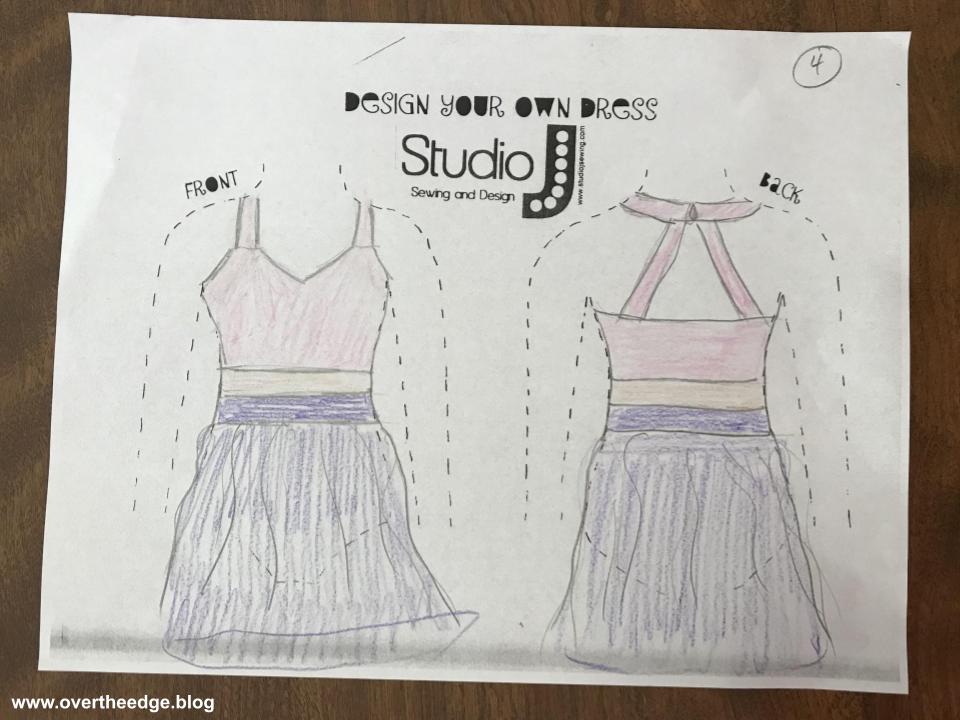
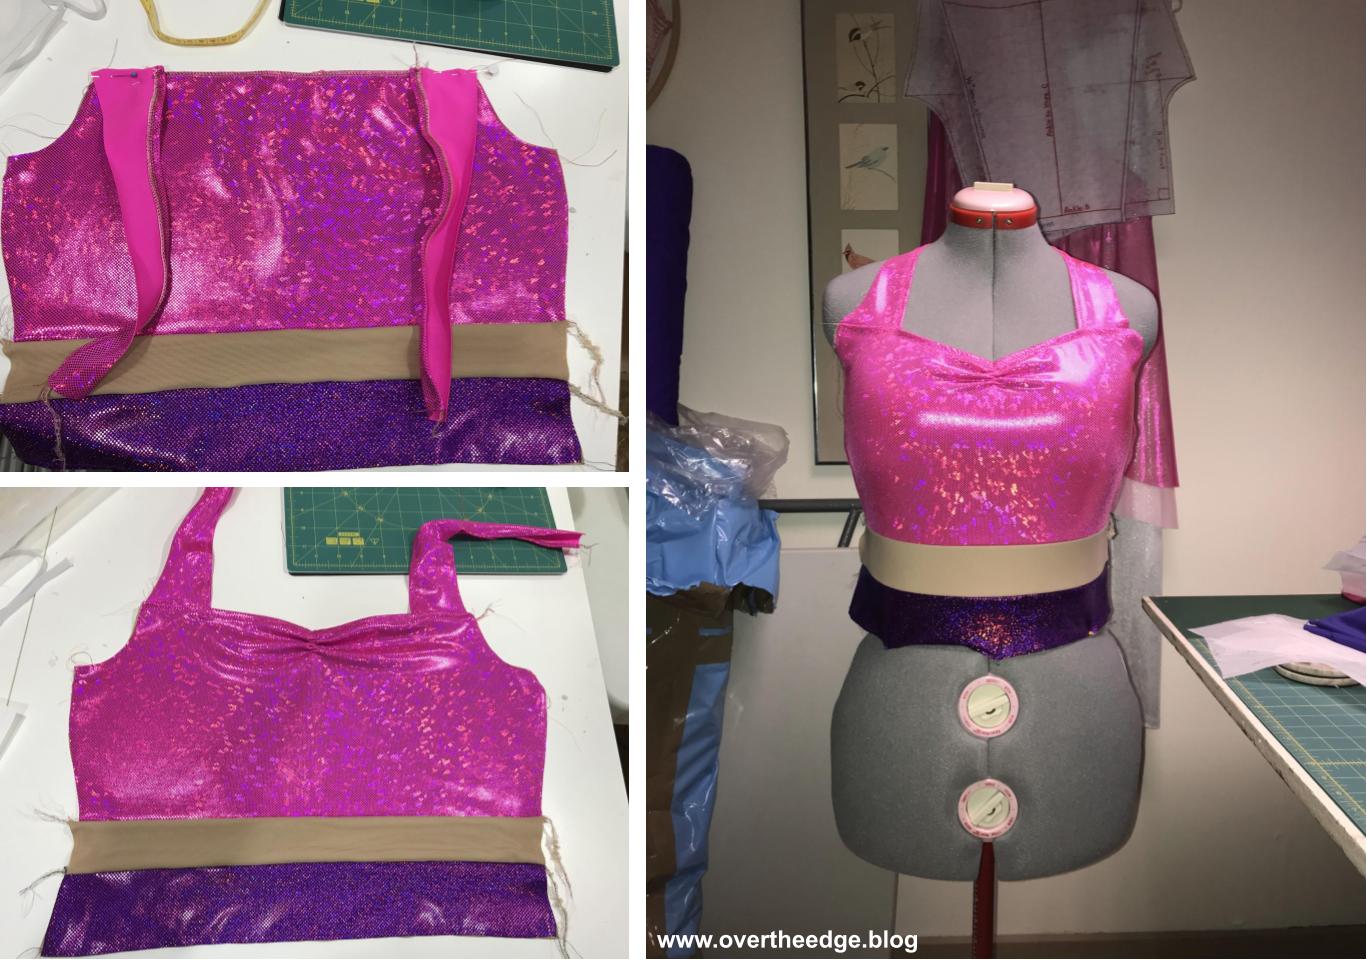
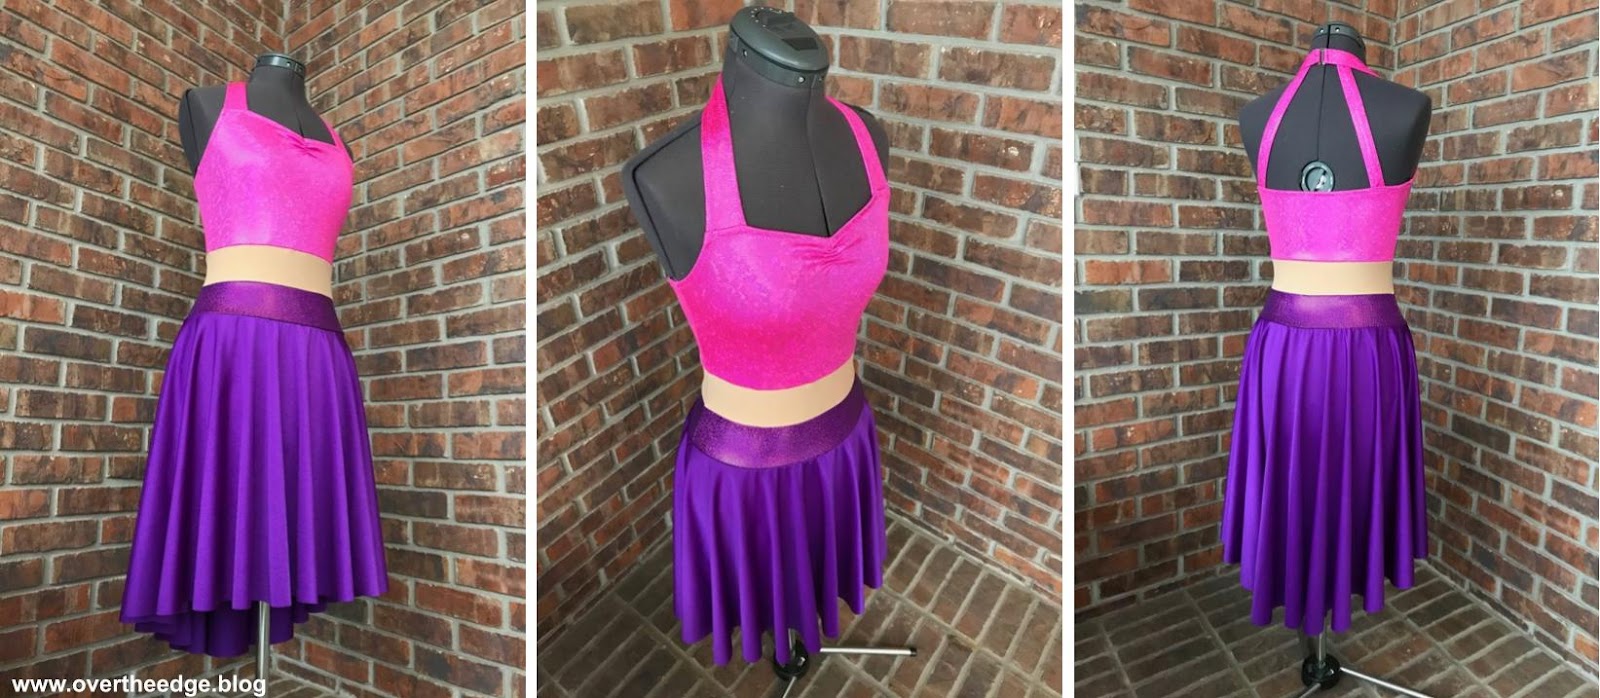
The inspiration for this dress came from a dress worn by Meryl Davis, an olympic gold medalist in ice dancing (photo below). They wanted the skirt to be longer and full and to dip in the back. They also wanted to add straps to hold up the bodice. The colors they chose were bright pink and purple.
Fabric Swatches
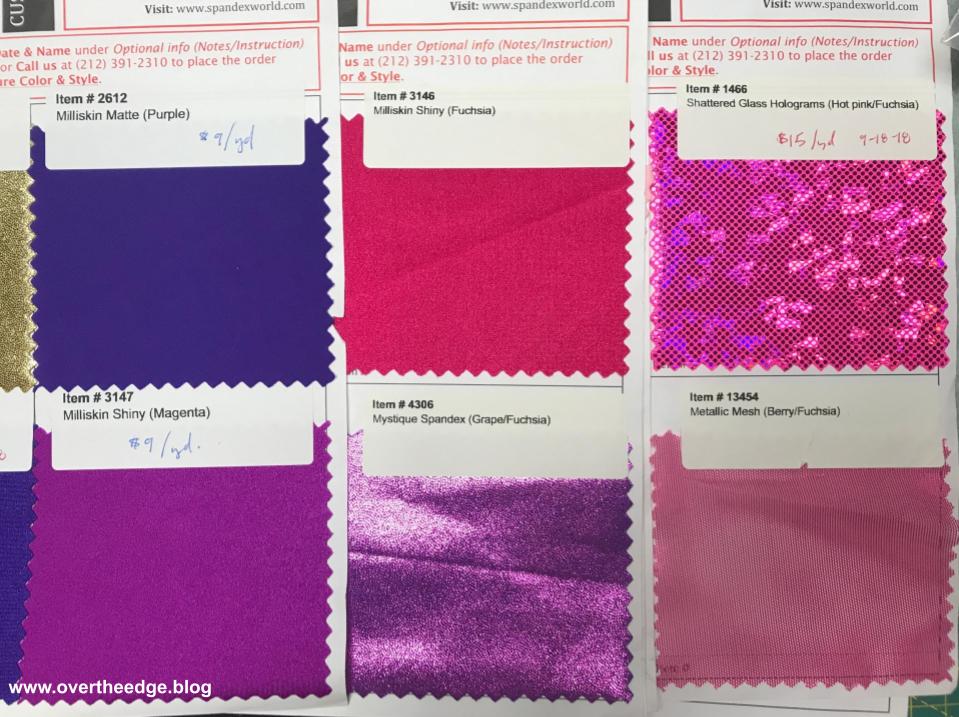
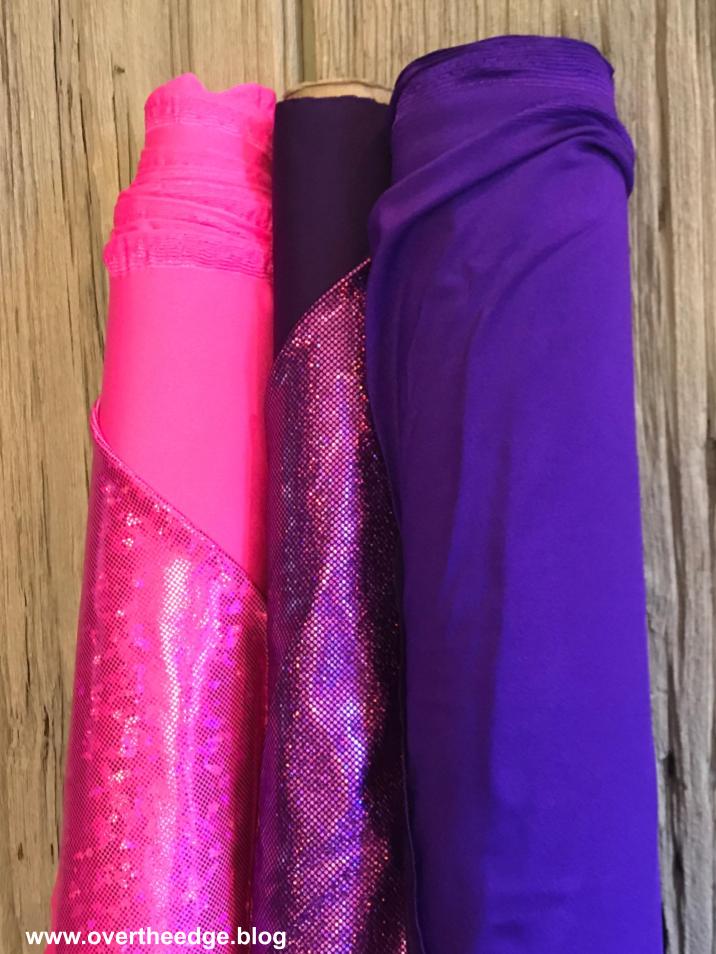
Based on our initial discussion, I typically order several different fabric swatches. Because they have a huge selection I order most of my spandex from spandexworld.com. The decisions on actual fabrics to be used are not made until after we’ve had a chance to touch and feel the fabric swatches. Fabrics can appear quite differently from how they appear on your computer screen.
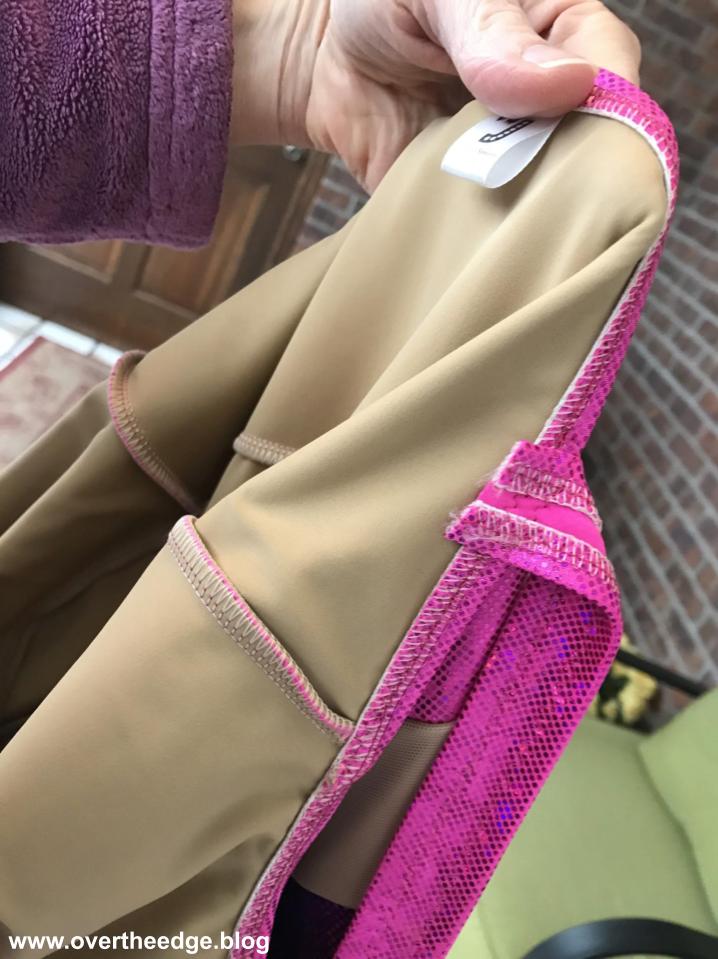
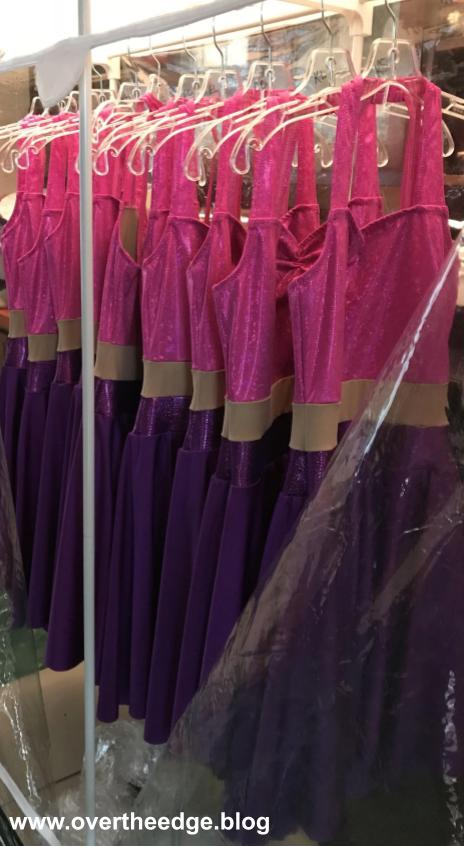
For this dress, we decided on a holographic pink bodice, a holographic purple belt and a sparkle purple spandex. What appears to be a bare midriff is really a stretch mesh with stretch lining underneath.
Meet, Determine and Measure
Once I receive the fabric swatches, I meet with the coaches/skaters. At this meeting we choose the actual fabrics to be used in the costume, and make final decisions about the dress design. I also take measurements of all of the performers. For teams, in addition to measurements, I have all of the performers try on my “fit samples”. These fit samples help skaters to determine the size they are most comfortable in. I use their preferences along with the measurements to determine which size costume to make for each performer.
Sketch
After gathering all of the data, I make a simple sketch of desired design and get approval from the coaches.
Estimates and Ordering
After the sketch is approved, I determine the amount of fabric to be ordered and provide an estimate for the project to the coaches/performers. Once the estimate has been approved and I have received the down payment, I order the fabrics and notions.
Prototype
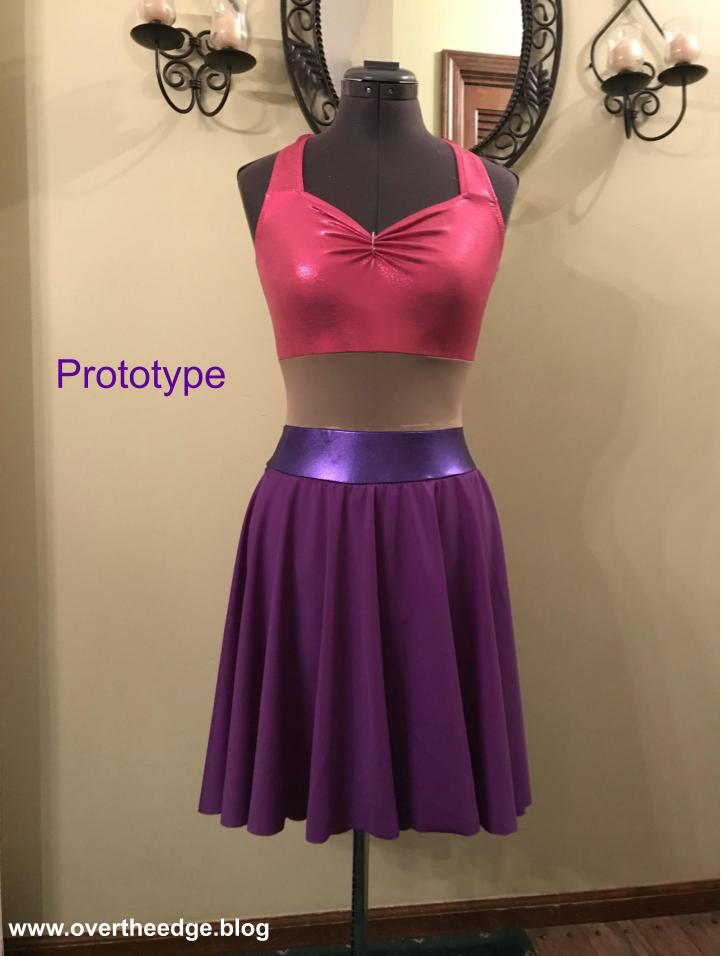
While I am waiting for the fabric to arrive, I make the prototype pattern and then the prototype dress from similar fabrics.The prototype is usually made in my size so I can put it on and evaluate the fit and design. Sometimes I use a commercial pattern as a base for the design, especially when I first began making skating dresses. But now I mostly work from a standard sloper I have created, which I modify for each design. If you are looking for some patterns to make skating dresses, Jalie has quite a few. Kwik Sew also has a few. There are also some independent pattern companies, such as Specialty Sportswear Patterns, that make figure skating dress patterns. I have links to their websites in the Resources section at the bottom of the post. The making of a skating dress is a lot like making a swimsuit with a skirt. See my blog post about the Purrfect Swimsuit. https://overtheedge.blog/the-purrfect-swimsuit/
Prototype Approval
Usually I send photos of the prototype on my dress form (or sometimes on me). Sometimes the prototype review is in person, so they have a good idea of what the finished product will look like. Seeing a sketch is great, but seeing a 3D model is even better. Sometimes I make minor changes at this stage based on input from the coaches.
After viewing this prototype, the coaches decided they would like the pink bodice to be a little longer, and they wanted the skirt to be more of a hi-low, with a dip in the back. But everything else was good.
Pattern Making
I make a custom pattern for each size needed. For teams I make the patterns in XS, S, M, L and maybe XL and match the skater to the best fit. I don’t make a custom pattern for each performer on a team unless the team wants to pay for custom patterns for each performer. Depending on the design of the dress I can end up with quite a few pattern pieces!
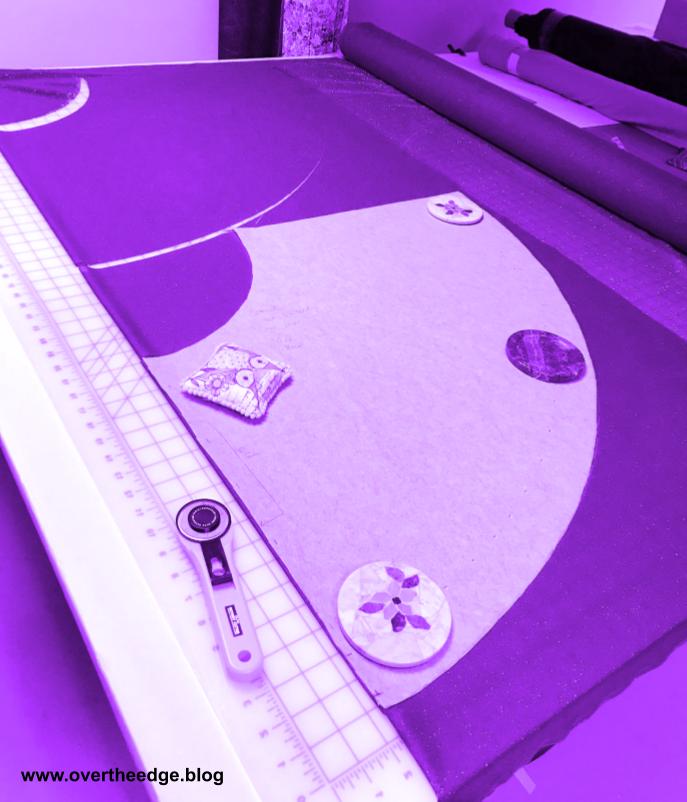
Layout and Cutting
Once the fabric arrives, I cut out all of the fabric pieces one fabric at a time. I have a large cutting mat, and typically rotary cut around my pattern pieces, using pattern weights. I use a ping pong table adapted to a large cutting table. Having the big table makes it easier to layout and cut since I order large quantities of fabric on big rolls. I have a bin designated for each dress, so I can keep all the pieces for each dress together.
Sewing and Serging
After I cut out all the pieces for all the costumes, I sew/serge assembly line style for efficiency. I will complete one step for all of the dresses before moving onto the next. Usually these costumes are made with a combination of sewing and serging. I use my sewing machine for basting and other misc things that may be difficult to do on my serger. I use my serger for most of the seams that need to stretch. Most costumes have a combination of both overlock stitches and cover stitches.
Test Fabric Color Fastness
It never even crossed my mind that a synthetic fabric would bleed. The first time I had this problem with a fabric was with a color guard uniform. It was a surprise to me and the performers when the front of their armpits turned pinkish purple from the purple band on their sleeveless unitard.
I recommend soaking your fabrics in warm water to see if any color bleeds. On bright colors, even spandex bleeds sometimes. I don’t typically prewash the fabrics because I am working with very large rolls. Cutting it up into washing machine size pieces and then washing and drying it would add a lot to the cost of the costume. And many performance fabrics lose their sheen if washed too much. If they need to wash them, I usually tell them to hand wash quickly, roll it up in a towel to blot it dry and then hang to finish drying. Many times performance costumes are not washed at all.
The bright pink and purple fabrics for this dress did bleed after soaking for a while.
Final Fitting
Once I have the costume completed, except for attaching the back of the straps, I meet with the performers to do a final fitting and adjust the straps for the best fit.
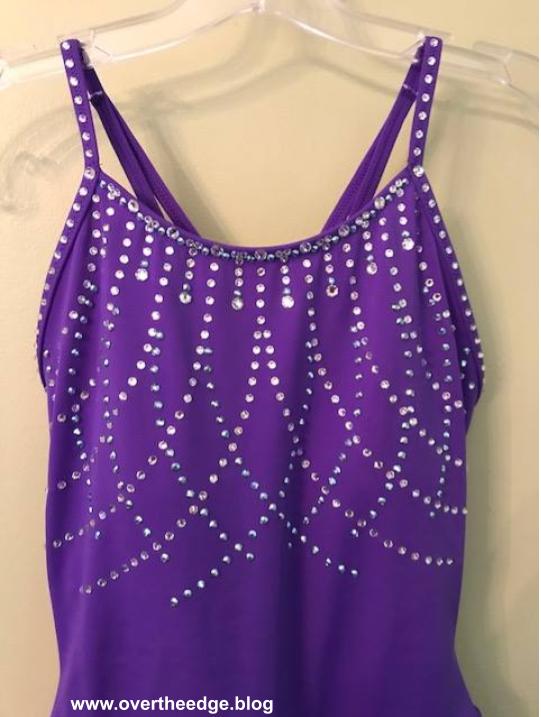
Final Touches
The straps are then permanently attached and the finishing touches are completed, such as applying embellishments and crystals. The synchronized skating and color guard teams I usually design for do not have crystals applied to their costumes. When I design dresses for individual figure skaters I usually apply crystals.
Photography
I photograph all of my creations so I can look back and remember all the fun stuff I made. Looking at photographs of old costumes always brings a smile to my face.
Delivery Preparations
To prepare the costumes for delivery, I put them hangers, steam them to remove wrinkles and place them in a garment bag.
Delivery/Pickup
Sometimes I deliver the costumes, and sometimes the coaches or performers pick them up. I love to see how excited the performers get when they try on their new costume for the first time. It’s kind of like Christmas morning when the kids first see the presents under the tree…..
Observe Performance
If possible, I attend a competition or skating event to see my creations in action. I don’t know if any other designers do this, but for me it brings great joy to see the finished result of my many hours of hard work.
If you are interested in seeing more of my costume creations, please visit my facebook page for Studio J Sewing (my sewing and design business). Click on photos and scroll past the face masks, and you will see many of the fun and beautiful costumes I have created.
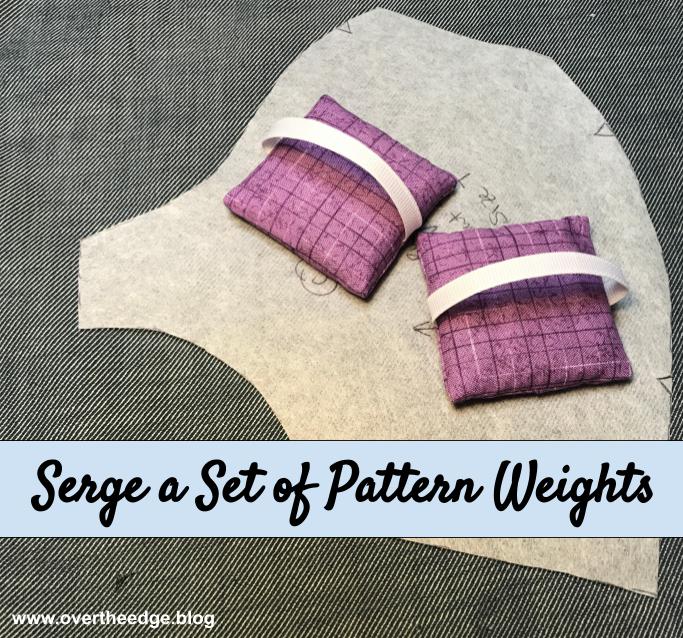
Learn how to serge a set of pattern weights that you will love! My pattern weights are a beginner friendly serger project, but even the most experienced sergist will enjoy making them.
I’ve been using oddball household items as pattern weights for years. If it could hold down a pattern piece it was fair game – old marble coasters, magnetic pin cushions, rulers, canned food, etc. I thought it was time I had some pretty pattern weights. And so an idea was born….
My Ideal Pattern Weights
Since I designed these myself, I wasn’t limited to features currently available commercially. I considered what features I would like in a pattern weight and the best way to construct it using a serger. Below is the list of criteria I used to design my ideal pattern weights:
made using only only my serger
no hand sewing
not too large
fairly heavy for its size
a handle to make it easy to pick up and move
Serger Techniques Used
4 thread overlock stitch
locking ends at the beginning and end of a seam
wrapped corners technique (Why clip corners to reduce bulk when you can wrap your corners instead!)
Supplies
Here’s what you need to make one pattern weight:
3” x 7” piece of fabric cut into one 3”x3” square and two 2”x3” rectangles
4” piece of ⅜” ribbon
2.5” of ½” wide fusible web like Steam a Seam 2
2 Tablespoons of metal BBs (like the kind you use in a BB gun)
Equipment
basic serger, capable of 4 thread overlock stitch
4 cones coordinating thread
tool for poking out corners
Wonder clips (or pins)
Serge a Set of Pattern Weights
I’m very pleased with my pattern weights. I can’t believe I spent all those years using oddball things for weights!
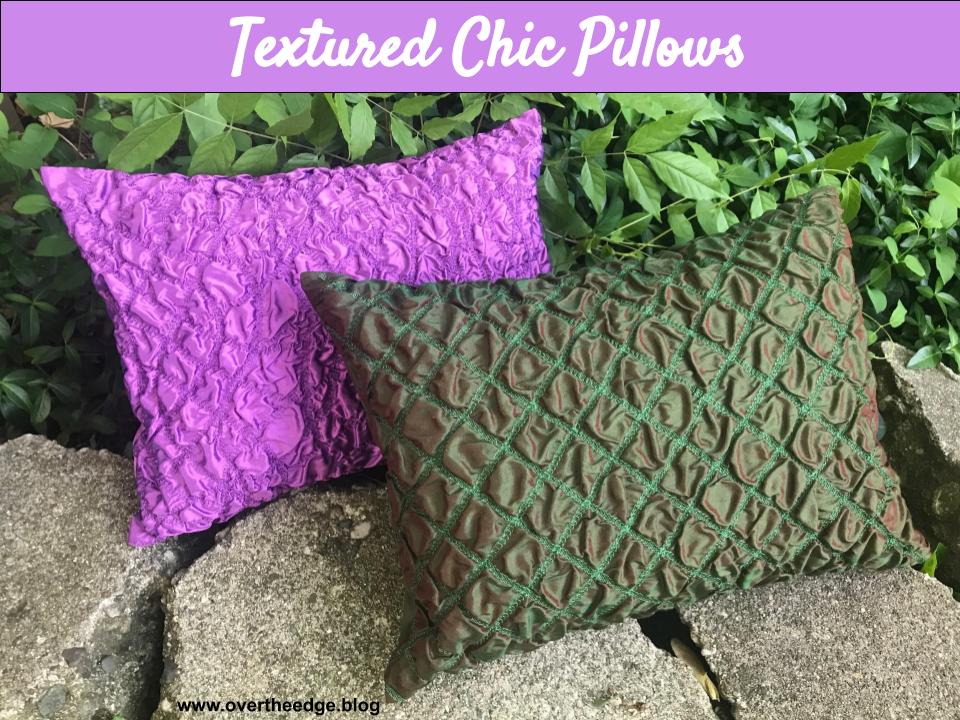
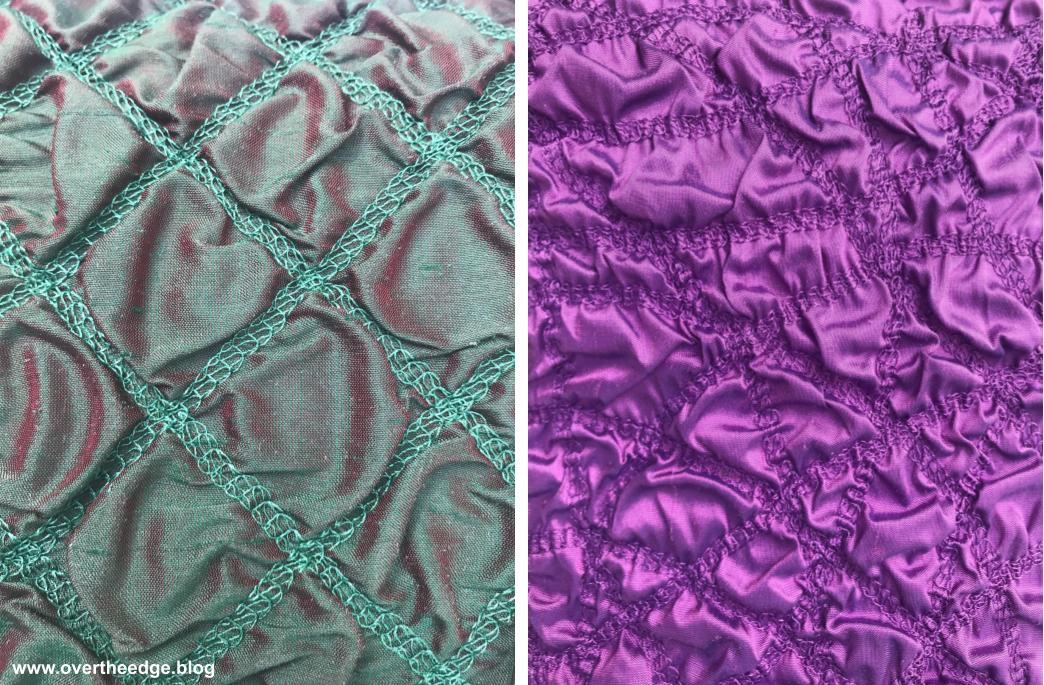
I always get excited when I get an opportunity to use the coverstitch on my serger for more than just hems on knits. Although these textured chic pillows may appear advanced, they were actually very easy to make on the serger using a narrow coverstitch and silk dupioni fabric. The secret to the texture is in the special shrinking fabric. I just love how the textured surface of the dupioni silk changes color with the light!
The Book – Serger Boutique
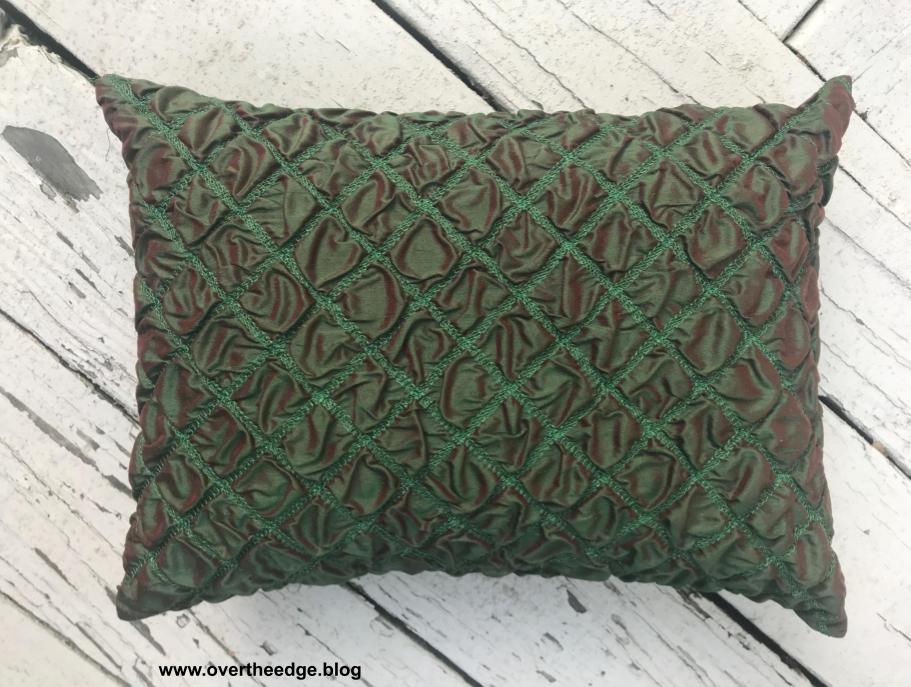
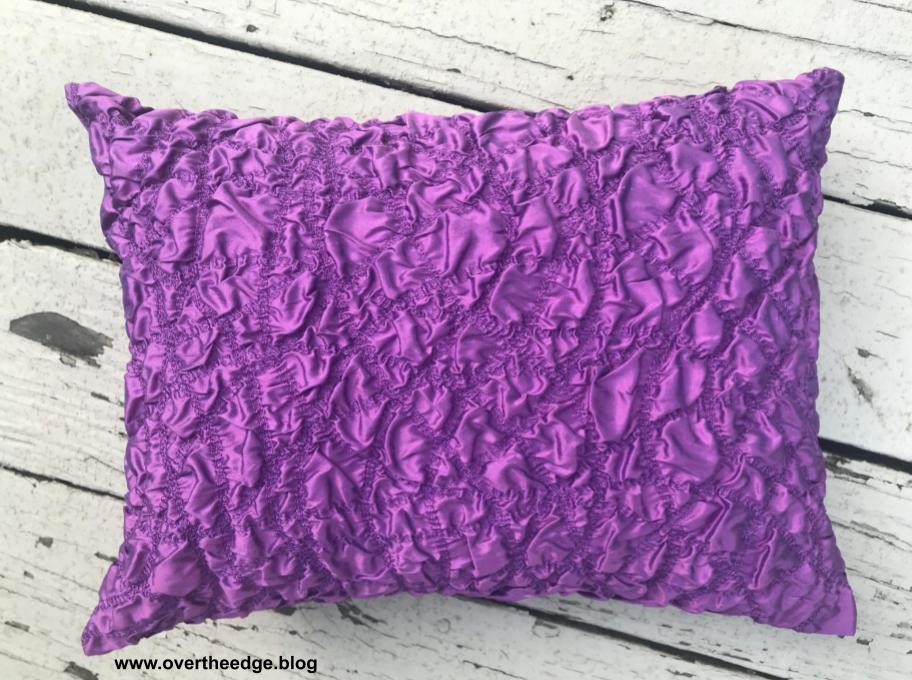
Both of these pillows were based on projects in the book, Serger Boutique by Nancy Zieman and Barbara Goldkorn. I used the instructions from the Textured Chic Pillow project to construct my green pillow. I constructed my purple pillow using the instructions from the project, Randomly Stitched Texture Pillow.
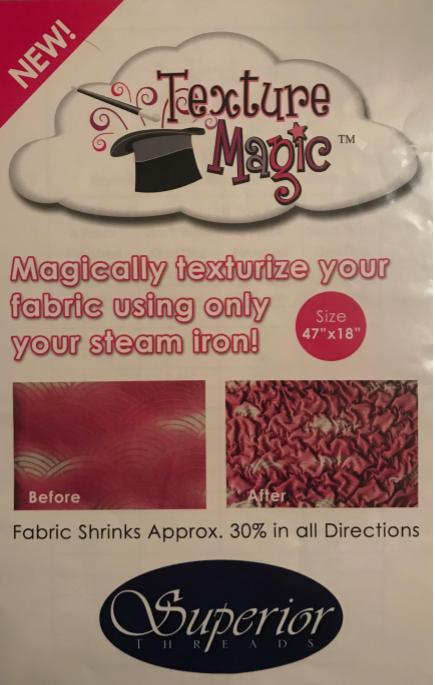
Texture Magic
The special shrinking fabric is a synthetic fabric that shrinks when it is steamed. There are two brands that I am familiar with – Texture Magic by Superior Threads and Fabric Magic by Pellon. Sew or serge it to the back of the fabric you want to texturize, apply steam and watch it magically transform. The package says it can shrink up to 30%. I think the amount of shrinkage is dependent on the fabric to which it is stitched.
Shrinkage Test
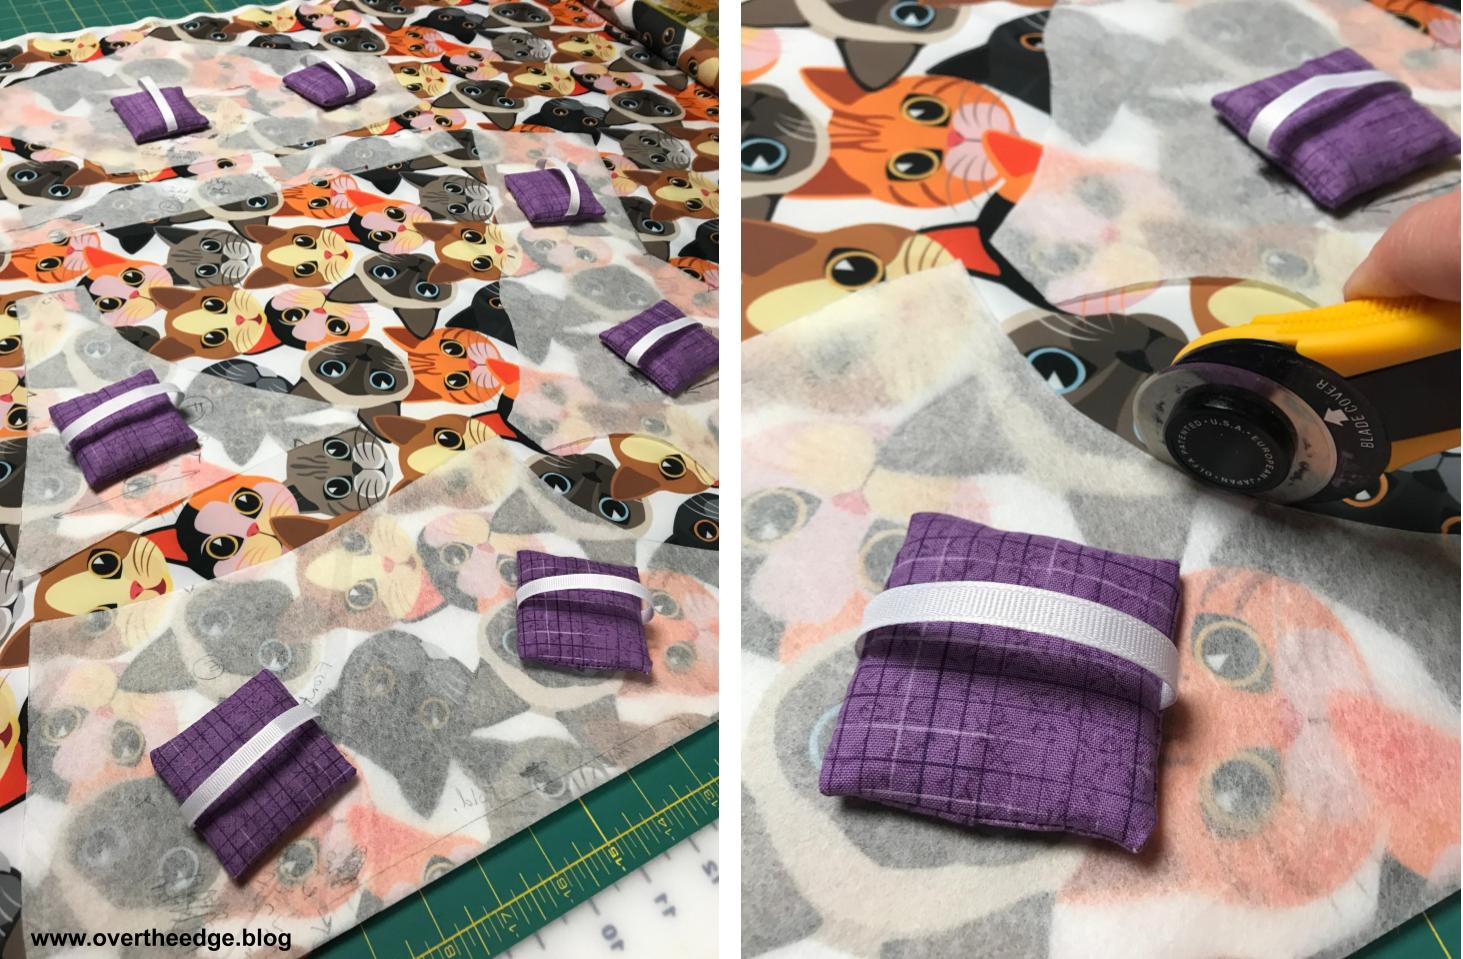
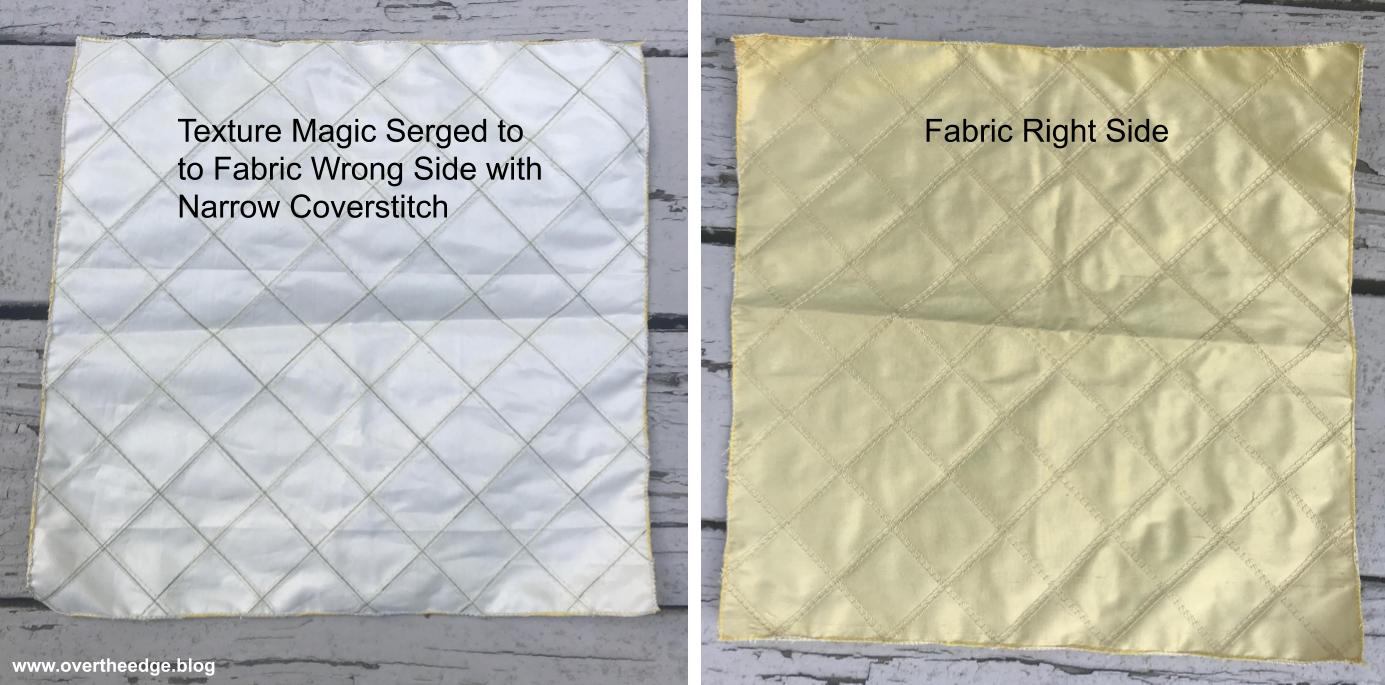
I wanted to see how much my silk dupioni would shrink, so I would know how much fabric I needed to make my pillows. For my test I started with a square of Texture Magic and of silk dupioni. I drew lines on the piece of Texture Magic and pinned it to my silk. I then stitched on the lines with a narrow coverstitch.
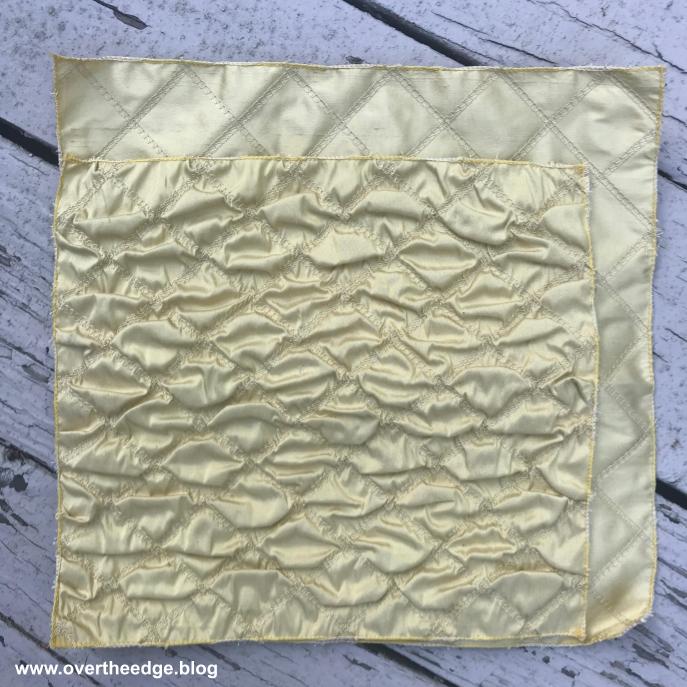
Then came the fun part – the steam! I hovered over the sample with my iron at full steam and watched the fabric shrink. The result of my test is shown in the photos below. My square started at 12.5” x 12.5” and it ended up at 10” x 11”. So my fabric shrank 12% in one direction and 20% in the other direction. My fabric didn’t shrink quite as much as the “up to 30%”, but the texture was still amazing.
Embellish the Pillow Fabric
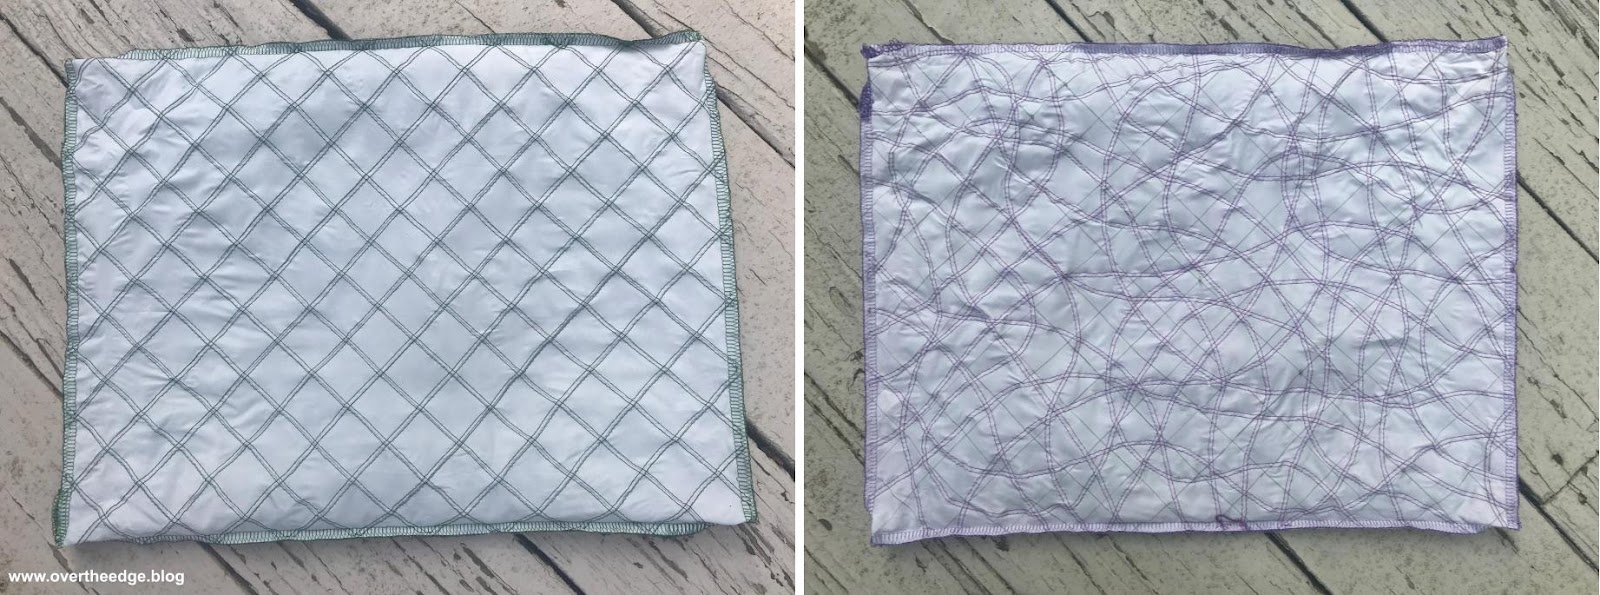
I began by drawing lines on the texture magic for where I wanted to stitch on the green pillow. For the purple pillow I didn’t need to draw the lines because I was stitching randomly. After finishing my lines, I pinned a piece of texture magic to the back side of each piece of dupioni.
I set up my serger for a narrow coverstitch with thread to coordinate with my fabric. I wanted the puffy texture to stand out and not the thread. Maxilock thread was used in the needles and Mettler embroidery thread was used in the chain looper.
So I could see the lines more easily, I used a clear foot, but a standard presser foot would also work. With the Texture Magic side up, I serged on the lines (or randomly) to stitch the Texture Magic to the silk.
I have a Babylock Evolution serger, and there is not very much room to the right of the needle. Because I was serging into the center of the fabric, I had to shift and maneuver the bulk of the fabric around the right side of the presser foot. If you have a coverstitch capable serger without a lot of “throat space” you will need to roll and fold your fabric to get it to fit through the machine. Those of you that have sergers like the Babylock Ovation or Babylock Triumph, you will have no problem serging into the center of large pieces of fabric.
Following the instructions for the texture magic, I steamed the fabric to shrink it and here are close up photos of the resulting texture.
Turn the Embellished Fabric into a Textured Chic Pillow
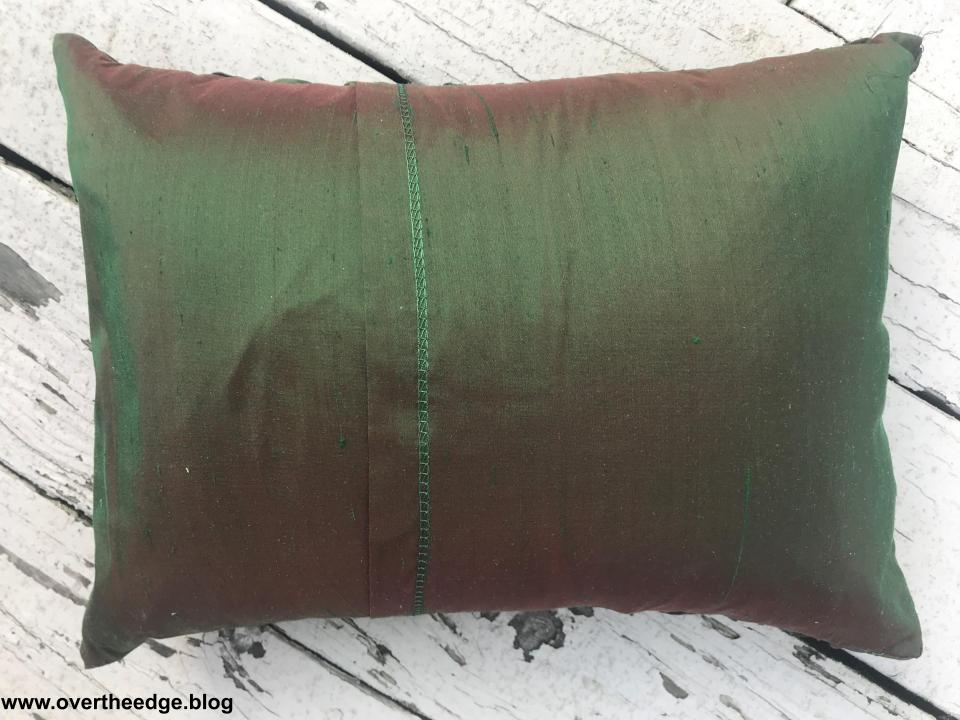
My finished pillows are 12” x 16” and completely made on the serger. I did not make the same size pillows as in the book, but I did follow the basic instructions. Because I wanted to remove my pillow forms for cleaning, I chose to make an overlap back for my pillows. I used a narrow coverstitch to make a 1” double fold hem on each side of the back opening.
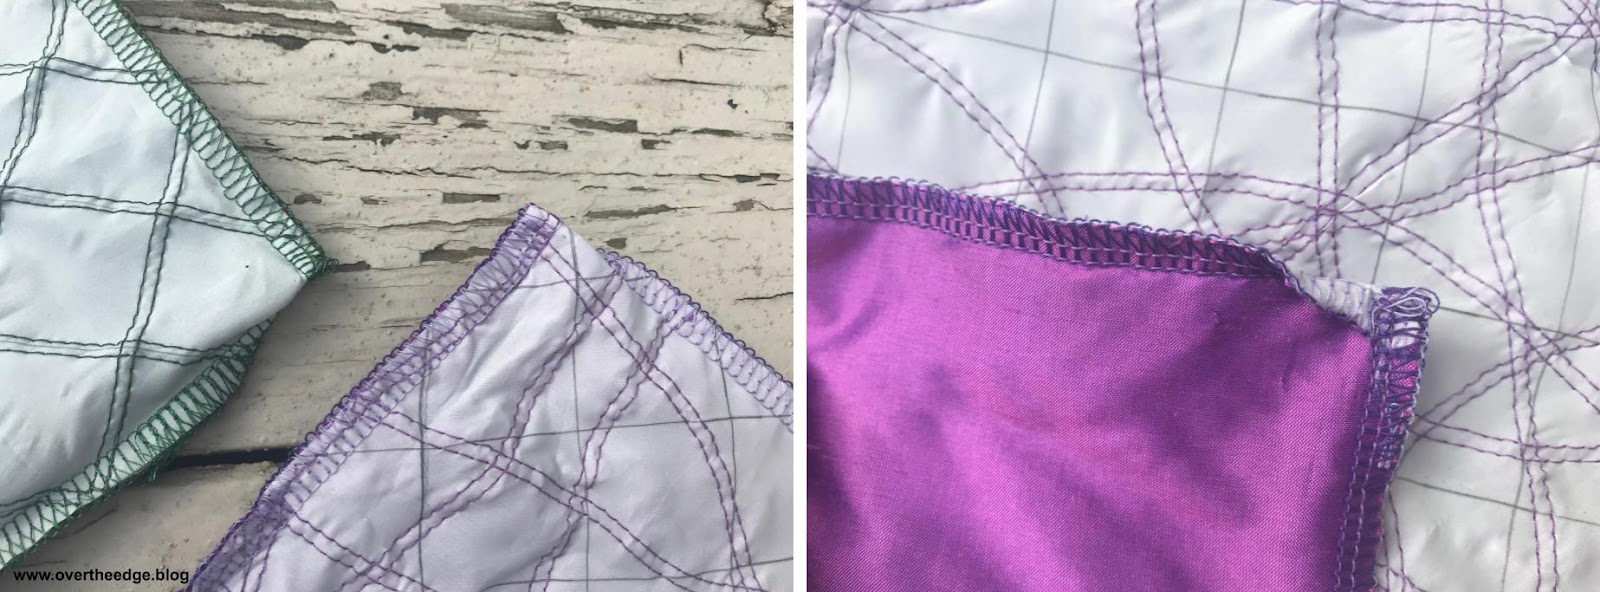
After embellishing my fabric and doing the hems, I switched my serger to a 4 thread overlock to construct the pillow. While serging the pillow seams, I wrapped the corners to make perfect points on the right side of my pillow. There is no need to trim the extra fabric from the corners with this technique. For more information on how to wrap corners with a serger, check out my His & Hers Serger Pillowcases Tutorial. https://overtheedge.blog/tutorials/his-hers-serger-pillowcases-tutorial/
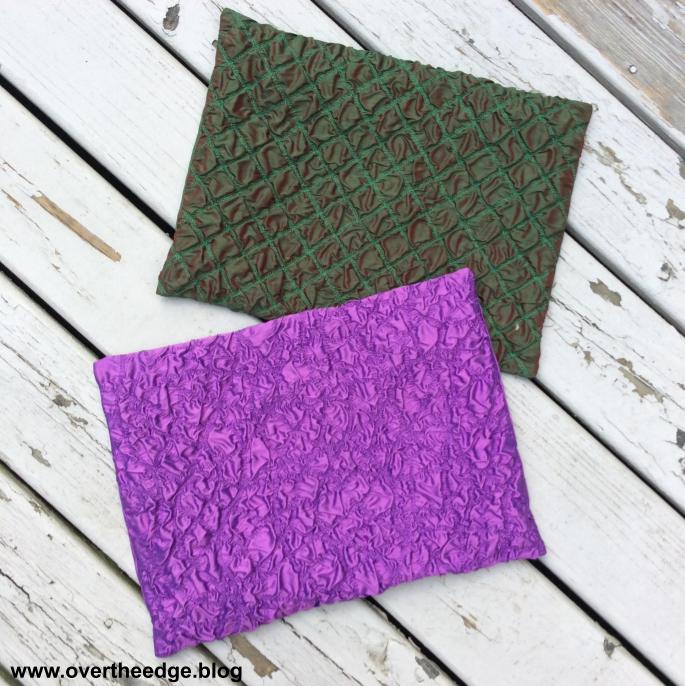
Textured Chic Pillows by Serger
I hope I inspired you to serge your own Textured Chic Pillows!
Resources
Serger Boutique – Book was published in 2012. Check your local sewing store, or check the internet, sites like ebay or amazon to get a copy.
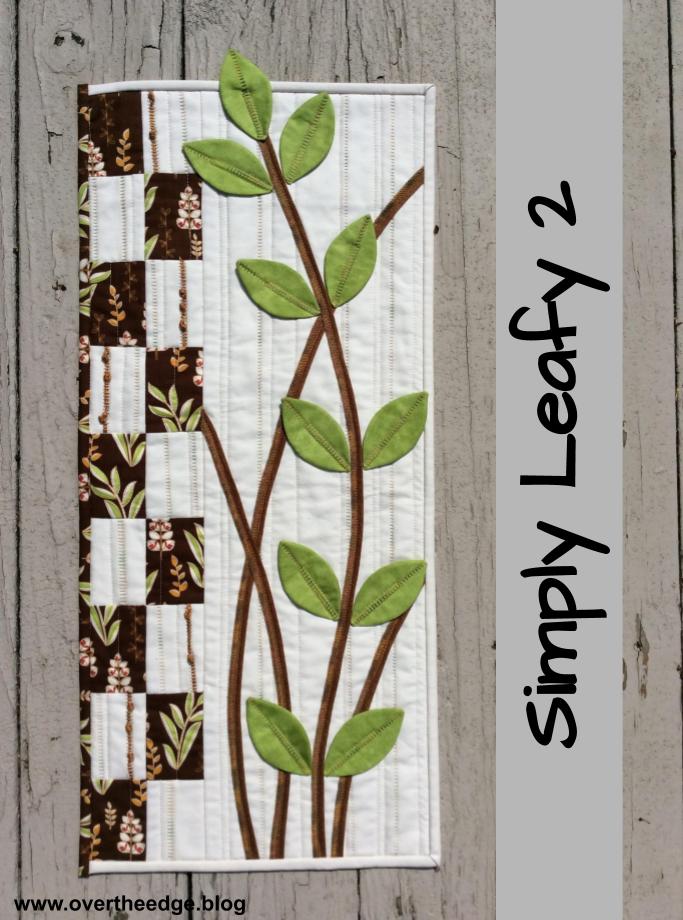
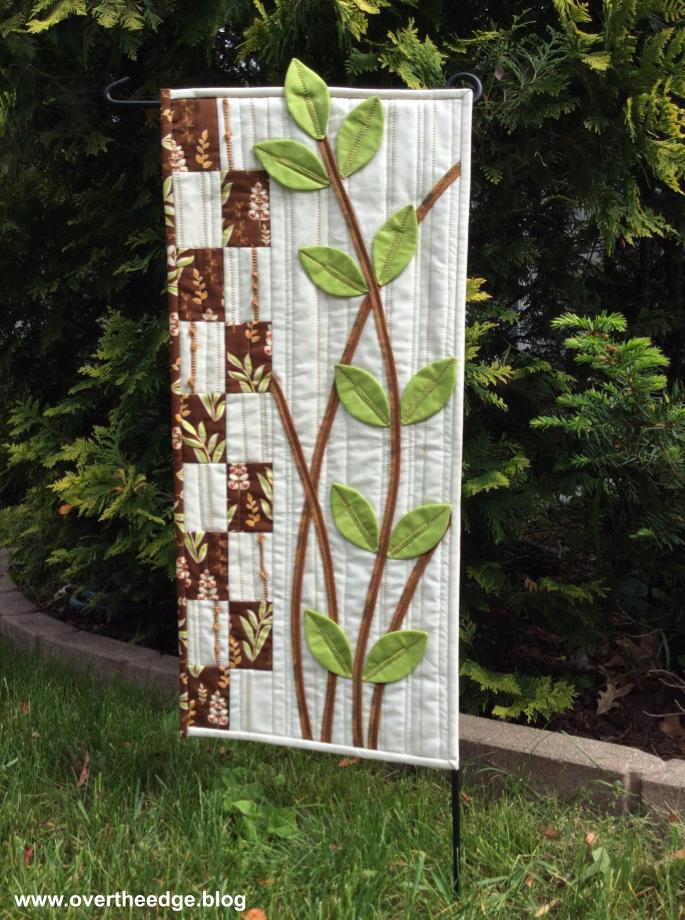
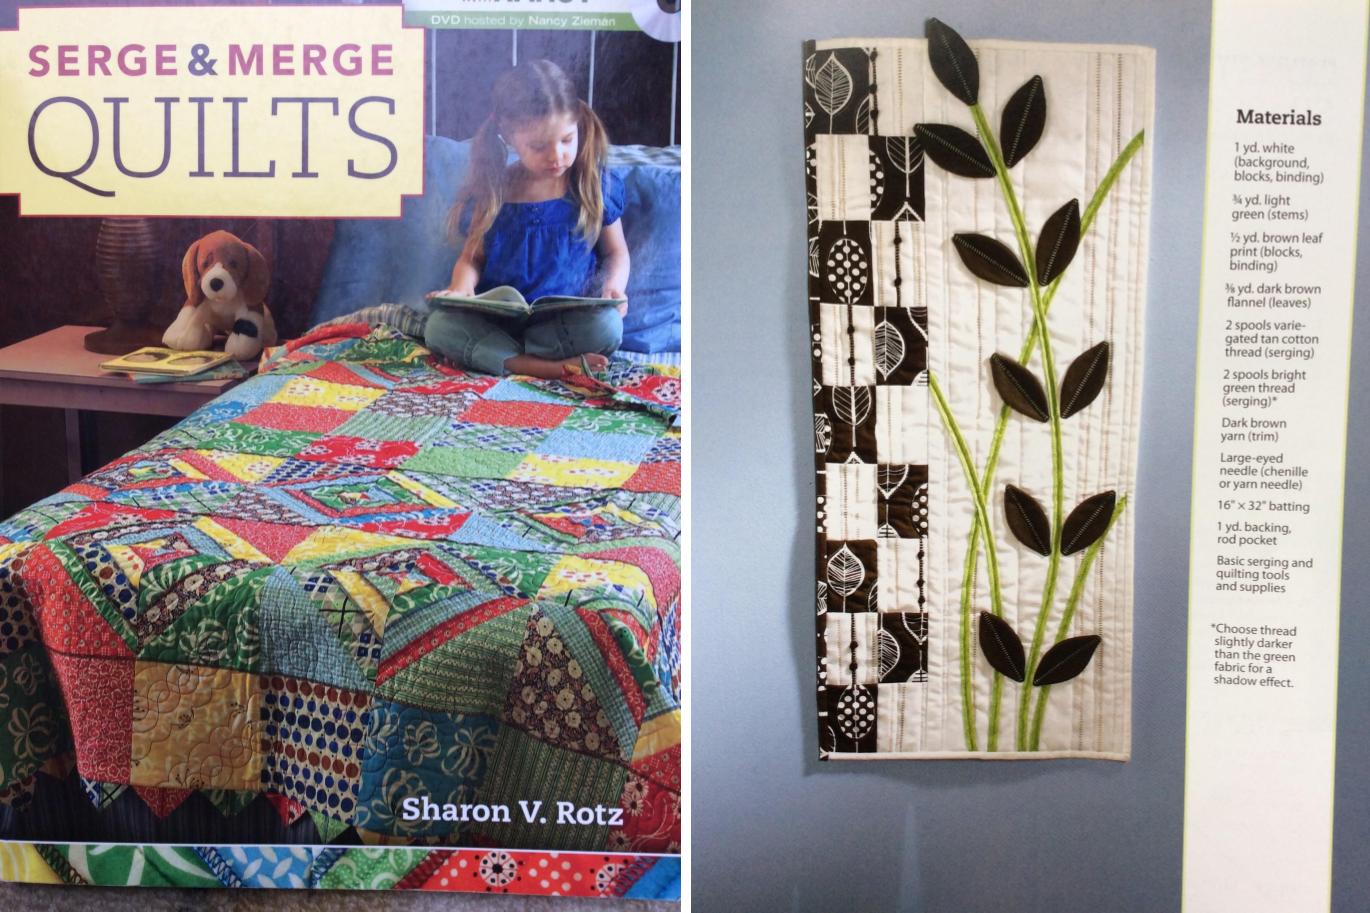
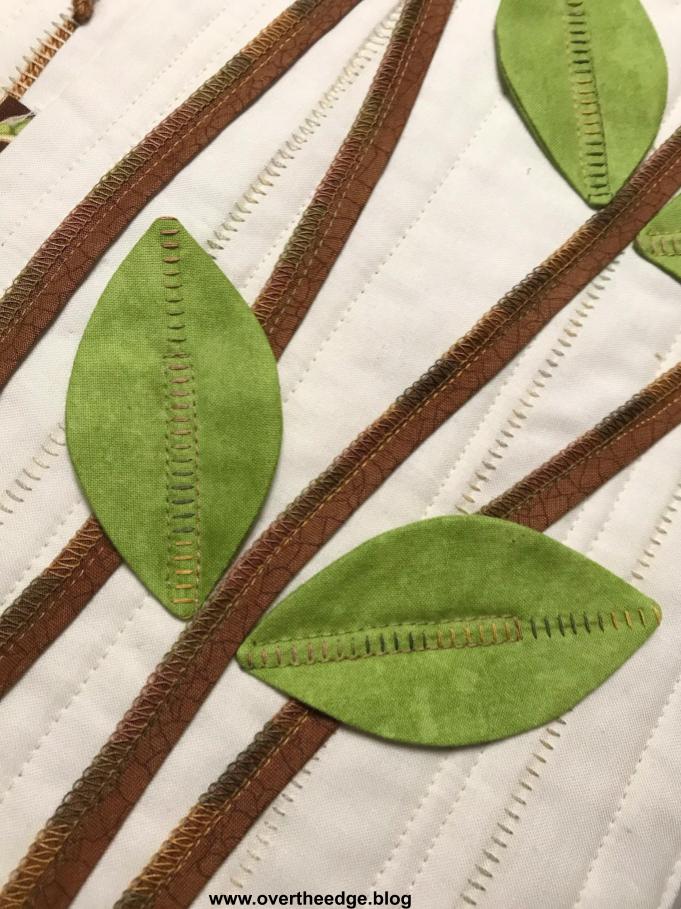
I had so much fun making my Simply Leafy 2 quilt that I thought I would share it with you. Simply Leafy 2 is a project from the book, Serge & Merge Quilts. It’s a small wall hanging and is the perfect size to experiment with creative serging. The serger creates the texture in the background and enhances the dimensional stems and leaves. The project showcases serger flatlock stitching, but uses a sewing machine to complete the quilting and binding. If you enjoy creative quilting and you have a serger, you should give this project a try!
Fabric and Thread Choices
I used quilting weight cotton for all the fabric in my Simply Leafy 2 quilt. I selected a brown leafy floral as my focus fabric and off white for the background. Based off the leafy floral fabric, I chose green fabric for the leaves and brown for the stems. The instructions said to use yarn for embellishing the flatlock stitches so I chose a brown perle cotton. I decided on a variegated Sulky Blendables 30 weight thread for the background flatlocking and a variegated YLI quilting cotton thread 40 weight for flatlocking the leaves and stems. I used Maxilock serger thread in the positions that were not visible in the stitches.
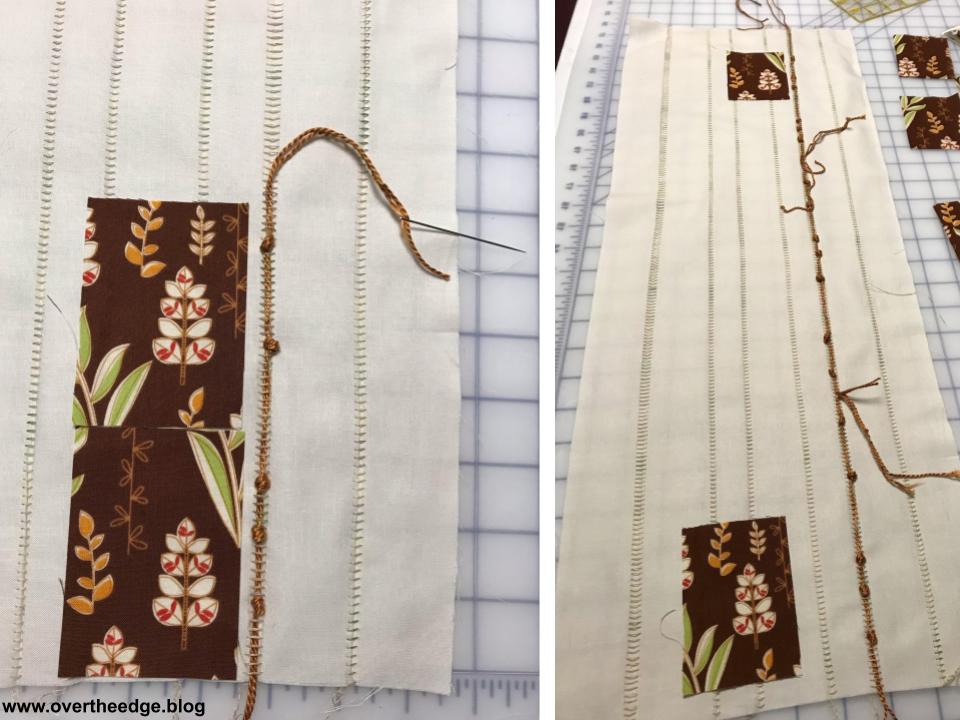
Flatlock Background and Create Rectangle Blocks
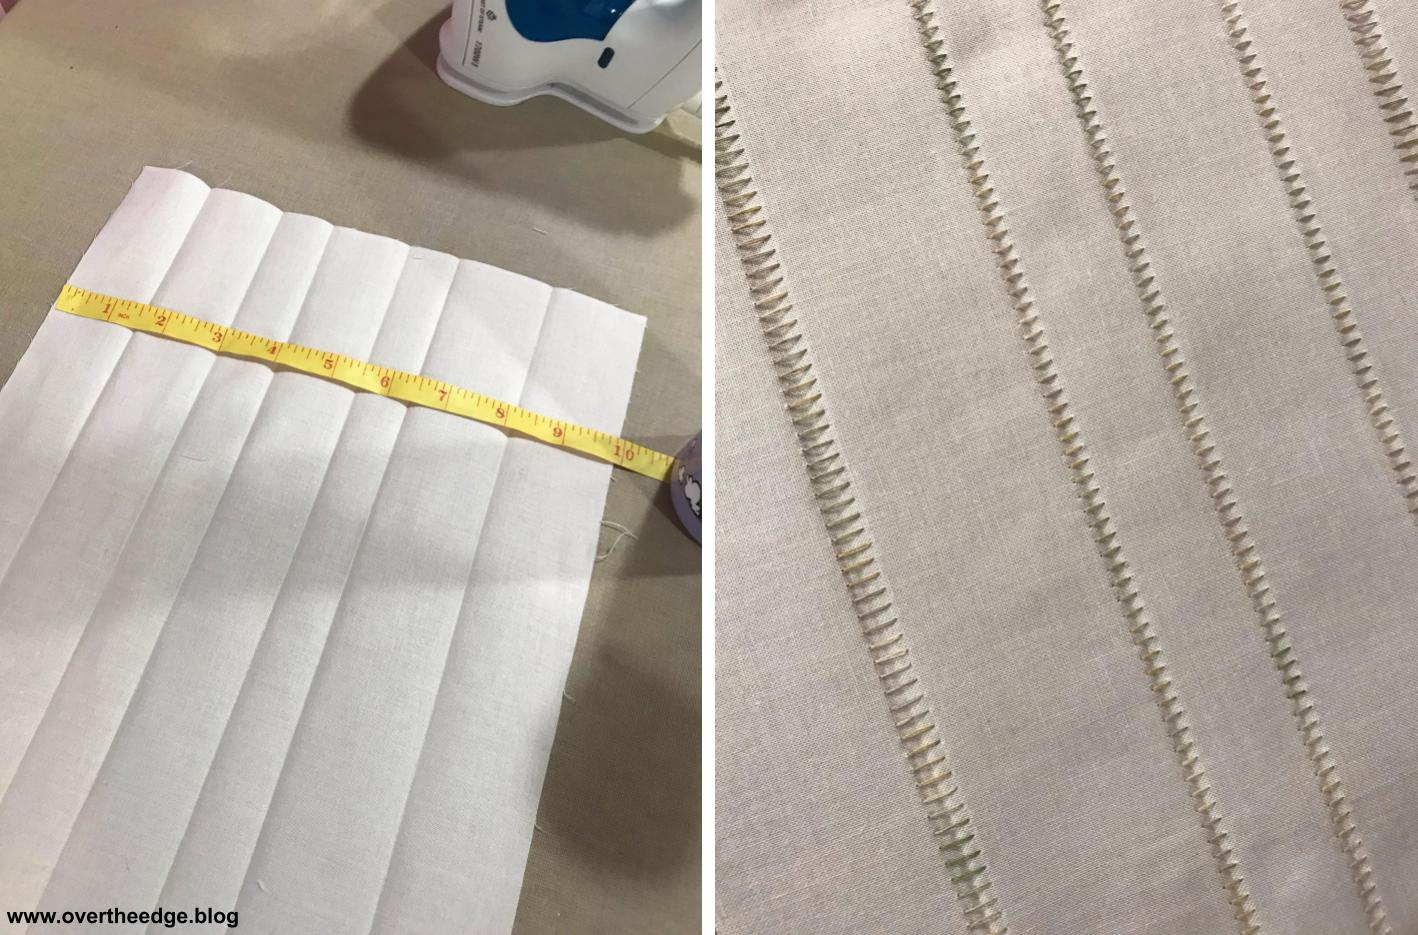
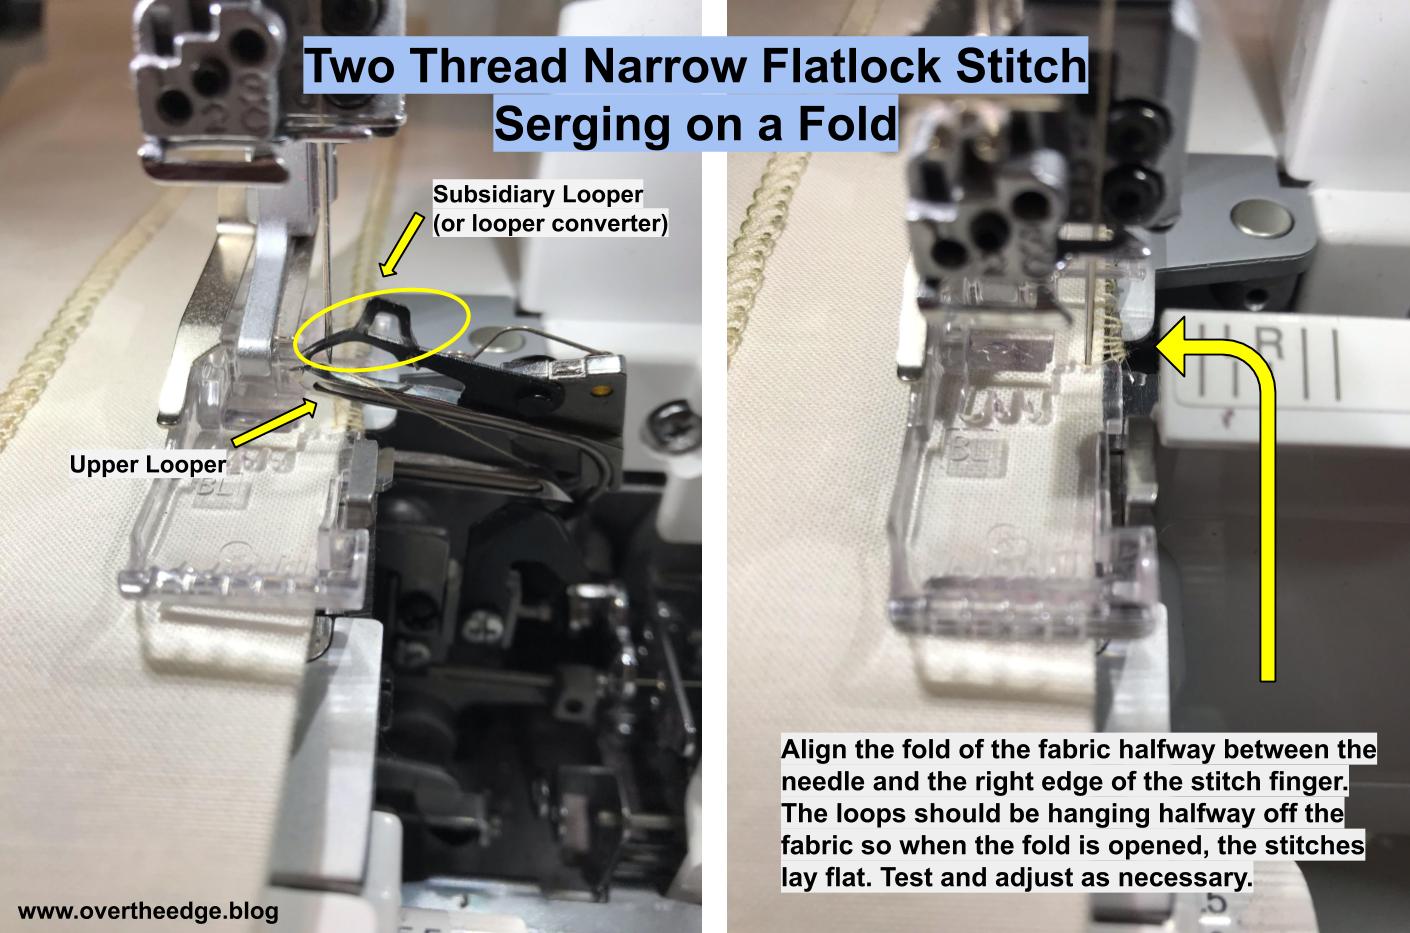
I randomly pressed lines in my background fabric to mark my folds for flatlocking. Then I created ladder stitching on the folds of fabric using both a narrow and wide two thread flatlock.
I serged each fold, then pulled it open. I pressed all of the flatlock stitching at once after I was finished serging the lines. After flatlocking I used two strands of perle cotton to create extra texture, making knots as suggested. The only change I made here was to add my yarn knots before I cut out the rectangle blocks. Unsecured flatlock stitching unravels easily near the edges, so I thought this change would create less stress on those stitches. When I ran out of yarn, I just cut 2 new pieces and continued where I left off. I fussy cut around the thread tails as I cut out my rectangles, so each rectangle was unique.
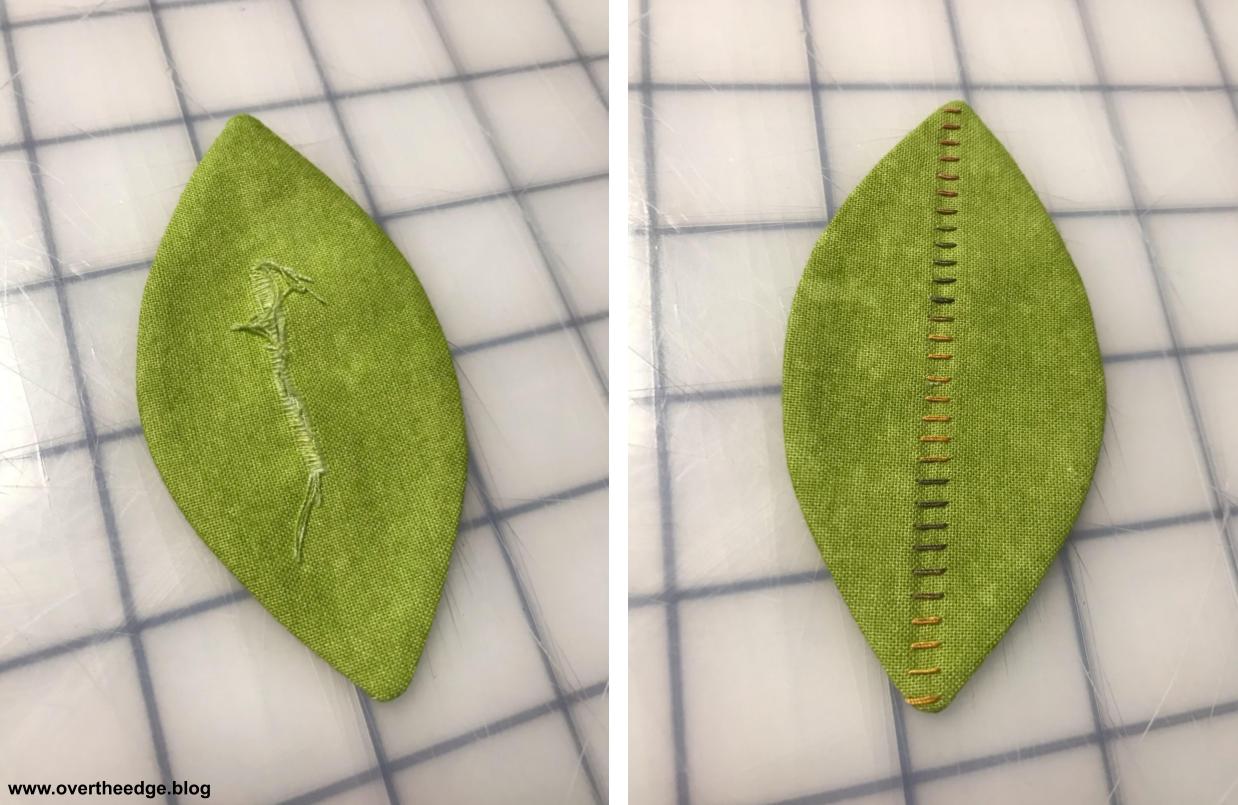
Create Leaves and Stems
For flatlocking my leaves, I put the variegated thread in my needle. I wanted the variegated thread to show on my leaves. After flatlocking the leaf strip on my serger, I traced the leaf pattern onto the fabric. I then completed making the leaves on my sewing machine.
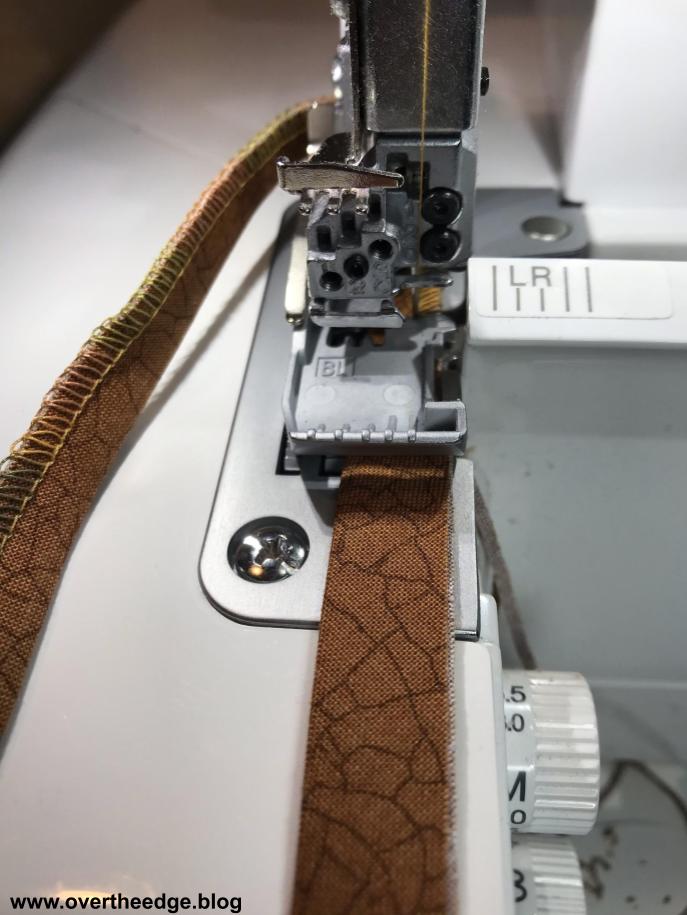
For finishing the stems, I set the serger up for a two thread overlock. The two thread overlock is basically the same stitch as the two thread flatlock, but you don’t open the seam. I put variegated thread in the lower looper because the loops ended up on the right side of my stems.
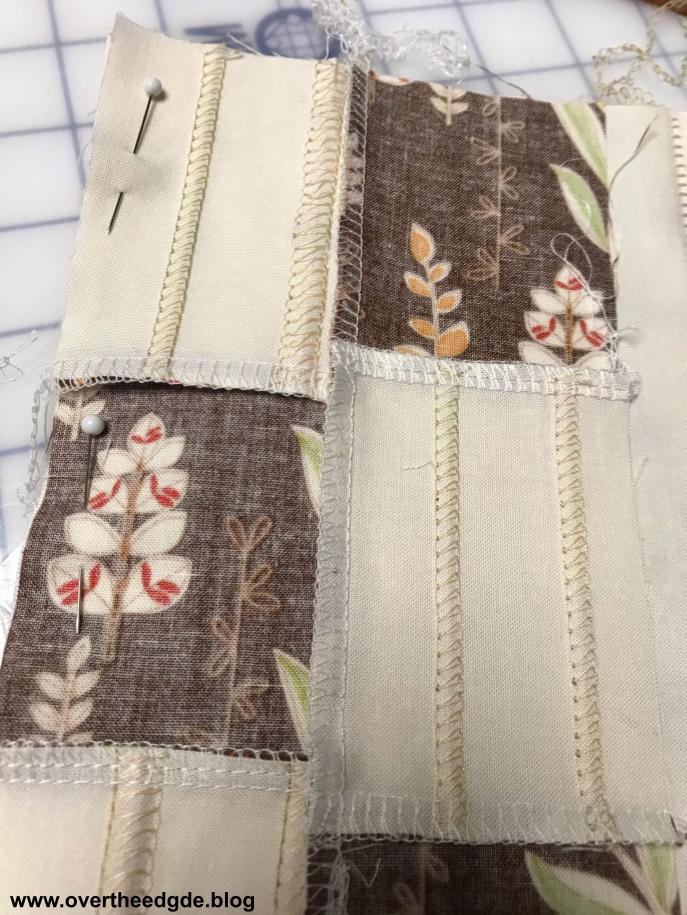
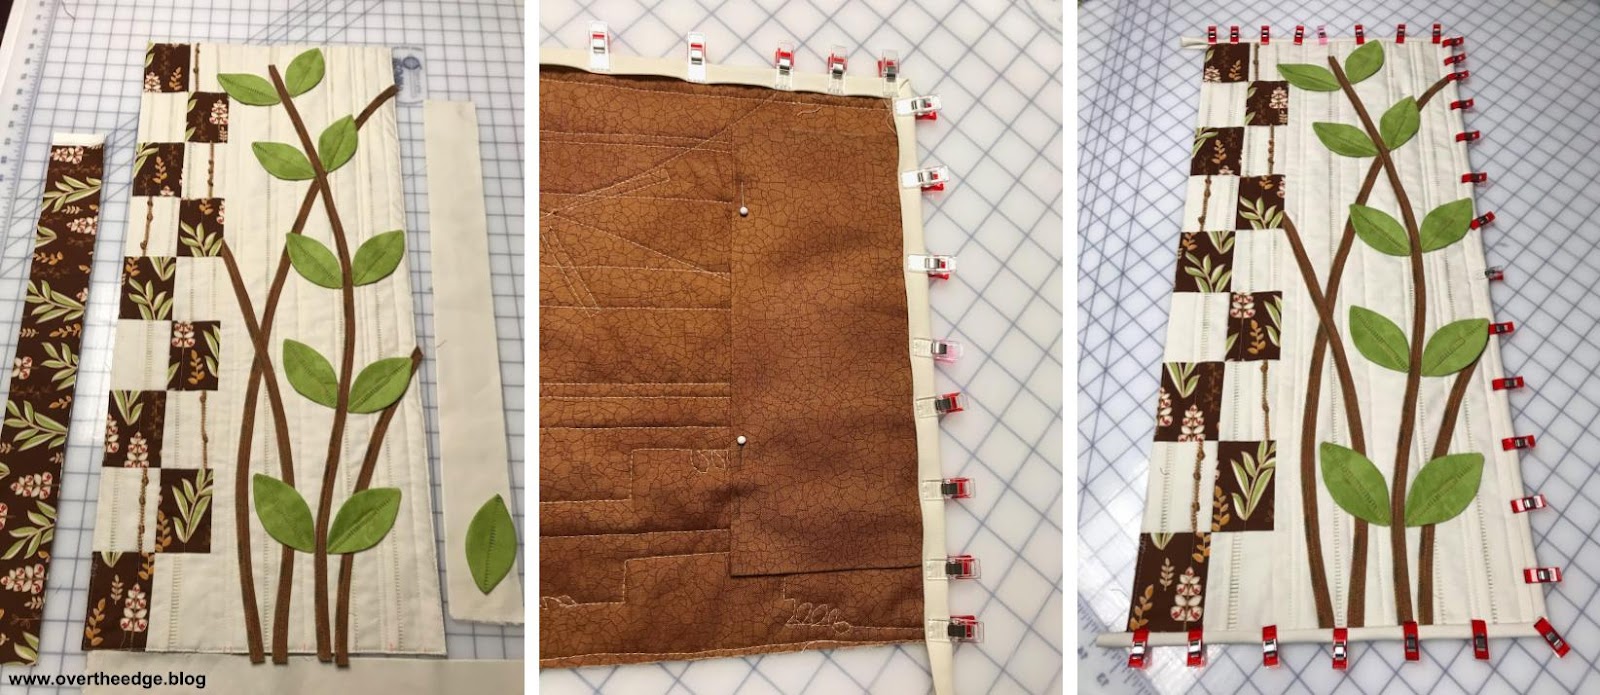
Piece Together Background
After serging the leaves and background, I converted my serger to a four thread overlock stitch. I used the four thread overlock stitch to serge the background rectangles together. I handled the rectangles carefully to keep the cut flatlock stitches from unraveling before piecing them together.
Quilt with Sewing Machine
I layered my backing, batting and top of my quilt sandwich and quilted the background using a sewing machine. My quilting was simple. I stitched lines between my lines of flatlocking and outlined some of the leaves in the brown rectangles.
Add Stems and Leaves
After the background was quilted, it was time to add the stems and leaves. I auditioned my stems and leaves on the background until I was happy with the layout. Then I stitched them all down with my sewing machine. Since the top leaf hangs off the edge, it was easier to stitch it on after the binding was applied. One of the things I really like about this project are the three dimensional stems and leaves!
Add Binding and Finish
The instructions have you use two different colors of binding. I bound the top, bottom and right side of my quilt with off-white and the left side with brown. I attached my binding to the front of quilt, and then flipped it to the back. To secure the binding, I stitched in the ditch on the front side with my sewing machine. I also added a hanging sleeve on the back
Flatlocking on the Fold
You typically see serger stitching on seam lines and fabric edges. But flatlocking is not limited to seams or fabric edges. You can flatlock on a fold and create decorative stitching within the body of your garment or project.
Flatlocking is a technique you can do with your standard presser foot. However, a foot with a guide, such as a blind hem foot, will make flatlocking easier.
The flatlock stitch is reversible. Which means you can use either side of this stitch in your projects. I like both the “loop” side and the “ladder” side of the flatlock stitch. To see the loops on the right side of your fabric you fold it with the wrong sides together. To see the ladders on the right side of your fabric you fold it with the right sides together.
When you flatlock on the fold, you serge with the loops hanging off of the fabric. You must guide your fabric so that the fold is about halfway between the needle and the blade. (See photo below.) Without the extra thread in those loops, you won’t be able to pull open the stitch to make it flat. If you have too much fabric in the stitch you won’t be able to fully open it. The stitch will look lumpy on one side and like a tunnel on the other. If you get too little fabric in the stitch you will have loose and floppy stitching.
I recommend you practice flatlocking on the fold before you begin this part of your project. Sharon provides some information about flatlocking on page 16 of her book. Your serger manual will instruct you how to set up and perform a flatlock stitch with your machine.
Simply Leafy 2
I hope you enjoyed my post about the creation of my Simply Leafy 2 wall hanging quilt.
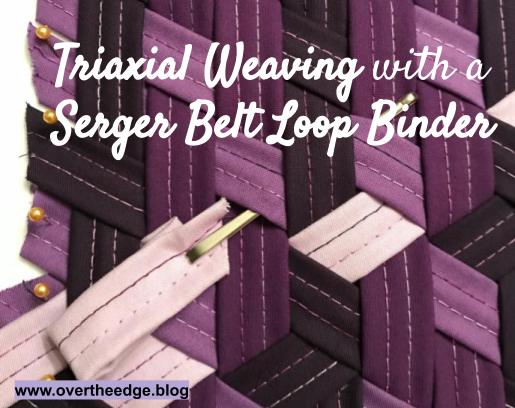
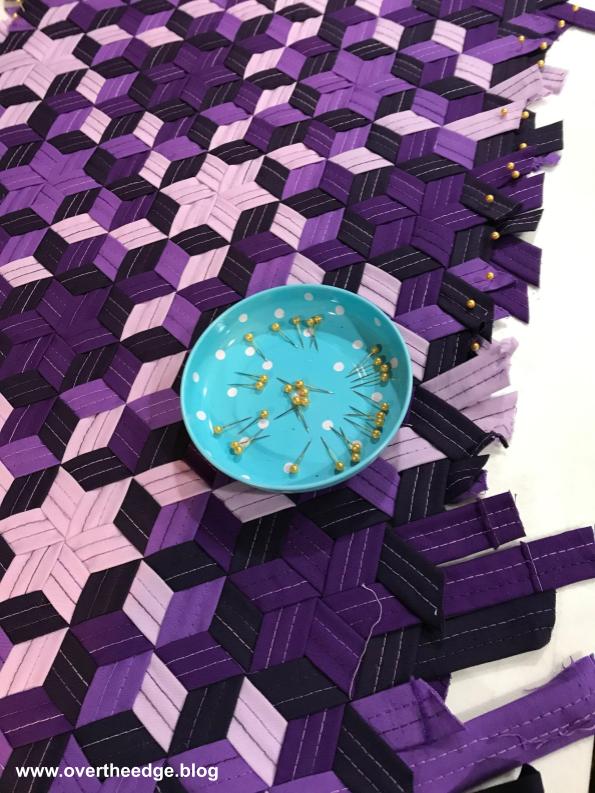
If you have a serger with a cover stitch and a belt loop binder attachment you are going to love this post, Triaxial Weaving with a Serger Belt Loop Binder. A new way to create quick and easy fabric strips for weaving into your own custom fabric! No more making fabric strips on the bias and no more burning your fingers while ironing the folded strips!
Serger Belt Loop Binder Attachment
Baby Lock has a specialty serger attachment called a Belt Loop Binder, which comes in two sizes (1.5” and ¾”). Other manufacturers may have something similar. The belt loop binder is designed to be used with a cover stitch.
I’ve seen it used to make belt loops, handles, straps, and bracelets. Belt loops and straps are very useful. But making your own woven fabric from these strips is way more exciting and is another perfect application for this attachment. And you don’t have to make bias strips for this weaving to work. You can cut strips by the width of the fabric (selvage to selvage), feed them into bias binder attachment on your serger, and quickly make fabric strips ready to weave into cool designs! This method is so much faster than cutting traditional bias fabric strips and standing at the ironing board pressing the edges under. And since it works on the cross grain, you don’t have to spend time creating the bias strips of fabric. I love my serger!!!
Modern Fabric Strip Weaving
Fabric strip weaving is becoming a popular activity. I first saw a bias fabric strip triaxial weaving project in a Sew News magazine (Feb/Mar 2017)
The article/project was titled “Take It or Weave It” was written by Tara Curtis, of Wefty. She invented a tool called the Wefty Needle to help make fabric strip weaving much easier. Bias fabric strips are made and then folded and pressed into bias tape. Then the bias tape is woven into fabric. Of course when I saw the project my first thought was “how can I use my serger to make this easier!”
Tools for Weaving
I purchased a set of Wefty needles from Tara. They work well for weaving ½” folded fabric strips and 1” folded fabric strips made with bias strips the traditional way. However, the Wefty Needles don’t work as well for serger belt loop binder strips. The tool was just a little too wide for the ¾” strips made from the 1.5” belt loop binder. It was hard for me to get through the tight weave of the third row of the triaxial weave. If the Wefty Needle was available in a ¾” or ⅜” it would be perfect for using with fabrics strips made with babylock belt loop binders!
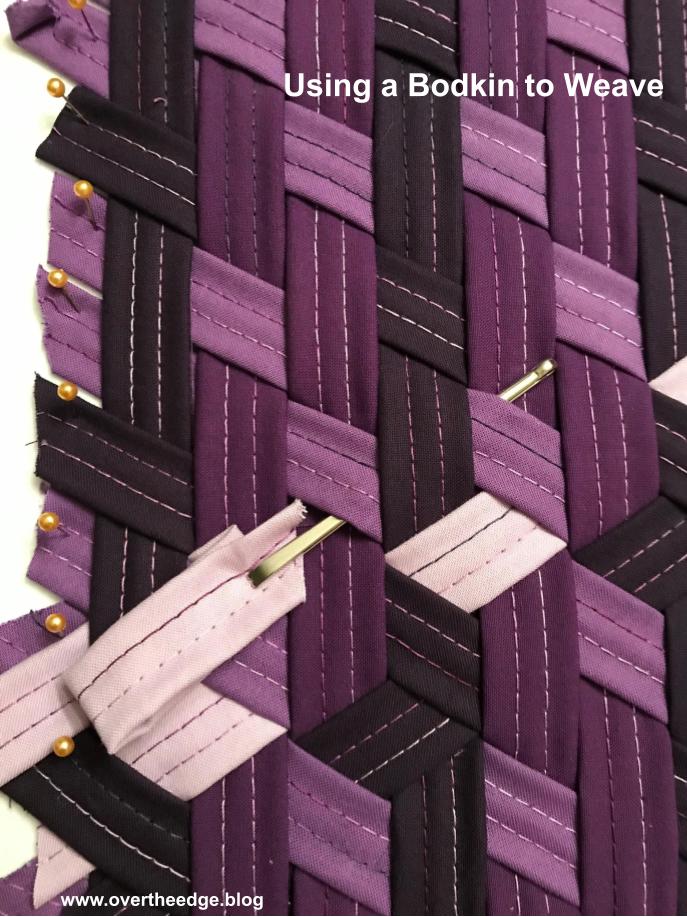
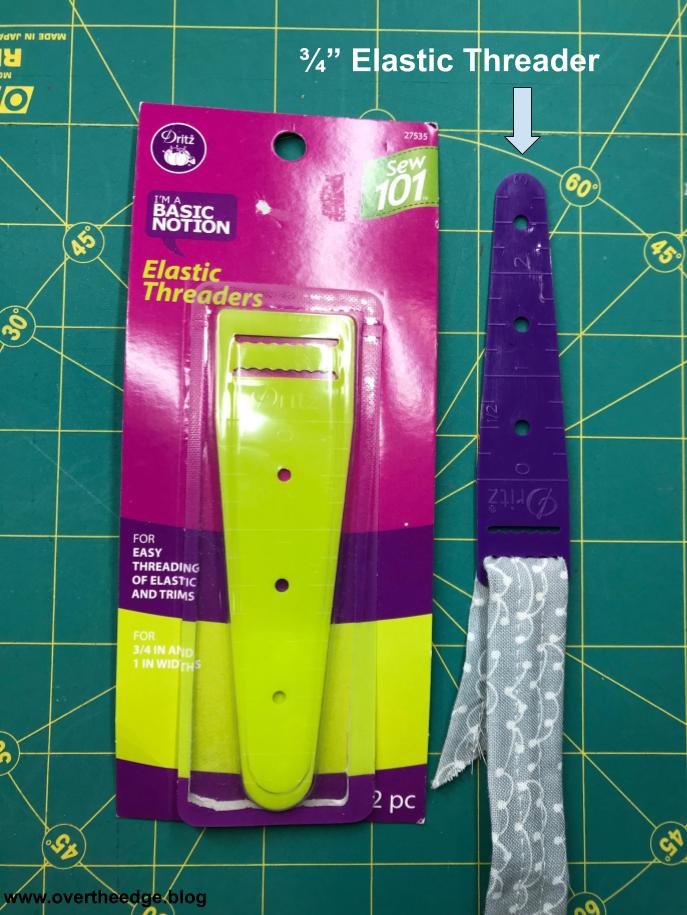
I ended up using a bodkin (for inserting elastic or cord into a casing) to help me weave that 3rd row. The Wefty needle would have worked better than the bodkin if it were the right size for the ¾” strips. Recently, I found a ¾” elastic threader by Dritz that I am going to try on my next project. For other tools needed for fabric strip weaving see the Resources section at the bottom of the post.
Weaving Types
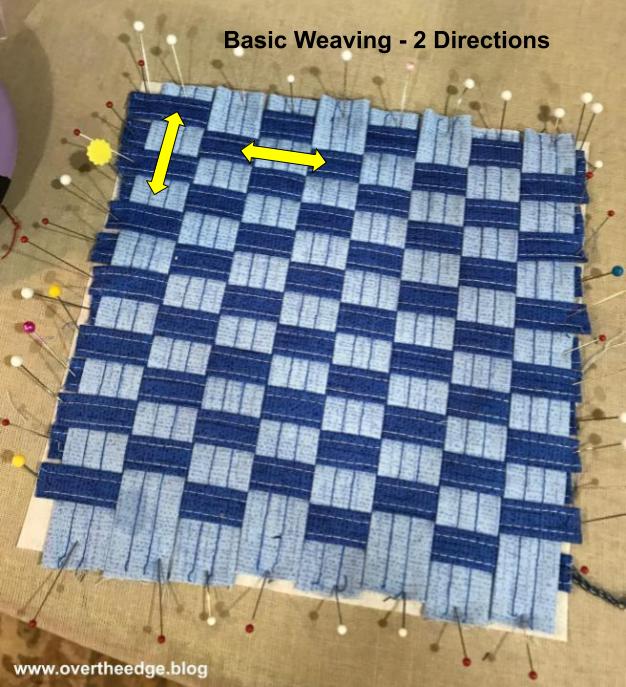
Basic or simple weaving occurs in 2 directions (biaxial at 90 degree angles to each other). Some forms of basic weaving you may be familiar with include plain weave, satin weave, twill weave, basket weave. Triaxial weaving occurs in 3 directions (triaxial 60 degree angles to each other). You can make some really nice weaving projects with basic weaving, but I think there is something special about triaxial weaves. I have included some links to resources about weaving at the end of this post.
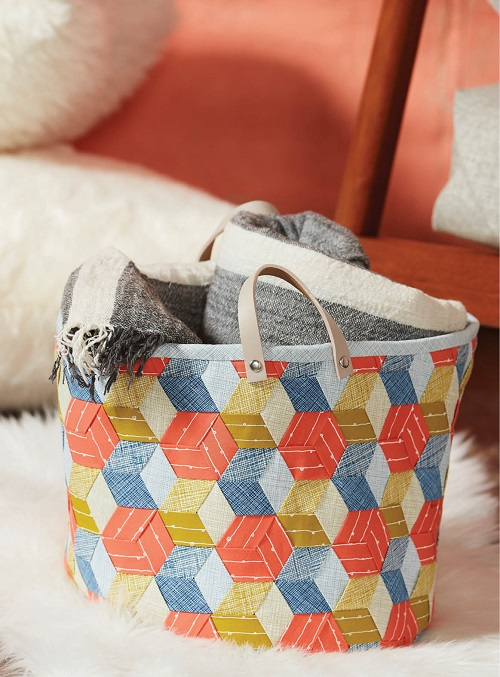
Jen’s Triaxial Weaving with a Serger Belt Loop Binder
The Sew News article did inspire me to try fabric strip weaving, even though I didn’t make the basket that was in the article. Following the basic instructions in the article, I created my triaxial weave using fabric strips made on my serger with the 1.5” belt loop binder attachment. I then used the new “fabric” to construct this bucket from Simplicity pattern 8859 (I did make a few minor modifications to the pattern for this fabric basket/bucket). I really enjoyed triaxial weaving so I had to do more of it. After one project I was hooked!
I really like the look of “stars” in triaxial weaving, so I decided that would be my next project. I figured out how to weave the stars after some trial and error and a little research on the internet. It probably would have been faster to purchase a pattern from Wefty to show me how to do it, but I wouldn’t have learned so much about weaving! Like with the fabric bucket project, I used the 1.5” belt loop binder attachment to make my strips. Then I made a pillow from the triaxial weave “stars” fabric that I created. This pillow was constructed on the serger, including using a cording foot to install the zipper. The pillow pattern I created may be included in my blog in the future.
Tutorial – Setting Up and Using a Serger Belt Loop Binder
I created a tutorial and a video to help you be successful using the belt loop binder attachment with your serger. You will find the links below.
It’s April now, and in a typical year I would be celebrating National Serger Month. In the last few weeks I have been sewing face masks almost non-stop, and I miss using my serger creatively. So I took a short break from mask production to create a serger project to share with you. I’ve seen on the news that in some places people are clapping and cheering for healthcare workers from their balconies. Others are making signs to show support. Well, I’m going to show you how to serge a flag with a flatlock stitch. Hang it outside or hang it in your window to show your support!
The flag is garden size, about 12” x 18”. I thought about making it larger but I didn’t have any pieces of batik large enough to make a bigger flag. Normally, I would just run out to the store to buy what I needed, but that is a little difficult right now.
The flag is reversible and since both sides of the fabric show in this flag, batiks work well. Solids would work too, but batiks are so much richer. Using black thread gives the effect of stained glass. Who knew you could make stained glass with your serger!
Supplies Used for this Flag
Red batik remnant at least 6” x 13”
Light colored batik remnant at least 7” x 16”
Blue batik remnant at least 10” x 26”
Black thread – 1 spool of sulky solids 12 wt (or other thick thread) and 2 cones of Maxilock serger thread
Serger, capable of 3 thread flatlock stitch
Rotary cutter, mat and ruler
Hanging rod
Tool for securing thread tails (large eyed needle or other tool)
Serger Set Up and Testing
I set my serger up for a 3 thread narrow flatlock stitch with the widest width. I used a spool of black Sulky Solids 12 weight cotton in my upper looper and black cones of Maxilock serger thread in my needle and lower looper. The Sulky Solid would have been good to try in the needle too. It would have made the ladder side of my flatlock stitches stand out more. But since I only had one spool, I went with the Maxilock thread instead.
Using scraps of fabric, I tested my stitch settings. After trying a few different stitch lengths, I decided on a stitch length of 1.5 to create my stained glass effect. I serged my samples with the wrong sides together, so the more dense loop side would be on the right side.
Flatlock Piecing on your Serger Video
Watch my short video on flatlock piecing if you would like to see the technique in action.
This photo shows the front side and the back side of the reversible flag. The stained glass look is more pronounced on the front side with the loops and the heavier thread.
Close Up View of Stitching
Flatlock Loops on Front
Flatlock Ladder on Back
Serge a Flag with a Flatlock Stitch
I hope you enjoyed this post and are inspired to serge a flag with a flatlock stitch. Hang it proudly and show your support of all the workers on the front line of this pandemic!
I believe that a sewing room really isn’t complete without a serger. A serger allows you to create professional looking seams that are difficult to replicate with a sewing machine. It sews your seam, trims your seam and overcasts the edge of your fabric all in one step – talk about a time saver! The stitches are formed from a bunch of interlocking loops, which give serger seams their signature “stretchiness” and make them perfect for knit fabrics. You will find serger stitches in almost every textile item in your home – take a close look at your clothes, your curtains, your tablecloths, etc. Did you find any serger stitches? I bet you did! The serger doesn’t replace your sewing machine, but it makes a perfect companion. A sewing machine and serger are like an oven and microwave. What would a kitchen be like without both? Sure, most sewing machines do overcast stitches and some have attachments that can cut, but the seams they create are just not the same (in my opinion). If you sew and don’t already own a serger, now would be a good time to do your research and decide if a serger is right for you. Stop by your local sewing store and talk with someone who knows sergers. If you do decide to get a serger, come back and visit me. If you already own a serger, whether you are a serger newbie or a sergist extraordinaire, you are in the right place.
This blog is for all of you out there who have invested in a serger and want to do more with it. Get it out of the box or the closet. Set it up. Start using it. Whether your goal is to neatly finish the edges of your fabric or to push your serger to its limits, I am here to help you learn to use your serger and to inspire you to create beautiful things. I look forward to serging with you!