Serger Roses

I love making fabric flowers, especially when I can use my serger! Serger roses are just gorgeous when you begin with a beautiful satin fabric and some fun decorative thread. A typical way to finish the raw edges of the satin with a serger would be to use the 3 thread rolled hem or the 3 or 4 thread overlock stitch, which would work well. However, for these roses I chose to use the 8 thread stitch on my Babylock Evolution to really emphasize the edges of my rose petals.
How to Make a Serger Rose
Here is what you need to make a serger rose like mine:
- 3″ wide by 58″ long strip of satin fabric
- 8 spools of machine embroidery thread (or as needed for your desired stitch)
- 3″ square of felt for the backing
- heavy duty hand sewing thread for finishing the rose
- hand sewing needle
- 2″x44″ long strip of poster board to use a folding template
- iron and ironing board
- serger, set up for an 8 thread stitch (or your desired stitch)
- a few wonder clips
- hot glue gun and glue sticks
Step 1: Serge
Begin by serging both raw edges of the fabric strip from the right side. Trim off just a little of the raw edge with your blade so you have a nice neat edge to your rose.


Step 2: Fold Strip Around Template
Draw a 45 degree line near both ends of your poster board strip, and one near the center. These lines serve as guidelines to help you fold your strip at the proper angle to create your rose “petals”. With right side showing, begin at one end and wrap your fabric strip around the template until you have wrapped it all. You can use a wonder clip to hold the ends and keep the strip from slipping off the template. See photo below.
Step 3: Press Folded Strip and Remove from Template
Press one or both long sides of your folded strip while still on your poster board template. If you would like a crisp edged rose, press both sides. If you would like a softer edged rose, press only one long side. After strip has cooled, carefully slide out the poster board template, and orient the folds of the strip just like they looked with the template inside. See photo below.

Step 4: Gather Strip and Form Rose
Thread a hand sewing needle with heavy duty thread. Sew a running stitch along one long edge and up one short edge at the end of the strip. Gather up your rose as desired. I gathered my fabric strips to about 12” long and then formed the rose by wrapping the gathered strip around itself. After each turn I took a stitch to tack the layers together. I made a base for my rose from a piece of felt and I used hot glue to secure it. Cut the base large enough to cover your tacking stitches, but small enough not to be seen from the front of the rose.


Step 5: Add to a Project and Enjoy!
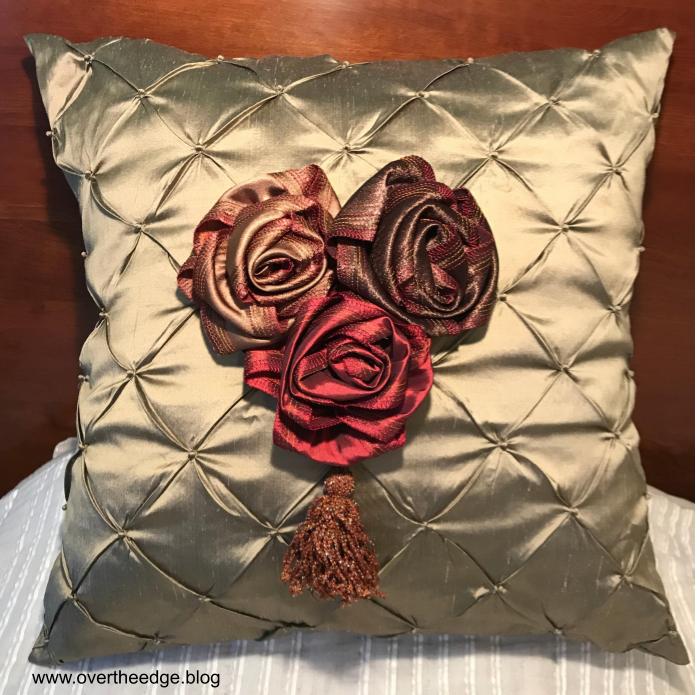
A serger rose would look equally beautiful on a garment, bag or home decor item. I choose to create a gorgeous pillow from this textured silk fabric to showcase my roses. And yes, in case you are wondering, I used my serger to make the both the pillow cover and the tassel.


Resources
I was inspired to make serger roses by the book, Fun-to-Wear Fabric Flowers, by Elizabeth Helene Searle. My method is very similar to the one used in her book on page 57 to create the “grey folded rose”. Instead of using a piece of fabric with the raw edges folded in, I used my serger to embellish the edges with thread. And instead of free-hand folding the strip into 45 degree folds, I created my own folding template to make this task much easier.
