Tag: serger flatlock stitch

Make a Serger Charm Table Runner

serger charm table runner

Serger Charm Table Runner

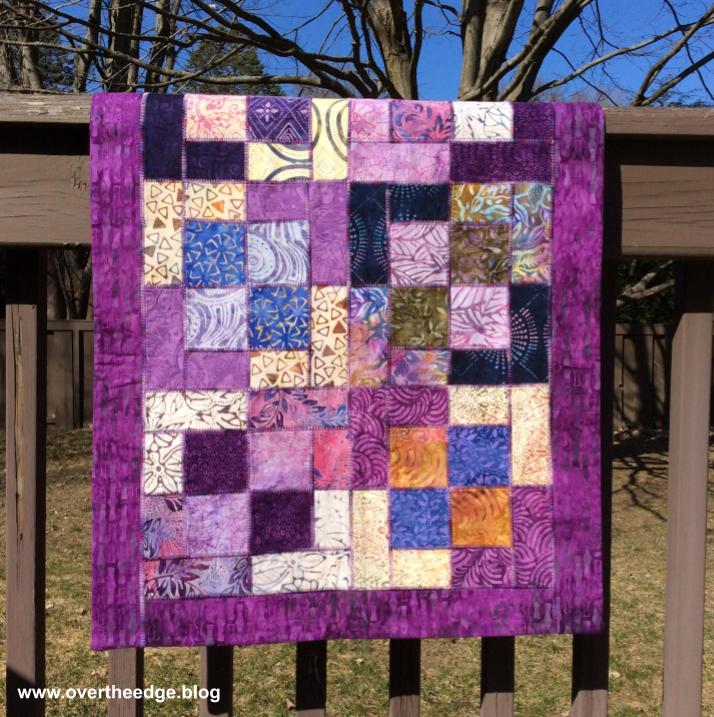
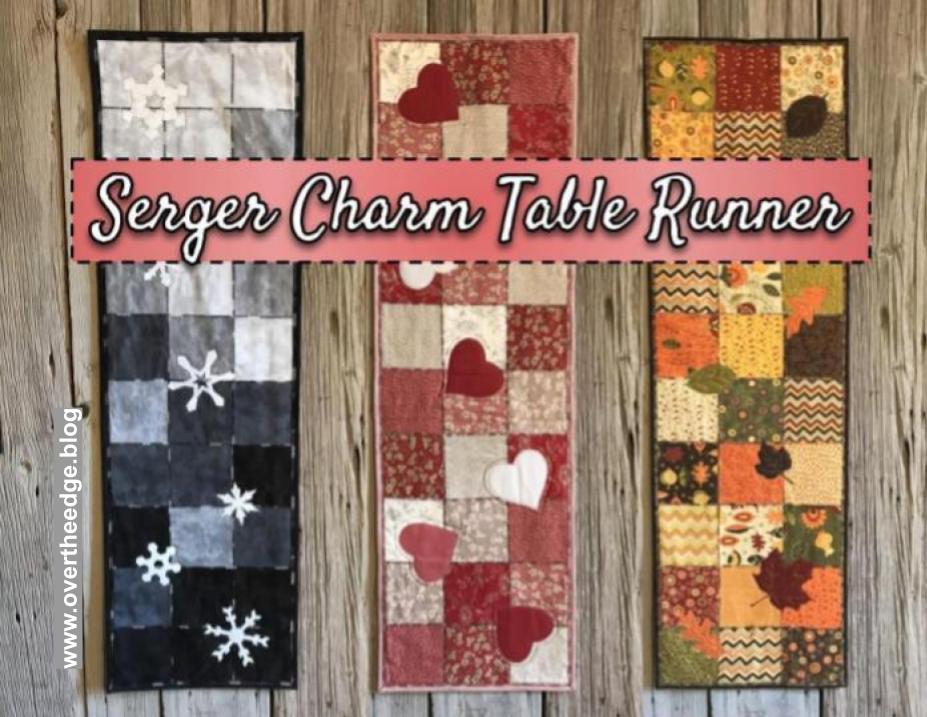
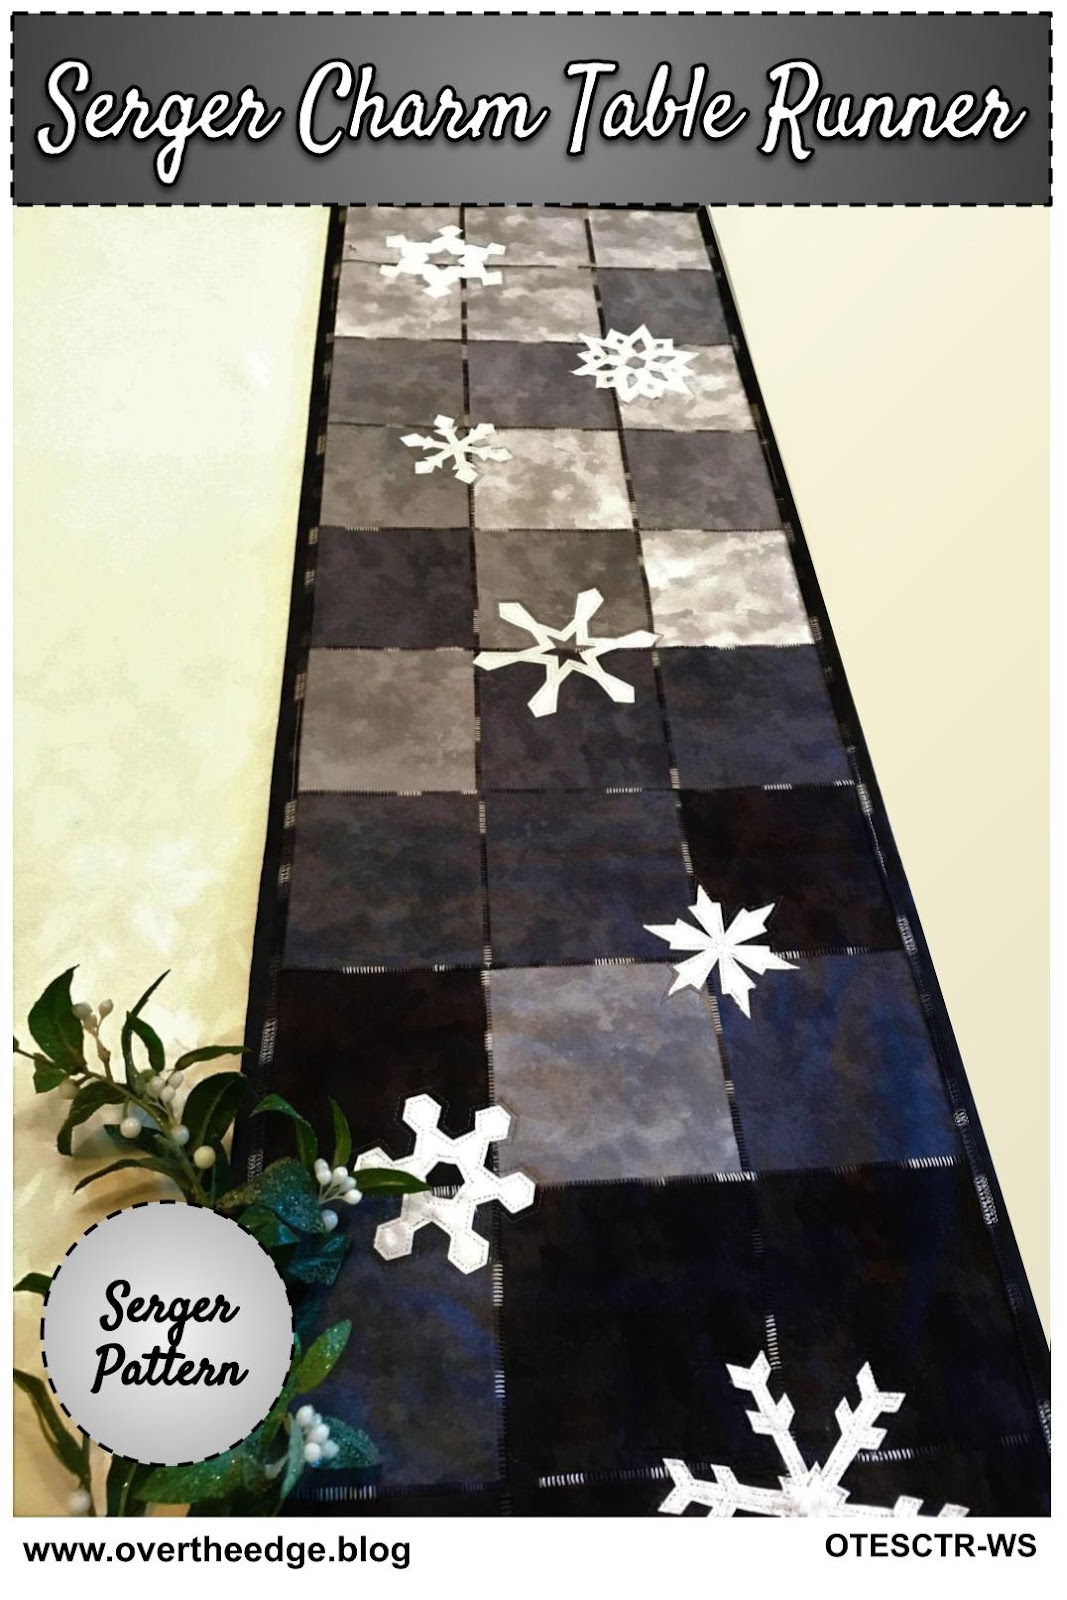
I finally completed the official pattern for my Serger Charm Table Runner design. It’s hard to believe that six years have passed since I first taught this design in a serger class. It’s time to get charmed by a serger!

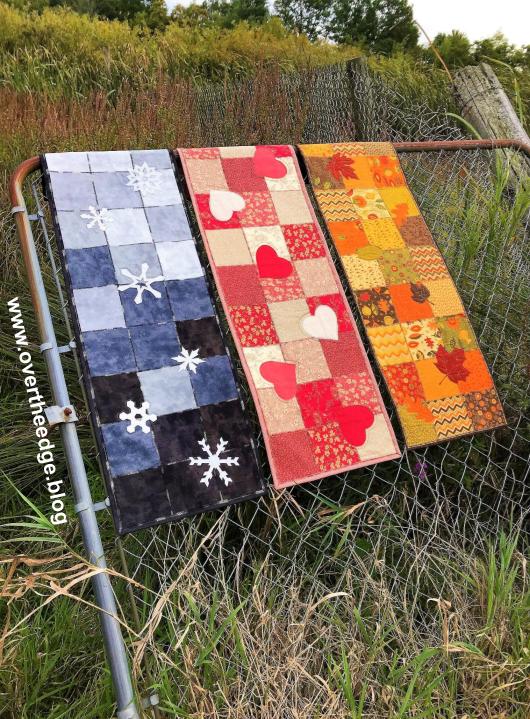
My serger charm table runner quilt is made from charm squares that are pieced together with a serger flatlock stitch. It even has overlock embellished binding. I included all three layouts and applique shapes in the pattern: Winter Skies, Hearts a Flutter and Falling Leaves. And of course, the step by step instructions have lots of diagrams and photographs. Keep reading to learn all about the table runners I made as samples for my pattern.

The Flatlock Stitch and Piecing a Quilt

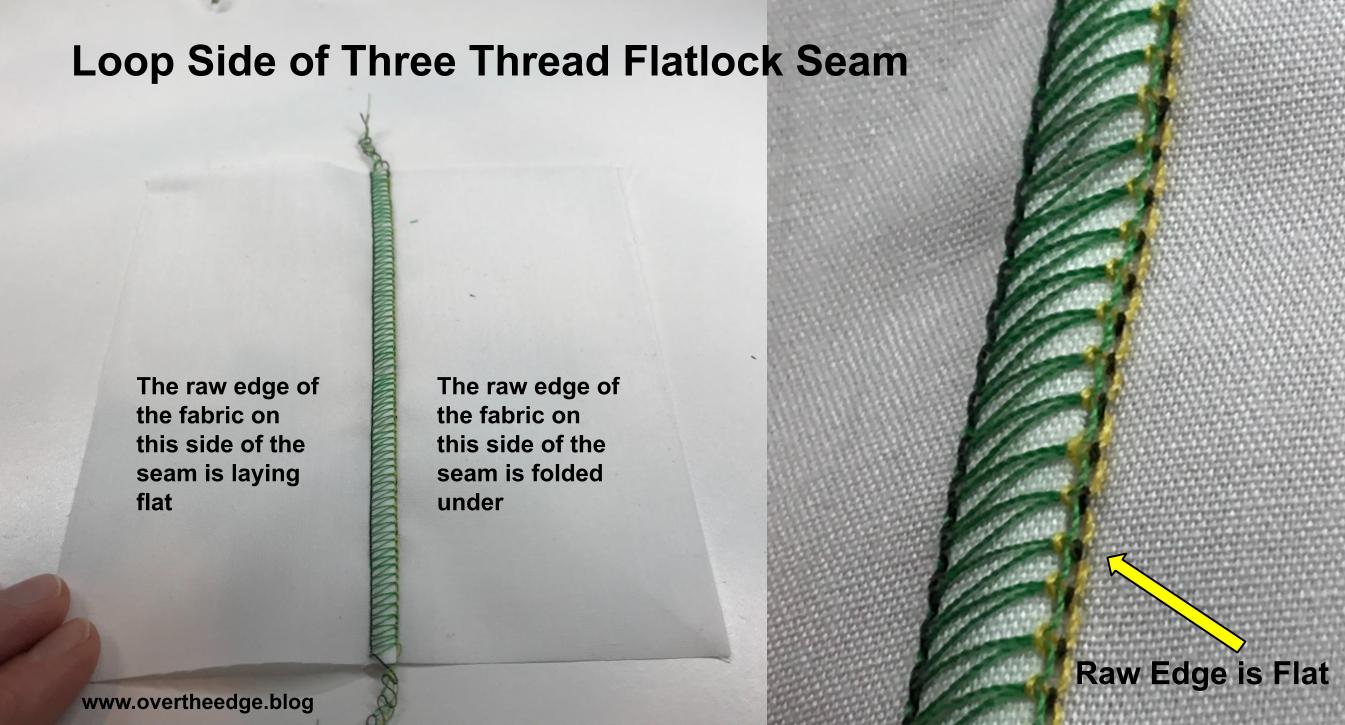
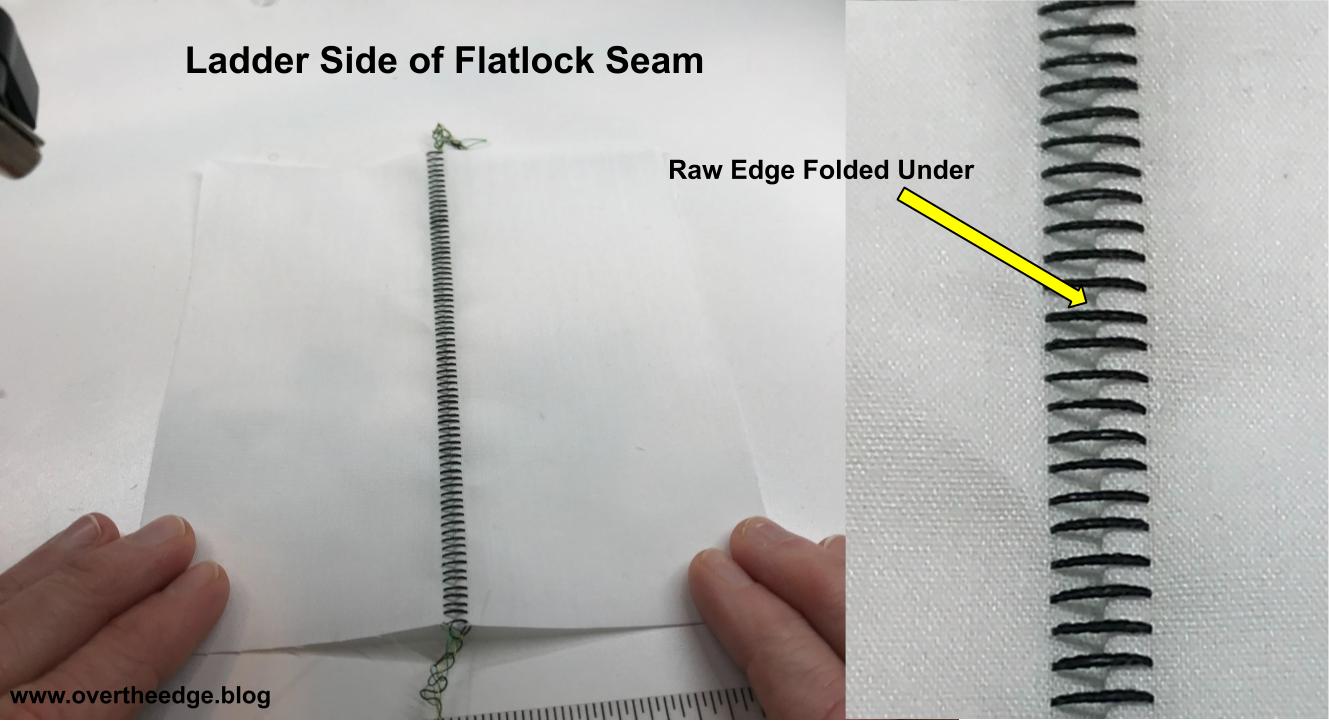
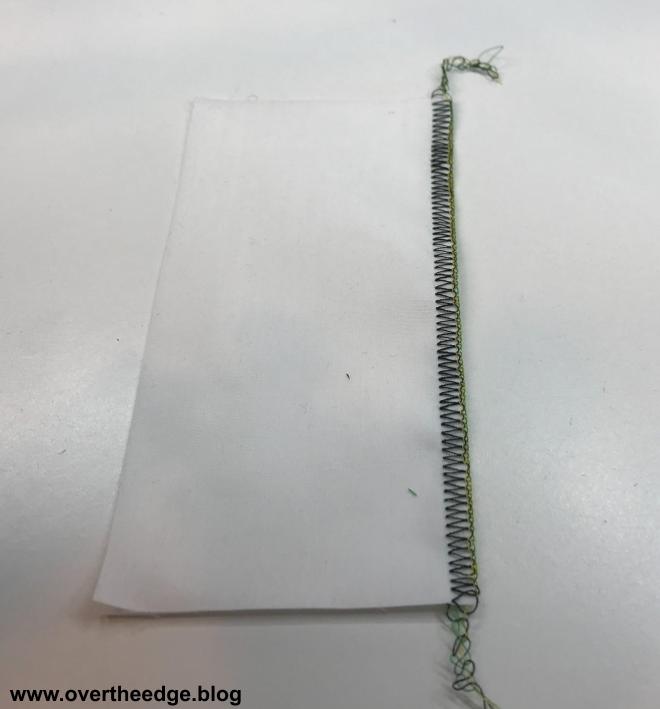
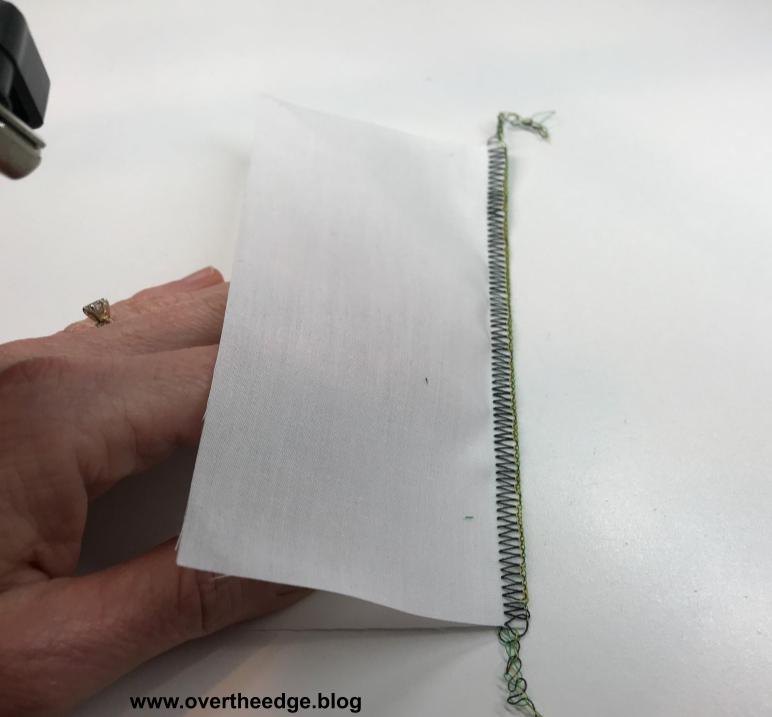
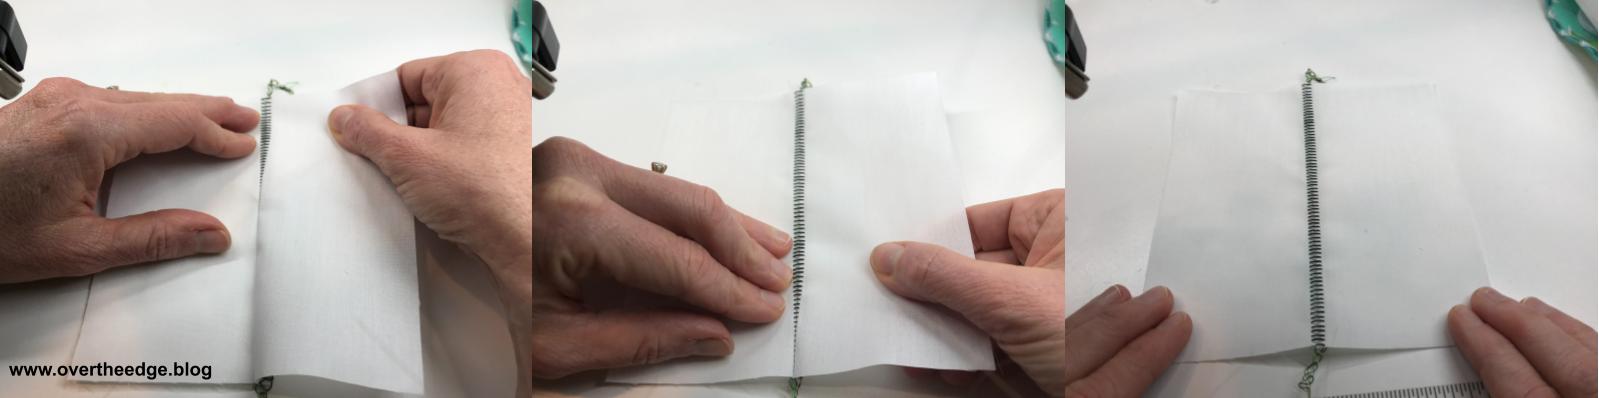
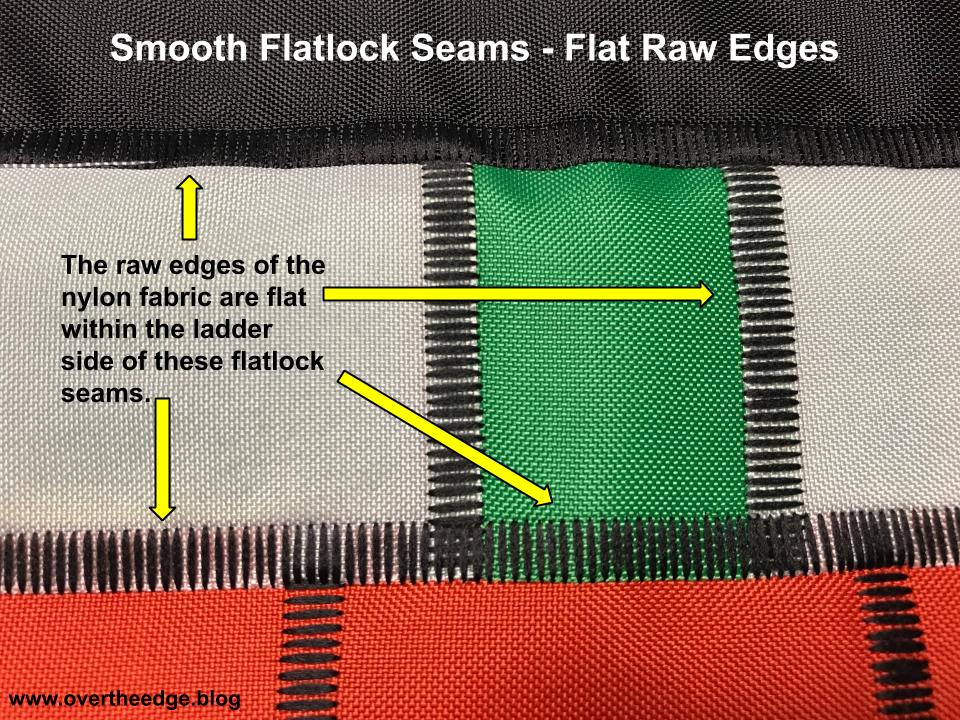
There are many different ways to use a flatlock stitch. Most involve serging with part of the loops hanging off the edge of the fabric. You need a steady hand (or a special presser foot) and a little practice to get it just right. But with flatlock piecing you don’t need a special foot. Your standard presser foot will work just fine. You guide the raw edges of your fabric next to your blade, and just trim off the stray threads. So the entire stitch lays on the fabric with no overhanging loops.

Flatlock piecing is a great introduction to using a flatlock stitch. For more information visit my tutorial, Master the Three Thread Flatlock Stitch for Quilt Piecing at https://overtheedge.blog/tutorials/master-the-three-thread-flatlock-stitch-for-quilt-piecing/

Fabric Charm Squares

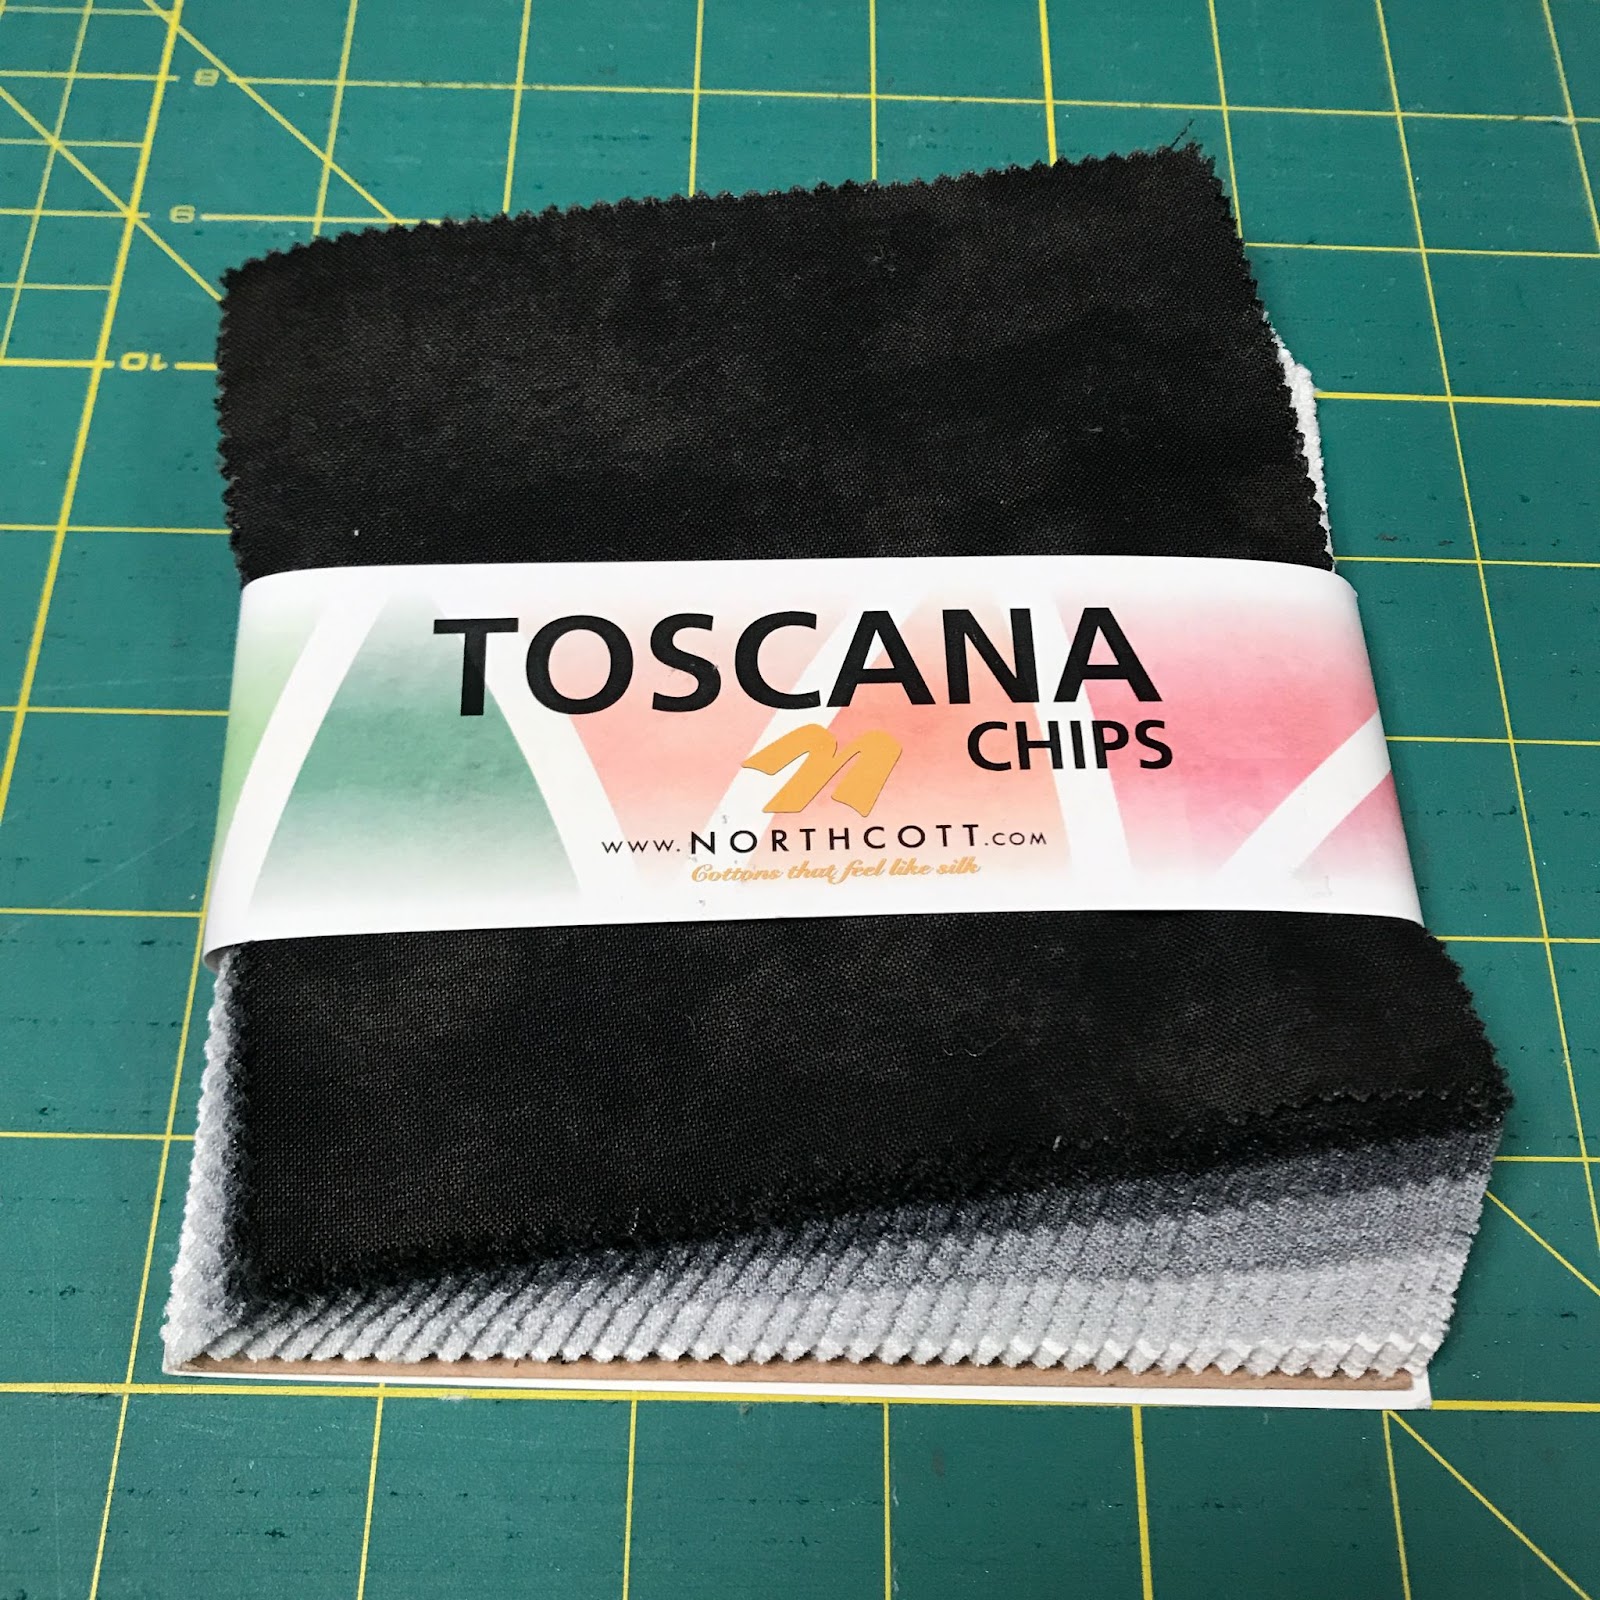
Charm squares are 5” squares that are cut from a collection of cotton quilting fabric and sold in packages. There are typically 40-42 squares per pack, but the number can vary. I used one package of charm squares for each of my table runners. 

  • Winter Skies – I used a Northcott Toscana Evening Shadow Chip Pack
  • Hearts a Flutter – I used a Moda French General Favorites Charm Pack
  • Falling Leaves – I used a Moda Hello Fall by Sandy Gervais Charm Pack

Both the background squares and the applique squares in my table runners came from the charm packs. The Northcott Toscana charm pack had 5 colors in it with multiples of each fabric. The Moda Hello Fall charm pack had very few repeats. The Moda French General Favorites charm pack had some repeats. You can always add in some applique fabric from your stash if the charm pack doesn’t have the solids or blenders you need for the appliques. I was lucky because the charm packs I chose had just the right amount of blenders for appliques. Or you could always cut your own collection of 5” squares for this table runner.

Quilt Top

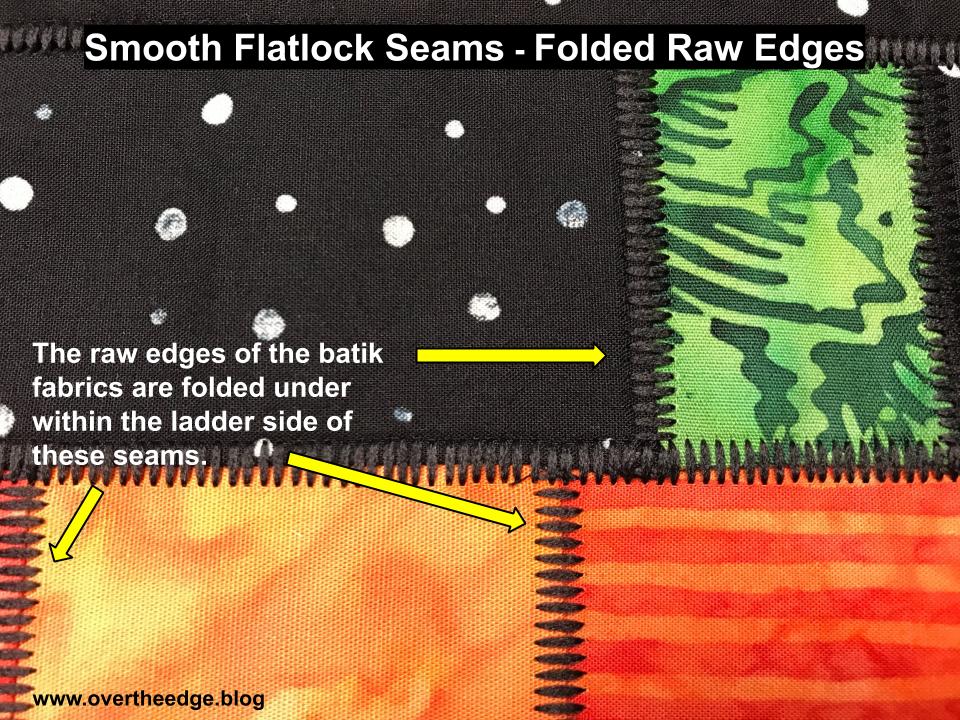
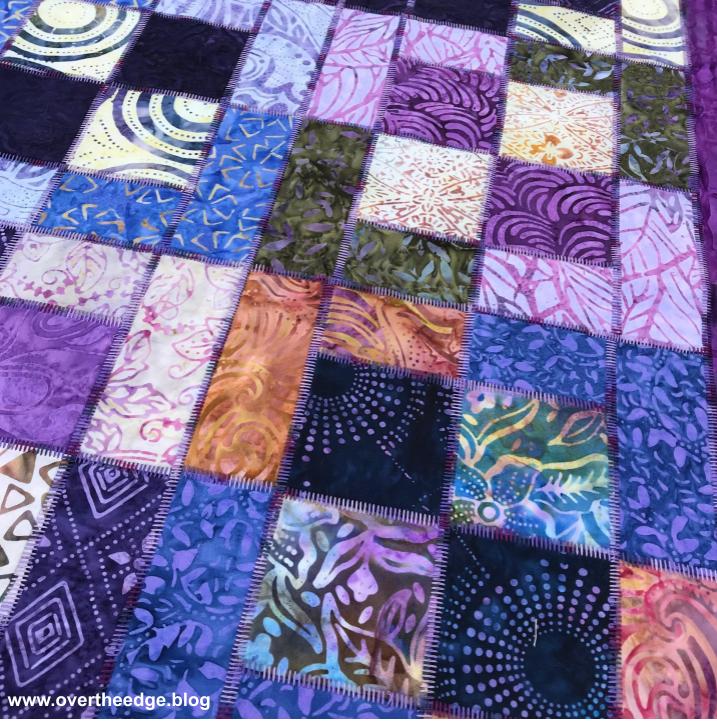
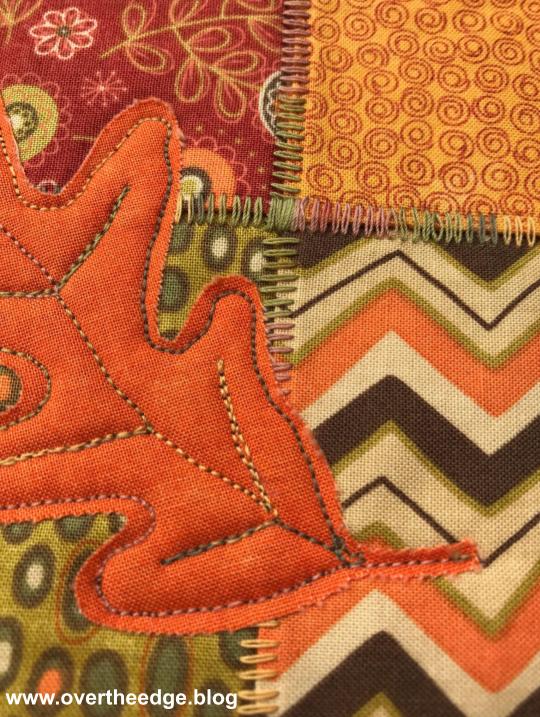
The table runners were pieced together using flatlock stitch. I love the look of the flatlock stitches in decorative quilts where the thread can be a focal point. And I love the way it looks with variegated thread. It really adds interest to a quilt. I’ve used both 30 wt and 40 wt variegated cotton threads by Sulky and YLI. The squares with the flatlocked seams look great as a background for applique.  
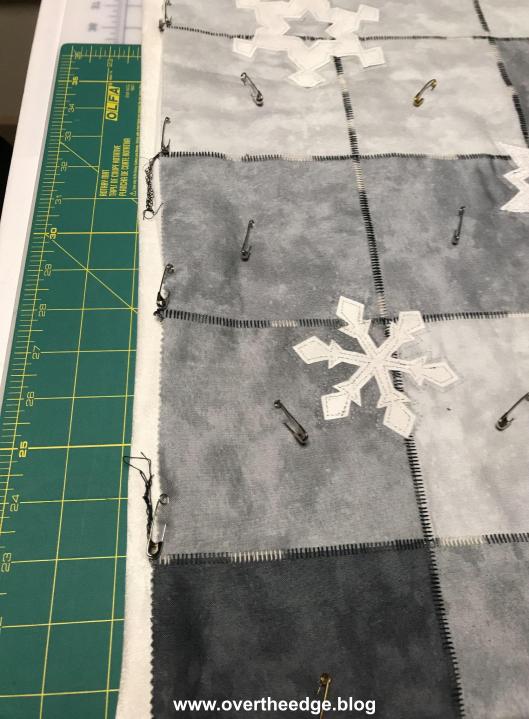
Applique

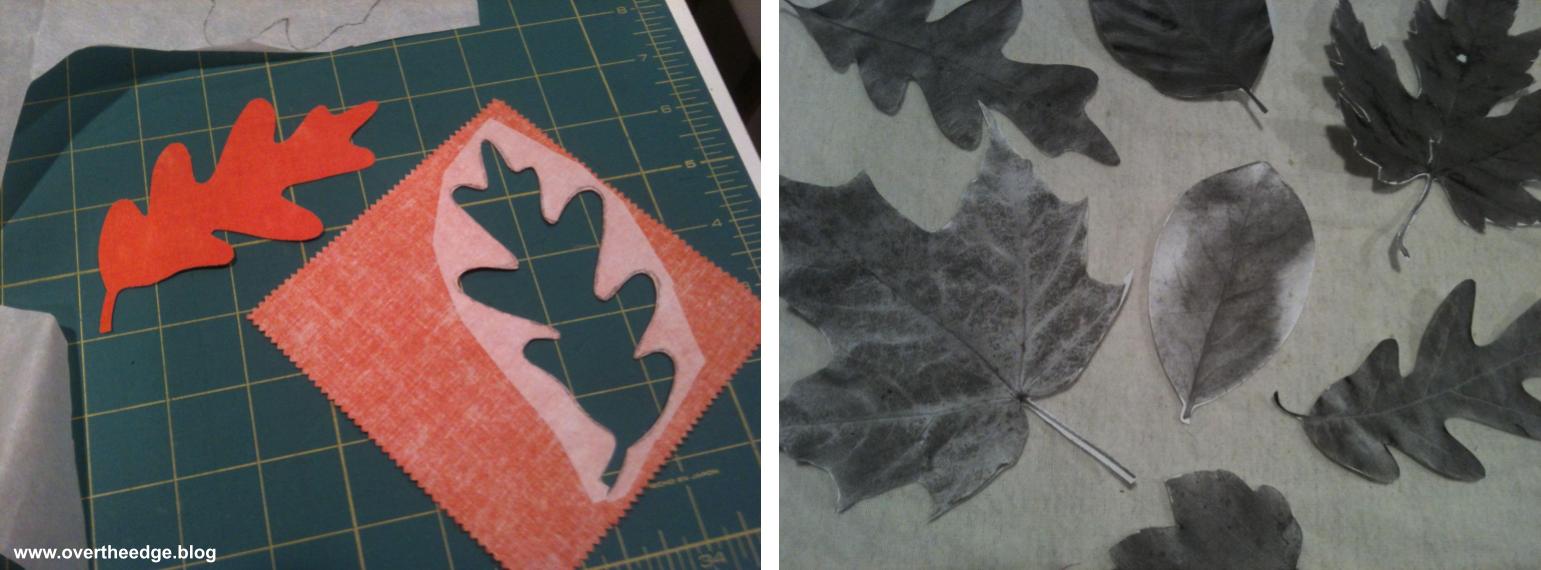
I had fun designing the applique shapes for this pattern. Real tree leaves were the inspiration for my Falling Leaves table runner. It’s amazing what you can do with real leaves and a copy machine! I learned how to make my own six sided paper snowflakes and picked my favorites to add to my Winter Skies table runner. For the Hearts a Flutter table runner I cut out several different paper hearts from folded paper and tested them on the runner before choosing my favorite. 

I used the raw edge applique technique to apply my shapes using a sewing machine. But other forms of applique would also work. If you have a serger with a large throat space you could applique with the chain stitch. You could even machine embroider some of your favorite applique designs on your table runner. 

serger charm table runner

Batting

Choose your favorite. I’ve made mine with thin fusible fleece, cotton quilt batting, and flannel. I like them all, but each is a little different. Flannel is the thinnest. Fusible fleece was a little more “stiff” and cotton quilt batting was the fluffiest. I think the fusible fleece fused to the back side of the quilt top fabric helps to hold the fabric and flatlock stitches in place, but I’ve had good success with all of these battings. 

Quilting

You can quilt this table runner with as little or as much quilting as you like, based on your selected batting. Some battings require quilting stitches every 3-4” or some like flannel can be quilted 8-10” apart. My table runners are decorations and are spot cleaned as needed (rarely), so quilting distances are not that important. I did minimal quilting on my table runners so that my variegated thread and flatlock stitches would stand out and be a focal point of the quilts. I quilted my table runners using both a sewing machine and a hand sewing needle.
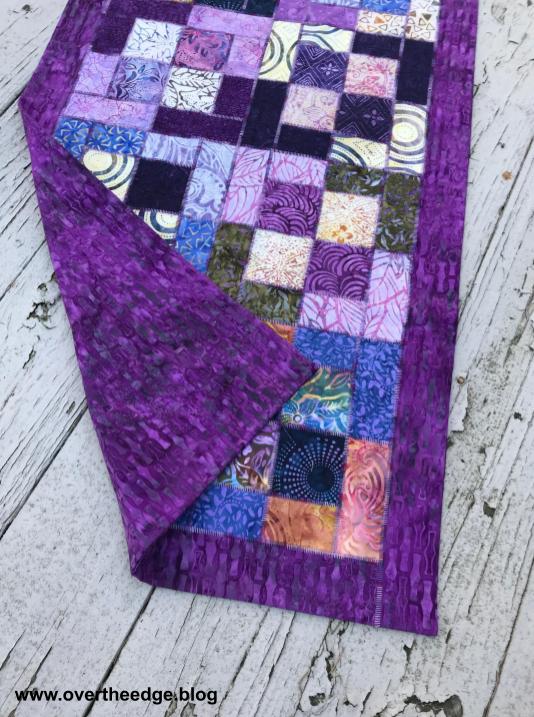
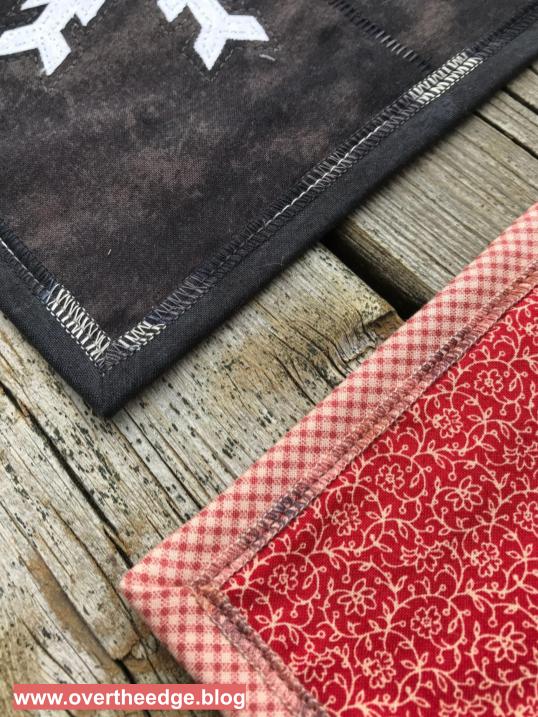
serger charm table runner

Binding

Although any method of binding would work for this table runner, I chose to embellish my binding with a three thread overlock stitch. The serger stitches on the binding really help tie together the quilt with the flatlock stitching around the squares. I attached and top stitched the binding to these table runners using a sewing machine, but a serger using a 4 thread overlock and/or a chain stitch would work as well.

serger charm table runner

Other Ways to Use a Serger for this Project

You can serge a table runner just like mine using the instructions in the pattern. A standard serger capable of a three thread flatlock stitch and a sewing machine are all you need.

Would you like to get more creative with your serger? Here are a few additional ways to use your serger that are not included in the pattern:

  • Use a rolled hem on the binding instead of an overlock
  • Attach the binding with a four thread overlock stitch or a chain stitch
  • Use a chain stitch to top stitch the binding
  • Stitch your applique using a chain stitch

For tips about quilting with a chain stitch, see my blog post “How to Serge a Quilt with a Chain Stitch” at https://overtheedge.blog/how-to-serge-a-quilt-with-a-chain-stitch/ and my tutorial “Tips for Serging with a Chain Stitch” at https://overtheedge.blog/tutorials/tips-for-serging-with-a-chain-stitch/.

Get Charmed by a Serger Today!

If you’d like to try making the Serger Charm Table Runner be sure to visit my etsy shop and get your own copy of my pattern. Use the coupon code SERGERCHARMNOV2021, which will give you a 20% discount on this pattern through November 30, 2021. Click on this link to take you directly to the pattern section of my shop. https://www.etsy.com/shop/studiojsewing?coupon=SERGERCHARMNOV2021

I hope you enjoyed learning about the making of my serger charm table runners. 

serging with jen

Resources 

Tutorial – Master the Three Thread Flatlock Stitch for Quilt Piecing https://overtheedge.blog/tutorials/master-the-three-thread-flatlock-stitch-for-quilt-piecing/

Serger Charm Table Runner Patterns https://www.etsy.com/shop/studiojsewing

Which Fabric Makes a Better Flag?

Making “stained glass” fabric flags with reversible fabrics is a great way to utilize the flatlock stitch on your serger! But which fabric makes a better flag – cotton batik or flag sport nylon?

Earlier this year I wrote a blog post and tutorial about making a serger flatlocked heart flag. That flag was made from cotton batik fabric because that is what I had access to at the time. After that post, I received several questions asking me if the flag could be made from nylon fabric. I finally got my hands on some flag sport nylon fabric and gave it a try. I experimented with garden flag prototypes until I was happy with the results. Making a flatlocked flag out of flag sport nylon is not that much different than making a flag using cotton batiks. But I do have a few tips to help you be more successful. Read on below to learn more about working with flag sport nylon to make flatlocked flags using your serger.

Since I really love using my serger to make these garden flags, I decided to design a flag for every season! My Pumpkin Garden Flag is both my second flag design and my second official serger pattern. You can find the pattern for my Pumpkin Garden Flag in my Etsy shop (see LINK at bottom of post). 

Which Makes a Better Flag – Cotton Batik or Flag Sport Nylon?

which fabric makes a better flag

These pumpkin garden flags are equally awesome in cotton batik or flag sport nylon. But there are pros and cons to using both fabrics for flags.  

Cotton Batiks

  • You can find cotton batiks in all sorts of interesting colors and patterns that really bring the flag to life. 
  • Cotton is easy to sew or serge. 
  • It is not water repellent or quick drying and will soak up water when it rains.
  • Cottons will fade when exposed to sunlight. 

Flag Sport Nylon

  • Flag sport nylon is available in only solid colors. 
  • Nylon can be stiffer and more slippery than cotton, and a little more difficult to handle than cotton.
  • It is mold/mildew resistant, water repellent and quick drying. 
  • Nylon will fade when exposed to sunlight, just not as fast as cotton.

Although I think the cotton batik flags are much more interesting, the flag sport nylon flag will probably hold up better outside. So my nylon flags will hang outside. And my batik flags will be for indoor use, or limited outdoor use. But maybe I will hang my batik flags outside anyway and make new ones when they fade. Now that I’ve made a few they are pretty quick to serge. I can make a flag in less than an hour, including cutting out the pieces. 

About the Flatlock Stitch

There are different techniques for doing a flatlock stitch, such as flatlock on the raw edges of fabric or flatlock on a fold. But for this blog post I am referring to flatlock piecing, where you use the three thread flatlock stitch to seam two pieces of fabric together with the knife engaged and slightly skimming/trimming the raw edges of the fabric. In the Resources section at the bottom of this post you will find a link to a short video I made about flatlock piecing.

As you serge, the upper looper forms “loops” on the top, and the needle thread forms “Vs” on the bottom and the lower looper forms a straight line right along the raw edges of the fabric.

three thread flatlock seam

When pulled open, one side of the seam will form “loops” and one side of the seam will form “ladders”. You will also notice that one of the fabric raw edges will remain flat, and the other will fold under. The raw edge of the fabric that is on top remains flat which you will see on the loop side of the stitch. The raw edge of the fabric that is on the bottom when you serge, will fold under which you will see on the ladder side of the stitch. 

loop side of three thread flatlock seam
ladder side of flatlock seam

How to Get the Fabric Raw Edge to Fold Consistently on the Ladder Side

The way you open the seam can help the raw edge fold well. Of course you can just grab it and yank it open, but you may find the raw edges don’t always fold over the way you want them to. If you work with the fabric and it’s natural tendency to fold you will get better results. Here’s what you can do to get a better fold of the raw edge in your flatlock stitch:

Place the seam with the bottom fabric side (the V side) facing up.

how to open a flatlock seam

Insert your fingers between the two layers of fabric, placing them next to the seam. 

how to open a flatlock seam

Use those fingers to hold the fabric down, while you use your other hand to pull the other piece of fabric to open the seam. Continue holding the fabric down and pulling the fabric open until you have opened the entire seam.

how to open a flatlock seam

Differences between Serging with Cotton Batik and Flag Sport Nylon

Cotton batik fabric is a softer and less slippery than nylon, which makes it a little easier to handle. I recommend that you make your first flag from cotton batiks, before moving onto to nylon.

Flatlocking with Cotton Batiks

Cotton batik fabrics are soft and supple enough that the raw edges typically fold under within a flatlock stitch. These folded raw edges lay flat within the seam and therefore the seams are fairly flat, especially if you press them. You don’t need to do anything else. Occasionally the raw edge may flip out and lay flat in a spot or two. You can just manually help it fold back under the stitches by using a stiletto or some other tool. 

flatlock stitch ladder side

which fabric makes a better flag

Flatlocking with Flag Sport Nylon

Nylon is stiffer, which means it prefers not to fold. So the raw edges of the nylon fabric within the flatlock seam will fold in some areas and try to lay flat in others. This flipping back and forth between flat raw edges and folded raw edges creates bumps or twists in the seam at each transition. See example below.

which fabric makes a better flag

lumpy flatlock seams

Since the nylon would prefer to lay flat and not fold, you will get a nicer looking seam if you prevent the raw edges from folding as you open the seam. I’ve found that if I run my fingers gently along the back of the seam as I am opening it up, I can prevent the raw edges of that bottom layer from folding under. However, I sometimes still end up with a few areas that have folded under.

So here’s what you do if you still have areas that are folded after you open your seam. Take a stiletto or other tool and insert it carefully between the ladder stitches and under the folded raw edge. Gently “grab” the folded edge with your tool and unfold it. Your seams will lay nice and flat if you do this. (You could do this with cottons too, but there is no need since the folded seams aren’t bulky.) I was very happy with the results of this technique on my nylon flags. The seams on the flags were smooth and flat. It was worth the little bit of extra fiddling with the seams to make them look perfect (see photo below).

which fabric makes a better flag

smooth flatlock seams

Types of Thread I used for Serging Flags

I’ve used several different types of thread for serging garden flags. The thicker decorative threads are more visible and create a better “stained glass” effect, but standard serger threads will work if that’s all you have or if that’s what works in your serger. Not all thick decorative threads work in all sergers. My Baby Lock Evolution serger happily handles all threads, but my first serger (a Pfaff) was very finicky. For example, it did not like YLI Wooly Nylon no matter how many adjustments I made, but it was happy with Gutermann Toldi Lock or Maxi Lock Stretch.

12 wt. Cotton or Rayon

I used both a 12 wt. cotton thread by Sulky and a 12 wt. rayon thread by Madeira for my cotton batik flags, and both work well. Even though the label on the spool recommends a size 100 needle, I used a size 90 serger needle, because that is the maximum size needle I can use in my serger. I serged at a slower speed, and didn’t have any problems with these threads in my needle. Of course, the loopers can handle these threads, no problem.

Texturized Nylon

Threads such as YLI Wooly Nylon, Madeira Aeroflock, Gutermann Bulky Nylon and Maxi Lock Stretch are all brands of texturized nylon thread. This type of thread serges well and has good coverage of the seams on the garden flags. I have found that the texturized nylon thread in a flatlock stitch tends to “snag” on rough surfaces more than other threads I have used for flags (such as cotton, rayon). So when the flag is flapping around in the breeze and rubs up against something, the thread may catch and pull the seam, distorting the stitches slightly. I did use texturized nylon thread for the seams on the nylon flags.

Pumpkin Garden Flag Pattern

Follow the link below to take you to the Pattern Section of my Etsy shop – Studio J Sewing. This pattern is available as a PDF file digital download. You can begin serging pumpkin garden flags as soon as you checkout!

Purchase the serger sewing pattern, Pumpkin Garden Flag, before October 31, 2020 and save 30% using Etsy coupon code SAVE30PATTERN during checkout.

https://www.etsy.com/shop/studiojsewing?coupon=SAVE30PATTERN

etsy pumpkin garden flag pattern serger sewing

I’d love to see the finished pumpkin garden flags you made with your sergers! Please share your photos via email to jennifer@overtheedge.blog. Which fabric makes a better flag? What do you think?

serging with jen

Resources

If you’d like to try making a heart flag with my free tutorial click on this link: https://overtheedge.blog/tutorials/serger-flatlocked-heart-flag/

To see flatlock piecing in action click on this link to view my YouTube video on Flatlock Piecing: https://youtu.be/iN_D06Htzwg

To learn how easy it is to remove stitches in a three thread flatlock seam, click on this link to view my YouTube video: https://youtu.be/QIW0PZQDW64  

Serge a Flag with a Flatlock Stitch

It’s April now, and in a typical year I would be celebrating National Serger Month. In the last few weeks I have been sewing face masks almost non-stop, and I miss using my serger creatively. So I took a short break from mask production to create a serger project to share with you. I’ve seen on the news that in some places people are clapping and cheering for healthcare workers from their balconies. Others are making signs to show support. Well, I’m going to show you how to serge a flag with a flatlock stitch. Hang it outside or hang it in your window to show your support!

The flag is garden size, about 12” x 18”. I thought about making it larger but I didn’t have any pieces of batik large enough to make a bigger flag. Normally, I would just run out to the store to buy what I needed, but that is a little difficult right now. 

The flag is reversible and since both sides of the fabric show in this flag, batiks work well. Solids would work too, but batiks are so much richer. Using black thread gives the effect of stained glass. Who knew you could make stained glass with your serger!

Supplies Used for this Flag

  • Red batik remnant at least 6” x 13”
  • Light colored batik remnant at least 7” x 16”
  • Blue batik remnant at least 10” x 26”
  • Black thread – 1 spool of sulky solids 12 wt (or other thick thread) and 2 cones of Maxilock serger thread
  • Serger, capable of 3 thread flatlock stitch
  • Rotary cutter, mat and ruler
  • Hanging rod
  • Tool for securing thread tails (large eyed needle or other tool)

Serger Set Up and Testing

I set my serger up for a 3 thread narrow flatlock stitch with the widest width. I used a spool of black Sulky Solids 12 weight cotton in my upper looper and black cones of Maxilock serger thread in my needle and lower looper. The Sulky Solid would have been good to try in the needle too. It would have made the ladder side of my flatlock stitches stand out more. But since I only had one spool, I went with the Maxilock thread instead. 

Using scraps of fabric, I tested my stitch settings. After trying a few different stitch lengths, I decided on a stitch length of 1.5 to create my stained glass effect. I serged my samples with the wrong sides together, so the more dense loop side would be on the right side.

Flatlock Piecing on your Serger Video

Watch my short video on flatlock piecing if you would like to see the technique in action.

Serger Flatlocked Heart Flag – Link to Tutorial

Click on this link to view my full tutorial for serging this stained glass heart flag using the flatlock stitch. https://overtheedge.blog/tutorials/serger-flatlocked-heart-flag/

Flag Front Side and Back Side

This photo shows the front side and the back side of the reversible flag. The stained glass look is more pronounced on the front side with the loops and the heavier thread. 

Close Up View of Stitching

Serge a Flag with a Flatlock Stitch

I hope you enjoyed this post and are inspired to serge a flag with a flatlock stitch. Hang it proudly and show your support of all the workers on the front line of this pandemic! 

Flatlock Piecing With a Serger

It’s still March and National Quilting Month, so here I am highlighting another way to use a serger to quilt.  Flatlock piecing with a serger is a great way to add an artistic flair to your quilts. With a serger flatlock stitch, you are embellishing your quilt with decorative thread as you piece it together. The photos in this post are of my Four Square Table Runner that I made in 2014. This table runner is one of my favorite serger quilts I have made!

My Four Square Table Runner 

My table runner is a great example of how easy it is to modify a traditional quilt pattern for serger construction.

Fabric, Pattern and Thread

I used a package of forty 5” squares called Tonga Treats by Timeless Treasures. The “Four Square Table Runner” pattern came free in the package. I don’t know if this fabric is still available, but you can do this technique with any fabric or quilt pattern.

I used a variegated purple YLI machine quilting thread in the needle and Maxilock serger thread in the loopers. 

Serging

I followed most of the pattern instructions to make the quilt top, except for using a sewing machine. Instead, I pieced the quilt together with my serger using a three thread flatlock stitch with a length of 2. I serged the pieces right sides together, so the “ladder” side showed after pulling the flatlock stitches open. 

I added a border, which I also attached with the flatlock stitch. Instead of a traditional quilt sandwich, I used a flannel fabric as batting. and attached the backing using the pillowcase or “birthing” method (without binding). I serged the layers together leaving an opening for turning right sides out. After turning and pressing, I hand stitched the opening closed and hand tacked the layers together invisibly at the corners of the blocks. I wanted the decorative thread and the flatlock stitching to be the center of attention.  

What is a Serger Flatlock Stitch?  

A flatlock stitch can be used to seam two fabrics together and to add detail to a seam line. It has unbalanced tensions that allow you to pull open the seam so it lays flat. Typically the needle thread tension is very loose and the lower looper tension is tight. The flatlock stitch is also reversible. It forms a “loop” stitch on one side of the fabric and a “ladder” stitch on the other side of the fabric. If you serge a seam with the fabrics right sides together, you will end up with a ladder stitch on the right side. The “ladder” you see is the needle thread. If you serge a seam with the fabric wrong sides together you will end up with a “loop” stitch on the right side. The “loop” you see is the looper thread.  The example below show the ladder and the loop sides of two maple leaf quilt blocks that I made when I was practicing flatlocking.

What is Serger Flatlock Piecing?

When you sew your pieces together to form a quilt block, it is referred to as “piecing”. When you piece with a sewing machine the stitches made by a sewing machine are hidden within the seam. Flatlock piecing with a serger is piecing your quilt blocks together with a flatlock stitch. The stitch used in flatlock seams is very visible in the finished quilt. You can use the standard serger presser foot for this technique.

Video – Flatlock Piecing With a Serger

For all you visual learners out there I created this short video of the flatlock stitch in action. https://overtheedge.blog/videos/flatlock-piecing-with-a-serger/

How to Easily Remove a Three Thread Flatlock Seam

Tips for Flatlock Piecing With a Serger

  • Follow the instructions in your manual for setting your serger up for a flatlock stitch. There are different types of flatlock stitches (2 or 3 thread, wide or narrow). I typically use a three thread flatlock for piecing quilts.
  • For piecing a quilt with a flatlock stitch, I keep the blade engaged and run the raw edge of my fabric along the blade. I don’t really cut anything off, I just trim stray threads.  
  • Always test your serger set-up on a scrap of fabric and adjust as needed, before you begin serging your actual project. The actual tension settings and stitch length needed will vary with different threads and fabrics.
  • Leave a few inches of thread tail at the end of each seam. By leaving long tails you will prevent your seams from unraveling until you have a chance to secure them.
  • Press your flatlock seams flat before pulling them open. I feel it helps the fabric within the seam fold properly during the opening process.  After pulling the seams open, I press them again.
  • Your finished blocks may be a little larger than they would be using a sewing machine. The process of opening of the seam allowance changes the size of the seam allowance slightly.  
  • I use the three thread flatlock stitch in smaller projects like table runners and wall hangings. Flatlock stitches are more exposed and tend to snag more easily, so I don’t typically use this stitch for quilts that will get a lot of wear.
  • Set your iron temperature appropriately for the thread you use in your flatlock stitch, or use a press cloth. Since the thread sits on the surface of your fabric it has more exposure to the heat of the iron. It is possible to melt the thread in your serger stitches – I know from personal experience!

Are you Inspired?

I hope you enjoyed this post and are inspired to try flatlock piecing with a serger.

Theme: Overlay by Kaira Extra Text
Cape Town, South Africa