My Fun and Festive Gather Together Serger Apron
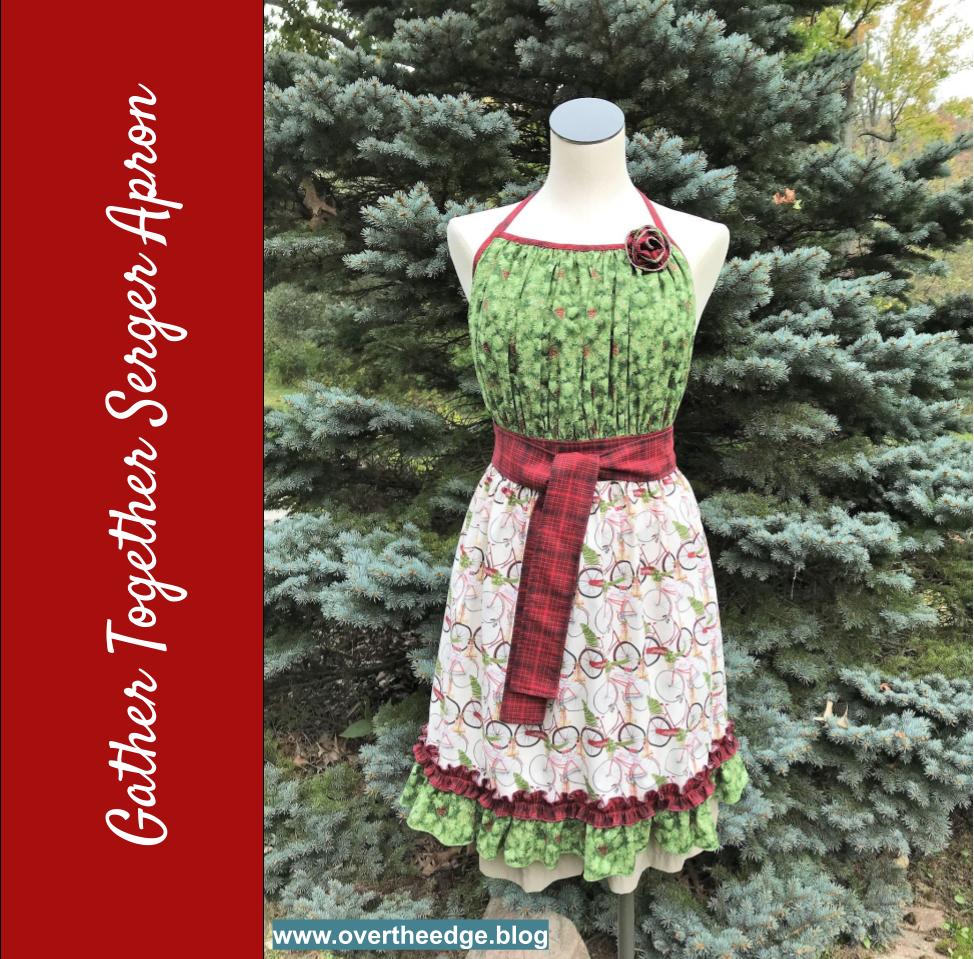
Every year my fellow employees and I sew up holiday aprons to display in the store. For my 2021 holiday apron I made the Gather Together Serger Apron by Baby Lock.
The Gather Together Serger Apron pattern was based on a sewing pattern by Pat Bravo of Art Gallery Fabrics, which was adapted for serger construction. See links to both apron patterns in the Resources section of this post.
How I Used My Serger
I serged the entire apron using only my Baby Lock Evolution serger. It’s a great apron pattern to try making with your serger. You can use your serger to make as little or as much of the apron as you like.
Edge Finishes
I used a variety of edge finishes to complete this apron, which utilized different stitches and/or attachments.
- Overlock stitch to keep raw edges from unravelling
- Rolled hem stitch for ruffles
- Wave stitch for fabric flower
- Hem sides of apron with ¼” plain hemmer attachment and chain stitch
- Encase edges of bodice and make neck straps with a double fold bias binder and chain stitch
Gathering and Ruffles
I gathered the ruffles using two different techniques.
- Four thread overlock technique which makes adjustable gathers, similar to a double row of basting stitches using a sewing machine. This technique is perfect for gathering fabric where you need to adjust the gathers to fit.
- Narrow cover stitch technique which makes permanent gathers. The gathers created by the cover stitch are much fuller than those created by an overlock stitch. However, they can not be adjusted.
- Long stitch lengths and differential feed are used in both gathering techniques.
Seams and Construction
I serged all seams using a chain stitch.
Feet and Attachments
I used the following feet and attachments to construct the Gather Together Serger Apron:
- Double fold bias binder 36mm
- Plain hemmer ¼”
- Cover/chain stitch foot
- Clear foot. The pattern did not call for this foot, but I like it’s visibilty. I thought the visibility of the foot made it easier for me to attach the double fold bias binding to the apron bodice.
- Standard foot
Photo Overview of my Gather Together Serger Apron
Wave Stitch
I used the wave stitch to finish the edges of the fabric flower. Metallic thread in both loopers gave the edges a bit of holiday sparkle. If your serger isn’t capable of the wave stitch you could substitute a rolled hem or three thread overlock stitch.
Three Thread Rolled Hem
I used a three thread rolled hem to finish the edges of the ruffles, with metallic thread in the upper looper.
Gathering The Bodice
The bodice of the apron was gathered using a four thread overlock stitch. After gathering with my serger, the bodice still needed a bit more gathering. Gathers created with the four thread overlock are adjustable. So I slid the fabrics along the needle threads adjusting the bodice edges to the proper dimensions. See link about gathering in the Resources section of this post.
Hem Sides of Skirt with ¼” Plain Hemmer Attachment
I love to try new things with my serger. Using the serger plain hemmer was a new experience for me. I hemmed the side edges of the apron’s skirt using the ¼” plain hemmer, a chain stitch and a standard presser foot. My practice piece turned out perfectly. It must have been beginner’s luck because the first hem on the actual project took me three tries to get it right. I figured out that I needed to generously turn/roll the edge of the fabric in advance and keep it turned as I fed it into the attachment. Then the plain hemmer worked really well. The second side hem of the apron looked beautiful on the first try! See the link in the Resources section for tips for using a serger ¼” plain hemmer.
The plain hemmer rolls the hem to the top side as it is serged. So you feed your fabric into the attachment with the wrong side up. The needle thread will be seen on the back side of your finished project. The chain looper thread will be seen on the right side of your project.
Finish Edges of Bodice and Create Straps Using a Double Fold Bias Binder Attachment
I followed the video class/instructions to make the apron. However, instead of making the top edge and neck straps all one piece, I bound the top edge first. Then I bound the side edges of the bodice and continued the binding from the sides to make the neck straps.
Gathering Ruffles Using a Narrow Cover Stitch
I used a narrow cover stitch along with the cover stitch foot to gather the narrow ruffle strip, bottom ruffle skirt and flower. The narrow cover stitch gathers fabric much more tightly than gathering with an overlock stitch. But the cover stitch gathers are not adjustable like the gathers made by serger overlock stitching.
Construct Seams
I used the chain stitch to serge the seams of the bodice, skirt and waistband/ties. Serging with a chain stitch is very similar to using a sewing machine straight stitch.
I attached the narrow ruffle and bottom ruffle to the skirt of the apron using a chain stitch too.
Gather Together Serger Apron
I hope you enjoyed learning about how I serged my Gather Together Serger Apron.

Resources
Using a Serger Plain Hemmer Attachment https://overtheedge.blog/tutorials/serger-plain-hemmer-attachment/
Tips for Using a Serger Double Fold Bias Binder Attachment https://overtheedge.blog/tutorials/serger-double-fold-bias-binder-tutorial/
Gathering Fabric Using a Serger Overlock Stitch https://overtheedge.blog/tutorials/how-to-gather-fabric-using-a-serger-overlock-stitch/
Links to apron patterns:
Find the serger version – Gather Together Serger Apron by Pam Mahshie of Baby Lock at www.sewedclasses.com
Find the free sewing version of the pattern at: http://www.patbravo.com/freeprojects/sewing/Spiceitup-1.pdf


