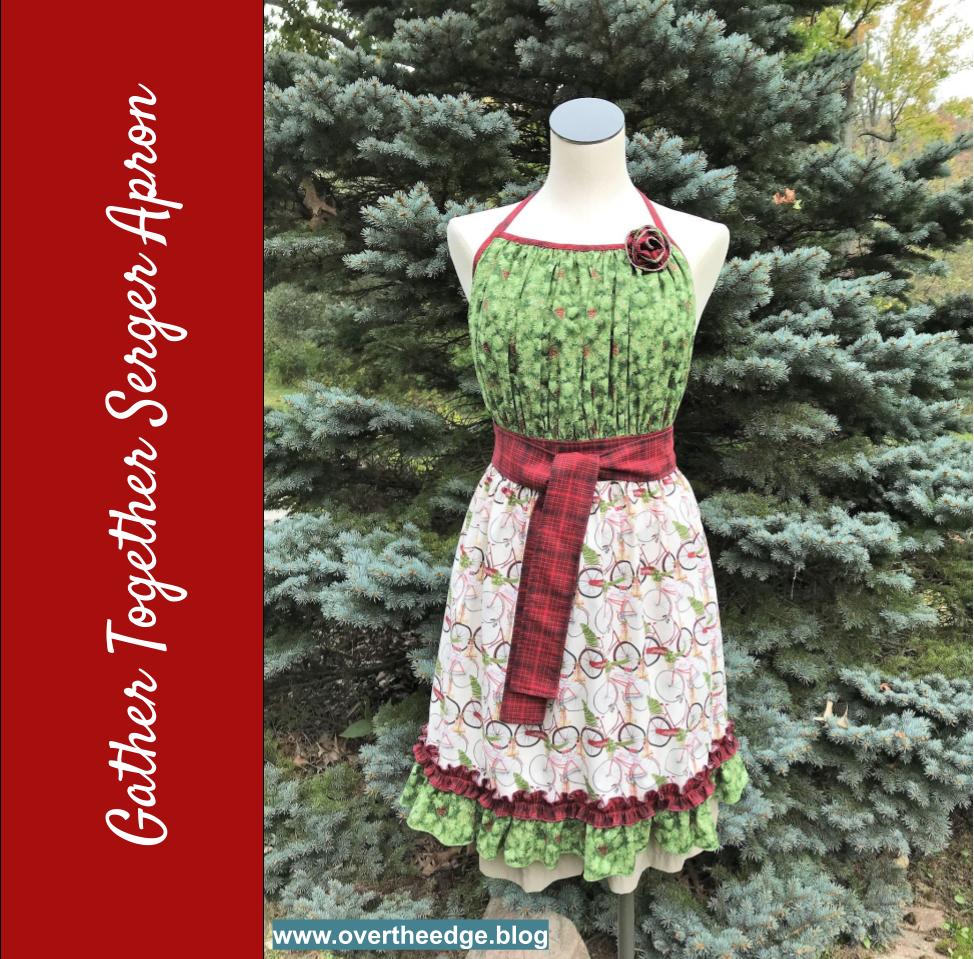
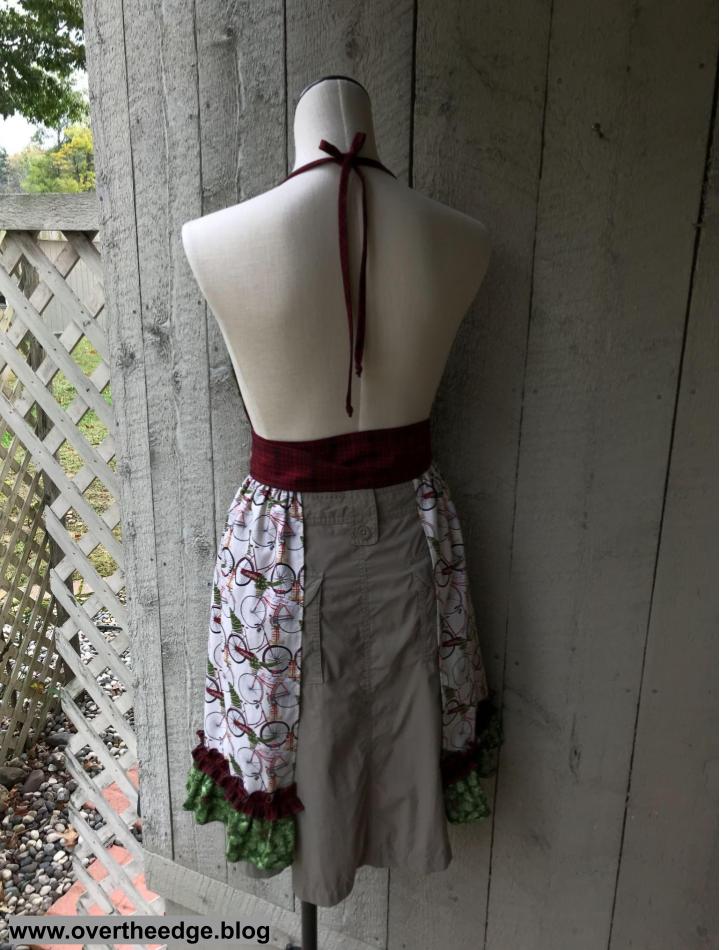
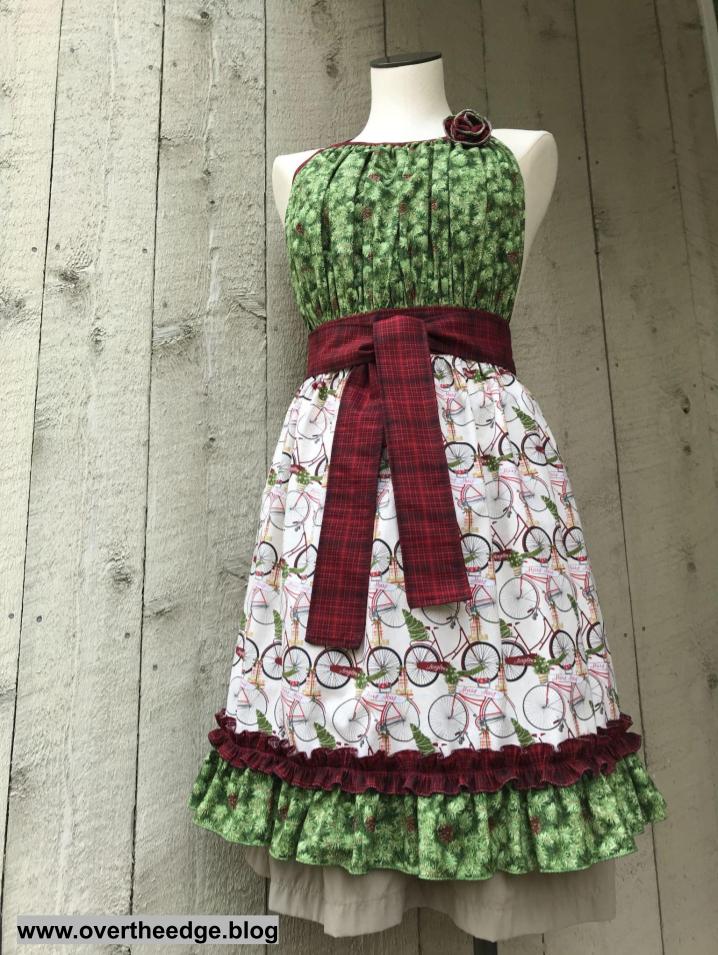
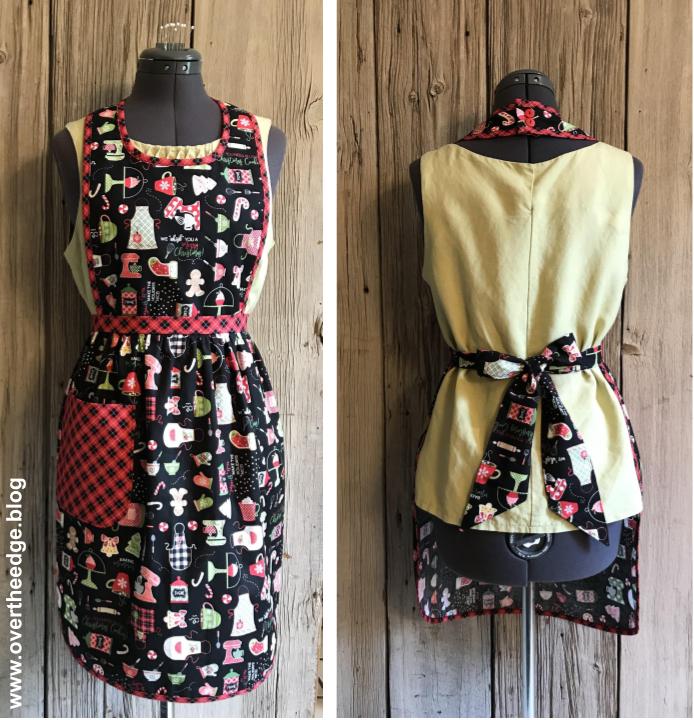
Every year my fellow employees and I sew up holiday aprons to display in the store. For my 2021 holiday apron I made the Gather Together Serger Apron by Baby Lock.
The Gather Together Serger Apron pattern was based on a sewing pattern by Pat Bravo of Art Gallery Fabrics, which was adapted for serger construction. See links to both apron patterns in the Resources section of this post.
How I Used My Serger
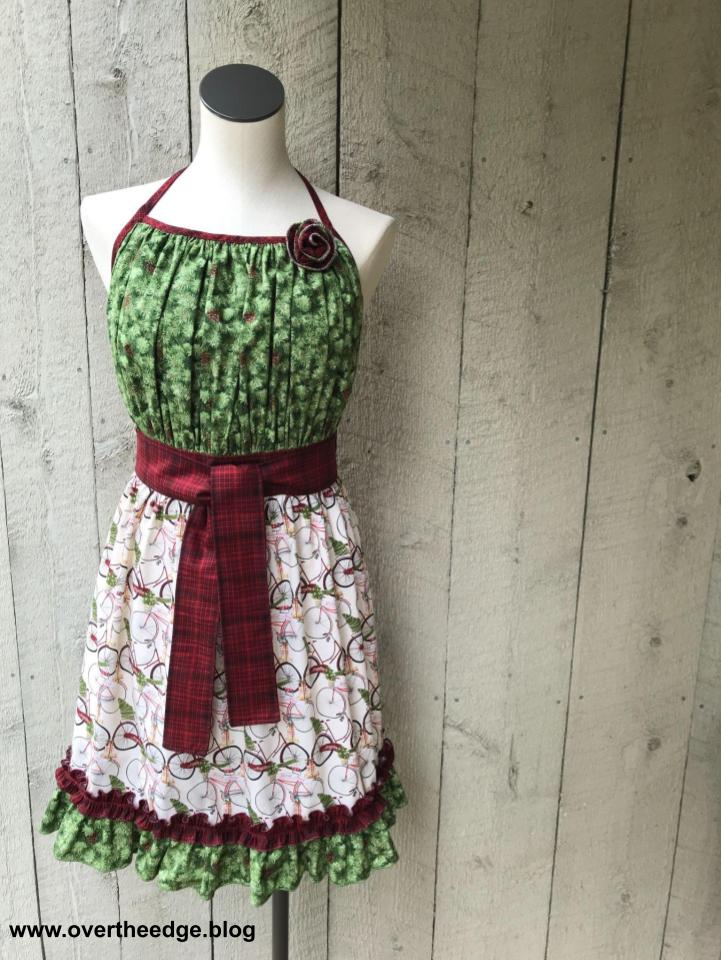
I serged the entire apron using only my Baby Lock Evolution serger. It’s a great apron pattern to try making with your serger. You can use your serger to make as little or as much of the apron as you like.
Edge Finishes
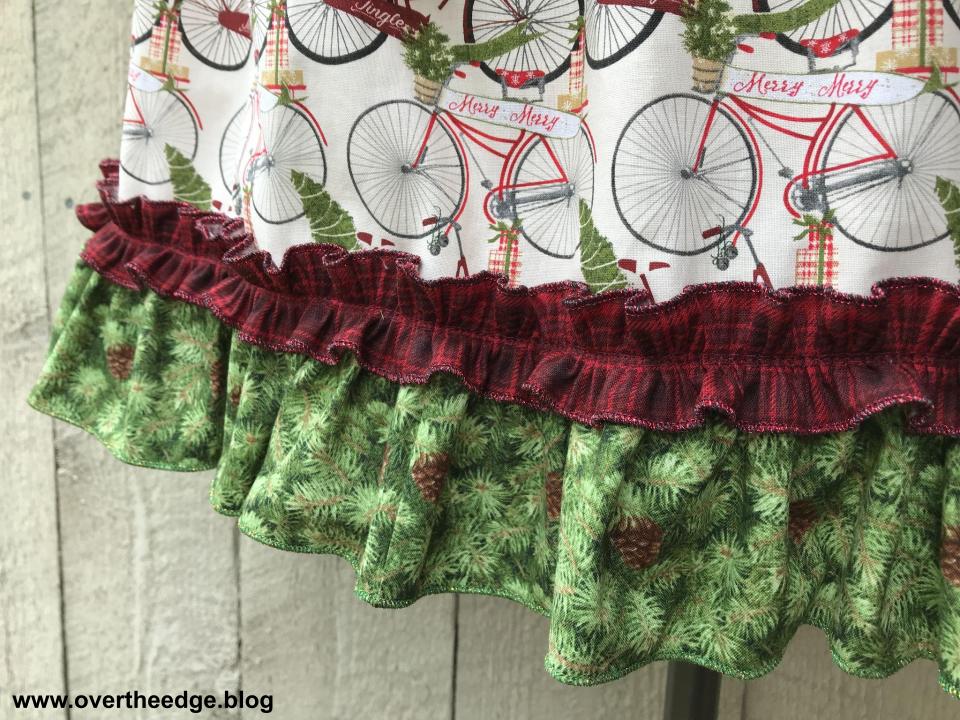
I used a variety of edge finishes to complete this apron, which utilized different stitches and/or attachments.
Overlock stitch to keep raw edges from unravelling
Rolled hem stitch for ruffles
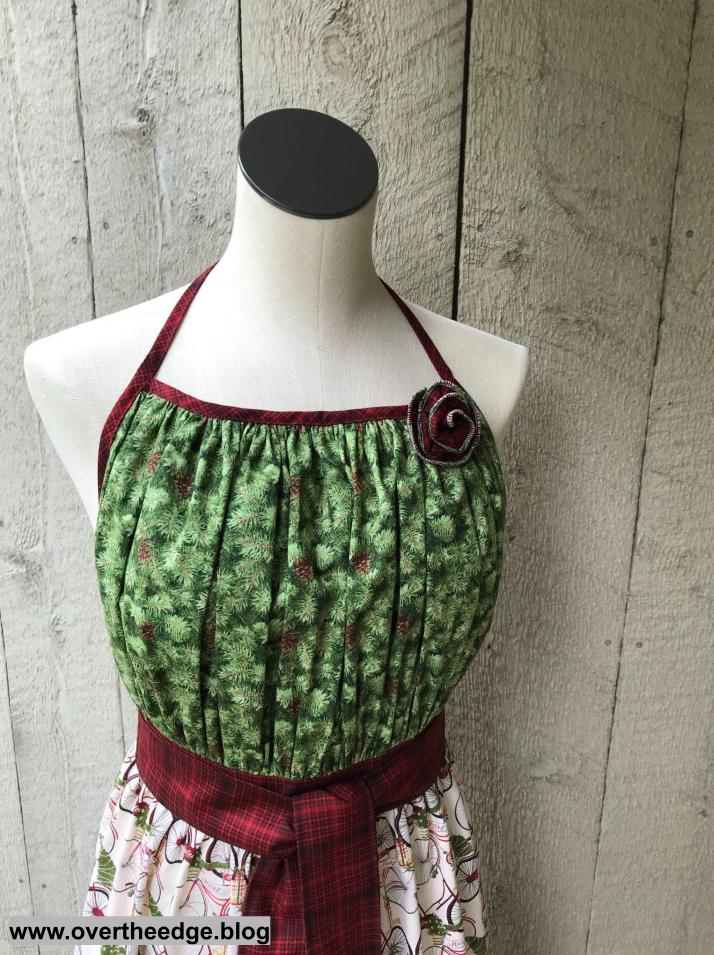
Wave stitch for fabric flower
Hem sides of apron with ¼” plain hemmer attachment and chain stitch
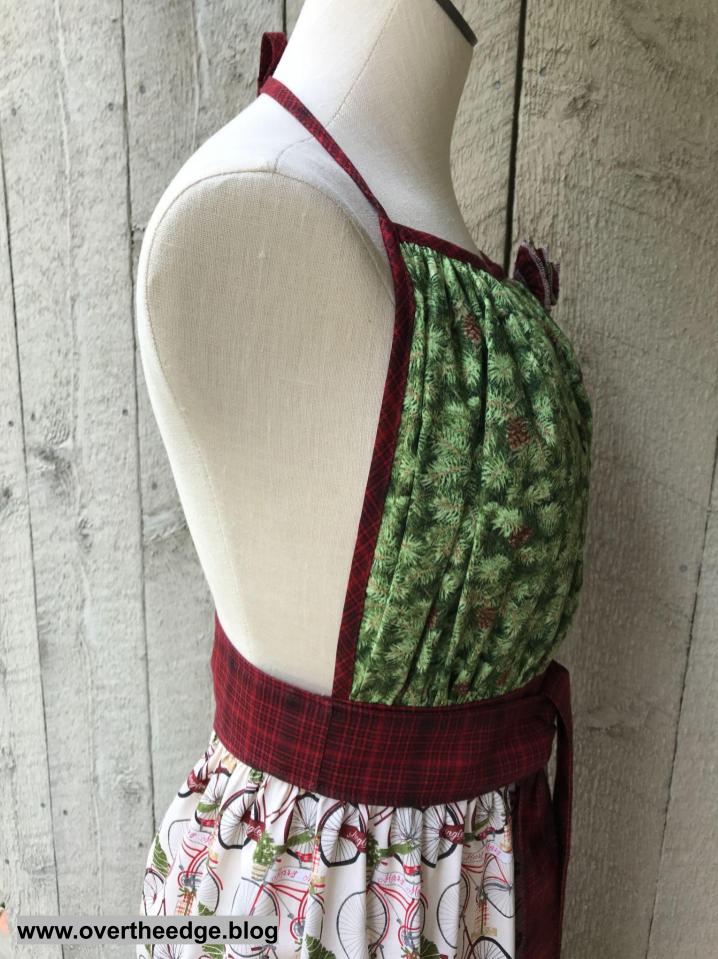
Encase edges of bodice and make neck straps with a double fold bias binder and chain stitch
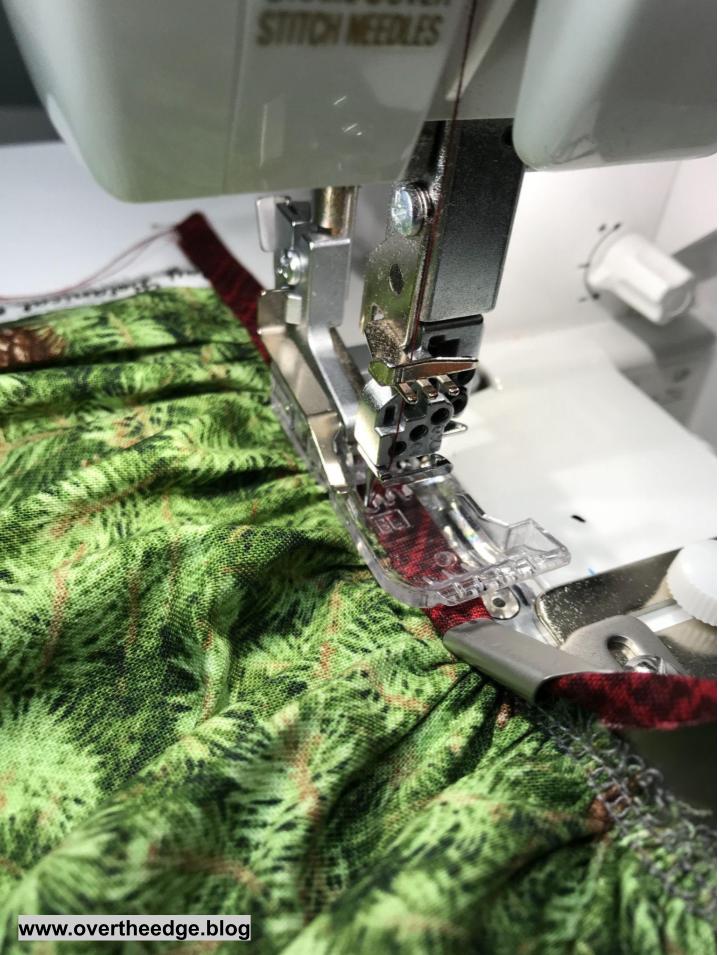
Gathering and Ruffles
I gathered the ruffles using two different techniques.
Four thread overlock technique which makes adjustable gathers, similar to a double row of basting stitches using a sewing machine. This technique is perfect for gathering fabric where you need to adjust the gathers to fit.
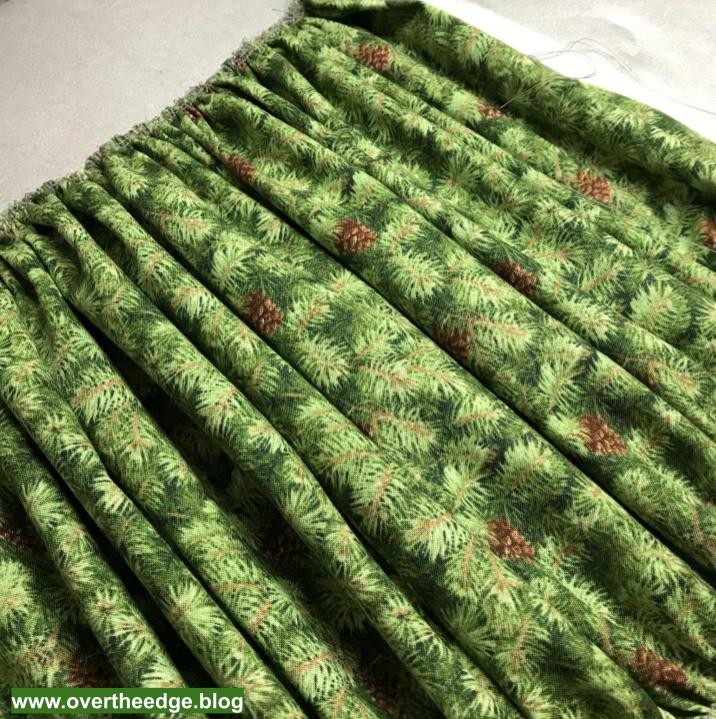
Narrow cover stitch technique which makes permanent gathers. The gathers created by the cover stitch are much fuller than those created by an overlock stitch. However, they can not be adjusted.
Long stitch lengths and differential feed are used in both gathering techniques.
Seams and Construction
I serged all seams using a chain stitch.
Feet and Attachments
I used the following feet and attachments to construct the Gather Together Serger Apron:
Double fold bias binder 36mm
Plain hemmer ¼”
Cover/chain stitch foot
Clear foot. The pattern did not call for this foot, but I like it’s visibilty. I thought the visibility of the foot made it easier for me to attach the double fold bias binding to the apron bodice.
Standard foot
Photo Overview of my Gather Together Serger Apron
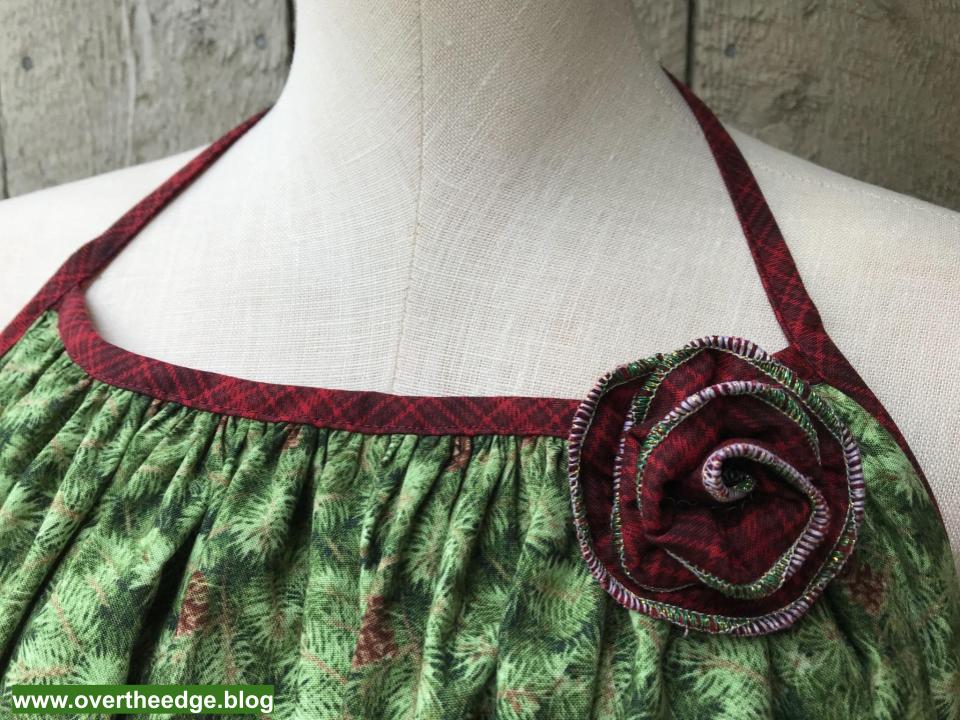
Wave Stitch
I used the wave stitch to finish the edges of the fabric flower. Metallic thread in both loopers gave the edges a bit of holiday sparkle. If your serger isn’t capable of the wave stitch you could substitute a rolled hem or three thread overlock stitch.
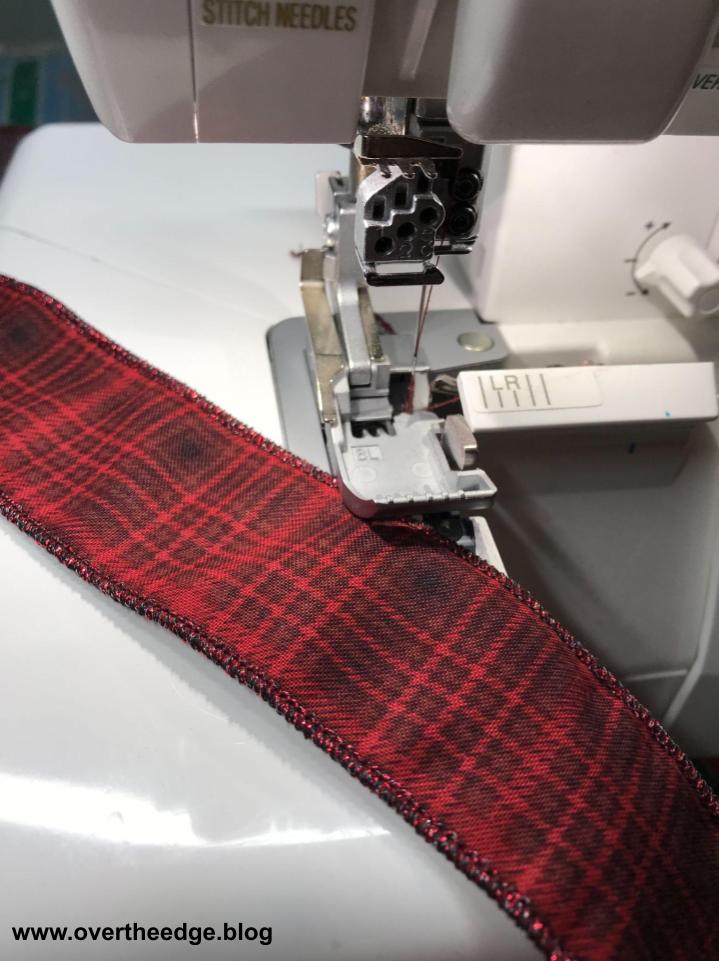
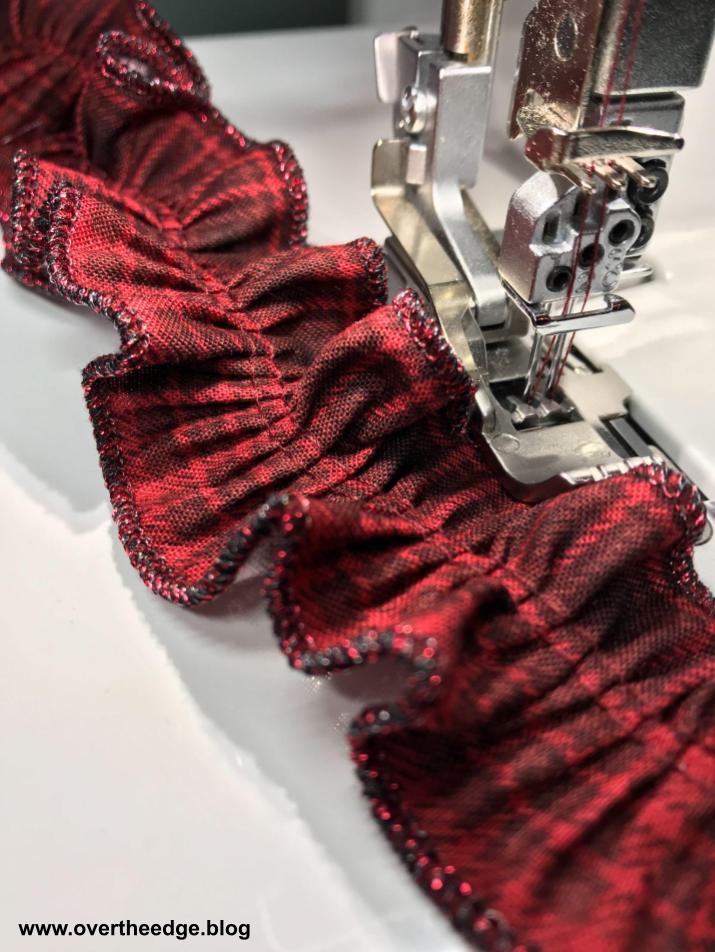
Three Thread Rolled Hem
I used a three thread rolled hem to finish the edges of the ruffles, with metallic thread in the upper looper.
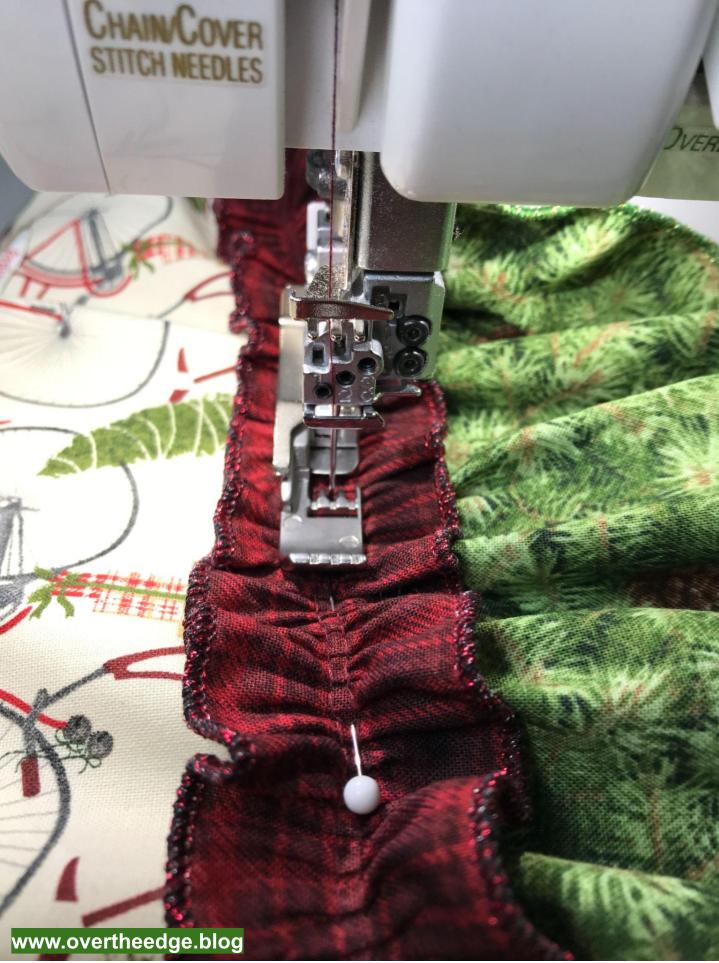
Gathering The Bodice
The bodice of the apron was gathered using a four thread overlock stitch. After gathering with my serger, the bodice still needed a bit more gathering. Gathers created with the four thread overlock are adjustable. So I slid the fabrics along the needle threads adjusting the bodice edges to the proper dimensions. See link about gathering in the Resources section of this post.
Hem Sides of Skirt with ¼” Plain Hemmer Attachment
I love to try new things with my serger. Using the serger plain hemmer was a new experience for me. I hemmed the side edges of the apron’s skirt using the ¼” plain hemmer, a chain stitch and a standard presser foot. My practice piece turned out perfectly. It must have been beginner’s luck because the first hem on the actual project took me three tries to get it right. I figured out that I needed to generously turn/roll the edge of the fabric in advance and keep it turned as I fed it into the attachment. Then the plain hemmer worked really well. The second side hem of the apron looked beautiful on the first try! See the link in the Resources section for tips for using a serger ¼” plain hemmer.
The plain hemmer rolls the hem to the top side as it is serged. So you feed your fabric into the attachment with the wrong side up. The needle thread will be seen on the back side of your finished project. The chain looper thread will be seen on the right side of your project.
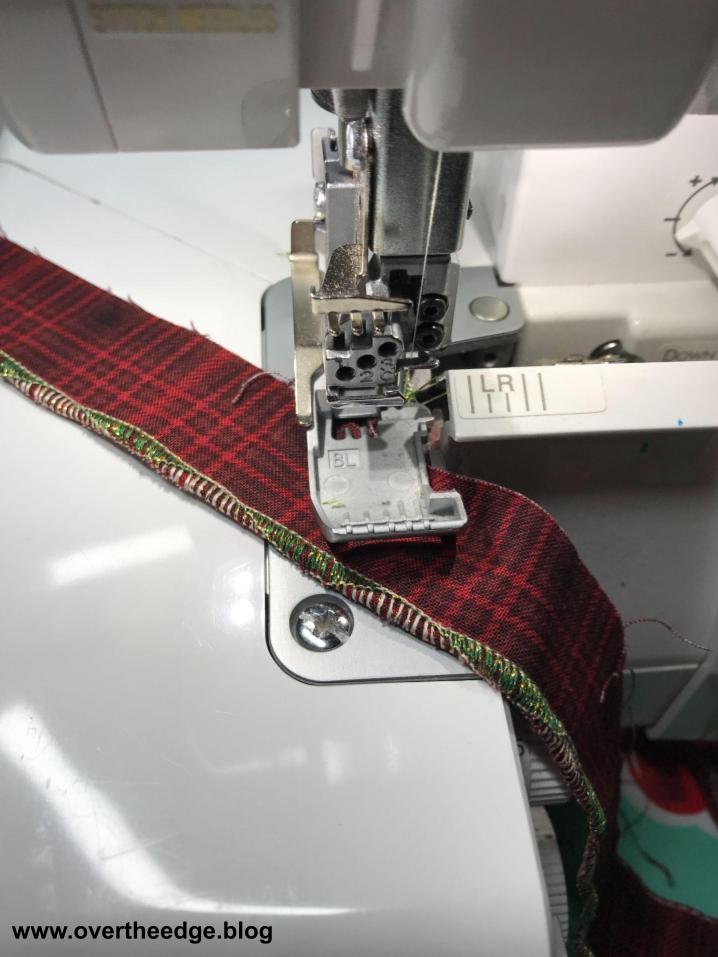
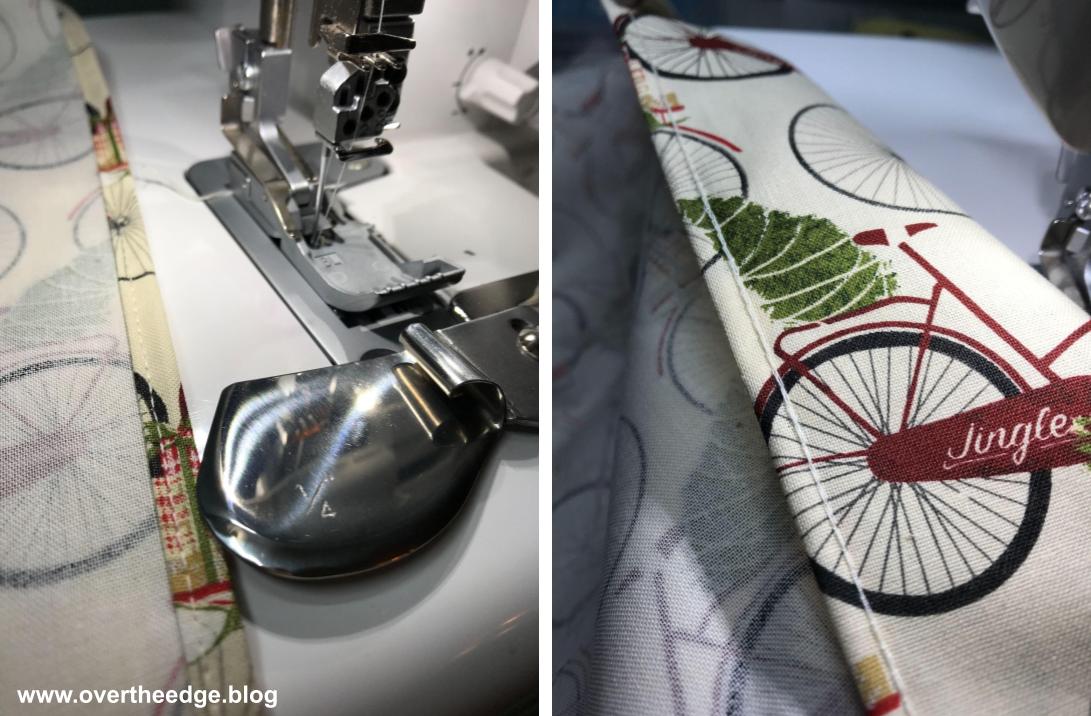
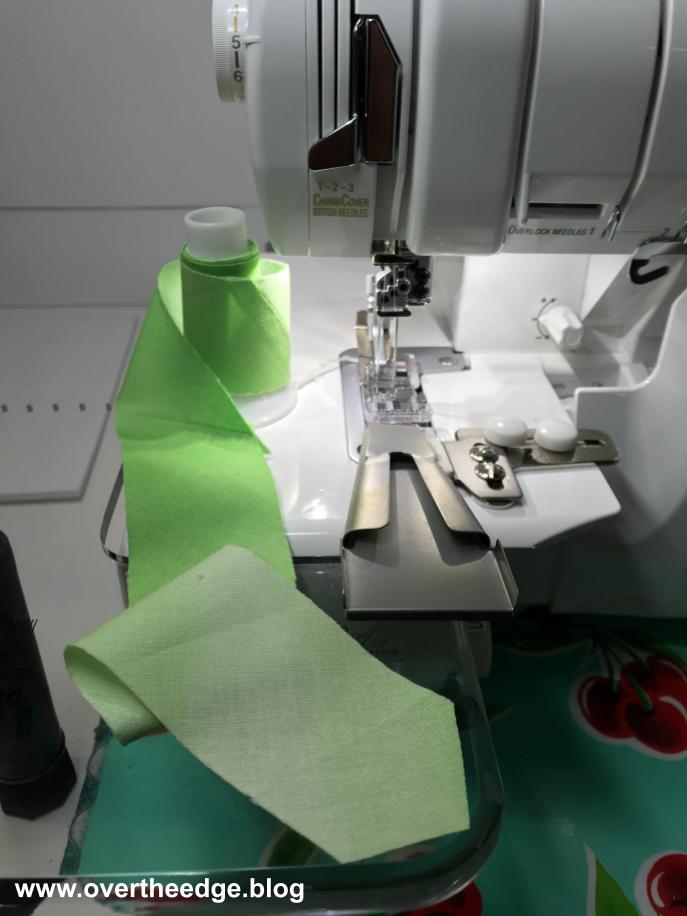
Finish Edges of Bodice and Create Straps Using a Double Fold Bias Binder Attachment
I followed the video class/instructions to make the apron. However, instead of making the top edge and neck straps all one piece, I bound the top edge first. Then I bound the side edges of the bodice and continued the binding from the sides to make the neck straps.
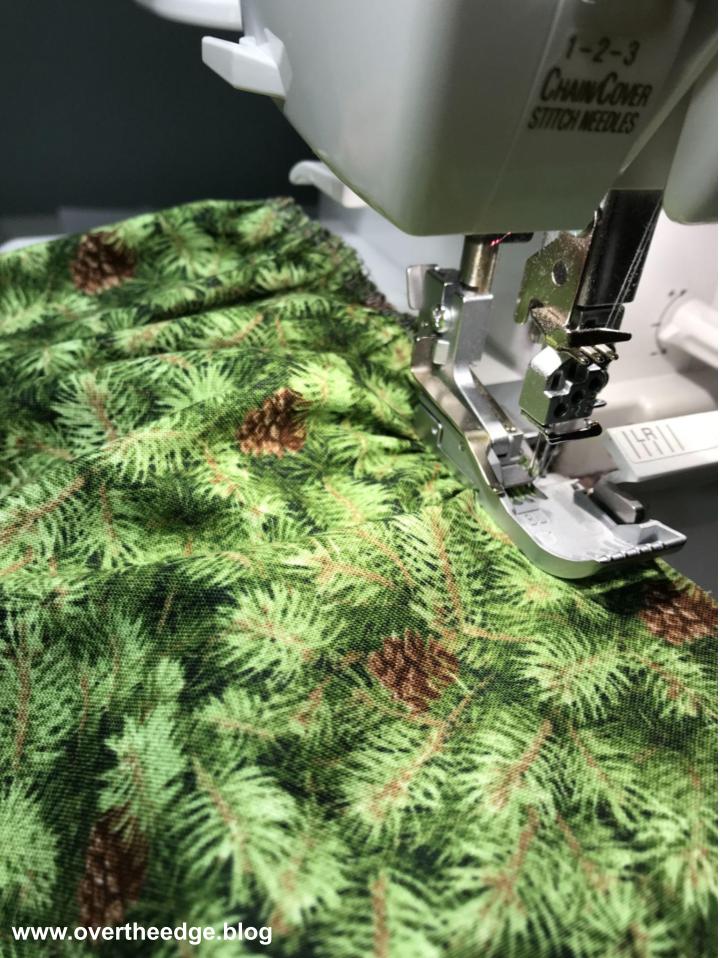
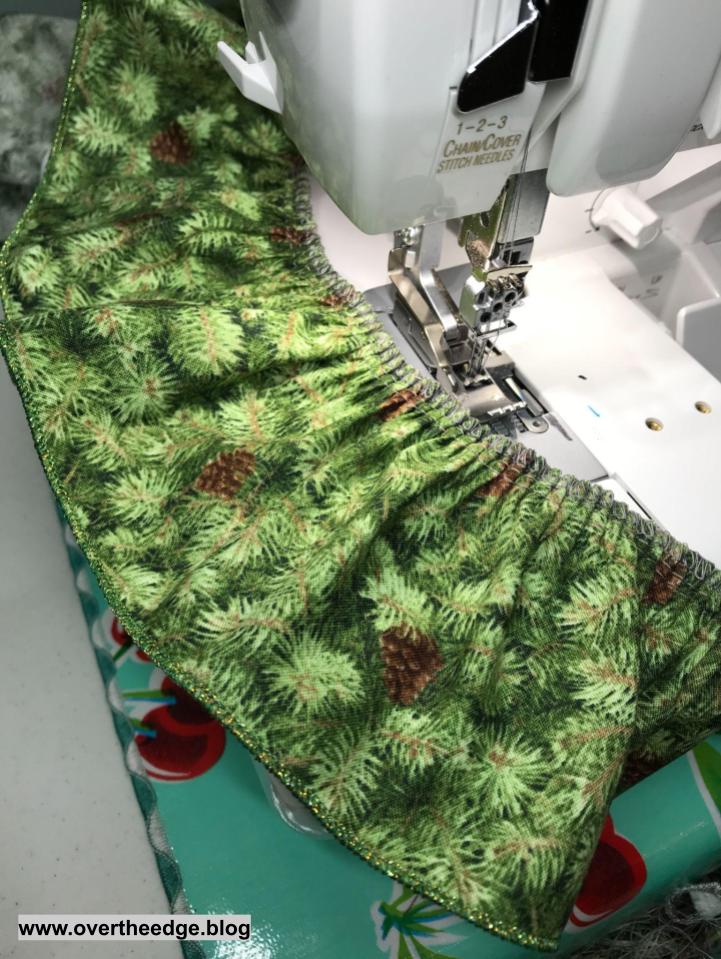
Gathering Ruffles Using a Narrow Cover Stitch
I used a narrow cover stitch along with the cover stitch foot to gather the narrow ruffle strip, bottom ruffle skirt and flower. The narrow cover stitch gathers fabric much more tightly than gathering with an overlock stitch. But the cover stitch gathers are not adjustable like the gathers made by serger overlock stitching.
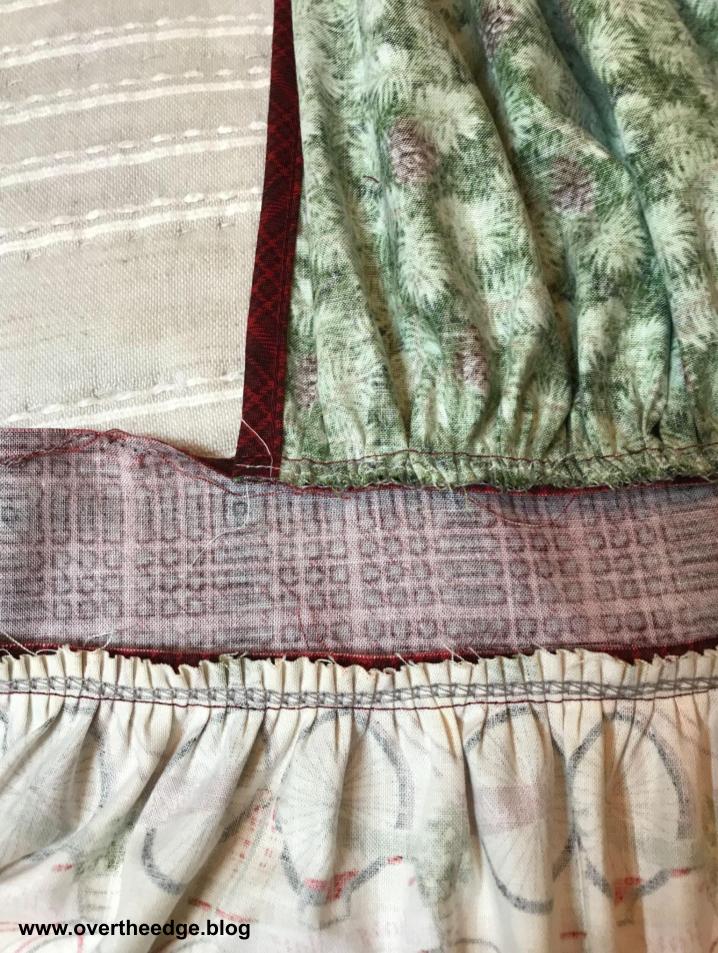
Construct Seams
I used the chain stitch to serge the seams of the bodice, skirt and waistband/ties. Serging with a chain stitch is very similar to using a sewing machine straight stitch.
I attached the narrow ruffle and bottom ruffle to the skirt of the apron using a chain stitch too.
Gather Together Serger Apron
I hope you enjoyed learning about how I serged my Gather Together Serger Apron.
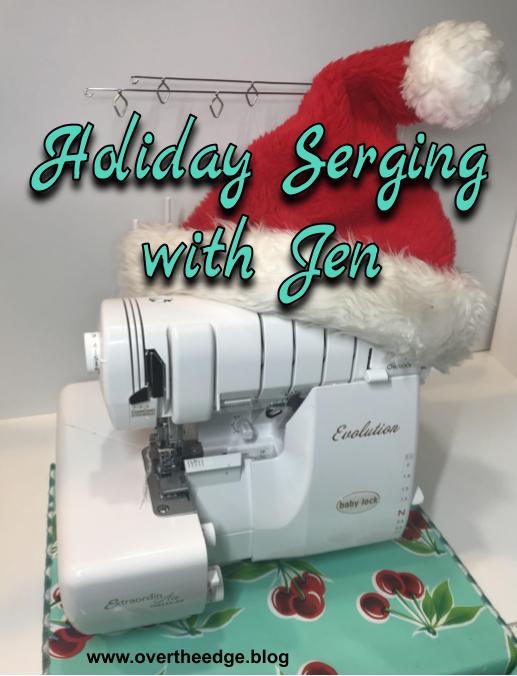
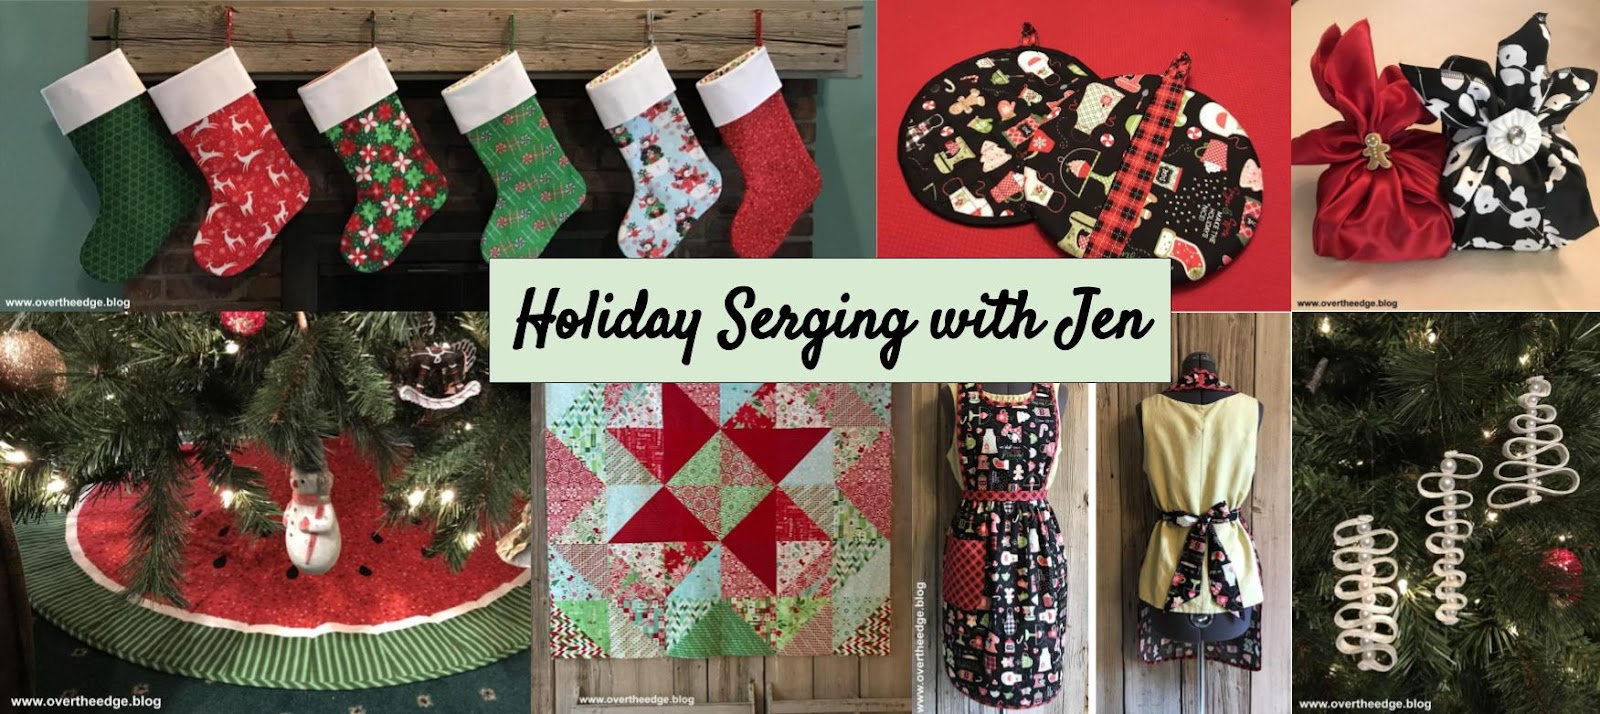
As I started pulling together ideas for this blog post, I realized I did quite a few holiday serging projects this year. I thought it would be fun to share my projects with you. Hopefully, Holiday Serging with Jen, will inspire you to try some future holiday serging of your own.
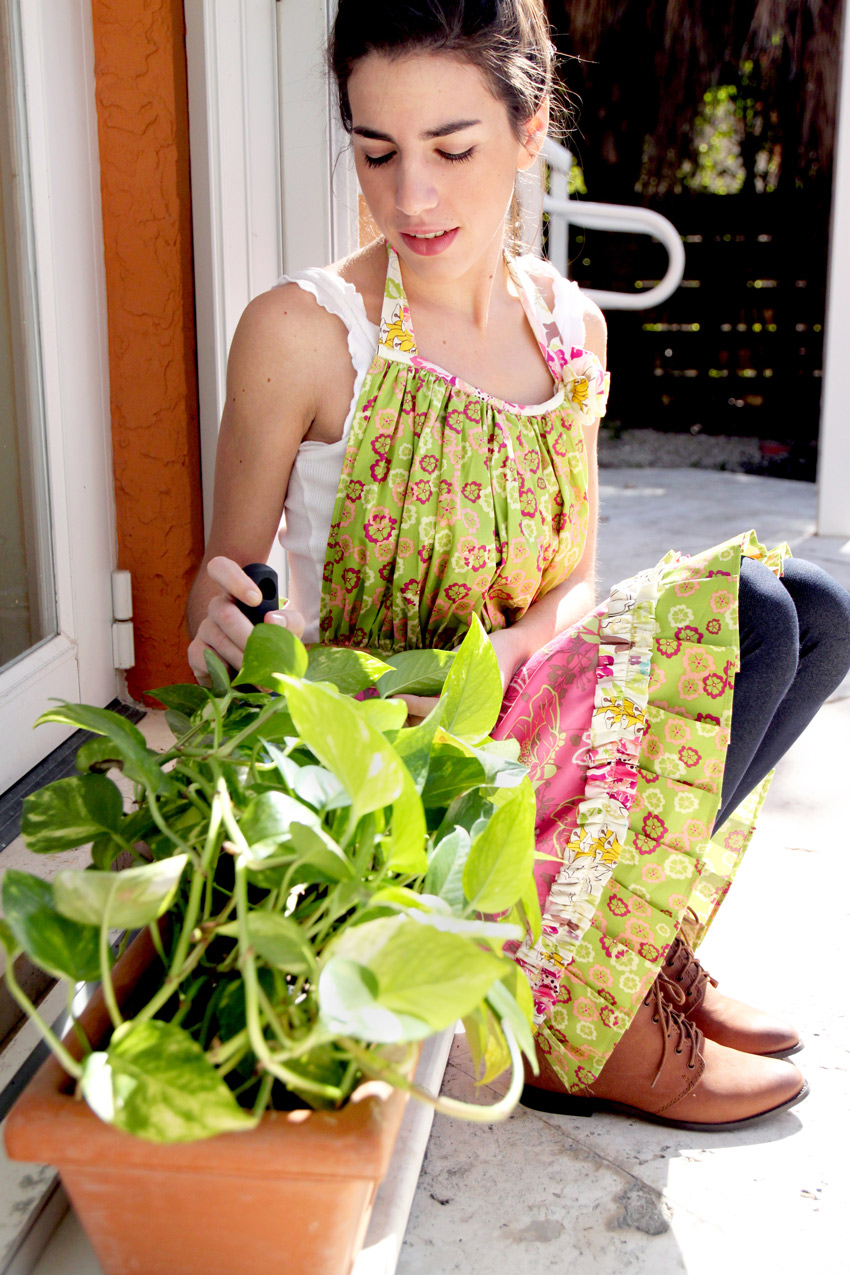
If you’ve been following my blog you’ve probably noticed that I always find ways to incorporate the use of my serger into my projects. For the holidays this year I made stockings, a tree skirt, gift wrap, an apron, some potholders, ornaments and a quilt, all using my serger. Some of these projects were made with only a serger, while others utilized a serger and maybe a sewing machine or some hand sewing.
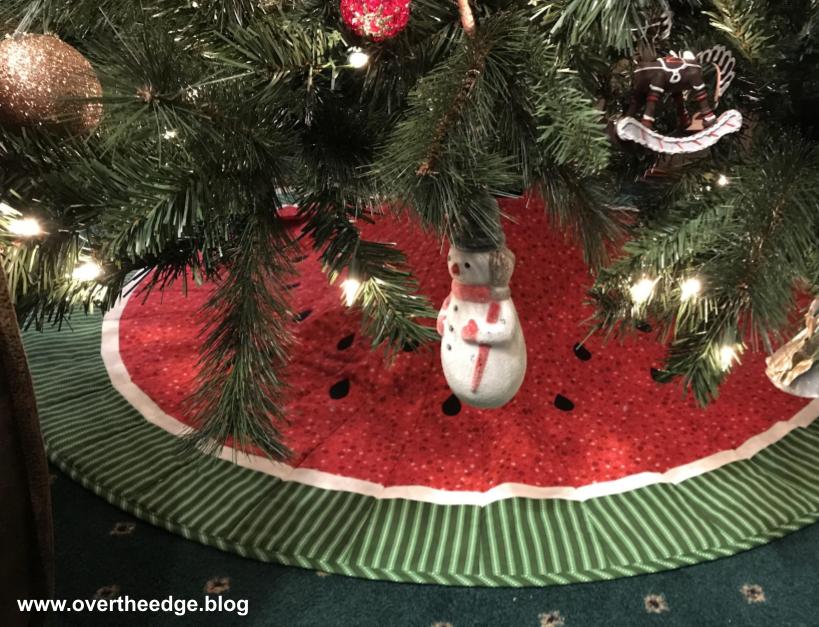
Christmas Tree Skirt
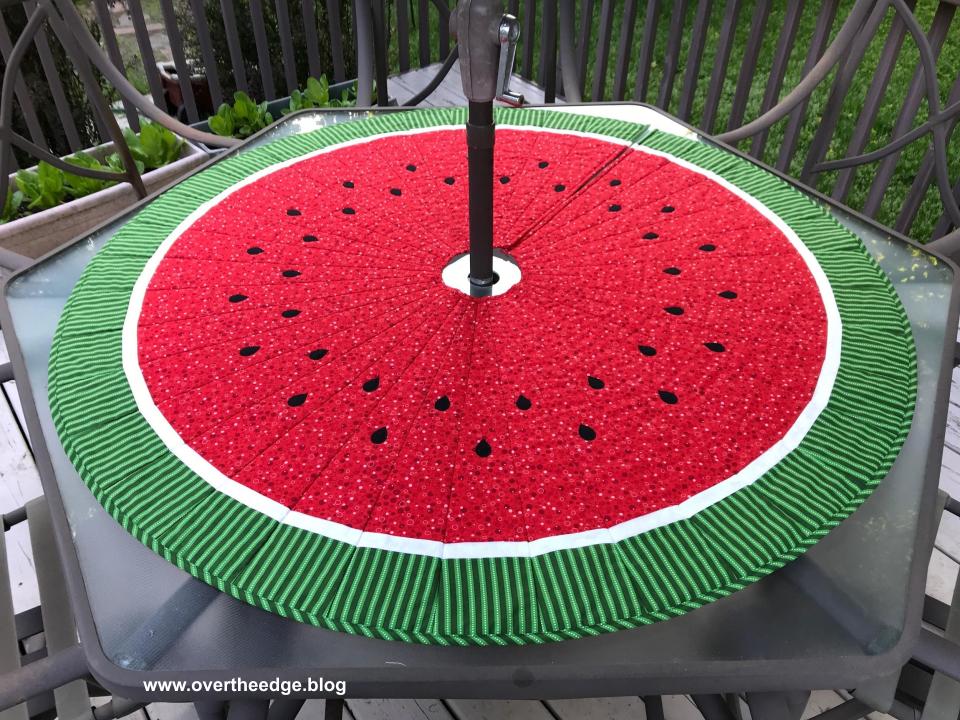
Does this tree skirt look familiar to you? In case you didn’t recognize it, it’s also my watermelon patio table topper I made with my serger that I blogged about this past summer. It fits around the umbrella post on my patio table.
We purchased an artificial Christmas tree this year, and I didn’t have a tree skirt to fit it. Since my table topper is basically a tree skirt in disguise, why not use it as my Christmas tree skirt too? It was actually my husband’s idea. It’s the perfect size for my new tree and the red and green fabrics I used in the tree skirt are from a Patrick Lose’s Christmas collection.
The watermelon design was my own, but I followed the basic tree skirt assembly instructions from the free pattern that came with my wedge ruler. I have a Ten Degree Wedge Ruler from Phillips Fiber Arts. This company has several patterns available that utilize the wedge rulers. See the resources section at bottom of this post for a link to the website.
I used a serger four thread overlock stitch to piece together the topper and I used a serger double fold bias binder to bind the circular edges. Here is a link to my tutorial if you would like more information on how to bind the edge of a quilt with a serger double fold bias binder.
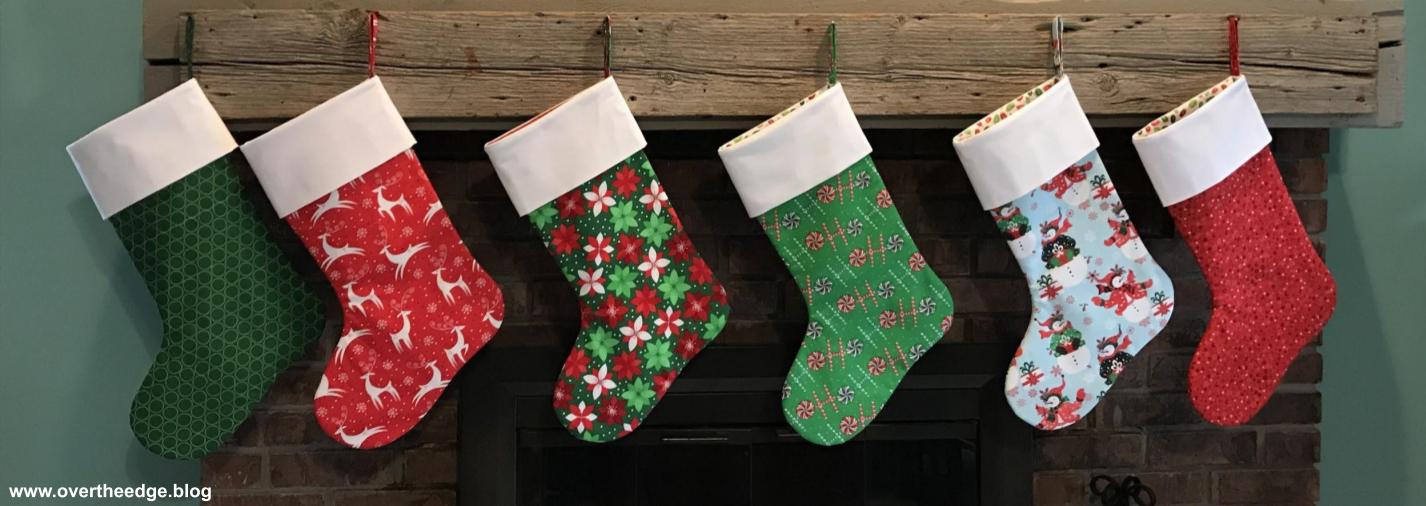
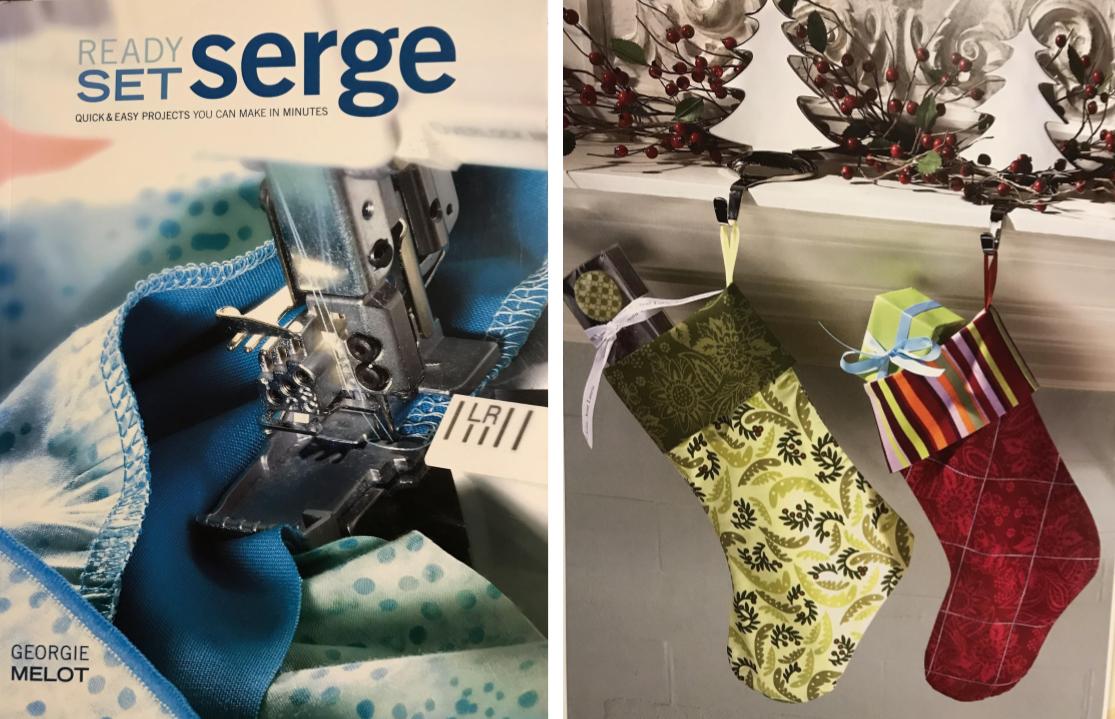
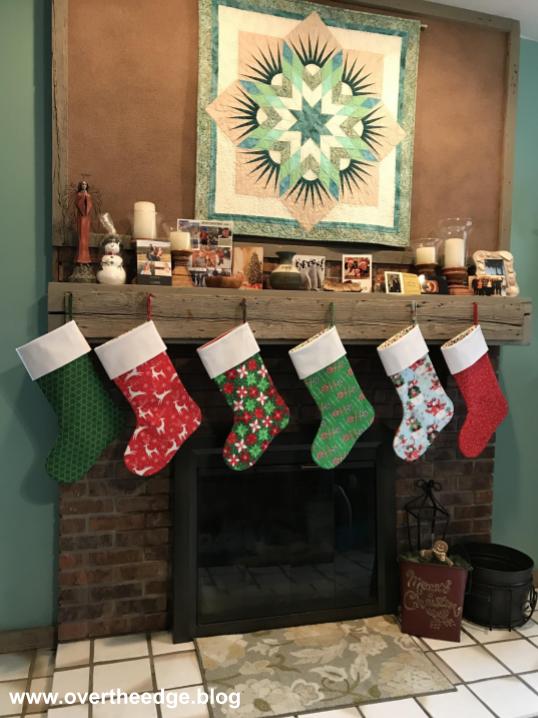
When I pulled my old stockings out of storage, I realized how tattered they looked. It was time to retire them. For the new stockings I chose mostly bright red and green fabrics that coordinate with my watermelon tree skirt. The serger technique I used to make my stockings came from the book, Ready Set Serge, by Georgie Melot. I didn’t use Georgie’s pattern for the stocking shape because I already had a favorite stocking shape. I used the stocking shape from the pattern, Stocking Sweet Stocking, by Bean Counter Quilts.
Many years ago a customer brought in some beautiful quilted stockings to the store where I work. I loved the shape of her stockings, so I asked her what pattern she used. It was the Stocking Sweet Stocking pattern. I’ve never made the quilted twister stocking, but I’ve made many serger stockings using that pattern for the shape.
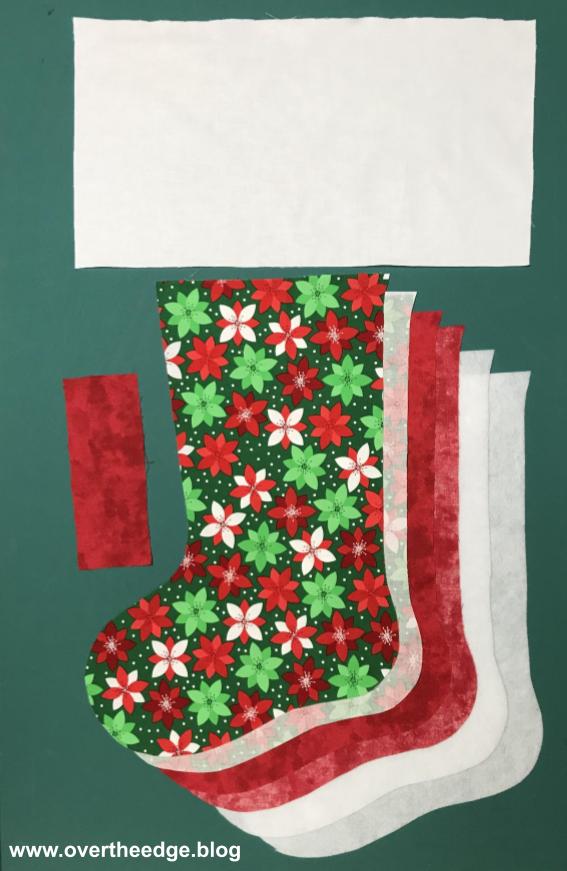
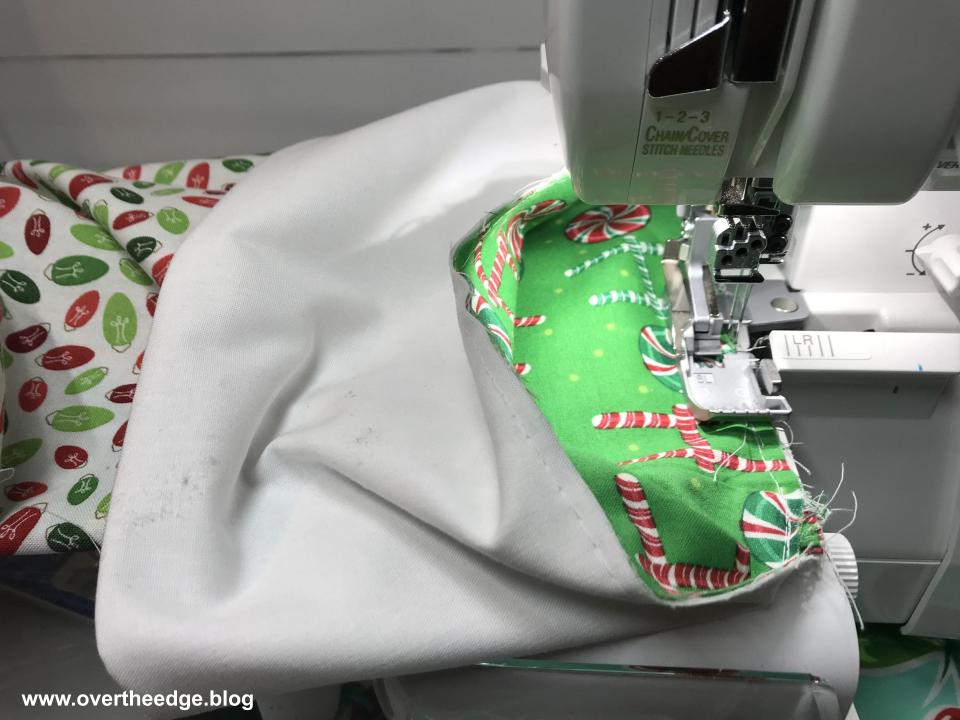
I used a four thread overlock to construct most of the stocking. Using a sewing machine, I top stitched the hanging loop and basted the layers together before serging around the stocking. Georgie Melot doesn’t use batting or tell you to baste the layers before serging, but I found the fabrics shifted less as I serged if I first basted the layers. If layers shift when you baste, no big deal. You simply take out the stitches and try again. If they shift while you are serging (and cutting) it’s much harder to fix. Plus, I like how the serging compresses the layers to make the seams flatter in the stocking.
Batting or no Batting?
I made one stocking with batting and one without batting so I could compare both methods. Both stockings turned out well. But I prefer the stability of the stockings with the batting. I used a thin sew in fleece batting by Pellon, but many other battings would work too. You can see in the photo below that the stocking without batting is a little floppy. The stocking with batting holds its shape.
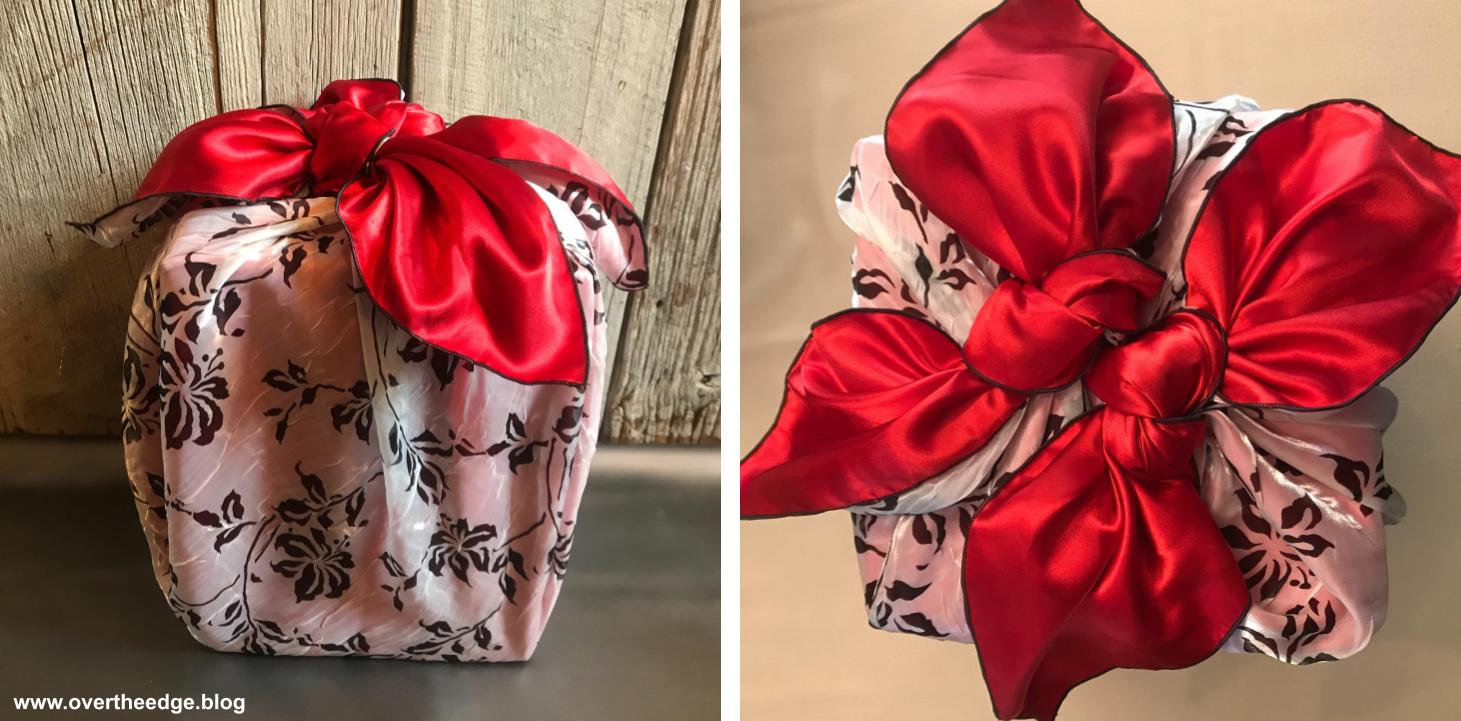
Fabric Gift Wrap
Fabric gift wrap is beautiful and can be used over and over again. I’ve been using fabric gift wrap for many years. The serger is a perfect tool for finishing the raw edges of your fabri gift wrap edges quickly and neatly. You can simply serge the edges of a piece of fabric just like you would with a cloth napkin and use it like wrapping paper. Or you can create a variety of gift bags with your serger. Check out my blog post and tutorial on serger made fabric gift wrap.
Every year at our store we make holiday aprons to display. This was my apron for 2020 and it was based on Kwik Sew pattern 4284.
I applied all of the binding on the apron using my 36mm double fold bias binder and a serger chain stitch. I used the same set up to apply the binding to my apron as I did for my watermelon tree skirt. Here are the links in case you would like to learn more.
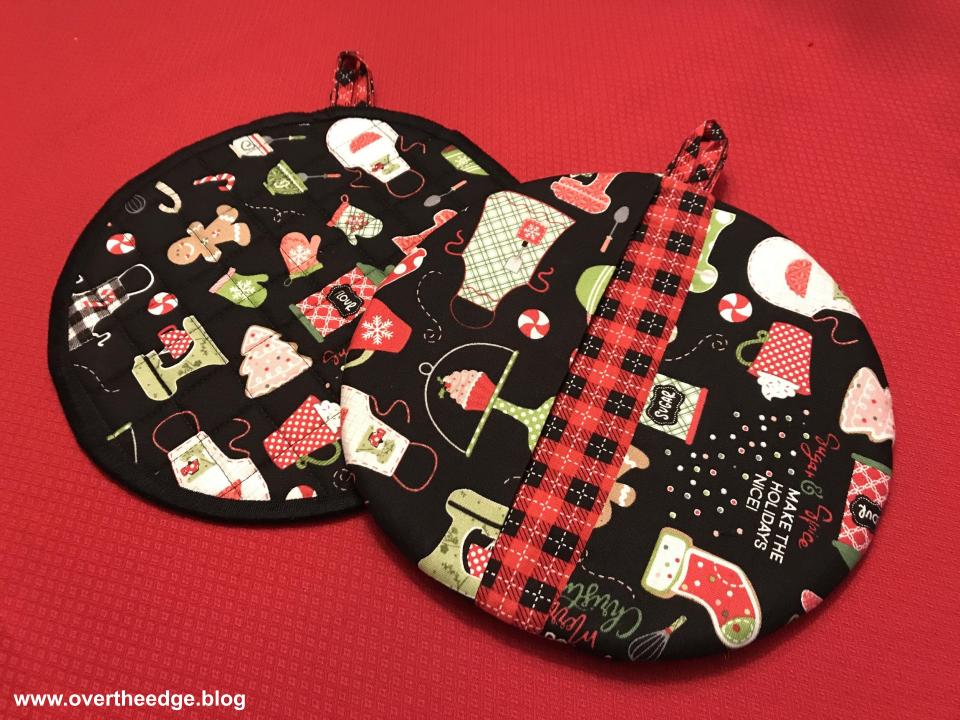
These potholders were a bonus project made with the leftover fabric from my apron. For the one on the left I made my own quilted fabric with my sewing machine. Then I used cotton thread with a three thread overlock wide and a small stitch length (can’t remember how small) and serged the edge. The one on the right was made by layering the fabrics and serging around the circle with a four thread overlock. Then I flipped the finger pockets over to conceal the serger stitches. The hanging loops were made from leftover bias fabric strips from the apron and the serger 36mm double fold bias binder.
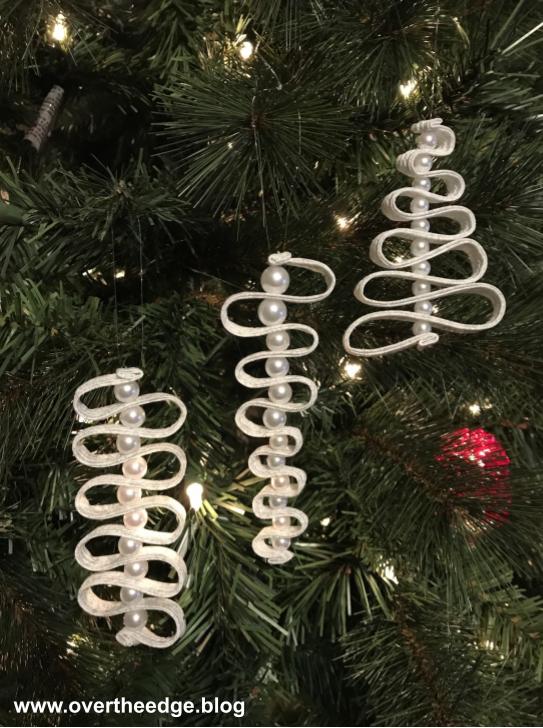
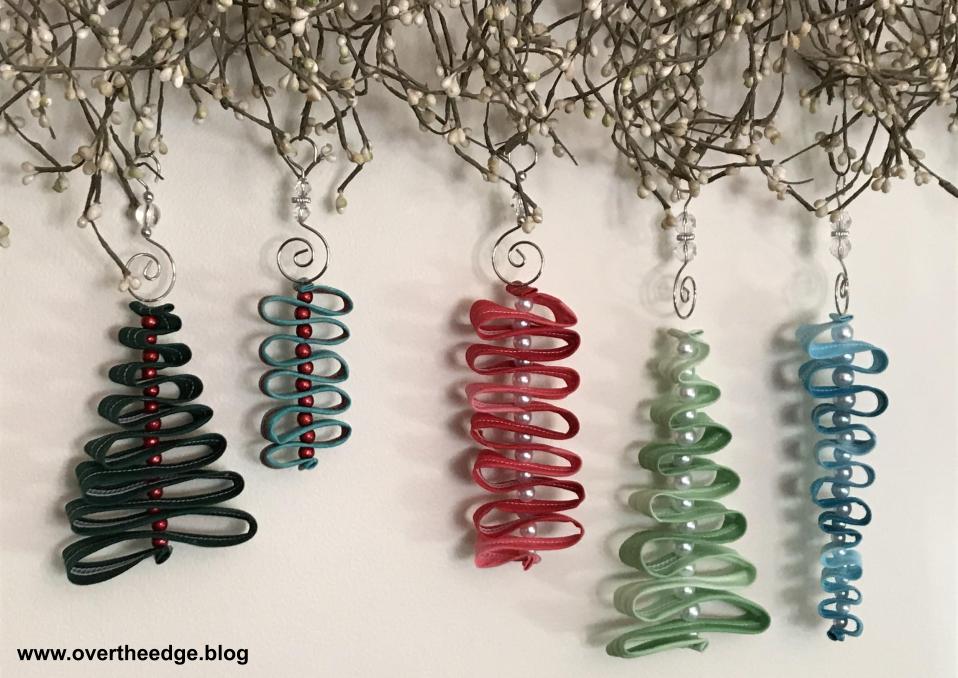
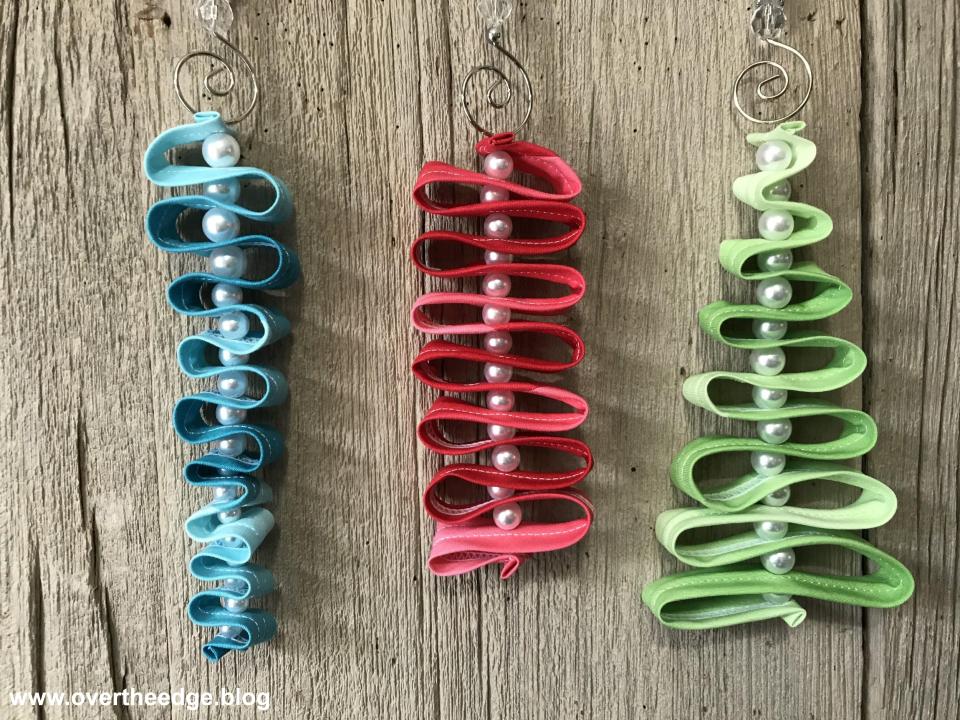
Ornaments
These ornaments all began with a folded piece of fabric, which I quickly and easily made with the cover stitch on my Baby Lock Evolution and the belt loop binder or double fold bias binder. Then I grabbed my hand sewing needle and combined the fabric “ribbons” with beads to make the ornaments. Your choice of fabric will determine whether your ornaments are fun and whimsical or lovely and elegant.
Check out my blog post about experimenting with your serger to make the best fabric ribbons for ornaments:
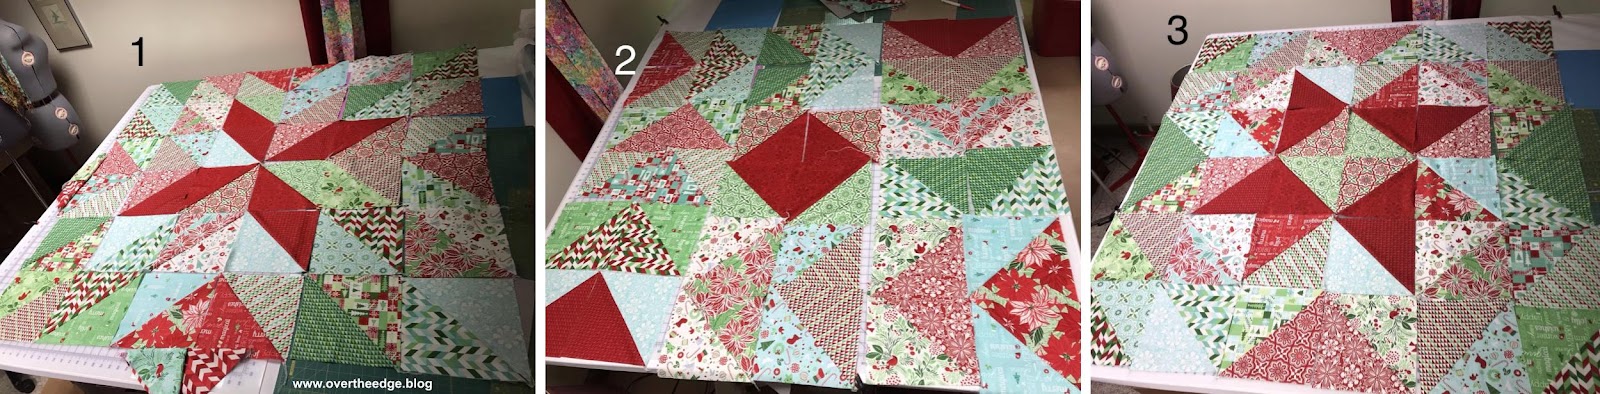
At the store this past spring most of the clerks participated in a fun activity for National Quilting Month. We created our own quilt patterns using only a layer cake for the fabric. Then we taught a class based on our designs. I called my quilt design, Forty Two Ten by Jen. Of course I had to use my serger to make my half square triangles (but you could also make it on a sewing machine.)
I also had a christmas layer cake, Jingle by Deb Strain of Moda, that I wanted to use. So I made a bunch of half square triangles with my serger and pieced them together to make this throw quilt for the holidays.
I considered three different layouts for the half square triangles in my holiday quilt. The winning layout was the friendship star in figure 3. But the giant flying geese in figure 2 was a close second. I finished piecing the quilt top earlier this year, but the layering and quilting will need to wait until next year…
Here is the link to my quilt tutorial for Forty Two Ten by Jen and my serger half square triangle video if you would like to give it a try:
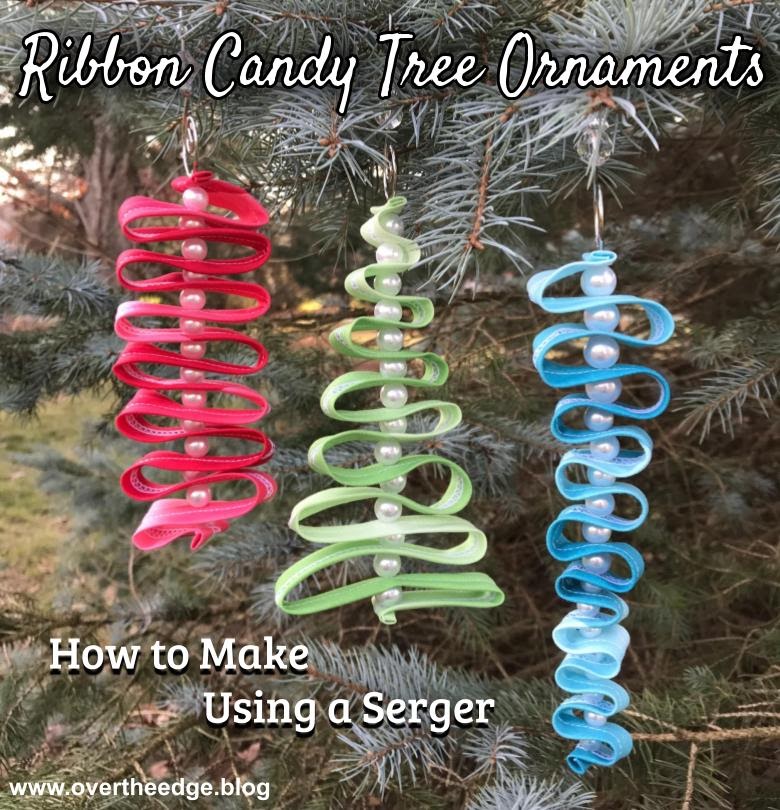
I’m always looking for new things to make with my serger and its attachments. And the holidays always bring out my creative side. As I was searching the internet for inspiration, I came across posts by Sara Gallegos of the Decorative Stitch and Mathew Boudreaux of Mister Domestic, which inspired me to create my Ribbon Candy Tree Ornaments Tutorial. (Links to their posts are in the Resources section at the bottom of the post). Sara followed Mathew’s strip tree ornament tutorial, but instead of using a sewing machine to create the fabric strips, she used her Baby Lock serger and the small belt loop binder attachment.
After reading about the process they used to make their tree ornaments, I decided to experiment with my serger and design my own ornaments. These ornaments all begin with a folded piece of fabric, which can be quickly and easily made with the right serger attachment. I own three different attachments for my Baby Lock serger that all fold the fabric and stitch it together in one step, so I tested all three attachments using both bias and cross grain fabric strips. I also tested the effect of adding interfacing to the fabric strips. This ornament project is a great way to practice using your attachments. Keep reading to learn how to make tree ornaments using a serger.
My Experiments with Making Fabric Ribbons Using a Serger
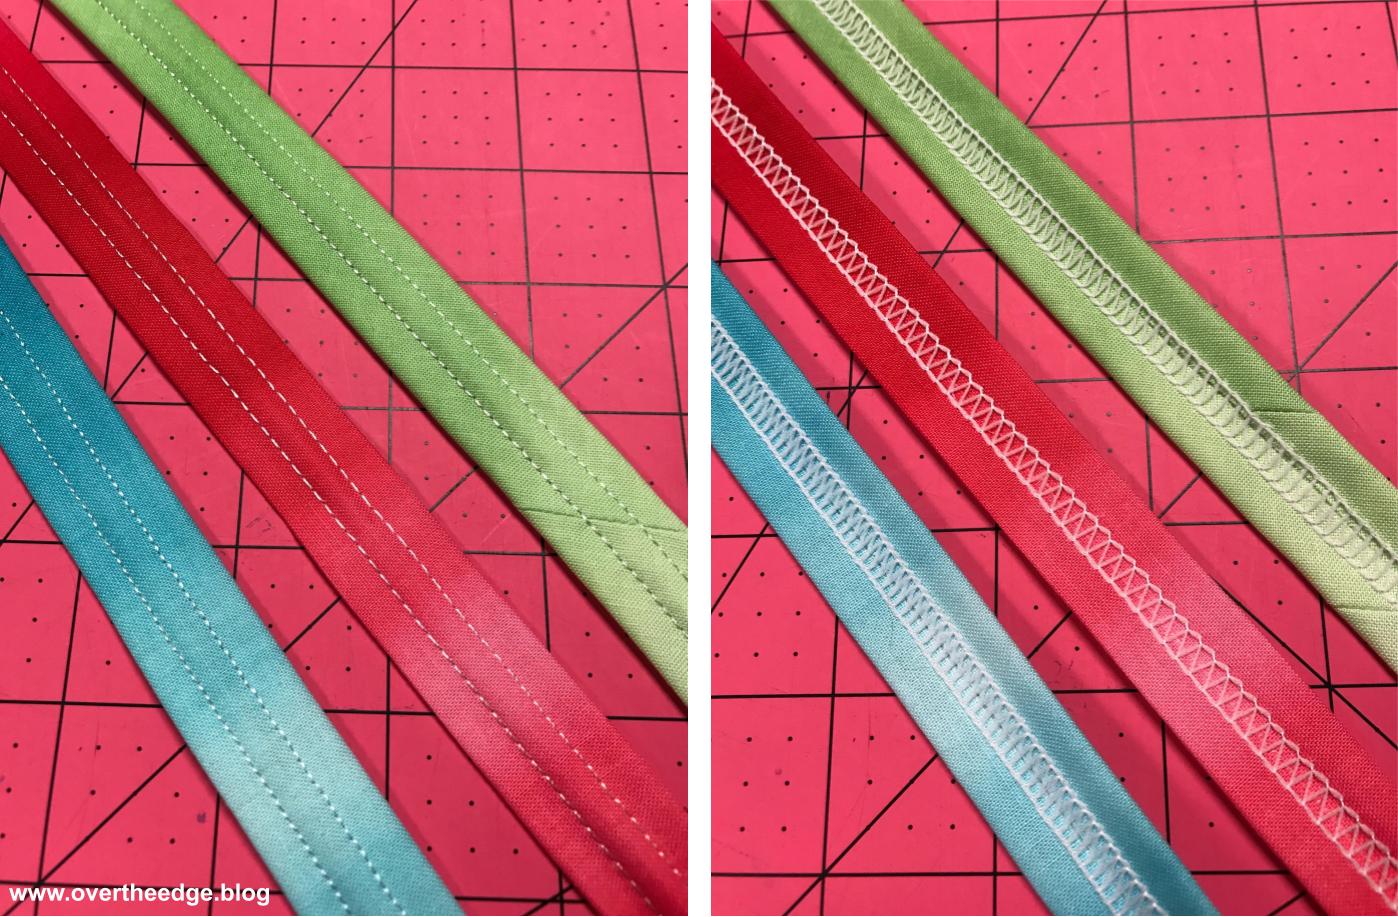
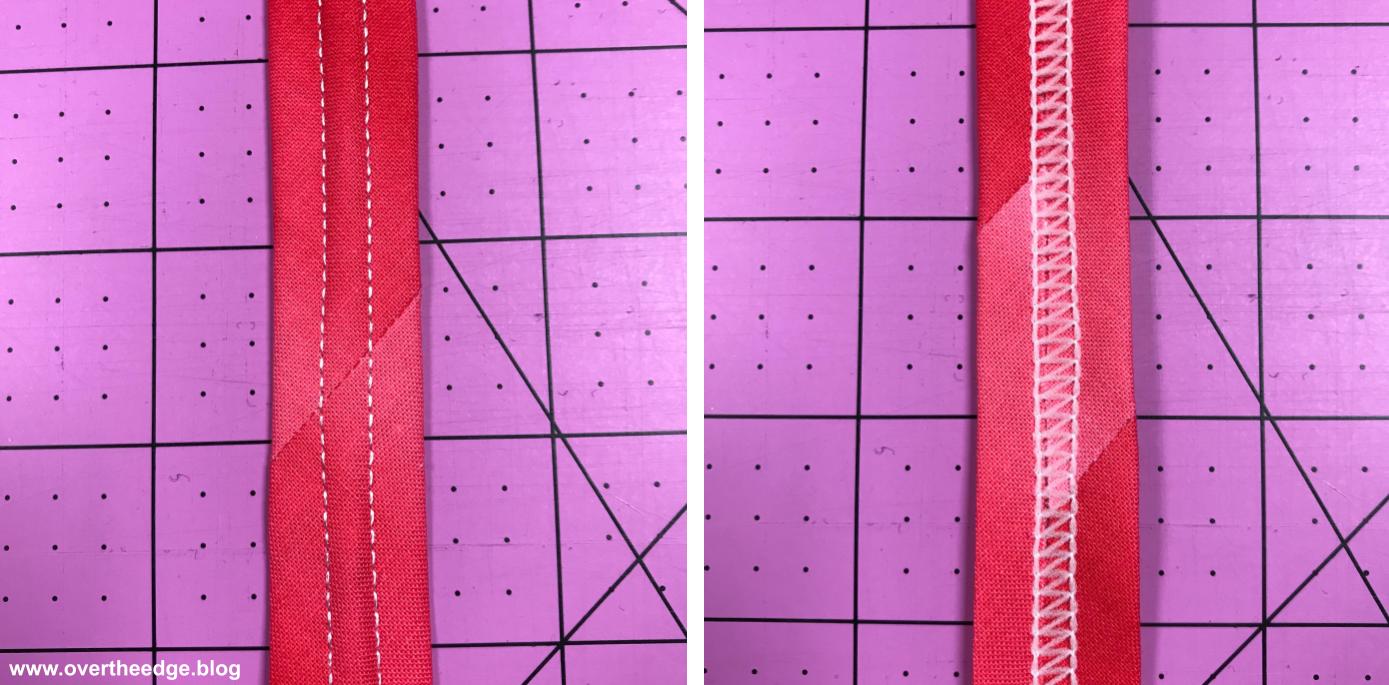
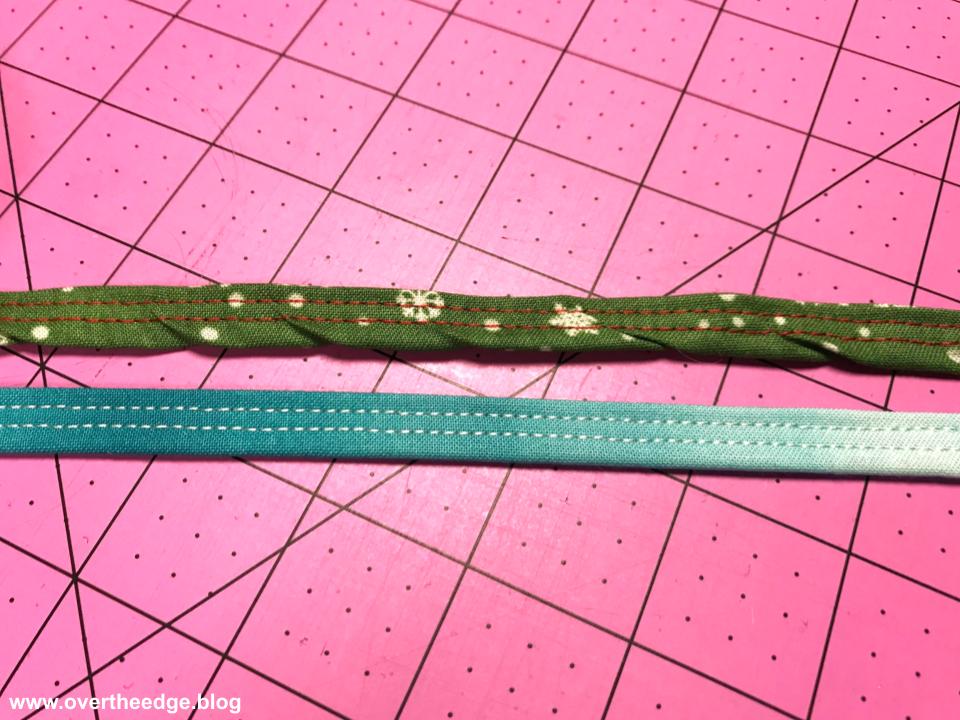
Using quilting weight cotton fabric I made fabric “ribbons” using three different attachments that I have for my serger. All three attachments are meant to be used with a cover stitch and fold under the raw edges of the strips to conceal them within the fabric and/or stitching. I used a wide cover stitch for the large belt loop attachment and a narrow cover stitch for both the smaller belt loop binder and the double fold bias binder. I tried each attachment with both crosswise grain and bias grain fabric strips. The red strips in the photo below are bias grain strips and the blue ones are cross grain.
I also experimented with different stitch lengths. The blue belt loop was serged at a stitch length of 2. the green at a stitch length of 2.5 and the red at at stitch length of 3. See photo below. At stitch lengths less than 3 on my Baby Lock serger you lose the ability to chain off with the cover stitch, but the shorter stitch lengths cover the raw edges better. I used embroidery thread in the needles and wooly nylon in the looper for better coverage of fabric raw edges.
Serger Attachments
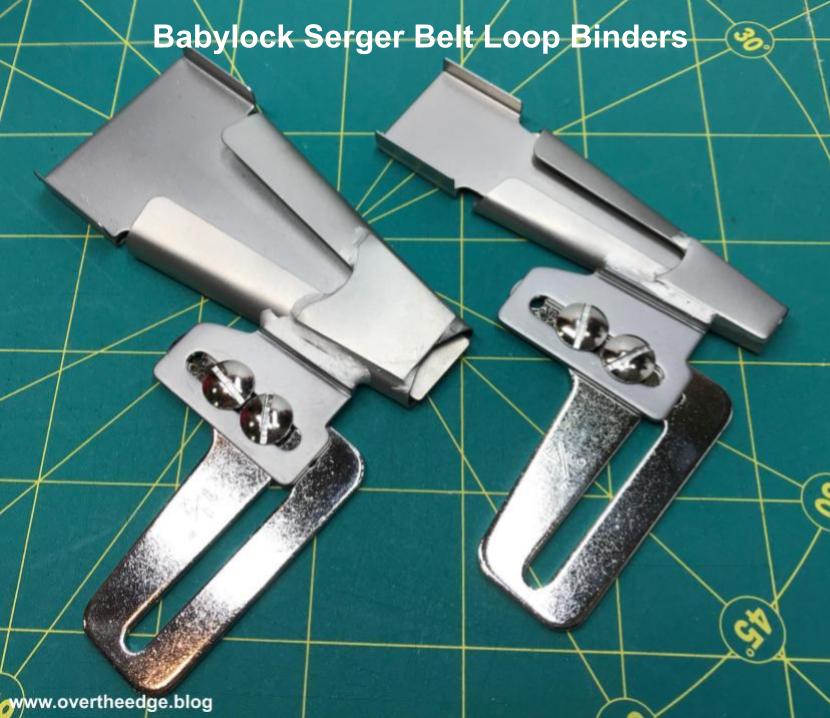
Belt Loop Folder/Binder Attachment
Baby Lock makes two different sizes of belt loop binders – 1½” and ¾”. The larger one makes finished belt loop strips that are about ¾” wide. The smaller one makes finished belt loop strips that are about ⅜” wide. The fabric is folded once and therefore the finished strips have two layers of fabric. There is a link to my belt loop binder tutorial in the Resources section at the bottom of this post if you would like more information about this attachment.
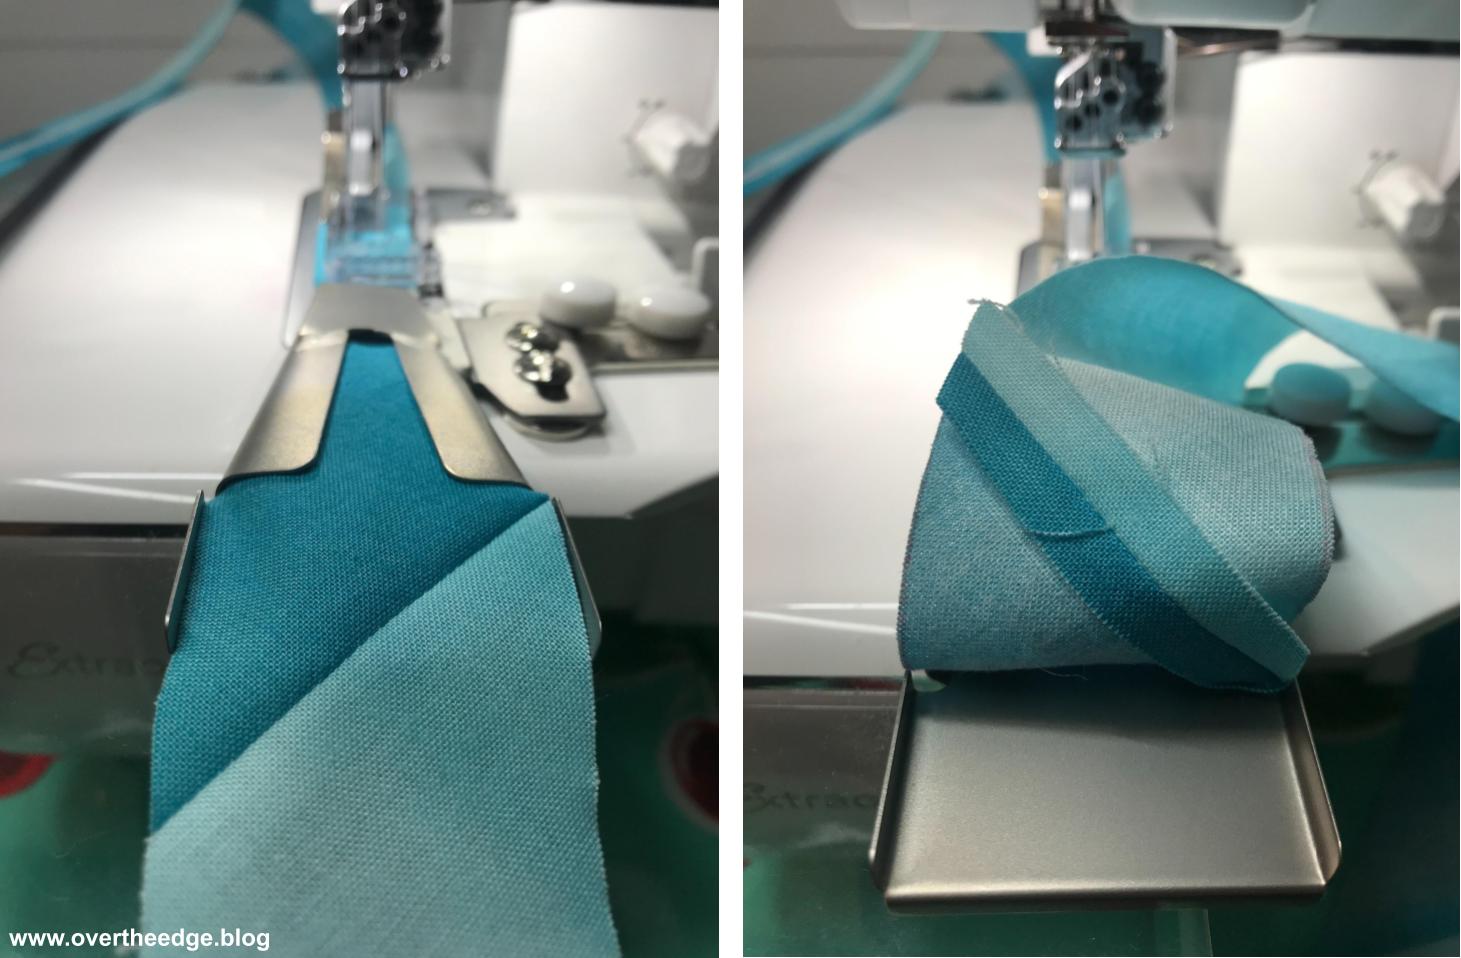
36 mm Double Fold Bias Binder Attachment
A serger double fold bias binder attachment can also be used to make finished binding strips that work well for making ornaments. This attachment makes finished binding that is about ⅜” wide. Since these strips are folded twice, there are four layers of fabric in the finished binding strip.
Normally when using this attachment to bind an edge you have to guide both the binding strip and the fabric you are binding. But for making fabric ribbons for ornaments you only have to guide one piece of fabric because you are not attaching the binding to anything.
There is a link to my double fold bias binder tutorial in the Resources section at the bottom of my post if you would like more information about this attachment.
Fabric Grain and Strip Width
Can you use Both Cross Grain and Bias Fabric Strips in the Attachments?
Both crosswise grain fabric strips and bias fabric strips will work in the belt loop binder attachment and the double fold bias binder attachment. But you may need to adjust the width of the cut fabric strips for best results depending on whether you use cross grain or bias layout. Interestingly, I found that the cut strip width recommended in the instructions worked well for the crosswise grain strips, but not so well for the bias cut strips. For me the bias cut strips folded better when I added another ⅛” to the width of the cut strip.
The chart below lists the best cut strip widths for the quilting cotton fabric I used in this comparison:
Attachment
Grain
Cut Strip Width
1½” Belt Loop Binder
Crosswise
1⅝”
1½” Belt Loop Binder
Bias
1¾”
¾” Belt Loop Binder
Crosswise
⅞”
¾” Belt Loop Binder
Bias
1”
36mm Double Fold Bias Binder
Crosswise
1⅜”
36mm Double Fold Bias Binder
Bias
1½”
Which Grain Makes the Best Ornament?
The fabric strips I use for weaving work well on the cross grain because weaving is done in a straight line. However, for the ornaments, I think the bias fabric strips work better because of the curves. The loops of the ornaments look smoother using bias fabric strips. See photo below for a comparison. The tree ornament on the left was made using a crosswise grain belt loop strip and the ornament on the right was made using a bias belt loop strip. The curves of the cross grain loops tend to slightly buckle. The curves of the bias grain loops are much smoother. So although I prefer to use the bias belt loop strips for my ornaments, the cross grain strips will work. So should you use cross grain fabric strips that are easier to cut or bias strips make a smoother curve? The decision is yours.
With or Without Interfacing?
Both Sara and Mathew used interfacing in the fabric ribbons they used to make their ornaments. I experimented with using interfacing on a crossgrain strip for the 1½” belt loop binder.
The first strip I serged without interfacing (red). The second strip I added a strip of light weight fusible interfacing to the strip (green). I fused a ⅝” wide piece of interfacing to the center of the wrong side of my fabric strip. I made my interfacing ⅛” smaller than the finished width of the belt loop, so the edges were not too stiff for proper folding.
Sara used a stabilizer in her example. She did not pre fuse it to the fabric. She fed it into the attachment as she was feeding in the fabric. I tried this method a few times and couldn’t get the hang of it it. So I decided to fuse the interfacing to the fabric before I fed it into the attachment.
The bias belt loops I used in the ornaments seemed to hold their shape fine, so I didn’t feel the need to add interfacing.
I made a tree ornament from both strips to compare the results. The loops on the green tree are more stable with the interfacing added. The loops on the red tree ornament without interfacing are softer and more prone to bending. So both methods of making belt loop fabric will work. You will get a sturdier ornament with the interfacing and a softer one without it.
Tips for Success Using Fabric Strips in a Serger Attachments
Press Seams Open
Make sure that seams in the fabric strip are pressed open and stay open when feeding into the attachment. When the seam allowances flip together, those areas may be too thick for the attachment to fold the fabric properly.
Minimize Number of Seam Allowances
Make your bias fabric strips from large pieces of fabric with as few seams as possible. The more seams in your bias strips, the more chances for them to flip the wrong way and cause “blips” in your perfectly folded belt loops. This is also true of seam allowances in cross grain fabric strips.
Avoid Intersecting Seams
The attachment can easily fold one pressed open seam.
But not two intersecting seams. You will always be disappointed with the folding results of intersecting seams in your belt loop fabric. The attachment just can’t fold the extra thick areas nicely. See example below where two perpendicular seams in the bias fabric strip come together and see how the attachment can’t fold it under.
Raw Edges Not Being Caught in the Stitches
If your raw edges are not catching in the stitches there are a couple of reasons why that might be happening.
Check the Width of your Fabric Strip
It could be that your strip isn’t wide enough. Different fabrics and even different grains within the same fabric can fold differently. The initial bias strips that I cut at 1⅝” wide (per the instructions) and fed into the belt loop binder weren’t wide enough to always catch the raw edges in the stitching. So I cut my bias fabric strips a little bit wider to 1¾” (just an extra ⅛”) and the problem went away. The cross grain strips cut at 1⅝” folded well as they went through the attachment.
Check the Placement of your Attachment
Not having the needles centered within the fabric strip can lead to raw edges on the back not being caught by the stitches. You should test your attachment line up and adjust as necessary.
Pay Attention to the Fabric Strip as it Feeds into the Attachment
How the fabric is fed into the attachment can affect whether or not the raw edges get folded under properly and captured within the stitches. Make certain your fabric strips are feeding into the attachment smoothly and evenly, centered within the feeding slot on the attachment. Pay special attention to the pressed open seam allowances to make certain they don’t flip as they enter the attachment.
Fabric Buckles and Folds
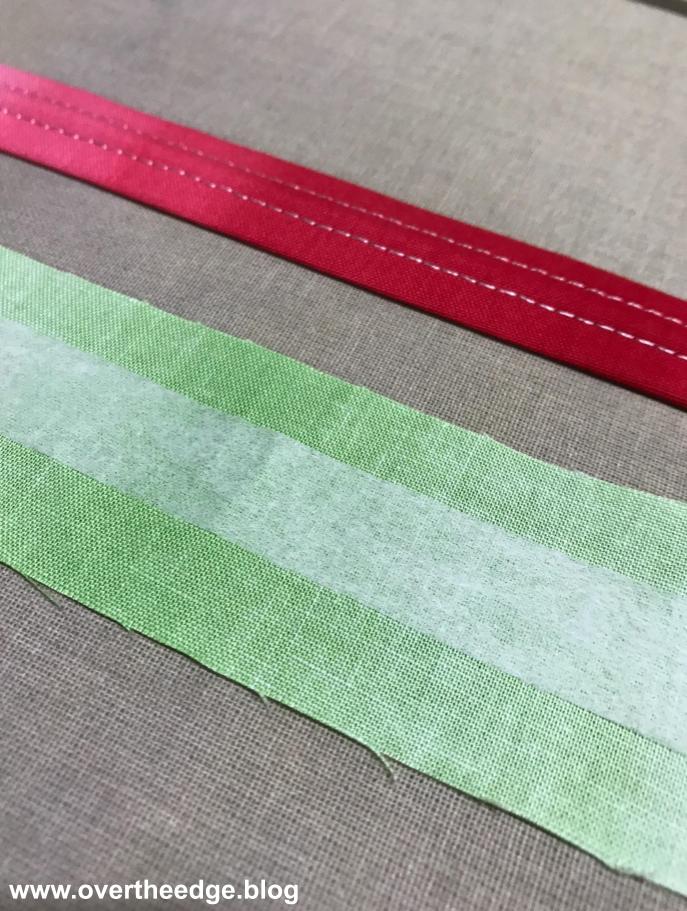
If the fabric strip is too wide to fold properly, it will buckle, fold and twist as it is folded within the attachment and stitched. The direction of grain in the strips, as well as the properties of the fabric itself can make a difference in the “right” width, so you may need to experiment to get your strips looking their best. In the photo above, there are two double fold bias binding strips, both cut on the cross grain of the fabric. The green one was cut at 1½” wide and was just a little too wide for the attachment, and it buckled, folded and twisted as it went through the attachment. And those folds and twists were stitched right into the strip. The blue one was cut at 1⅜” wide, and folded well in the attachment to create a nice smooth strip.
In Conclusion
All above methods of making fabric “ribbons” on a serger yielded good results for making ribbon candy tree ornaments. If you prefer the look of an ornament made from ⅜” wide fabric ribbons then I would use the smaller belt loop binder or the double fold bias binder. If you prefer the look of an ornament made from the ¾” wide fabric ribbons then I would use the 1½” belt loop binder.
Get My Instructions for Making Ribbon Candy Tree Ornaments
For my Ribbon Candy Tree Ornament Tutorial, I chose to use the bias fabric ribbons without interfacing made with my 1½” belt loop binder attachment. I wanted to make “large” ornaments which I thought worked best with the larger ribbon produced by this attachment. I created my own version of three different ornament shapes – a tree, an icicle and a piece of ribbon candy – and have shared my instructions with you in my Ribbon Candy Tree Ornament Tutorial for Sergers. Here is the link: https://overtheedge.blog/tutorials/ribbon-candy-tree-ornament-tutorial-for-sergers/
Feel free to experiment and find your favorite combination.I hope you enjoyed learning about how to make tree ornaments with your serger. I would love to see the ornaments that you create!
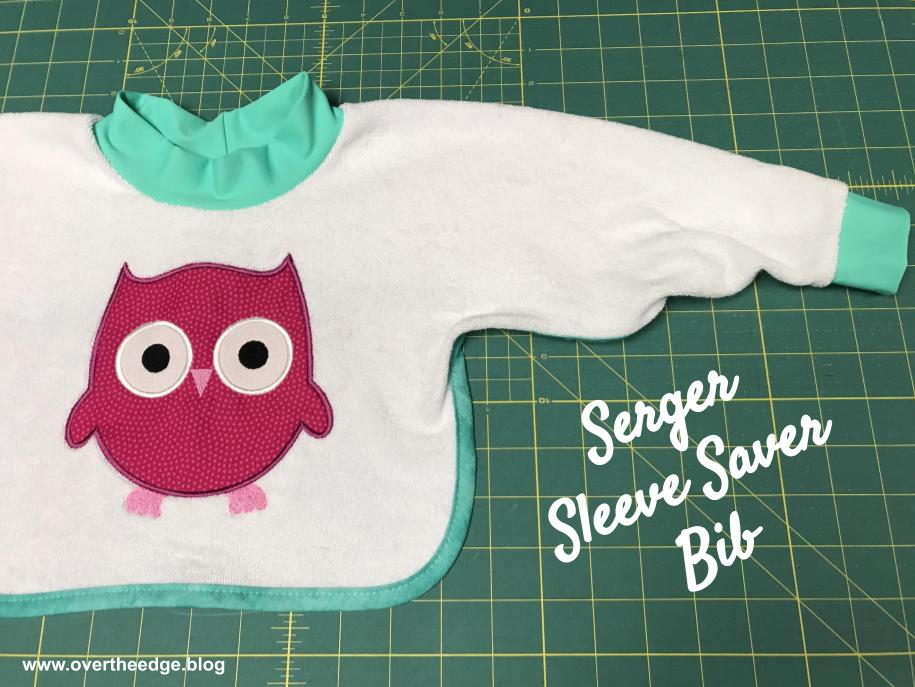
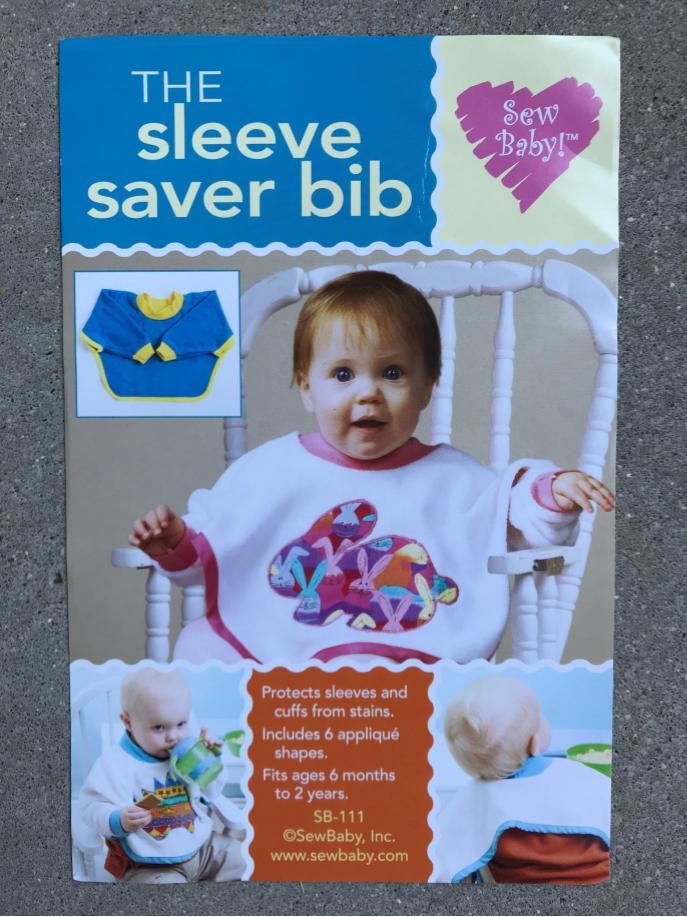
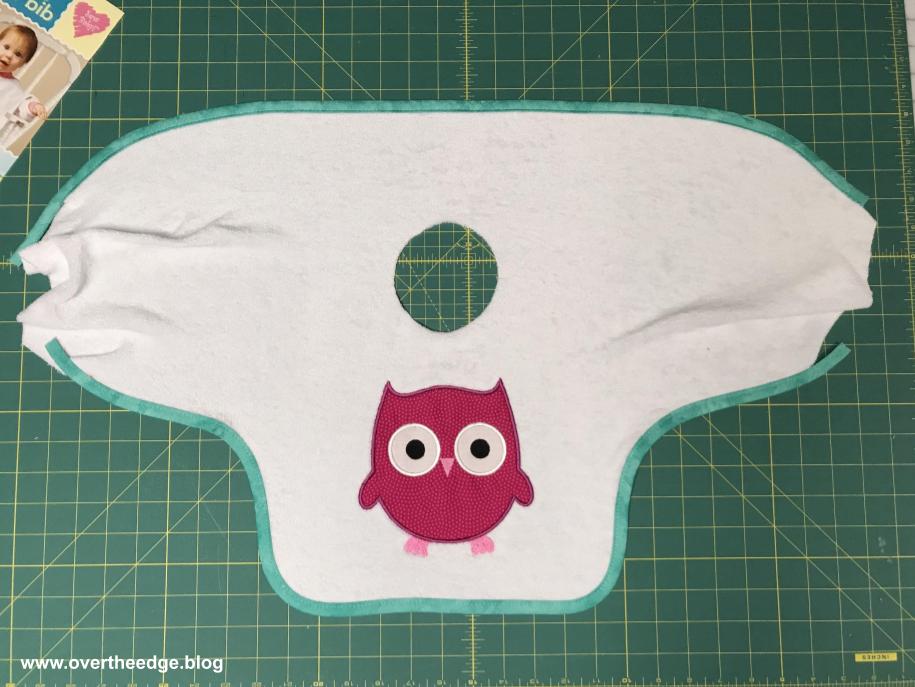
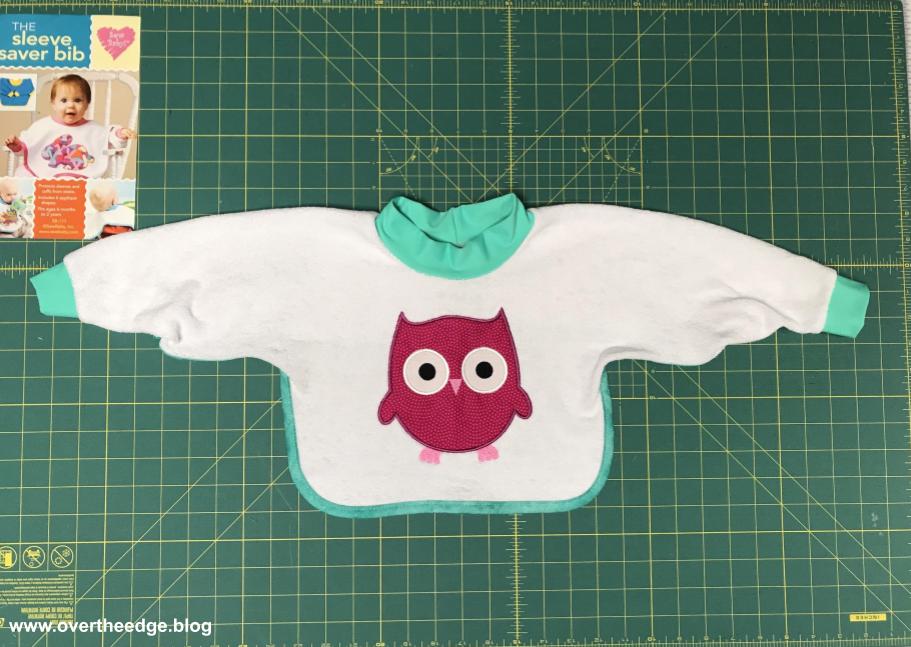
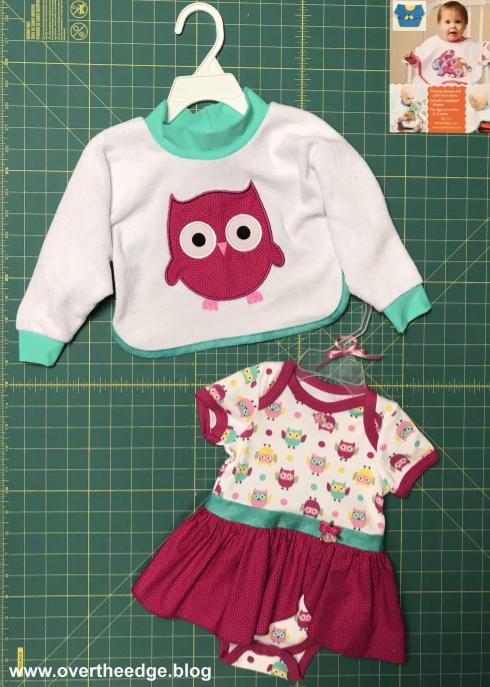
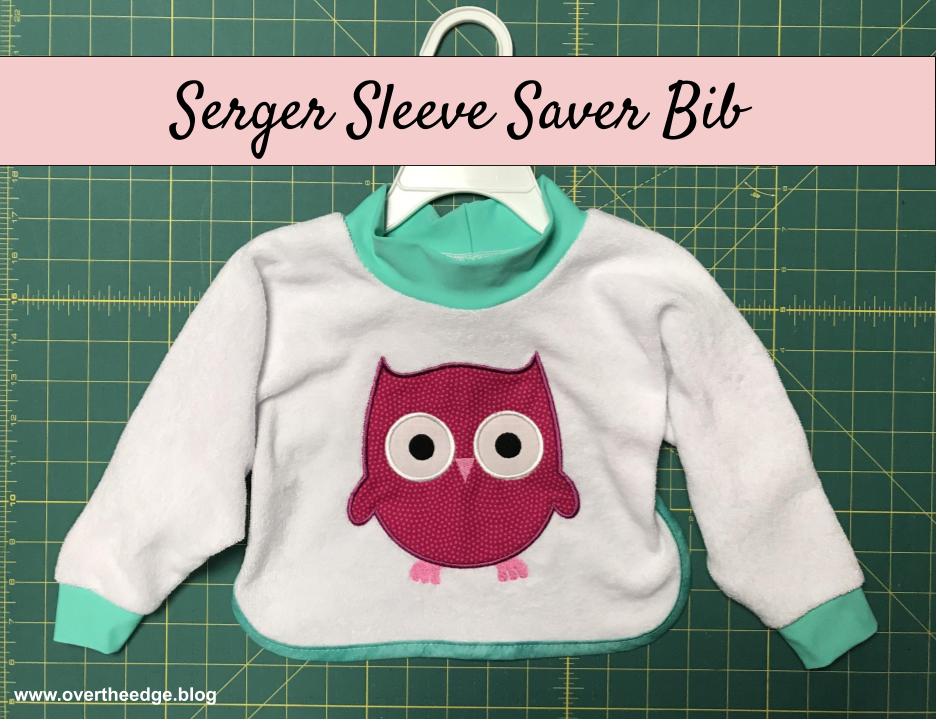
Last week I blogged about the Serger Funsie Onesie that I made for my niece’s baby. This week I made another gift for her baby – a Serger Sleeve Saver Bib. This great bib has sleeves to protect the sleeves of your child’s outfit. The bib is made from stretch terry cloth with ribbing at the cuffs and neckline and bias binding on the edges. The serger is the perfect tool for construction of this bib and to apply the bias binding.
The Pattern
The pattern instructions for applying the ribbing and constructing the seams are written for a standard four thread overlock stitch on a serger. A sewing machine can also be used. The pattern applies the binding using a sewing machine, but I applied the bias binding with a serger chain stitch using a double fold bias binder. If you don’t have a chain stitch capable serger you could apply the binding with your sewing machine following the instructions in the pattern. You will find a link to the Sleeve Saver Bib pattern in the Resources section at the bottom of this post.
Applique
I used my embroidery machine to applique a cute owl on the front of the bib. If you don’t have an embroidery machine you can apply an applique with your sewing machine. The pattern comes with several shapes for appliques. I purchased the owl applique on Etsy. You will find a link to the design in the resources section at the bottom of this post.
Here is my terry cloth pattern piece with my owl applique already applied.
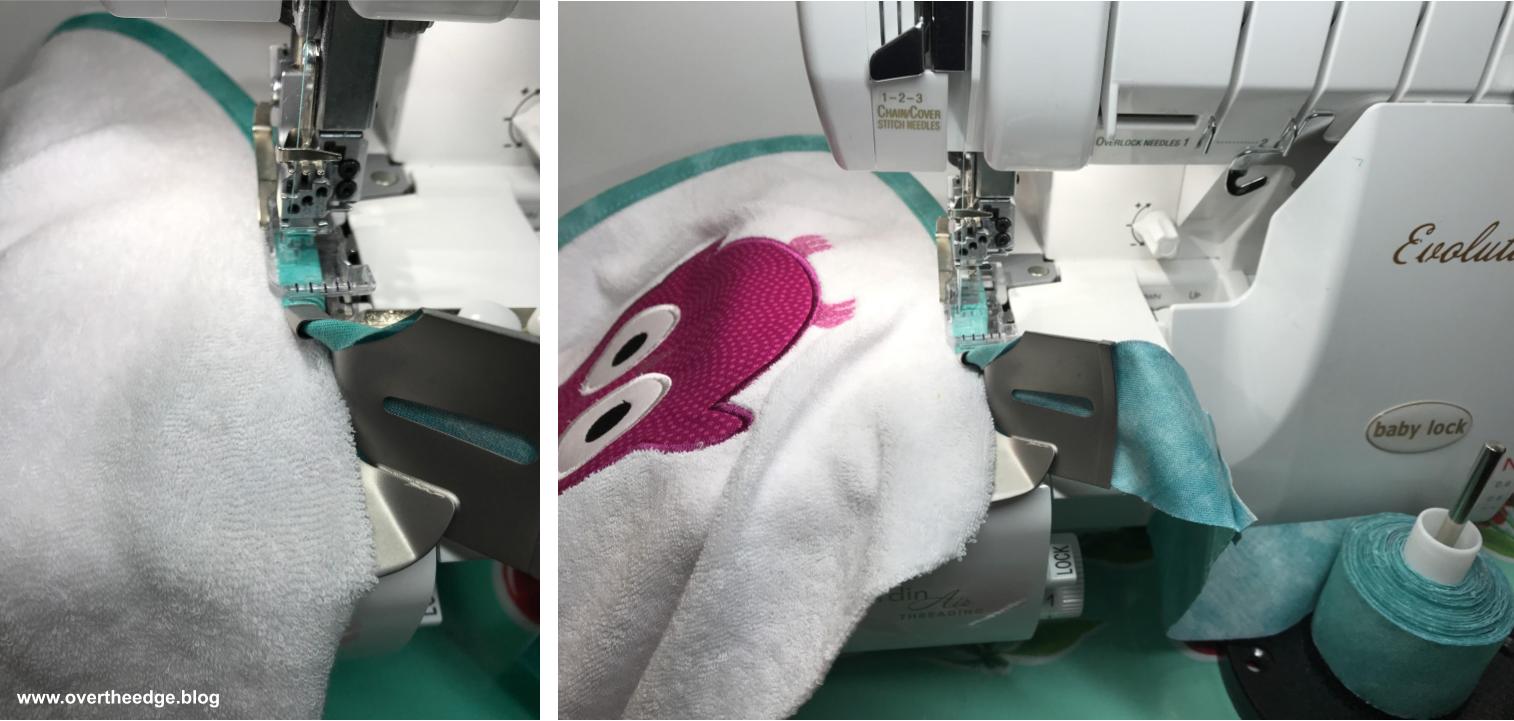
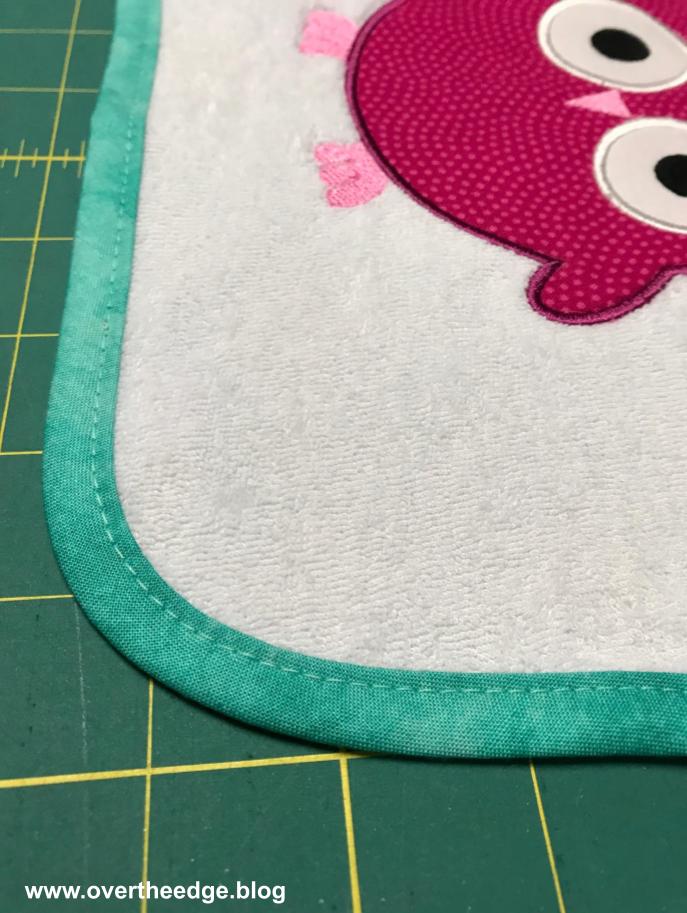
Apply Bias Tape
The bias binding I used for the bib, was the same bias binding I created for the funsie onesie. I set up my serger for a C1 chain stitch and attached my 36mm double fold bias binder.
I’ll be honest with you. I was trying to finish this project quickly and so I just jumped right in without practicing. Not a good idea with stretch terry. The first time I bound the back edge it was a little wavy, so I took it out and tried again with my differential feed set to 1.3. This time the back edge looked good. The straight back edge was fairly easy, but it took me three tries to get the binding right on the sharp curves on the front. Good thing that the chain stitch pulls out easily and I made lots of extra bias strips!
The trick on sharp curves on stretch terry is to go slow. Take a few stitches. Stop with the needle down. Lift the presser foot to release the pressure on the stretch terry. Continue this process until you are through the curve.
How to Use a Serger Double Fold Bias Binder Tutorial and Video
For more information on how to use double fold bias binder with a serger check out my tutorial and video:
Seam allowances on the Sleeve Saver Bib pattern are ⅝”. If you are using a sewing machine, the pattern has you trim the seams down to ¼” after they are sewn.
Since I used my serger for all the seams, I just trimmed the allowances down to ¼” as I serged. My serger has markings to the right of the blade that show you where to line up your raw edges of seams with ⅝” seam allowances. If you are unsure of how to trim down a ⅝” seam to ¼” using your serger, you could always trim off the extra seam allowance with your scissors before you serge. Then when you serge you only need to align the raw edges next to the blades. Or you could use a marking pencil to draw the seam allowance on the fabric and align the marks with your needles.
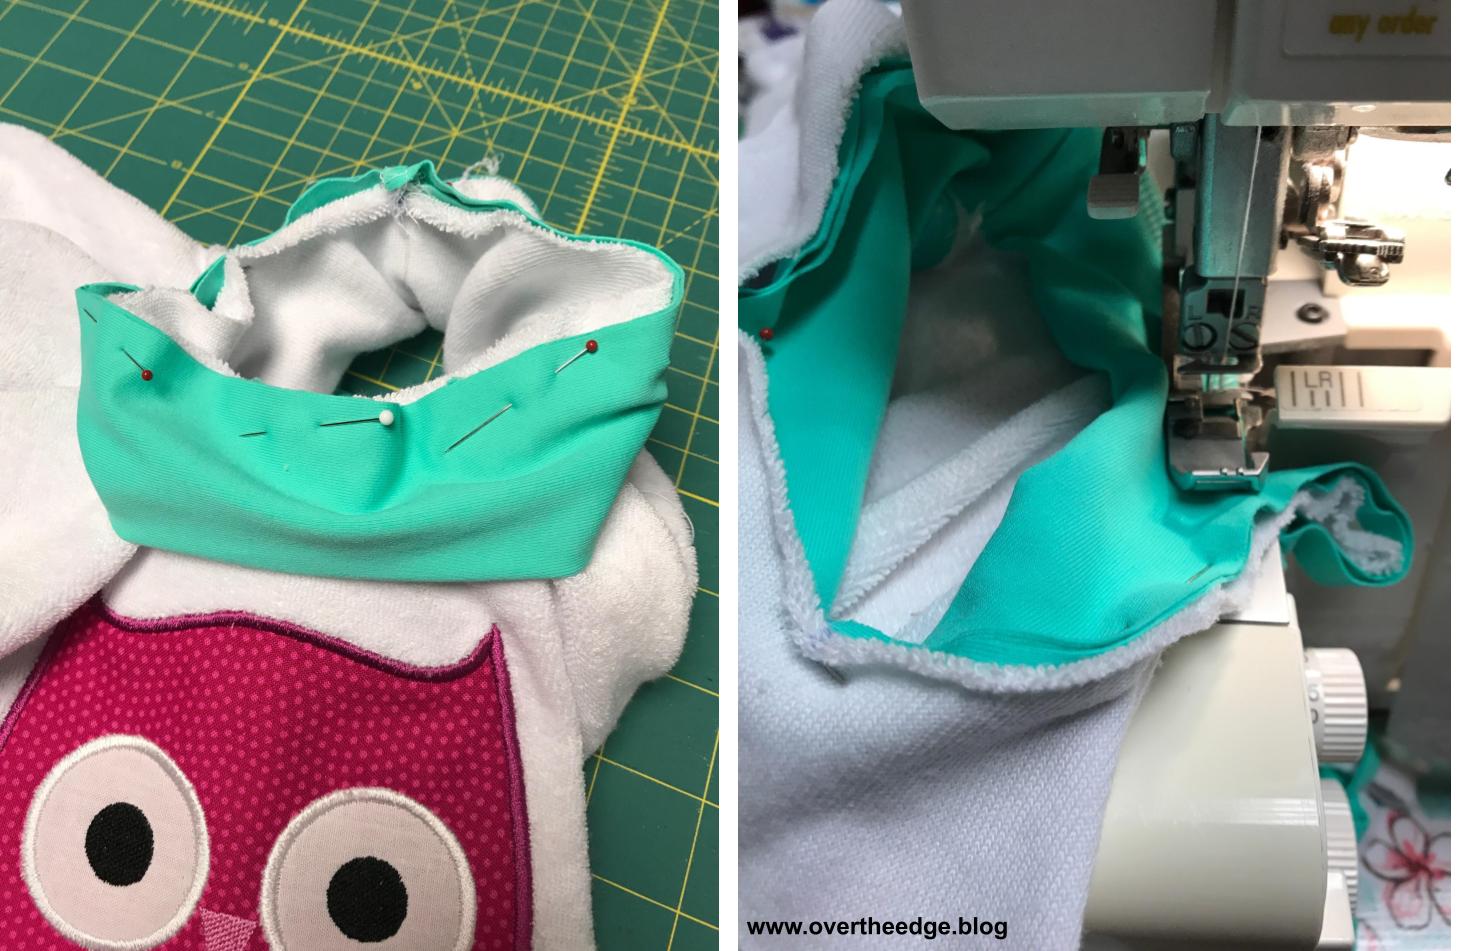
Apply Ribbing
I used a piece of spandex material in place of the ribbing called for in the pattern.
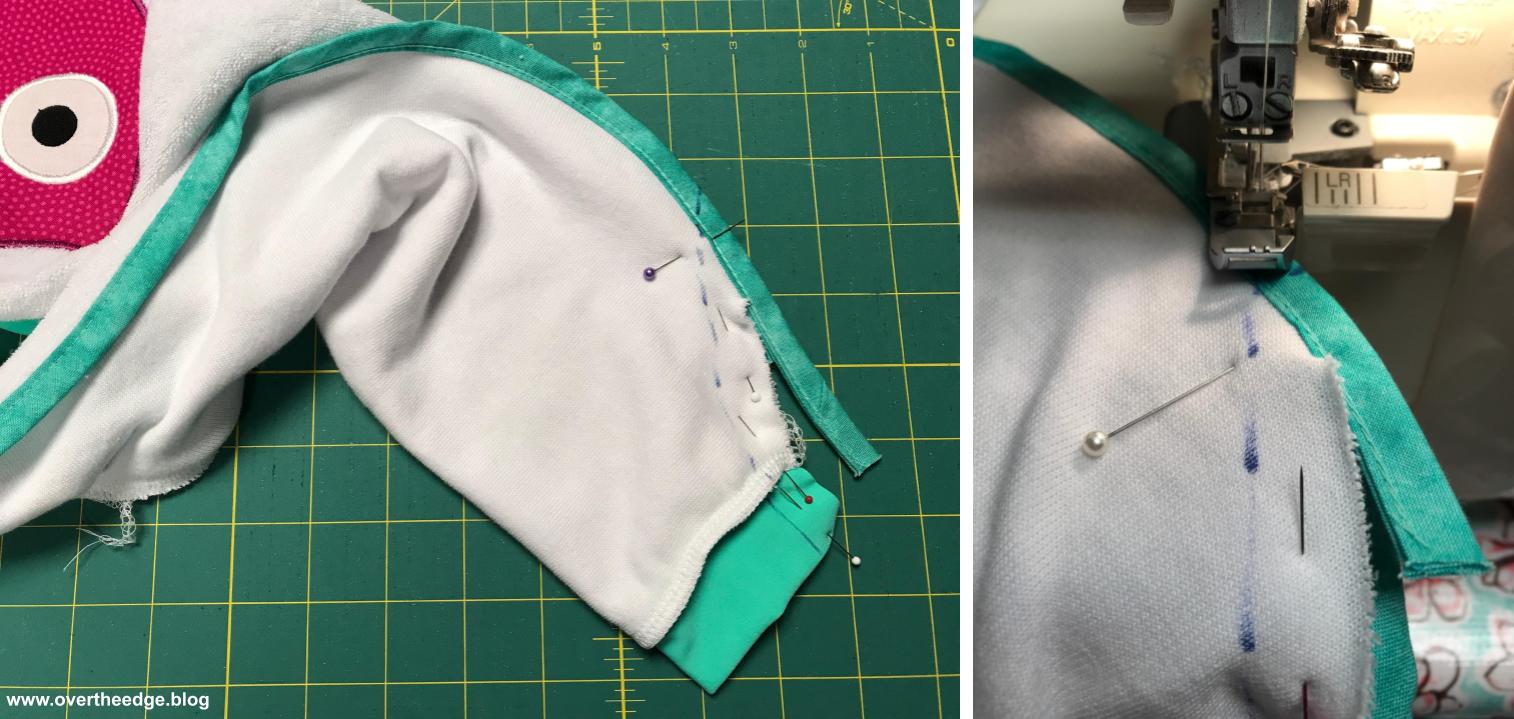
The cuff pieces were applied first. I cut the pieces 2” longer than stated in the pattern so I had a one inch “grab tab” on each end. It’s not required, but I find it easier to have the extra fabric to hold onto when stretching the ribbing to fit.
If you find it difficult to keep all three layers from shifting as you serge, you can always baste the raw edges of the folded ribbing together before pinning the ribbing to the project. That way you only have to control two layers of fabric instead of three. Basting first with my sewing machine gives me much better results on ribbing. And I spend a lot less time resewing because one layer of fabric slipped away from the seam.
Next I applied the neck band. I serged the short ends together to make a circle. Then I folded it in half lengthwise, wrong sides together and pinned the neck band to the bib. I matched the seam of neck band to center back of neck of the bib. You will need to evenly stretch the ribbing to fit.
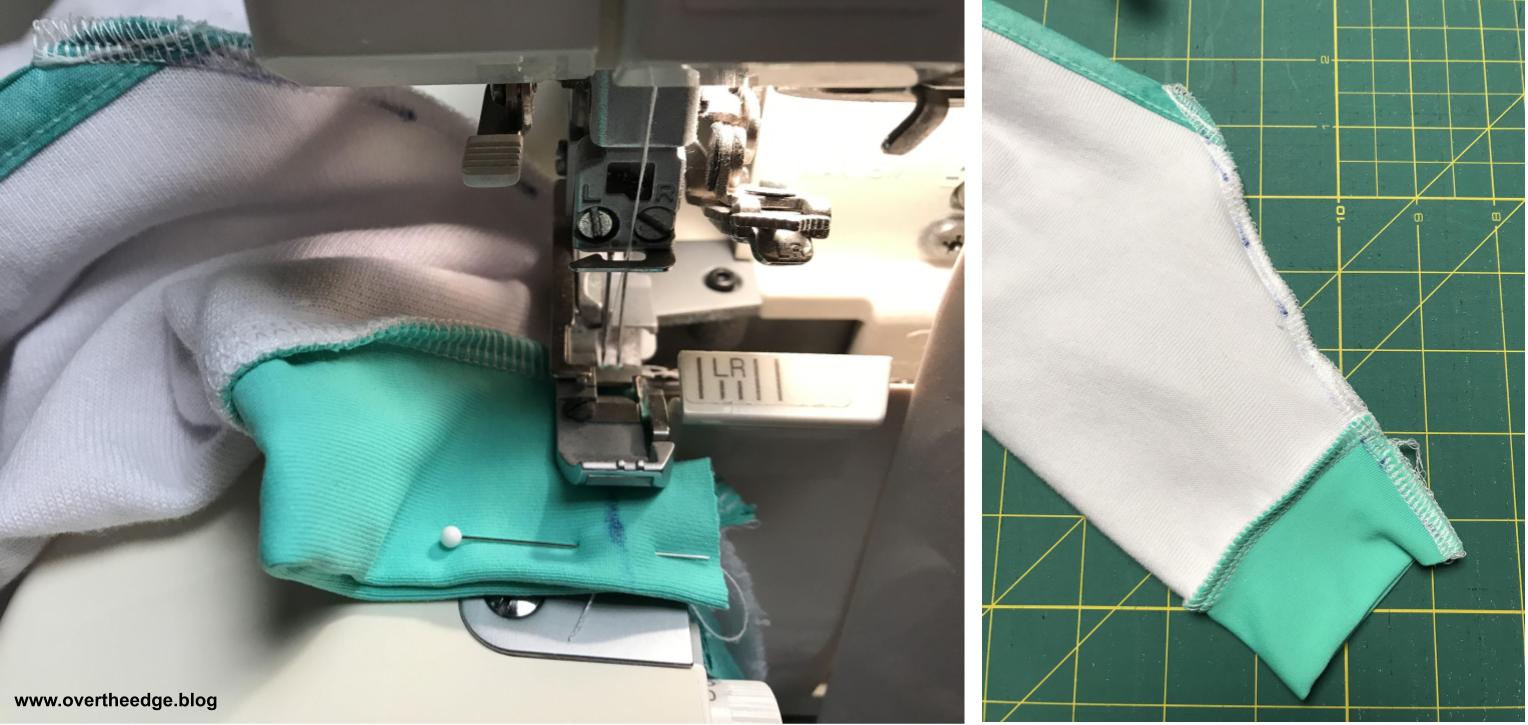
Sleeve Seams
The last step was to serge the sleeve seams. I finished the ends of my seams by locking the ends with my serger.
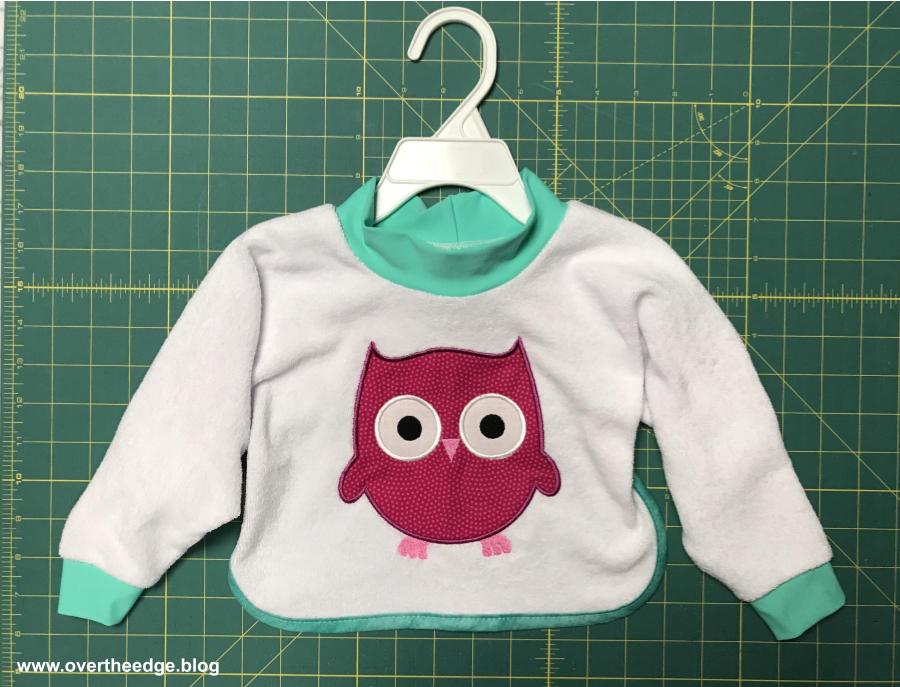
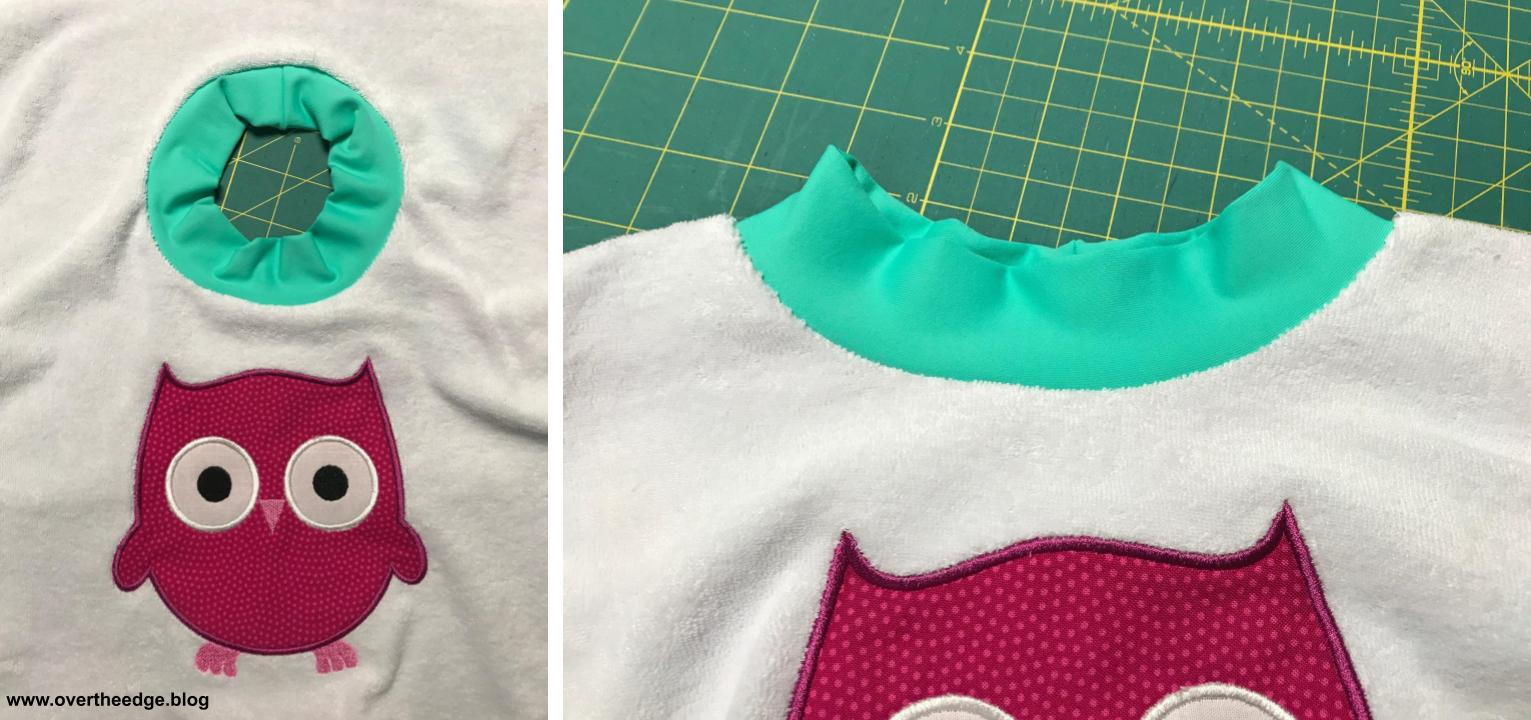
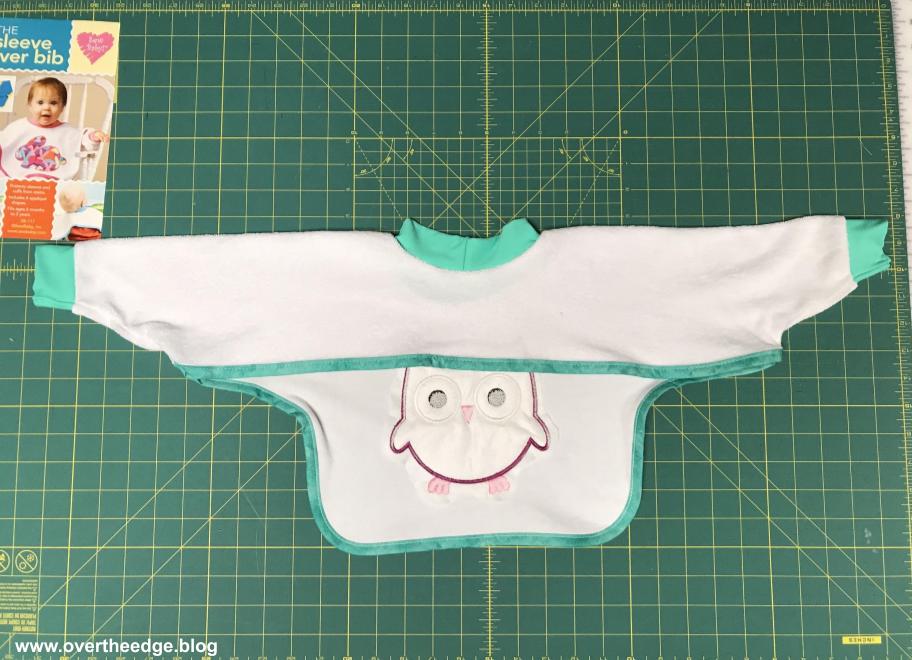
Serger Sleeve Saver Bib
Here is a front view and a back view of my finished Serger Sleeve Saver Bib.
This bib is both cute and practical and the perfect accessory for my serger funsie onesie from last week’s blog post. I can’t wait to see it on my niece’s baby girl! I hope this post inspires you to use your serger more…..