Tag: Serger sewing project

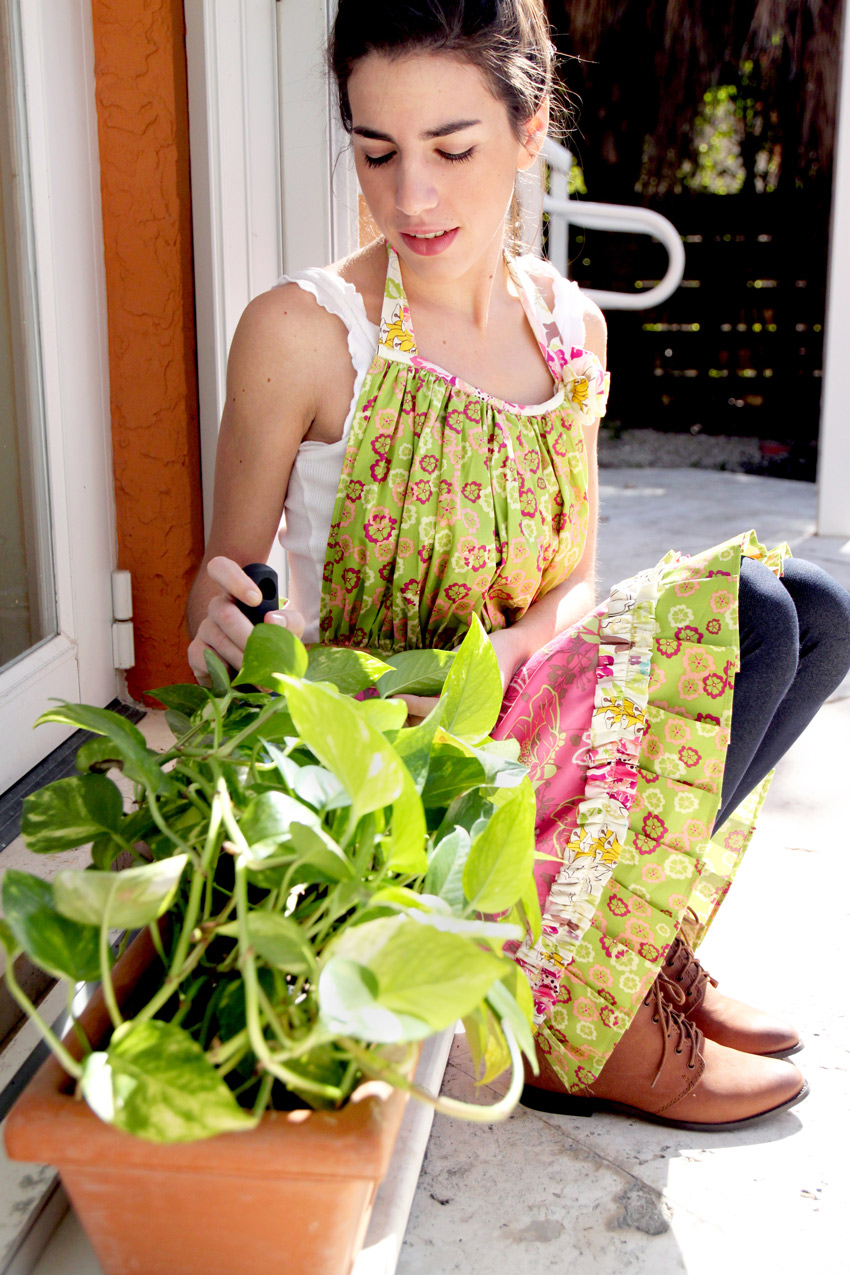
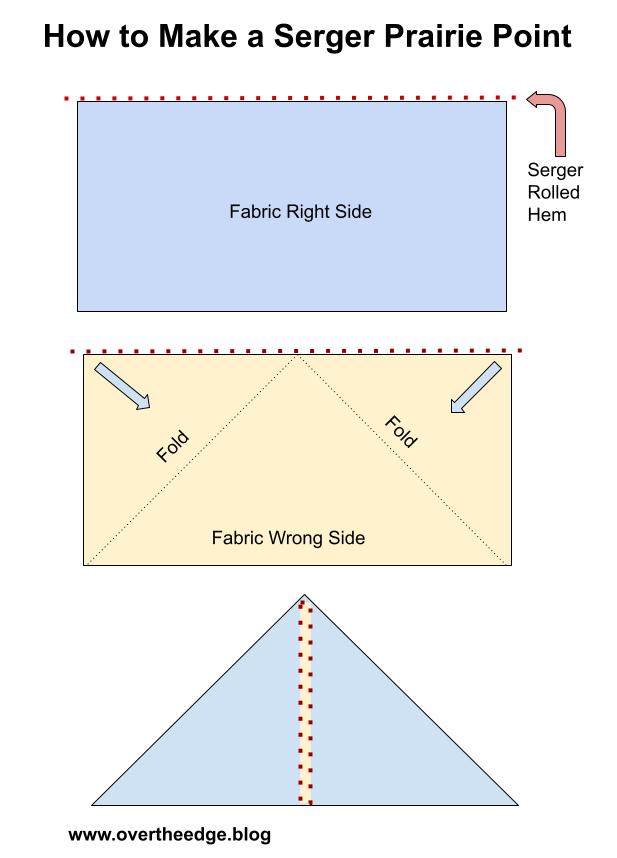
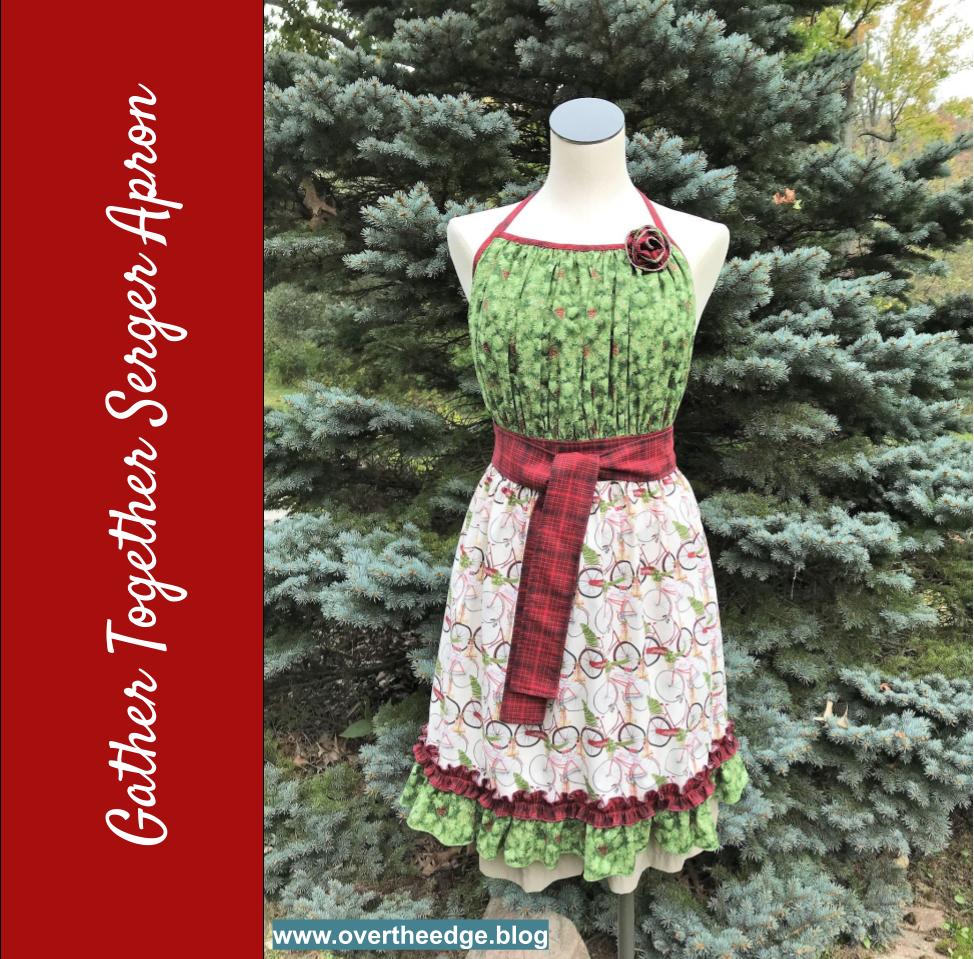
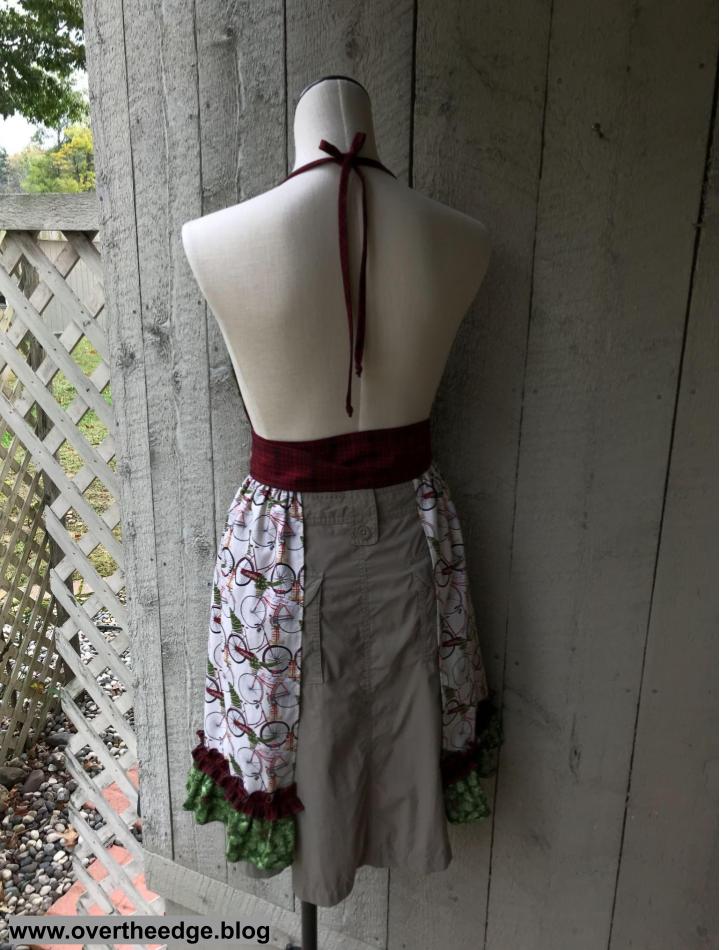
My Fun and Festive Gather Together Serger Apron

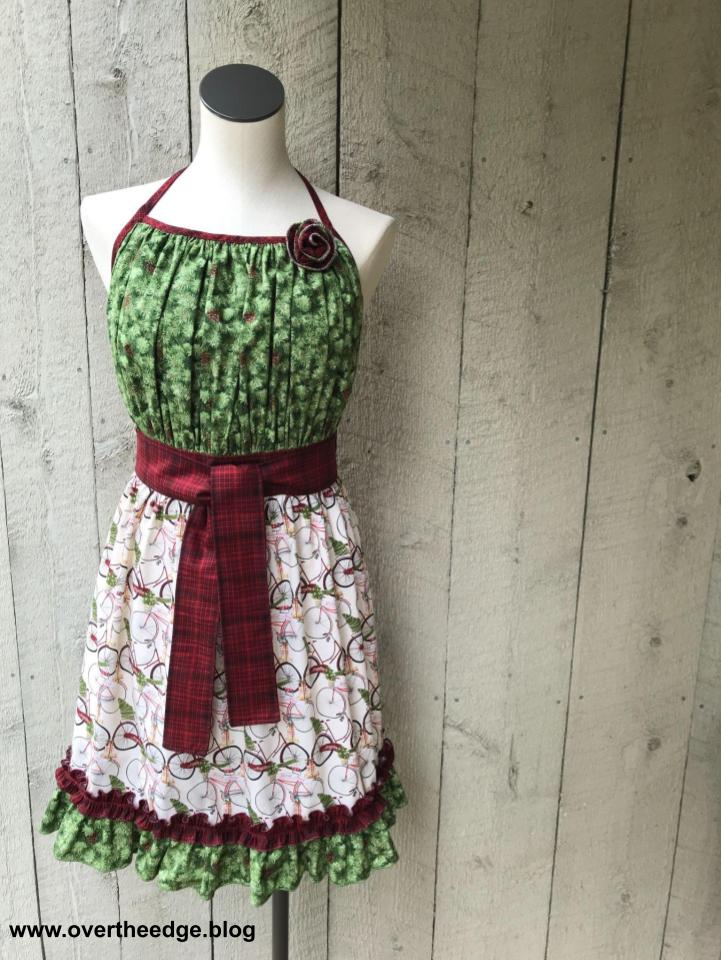
Every year my fellow employees and I sew up holiday aprons to display in the store. For my 2021 holiday apron I made the Gather Together Serger Apron by Baby Lock.

The Gather Together Serger Apron pattern was based on a sewing pattern by Pat Bravo of Art Gallery Fabrics, which was adapted for serger construction. See links to both apron patterns in the Resources section of this post. 

How I Used My Serger

I serged the entire apron using only my Baby Lock Evolution serger. It’s a great apron pattern to try making with your serger. You can use your serger to make as little or as much of the apron as you like.
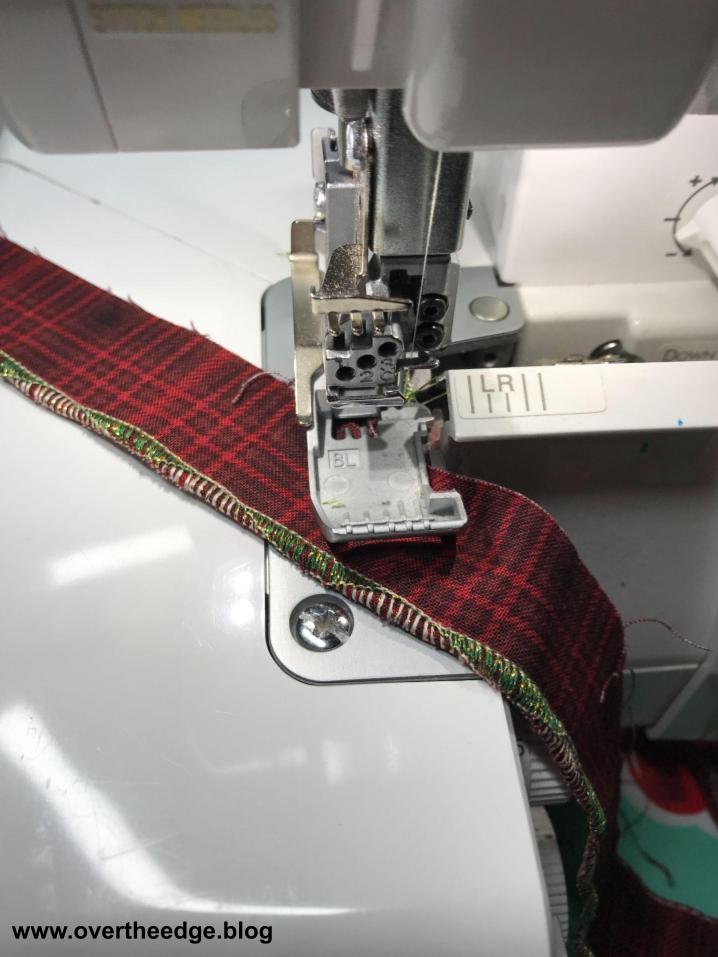
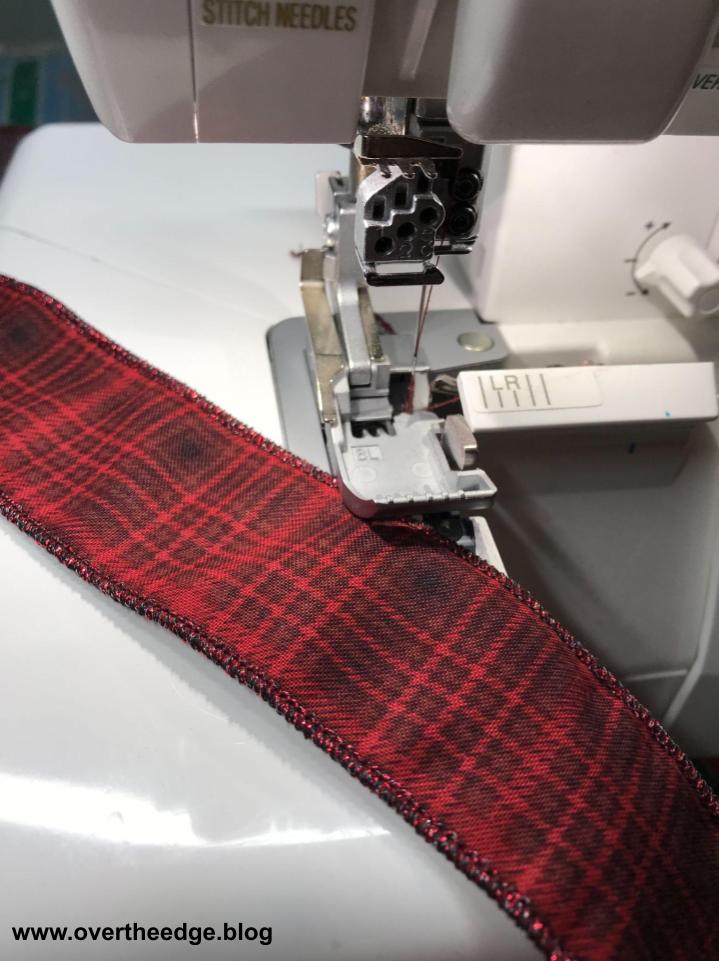
Edge Finishes

I used a variety of edge finishes to complete this apron, which utilized different stitches and/or attachments.

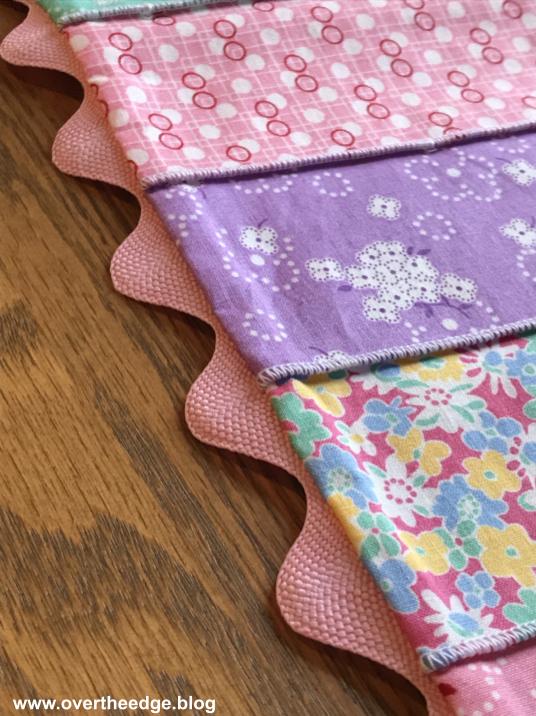
  • Overlock stitch to keep raw edges from unravelling
  • Rolled hem stitch for ruffles
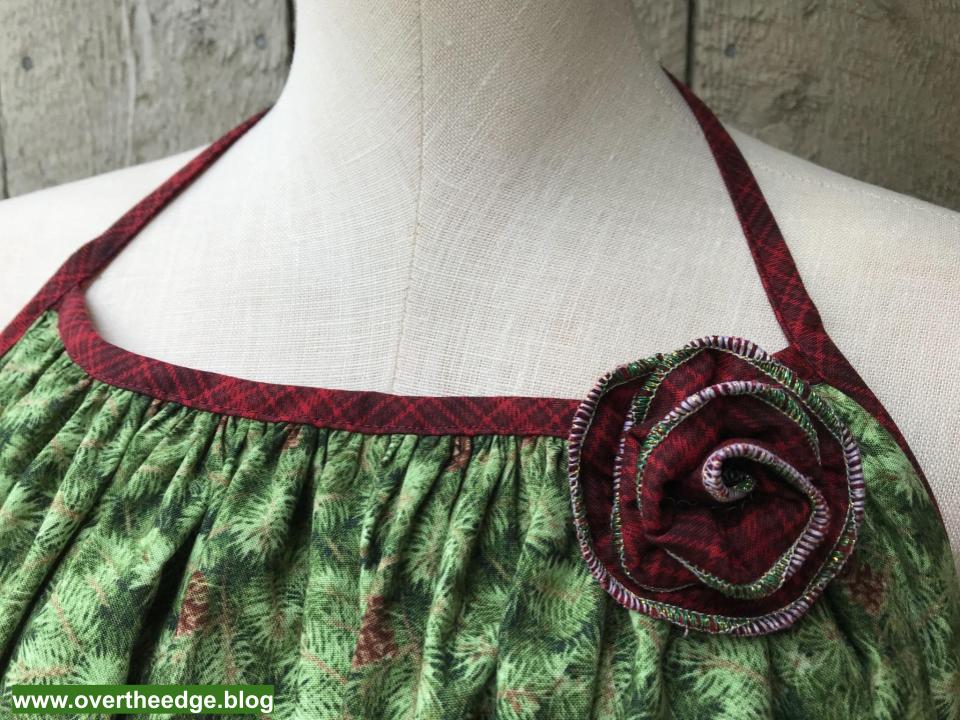
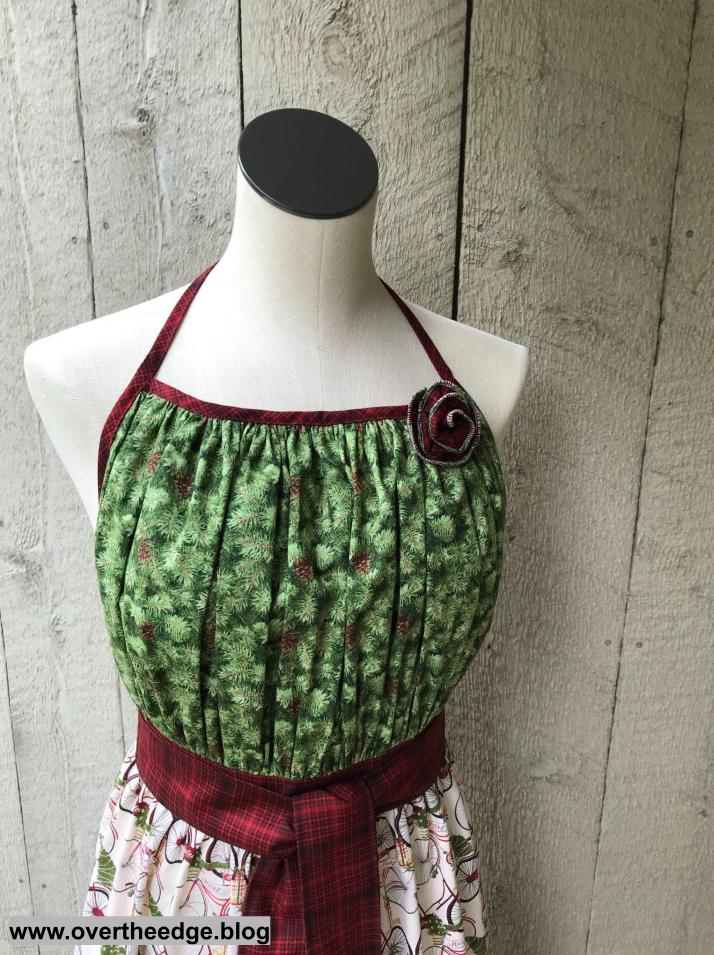
  • Wave stitch for fabric flower
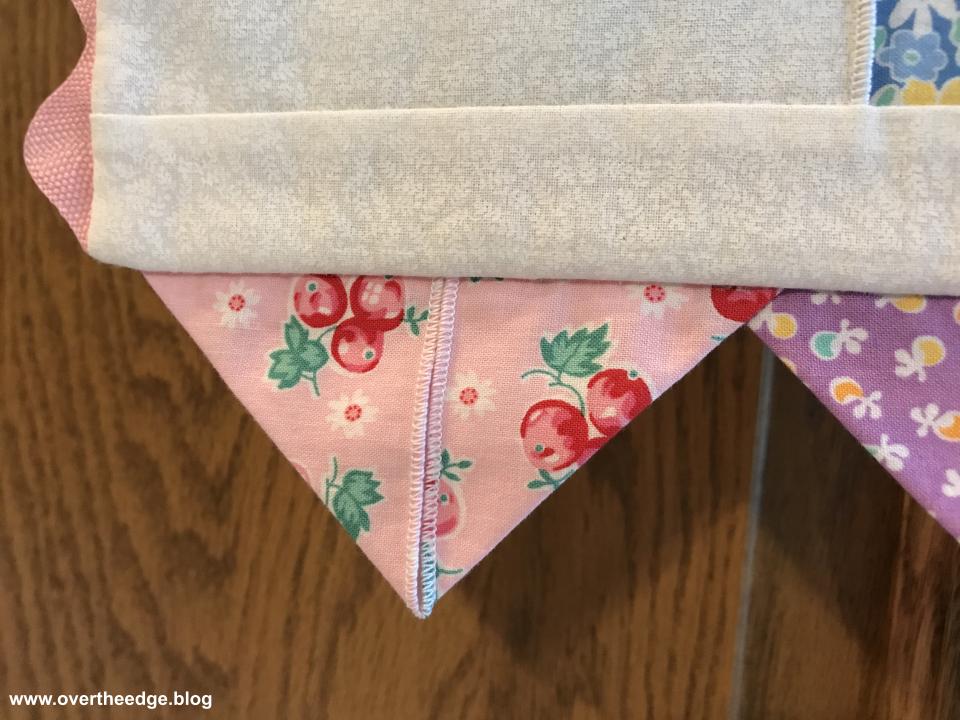
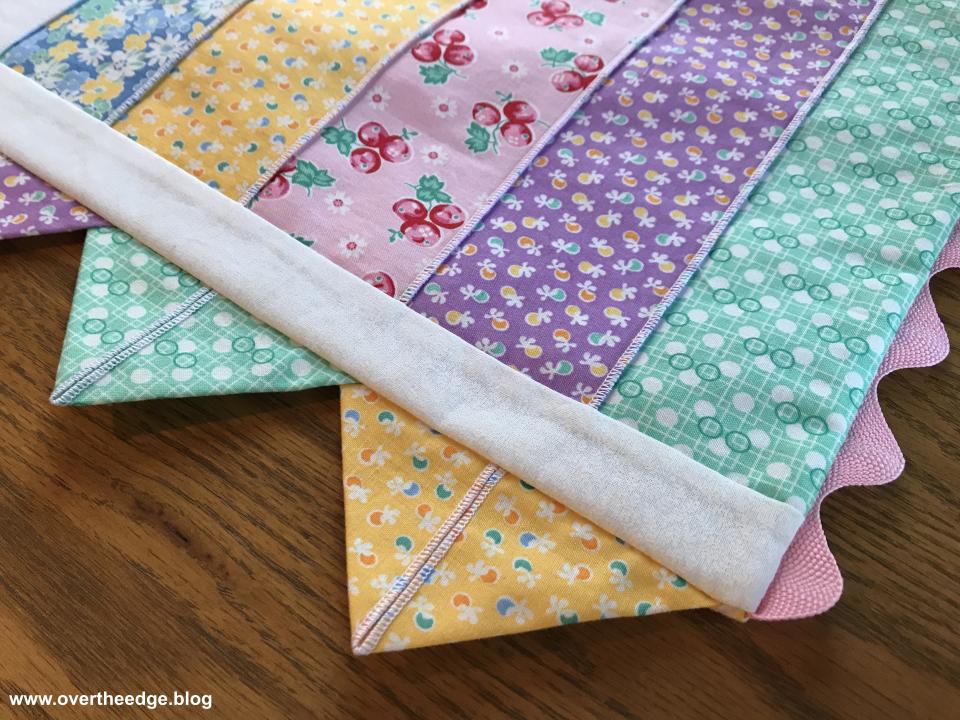
  • Hem sides of apron with ¼” plain hemmer attachment and chain stitch
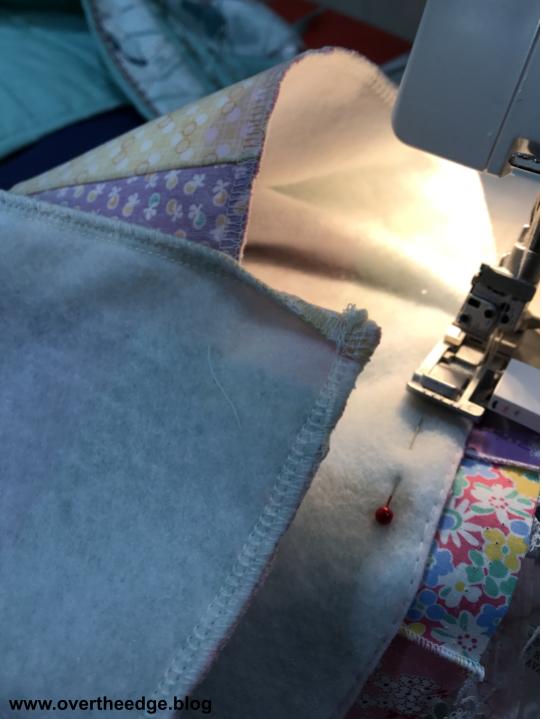
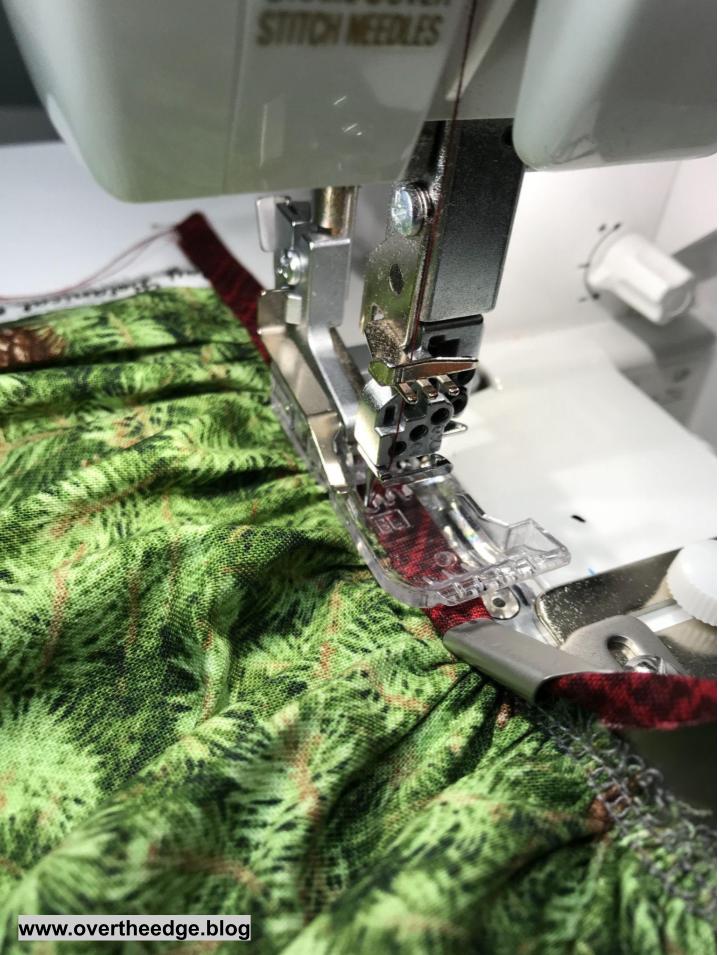
  • Encase edges of bodice and make neck straps with a double fold bias binder and chain stitch

Gathering and Ruffles

I gathered the ruffles using two different techniques.

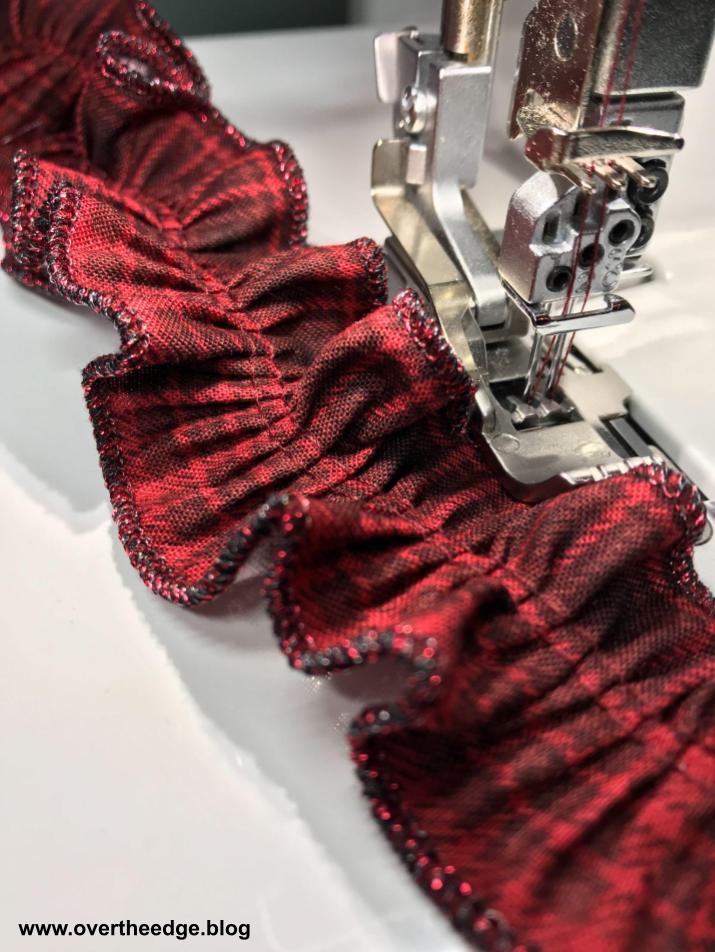
  • Four thread overlock technique which makes adjustable gathers, similar to a double row of basting stitches using a sewing machine. This technique is perfect for gathering fabric where you need to adjust the gathers to fit.
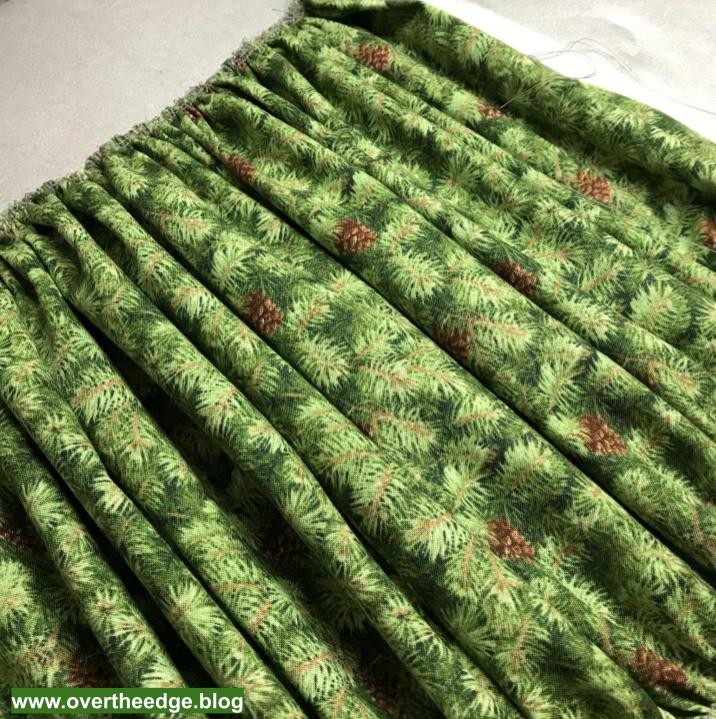
  • Narrow cover stitch technique which makes permanent gathers. The gathers created by the cover stitch are much fuller than those created by an overlock stitch. However, they can not be adjusted.
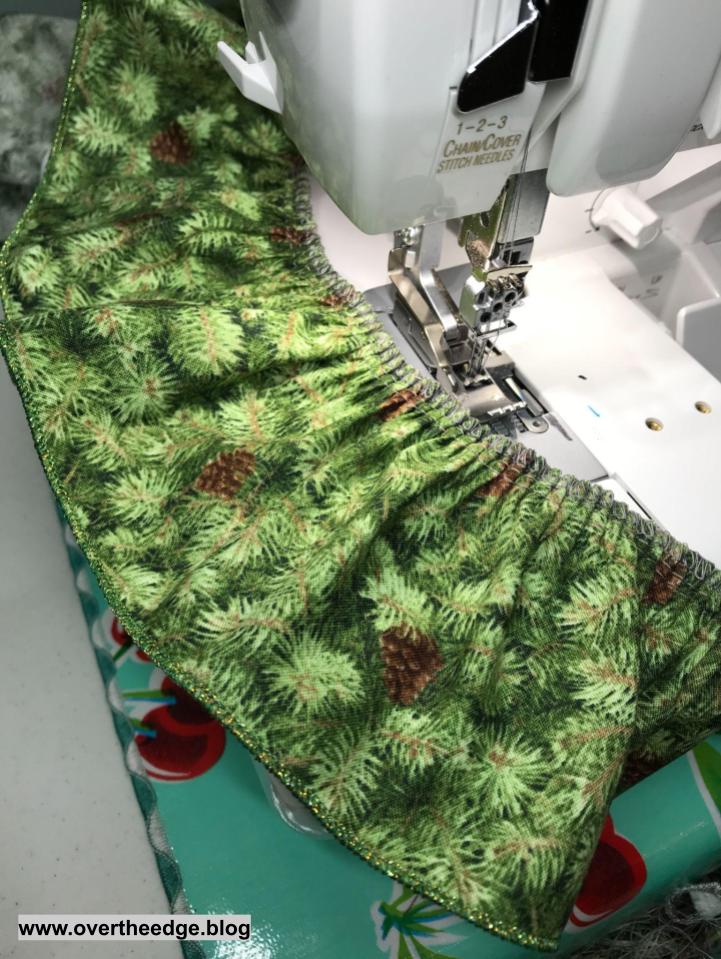
  • Long stitch lengths and differential feed are used in both gathering techniques. 

Seams and Construction

I serged all seams using a chain stitch.

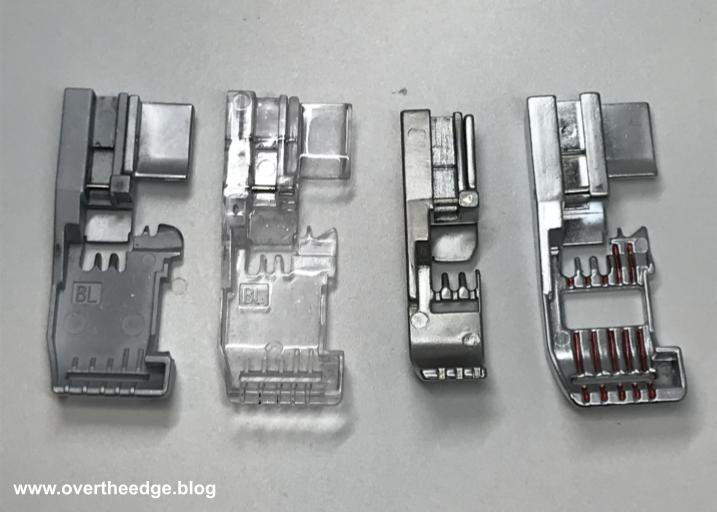
Feet and Attachments

I used the following feet and attachments to construct the Gather Together Serger Apron:

  • Double fold bias binder 36mm
  • Plain hemmer ¼”
  • Cover/chain stitch foot
  • Clear foot. The pattern did not call for this foot, but I like it’s visibilty. I thought the visibility of the foot made it easier for me to attach the double fold bias binding to the apron bodice.
  • Standard foot

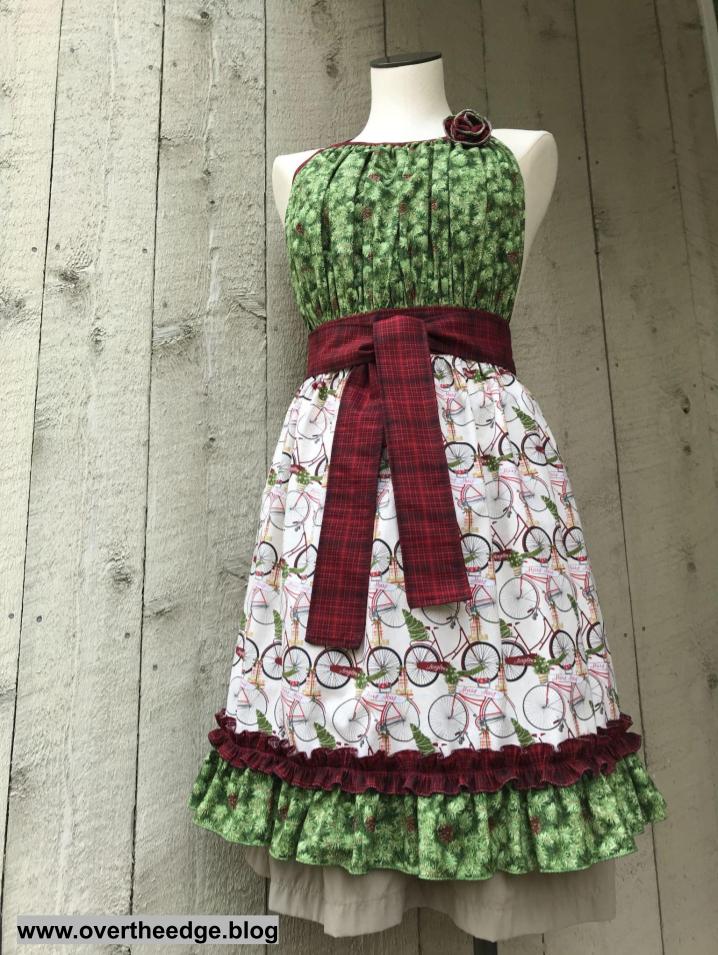
Photo Overview of my Gather Together Serger Apron

Wave Stitch

I used the wave stitch to finish the edges of the fabric flower. Metallic thread in both loopers gave the edges a bit of holiday sparkle. If your serger isn’t capable of the wave stitch you could substitute a rolled hem or three thread overlock stitch.

gather together serger apron

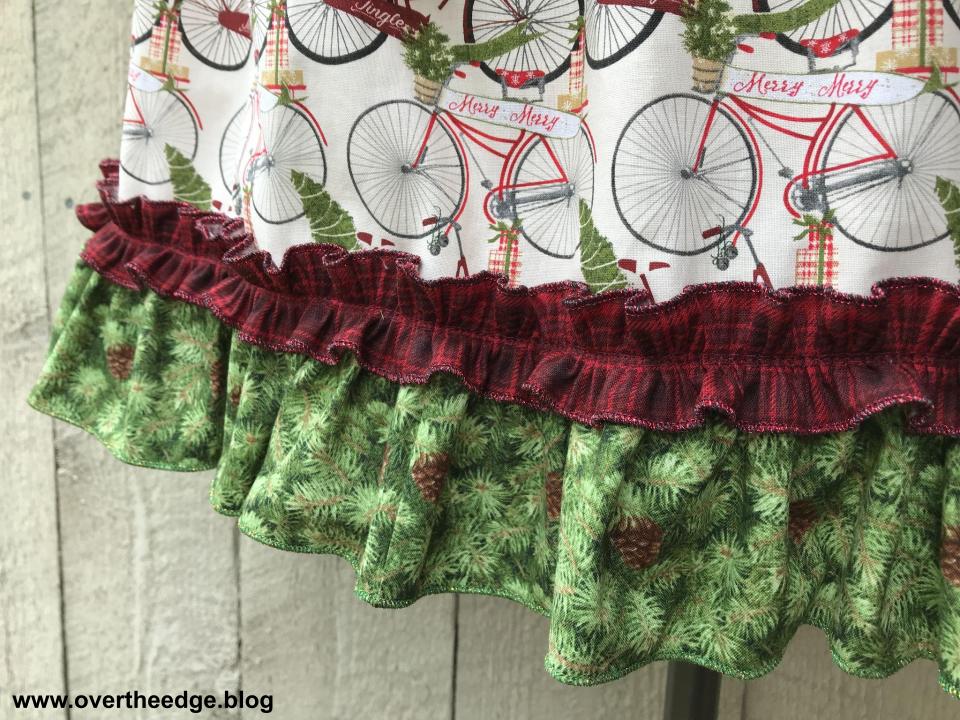
Three Thread Rolled Hem

I used a three thread rolled hem to finish the edges of the ruffles, with metallic thread in the upper looper.

gather together serger apron

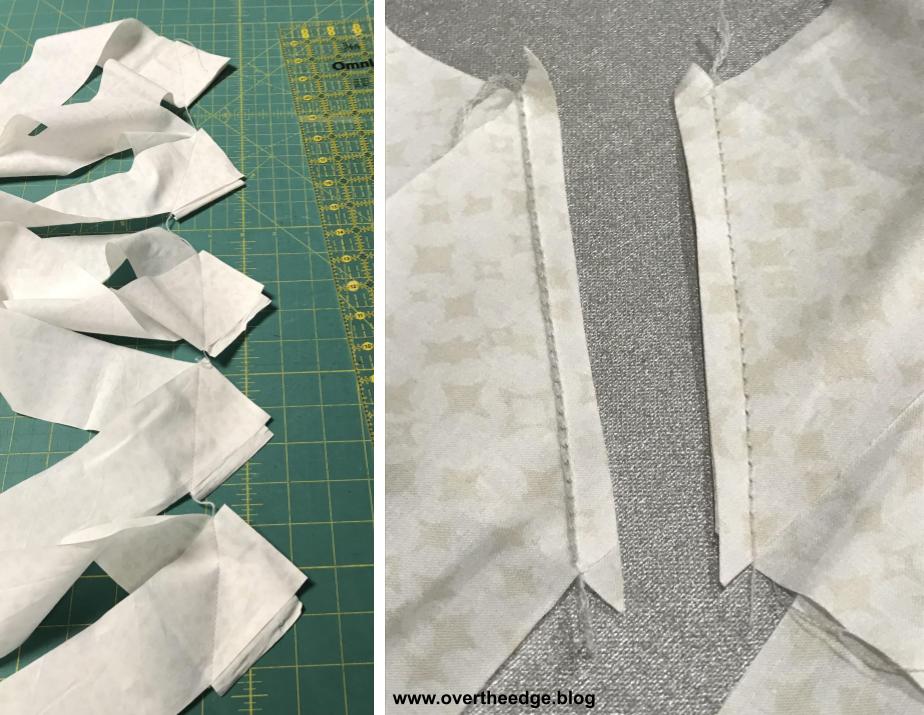
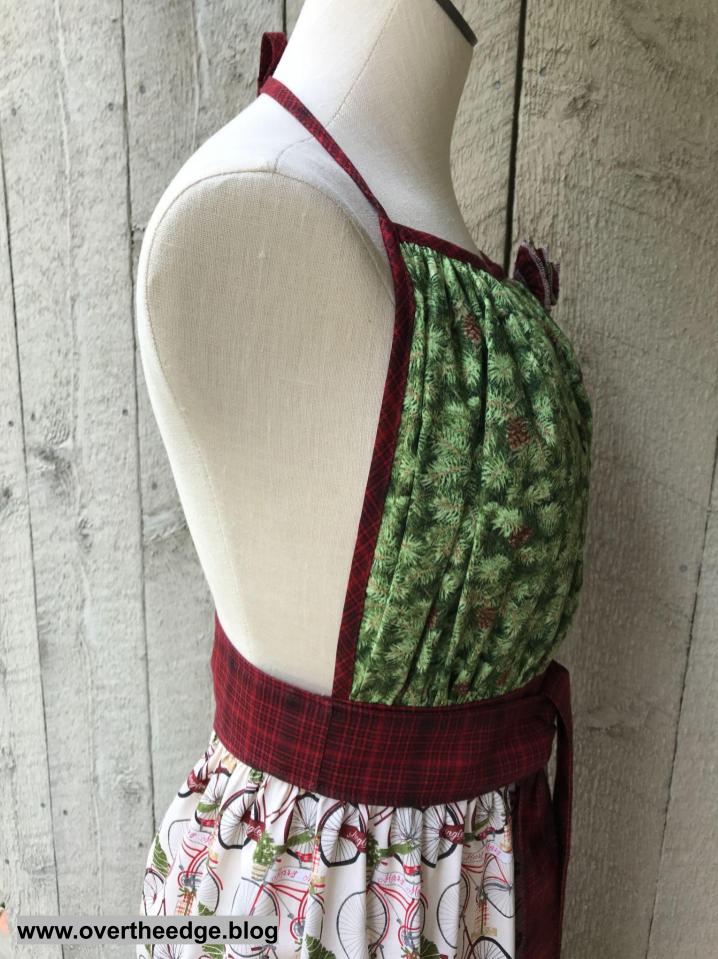
Gathering The Bodice

The bodice of the apron was gathered using a four thread overlock stitch. After gathering with my serger, the bodice still needed a bit more gathering. Gathers created with the four thread overlock are adjustable. So I slid the fabrics along the needle threads adjusting the bodice edges to the proper dimensions. See link about gathering in the Resources section of this post.

gather together serger apron

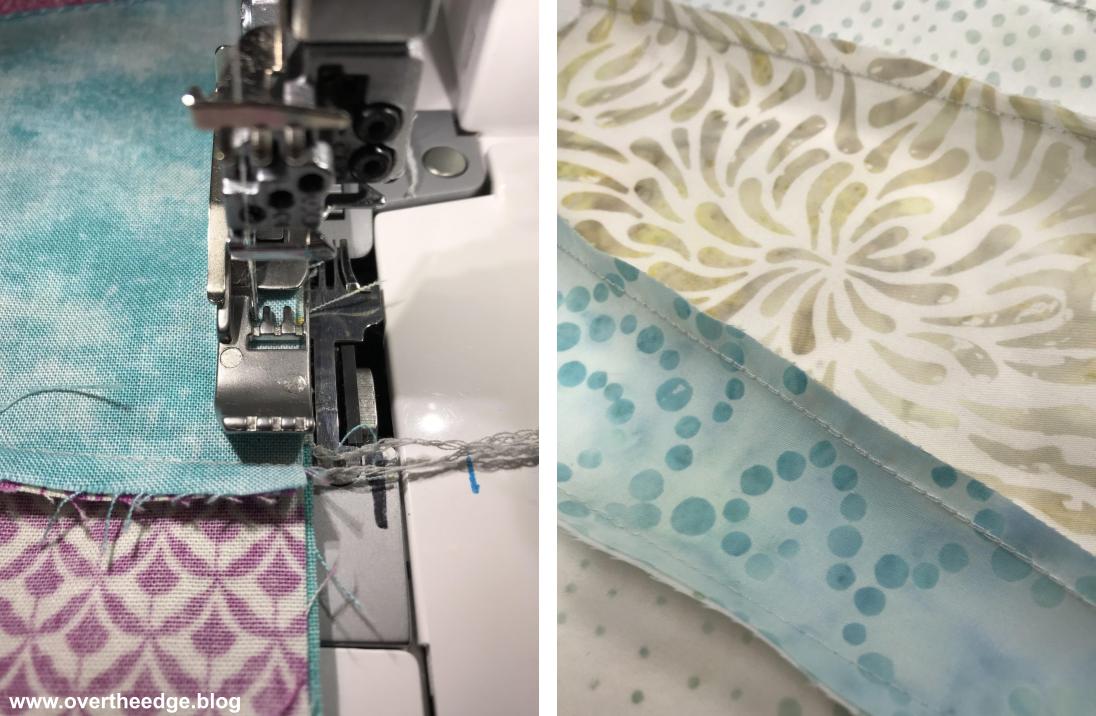
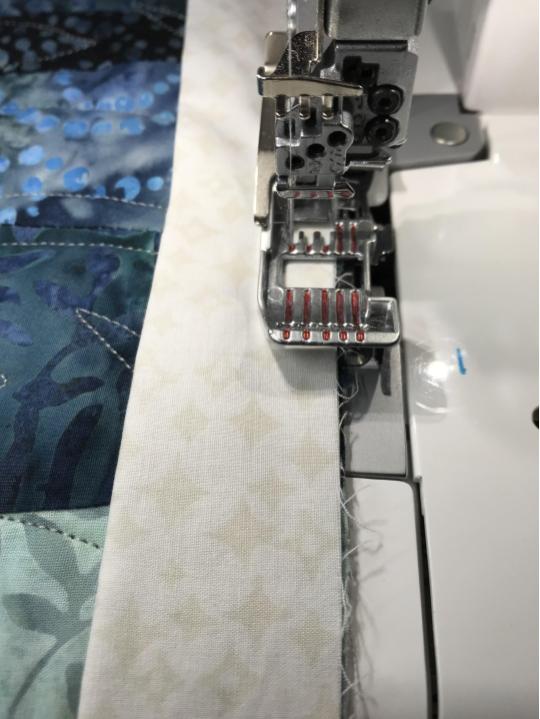
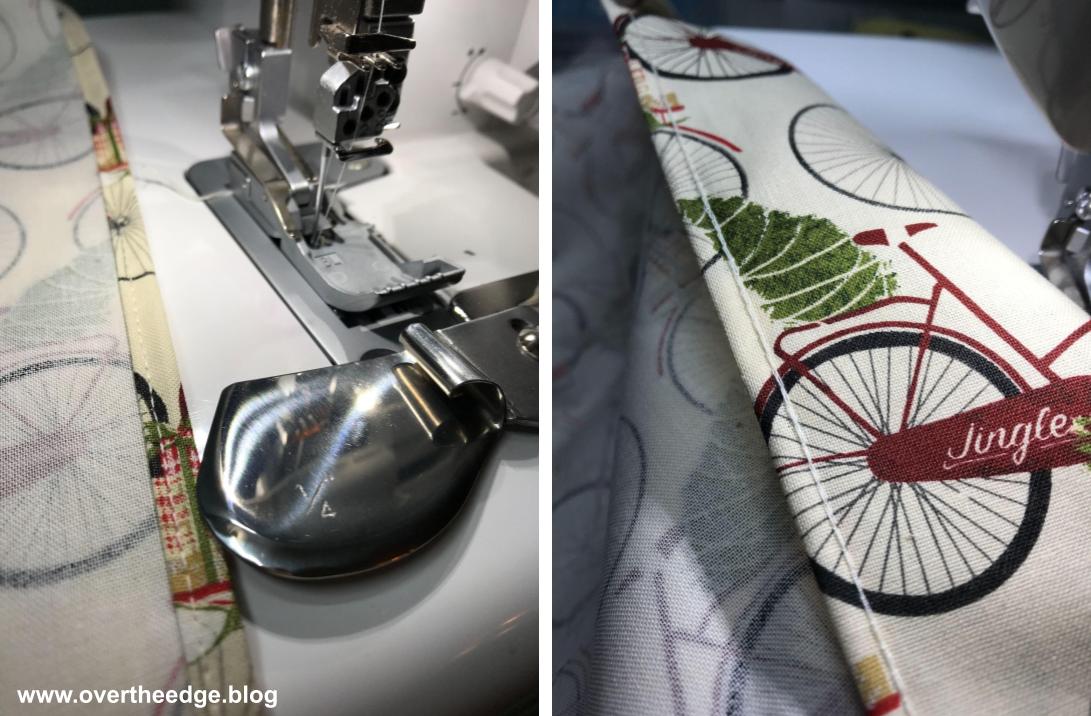
Hem Sides of Skirt with ¼” Plain Hemmer Attachment

I love to try new things with my serger. Using the serger plain hemmer was a new experience for me. I hemmed the side edges of the apron’s skirt using the ¼” plain hemmer, a chain stitch and a standard presser foot. My practice piece turned out perfectly. It must have been beginner’s luck because the first hem on the actual project took me three tries to get it right. I figured out that I needed to generously turn/roll the edge of the fabric in advance and keep it turned as I fed it into the attachment. Then the plain hemmer worked really well. The second side hem of the apron looked beautiful on the first try! See the link in the Resources section for tips for using a serger ¼” plain hemmer.

The plain hemmer rolls the hem to the top side as it is serged. So you feed your fabric into the attachment with the wrong side up. The needle thread will be seen on the back side of your finished project. The chain looper thread will be seen on the right side of your project.

gather together serger apron

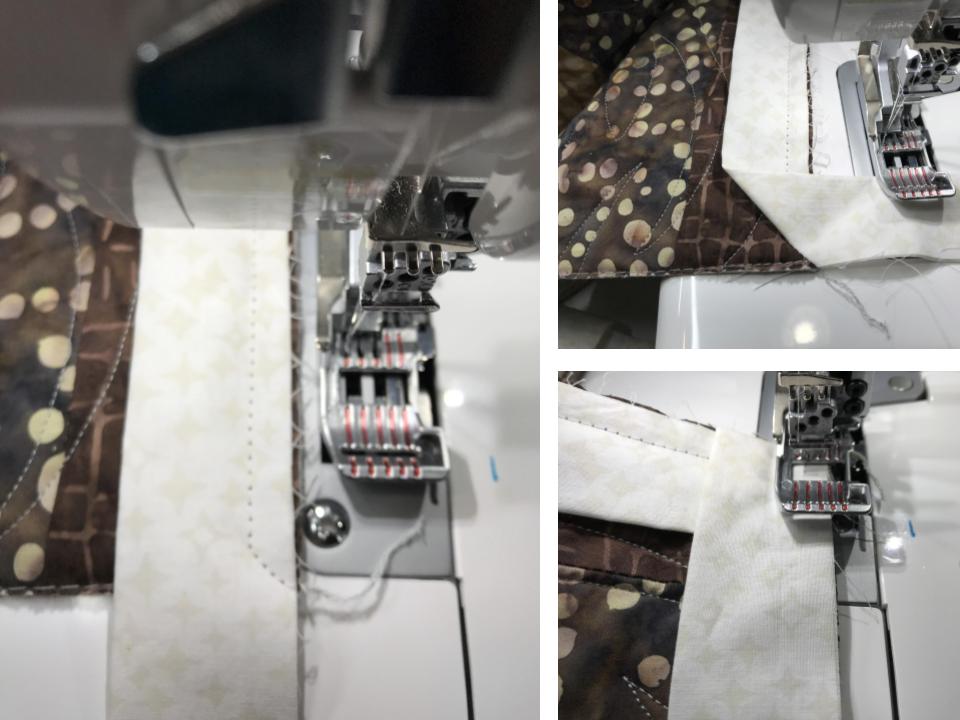
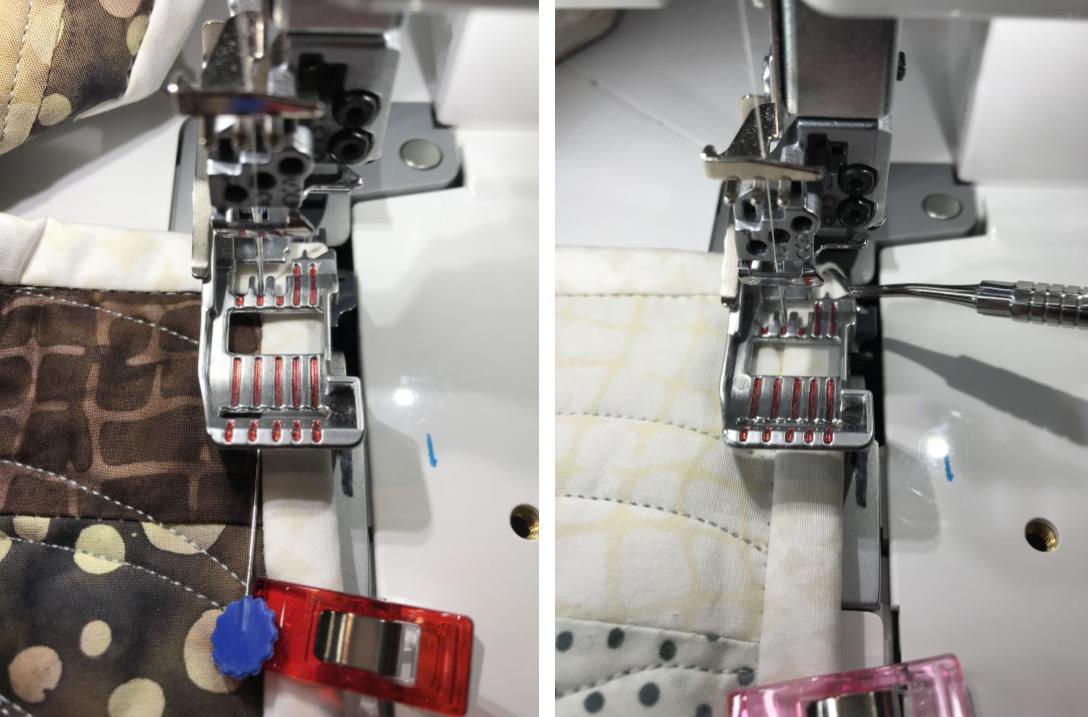
Finish Edges of Bodice and Create Straps Using a Double Fold Bias Binder Attachment

I followed the video class/instructions to make the apron. However, instead of making the top edge and neck straps all one piece, I bound the top edge first. Then I bound the side edges of the bodice and continued the binding from the sides to make the neck straps.

gather together serger apron

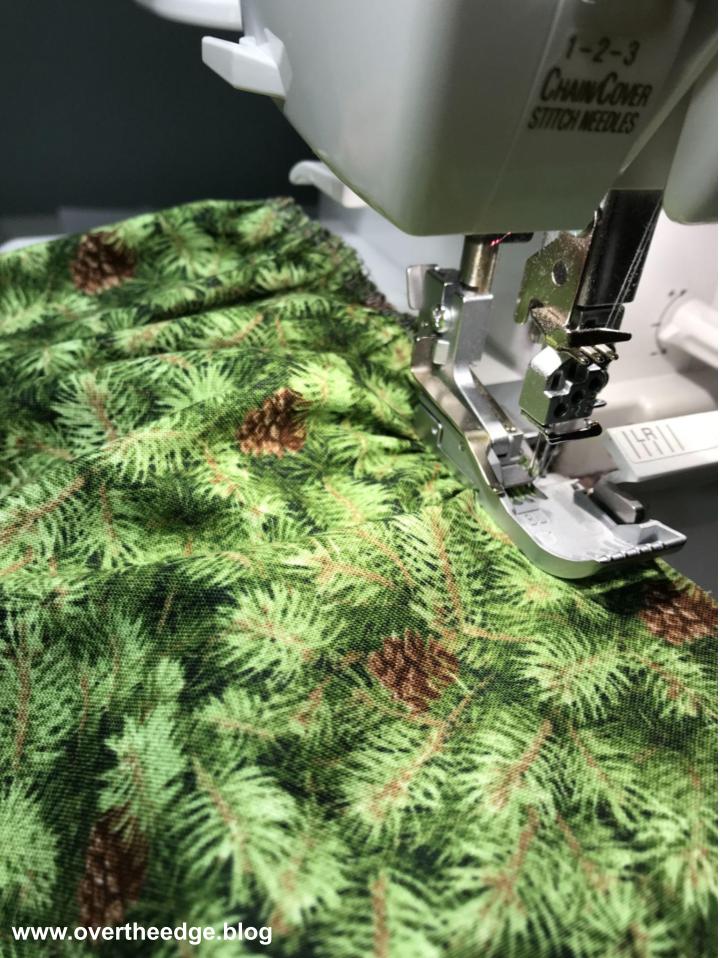
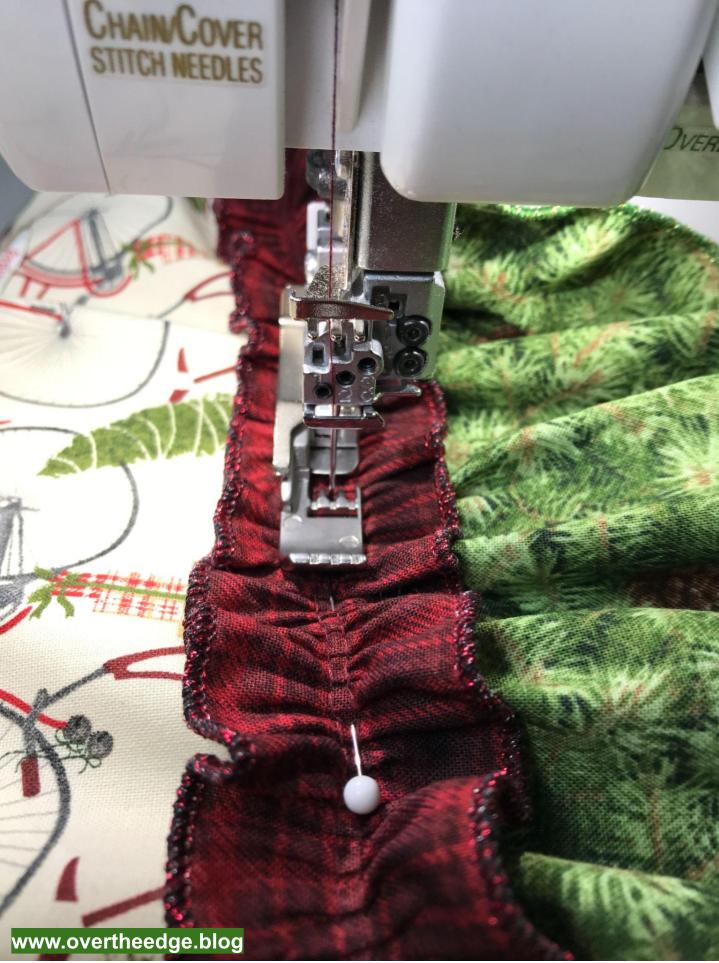
Gathering Ruffles Using a Narrow Cover Stitch

I used a narrow cover stitch along with the cover stitch foot to gather the narrow ruffle strip, bottom ruffle skirt and flower. The narrow cover stitch gathers fabric much more tightly than gathering with an overlock stitch. But the cover stitch gathers are not adjustable like the gathers made by serger overlock stitching.

gather together serger apron

Construct Seams

I used the chain stitch to serge the seams of the bodice, skirt and waistband/ties. Serging with a chain stitch is very similar to using a sewing machine straight stitch.

gather together serger apron

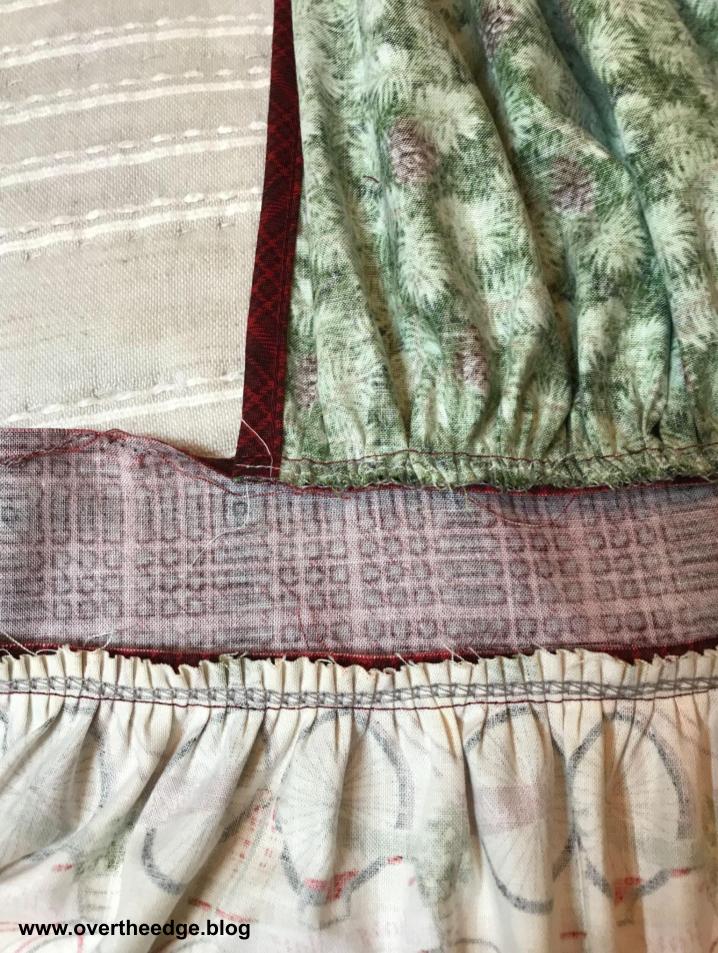
I attached the narrow ruffle and bottom ruffle to the skirt of the apron using a chain stitch too.

gather together serger apron

Gather Together Serger Apron

I hope you enjoyed learning about how I serged my Gather Together Serger Apron.

serging with jen
gather together serger apron

Resources

Using a Serger Plain Hemmer Attachment https://overtheedge.blog/tutorials/serger-plain-hemmer-attachment/

Tips for Using a Serger Double Fold Bias Binder Attachment https://overtheedge.blog/tutorials/serger-double-fold-bias-binder-tutorial/

Gathering Fabric Using a Serger Overlock Stitch https://overtheedge.blog/tutorials/how-to-gather-fabric-using-a-serger-overlock-stitch/

Links to apron patterns:

Find the serger version – Gather Together Serger Apron by Pam Mahshie of Baby Lock at www.sewedclasses.com

Find the free sewing version of the pattern at: http://www.patbravo.com/freeprojects/sewing/Spiceitup-1.pdf

gather together serger apron

My Bunnies and Flowers Reversible Serger Table Runner

Spring is in the air! The sun is shining and the snow has melted. It’s once again time to dress the table with my colorful and reversible serger table runner. It’s full of texture with exposed seams, prairie points, bunny tails and fabric flowers.

Reversible Serger Table Runner Inspiration

I designed this table runner a few years ago using a bunch of leftover jelly roll strips from another project. And of course I challenged myself to use my serger to make it. My vision began with a “stripey” table runner with texture, and evolved as I serged. 

Creation of Table Runner

I pieced the strips together with the 3 thread rolled hem stitch. I serged the strips wrong sides together so the rolled hem would show on the right side of the table runner. Then I cut the strip sets into two sections and serged the sections together to end up with a rectangle about 16” wide by 48” long.

reversible serger table runner

A Second Runner

I still had a few more jelly roll strips left so I decided to make a second but different runner. I serged these strips together with a three thread rolled hem stitch, adding in a wider strip of white fabric. Then I cut the strips into squares, alternated the layout and added sashing strips in between the squares.

The Reversible Serger Table Runner

Instead of two separate table runners, I decided to make one reversible table runner. I added a wide ric rac trim to the long sides and prairie points to the short sides.

I then layered the two table runner tops right sides together, along with a layer of batting and serged around the outside edges, using a 4 thread overlock stitch.

Here is a closeup of the wrapped corners technique I used at the corners so I didn’t need to trim away any fabric at the corners. For more information about how to wrap a corner with a serger visit my pillowcase tutorial at: https://overtheedge.blog/tutorials/his-hers-serger-pillowcases-tutorial/

I left an opening on one side for turning and closed it up using a fusible web and an iron. 

Serger Rolled Hem Prairie Points

My prairie points started as rectangles that were 5” long and 2.5” wide. I serged one long edge of the rectangle and then folded two corners to the middle to make the prairie point. The rolled hem edge ends up in the center of the prairie point.

serger prairie point
reversible serger table runner
serger rolled hem prairie point

Finishing Touches

The reversible runner turned out nicely, but I thought it needed a little something extra to make it compete. So I added bunnies on one side and flowers on the other. Adorable!

reversible serger table runner

My Felt Bunnies

I cut out two bunny shapes from some white felt and glued the bunnies to the ends of the table runner. The bunny tails were made from fabric trimmings that were cut off to even up the edges of the table runner. I took the strips and twisted them and then rolled them into a circle to form the tails.

My Fabric Flowers

I had a few more leftover jelly roll strips that I transformed into fabric flowers. To make a flower, I serged one edge of a fabric strip using a 3 thread rolled hem. Then I set up my serger to gather and serged the other long edge to gather the fabric. Pulling on the needle threads, I gathered the fabric a bit more before shaping it into a flower. And I added a fabric covered button to create the flower center.

So they could be easily removed when I wanted to display the bunny side, I pinned the flowers to the table runner.  

reversible serger table runner

Reversible Serger Table Runner

I hope you enjoyed learning about how I made my bunnies and flowers reversible serger table runner! And in case you didn’t know, April is National Serger Month. Now would be a good time to serge something fun for spring!

serging with jen

Resources

Setting up for a rolled hem on a Baby Lock Vibrant:  https://youtu.be/KBOZjD57JUU

How to Serge a Quilt with a Chain Stitch

serge a quilt with a chain stitch

Did you know that you can serge a quilt with a chain stitch? I tried it, and I am so excited to share with you my latest quilt by serger. My Happy Place Quilt is an abstract waterscape quilt designed with a layer cake and a ten degree wedge ruler. I’ve made serger quilts using many types of serger stitches and techniques. But this is the first quilt I have pieced and bound exclusively using a serger chain stitch.

I was so happy with the results that I decided to create an official pattern for the quilt. The pattern is full of step by step photographs and diagrams. And the quilt can be made using a serger and/or a sewing machine. If you’d like to make your own My Happy Place Quilt, you can find the pattern for sale in the Shop section of my blog: https://overtheedge.blog/shop/  

My Happy Place Quilt serging with Jen

Story Behind the Quilt

I created the quilt as a personal design challenge for National Quilting Month this year. And of course, I chose to use my serger to make it. So I guess it counts for National Serger Month too!

I wanted to use my ten degree wedge ruler for another project.

You may remember that last year I used my serger and ten degree wedge ruler to create a watermelon quilt. I’ve used the quilt as both a patio table topper and a tree skirt. 

I found a few wedge style quilts online that seemed interesting. But when I saw the “It Takes All Sorts” quilt from Christina Cameli’s book, Wedge Quilt Workshop, I was instantly inspired. 

I had the idea, but now I needed the perfect fabric. I found it in the sale rack where I work. It was the Ocean Stone batik layer cake from Boundless Fabrics by Craftsy. The blues and browns reminded me of Lake Michigan. And I love layer cakes because they are complete collections of coordinated fabric. The less time I spend choosing fabric is more time I can spend serging! At first I thought I would do something completely abstract, but as I experimented with my wedge layout, the abstract waterscape began to materialize.  

serge a quilt with a chain stitch

How to Serge a Quilt with a Chain Stitch

Not all sergers are capable of making a chain stitch. But if your serger does, you can use a chain stitch to serge a quilt. I have a Baby Lock Evolution serger, which is both an overlock and a cover stitch machine.

Here are some useful tidbits about serging and quilting with a chain stitch.

  • Seams can be pressed to the side or pressed open
  • Uses two threads, similar to a sewing machine
  • Can be quickly and easily removed if you make a mistake
  • Blades are disengaged so no accidentally cutting into your seams
  • Stitch length is usually a little longer than when sewing, about 2.75-3
  • Don’t have to worry about running out of bobbin thread
  • Can be used for piecing, binding and quilting

Piecing with a Serger Chain Stitch

serge a quilt with a chain stitch

I pieced together all of My Happy Place Quilt using a chain stitch and the cover stitch presser foot. Several different feet can be used – standard foot, clear foot, open toe foot, cover stitch foot, etc. Check your manual for the best settings and presser foot to use for your serger. Any foot that has good visibility makes it easier to get accurate ¼” seams. For chain stitch quilting I prefer the cover stitch foot or the open toe foot.

Pictured below are a few presser feet I use to quilt with my Baby Lock Evolution serger. From left to right: standard foot, clear standard foot, cover stitch foot, open toe foot.

serge a quilt with a chain stitch

I used my left needle and guided the fabric along the right needle marking on the toe of my presser foot. Guiding the fabric this way gave me accurate ¼” seams. I used standard serger cone thread in my needle and chain looper.

serge a quilt with a chain stitch

Attach Binding with a Chain Stitch

Applying binding with a serger chain stitch is just like applying binding with a sewing machine. You stitch the binding onto the front or back of the quilt and then wrap it around the edges and stitch it down by hand or machine.

I used this binding method for my quilt because I wanted two layers of fabric in the binding at the raw edges of the quilt. I used a very light color binding and did not want the dark fabrics in the quilt to show through. After testing the seam allowances I decided that a scant ⅜” seam allowance was best. The binding on the back would be perfectly secured by the “stitch in the ditch” stitches from the front. A scant ⅜” seam allowance from my left chain needle is between the third and 4th red marking from the left on the toe of my open toe presser foot as seen in the photo below.

serge a quilt with a chain stitch

I even chain pieced my binding strip seams with the chain stitch on my serger.

serge a quilt with a chain stitch

When I approached the corners, I simply turned the quilt clockwise and serged off the corner on a diagonal. Then I folded the binding at the corner and serged back on to the next side of the quilt, just like I would on a sewing machine. 

sere a quilt with a chain stitch

After the binding was attached to the front of the quilt, I turned the folded edge to the back and clipped in place.

serge a quilt with a chain stitch

Finish Binding – Stitch in the Ditch Method

The last step of binding a quilt is stitching down the folded edge of the binding on the front or back of the quilt. It can be stitched by hand or by machine. I completed this last step of my quilt binding by serger, using a chain stitch and the “stitch in the ditch” method from the front side of My Happy Place Quilt. For the best visibility of the “ditch” between the binding and the quilt, I used my open toe foot and the center chain needle position. 

serge a quilt with a chain stitch

You do have to turn your corners just a little bit differently with a chain stitch. When you get to the corner, stop with your needle down in the fabric. Then turn the hand wheel until the eye of the needle just peeks out above the fabric. 

serge a quilt with a chain stitch

Next lift the presser foot and carefully rotate your fabric counter clockwise. Once positioned, start serging again. You may need to use a stiletto or other tool to gently pull or push on the fabric to keep the bulky corner from getting stuck after the turn. I used a pin to hold the binding in place near the corner and removed it after I took a few stitches, since wonder clips are too bulky to use close to the corner.

sere a quilt with a chain stitch

Here’s a view of the chain stitch in the ditch from the right side of the quilt.

serge a quilt with a chain stitch

Here’s a close up of the chain stitch on the binding on the back side of the quilt.

serge a quilt with a chain stitch

Tips for Serging with a Chain Stitch

When piecing my quilts with a chain stitch, I like to trim the thread chain tails to about an inch past the edge of the fabric. The extra inch of thread gives me a little wiggle room, just in case the chain starts to unravel as it is handled.

If you need some assistance with the mechanics of serging with a chain stitch, check out my tutorial: Tips for Serging with a Chain Stitch at https://overtheedge.blog/tutorials/tips-for-serging-with-a-chain-stitch/. In the tutorial I share tips on how to start and end a seam, how to secure the ends of the seam, and how to easily remove a chain stitched seam.

How to Serge a Quilt with a Chain Stitch

I hope you enjoyed learning about My Happy Place Quilt and how to serge a quilt with a serger chain stitch.

sere a quilt with a chain stitch
serging with jen

Resources

https://www.etsy.com/shop/studiojsewing?ref=seller-platform-mcnav&section_id=30533440 – My Happy Place Quilt Pattern.

https://www.christinacameli.com/product-page/e-book-wedge-quilt-workshop – Quilts that inspired me.

https://quiltsocial.com/a-quilt-block-of-wedges-tantalizes-the-senses-using-shimmer-and-toscan/ – Quilt that inspired me.

https://overtheedge.blog/tutorials/tips-for-serging-with-a-chain-stitch/ – My tips for serging with a chain stitch.

Theme: Overlay by Kaira Extra Text
Cape Town, South Africa