Month: June 2020

Serger Funsie Onesie

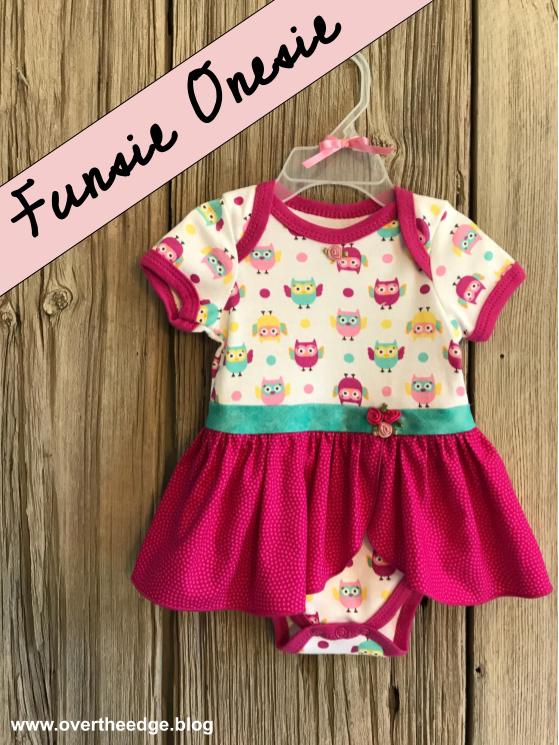
Transform an ordinary onesie into a super sweet outfit for a little baby girl! This Serger Funsie Onesie is fun to create using basic stitches on your serger. My niece is having a little baby girl and her nursery theme is owls. I found this cute little owl onesie and knew I could turn it into something special. I can’t wait until the baby is big enough to wear it!

The Funsie Onesie Pattern

The pattern for the Funsie Onesie came from the book, Simple Serging Sewing, edited by Julie Johnson.

simple serger sewing book

The Transformation from Onesie to Sweet Dress

I was amazed at how a few simple additions took this onesie from cute to amazing! Read along and observe the transformation.

Here’s my onesie, skirt fabric and waistband bias strip.

serger funsie onesie

Prepare Strip for Ruffled Skirt

Because my onesie was larger than the one in the pattern, I added 1” to the length of the ruffled skirt piece.

The instructions said to use a plate as a template for rounding the ends of the ruffle strip. I used the plate as a starting point, and then I drew in the rest of the curve in freehand. 

For this project I used a Babylock Imagine serger. I set my serger up for a 3 thread narrow hem to finish the bottom edge of my ruffled skirt. You could also use a 3 thread rolled hem if you like. I used Maxilock thread in a color that matched my fabric.

serger rolled hem

For helpful information on serging with a rolled hem, check out my tutorial on Quick and Easy Serger Napkins. https://overtheedge.blog/tutorials/quick-easy-serger-napkins/

Gather Skirt

To gather the ruffled skirt, I used my serger ruffling foot (the G foot for the Babylock Imagine) with a 4 thread overlock stitch. Even though you can use the foot to simultaneously create the ruffle and attach it, I chose to do it in two steps so I could adjust the ruffle to fit the onesie exactly. I set my differential feed to 2, my stitch length to 4 and my stitch width to M. The raw edge of the skirt was just skimmed by the blade as I serged. I also held my finger behind the foot to help it gather just a little bit more. 

If you don’t have a ruffling foot for your serger, you can still use your serger to gather. Follow your instruction manual for gathering. Usually gathering on a serger involves increasing the differential feed and stitch length (and increasing your needle tensions if you have a serger with tension dials.)

gathering with a serger ruffling foot

Here’s what my ruffled skirt piece looked like after gathering it with my serger.

gathering with a serger ruffling foot

Prepare Onesie

Determine where to cut your onesie. My onesie was a 6-9 month size. I cut it apart as stated in the pattern instructions. 

serger funsie onesie

Create Bias Waistband

Next I created the bias waistband strip. The bias fabric strip has a some stretch which makes it a little easier to dress the baby. The waistband also adds back in length that was lost in the seams from adding the skirt to the onesie. So your onesie length will still be the same size as when you started. I used a standard 4 thread overlock stitch with a stitch length of 2.5 to serge the ends of the waistband together.

Attach Waistband

I pinned the bias waistband strip to the top half of the onesie, and serged the seam with a standard 4 thread overlock stitch.

serger funsie onesie

Attach Skirt

My onesie waistband measured about 18” around, so I adjusted the gathers of my ruffle to equal 20” (18″ + 2″ for overlap.) My serger didn’t gather the fabric quite as much as I needed. So I adjusted the gathers by first separating the needle threads from the looper threads. And then I pulled on the needle threads and slid the fabric, just like I would using 2 rows of basting stitches on my sewing machine. I overlapped the ends of my ruffled skirt by 1” on each end. 

After adjusting the gathers, I pinned the ruffled skirt to the bottom of waistband, aligning the overlapped section of skirt slightly off center. I serged this skirt to the waistband using a standard 4 thread overlock with a stitch length of 2.5.

serger funsie onesie

Attach Bottom Half to Top Half

After attaching the skirt, the last step was to reattach the bottom half of the onesie. I pinned the onesie panties to the waistband/skirt section, making sure that the side seams of both onesie halves were aligned. To serge this seam, I increased my stitch width as wide as it would go (7.5) and used a stitch length of 2.5. I made this stitch wider than the stitching I used to gather the ruffle, so the gathering stitches on the skirt would not show on the right side of the garment.

serger funsie onesie

Add Finishing Touches

Even though the skirted onesie was adorable, I thought it needed just a little something more. So I hand stitched a few ribbon roses on the waistband and one at the center of the neckline.

serger funsie onesie

My Serger Funsie Onesie

My serger funsie onesie is finished and ready for a sweet baby girl to wear! I hope you enjoyed this post and are inspired to serge.

serger funsie onesie
serging with jen

Resources

Book – Simple Serger Sewing, published in 2009, but found online:

How to make bias strips: https://sew4home.com/how-to-make-your-own-continuous-bias-binding/

Quick video on using the ruffling foot to gather fabric:

Bind a Quilt with a Serger Double Fold Bias Binder

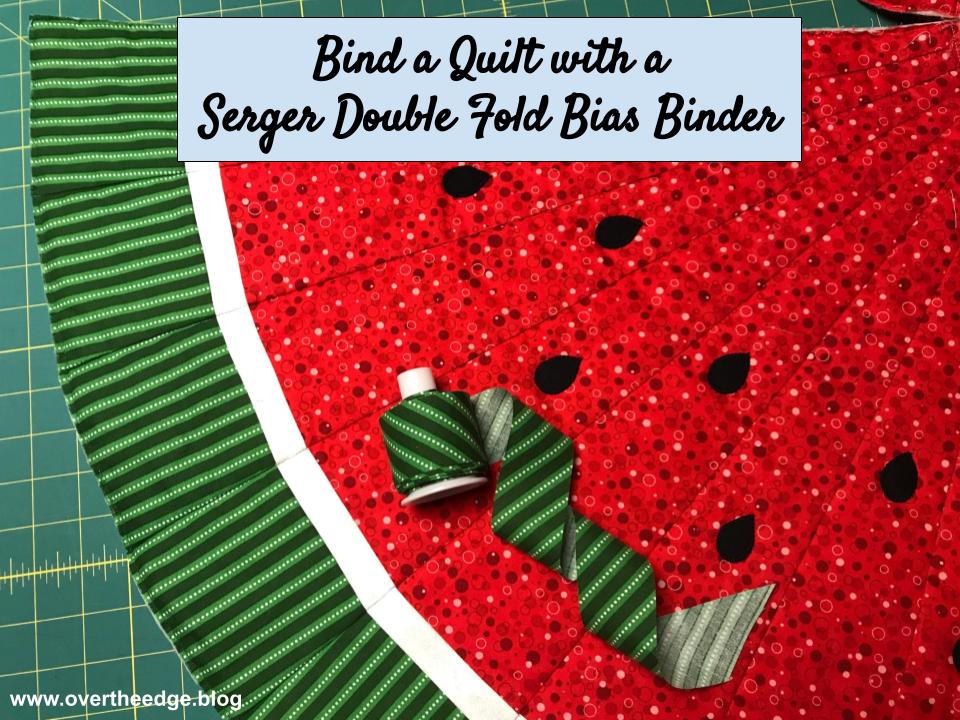
Would you like to learn how to bind a quilt using a serger double fold bias binder? If yes, then keep reading! Although I’ve found several videos and articles about the double fold bias binder and its potential as a tool, the internet seems to be lacking in resources about actual projects made using this attachment. So I thought I would try to fill the gaps by sharing my experiences using the attachment on some of my projects. 

bind a quilt with a serger double fold bias binder

The project featured in this post is my recently designed and completed Watermelon Patio Table Topper Quilt. It’s basically a christmas tree skirt with a summer twist! The opening in the quilt fits around my patio table umbrella. The topper adds a little fun to my outdoor summer dining. In the future I hope to create an actual pattern for my design, but for now I will share with you how I used the serger double fold bias binder attachment to finish the curved edges of the quilt

serger quilt binding

Traditional Double Fold Bias Tape

I love the look of traditional bias bound edges, but I am not always excited about applying folded bias tape using traditional methods. If you use pre-folded bias tape and just slide it over the edge of your project and stitch it down, you risk not catching it on the back side. Or you do catch the back side, but your stitches waver because you didn’t catch the bias tape evenly. And pre-made folded bias tape isn’t available in many colors or prints, so often it is hard to find one that matches your project. Sometimes I do make my own double fold bias tape to coordinate with a project, but I don’t enjoy spending all that time at my ironing board pressing the folds into my bias fabric strips.

Serger Applied Double Fold Bias Binding

Now that I’ve experienced using the double fold bias binder for my serger, I’m in love! The serger double fold bias binder attachment folds your bias fabric and attaches it all in one step, saving you time and giving you professional results. To use this attachment you need to make your own bias fabric strips. This does take a little time, but opens up so many creative possibilities because you are not limited to what is available commercially.

bind a quilt with a serger double fold bias binder

Getting Ready to Bind a Quilt with a Serger Double Fold Bias Binder 

Things you need to get started:

  • Serger, capable of chain stitch or cover stitch
  • Double fold bias binder attachment and attaching screws
  • Bias cut fabric strip
  • Quilt or project to bind
serger double fold bias binder

Things I’ve Learned About the Serger Double Fold Bias Binder

  • Practice. You will be guiding the project with your left hand and the bias fabric strip with your right. Grab some scraps and begin with straight edges. Once you’ve mastered the straight edge, experiment with some curves.  
  • Test your binder alignment and settings before jumping into the project. It’s no fun if you have to readjust after you start applying binding to your actual project.
  • Make sure you keep your project raw edge positioned against the folder. If it migrates away, you may not catch it in the binding.
  • Don’t be afraid to modify the width of your bias fabric strips slightly to achieve better results. I found that I had better results with 1½” bias strips on my project instead of the recommended 1⅜”.
  • You may need to change your needle positions for better results with the chain stitch. I found that using the left needle C1 worked much better for me than the right needle C3.
  • Tweezers are very useful at getting the bias fabric strip into the attachment and under the presser foot.
  • Make more bias fabric strips than you think you will need. That way you are ready if you have to do a lot of testing or make a mistake. If you have extra left over, you can always use it on another project or for more testing.
  • The fewer seams in your bias fabric strip, the better. The extra bulk in the seams can sometimes cause little fluctuations in your stitching.
  • You can’t miter corners with this method of applying binding. You must serge on at the beginning and serge off the end of each edge.
serger quilt binding

Full Tutorial and Video on How to use the Serger Double Fold Bias Binder

If you want all the details on how to use the serger double fold bias binder to bind a quilt or other project click on the link to read my full tutorial at:

I also created a video on how to use a serger double fold bias binder in case you prefer to watch the tool in action. Click on the link below to watch my bias binder video.

Other Examples of Projects with Serger Binding

The serger double fold bias binder attachment is not just for binding quilts.  I’ve used it on other projects such as aprons. The aprons below were bound using my serger and the double fold bias binder. 

Jen’s Basic Serger Bound Apron –  Isn’t this apron cute?! The binding, the ties and the flower on this apron were all done with this tool. Learn how to make this apron in a future project post on my blog.

serger double fold bias binder

Festive Holiday Apron – This apron was made from Simplicity pattern 8857. I adapted the instructions slightly so I could use my serger double fold bias binder attachment. All of the red binding on this apron was done with this tool. I was really happy with the results!

serger double fold bias binder

Until the Next Project…

I hope you enjoyed this post about how to bind a quilt using serger double fold bias binder. Hope to see you back at my blog soon!

serging with jen

Resources

https://www.allpeoplequilt.com/how-to-quilt/quilting-basics/machine-minute-evolution-serger-double-fold-bias-binder

Textured Chic Pillows

textured chic pillows

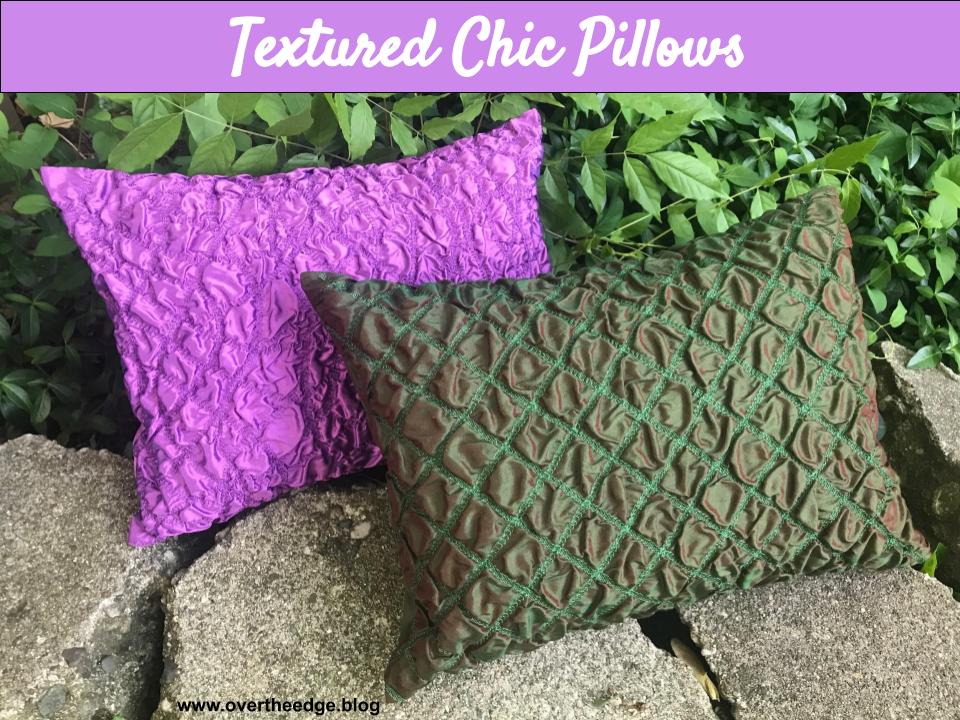
I always get excited when I get an opportunity to use the coverstitch on my serger for more than just hems on knits. Although these textured chic pillows may appear advanced, they were actually very easy to make on the serger using a narrow coverstitch and silk dupioni fabric. The secret to the texture is in the special shrinking fabric. I just love how the textured surface of the dupioni silk changes color with the light! 

The Book – Serger Boutique

Both of these pillows were based on projects in the book, Serger Boutique by Nancy Zieman and Barbara Goldkorn. I used the instructions from the Textured Chic Pillow project to construct my green pillow. I constructed my purple pillow using the instructions from the project, Randomly Stitched Texture Pillow.

serger boutique book

Texture Magic

The special shrinking fabric is a synthetic fabric that shrinks when it is steamed. There are two brands that I am familiar with – Texture Magic by Superior Threads and Fabric Magic by Pellon. Sew or serge it to the back of the fabric you want to texturize, apply steam and watch it magically transform. The package says it can shrink up to 30%. I think the amount of shrinkage is dependent on the fabric to which it is stitched.

Shrinkage Test

I wanted to see how much my silk dupioni would shrink, so I would know how much fabric I needed to make my pillows. For my test I started with a square of Texture Magic and of silk dupioni. I drew lines on the piece of Texture Magic and pinned it to my silk. I then stitched on the lines with a narrow coverstitch.  

texture magic and serger

Then came the fun part – the steam!  I hovered over the sample with my iron at full steam and watched the fabric shrink. The result of my test is shown in the photos below. My square started at 12.5” x 12.5” and it ended up at 10” x 11”. So my fabric shrank 12% in one direction and 20% in the other direction. My fabric didn’t shrink quite as much as the “up to 30%”, but the texture was still amazing.

Texture Magic
create texture with serger and texture magic

Embellish the Pillow Fabric

I began by drawing lines on the texture magic for where I wanted to stitch on the green pillow. For the purple pillow I didn’t need to draw the lines because I was stitching randomly. After finishing my lines, I pinned a piece of texture magic to the back side of each piece of dupioni.

I set up my serger for a narrow coverstitch with thread to coordinate with my fabric. I wanted the puffy texture to stand out and not the thread. Maxilock thread was used in the needles and Mettler embroidery thread was used in the chain looper.

So I could see the lines more easily, I used a clear foot, but a standard presser foot would also work. With the Texture Magic side up, I serged on the lines (or randomly) to stitch the Texture Magic to the silk.

create texture with serger and Texture Magic

I have a Babylock Evolution serger, and there is not very much room to the right of the needle. Because I was serging into the center of the fabric, I had to shift and maneuver the bulk of the fabric around the right side of the presser foot. If you have a coverstitch capable serger without a lot of “throat space” you will need to roll and fold your fabric to get it to fit through the machine. Those of you that have sergers like the Babylock Ovation or Babylock Triumph, you will have no problem serging into the center of large pieces of fabric.  

Following the instructions for the texture magic, I steamed the fabric to shrink it and here are close up photos of the resulting texture.

textured chic pillows by serger

Turn the Embellished Fabric into a Textured Chic Pillow

My finished pillows are 12” x 16” and completely made on the serger. I did not make the same size pillows as in the book, but I did follow the basic instructions. Because I wanted to remove my pillow forms for cleaning, I chose to make an overlap back for my pillows. I used a narrow coverstitch to make a 1” double fold hem on each side of the back opening. 

serger pillow project

After embellishing my fabric and doing the hems, I switched my serger to a 4 thread overlock to construct the pillow. While serging the pillow seams, I wrapped the corners to make perfect points on the right side of my pillow. There is no need to trim the extra fabric from the corners with this technique. For more information on how to wrap corners with a serger, check out my His & Hers Serger Pillowcases Tutorial. https://overtheedge.blog/tutorials/his-hers-serger-pillowcases-tutorial/

wrap corners with a serger
textured chic pillows

Textured Chic Pillows by Serger

I hope I inspired you to serge your own Textured Chic Pillows!

textured chic pillows
serging with jen

Resources

Serger Boutique – Book was published in 2012. Check your local sewing store, or check the internet, sites like ebay or amazon to get a copy.

Nancy Zieman’s blog about the book, Serger Boutique. http://www.nancyzieman.com/blog/sewing-with-nancy/how-to-use-a-serger/

Theme: Overlay by Kaira Extra Text
Cape Town, South Africa