Tag: overlock

Serge and Merge Quilts – Down the Pathway

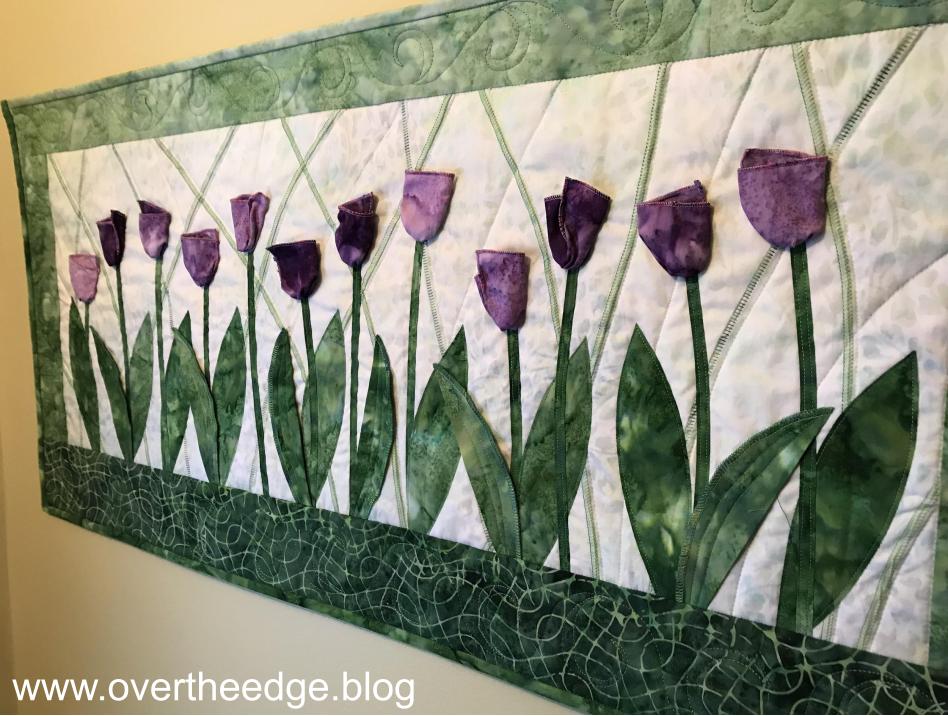
Down the Pathway is a project from the book, Serge and Merge Quilts, by Sharon V. Rotz. As she says in her intro to the project  “Have fun displaying your serging talents as you construct a tulip garden with dimensional flowers and leaves.” And I sure did! This quilt was fun to make!

I love my Down the Pathway quilt. It makes me happy! Every time I look at my quilt I think of a beautiful spring day. I serged it with a combination of flatlock, rolled hem and overlock stitches and merged it with traditional quilting on a sewing machine.

Fabric Prep

I chose an ombre purple batik fabric for my tulips and an ombre green batik for my stems, leaves and borders. The ombre fabrics gave me the perfect variety of colors for my tulips, greenery, borders and binding. The bottom border (or ground) was a coordinating green batik. I used a light green batik as the background (sky). The photo shows how I fussy cut my leaves, stems, borders and binding from the green ombre batik.

Create Background

The first step I took in creating the background of this quilt was to serge my “stems” using a flatlock stitch on the fold of the fabric. I serged some stems with the ladder side up and some with the loop side up. I used a variegated Madeira Polyneon thread for my flatlock stitches.

Flatlocking on the fold is a little different than flatlock piecing. By folding the fabric you can place the flatlock stitch in the center of the fabric rather than only on the edge. When you flatlock on the fold, you serge with the loops hanging half off of the fabric, which allows your fabric to lay flat when the stitch is pulled open. I recommend you practice flatlocking on the fold before you begin this part of your project. It takes a little more skill to get a nice even stitch than does flatlock piecing. Flatlock piecing is used to join two pieces of fabric and it is placed on the edge of the fabric. Sharon provides some information about flatlocking on page 16 of her book.

After finishing the flatlock “stems” I added the top and side borders. I did not miter my borders as is instructed in the book. Using a sewing machine, I quilted this piece to the batting/backing along each of the flatlock stems.

Create Tulips

I serged the edges of the tulips using a 3 thread rolled hem stitch with Madeira Polyneon embroidery thread in the upper looper. To create the three dimensional tulips, I gathered the bottoms by hand with a running stitch and a strong thread .

Layout, Fuse and Quilt Greenery and Attach Tulips

After laying out my stems and leaves in a pleasing arrangement, I fused them down with an iron and pressing sheet. The pressing sheet both protected my iron from the fusible web and my thread from the heat of the iron. After fusing, I stitched down the raw edges of the stems and leaves using a sewing machine. I left some leaves 3 dimensional, as it says in book. After finishing the leaves and stems, I hand stitched a tulip at the top of each stem.

Add Bottom Border

I added the bottom border after the tulips and greenery were attached to the batting and backing.

Machine Quilt Borders

I used a swirly leaf pattern for the free motion machine quilting of my borders, as you can see from the back side of my quilt in the photo below. 

Add Binding and Finish

I used my rotary cutter and a ruler to trim and square my quilt sandwich before adding binding. 

I chose to use two different parts of the green ombre batik fabric for my binding. The light colored green was the perfect choice for the top and right edge binding. And I used the darker green for left and bottom binding.

To finish the quilt, I added a hanging sleeve, which you can see pinned on the right side of the photo. 

All done!

serge and merge

Down the Pathway Details

I included a few close up photos of the tulips, leaves and background flatlock stitching so you can better see the details.

Down the Pathway Class

I taught this as a class at my local fabric store. The class covered only the serger portion of the project (flatlocking, overlocking and rolled hem). Students did the rest on their own at home. A few of the students allowed me to share photos of their Down the Pathway quilts. Aren’t they beautiful. Spring is in the air!

A Few Final Words

It’s never too late to change something. After I finished the quilt, I stepped back to admire it from a distance. Everything looked great except one area of the background. My eyes kept being drawn to an area of the background that was a too dense with flatlock stems. I ended up removing one stem of flatlock stitches, and now I think it’s perfect!  Can you spot the change?

serge and merge quilts

Serge and Merge Quilts – Down the Pathway

The book, Serge & Merge Quilts was published back in 2009. After eleven years, it may be unavailable from your local store. If you can’t find a copy at the store, try the internet.

In case you would like to learn more about the author and Serge and Merge Quilts – Down the Pathway, here is a link to Sharon’s blog post. http://sharonrotz.blogspot.com/2013/04/tulips-springing-up.html

The Down the Pathway quilt is just one of several projects I have completed from Sharon’s book, which I will share with you in the future.  I hope you enjoyed this post!

Serger Roses

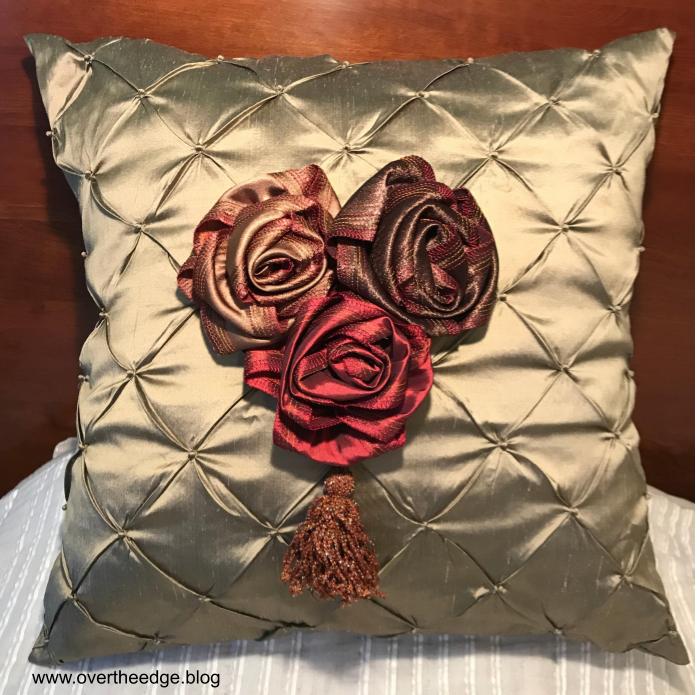
I love making fabric flowers, especially when I can use my serger! Serger roses are just gorgeous when you begin with a beautiful satin fabric and some fun decorative thread. A typical way to finish the raw edges of the satin with a serger would be to use the 3 thread rolled hem or the 3 or 4 thread overlock stitch, which would work well. However, for these roses I chose to use the 8 thread stitch on my Babylock Evolution to really emphasize the edges of my rose petals.

How to Make a Serger Rose

Here is what you need to make a serger rose like mine:

  • 3″ wide by 58″ long strip of satin fabric
  • 8 spools of machine embroidery thread (or as needed for your desired stitch)
  • 3″ square of felt for the backing
  • heavy duty hand sewing thread for finishing the rose
  • hand sewing needle
  • 2″x44″ long strip of poster board to use a folding template
  • iron and ironing board
  • serger, set up for an 8 thread stitch (or your desired stitch)
  • a few wonder clips
  • hot glue gun and glue sticks

Step 1: Serge

Begin by serging both raw edges of the fabric strip from the right side. Trim off just a little of the raw edge with your blade so you have a nice neat edge to your rose.

Step 2: Fold Strip Around Template

Draw a 45 degree line near both ends of your poster board strip, and one near the center. These lines serve as guidelines to help you fold your strip at the proper angle to create your rose “petals”. With right side showing, begin at one end and wrap your fabric strip around the template until you have wrapped it all. You can use a wonder clip to hold the ends and keep the strip from slipping off the template. See photo below.

Step 3: Press Folded Strip and Remove from Template

Press one or both long sides of your folded strip while still on your poster board template. If you would like a crisp edged rose, press both sides. If you would like a softer edged rose, press only one long side. After strip has cooled, carefully slide out the poster board template, and orient the folds of the strip just like they looked with the template inside. See photo below.

Step 4: Gather Strip and Form Rose

Thread a hand sewing needle with heavy duty thread. Sew a running stitch along one long edge and up one short edge at the end of the strip. Gather up your rose as desired. I gathered my fabric strips to about 12” long and then formed the rose by wrapping the gathered strip around itself. After each turn I took a stitch to tack the layers together. I made a base for my rose from a piece of felt and I used hot glue to secure it. Cut the base large enough to cover your tacking stitches, but small enough not to be seen from the front of the rose.

Step 5: Add to a Project and Enjoy!

A serger rose would look equally beautiful on a garment, bag or home decor item.  I choose to create a gorgeous pillow from this textured silk fabric to showcase my roses. And yes, in case you are wondering, I used my serger to make the both the pillow cover and the tassel.

Resources

I was inspired to make serger roses by the book, Fun-to-Wear Fabric Flowers, by Elizabeth Helene Searle. My method is very similar to the one used in her book on page 57 to create the “grey folded rose”. Instead of using a piece of fabric with the raw edges folded in, I used my serger to embellish the edges with thread. And instead of free-hand folding the strip into 45 degree folds, I created my own folding template to make this task much easier.

Cozy Sweater Shirt – 100% Serger Made

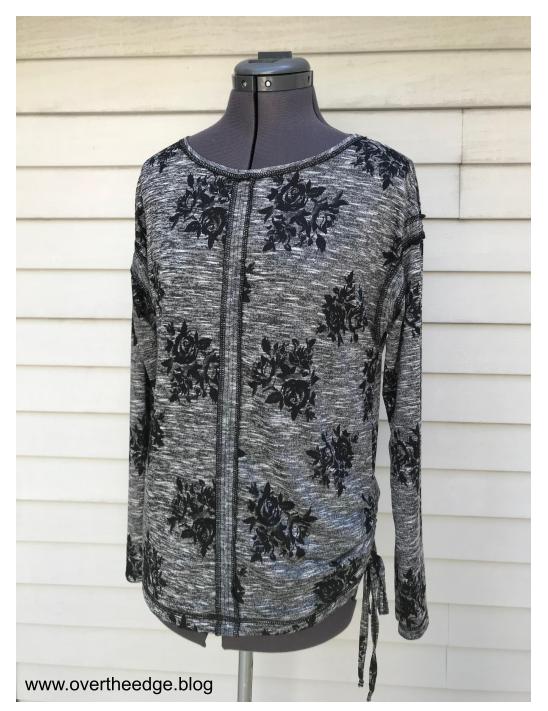
I introduce to you, the cozy sweater shirt – 100% serger made – no sewing machine required. 

Because I love my serger, I am always looking for more ways to use it.  I wanted to make a top that could be completely constructed on my serger without the use of a sewing machine. When I saw Simplicity 8988, I knew that this pattern would be a great starting point for my cozy sweater shirt. The exposed seams down the center front and back were perfect for showcasing serger stitching with decorative thread.

How I Changed the Pattern to Serge my Cozy Sweater Shirt:

Simplicity 8988 was written for a sewing machine, but I easily adapted it for serger construction and embellishment utilizing both overlock and cover stitches. If your serger is not capable of chain stitch or cover stitch you could still make this cozy sweater shirt. You would just need to substitute your sewing machine for the steps that include chain stitch or cover stitch.

To adapt a pattern for serging, all you need to do is to group similar stitch types as much as possible. Most sewing patterns are not optimized for serger construction. If you follow the pattern as written, you will find yourself converting back and forth between serger stitches. For some sergers, this conversion can be a time consuming process. I feel very fortunate to own a Babylock Evolution serger because converting between stitch types is easy!

Four Thread Overlock:

I began by grouping all of the 4 thread overlock operations together. I serge finished the raw edges of the exposed seams and neck edges with decorative Madeira Lana thread.  The shoulder seams and the raw edges of the interior seams were serged with Maxilock Stretch thread. 

Chain Stitch:

Next I converted my serger to the chain stitch to sew the center front and back seams and the upper sleeve seams.

Wide Cover Stitch:

Then I switched to a wide cover stitch and stitched down the center of the exposed front and back seams and the upper sleeve seams.  The cover stitch helps to keep the seams partially open during wearing so the cool serger stitching always shows.

The wide cover stitch was also used for the bottom hem and the sleeve hems. I turned the hems to the inside and serged so that the looper thread showed on the right side of the top. These hems were finished before closing the side seams. It is much easier to cover stitch flat than in the round.

The belt loop binder attachment along with the wide cover stitch was used to make the ties.

Chain Stitch:

The last serger conversion was back to the chain stitch to sew up the side seams, finish the neck hem, and make the channels for the ties.  After inserting the ties, my cozy sweater shirt was ready to wear!

I hope this post inspired you to serge!

Theme: Overlay by Kaira Extra Text
Cape Town, South Africa