Tag: serger pattern

My Fun and Festive Gather Together Serger Apron

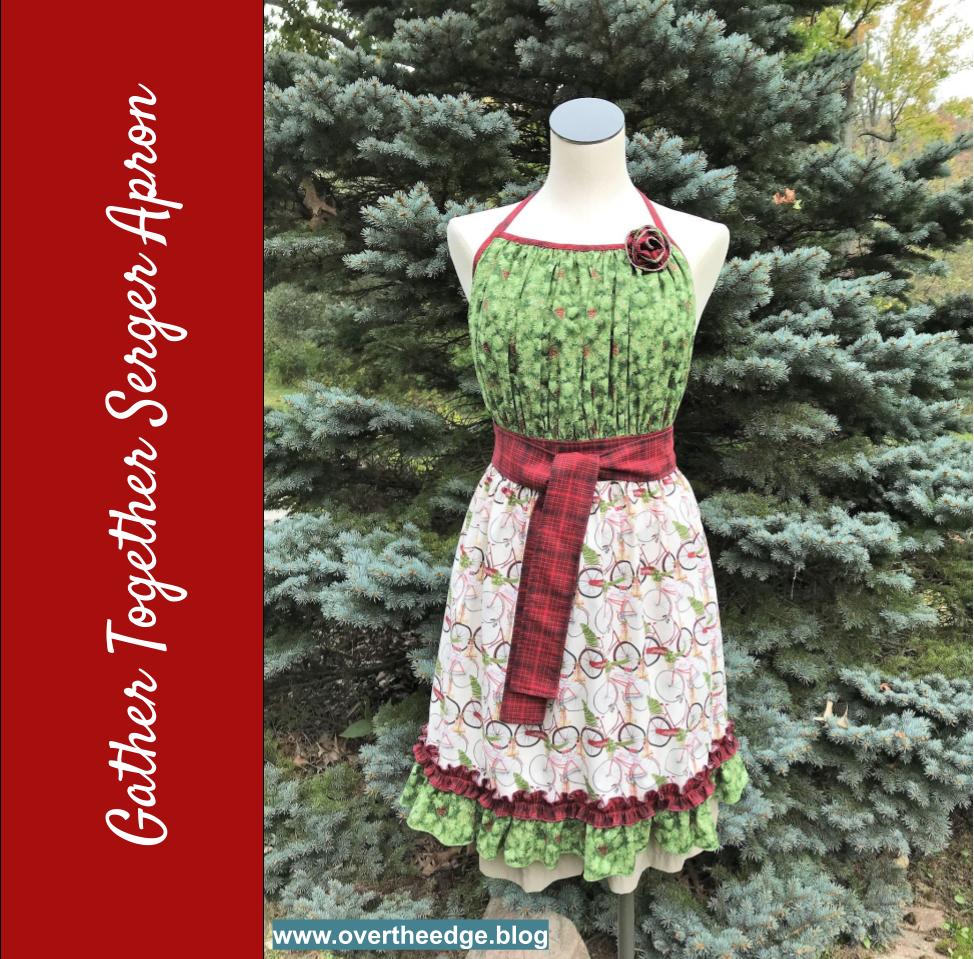
Every year my fellow employees and I sew up holiday aprons to display in the store. For my 2021 holiday apron I made the Gather Together Serger Apron by Baby Lock.

The Gather Together Serger Apron pattern was based on a sewing pattern by Pat Bravo of Art Gallery Fabrics, which was adapted for serger construction. See links to both apron patterns in the Resources section of this post. 

How I Used My Serger

I serged the entire apron using only my Baby Lock Evolution serger. It’s a great apron pattern to try making with your serger. You can use your serger to make as little or as much of the apron as you like.

Edge Finishes

I used a variety of edge finishes to complete this apron, which utilized different stitches and/or attachments.

  • Overlock stitch to keep raw edges from unravelling
  • Rolled hem stitch for ruffles
  • Wave stitch for fabric flower
  • Hem sides of apron with ¼” plain hemmer attachment and chain stitch
  • Encase edges of bodice and make neck straps with a double fold bias binder and chain stitch

Gathering and Ruffles

I gathered the ruffles using two different techniques.

  • Four thread overlock technique which makes adjustable gathers, similar to a double row of basting stitches using a sewing machine. This technique is perfect for gathering fabric where you need to adjust the gathers to fit.
  • Narrow cover stitch technique which makes permanent gathers. The gathers created by the cover stitch are much fuller than those created by an overlock stitch. However, they can not be adjusted.
  • Long stitch lengths and differential feed are used in both gathering techniques. 

Seams and Construction

I serged all seams using a chain stitch.

Feet and Attachments

I used the following feet and attachments to construct the Gather Together Serger Apron:

  • Double fold bias binder 36mm
  • Plain hemmer ¼”
  • Cover/chain stitch foot
  • Clear foot. The pattern did not call for this foot, but I like it’s visibilty. I thought the visibility of the foot made it easier for me to attach the double fold bias binding to the apron bodice.
  • Standard foot

Photo Overview of my Gather Together Serger Apron

Wave Stitch

I used the wave stitch to finish the edges of the fabric flower. Metallic thread in both loopers gave the edges a bit of holiday sparkle. If your serger isn’t capable of the wave stitch you could substitute a rolled hem or three thread overlock stitch.

gather together serger apron

Three Thread Rolled Hem

I used a three thread rolled hem to finish the edges of the ruffles, with metallic thread in the upper looper.

gather together serger apron

Gathering The Bodice

The bodice of the apron was gathered using a four thread overlock stitch. After gathering with my serger, the bodice still needed a bit more gathering. Gathers created with the four thread overlock are adjustable. So I slid the fabrics along the needle threads adjusting the bodice edges to the proper dimensions. See link about gathering in the Resources section of this post.

gather together serger apron

Hem Sides of Skirt with ¼” Plain Hemmer Attachment

I love to try new things with my serger. Using the serger plain hemmer was a new experience for me. I hemmed the side edges of the apron’s skirt using the ¼” plain hemmer, a chain stitch and a standard presser foot. My practice piece turned out perfectly. It must have been beginner’s luck because the first hem on the actual project took me three tries to get it right. I figured out that I needed to generously turn/roll the edge of the fabric in advance and keep it turned as I fed it into the attachment. Then the plain hemmer worked really well. The second side hem of the apron looked beautiful on the first try! See the link in the Resources section for tips for using a serger ¼” plain hemmer.

The plain hemmer rolls the hem to the top side as it is serged. So you feed your fabric into the attachment with the wrong side up. The needle thread will be seen on the back side of your finished project. The chain looper thread will be seen on the right side of your project.

gather together serger apron

Finish Edges of Bodice and Create Straps Using a Double Fold Bias Binder Attachment

I followed the video class/instructions to make the apron. However, instead of making the top edge and neck straps all one piece, I bound the top edge first. Then I bound the side edges of the bodice and continued the binding from the sides to make the neck straps.

gather together serger apron

Gathering Ruffles Using a Narrow Cover Stitch

I used a narrow cover stitch along with the cover stitch foot to gather the narrow ruffle strip, bottom ruffle skirt and flower. The narrow cover stitch gathers fabric much more tightly than gathering with an overlock stitch. But the cover stitch gathers are not adjustable like the gathers made by serger overlock stitching.

gather together serger apron

Construct Seams

I used the chain stitch to serge the seams of the bodice, skirt and waistband/ties. Serging with a chain stitch is very similar to using a sewing machine straight stitch.

gather together serger apron

I attached the narrow ruffle and bottom ruffle to the skirt of the apron using a chain stitch too.

gather together serger apron

Gather Together Serger Apron

I hope you enjoyed learning about how I serged my Gather Together Serger Apron.

serging with jen
gather together serger apron

Resources

Using a Serger Plain Hemmer Attachment https://overtheedge.blog/tutorials/serger-plain-hemmer-attachment/

Tips for Using a Serger Double Fold Bias Binder Attachment https://overtheedge.blog/tutorials/serger-double-fold-bias-binder-tutorial/

Gathering Fabric Using a Serger Overlock Stitch https://overtheedge.blog/tutorials/how-to-gather-fabric-using-a-serger-overlock-stitch/

Links to apron patterns:

Find the serger version – Gather Together Serger Apron by Pam Mahshie of Baby Lock at www.sewedclasses.com

Find the free sewing version of the pattern at: http://www.patbravo.com/freeprojects/sewing/Spiceitup-1.pdf

gather together serger apron

Make a Serger Charm Table Runner

serger charm table runner

Serger Charm Table Runner

I finally completed the official pattern for my Serger Charm Table Runner design. It’s hard to believe that six years have passed since I first taught this design in a serger class. It’s time to get charmed by a serger!

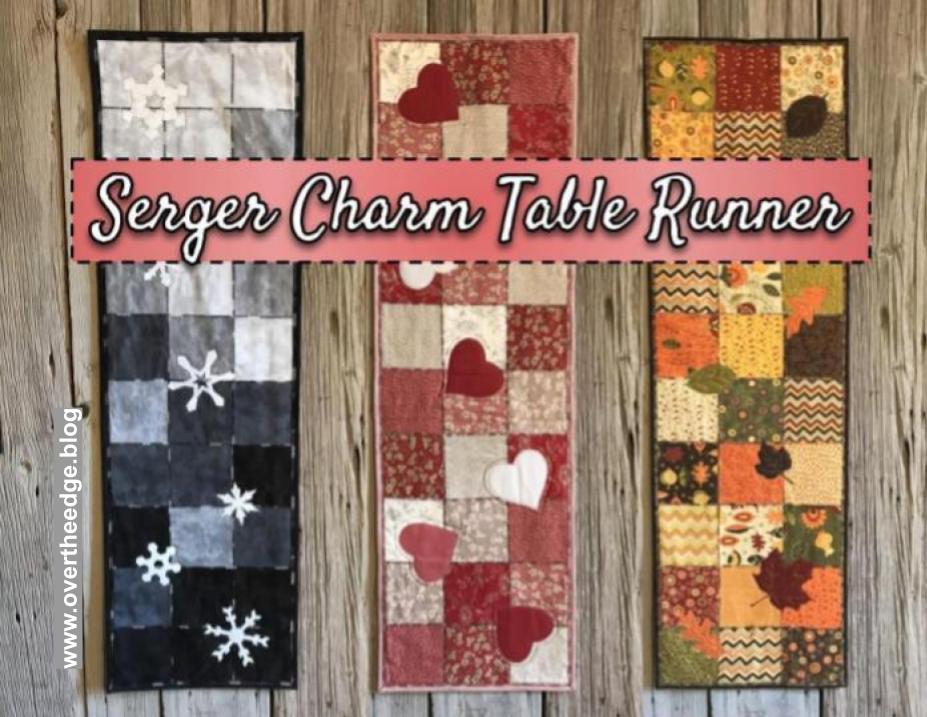
My serger charm table runner quilt is made from charm squares that are pieced together with a serger flatlock stitch. It even has overlock embellished binding. I included all three layouts and applique shapes in the pattern: Winter Skies, Hearts a Flutter and Falling Leaves. And of course, the step by step instructions have lots of diagrams and photographs. Keep reading to learn all about the table runners I made as samples for my pattern.

The Flatlock Stitch and Piecing a Quilt

There are many different ways to use a flatlock stitch. Most involve serging with part of the loops hanging off the edge of the fabric. You need a steady hand (or a special presser foot) and a little practice to get it just right. But with flatlock piecing you don’t need a special foot. Your standard presser foot will work just fine. You guide the raw edges of your fabric next to your blade, and just trim off the stray threads. So the entire stitch lays on the fabric with no overhanging loops.

Flatlock piecing is a great introduction to using a flatlock stitch. For more information visit my tutorial, Master the Three Thread Flatlock Stitch for Quilt Piecing at https://overtheedge.blog/tutorials/master-the-three-thread-flatlock-stitch-for-quilt-piecing/

Fabric Charm Squares

Charm squares are 5” squares that are cut from a collection of cotton quilting fabric and sold in packages. There are typically 40-42 squares per pack, but the number can vary. I used one package of charm squares for each of my table runners. 

  • Winter Skies – I used a Northcott Toscana Evening Shadow Chip Pack
  • Hearts a Flutter – I used a Moda French General Favorites Charm Pack
  • Falling Leaves – I used a Moda Hello Fall by Sandy Gervais Charm Pack

Both the background squares and the applique squares in my table runners came from the charm packs. The Northcott Toscana charm pack had 5 colors in it with multiples of each fabric. The Moda Hello Fall charm pack had very few repeats. The Moda French General Favorites charm pack had some repeats. You can always add in some applique fabric from your stash if the charm pack doesn’t have the solids or blenders you need for the appliques. I was lucky because the charm packs I chose had just the right amount of blenders for appliques. Or you could always cut your own collection of 5” squares for this table runner.

Quilt Top

The table runners were pieced together using flatlock stitch. I love the look of the flatlock stitches in decorative quilts where the thread can be a focal point. And I love the way it looks with variegated thread. It really adds interest to a quilt. I’ve used both 30 wt and 40 wt variegated cotton threads by Sulky and YLI. The squares with the flatlocked seams look great as a background for applique.  

Applique

I had fun designing the applique shapes for this pattern. Real tree leaves were the inspiration for my Falling Leaves table runner. It’s amazing what you can do with real leaves and a copy machine! I learned how to make my own six sided paper snowflakes and picked my favorites to add to my Winter Skies table runner. For the Hearts a Flutter table runner I cut out several different paper hearts from folded paper and tested them on the runner before choosing my favorite. 

I used the raw edge applique technique to apply my shapes using a sewing machine. But other forms of applique would also work. If you have a serger with a large throat space you could applique with the chain stitch. You could even machine embroider some of your favorite applique designs on your table runner. 

serger charm table runner

Batting

Choose your favorite. I’ve made mine with thin fusible fleece, cotton quilt batting, and flannel. I like them all, but each is a little different. Flannel is the thinnest. Fusible fleece was a little more “stiff” and cotton quilt batting was the fluffiest. I think the fusible fleece fused to the back side of the quilt top fabric helps to hold the fabric and flatlock stitches in place, but I’ve had good success with all of these battings. 

Quilting

You can quilt this table runner with as little or as much quilting as you like, based on your selected batting. Some battings require quilting stitches every 3-4” or some like flannel can be quilted 8-10” apart. My table runners are decorations and are spot cleaned as needed (rarely), so quilting distances are not that important. I did minimal quilting on my table runners so that my variegated thread and flatlock stitches would stand out and be a focal point of the quilts. I quilted my table runners using both a sewing machine and a hand sewing needle.

serger charm table runner

Binding

Although any method of binding would work for this table runner, I chose to embellish my binding with a three thread overlock stitch. The serger stitches on the binding really help tie together the quilt with the flatlock stitching around the squares. I attached and top stitched the binding to these table runners using a sewing machine, but a serger using a 4 thread overlock and/or a chain stitch would work as well.

serger charm table runner

Other Ways to Use a Serger for this Project

You can serge a table runner just like mine using the instructions in the pattern. A standard serger capable of a three thread flatlock stitch and a sewing machine are all you need.

Would you like to get more creative with your serger? Here are a few additional ways to use your serger that are not included in the pattern:

  • Use a rolled hem on the binding instead of an overlock
  • Attach the binding with a four thread overlock stitch or a chain stitch
  • Use a chain stitch to top stitch the binding
  • Stitch your applique using a chain stitch

For tips about quilting with a chain stitch, see my blog post “How to Serge a Quilt with a Chain Stitch” at https://overtheedge.blog/how-to-serge-a-quilt-with-a-chain-stitch/ and my tutorial “Tips for Serging with a Chain Stitch” at https://overtheedge.blog/tutorials/tips-for-serging-with-a-chain-stitch/.

Get Charmed by a Serger Today!

If you’d like to try making the Serger Charm Table Runner be sure to visit my etsy shop and get your own copy of my pattern. Use the coupon code SERGERCHARMNOV2021, which will give you a 20% discount on this pattern through November 30, 2021. Click on this link to take you directly to the pattern section of my shop. https://www.etsy.com/shop/studiojsewing?coupon=SERGERCHARMNOV2021

I hope you enjoyed learning about the making of my serger charm table runners. 

serging with jen

Resources 

Tutorial – Master the Three Thread Flatlock Stitch for Quilt Piecing https://overtheedge.blog/tutorials/master-the-three-thread-flatlock-stitch-for-quilt-piecing/

Serger Charm Table Runner Patterns https://www.etsy.com/shop/studiojsewing

Scrappy Fabric Pumpkins Make Perfect Fall Decor

I’m very excited to announce that I have released my first “official” serger sewing pattern, Scrappy Fabric Pumpkins. I originally created this design for a class I taught a few years ago. But now as the leaves begin to change colors, I thought it was the perfect time to update my pattern and make it available to you.

Learn to do More with your Serger

If you’ve taken a serger class with me, you know it is not unusual for me to create my own projects to teach. My goal is to create projects that inspire people to want to use their sergers for more than finishing raw edges or creating samples of techniques for a notebook.

Finishing raw edges cleanly with a serger is a great use of the serger. And technique notebooks are important for understanding the potential uses of your serger. But many people never take the next step when it comes to learning their serger. It would be like making a sample of all the stitches your sewing machine can do, but never using the sewing machine to create a project. Maybe one reason this happens is because patterns written specifically for sergers are not nearly as abundant in the marketplace as patterns written for sewing machines. I’m hoping to change that, one serger pattern at a time!

On my blog I have shared a lot of free content and I will continue to do so. However, there are expenses associated with maintaining a blog, and it is my hope that selling patterns written for sergers will generate enough income to cover those expenses and allow me to continue to inspire others to serge. Thanks for your support!

The Scrappy Fabric Pumpkins Pattern

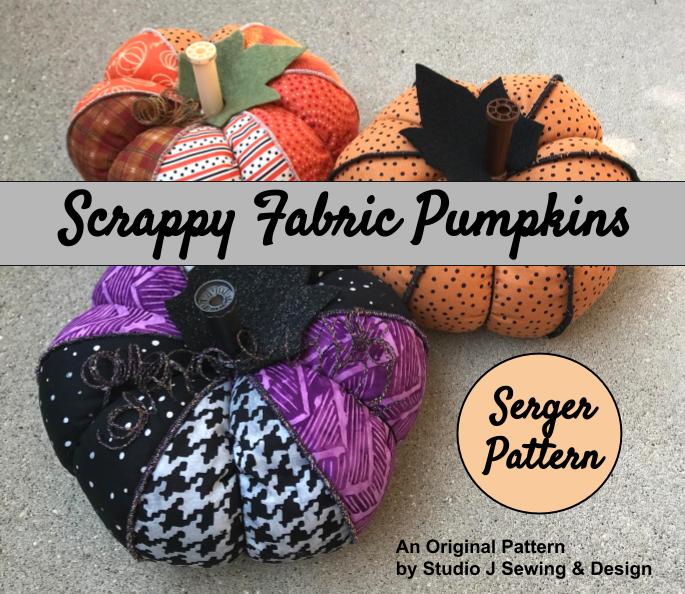
Serge a scrappy fabric pumpkin for fall and learn to use a serger rolled hem stitch for more than napkins, ruffles and scarves. Not only can you create fun decorations for your home, but you can improve your serging skills. Scrappy serger pumpkins are so cute you won’t be able to make just one! Even the tendrils are made with the serger. An empty skinny thread spool makes a great stem. I’ve included lots of color photographs to help you out every step of the way. Happy Fall! 

Follow the link below to take you to the Pattern Section of my Etsy shop – Studio J Sewing. This pattern is available as a PDF file digital download. You can begin serging pumpkins as soon as you checkout!

Purchase the serger sewing pattern, Scrappy Fabric Pumpkins, before October 31, 2020 and save 30% using Etsy coupon code SAVE30PATTERN during checkout.

https://www.etsy.com/shop/studiojsewing?ref=seller-platform-mcnav&section_id=30533440

I’d love to see the finished scrappy fabric pumpkins you made with your sergers! Please share your photos via email to jennifer@overtheedge.blog.

serging with jen

Decorative Serged Seams

Adding decorative serged seams to your garments is as easy as serging a seam. Just use pretty thread and serge your pattern pieces wrong sides together so the serged seams become exposed on the right side of the garment!

In recent years the inside-out look has become popular. Exposed serged seams can be found in many ready to wear garments. It’s fun to duplicate that look in garments you make yourself.

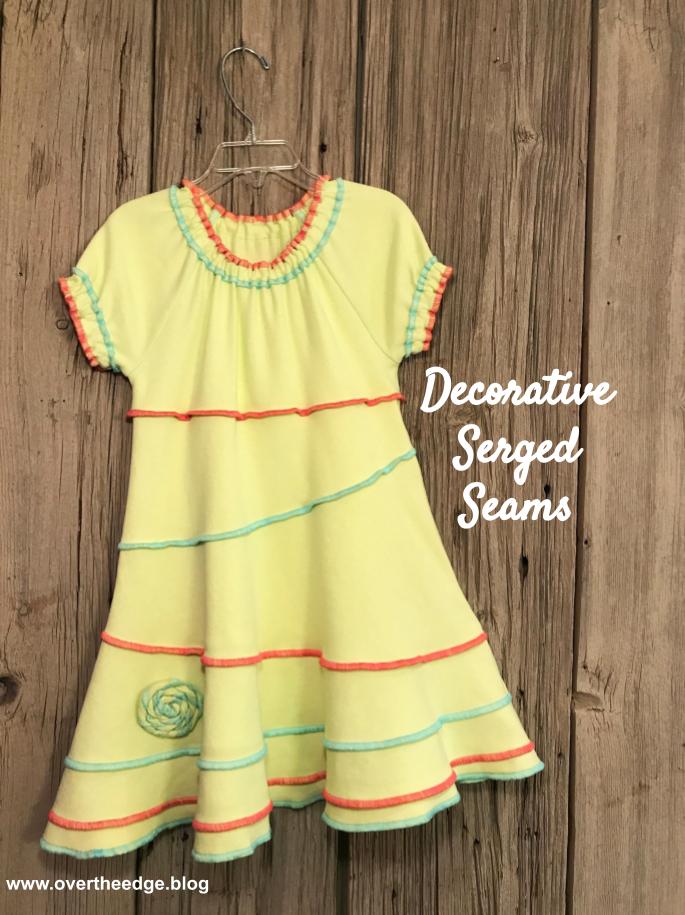
I made this cute little girl’s dress with a basic serger, long before I had my Babylock Evolution. The dress was made with a soft cotton interlock knit, a wide three thread overlock stitch and Maxi Lock serger thread. The flared skirt panels are very twirly, perfect for the little girl who likes to twirl! This project is proof that you can make great garments with a basic serger. (However it does take a little more work and time because you have to do more testing of your stitches and spend more time threading.)

The Dress – Kwik Sew Pattern K3944

kwik sew k3944

I made this cute dress many years ago, and so the pattern is now out of print. But I searched the internet and found it still for sale on various sites like Etsy. What I liked about this Kwik Sew pattern (besides the cute dress) was that the instructions were written for a serger.  As you can see from the pattern envelope, I pretty much made view A exactly as pictured – similar yellowish green fabric, and pink and blue thread. I used a 3 thread wide overlock stitch for all the exposed and internal seams. The sewing machine was only used for top-stitching the elastic casing on the sleeves and neckline. And I did design my own flower for the skirt, instead of making the one included with the pattern. 

decorative serged seams

Here are a few closeup photos of the stitching. 

decorative serged seam
Neckline Casing
inside Seams
Sleeve Casing
decorative serged seams
Exposed Serged Seams on Skirt

Notes on Construction

I changed the order of construction to minimize changeovers between the pink and blue thread. I used a shorter than normal stitch length on the exposed seams, making the serger thread more visible. At the time I made this dress I didn’t have any thick decorative thread, so I just used standard serger thread. I did some testing on scraps to determine the best combination of fabric, stitch and thread before beginning the project.

My Flower

I took a long strip of knit and serged both long raw edges with a 3 thread overlock. Then I twisted the strip like you would twist streamer decorations for a party. Then I coiled the strip and glued a piece of fabric to the back to hold it together. I safety pinned it to the dress so it could be removed for washing.

serger fabric flower

Adding Decorative Serged Seams to Your Garments

I hope you enjoyed my post about adding decorative serged seams to your garments. For another example of decorative serged seams check out my Cozy Sweater Shirt post link below. 

Resources

Kwik Sew has several patterns in its current collection called “Kwik Serge.” These patterns were written for use with a serger. Here is the link:  https://mccall.com/kwik-sew/collections/kwik-serge/

serging with jen

Cozy Sweater Shirt – 100% Serger Made

I introduce to you, the cozy sweater shirt – 100% serger made – no sewing machine required. 

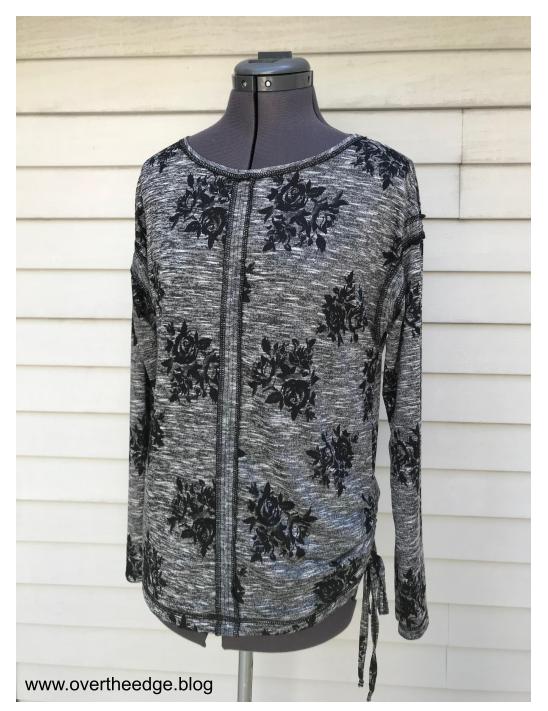
Because I love my serger, I am always looking for more ways to use it.  I wanted to make a top that could be completely constructed on my serger without the use of a sewing machine. When I saw Simplicity 8988, I knew that this pattern would be a great starting point for my cozy sweater shirt. The exposed seams down the center front and back were perfect for showcasing serger stitching with decorative thread.

How I Changed the Pattern to Serge my Cozy Sweater Shirt:

Simplicity 8988 was written for a sewing machine, but I easily adapted it for serger construction and embellishment utilizing both overlock and cover stitches. If your serger is not capable of chain stitch or cover stitch you could still make this cozy sweater shirt. You would just need to substitute your sewing machine for the steps that include chain stitch or cover stitch.

To adapt a pattern for serging, all you need to do is to group similar stitch types as much as possible. Most sewing patterns are not optimized for serger construction. If you follow the pattern as written, you will find yourself converting back and forth between serger stitches. For some sergers, this conversion can be a time consuming process. I feel very fortunate to own a Babylock Evolution serger because converting between stitch types is easy!

Four Thread Overlock:

I began by grouping all of the 4 thread overlock operations together. I serge finished the raw edges of the exposed seams and neck edges with decorative Madeira Lana thread.  The shoulder seams and the raw edges of the interior seams were serged with Maxilock Stretch thread. 

Chain Stitch:

Next I converted my serger to the chain stitch to sew the center front and back seams and the upper sleeve seams.

Wide Cover Stitch:

Then I switched to a wide cover stitch and stitched down the center of the exposed front and back seams and the upper sleeve seams.  The cover stitch helps to keep the seams partially open during wearing so the cool serger stitching always shows.

The wide cover stitch was also used for the bottom hem and the sleeve hems. I turned the hems to the inside and serged so that the looper thread showed on the right side of the top. These hems were finished before closing the side seams. It is much easier to cover stitch flat than in the round.

The belt loop binder attachment along with the wide cover stitch was used to make the ties.

Chain Stitch:

The last serger conversion was back to the chain stitch to sew up the side seams, finish the neck hem, and make the channels for the ties.  After inserting the ties, my cozy sweater shirt was ready to wear!

I hope this post inspired you to serge!

Theme: Overlay by Kaira Extra Text
Cape Town, South Africa