Tag: cover stitch

My Fun and Festive Gather Together Serger Apron

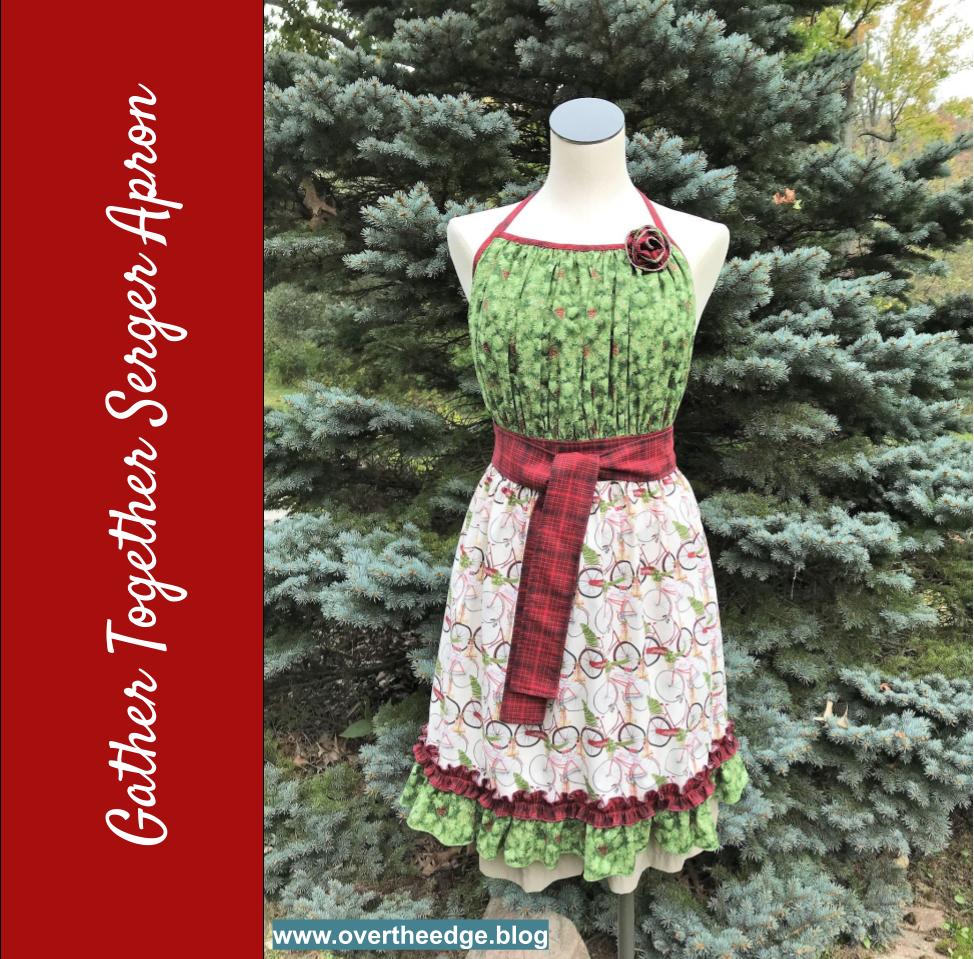
Every year my fellow employees and I sew up holiday aprons to display in the store. For my 2021 holiday apron I made the Gather Together Serger Apron by Baby Lock.

The Gather Together Serger Apron pattern was based on a sewing pattern by Pat Bravo of Art Gallery Fabrics, which was adapted for serger construction. See links to both apron patterns in the Resources section of this post. 

How I Used My Serger

I serged the entire apron using only my Baby Lock Evolution serger. It’s a great apron pattern to try making with your serger. You can use your serger to make as little or as much of the apron as you like.

Edge Finishes

I used a variety of edge finishes to complete this apron, which utilized different stitches and/or attachments.

  • Overlock stitch to keep raw edges from unravelling
  • Rolled hem stitch for ruffles
  • Wave stitch for fabric flower
  • Hem sides of apron with ¼” plain hemmer attachment and chain stitch
  • Encase edges of bodice and make neck straps with a double fold bias binder and chain stitch

Gathering and Ruffles

I gathered the ruffles using two different techniques.

  • Four thread overlock technique which makes adjustable gathers, similar to a double row of basting stitches using a sewing machine. This technique is perfect for gathering fabric where you need to adjust the gathers to fit.
  • Narrow cover stitch technique which makes permanent gathers. The gathers created by the cover stitch are much fuller than those created by an overlock stitch. However, they can not be adjusted.
  • Long stitch lengths and differential feed are used in both gathering techniques. 

Seams and Construction

I serged all seams using a chain stitch.

Feet and Attachments

I used the following feet and attachments to construct the Gather Together Serger Apron:

  • Double fold bias binder 36mm
  • Plain hemmer ¼”
  • Cover/chain stitch foot
  • Clear foot. The pattern did not call for this foot, but I like it’s visibilty. I thought the visibility of the foot made it easier for me to attach the double fold bias binding to the apron bodice.
  • Standard foot

Photo Overview of my Gather Together Serger Apron

Wave Stitch

I used the wave stitch to finish the edges of the fabric flower. Metallic thread in both loopers gave the edges a bit of holiday sparkle. If your serger isn’t capable of the wave stitch you could substitute a rolled hem or three thread overlock stitch.

gather together serger apron

Three Thread Rolled Hem

I used a three thread rolled hem to finish the edges of the ruffles, with metallic thread in the upper looper.

gather together serger apron

Gathering The Bodice

The bodice of the apron was gathered using a four thread overlock stitch. After gathering with my serger, the bodice still needed a bit more gathering. Gathers created with the four thread overlock are adjustable. So I slid the fabrics along the needle threads adjusting the bodice edges to the proper dimensions. See link about gathering in the Resources section of this post.

gather together serger apron

Hem Sides of Skirt with ¼” Plain Hemmer Attachment

I love to try new things with my serger. Using the serger plain hemmer was a new experience for me. I hemmed the side edges of the apron’s skirt using the ¼” plain hemmer, a chain stitch and a standard presser foot. My practice piece turned out perfectly. It must have been beginner’s luck because the first hem on the actual project took me three tries to get it right. I figured out that I needed to generously turn/roll the edge of the fabric in advance and keep it turned as I fed it into the attachment. Then the plain hemmer worked really well. The second side hem of the apron looked beautiful on the first try! See the link in the Resources section for tips for using a serger ¼” plain hemmer.

The plain hemmer rolls the hem to the top side as it is serged. So you feed your fabric into the attachment with the wrong side up. The needle thread will be seen on the back side of your finished project. The chain looper thread will be seen on the right side of your project.

gather together serger apron

Finish Edges of Bodice and Create Straps Using a Double Fold Bias Binder Attachment

I followed the video class/instructions to make the apron. However, instead of making the top edge and neck straps all one piece, I bound the top edge first. Then I bound the side edges of the bodice and continued the binding from the sides to make the neck straps.

gather together serger apron

Gathering Ruffles Using a Narrow Cover Stitch

I used a narrow cover stitch along with the cover stitch foot to gather the narrow ruffle strip, bottom ruffle skirt and flower. The narrow cover stitch gathers fabric much more tightly than gathering with an overlock stitch. But the cover stitch gathers are not adjustable like the gathers made by serger overlock stitching.

gather together serger apron

Construct Seams

I used the chain stitch to serge the seams of the bodice, skirt and waistband/ties. Serging with a chain stitch is very similar to using a sewing machine straight stitch.

gather together serger apron

I attached the narrow ruffle and bottom ruffle to the skirt of the apron using a chain stitch too.

gather together serger apron

Gather Together Serger Apron

I hope you enjoyed learning about how I serged my Gather Together Serger Apron.

serging with jen
gather together serger apron

Resources

Using a Serger Plain Hemmer Attachment https://overtheedge.blog/tutorials/serger-plain-hemmer-attachment/

Tips for Using a Serger Double Fold Bias Binder Attachment https://overtheedge.blog/tutorials/serger-double-fold-bias-binder-tutorial/

Gathering Fabric Using a Serger Overlock Stitch https://overtheedge.blog/tutorials/how-to-gather-fabric-using-a-serger-overlock-stitch/

Links to apron patterns:

Find the serger version – Gather Together Serger Apron by Pam Mahshie of Baby Lock at www.sewedclasses.com

Find the free sewing version of the pattern at: http://www.patbravo.com/freeprojects/sewing/Spiceitup-1.pdf

gather together serger apron

Triaxial Weaving with a Serger Belt Loop Binder

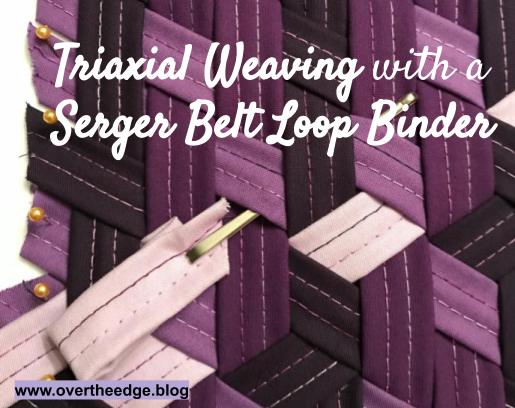
If you have a serger with a cover stitch and a belt loop binder attachment you are going to love this post, Triaxial Weaving with a Serger Belt Loop Binder. A new way to create quick and easy fabric strips for weaving into your own custom fabric! No more making fabric strips on the bias and no more burning your fingers while ironing the folded strips!

Serger Belt Loop Binder Attachment

Baby Lock has a specialty serger attachment called a Belt Loop Binder, which comes in two sizes (1.5” and ¾”). Other manufacturers may have something similar. The belt loop binder is designed to be used with a cover stitch.

I’ve seen it used to make belt loops, handles, straps, and bracelets. Belt loops and straps are very useful. But making your own woven fabric from these strips is way more exciting and is another perfect application for this attachment. And you don’t have to make bias strips for this weaving to work. You can cut strips by the width of the fabric (selvage to selvage), feed them into bias binder attachment on your serger, and quickly make fabric strips ready to weave into cool designs! This method is so much faster than cutting traditional bias fabric strips and standing at the ironing board pressing the edges under. And since it works on the cross grain, you don’t have to spend time creating the bias strips of fabric. I love my serger!!! 

Modern Fabric Strip Weaving

Fabric strip weaving is becoming a popular activity. I first saw a bias fabric strip triaxial weaving project in a Sew News magazine (Feb/Mar 2017)

The article/project was titled “Take It or Weave It” was written by Tara Curtis, of Wefty. She invented a tool called the Wefty Needle to help make fabric strip weaving much easier. Bias fabric strips are made and then folded and pressed into bias tape. Then the bias tape is woven into fabric. Of course when I saw the project my first thought was “how can I use my serger to make this easier!”  

Tools for Weaving

I purchased a set of Wefty needles from Tara. They work well for weaving ½” folded fabric strips and 1” folded fabric strips made with bias strips the traditional way. However, the Wefty Needles don’t work as well for serger belt loop binder strips. The tool was just a little too wide for the ¾” strips made from the 1.5” belt loop binder. It was hard for me to get through the tight weave of the third row of the triaxial weave. If the Wefty Needle was available in a ¾” or ⅜” it would be perfect for using with fabrics strips made with babylock belt loop binders! 

I ended up using a bodkin (for inserting elastic or cord into a casing) to help me weave that 3rd row. The Wefty needle would have worked better than the bodkin if it were the right size for the ¾” strips. Recently, I found a ¾” elastic threader by Dritz that I am going to try on my next project.  For other tools needed for fabric strip weaving see the Resources section at the bottom of the post.

Weaving Types

Basic or simple weaving occurs in 2 directions (biaxial at 90 degree angles to each other). Some forms of basic weaving you may be familiar with include plain weave, satin weave, twill weave, basket weave. Triaxial weaving occurs in 3 directions (triaxial 60 degree angles to each other). You can make some really nice weaving projects with basic weaving, but I think there is something special about triaxial weaves. I have included some links to resources about weaving at the end of this post.

Jen’s Triaxial Weaving with a Serger Belt Loop Binder

The Sew News article did inspire me to try fabric strip weaving, even though I didn’t make the basket that was in the article. Following the basic instructions in the article, I created my triaxial weave using fabric strips made on my serger with the 1.5” belt loop binder attachment. I then used the new “fabric” to construct this bucket from Simplicity pattern 8859 (I did make a few minor modifications to the pattern for this fabric basket/bucket). I really enjoyed triaxial weaving so I had to do more of it. After one project I was hooked!

I really like the look of “stars” in triaxial weaving, so I decided that would be my next project. I figured out how to weave the stars after some trial and error and a little research on the internet. It probably would have been faster to purchase a pattern from Wefty to show me how to do it, but I wouldn’t have learned so much about weaving!  Like with the fabric bucket project, I used the 1.5” belt loop binder attachment to make my strips. Then I made a pillow from the triaxial weave “stars” fabric that I created. This pillow was constructed on the serger, including using a cording foot to install the zipper. The pillow pattern I created may be included in my blog in the future.

Tutorial – Setting Up and Using a Serger Belt Loop Binder 

I created a tutorial and a video to help you be successful using the belt loop binder attachment with your serger. You will find the links below.

Hope you enjoyed learning about triaxial weaving with a serger belt loop binder!

Resources for Fabric Strip Weaving

Here are a few internet sites and youtube videos for you to check out if you would like to learn more about the process of weaving with fabric strips. 

Tara Curtis of Wefty

Website: www.weftyneedle.com 

https://weftyneedle.com/blog/2016/8/26/tools-for-weaving-updated

Tumbling Blocks Mad Weave Tutorial Video by Wefty – https://youtu.be/6xlUirFs0Kg

https://youtu.be/6xlUirFs0Kg

Mathew Boudreaux of Mister Domestic

Website: www.misterdomestic.net

https://misterdomestic.net/2017/12/29/fundamentals-of-fabric-weaving/

Fundamentals of Fabric Weaving Video by Mister Domestic  – https://youtu.be/vlGt5Mxs2M0

If you want to get Tara’s fabric bucket pattern from the Sew News magazine, click on the link below to get more information.

https://www.interweave.com/product/sew-news-february-march-2017-digital-edition/

What do you get when you combine serging with embroidery? Serge-Broidery!

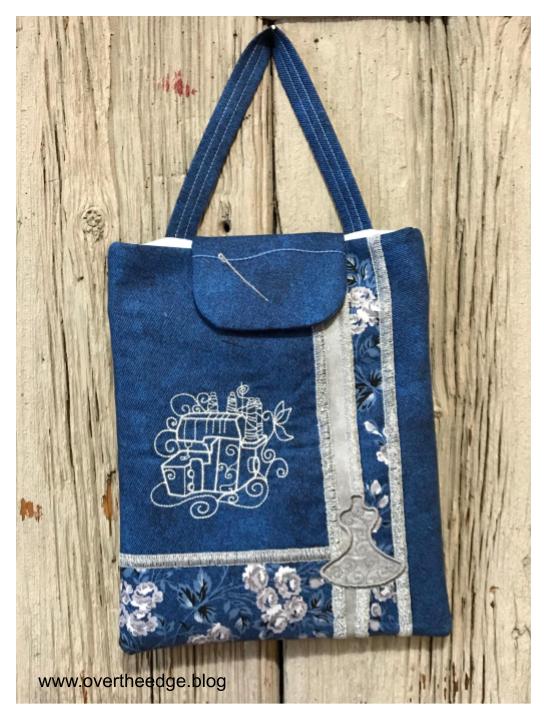
Did you know that February is National Embroidery Month? I thought this would be the perfect time to share with you the sewing tote project I made using both my serger and my embroidery machine. I used the pattern “Serge-Broidery Sewing Tote” by Sue Overy Designs. https://sueoverydesigns.com/product/sewing-tote-serge-broidery/

About the Tote:

When I teach serger classes, I use this tote to carry my supplies.  It has an interior pocket that I use for patterns or fabric, and an outside clear vinyl pocket with a zipper that I use for accessories such as feet and tweezers. I really like being able to see my accessories through the clear vinyl pocket! The only part of the pattern I wasn’t crazy about was the bamboo handle. So I made a fabric handle instead. 

Machine Embroidered Details:

All of the embroidery designs I used on this tote were included with the pattern. I began by stitching the serger design near the center front of the tote. Then after finishing the flatlock piecing of the front panel, I embroidered the dress form applique on the front lower right corner. Finally, the needle was embroidered on the flap after chain stitching the “thread”.

Serger Details:

The tote features decorative thread and four serger stitches – flatlock, cover stitch, chain stitch and four thread overlock.

For my decorative thread, I chose metallic Madeira 12 wt. Glamour to give my serger stitches a little sparkle. Using a flatlock stitch, I pieced together the fabric for the front of the tote.  I installed the zipper on the clear vinyl pocket on the back using the cover stitch, along with a cording foot.  I also used the cover stitch in combination with the belt loop binder attachment to make the handle. The “thread” that goes through the needle on the flap is a clever use of the chain stitch.  The four thread overlock stitch was used to finish constructing the tote.

If you are interested in utilizing different stitches and techniques on your serger, this would be a good project for you.

Isn’t this project tote-ally cute!


Cozy Sweater Shirt – 100% Serger Made

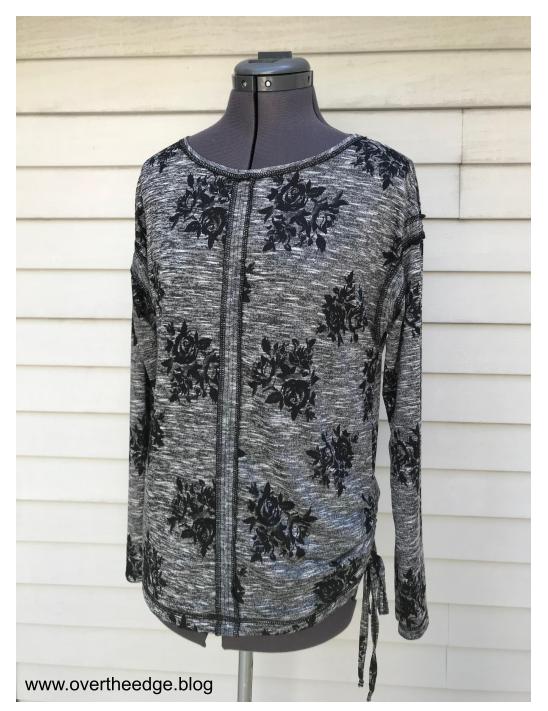
I introduce to you, the cozy sweater shirt – 100% serger made – no sewing machine required. 

Because I love my serger, I am always looking for more ways to use it.  I wanted to make a top that could be completely constructed on my serger without the use of a sewing machine. When I saw Simplicity 8988, I knew that this pattern would be a great starting point for my cozy sweater shirt. The exposed seams down the center front and back were perfect for showcasing serger stitching with decorative thread.

How I Changed the Pattern to Serge my Cozy Sweater Shirt:

Simplicity 8988 was written for a sewing machine, but I easily adapted it for serger construction and embellishment utilizing both overlock and cover stitches. If your serger is not capable of chain stitch or cover stitch you could still make this cozy sweater shirt. You would just need to substitute your sewing machine for the steps that include chain stitch or cover stitch.

To adapt a pattern for serging, all you need to do is to group similar stitch types as much as possible. Most sewing patterns are not optimized for serger construction. If you follow the pattern as written, you will find yourself converting back and forth between serger stitches. For some sergers, this conversion can be a time consuming process. I feel very fortunate to own a Babylock Evolution serger because converting between stitch types is easy!

Four Thread Overlock:

I began by grouping all of the 4 thread overlock operations together. I serge finished the raw edges of the exposed seams and neck edges with decorative Madeira Lana thread.  The shoulder seams and the raw edges of the interior seams were serged with Maxilock Stretch thread. 

Chain Stitch:

Next I converted my serger to the chain stitch to sew the center front and back seams and the upper sleeve seams.

Wide Cover Stitch:

Then I switched to a wide cover stitch and stitched down the center of the exposed front and back seams and the upper sleeve seams.  The cover stitch helps to keep the seams partially open during wearing so the cool serger stitching always shows.

The wide cover stitch was also used for the bottom hem and the sleeve hems. I turned the hems to the inside and serged so that the looper thread showed on the right side of the top. These hems were finished before closing the side seams. It is much easier to cover stitch flat than in the round.

The belt loop binder attachment along with the wide cover stitch was used to make the ties.

Chain Stitch:

The last serger conversion was back to the chain stitch to sew up the side seams, finish the neck hem, and make the channels for the ties.  After inserting the ties, my cozy sweater shirt was ready to wear!

I hope this post inspired you to serge!

Theme: Overlay by Kaira Extra Text
Cape Town, South Africa