Tag: serging with Jen

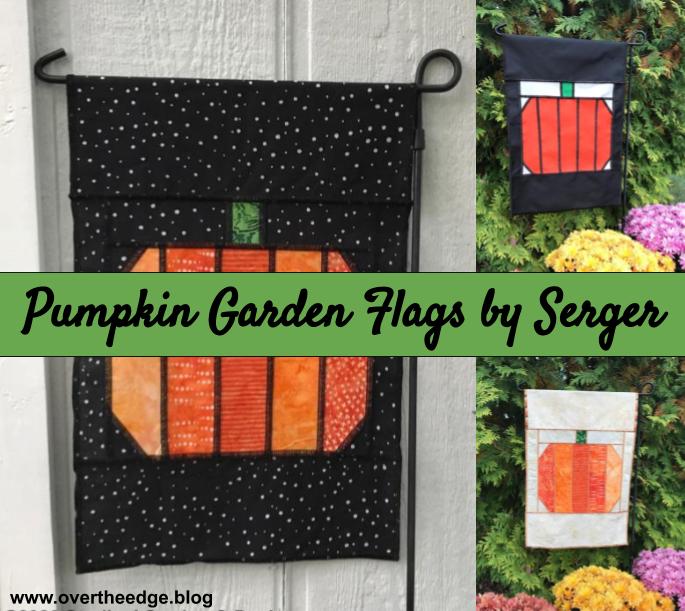
Which Fabric Makes a Better Flag?

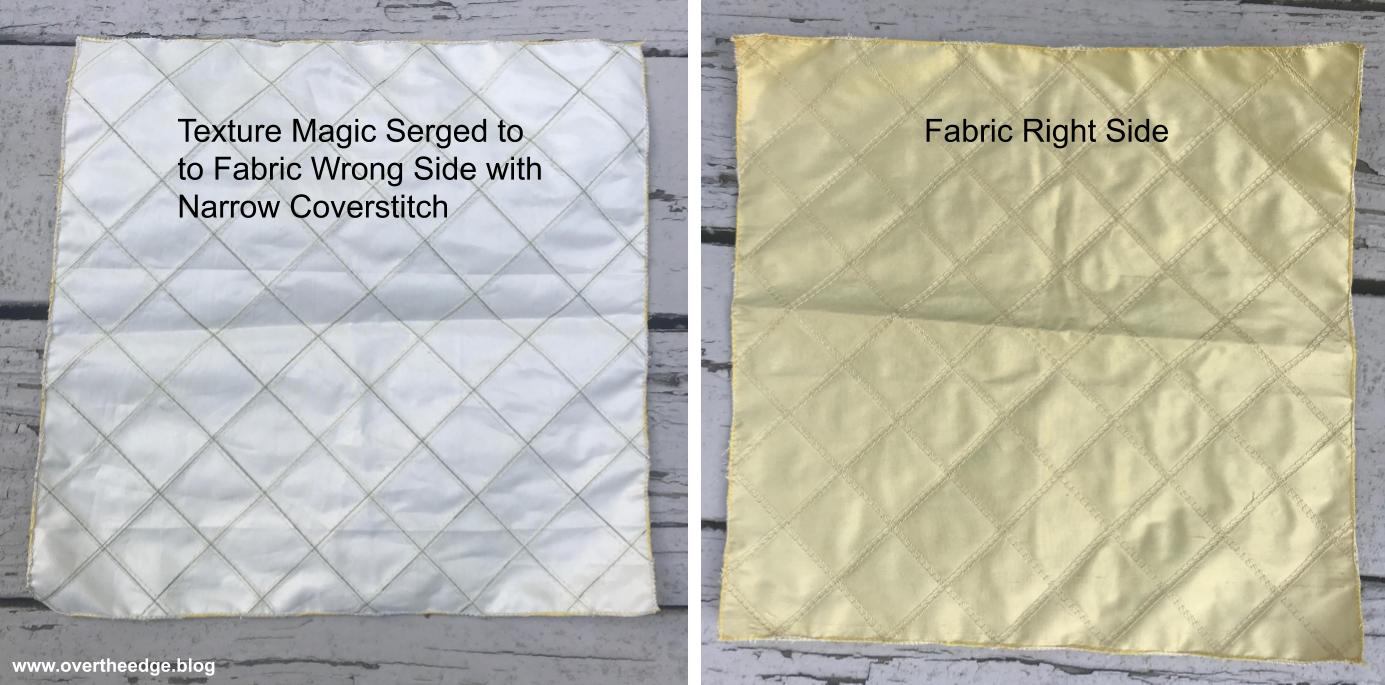
Making “stained glass” fabric flags with reversible fabrics is a great way to utilize the flatlock stitch on your serger! But which fabric makes a better flag – cotton batik or flag sport nylon?

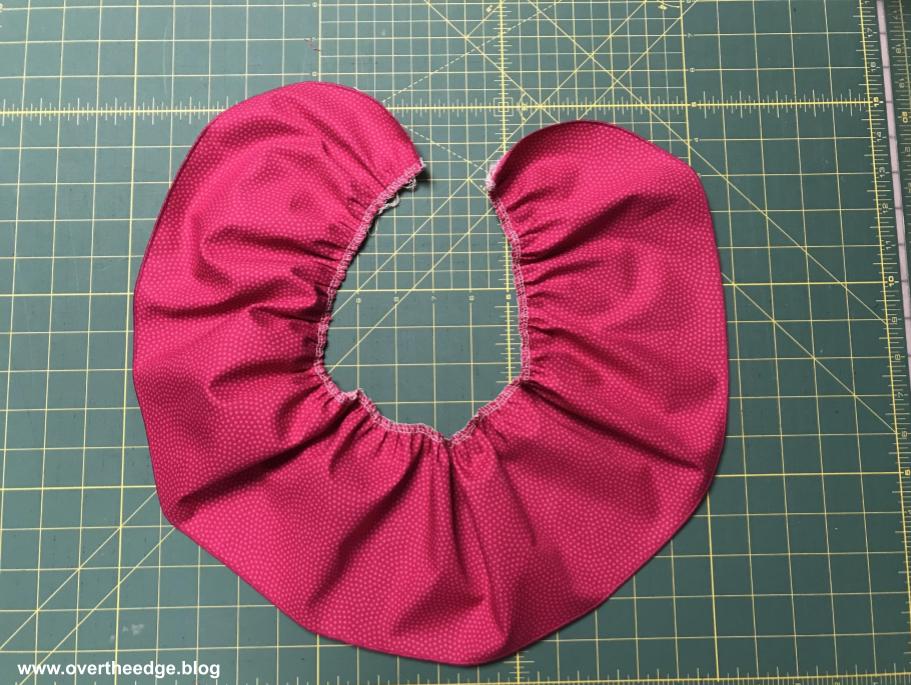
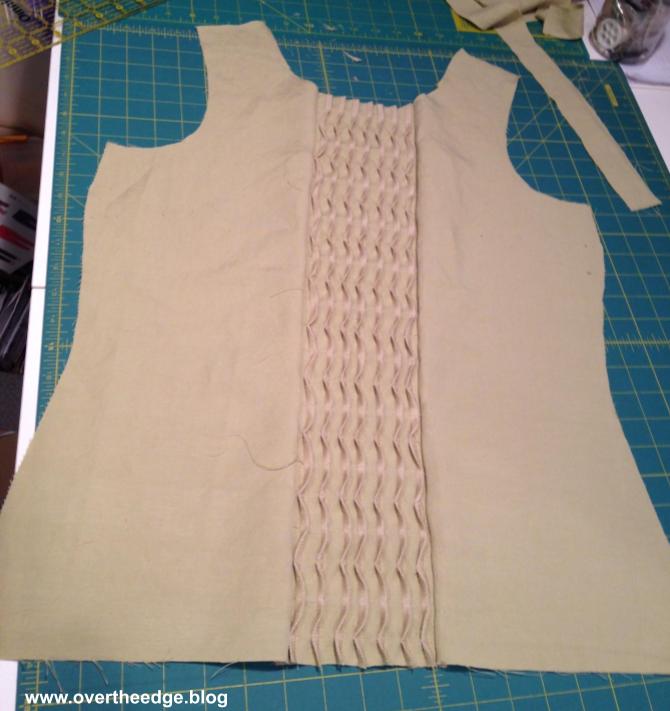
Earlier this year I wrote a blog post and tutorial about making a serger flatlocked heart flag. That flag was made from cotton batik fabric because that is what I had access to at the time. After that post, I received several questions asking me if the flag could be made from nylon fabric. I finally got my hands on some flag sport nylon fabric and gave it a try. I experimented with garden flag prototypes until I was happy with the results. Making a flatlocked flag out of flag sport nylon is not that much different than making a flag using cotton batiks. But I do have a few tips to help you be more successful. Read on below to learn more about working with flag sport nylon to make flatlocked flags using your serger.

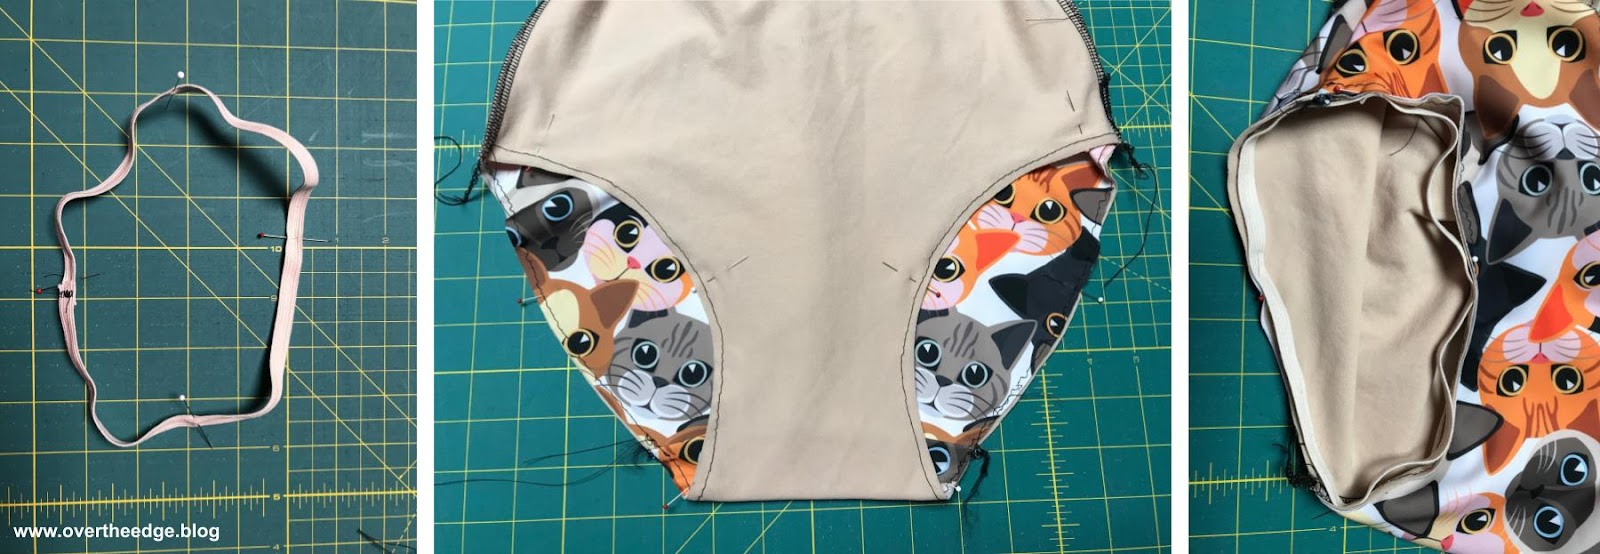
Since I really love using my serger to make these garden flags, I decided to design a flag for every season! My Pumpkin Garden Flag is both my second flag design and my second official serger pattern. You can find the pattern for my Pumpkin Garden Flag in my Etsy shop (see LINK at bottom of post). 

Which Makes a Better Flag – Cotton Batik or Flag Sport Nylon?

which fabric makes a better flag

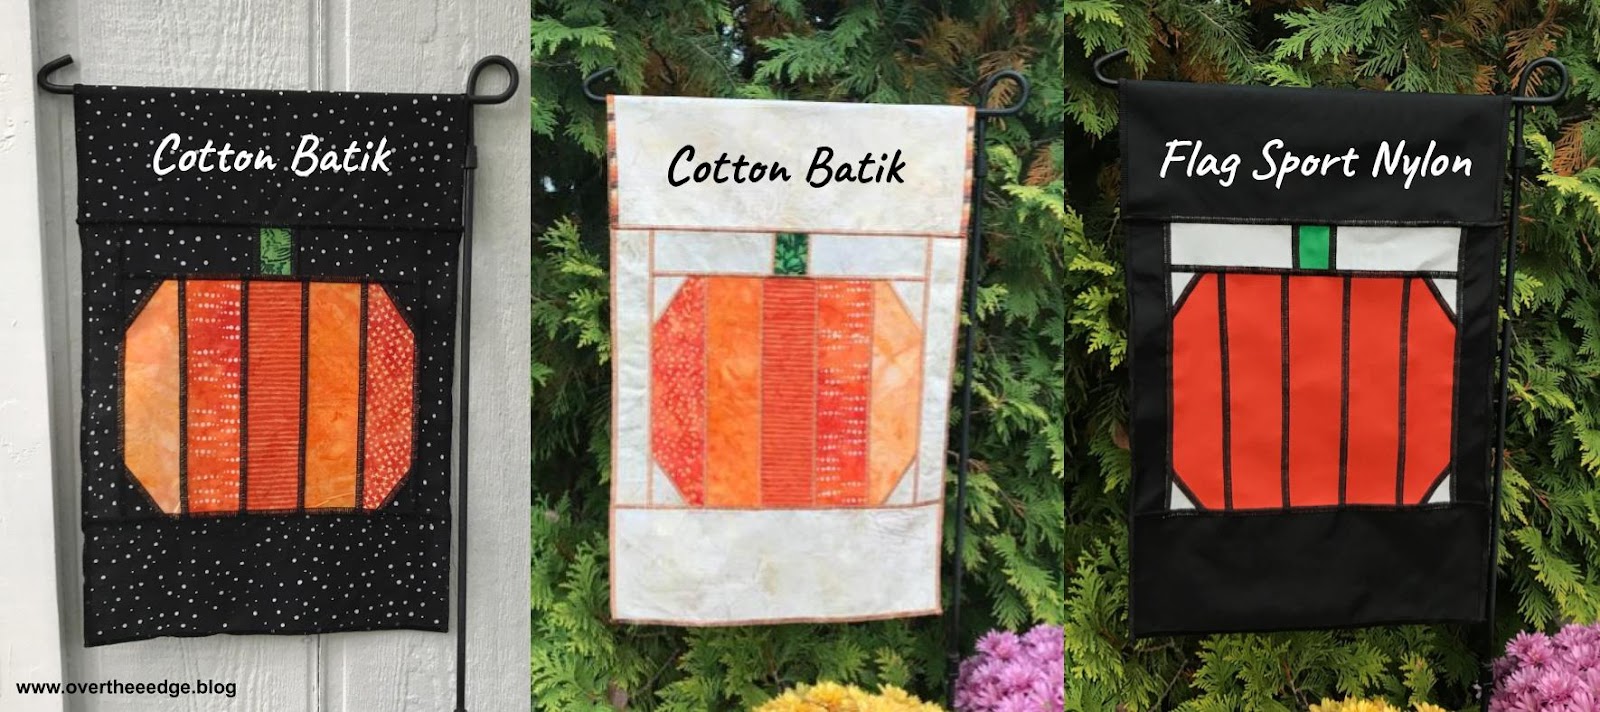
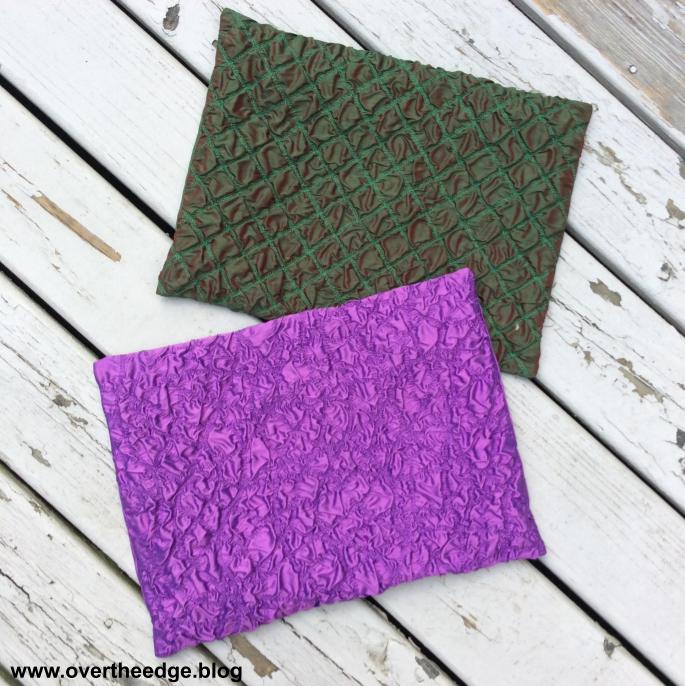
These pumpkin garden flags are equally awesome in cotton batik or flag sport nylon. But there are pros and cons to using both fabrics for flags.  

Cotton Batiks

  • You can find cotton batiks in all sorts of interesting colors and patterns that really bring the flag to life. 
  • Cotton is easy to sew or serge. 
  • It is not water repellent or quick drying and will soak up water when it rains.
  • Cottons will fade when exposed to sunlight. 

Flag Sport Nylon

  • Flag sport nylon is available in only solid colors. 
  • Nylon can be stiffer and more slippery than cotton, and a little more difficult to handle than cotton.
  • It is mold/mildew resistant, water repellent and quick drying. 
  • Nylon will fade when exposed to sunlight, just not as fast as cotton.

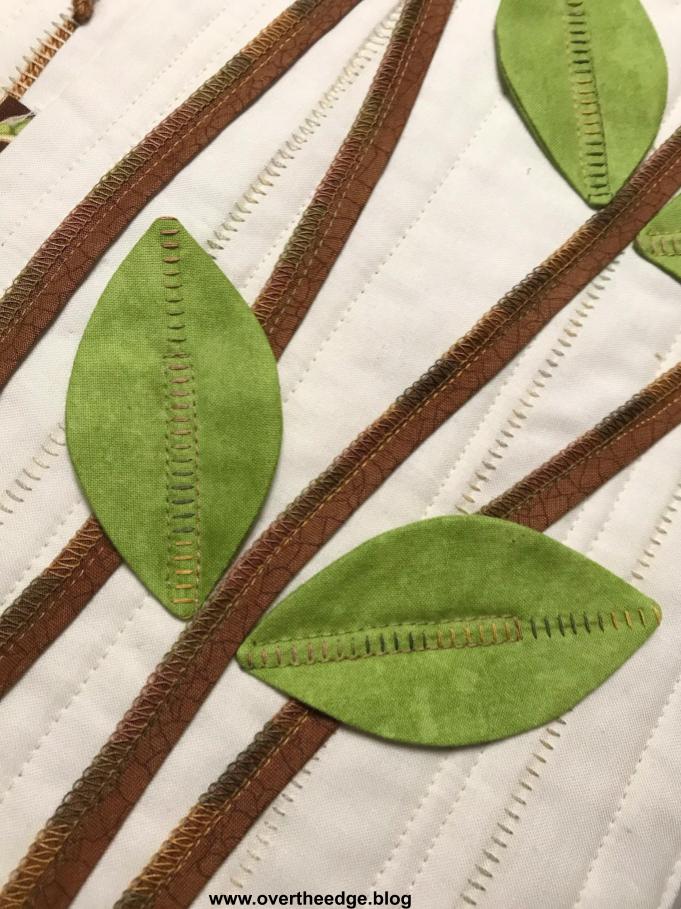
Although I think the cotton batik flags are much more interesting, the flag sport nylon flag will probably hold up better outside. So my nylon flags will hang outside. And my batik flags will be for indoor use, or limited outdoor use. But maybe I will hang my batik flags outside anyway and make new ones when they fade. Now that I’ve made a few they are pretty quick to serge. I can make a flag in less than an hour, including cutting out the pieces. 

About the Flatlock Stitch

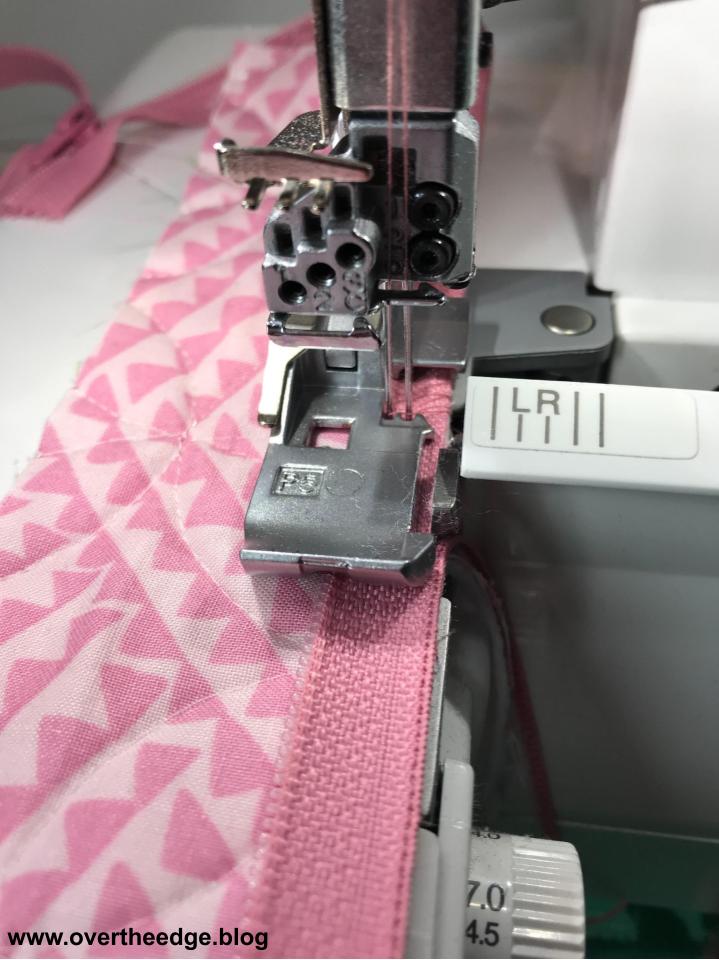
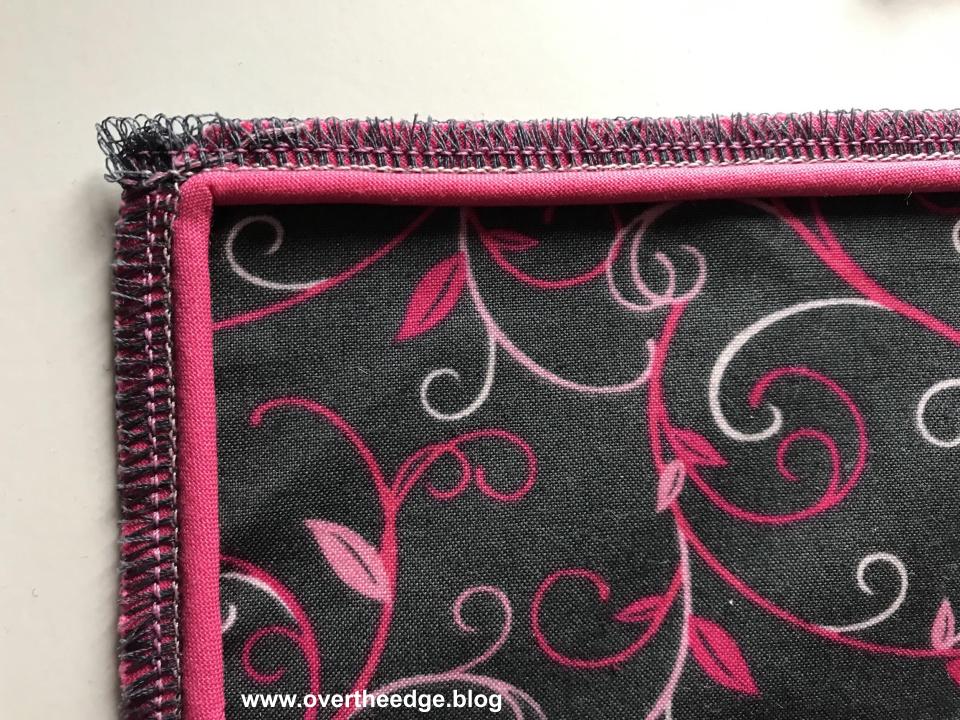
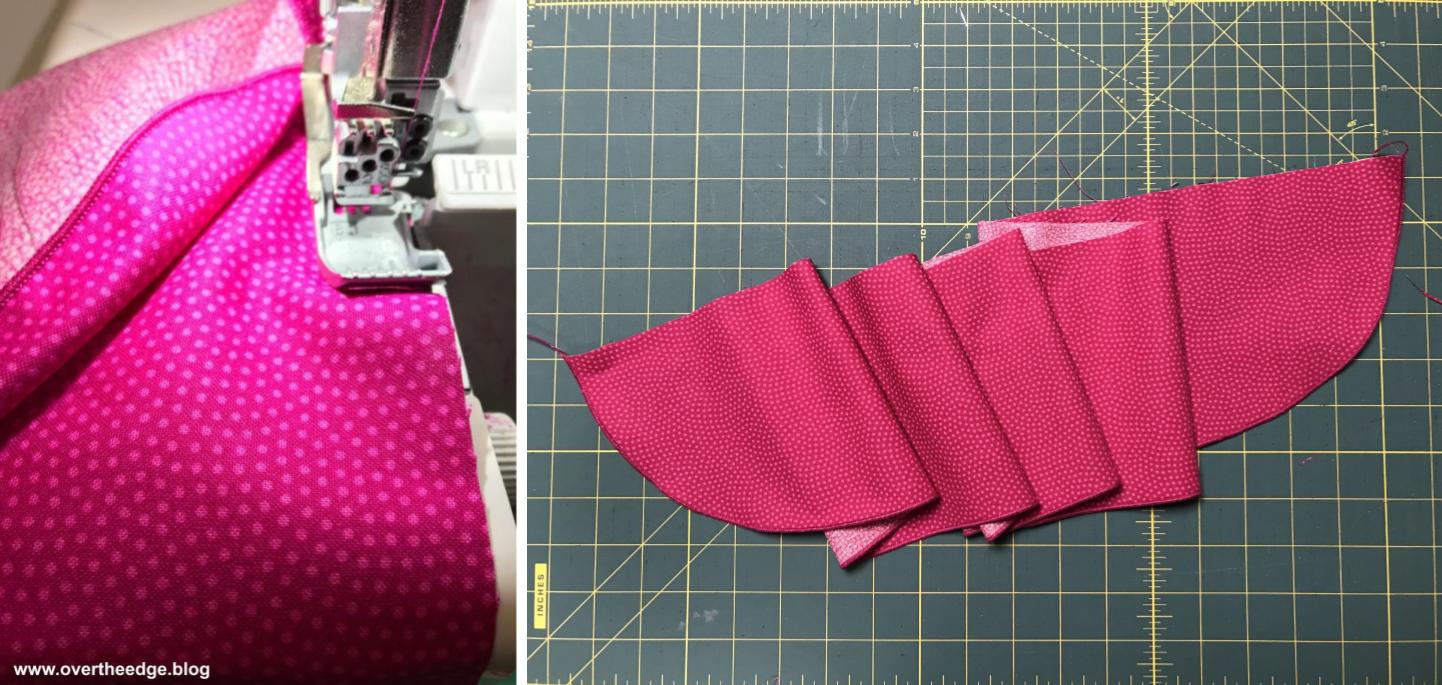
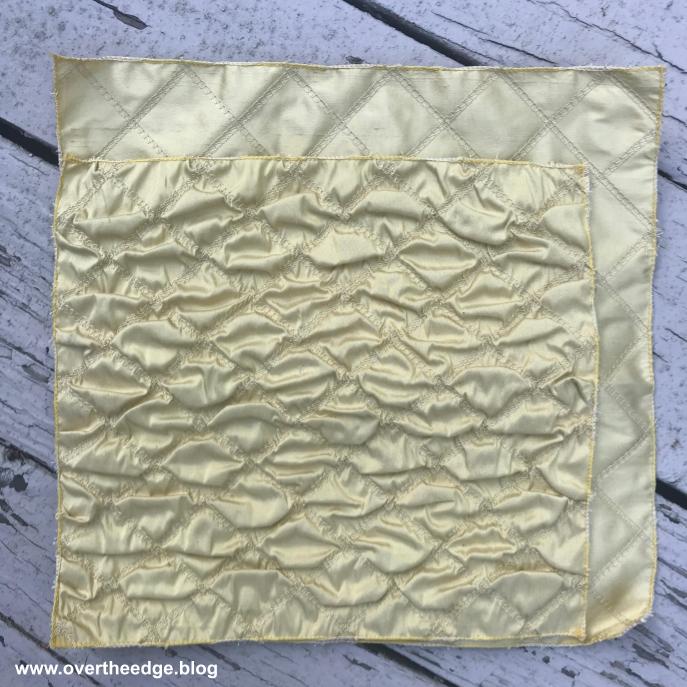
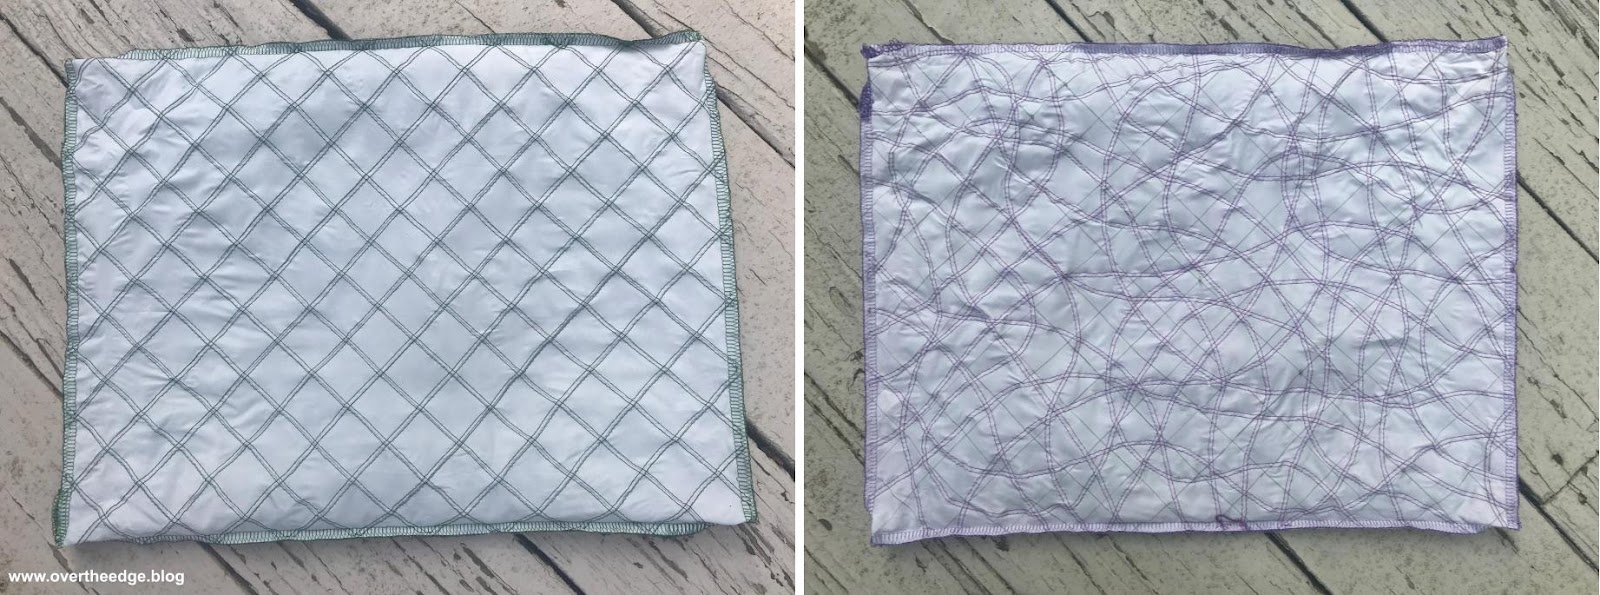
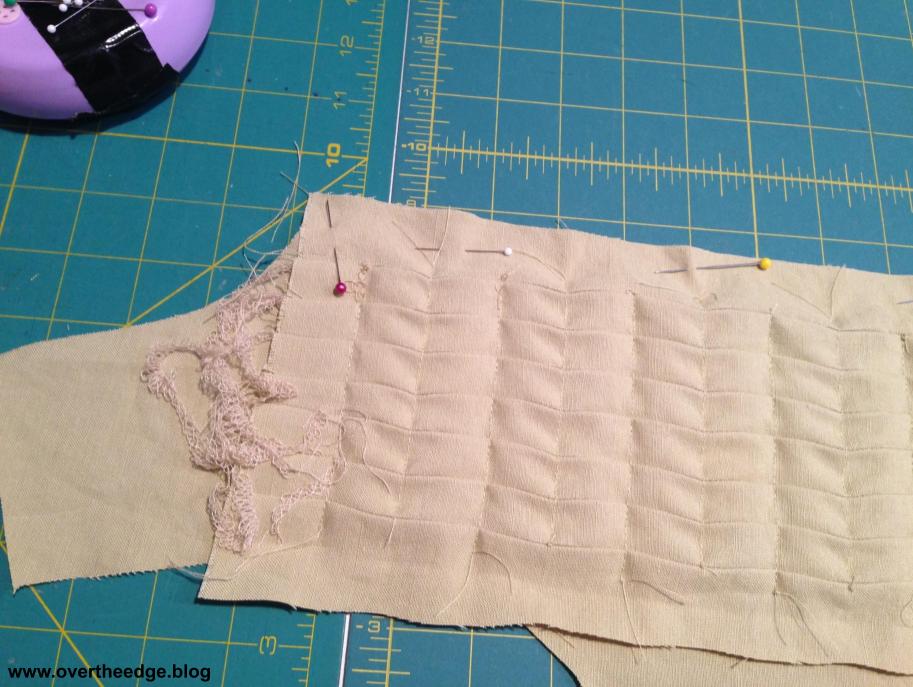
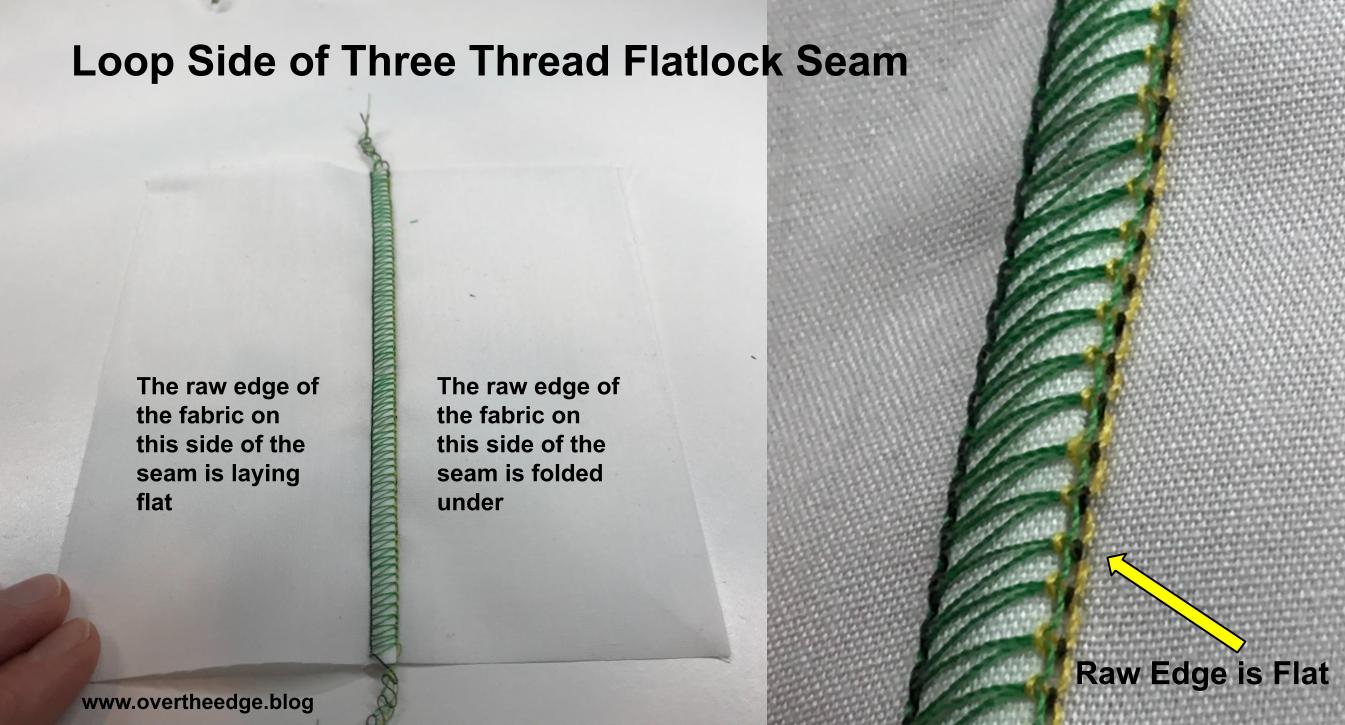
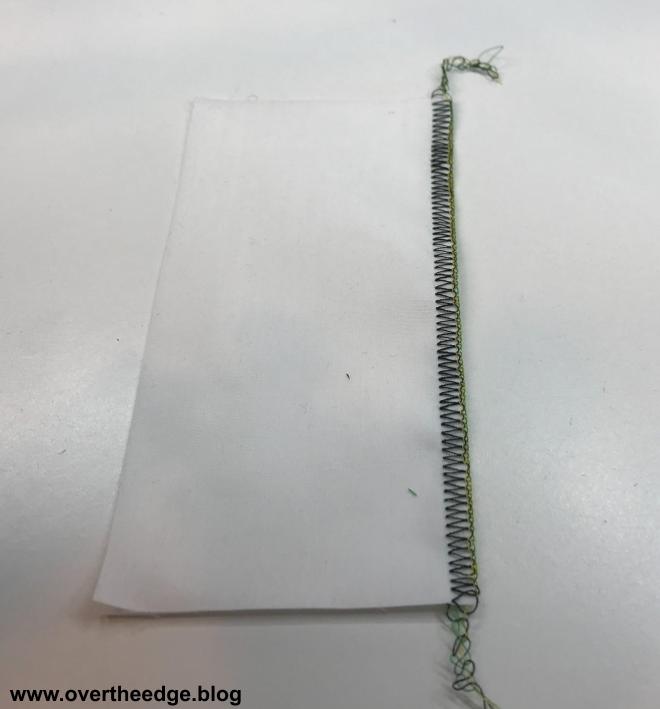
There are different techniques for doing a flatlock stitch, such as flatlock on the raw edges of fabric or flatlock on a fold. But for this blog post I am referring to flatlock piecing, where you use the three thread flatlock stitch to seam two pieces of fabric together with the knife engaged and slightly skimming/trimming the raw edges of the fabric. In the Resources section at the bottom of this post you will find a link to a short video I made about flatlock piecing.

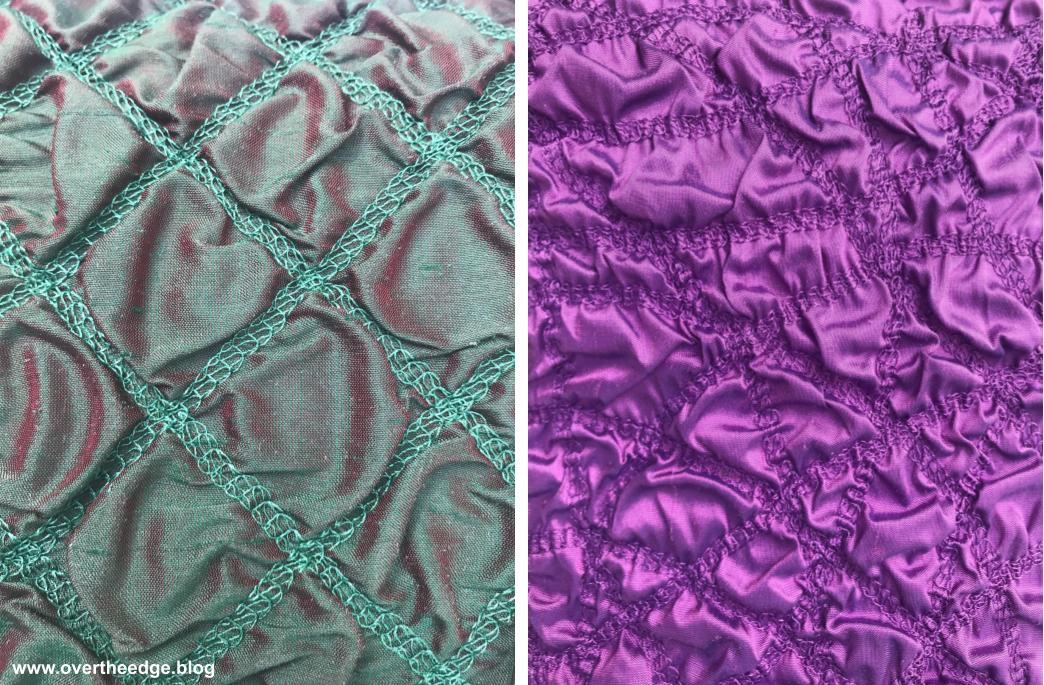
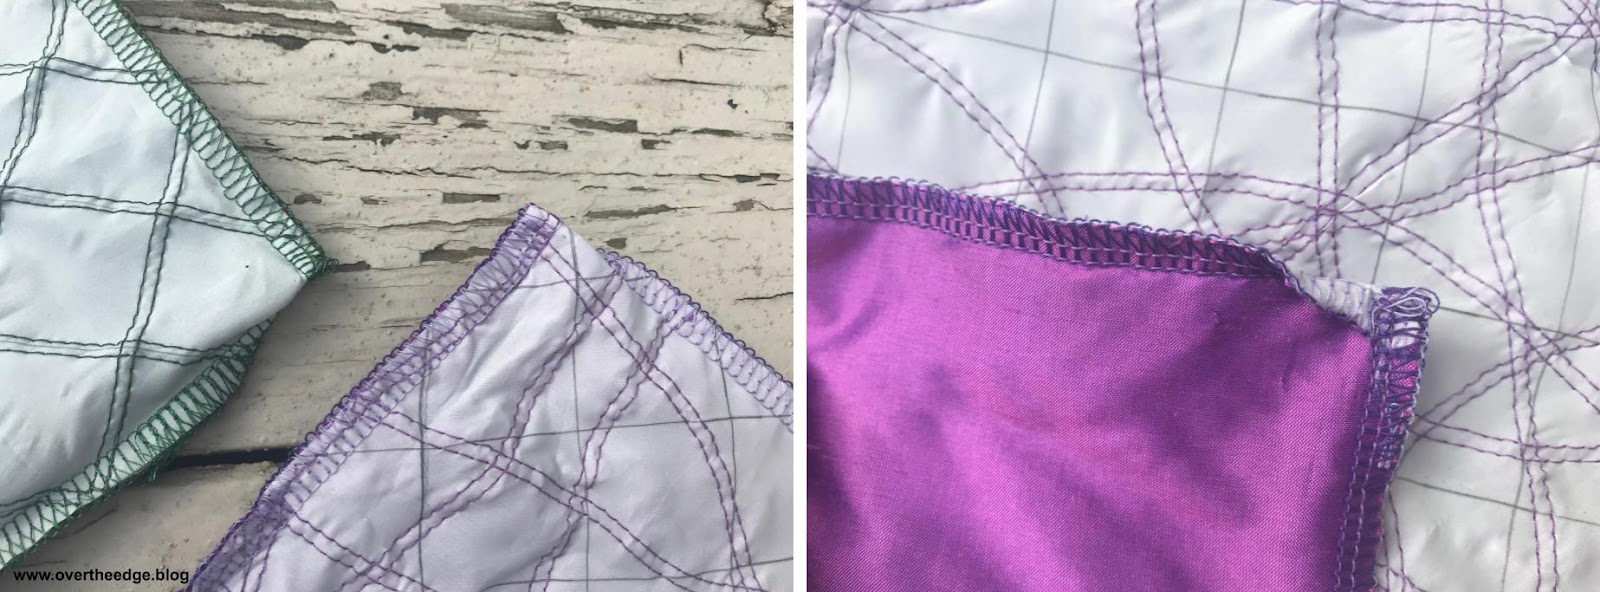
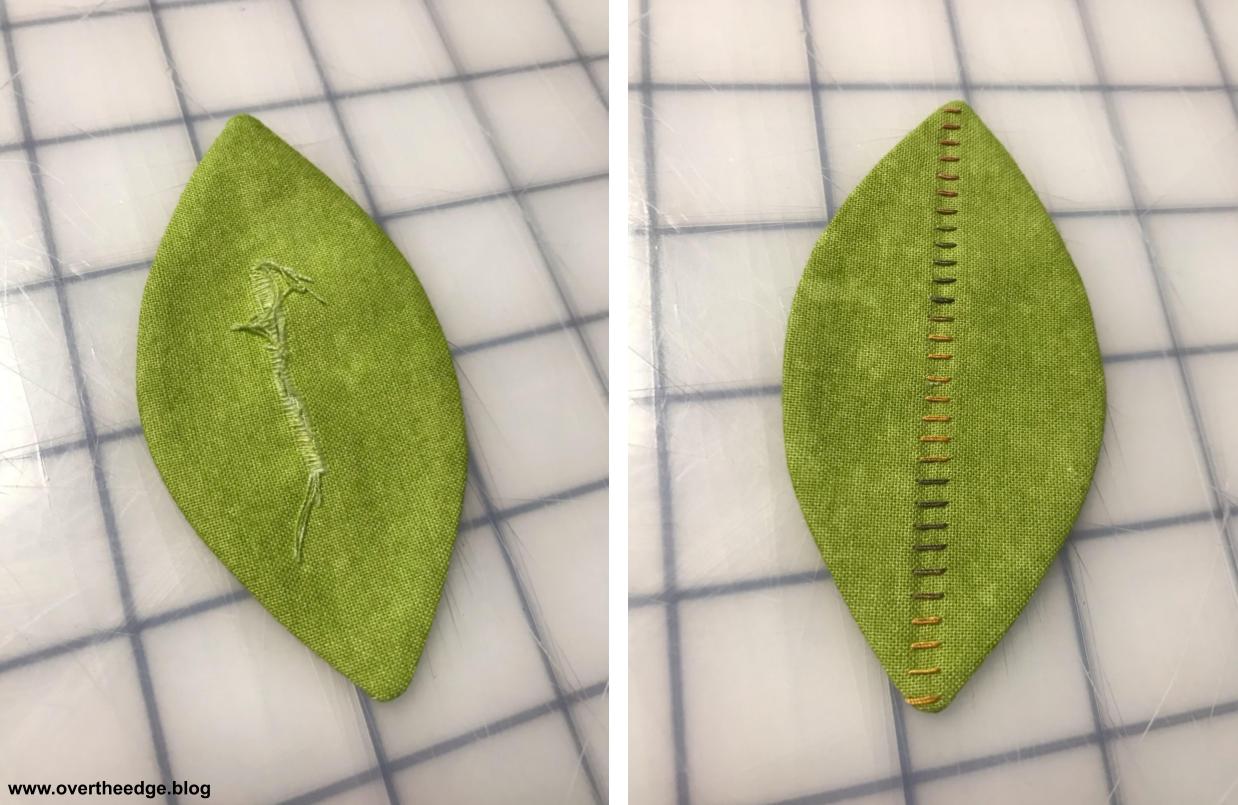
As you serge, the upper looper forms “loops” on the top, and the needle thread forms “Vs” on the bottom and the lower looper forms a straight line right along the raw edges of the fabric.

three thread flatlock seam

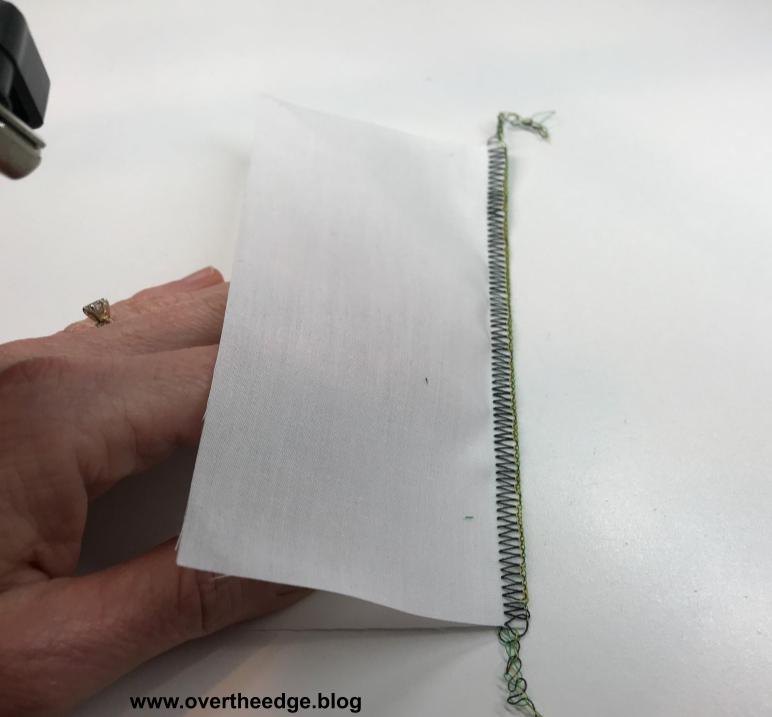
When pulled open, one side of the seam will form “loops” and one side of the seam will form “ladders”. You will also notice that one of the fabric raw edges will remain flat, and the other will fold under. The raw edge of the fabric that is on top remains flat which you will see on the loop side of the stitch. The raw edge of the fabric that is on the bottom when you serge, will fold under which you will see on the ladder side of the stitch. 

loop side of three thread flatlock seam
ladder side of flatlock seam

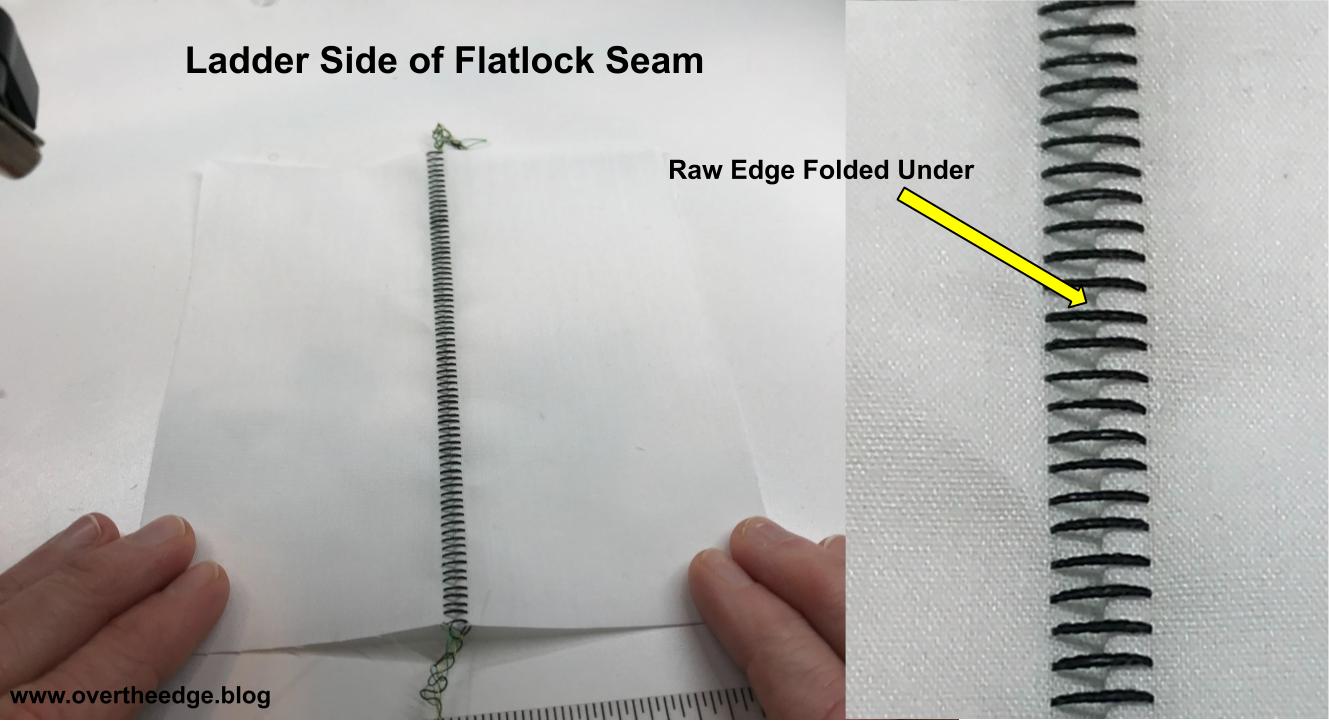
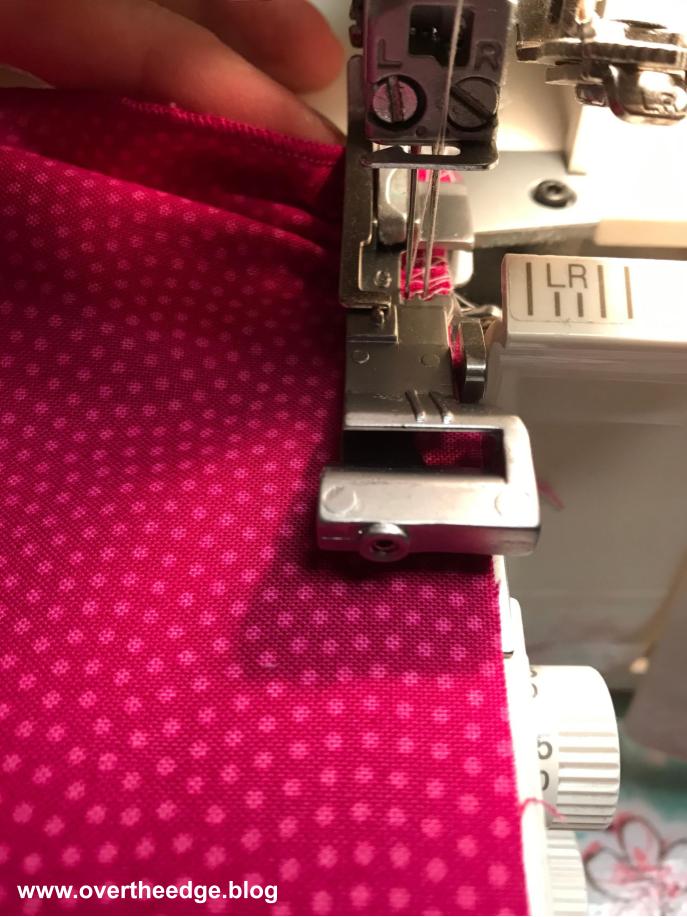
How to Get the Fabric Raw Edge to Fold Consistently on the Ladder Side

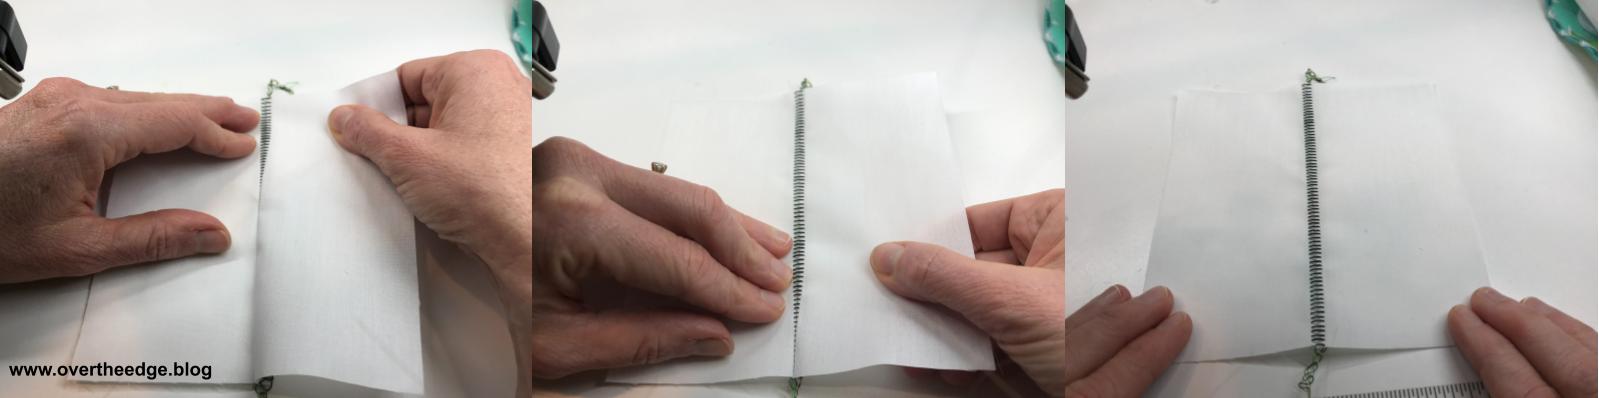
The way you open the seam can help the raw edge fold well. Of course you can just grab it and yank it open, but you may find the raw edges don’t always fold over the way you want them to. If you work with the fabric and it’s natural tendency to fold you will get better results. Here’s what you can do to get a better fold of the raw edge in your flatlock stitch:

Place the seam with the bottom fabric side (the V side) facing up.

how to open a flatlock seam

Insert your fingers between the two layers of fabric, placing them next to the seam. 

how to open a flatlock seam

Use those fingers to hold the fabric down, while you use your other hand to pull the other piece of fabric to open the seam. Continue holding the fabric down and pulling the fabric open until you have opened the entire seam.

how to open a flatlock seam

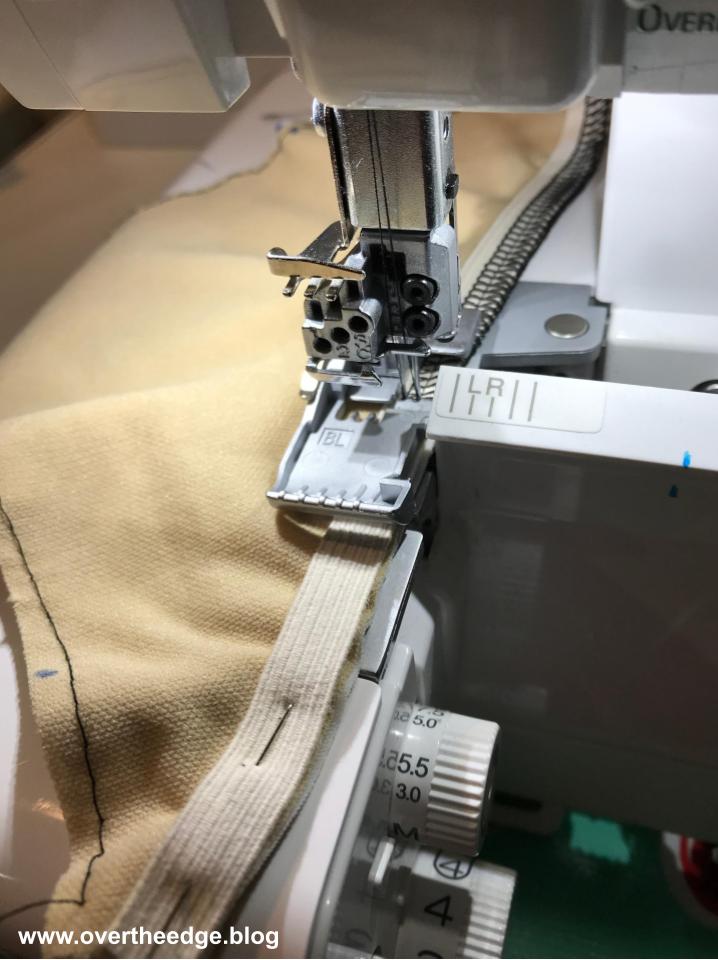
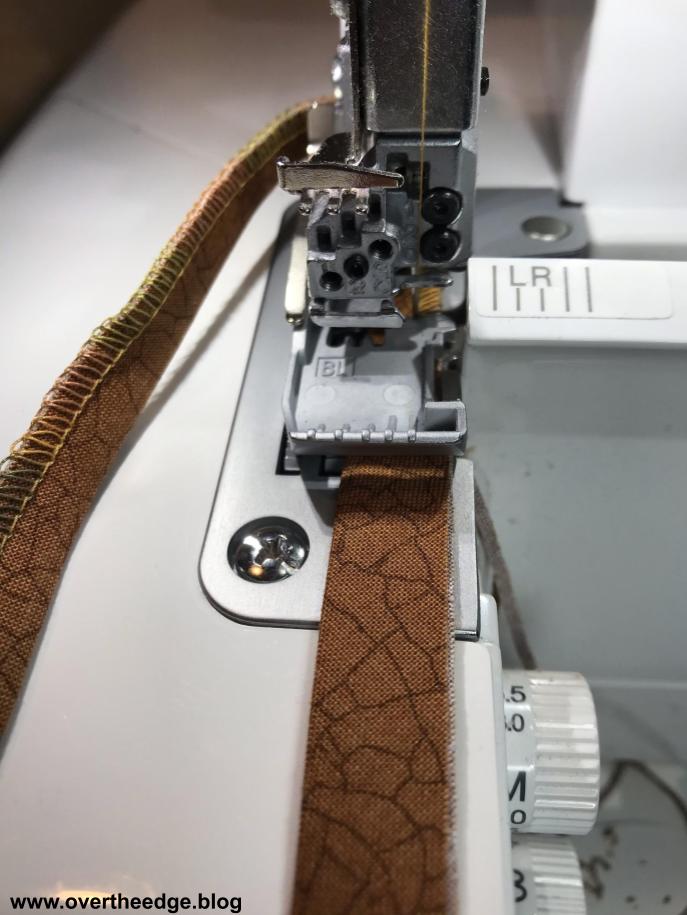
Differences between Serging with Cotton Batik and Flag Sport Nylon

Cotton batik fabric is a softer and less slippery than nylon, which makes it a little easier to handle. I recommend that you make your first flag from cotton batiks, before moving onto to nylon.

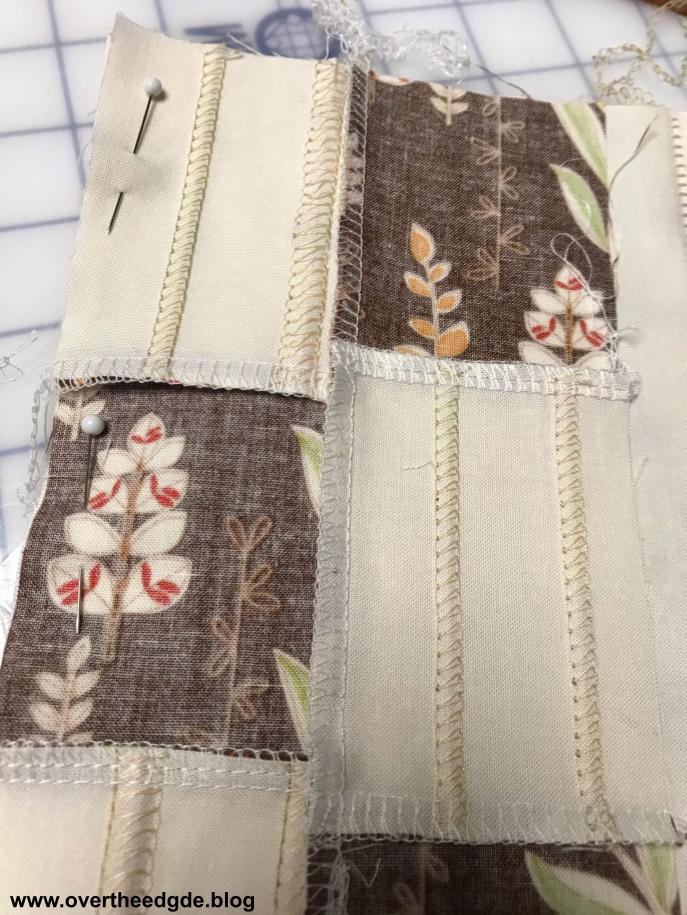
Flatlocking with Cotton Batiks

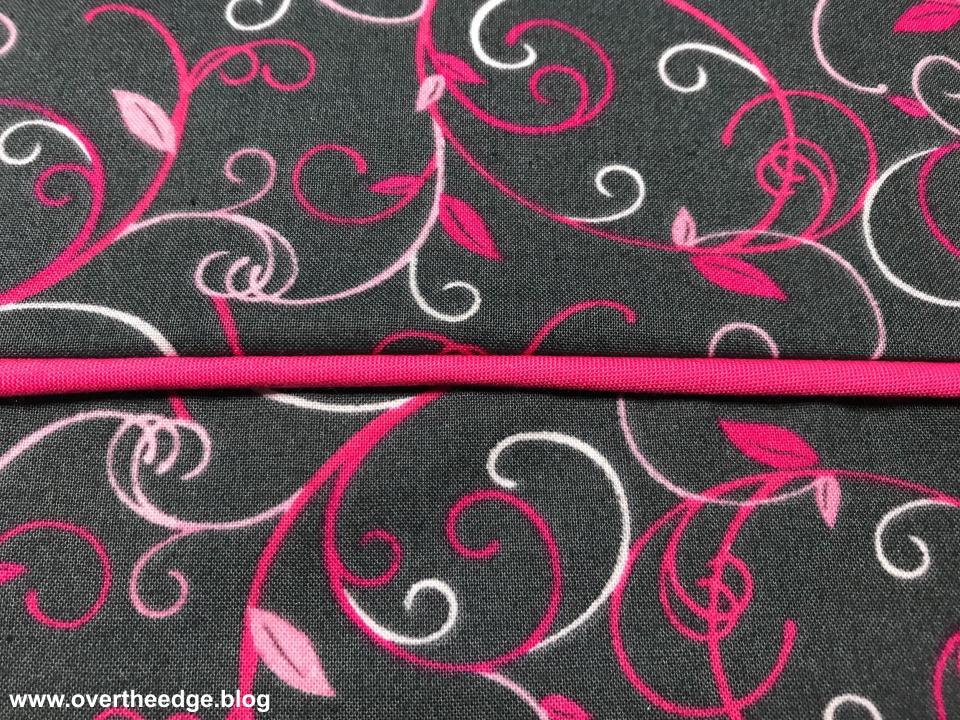
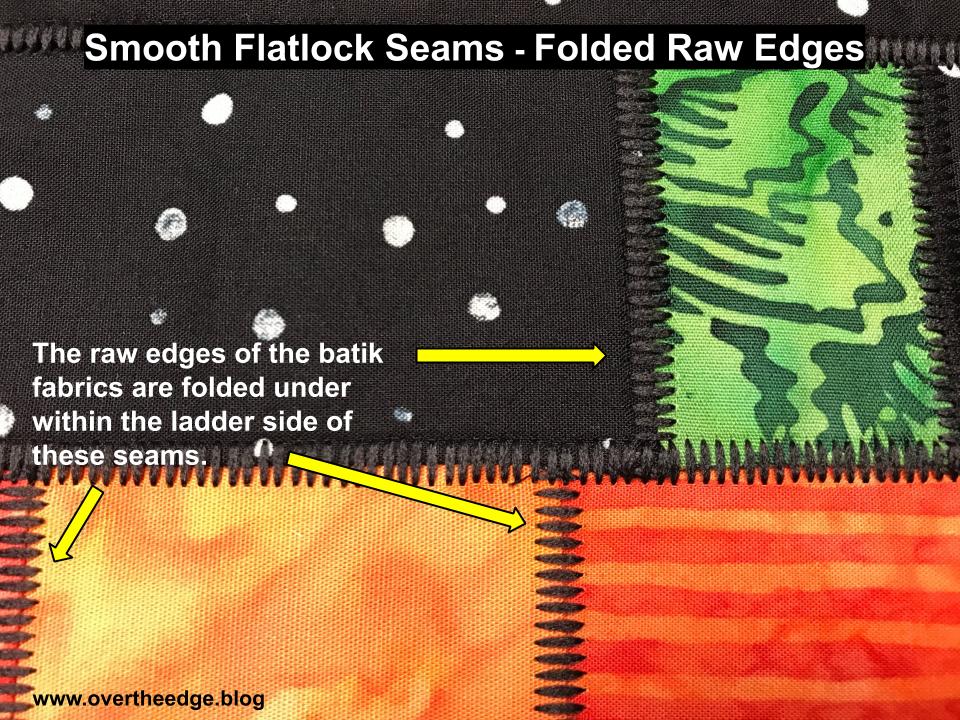
Cotton batik fabrics are soft and supple enough that the raw edges typically fold under within a flatlock stitch. These folded raw edges lay flat within the seam and therefore the seams are fairly flat, especially if you press them. You don’t need to do anything else. Occasionally the raw edge may flip out and lay flat in a spot or two. You can just manually help it fold back under the stitches by using a stiletto or some other tool. 

flatlock stitch ladder side

which fabric makes a better flag

Flatlocking with Flag Sport Nylon

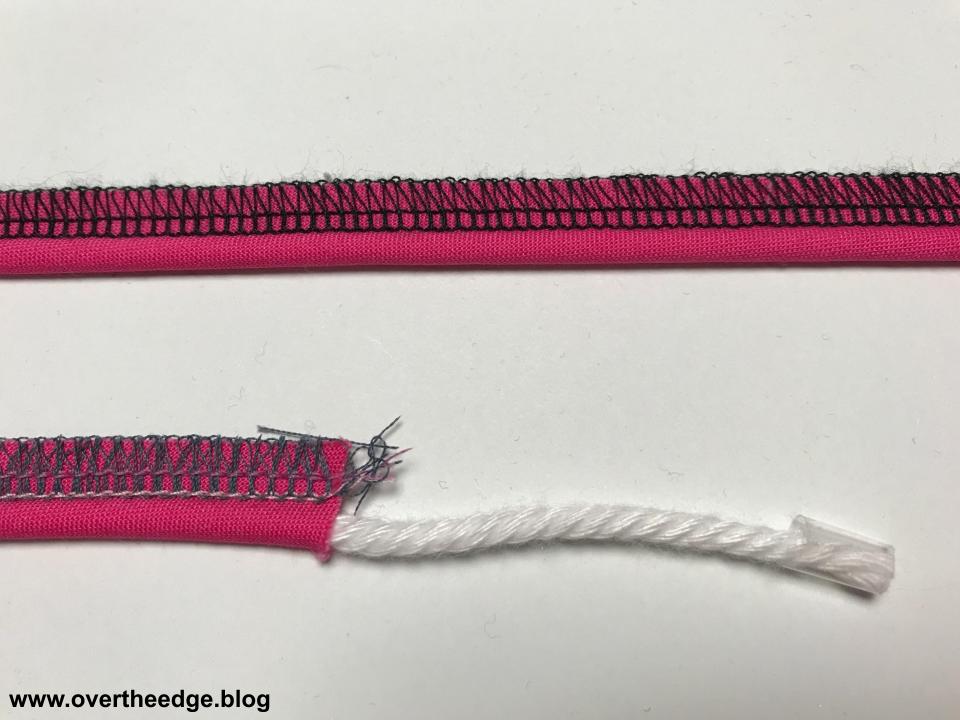
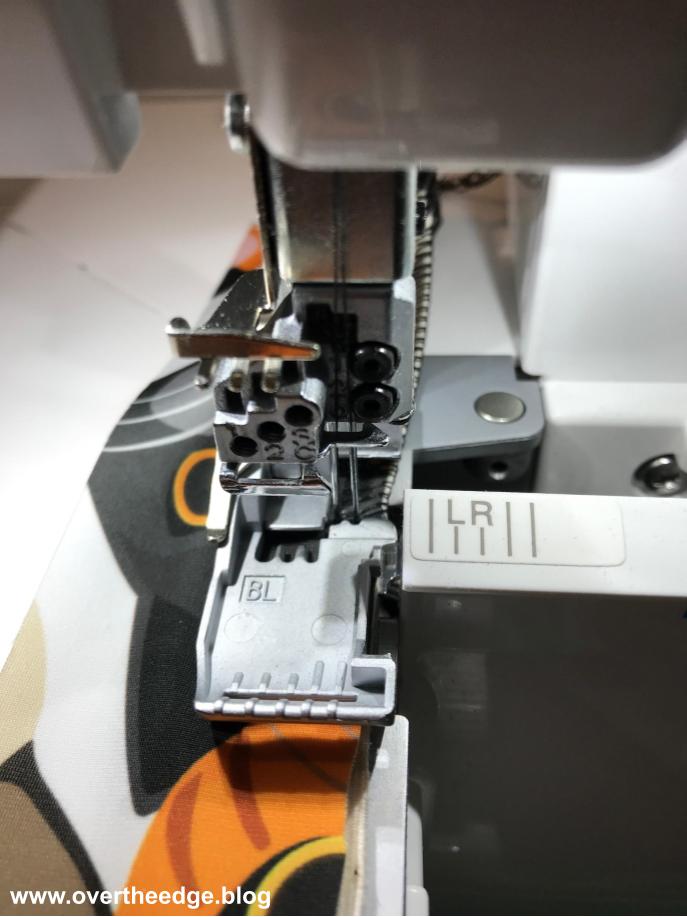
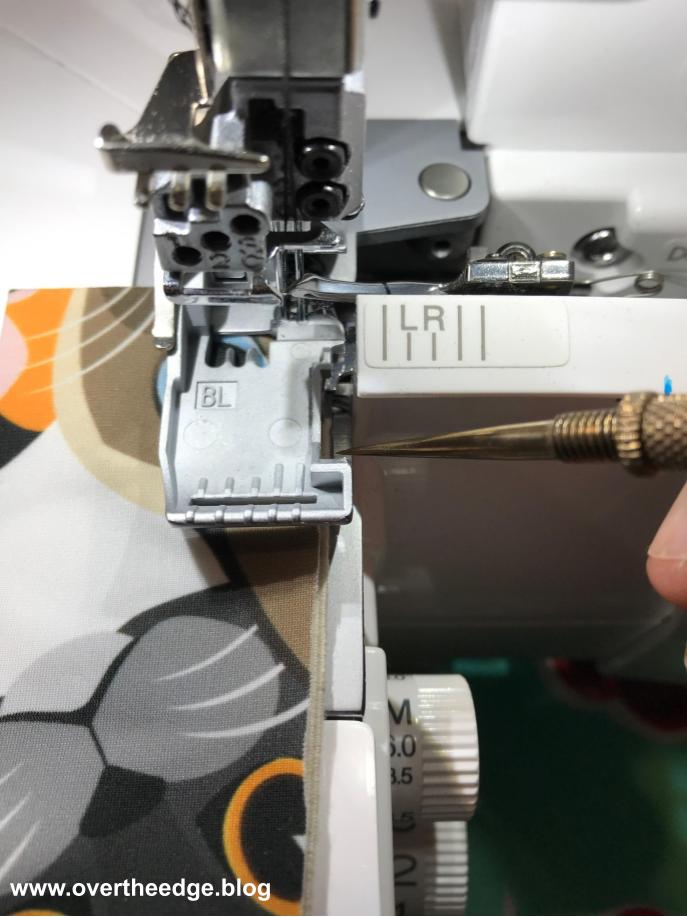
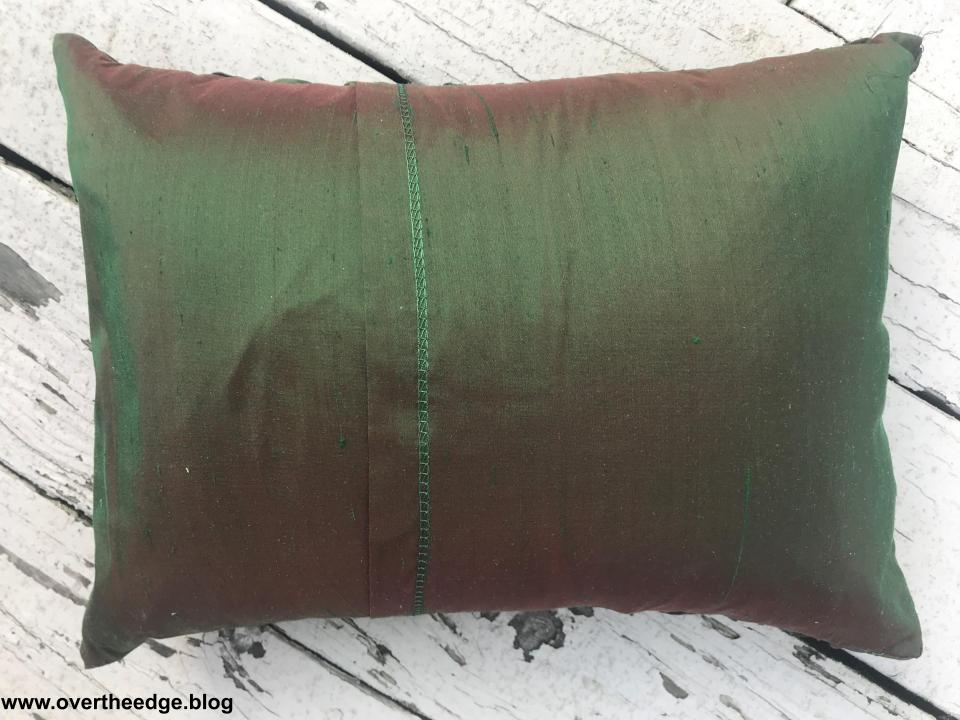
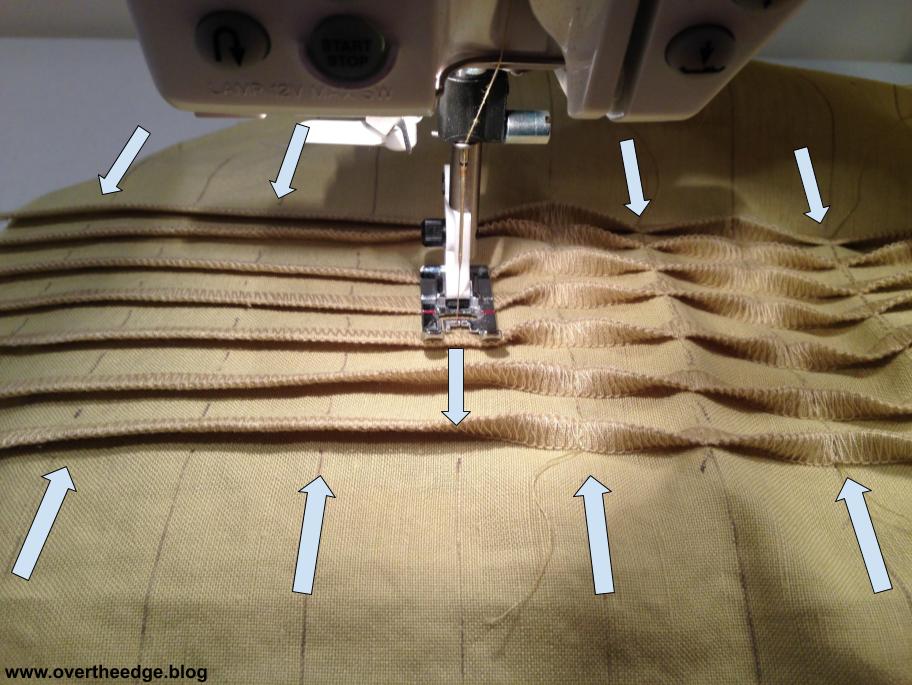
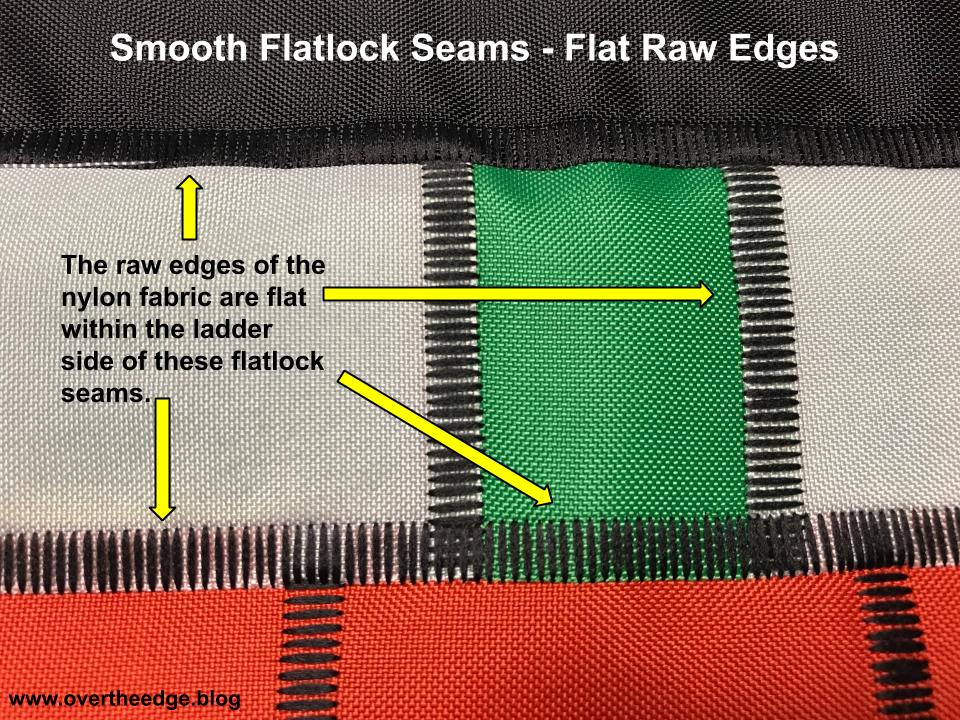
Nylon is stiffer, which means it prefers not to fold. So the raw edges of the nylon fabric within the flatlock seam will fold in some areas and try to lay flat in others. This flipping back and forth between flat raw edges and folded raw edges creates bumps or twists in the seam at each transition. See example below.

which fabric makes a better flag

lumpy flatlock seams

Since the nylon would prefer to lay flat and not fold, you will get a nicer looking seam if you prevent the raw edges from folding as you open the seam. I’ve found that if I run my fingers gently along the back of the seam as I am opening it up, I can prevent the raw edges of that bottom layer from folding under. However, I sometimes still end up with a few areas that have folded under.

So here’s what you do if you still have areas that are folded after you open your seam. Take a stiletto or other tool and insert it carefully between the ladder stitches and under the folded raw edge. Gently “grab” the folded edge with your tool and unfold it. Your seams will lay nice and flat if you do this. (You could do this with cottons too, but there is no need since the folded seams aren’t bulky.) I was very happy with the results of this technique on my nylon flags. The seams on the flags were smooth and flat. It was worth the little bit of extra fiddling with the seams to make them look perfect (see photo below).

which fabric makes a better flag

smooth flatlock seams

Types of Thread I used for Serging Flags

I’ve used several different types of thread for serging garden flags. The thicker decorative threads are more visible and create a better “stained glass” effect, but standard serger threads will work if that’s all you have or if that’s what works in your serger. Not all thick decorative threads work in all sergers. My Baby Lock Evolution serger happily handles all threads, but my first serger (a Pfaff) was very finicky. For example, it did not like YLI Wooly Nylon no matter how many adjustments I made, but it was happy with Gutermann Toldi Lock or Maxi Lock Stretch.

12 wt. Cotton or Rayon

I used both a 12 wt. cotton thread by Sulky and a 12 wt. rayon thread by Madeira for my cotton batik flags, and both work well. Even though the label on the spool recommends a size 100 needle, I used a size 90 serger needle, because that is the maximum size needle I can use in my serger. I serged at a slower speed, and didn’t have any problems with these threads in my needle. Of course, the loopers can handle these threads, no problem.

Texturized Nylon

Threads such as YLI Wooly Nylon, Madeira Aeroflock, Gutermann Bulky Nylon and Maxi Lock Stretch are all brands of texturized nylon thread. This type of thread serges well and has good coverage of the seams on the garden flags. I have found that the texturized nylon thread in a flatlock stitch tends to “snag” on rough surfaces more than other threads I have used for flags (such as cotton, rayon). So when the flag is flapping around in the breeze and rubs up against something, the thread may catch and pull the seam, distorting the stitches slightly. I did use texturized nylon thread for the seams on the nylon flags.

Pumpkin Garden Flag Pattern

Follow the link below to take you to the Pattern Section of my Etsy shop – Studio J Sewing. This pattern is available as a PDF file digital download. You can begin serging pumpkin garden flags as soon as you checkout!

Purchase the serger sewing pattern, Pumpkin Garden Flag, before October 31, 2020 and save 30% using Etsy coupon code SAVE30PATTERN during checkout.

https://www.etsy.com/shop/studiojsewing?coupon=SAVE30PATTERN

etsy pumpkin garden flag pattern serger sewing

I’d love to see the finished pumpkin garden flags you made with your sergers! Please share your photos via email to jennifer@overtheedge.blog. Which fabric makes a better flag? What do you think?

serging with jen

Resources

If you’d like to try making a heart flag with my free tutorial click on this link: https://overtheedge.blog/tutorials/serger-flatlocked-heart-flag/

To see flatlock piecing in action click on this link to view my YouTube video on Flatlock Piecing: https://youtu.be/iN_D06Htzwg

To learn how easy it is to remove stitches in a three thread flatlock seam, click on this link to view my YouTube video: https://youtu.be/QIW0PZQDW64  

Improve your Serging with a Piping/Cording Foot

improve your serging with a piping/cording foot

“Why would I want a piping/cording foot for my serger?” you might ask. Well, let me tell you. You can improve your serging with a piping/cording foot. The foot can be used to create custom piping, to attach piping, and even to install a plastic coil zipper in home decor, bags, and more with great results. So if you do any of those types of sewing and have a serger, you will benefit from a serger piping/cording foot.

The Anatomy of the Foot

Your serger piping/cording foot may look a little different than the ones pictured below. But they all function pretty much the same way. Feet designed for standard 4 thread overlock sergers will be narrower than those designed for machines that both overlock and coverstitch. The feet for 8 thread machines will be wider, because they can be used with either the overlock needles or the coverstitch needles. All of the serger piping/cording feet have a special groove on the bottom that wraps around the piping or zipper coils, keeping them in position. Since the foot guides the piping or zipper coils, you only have to worry about guiding your fabric as you serge. Insert piping and zippers nice and evenly with this foot!

a serger piping cording foot

Uses for a Serger Piping/Cording Foot

As the name implies, use this foot to make custom piping.

serger piping

And also to attach piping.

serger piping

Or to insert piping into a seam.

a serger piping

But you can also use the foot to install a zipper.

install a zipper with a serger piping cording foot

Project Example

I made the garment bag and travel set picture below using a serger. The zipper and the piping were both serged using a piping/cording foot.

a serger piping cording foot

Serge a Zippered Bag

My favorite use for this foot is to install a zipper. A zippered bag is the perfect project to practice inserting a zipper with a serger. You can make them in all shapes and sizes. Click on the links below to view my Serge a Stylish Zippered Bag Tutorial or my Simple Serged Bag with a Zipper Youtube video.

https://overtheedge.blog/tutorials/serge-a-stylish-zippered-bag/

Try it out and see if the piping/cording foot helps you get great results with your serger projects!

serging with jen

Resources

https://www.youtube.com/watch?v=pcn9466SI0g – Babylock cording foot used to make and insert piping.

https://www.asg.org/serger-piping/  – American Sewing Guild – Making and inserting piping with a serger.

https://babylock.com/learn-and-create/projects/serged-and-corded-story-time-pillow – Serger project which uses this foot for piping and zipper.

The Making of a Skating Dress

the making of a skating dress

I was inspired to blog about the making of a skating dress, because this is the time of year I am typically crazy busy making costumes for color guards and figure skaters. But not this year. Because of the pandemic most of these activities were cancelled or down-sized. The good news is that I will have more time to invest in my blog. But I still am going to miss the creative process of designing costumes for these performers. I might not be sewing them this year, but I can reminisce and share some of my creations with you. So today my blog post is all about The Making of a Skating Dress.

I started designing and sewing figure skating dresses when my daughters were skating many years ago. My serger was the perfect tool to use to create these costumes. I taught myself through trial and error, like most designers of figure skating fashion. After my daughters transitioned to color guard, I started designing and sewing color guard uniforms. My girls no longer skate or guard, but I am still designing and sewing costumes for others! I enjoy working with all of the pretty fabrics and embellishments.

The Making of a Skating Dress from Start to Finish

I didn’t photograph the steps of the creation process for many of my costumes, but I did happen to take enough photos of one of my dress designs to be able to feature it in this blog post. This dress was designed for a collegiate synchronized figure skating team.

Here is the process I follow to create a custom costume. Typically I need 6-8 weeks of time (minimum) from meeting with the coaches to delivering a set of costumes. It really depends on the complexity of the costume and the number of performers. I do all the designing and sewing myself. Sometimes my hubby will help me with some cutting or hand sewing.

Initial Discussion of Ideas, Budget and Timeline 

The first step is to talk with the coaches/performers about the design they are envisioning and get their input about fabric and colors. We also discuss their budget and timeline. If they have made sketches or collected photos of what they are looking for, I also ask for copies of those. 

The inspiration for this dress came from a dress worn by Meryl Davis, an olympic gold medalist in ice dancing (photo below). They wanted the skirt to be longer and full and to dip in the back. They also wanted to add straps to hold up the bodice. The colors they chose were bright pink and purple.

Fabric Swatches

Based on our initial discussion, I typically order several different fabric swatches. Because they have a huge selection I order most of my spandex from spandexworld.com. The decisions on actual fabrics to be used are not made until after we’ve had a chance to touch and feel the fabric swatches. Fabrics can appear quite differently from how they appear on your computer screen. 

For this dress, we decided on a holographic pink bodice, a holographic purple belt and a sparkle purple spandex. What appears to be a bare midriff is really a stretch mesh with stretch lining underneath. 

the making of a skating dress

Meet, Determine and Measure

Once I receive the fabric swatches, I meet with the coaches/skaters. At this meeting we choose the actual fabrics to be used in the costume, and make final decisions about the dress design. I also take measurements of all of the performers. For teams, in addition to measurements, I have all of the performers try on my “fit samples”. These fit samples help skaters to determine the size they are most comfortable in. I use their preferences along with the measurements to determine which size costume to make for each performer.

Sketch

After gathering all of the data, I make a simple sketch of desired design and get approval from the coaches.

the making of a skating dress

Estimates and Ordering

After the sketch is approved, I determine the amount of fabric to be ordered and provide an estimate for the project to the coaches/performers. Once the estimate has been approved and I have received the down payment, I order the fabrics and notions.

the making of a skating dress

Prototype

While I am waiting for the fabric to arrive, I make the prototype pattern and then the prototype dress from similar fabrics.The prototype is usually made in my size so I can put it on and evaluate the fit and design. Sometimes I use a commercial pattern as a base for the design, especially when I first began making skating dresses. But now I mostly work from a standard sloper I have created, which I modify for each design. If you are looking for some patterns to make skating dresses, Jalie has quite a few. Kwik Sew also has a few. There are also some independent pattern companies, such as Specialty Sportswear Patterns, that make figure skating dress patterns. I have links to their websites in the Resources section at the bottom of the post. The making of a skating dress is a lot like making a swimsuit with a skirt. See my blog post about the Purrfect Swimsuit. https://overtheedge.blog/the-purrfect-swimsuit/

Prototype Approval

Usually I send photos of the prototype on my dress form (or sometimes on me). Sometimes the prototype review is in person, so they have a good idea of what the finished product will look like. Seeing a sketch is great, but seeing a 3D model is even better. Sometimes I make minor changes at this stage based on input from the coaches.  

After viewing this prototype, the coaches decided they would like the pink bodice to be a little longer, and they wanted the skirt to be more of a hi-low, with a dip in the back. But everything else was good.

the making of a skating dress

Pattern Making

I make a custom pattern for each size needed. For teams I make the patterns in XS, S, M, L and maybe XL and match the skater to the best fit. I don’t make a custom pattern for each performer on a team unless the team wants to pay for custom patterns for each performer. Depending on the design of the dress I can end up with quite a few pattern pieces!

Layout and Cutting

Once the fabric arrives, I cut out all of the fabric pieces one fabric at a time. I have a large cutting mat, and typically rotary cut around my pattern pieces, using pattern weights. I use a ping pong table adapted to a large cutting table. Having the big table makes it easier to layout and cut since I order large quantities of fabric on big rolls. I have a bin designated for each dress, so I can keep all the pieces for each dress together.

the making of a skating dress

Sewing and Serging

After I cut out all the pieces for all the costumes, I sew/serge assembly line style for efficiency. I will complete one step for all of the dresses before moving onto the next. Usually these costumes are made with a combination of sewing and serging. I use my sewing machine for basting and other misc things that may be difficult to do on my serger. I use my serger for most of the seams that need to stretch. Most costumes have a combination of both overlock stitches and cover stitches.

the making of a skating dress

Test Fabric Color Fastness

It never even crossed my mind that a synthetic fabric would bleed. The first time I had this problem with a fabric was with a color guard uniform. It was a surprise to me and the performers when the front of their armpits turned pinkish purple from the purple band on their sleeveless unitard.  

I recommend soaking your fabrics in warm water to see if any color bleeds. On bright colors, even spandex bleeds sometimes. I don’t typically prewash the fabrics because I am working with very large rolls. Cutting it up into washing machine size pieces and then washing and drying it would add a lot to the cost of the costume. And many performance fabrics lose their sheen if washed too much. If they need to wash them, I usually tell them to hand wash quickly, roll it up in a towel to blot it dry and then hang to finish drying. Many times performance costumes are not washed at all. 

The bright pink and purple fabrics for this dress did bleed after soaking for a while.

Final Fitting

Once I have the costume completed, except for attaching the back of the straps, I meet with the performers to do a final fitting and adjust the straps for the best fit.

Final Touches

The straps are then permanently attached and the finishing touches are completed, such as applying embellishments and crystals. The synchronized skating and color guard teams I usually design for do not have crystals applied to their costumes. When I design dresses for individual figure skaters I usually apply crystals.

the making of a skating dress

Photography

I photograph all of my creations so I can look back and remember all the fun stuff I made. Looking at photographs of old costumes always brings a smile to my face.

the making of a skating dress

Delivery Preparations

To prepare the costumes for delivery, I put them hangers, steam them to remove wrinkles and place them in a garment bag.

the making of a skating dress

Delivery/Pickup

Sometimes I deliver the costumes, and sometimes the coaches or performers pick them up. I love to see how excited the performers get when they try on their new costume for the first time. It’s kind of like Christmas morning when the kids first see the presents under the tree…..

Observe Performance

If possible, I attend a competition or skating event to see my creations in action. I don’t know if any other designers do this, but for me it brings great joy to see the finished result of my many hours of hard work. 

the making of a skating dress

If you are interested in seeing more of my costume creations, please visit my facebook page for Studio J Sewing (my sewing and design business). Click on photos and scroll past the face masks, and you will see many of the fun and beautiful costumes I have created.

https://www.facebook.com/studiojsewing/

The Making of a Skating Dress

I hope you enjoyed learning about The Making of a Skating Dress!

serging with jen

Resources

https://jalie.com/

https://www.specialtysportswearpatterns.com/

https://somethingdelightful.com/kwik-sew/costumes/

Serge a Set of Pattern Weights

Learn how to serge a set of pattern weights that you will love! My pattern weights are a beginner friendly serger project, but even the most experienced sergist will enjoy making them.

I’ve been using oddball household items as pattern weights for years. If it could hold down a pattern piece it was fair game – old marble coasters, magnetic pin cushions, rulers, canned food, etc. I thought it was time I had some pretty pattern weights. And so an idea was born….

serge a set of pattern weights

My Ideal Pattern Weights

Since I designed these myself, I wasn’t limited to features currently available commercially. I considered what features I would like in a pattern weight and the best way to construct it using a serger. Below is the list of criteria I used to design my ideal pattern weights: 

  • made using only only my serger
  • no hand sewing
  • not too large
  • fairly heavy for its size
  • a handle to make it easy to pick up and move
serge a set of pattern weights

Serger Techniques Used

  • 4 thread overlock stitch
  • locking ends at the beginning and end of a seam
  • wrapped corners technique (Why clip corners to reduce bulk when you can wrap your corners instead!)

Supplies

Here’s what you need to make one pattern weight:

  • 3” x 7” piece of fabric cut into one 3”x3” square and two 2”x3” rectangles
  • 4” piece of ⅜” ribbon
  • 2.5” of ½” wide fusible web like Steam a Seam 2
  • 2 Tablespoons of metal BBs (like the kind you use in a BB gun)

Equipment

  • basic serger, capable of 4 thread overlock stitch
  • 4 cones coordinating thread
  • tool for poking out corners
  • Wonder clips (or pins)
serge a set of pattern weights

Serge a Set of Pattern Weights

I’m very pleased with my pattern weights. I can’t believe I spent all those years using oddball things for weights!

I thought you may enjoy making them too, so I created a tutorial to share with you. If you would like to Serge a Set of Pattern Weights please click on the link below to visit my full tutorial. https://overtheedge.blog/tutorials/jens-serger-pattern-weights-tutorial/

serging with jen

Resources

Where to get BBs – 

The “Purr”fect Swimsuit

Several years ago I purchased this fun kitty spandex so I could make my daughter a swimsuit or maybe a pair of leggings. For my daughter’s birthday this year, I finally made her the “purr”fect swimsuit. Summer is here, and the perfect time to serge a swimsuit!

Swimsuits by Serger or Sewing Machine

Although you could use a sewing machine to make a swimsuit, it’s so much more professional looking if you use a serger. The four thread overlock stitch is great for serging seams and applying elastic. The narrow cover stitch is perfect for top-stitching. If you don’t have a cover stitch machine you could use a sewing machine and a zig zag stitch to top-stitch. This is the way I used to do swimsuits and figure skating costumes before I had the cover stitch.

Three Thread or Four Thread Overlock

Technically a three thread overlock is the stretchiest stitch, and is sometimes recommended for stretchy knits. The four thread overlock is almost as stretchy. I typically use the four thread overlock for serging all of my knit garments because I like the added security of the second row of straight stitches. If one row of straight stitching pops, I still have one row to hold the seam together.

Thread

I used Maxilock serger thread in the needles and Guterman Bulky Nylon in the loopers. The texturized nylon is soft next to the skin and really stretchy. Some other brands of texturized nylon thread I use are Maxilock Stretch, YLI Wooly Nylon and Madeira AeroFlock.

Pattern Used for The “Purr”fect Swimsuit – Jalie 3350

jalie 3350

For my daughter’s “purr”fect swimsuit I used Jalie pattern 3350. I combined the twist front from view B with the open back of view A. The pattern didn’t call for lining on the back side, but I added it. The kitty spandex had a white background, and I was afraid it would be too see-through when wet. I also changed the order of construction to minimize changeovers on my serger between overlock and coverstitch. 

This swimsuit pattern was a little more complicated because of the twist at the bust. But the twist was worth the time and fuss because of the extra flair it added to the suit. 

the "purr"fect swimsuit

The pattern also included an extra pocket in the bust lining so you could insert a swim cup for more bust coverage. I bought my swim cups from Sew Sassy. A link to their website is included in the Resources section at the bottom of this post.

the "purr"fect swimsuit

I haven’t seen Jalie patterns in the stores locally, but they are easy to find online. Jalie is a Canadian company. You can also find their patterns in shops on etsy and ebay. I’ve used Jalie patterns many times for swimsuits and figure skating dresses. Their patterns include a ton of sizes, so it’s possible to get a great fit without a lot of pattern modifications. The pattern also gives tips for sewing a swimsuit with a sewing machine. 

Jalie wants you to be successful using their patterns. You will find photo tutorials for different patterns and lots of tips on Jalie’s website. I have included a link to their website in the Resources section at the bottom of this post. 

Applying Elastic to a Swimsuit with a Serger

For this swimsuit, I used ⅜” cotton elastic meant for swimwear. I pre-treated it by soaking in hot water and then drying it in my dryer on low heat. 

Presser Foot

I use a standard presser foot to apply my elastic on my swimsuits. There is such a thing as an elastic foot for a serger, which is great for some applications. But I find it easier to use a standard presser foot for serging the elastic on swimsuits, or for a pattern that calls for applying elastic in the round.  

Quarter Pinning

The most common technique I use for applying elastic by serger is called quarter pinning. I divide both the elastic and the spandex edge into fourths and mark them with pins. Then I pin the elastic to the project aligning the marks.

the "purr"fect swimsuit

Usually the elastic is smaller than the spandex, so you have to stretch the elastic as you serge. Quarter pinning helps you spread out the extra spandex so everything looks nice and even. If the edges are fairly long, I will pin in eighths to be sure I am evenly stretching the elastic to fit my spandex. 

Serge with Elastic on Top or on Bottom?

The most common way I see instructions written for applying elastic by serger is to serge with the elastic on top and your fabric on bottom (against the feed dogs). A tiny little bit of fabric should peek out to the right of the elastic so you are sure you are catching it in the stitches. Sometimes I do it this way. 

apply elastic with a serger

And sometimes I serge with the elastic on bottom against the feed dogs. A little bit of elastic should peek out to the right of the fabric, so you are certain you are catching the elastic in the stitching.

apply elastic with a serger

Sometimes I find it easier to line up the raw edges of the spandex and the elastic as I am stretching it to fit, when the elastic is on bottom. I am less likely to have the spandex migrate away from the elastic and end up with spots not caught in the stitching.

When I made the “purr”fect swimsuit, I applied elastic using both methods.

Engage or Disengage Blades?

I disengage my serger blades when I am using a standard presser foot to apply my elastic, so I don’t cut through my elastic. I am very careful to align the elastic and spandex along the edge where the blade normally cuts. If the fabric and elastic move too far to the right of the blade, they could get caught in the loopers and create a mess. The photo below shows my fabric (on top) and elastic (on bottom next to the feed dogs) lined up just to the left of my cutting blade. The stiletto is pointing to the location of the blades.

the "purr"fect swimsuit

With the blades disengaged, you will need to manually trim the threads from any seam allowances you cross as you serge.

apply elastic with a serger

I also increase my stitch length to 4 so I don’t put too much thread bulk into my seams. You could use a three thread overlock stitch to attach elastic. But I usually use a four thread overlock to attach the elastic because I don’t want to spend the extra time changing between stitches. Since I am usually stretching the elastic to fit the spandex, all the stitching seems closer together when everything relaxes back to its unstretched state.

Serging and Sewing the “Purr”fect Swimsuit

I used my sewing machine to:

  • baste the lining pieces to the main pieces
  • gather a small amount in bust area
  • attach the back closure hook
  • attach the straps at the back edge
  • stitch a few areas of the bust twist
  • attach the elastic to the short front V neckline using a zig zag (The bulk of the twist at the neckline was easier to maneuver through the sewing machine.)

I used my serger to:

  • attach the elastic
  • serge the seams
  • finish any exposed edges
  • top stitch the elastic with a narrow coverstitch

Basting is Helpful for Serging

I baste all of my lining pieces to my main pieces using the longest straight stitch my sewing machine will do (which is 6 mm I think). The basting keeps the layers from shifting when I am serging. Because the fabric stretches a little as I baste, the stitches look a little loose, but that’s ok. These stitches are not seen from the right side of the finished swimsuit. 

When I am done serging the seams, I stretch each seam until I hear the basting stitches pop. After the basting stitches break the seam regains its full stretch-ability. Don’t forget to break the basting stitches or the person putting it on for the first time will pop them and think they ripped the swimsuit. If the basting stitches hang out of the seam too much after popping I will pull some of them out, but mostly I leave them in. No one but me really notices the seams anyway. Most people just notice how good they look in the garment!

Narrow Cover Stitch

I used a narrow cover stitch to top-stitch all of the elastic in the swimsuit. The narrow cover stitch works well for top-stitching ⅜” elastic, and I like the way it looks. 

I used my cover stitch foot to apply the elastic with the needles in the C1/C2 position. The cover stitch foot is narrower and makes it easier to see the right edge of your project. By aligning the right edge of the elastic just past the right edge of the cover stitch foot I get the perfect placement for my narrow cover stitch on 3/8″ elastic. You want to stitch close to the left inner edge of the elastic. If you stitch too close to the outer edge, the wrong side of your elastic will tend to curl out and not lay flat against your body when worn. 

I used a stitch length of 4, which is the longest stitch length on my serger. The stitches end up looking shorter because of the thickness of the elastic and multiple layers of spandex.

narrow cover stitch

A Great Technique for Finishing off a Cover Stitch

This technique has worked with every serger I have tried. It will pull your needle threads to the back at the end of the seam so they are ready to finish off with a knot. It saves time and frustration. See the Resources section at the bottom of the post for a link to my tutorial on Finishing off a Cover Stitch in the Round.

The “Purr”fect Swimsuit

the "purr"fect swimsuit

I hope you enjoyed this post and are inspired to serge a little spandex!

serging with jen

Resources

https://jalie.com/jalie3350-one-piece-swimsuit-sewing-pattern  link to Jalie’s Website and pattern.

https://jalie.com/blog/cat/photos  Link to Jalie’s photo tutorials – There are six tutorials on how to make the 3350 swimsuit. I didn’t discover these until after I had made my swimsuit. It would have been helpful for everything but making the twist! Unfortunately the tutorial for the front was only for view A.

https://www.sewsassy.com/BraProducts/bra-and-swim-cups.html Link to source for swim cups.

Serger Sleeve Saver Bib

serger sleeve saver bib

Last week I blogged about the Serger Funsie Onesie that I made for my niece’s baby. This week I made another gift for her baby – a Serger Sleeve Saver Bib. This great bib has sleeves to protect the sleeves of your child’s outfit. The bib is made from stretch terry cloth with ribbing at the cuffs and neckline and bias binding on the edges. The serger is the perfect tool for construction of this bib and to apply the bias binding.  

The Pattern

The pattern instructions for applying the ribbing and constructing the seams are written for a standard four thread overlock stitch on a serger. A sewing machine can also be used. The pattern applies the binding using a sewing machine, but I applied the bias binding with a serger chain stitch using a double fold bias binder. If you don’t have a chain stitch capable serger you could apply the binding with your sewing machine following the instructions in the pattern. You will find a link to the Sleeve Saver Bib pattern in the Resources section at the bottom of this post.

sleeve saver bib pattern

Applique

I used my embroidery machine to applique a cute owl on the front of the bib. If you don’t have an embroidery machine you can apply an applique with your sewing machine. The pattern comes with several shapes for appliques. I purchased the owl applique on Etsy. You will find a link to the design in the resources section at the bottom of this post.

Here is my terry cloth pattern piece with my owl applique already applied. 

Apply Bias Tape 

The bias binding I used for the bib, was the same bias binding I created for the funsie onesie. I set up my serger for a C1 chain stitch and attached my 36mm double fold bias binder.

I’ll be honest with you. I was trying to finish this project quickly and so I just jumped right in without practicing. Not a good idea with stretch terry. The first time I bound the back edge it was a little wavy, so I took it out and tried again with my differential feed set to 1.3. This time the back edge looked good. The straight back edge was fairly easy, but it took me three tries to get the binding right on the sharp curves on the front. Good thing that the chain stitch pulls out easily and I made lots of extra bias strips!

The trick on sharp curves on stretch terry is to go slow. Take a few stitches. Stop with the needle down. Lift the presser foot to release the pressure on the stretch terry. Continue this process until you are through the curve. 

serger double fold bias binder
baby lock double fold bias binder
serger chainstitch
serger chainstitch
serger sleeve saver bib

How to Use a Serger Double Fold Bias Binder Tutorial and Video

For more information on how to use double fold bias binder with a serger check out my tutorial and video:

Adapting ⅝” Seam Allowance for Serger

Seam allowances on the Sleeve Saver Bib pattern are ⅝”. If you are using a sewing machine, the pattern has you trim the seams down to ¼” after they are sewn.

Since I used my serger for all the seams, I just trimmed the allowances down to ¼” as I serged. My serger has markings to the right of the blade that show you where to line up your raw edges of seams with ⅝” seam allowances. If you are unsure of how to trim down a ⅝” seam to ¼” using your serger, you could always trim off the extra seam allowance with your scissors before you serge. Then when you serge you only need to align the raw edges next to the blades. Or you could use a marking pencil to draw the seam allowance on the fabric and align the marks with your needles.

Apply Ribbing

I used a piece of spandex material in place of the ribbing called for in the pattern. 

The cuff pieces were applied first. I cut the pieces 2” longer than stated in the pattern so I had a one inch “grab tab” on each end. It’s not required, but I find it easier to have the extra fabric to hold onto when stretching the ribbing to fit.

If you find it difficult to keep all three layers from shifting as you serge, you can always baste the raw edges of the folded ribbing together before pinning the ribbing to the project. That way you only have to control two layers of fabric instead of three. Basting first with my sewing machine gives me much better results on ribbing. And I spend a lot less time resewing because one layer of fabric slipped away from the seam.  

Next I applied the neck band. I serged the short ends together to make a circle. Then I folded it in half lengthwise, wrong sides together and pinned the neck band to the bib. I matched the seam of neck band to center back of neck of the bib. You will need to evenly stretch the ribbing to fit. 

Sleeve Seams

The last step was to serge the sleeve seams. I finished the ends of my seams by locking the ends with my serger. 

Serger Sleeve Saver Bib

Here is a front view and a back view of my finished Serger Sleeve Saver Bib. 

serger sleeve saver bib front
serger sleeve saver bib back

This bib is both cute and practical and the perfect accessory for my serger funsie onesie from last week’s blog post. I can’t wait to see it on my niece’s baby girl! I hope this post inspires you to use your serger more…..

serger sleeve saver bib and funsie onesie
serger sleeve saver bib
serging with jen

Resources

Sleeve Saver Bib Pattern: https://www.sewbaby.com/shopbaby/product_info.php?products_id=3123

Owl applique for machine embroidery from Etsy shop Stitchtopia: https://www.etsy.com/listing/545350124/forest-animals-owl-applique-design-6?ga_search_query=owl&ref=shop_items_search_4&pro=1

Serger Funsie Onesie

Transform an ordinary onesie into a super sweet outfit for a little baby girl! This Serger Funsie Onesie is fun to create using basic stitches on your serger. My niece is having a little baby girl and her nursery theme is owls. I found this cute little owl onesie and knew I could turn it into something special. I can’t wait until the baby is big enough to wear it!

The Funsie Onesie Pattern

The pattern for the Funsie Onesie came from the book, Simple Serging Sewing, edited by Julie Johnson.

simple serger sewing book

The Transformation from Onesie to Sweet Dress

I was amazed at how a few simple additions took this onesie from cute to amazing! Read along and observe the transformation.

Here’s my onesie, skirt fabric and waistband bias strip.

serger funsie onesie

Prepare Strip for Ruffled Skirt

Because my onesie was larger than the one in the pattern, I added 1” to the length of the ruffled skirt piece.

The instructions said to use a plate as a template for rounding the ends of the ruffle strip. I used the plate as a starting point, and then I drew in the rest of the curve in freehand. 

For this project I used a Babylock Imagine serger. I set my serger up for a 3 thread narrow hem to finish the bottom edge of my ruffled skirt. You could also use a 3 thread rolled hem if you like. I used Maxilock thread in a color that matched my fabric.

serger rolled hem

For helpful information on serging with a rolled hem, check out my tutorial on Quick and Easy Serger Napkins. https://overtheedge.blog/tutorials/quick-easy-serger-napkins/

Gather Skirt

To gather the ruffled skirt, I used my serger ruffling foot (the G foot for the Babylock Imagine) with a 4 thread overlock stitch. Even though you can use the foot to simultaneously create the ruffle and attach it, I chose to do it in two steps so I could adjust the ruffle to fit the onesie exactly. I set my differential feed to 2, my stitch length to 4 and my stitch width to M. The raw edge of the skirt was just skimmed by the blade as I serged. I also held my finger behind the foot to help it gather just a little bit more. 

If you don’t have a ruffling foot for your serger, you can still use your serger to gather. Follow your instruction manual for gathering. Usually gathering on a serger involves increasing the differential feed and stitch length (and increasing your needle tensions if you have a serger with tension dials.)

gathering with a serger ruffling foot

Here’s what my ruffled skirt piece looked like after gathering it with my serger.

gathering with a serger ruffling foot

Prepare Onesie

Determine where to cut your onesie. My onesie was a 6-9 month size. I cut it apart as stated in the pattern instructions. 

serger funsie onesie

Create Bias Waistband

Next I created the bias waistband strip. The bias fabric strip has a some stretch which makes it a little easier to dress the baby. The waistband also adds back in length that was lost in the seams from adding the skirt to the onesie. So your onesie length will still be the same size as when you started. I used a standard 4 thread overlock stitch with a stitch length of 2.5 to serge the ends of the waistband together.

Attach Waistband

I pinned the bias waistband strip to the top half of the onesie, and serged the seam with a standard 4 thread overlock stitch.

serger funsie onesie

Attach Skirt

My onesie waistband measured about 18” around, so I adjusted the gathers of my ruffle to equal 20” (18″ + 2″ for overlap.) My serger didn’t gather the fabric quite as much as I needed. So I adjusted the gathers by first separating the needle threads from the looper threads. And then I pulled on the needle threads and slid the fabric, just like I would using 2 rows of basting stitches on my sewing machine. I overlapped the ends of my ruffled skirt by 1” on each end. 

After adjusting the gathers, I pinned the ruffled skirt to the bottom of waistband, aligning the overlapped section of skirt slightly off center. I serged this skirt to the waistband using a standard 4 thread overlock with a stitch length of 2.5.

serger funsie onesie

Attach Bottom Half to Top Half

After attaching the skirt, the last step was to reattach the bottom half of the onesie. I pinned the onesie panties to the waistband/skirt section, making sure that the side seams of both onesie halves were aligned. To serge this seam, I increased my stitch width as wide as it would go (7.5) and used a stitch length of 2.5. I made this stitch wider than the stitching I used to gather the ruffle, so the gathering stitches on the skirt would not show on the right side of the garment.

serger funsie onesie

Add Finishing Touches

Even though the skirted onesie was adorable, I thought it needed just a little something more. So I hand stitched a few ribbon roses on the waistband and one at the center of the neckline.

serger funsie onesie

My Serger Funsie Onesie

My serger funsie onesie is finished and ready for a sweet baby girl to wear! I hope you enjoyed this post and are inspired to serge.

serger funsie onesie
serging with jen

Resources

Book – Simple Serger Sewing, published in 2009, but found online:

How to make bias strips: https://sew4home.com/how-to-make-your-own-continuous-bias-binding/

Quick video on using the ruffling foot to gather fabric:

Textured Chic Pillows

textured chic pillows

I always get excited when I get an opportunity to use the coverstitch on my serger for more than just hems on knits. Although these textured chic pillows may appear advanced, they were actually very easy to make on the serger using a narrow coverstitch and silk dupioni fabric. The secret to the texture is in the special shrinking fabric. I just love how the textured surface of the dupioni silk changes color with the light! 

The Book – Serger Boutique

Both of these pillows were based on projects in the book, Serger Boutique by Nancy Zieman and Barbara Goldkorn. I used the instructions from the Textured Chic Pillow project to construct my green pillow. I constructed my purple pillow using the instructions from the project, Randomly Stitched Texture Pillow.

serger boutique book

Texture Magic

The special shrinking fabric is a synthetic fabric that shrinks when it is steamed. There are two brands that I am familiar with – Texture Magic by Superior Threads and Fabric Magic by Pellon. Sew or serge it to the back of the fabric you want to texturize, apply steam and watch it magically transform. The package says it can shrink up to 30%. I think the amount of shrinkage is dependent on the fabric to which it is stitched.

Shrinkage Test

I wanted to see how much my silk dupioni would shrink, so I would know how much fabric I needed to make my pillows. For my test I started with a square of Texture Magic and of silk dupioni. I drew lines on the piece of Texture Magic and pinned it to my silk. I then stitched on the lines with a narrow coverstitch.  

texture magic and serger

Then came the fun part – the steam!  I hovered over the sample with my iron at full steam and watched the fabric shrink. The result of my test is shown in the photos below. My square started at 12.5” x 12.5” and it ended up at 10” x 11”. So my fabric shrank 12% in one direction and 20% in the other direction. My fabric didn’t shrink quite as much as the “up to 30%”, but the texture was still amazing.

Texture Magic
create texture with serger and texture magic

Embellish the Pillow Fabric

I began by drawing lines on the texture magic for where I wanted to stitch on the green pillow. For the purple pillow I didn’t need to draw the lines because I was stitching randomly. After finishing my lines, I pinned a piece of texture magic to the back side of each piece of dupioni.

I set up my serger for a narrow coverstitch with thread to coordinate with my fabric. I wanted the puffy texture to stand out and not the thread. Maxilock thread was used in the needles and Mettler embroidery thread was used in the chain looper.

So I could see the lines more easily, I used a clear foot, but a standard presser foot would also work. With the Texture Magic side up, I serged on the lines (or randomly) to stitch the Texture Magic to the silk.

create texture with serger and Texture Magic

I have a Babylock Evolution serger, and there is not very much room to the right of the needle. Because I was serging into the center of the fabric, I had to shift and maneuver the bulk of the fabric around the right side of the presser foot. If you have a coverstitch capable serger without a lot of “throat space” you will need to roll and fold your fabric to get it to fit through the machine. Those of you that have sergers like the Babylock Ovation or Babylock Triumph, you will have no problem serging into the center of large pieces of fabric.  

Following the instructions for the texture magic, I steamed the fabric to shrink it and here are close up photos of the resulting texture.

textured chic pillows by serger

Turn the Embellished Fabric into a Textured Chic Pillow

My finished pillows are 12” x 16” and completely made on the serger. I did not make the same size pillows as in the book, but I did follow the basic instructions. Because I wanted to remove my pillow forms for cleaning, I chose to make an overlap back for my pillows. I used a narrow coverstitch to make a 1” double fold hem on each side of the back opening. 

serger pillow project

After embellishing my fabric and doing the hems, I switched my serger to a 4 thread overlock to construct the pillow. While serging the pillow seams, I wrapped the corners to make perfect points on the right side of my pillow. There is no need to trim the extra fabric from the corners with this technique. For more information on how to wrap corners with a serger, check out my His & Hers Serger Pillowcases Tutorial. https://overtheedge.blog/tutorials/his-hers-serger-pillowcases-tutorial/

wrap corners with a serger
textured chic pillows

Textured Chic Pillows by Serger

I hope I inspired you to serge your own Textured Chic Pillows!

textured chic pillows
serging with jen

Resources

Serger Boutique – Book was published in 2012. Check your local sewing store, or check the internet, sites like ebay or amazon to get a copy.

Nancy Zieman’s blog about the book, Serger Boutique. http://www.nancyzieman.com/blog/sewing-with-nancy/how-to-use-a-serger/

Simply Leafy 2

simply leafy 2 serge & merge quilts

I had so much fun making my Simply Leafy 2 quilt that I thought I would share it with you. Simply Leafy 2 is a project from the book, Serge & Merge Quilts. It’s a small wall hanging and is the perfect size to experiment with creative serging. The serger creates the texture in the background and enhances the dimensional stems and leaves. The project showcases serger flatlock stitching, but uses a sewing machine to complete the quilting and binding. If you enjoy creative quilting and you have a serger, you should give this project a try!

serge & merge quilts

Fabric and Thread Choices

I used quilting weight cotton for all the fabric in my Simply Leafy 2 quilt. I selected a brown leafy floral as my focus fabric and off white for the background. Based off the leafy floral fabric, I chose green fabric for the leaves and brown for the stems. The instructions said to use yarn for embellishing the flatlock stitches so I chose a brown perle cotton. I decided on a variegated Sulky Blendables 30 weight thread for the background flatlocking and a variegated YLI quilting cotton thread 40 weight for flatlocking the leaves and stems. I used Maxilock serger thread in the positions that were not visible in the stitches.

Flatlock Background and Create Rectangle Blocks

I randomly pressed lines in my background fabric to mark my folds for flatlocking. Then I created ladder stitching on the folds of fabric using both a narrow and wide two thread flatlock.

simply leafy 2 flatlocking

I serged each fold, then pulled it open. I pressed all of the flatlock stitching at once after I was finished serging the lines. After flatlocking I used two strands of perle cotton to create extra texture, making knots as suggested. The only change I made here was to add my yarn knots before I cut out the rectangle blocks. Unsecured flatlock stitching unravels easily near the edges, so I thought this change would create less stress on those stitches. When I ran out of yarn, I just cut 2 new pieces and continued where I left off. I fussy cut around the thread tails as I cut out my rectangles, so each rectangle was unique.

simply leafy 2
simply leafy2
simply leafy 2

Create Leaves and Stems

For flatlocking my leaves, I put the variegated thread in my needle. I wanted the variegated thread to show on my leaves. After flatlocking the leaf strip on my serger, I traced the leaf pattern onto the fabric. I then completed making the leaves on my sewing machine.

simply leafy 2

For finishing the stems, I set the serger up for a two thread overlock. The two thread overlock is basically the same stitch as the two thread flatlock, but you don’t open the seam. I put variegated thread in the lower looper because the loops ended up on the right side of my stems.

simply leafy 2

Piece Together Background

After serging the leaves and background, I converted my serger to a four thread overlock stitch. I used the four thread overlock stitch to serge the background rectangles together. I handled the rectangles carefully to keep the cut flatlock stitches from unraveling before piecing them together.

simply leafy 2

Quilt with Sewing Machine

I layered my backing, batting and top of my quilt sandwich and quilted the background using a sewing machine. My quilting was simple. I stitched lines between my lines of flatlocking and outlined some of the leaves in the brown rectangles.

simply leafy 2 quilting

Add Stems and Leaves

After the background was quilted, it was time to add the stems and leaves. I auditioned my stems and leaves on the background until I was happy with the layout. Then I stitched them all down with my sewing machine. Since the top leaf hangs off the edge, it was easier to stitch it on after the binding was applied. One of the things I really like about this project are the three dimensional stems and leaves!

simply leafy 2
simply leafy 2 flatlock stitching

Add Binding and Finish

The instructions have you use two different colors of binding. I bound the top, bottom and right side of my quilt with off-white and the left side with brown. I attached my binding to the front of quilt, and then flipped it to the back. To secure the binding, I stitched in the ditch on the front side with my sewing machine. I also added a hanging sleeve on the back

simply leafy 2 binding

Flatlocking on the Fold

You typically see serger stitching on seam lines and fabric edges. But flatlocking is not limited to seams or fabric edges. You can flatlock on a fold and create decorative stitching within the body of your garment or project.

Flatlocking is a technique you can do with your standard presser foot. However, a foot with a guide, such as a blind hem foot, will make flatlocking easier. 

The flatlock stitch is reversible. Which means you can use either side of this stitch in your projects. I like both the “loop” side and the “ladder” side of the flatlock stitch. To see the loops on the right side of your fabric you fold it with the wrong sides together. To see the ladders on the right side of your fabric you fold it with the right sides together.

When you flatlock on the fold, you serge with the loops hanging off of the fabric. You must guide your fabric so that the fold is about halfway between the needle and the blade. (See photo below.) Without the extra thread in those loops, you won’t be able to pull open the stitch to make it flat. If you have too much fabric in the stitch you won’t be able to fully open it. The stitch will look lumpy on one side and like a tunnel on the other. If you get too little fabric in the stitch you will have loose and floppy stitching.

I recommend you practice flatlocking on the fold before you begin this part of your project. Sharon provides some information about flatlocking on page 16 of her book. Your serger manual will instruct you how to set up and perform a flatlock stitch with your machine.

simply leafy 2 serge & merge quilts

Simply Leafy 2

I hope you enjoyed my post about the creation of my Simply Leafy 2 wall hanging quilt.

Check out another fun project called Down the Pathway that I made from the book, Serge & Merge Quilts.  https://overtheedge.blog/serge-and-merge-quilts-down-the-pathway/

serging with jen

Resources

Serge & Merge Quilts by Sharon Rotz. This book was published in 2009. If you can’t find it in your local shop, try the internet. https://www.amazon.com/Serge-Merge-Quilts-Create-Nancy/dp/0896898105

Serger Twists Sleeveless Top

Embellishment can turn a plain garment into a WOW garment. Why not use your serger to make your garments special! I love the texture created from twists and tucks. I’ve heard them called wave tucks or twisted tucks, or as I call them serger twists. I’ve used this serger technique in bags, pillows, serger covers and garments. You can make these folded tucks/twists with a sewing machine, but it is more fun with a serger because you have the added element of decorative thread. Keep reading to learn more about how I started with a pattern for a plain top and transformed it into my serger twists sleeveless top. 

serger twists sleeveless top

The Pattern

As a foundation for my serger twists sleeveless top, I chose a simple sleeveless top pattern, New Look 6483 view E, and a linen blend fabric. I basically followed the pattern to construct the top, but with a few changes. I modified the pattern to include a serger twists center panel, and I serged some of the steps instead of using my sewing machine.

Equipment

  • Serger capable of three thread overlock and 4 thread overlock
  • Sewing machine
  • Sewing and serging supplies
  • Pattern, such as New Look 6483
  • Marking pen/pencil
  • Fabric and thread

How to Create Serger Twists

I began by preparing the center panel. I cut a rectangle piece of fabric about 4” longer than the center front pattern piece of the top and about twice as wide as my desired finished center panel plus 4” extra. You need the extra fabric because the width is drawn in as you create the twist. For my top I decided on 7 twists. I marked 7 vertical lines 1¼” apart with a Frixion pen in the center of my rectangle. I folded each line, wrong sides together and pressed to create creases. The creases make it easier to serge on the folds in the next step.

Serge

I set up my serger for 3 thread overlock wide with a stitch width of ¼” and disengaged the blade. Maxi Lock thread was used for all positions because I wanted my thread to blend in with the fabric to emphasize the texture and not the thread color. You could use a more decorative thread if you wanted. I used a stitch length 2-2.5, but it could be longer or shorter depending on the thread and look you are trying to achieve.

Serge on each fold, lining up the fold with where the blade would normally cut. I used a standard foot and guided my fabric along the disengaged blade. But you could also use a blind hem foot for your serger and set up the guide to help you position the fold in the proper place. Serge the same direction each time, so that the upper looper thread is on the same side of all the folds. Press folds well to set the stitches. You may need to use a press cloth so you don’t damage your thread.

serger twists

Mark and Stitch

I drew horizontal lines 1” apart on the panel perpendicular to my serged folds using my Frixion pen. Using my sewing machine I stitched across the folds on the lines in alternating directions. You can hold the twists down with your fingers as you stitch to make sure they lay the proper direction. See photo below. Don’t press the twists after making them or you will distort them. You can hover over them and steam them if needed.

serger twists

How to Modify Pattern Front for Center Panel

I measured my center panel as it would be finished in my top to be 4.5”. So I added my seam allowances (⅝” + ⅝” = 1¼”) before trimming the center panel to 5¾” wide.  The extra fabric on the top and bottom was cut off after combining the center panel with the rest of the front pieces. 

Since I added in a center panel, I needed to remove an equivalent amount from the front pattern piece, so the new top front was the same size as the original pattern piece. I determined that the amount to be removed was 3¼” (4½” for the center less seam allowances of ⅝” + ⅝” = 1¼”). The original pattern piece was a single piece cut on the fold. So I cut off 1⅝” from the center of the folded front and ended up with a right and left front piece. 

I changed my serger over to a standard 4 thread overlock stitch for serging my garment seams. To create my new top front I serged together the left, center and right front pieces. I pinned the center panel right sides together with the right front and left front. Then I double checked that my new front piece would end up the same size as my original pattern piece front. I serged the seams and trimmed center panel using the original front pattern piece as guide.

serger twists sleeveless top

Finish Garment Construction

The rest of the garment was constructed using the pattern instructions, but I used my serger for some of the steps. The stay stitching, darts, neckline, armhole edges and hem top stitching was done with my sewing machine. I also used my sewing machine to under-stitch the neckline front facing to keep it from flipping outward. The side seams and raw edges of hems and facings were serged with a standard 4 thread overlock. I used ⅝” seam allowances to be consistent with the pattern and trimmed off the extra as I serged.

Once you cut off that extra seam allowance you cannot put it back on, so I suggest you make certain the garment fits before seaming it with a serger. Making a muslin mock-up takes more effort, but it leads to much less frustration in the long run. It’s a real bummer to spend hours making a beautiful looking garment only to have it not fit when you are all done.

Inside Look

I turned my top inside out so you could get a detailed look at the construction. If you look closely you will see darts, seams, hem and facing edges, and the wrong side of the serger twists. This top has been worn and washed so the stitching you are looking at is not as crisp and clean as when new. 

My Serger Twists Sleeveless Top

Serger twists are a fun way to add embellishment to your projects and garments. As with any garments with exposed stitches, handle and launder with care. Any large loops on garments always have the potential to snag or get pulled. Think of those light, airy, lacy sweaters that we buy at the store that are so beautiful. We love to wear them, even though they snag easily. Serger stitches don’t snag as easily as those sweaters, but because of the loops, it’s best to handle them with care. I recommend hand washing garments with exposed stitching. After I spent all that time making the garment I want to be able to wear it more than once!

I hope you enjoyed this post about my serger twists sleeveless top. Try spicing up your garments with serger stitching!

serger twists sleeveless top

Happy Serging! – Jen

serging with jen

Resources

For another example of exposed serged stitches check out my post, Decorative Serged Seams: https://overtheedge.blog/decorative-serged-seams/

Babylock Wave Tucked Pillow Project: https://www.babylock.com/learn-and-create/projects/serger-pillows-pintuck-wave

Serger twists with Nancy Zieman in her book, Serge with Confidence: https://www.amazon.com/Serge-Confidence-Nancy-Zieman/dp/0873498550

Theme: Overlay by Kaira Extra Text
Cape Town, South Africa